Gradle User Manual: Version 8.7
- OVERVIEW
- RELEASES
- RUNNING GRADLE BUILDS
- CORE CONCEPTS
- OTHER TOPICS
- AUTHORING GRADLE BUILDS
- THE BASICS
- STRUCTURING BUILDS
- DEVELOPING TASKS
- Configuring Tasks Lazily
- Understanding Lazy properties
- Creating a Property or Provider instance
- Connecting properties together
- Working with files
- Working with task inputs and outputs
- Working with collections
- Working with maps
- Applying a convention to a property
- Making a property unmodifiable
- Using the Provider API
- DEVELOPING PLUGINS
- BEST PRACTICES
- OTHER TOPICS
- AUTHORING JVM BUILDS
- JAVA TOOLCHAINS
- JVM PLUGINS
- WORKING WITH DEPENDENCIES
- THE BASICS
- DECLARING VERSIONS
- CONTROLLING TRANSITIVES
- Upgrading versions of transitive dependencies
- Downgrading versions and excluding dependencies
- Sharing dependency versions between projects
- Aligning dependency versions
- Handling mutually exclusive dependencies
- Fixing metadata with component metadata rules
- Customizing resolution of a dependency directly
- Preventing accidental dependency upgrades
- PRODUCING AND CONSUMING VARIANTS OF LIBRARIES
- PUBLISHING LIBRARIES
- OPTIMIZING BUILD PERFORMANCE
- USING THE BUILD CACHE
- GRADLE ON CI
- REFERENCE
- GRADLE DSLs and API
- LICENSE INFORMATION
OVERVIEW
Gradle User Manual
Gradle Build Tool
 Gradle Build Tool is a fast, dependable, and adaptable open-source build automation tool with an elegant and extensible declarative build language.
In this User Manual, Gradle Build Tool is abbreviated Gradle.
Why Gradle?
Gradle is a widely used and mature tool with an active community and a strong developer ecosystem.
-
Gradle is the most popular build system for the JVM and is the default system for Android and Kotlin Multi-Platform projects. It has a rich community plugin ecosystem.
-
Gradle can automate a wide range of software build scenarios using either its built-in functionality, third-party plugins, or custom build logic.
-
Gradle provides a high-level, declarative, and expressive build language that makes it easy to read and write build logic.
-
Gradle is fast, scalable, and can build projects of any size and complexity.
-
Gradle produces dependable results while benefiting from optimizations such as incremental builds, build caching, and parallel execution.
Gradle, Inc. provides a free service called Build Scan® that provides extensive information and insights about your builds. You can view scans to identify problems or share them for debugging help.
Supported Languages and Frameworks
Gradle supports Android, Java, Kotlin Multiplatform, Groovy, Scala, Javascript, and C/C++.

Compatible IDEs
All major IDEs support Gradle, including Android Studio, IntelliJ IDEA, Visual Studio Code, Eclipse, and NetBeans.

You can also invoke Gradle via its command-line interface (CLI) in your terminal or through your continuous integration (CI) server.
Education
The Gradle User Manual is the official documentation for the Gradle Build Tool.
-
Getting Started Tutorial — Learn Gradle basics and the benefits of building your App with Gradle.
-
Training Courses — Head over to the courses page to sign up for free Gradle training.
Support
-
Forum — The fastest way to get help is through the Gradle Forum.
-
Slack — Community members and core contributors answer questions directly on our Slack Channel.
Licenses
Gradle Build Tool source code is open and licensed under the Apache License 2.0. Gradle user manual and DSL reference manual are licensed under Creative Commons Attribution-NonCommercial-ShareAlike 4.0 International License.
The User Manual
Explore our guides and examples to use Gradle.
Releases
Information on Gradle releases and how to install Gradle is found on the Installation page.
Content
The Gradle User Manual is broken down into the following sections:
- Running Gradle Builds
-
Learn Gradle basics and how to use Gradle to build your project.
- Authoring Gradle Builds
-
Develop tasks and plugins to customize your build.
- Authoring JVM Builds
-
Use Gradle with your Java project.
- Working with Dependencies
-
Add dependencies to your build.
- Optimizing Builds
-
Use caches to optimize your build and understand the Gradle daemon, incremental builds and file system watching.
- Gradle on CI
-
Gradle integration with popular continuous integration (CI) servers.
RELEASES
Installing Gradle
Gradle Installation
If all you want to do is run an existing Gradle project, then you don’t need to install Gradle if the build uses the Gradle Wrapper.
This is identifiable by the presence of the gradlew or gradlew.bat files in the root of the project:
.   // (1)
├── gradle
│   └── wrapper // (2)
├── gradlew         // (3)
├── gradlew.bat     // (3)
└── ⋮
-
Project root directory.
-
Scripts for executing Gradle builds.
If the gradlew or gradlew.bat files are already present in your project, you do not need to install Gradle.
But you need to make sure your system satisfies Gradle’s prerequisites.
You can follow the steps in the Upgrading Gradle section if you want to update the Gradle version for your project. Please use the Gradle Wrapper to upgrade Gradle.
Android Studio comes with a working installation of Gradle, so you don’t need to install Gradle separately when only working within that IDE.
If you do not meet the criteria above and decide to install Gradle on your machine, first check if Gradle is already installed by running gradle -v in your terminal.
If the command does not return anything, then Gradle is not installed, and you can follow the instructions below.
You can install Gradle Build Tool on Linux, macOS, or Windows. The installation can be done manually or using a package manager like SDKMAN! or Homebrew.
You can find all Gradle releases and their checksums on the releases page.
Prerequisites
Gradle runs on all major operating systems. It requires Java Development Kit (JDK) version 8 or higher to run. You can check the compatibility matrix for more information.
To check, run java -version:
❯ java -version
openjdk version "11.0.18" 2023-01-17
OpenJDK Runtime Environment Homebrew (build 11.0.18+0)
OpenJDK 64-Bit Server VM Homebrew (build 11.0.18+0, mixed mode)
❯ java version "1.8.0_151"
Java(TM) SE Runtime Environment (build 1.8.0_151-b12)
Java HotSpot(TM) 64-Bit Server VM (build 25.151-b12, mixed mode)
Gradle uses the JDK it finds in your path, the JDK used by your IDE, or the JDK specified by your project. In this example, the $PATH points to JDK17:
❯ echo $PATH
/opt/homebrew/opt/openjdk@17/bin
You can also set the JAVA_HOME environment variable to point to a specific JDK installation directory.
This is especially useful when multiple JDKs are installed:
❯ echo %JAVA_HOME%
C:\Program Files\Java\jdk1.7.0_80
❯ echo $JAVA_HOME
/Library/Java/JavaVirtualMachines/jdk-16.jdk/Contents/Home
Linux installation
Installing with a package manager
SDKMAN! is a tool for managing parallel versions of multiple Software Development Kits on most Unix-like systems (macOS, Linux, Cygwin, Solaris and FreeBSD). Gradle is deployed and maintained by SDKMAN!:
❯ sdk install gradle
Other package managers are available, but the version of Gradle distributed by them is not controlled by Gradle, Inc. Linux package managers may distribute a modified version of Gradle that is incompatible or incomplete when compared to the official version.
Installing manually
Step 1 - Download the latest Gradle distribution
The distribution ZIP file comes in two flavors:
-
Binary-only (bin)
-
Complete (all) with docs and sources
We recommend downloading the bin file; it is a smaller file that is quick to download (and the latest documentation is available online).
Step 2 - Unpack the distribution
Unzip the distribution zip file in the directory of your choosing, e.g.:
❯ mkdir /opt/gradle
❯ unzip -d /opt/gradle gradle-8.7-bin.zip
❯ ls /opt/gradle/gradle-8.7
LICENSE  NOTICE  bin  README  init.d  lib  media
Step 3 - Configure your system environment
To install Gradle, the path to the unpacked files needs to be in your Path.
Configure your PATH environment variable to include the bin directory of the unzipped distribution, e.g.:
❯ export PATH=$PATH:/opt/gradle/gradle-8.7/bin
Alternatively, you could also add the environment variable GRADLE_HOME and point this to the unzipped distribution.
Instead of adding a specific version of Gradle to your PATH, you can add $GRADLE_HOME/bin to your PATH.
When upgrading to a different version of Gradle, simply change the GRADLE_HOME environment variable.
export GRADLE_HOME=/opt/gradle/gradle-8.7
export PATH=${GRADLE_HOME}/bin:${PATH}
macOS installation
Installing with a package manager
SDKMAN! is a tool for managing parallel versions of multiple Software Development Kits on most Unix-like systems (macOS, Linux, Cygwin, Solaris and FreeBSD). Gradle is deployed and maintained by SDKMAN!:
❯ sdk install gradle
Using Homebrew:
❯ brew install gradle
Using MacPorts:
❯ sudo port install gradle
Other package managers are available, but the version of Gradle distributed by them is not controlled by Gradle, Inc.
Installing manually
Step 1 - Download the latest Gradle distribution
The distribution ZIP file comes in two flavors:
-
Binary-only (bin)
-
Complete (all) with docs and sources
We recommend downloading the bin file; it is a smaller file that is quick to download (and the latest documentation is available online).
Step 2 - Unpack the distribution
Unzip the distribution zip file in the directory of your choosing, e.g.:
❯ mkdir /usr/local/gradle
❯ unzip gradle-8.7-bin.zip -d /usr/local/gradle
❯ ls /usr/local/gradle/gradle-8.7
LICENSE	NOTICE	README	bin	init.d	lib
Step 3 - Configure your system environment
To install Gradle, the path to the unpacked files needs to be in your Path.
Configure your PATH environment variable to include the bin directory of the unzipped distribution, e.g.:
❯ export PATH=$PATH:/usr/local/gradle/gradle-8.7/bin
Alternatively, you could also add the environment variable GRADLE_HOME and point this to the unzipped distribution.
Instead of adding a specific version of Gradle to your PATH, you can add $GRADLE_HOME/bin to your PATH.
When upgrading to a different version of Gradle, simply change the GRADLE_HOME environment variable.
It’s a good idea to edit .bash_profile in your home directory to add GRADLE_HOME variable:
export GRADLE_HOME=/usr/local/gradle/gradle-8.7
export PATH=$GRADLE_HOME/bin:$PATH
Windows installation
Installing manually
Step 1 - Download the latest Gradle distribution
The distribution ZIP file comes in two flavors:
-
Binary-only (bin)
-
Complete (all) with docs and sources
We recommend downloading the bin file.
Step 2 - Unpack the distribution
Create a new directory C:\Gradle with File Explorer.
Open a second File Explorer window and go to the directory where the Gradle distribution was downloaded. Double-click the ZIP archive to expose the content.
Drag the content folder gradle-8.7 to your newly created C:\Gradle folder.
Alternatively, you can unpack the Gradle distribution ZIP into C:\Gradle using the archiver tool of your choice.
Step 3 - Configure your system environment
To install Gradle, the path to the unpacked files needs to be in your Path.
In File Explorer right-click on the This PC (or Computer) icon, then click Properties → Advanced System Settings → Environmental Variables.
Under System Variables select Path, then click Edit.
Add an entry for C:\Gradle\gradle-8.7\bin.
Click OK to save.
Alternatively, you can add the environment variable GRADLE_HOME and point this to the unzipped distribution.
Instead of adding a specific version of Gradle to your Path, you can add %GRADLE_HOME%\bin to your Path.
When upgrading to a different version of Gradle, just change the GRADLE_HOME environment variable.
Verify the installation
Open a console (or a Windows command prompt) and run gradle -v to run gradle and display the version, e.g.:
❯ gradle -v

------------------------------------------------------------
Gradle 8.7
------------------------------------------------------------

Build time:   2023-03-03 16:41:37 UTC
Revision:     7d6581558e226a580d91d399f7dfb9e3095c2b1d

Kotlin:       1.8.10
Groovy:       3.0.13
Ant:          Apache Ant(TM) version 1.10.11 compiled on July 10 2021
JVM:          17.0.6 (Homebrew 17.0.6+0)
OS:           Mac OS X 13.2.1 aarch64
You can verify the integrity of the Gradle distribution by downloading the SHA-256 file (available from the releases page) and following these verification instructions.
Compatibility Matrix
The sections below describe Gradle’s compatibility with several integrations. Versions not listed here may or may not work.
Java
A Java version between 8 and 21 is required to execute Gradle. Java 22 and later versions are not yet supported.
Java 6 and 7 can be used for compilation but are deprecated for use with testing. Testing with Java 6 and 7 will not be supported in Gradle 9.0.
Any fully supported version of Java can be used for compilation or testing. However, the latest Java version may only be supported for compilation or testing, not for running Gradle. Support is achieved using toolchains and applies to all tasks supporting toolchains.
See the table below for the Java version supported by a specific Gradle release:
| Java version | Support for toolchains | Support for running Gradle |
|---|---|---|
8 |
N/A |
2.0 |
9 |
N/A |
4.3 |
10 |
N/A |
4.7 |
11 |
N/A |
5.0 |
12 |
N/A |
5.4 |
13 |
N/A |
6.0 |
14 |
N/A |
6.3 |
15 |
6.7 |
6.7 |
16 |
7.0 |
7.0 |
17 |
7.3 |
7.3 |
18 |
7.5 |
7.5 |
19 |
7.6 |
7.6 |
20 |
8.1 |
8.3 |
21 |
8.4 |
8.5 |
22 |
8.7 |
N/A |
23 |
N/A |
N/A |
Kotlin
Gradle is tested with Kotlin 1.6.10 through 2.0.0-Beta3. Beta and RC versions may or may not work.
| Minimum Gradle version | Embedded Kotlin version | Kotlin Language version |
|---|---|---|
5.0 |
1.3.10 |
1.3 |
5.1 |
1.3.11 |
1.3 |
5.2 |
1.3.20 |
1.3 |
5.3 |
1.3.21 |
1.3 |
5.5 |
1.3.31 |
1.3 |
5.6 |
1.3.41 |
1.3 |
6.0 |
1.3.50 |
1.3 |
6.1 |
1.3.61 |
1.3 |
6.3 |
1.3.70 |
1.3 |
6.4 |
1.3.71 |
1.3 |
6.5 |
1.3.72 |
1.3 |
6.8 |
1.4.20 |
1.3 |
7.0 |
1.4.31 |
1.4 |
7.2 |
1.5.21 |
1.4 |
7.3 |
1.5.31 |
1.4 |
7.5 |
1.6.21 |
1.4 |
7.6 |
1.7.10 |
1.4 |
8.0 |
1.8.10 |
1.8 |
8.2 |
1.8.20 |
1.8 |
8.3 |
1.9.0 |
1.8 |
8.4 |
1.9.10 |
1.8 |
8.5 |
1.9.20 |
1.8 |
8.7 |
1.9.22 |
1.8 |
Groovy
Gradle is tested with Groovy 1.5.8 through 4.0.0.
Gradle plugins written in Groovy must use Groovy 3.x for compatibility with Gradle and Groovy DSL build scripts.
Android
Gradle is tested with Android Gradle Plugin 7.3 through 8.2. Alpha and beta versions may or may not work.
The Feature Lifecycle
Gradle is under constant development. New versions are delivered on a regular and frequent basis (approximately every six weeks) as described in the section on end-of-life support.
Continuous improvement combined with frequent delivery allows new features to be available to users early. Early users provide invaluable feedback, which is incorporated into the development process.
Getting new functionality into the hands of users regularly is a core value of the Gradle platform.
At the same time, API and feature stability are taken very seriously and considered a core value of the Gradle platform. Design choices and automated testing are engineered into the development process and formalized by the section on backward compatibility.
The Gradle feature lifecycle has been designed to meet these goals. It also communicates to users of Gradle what the state of a feature is. The term feature typically means an API or DSL method or property in this context, but it is not restricted to this definition. Command line arguments and modes of execution (e.g. the Build Daemon) are two examples of other features.
1. Internal
Internal features are not designed for public use and are only intended to be used by Gradle itself. They can change in any way at any point in time without any notice. Therefore, we recommend avoiding the use of such features. Internal features are not documented. If it appears in this User Manual, the DSL Reference, or the API Reference, then the feature is not internal.
Internal features may evolve into public features.
2. Incubating
Features are introduced in the incubating state to allow real-world feedback to be incorporated into the feature before making it public. It also gives users willing to test potential future changes early access.
A feature in an incubating state may change in future Gradle versions until it is no longer incubating. Changes to incubating features for a Gradle release will be highlighted in the release notes for that release. The incubation period for new features varies depending on the feature’s scope, complexity, and nature.
Features in incubation are indicated. In the source code, all methods/properties/classes that are incubating are annotated with incubating. This results in a special mark for them in the DSL and API references.
If an incubating feature is discussed in this User Manual, it will be explicitly said to be in the incubating state.
Feature Preview API
The feature preview API allows certain incubating features to be activated by adding enableFeaturePreview('FEATURE') in your settings file.
Individual preview features will be announced in release notes.
When incubating features are either promoted to public or removed, the feature preview flags for them become obsolete, have no effect, and should be removed from the settings file.
3. Public
The default state for a non-internal feature is public. Anything documented in the User Manual, DSL Reference, or API reference that is not explicitly said to be incubating or deprecated is considered public. Features are said to be promoted from an incubating state to public. The release notes for each release indicate which previously incubating features are being promoted by the release.
A public feature will never be removed or intentionally changed without undergoing deprecation. All public features are subject to the backward compatibility policy.
4. Deprecated
Some features may be replaced or become irrelevant due to the natural evolution of Gradle. Such features will eventually be removed from Gradle after being deprecated. A deprecated feature may become stale until it is finally removed according to the backward compatibility policy.
Deprecated features are indicated to be so. In the source code, all methods/properties/classes that are deprecated are annotated with “@java.lang.Deprecated” which is reflected in the DSL and API References. In most cases, there is a replacement for the deprecated element, which will be described in the documentation. Using a deprecated feature will result in a runtime warning in Gradle’s output.
The use of deprecated features should be avoided. The release notes for each release indicate any features being deprecated by the release.
Backward compatibility policy
Gradle provides backward compatibility across major versions (e.g., 1.x, 2.x, etc.).
Once a public feature is introduced in a Gradle release, it will remain indefinitely unless deprecated.
Once deprecated, it may be removed in the next major release.
Deprecated features may be supported across major releases, but this is not guaranteed.
Release end-of-life Policy
Every day, a new nightly build of Gradle is created.
This contains all of the changes made through Gradle’s extensive continuous integration tests during that day. Nightly builds may contain new changes that may or may not be stable.
The Gradle team creates a pre-release distribution called a release candidate (RC) for each minor or major release. When no problems are found after a short time (usually a week), the release candidate is promoted to a general availability (GA) release. If a regression is found in the release candidate, a new RC distribution is created, and the process repeats. Release candidates are supported for as long as the release window is open, but they are not intended to be used for production. Bug reports are greatly appreciated during the RC phase.
The Gradle team may create additional patch releases to replace the final release due to critical bug fixes or regressions. For instance, Gradle 5.2.1 replaces the Gradle 5.2 release.
Once a release candidate has been made, all feature development moves on to the next release for the latest major version. As such, each minor Gradle release causes the previous minor releases in the same major version to become end-of-life (EOL). EOL releases do not receive bug fixes or feature backports.
For major versions, Gradle will backport critical fixes and security fixes to the last minor in the previous major version. For example, when Gradle 7 was the latest major version, several releases were made in the 6.x line, including Gradle 6.9 (and subsequent releases).
As such, each major Gradle release causes:
-
The previous major version becomes maintenance only. It will only receive critical bug fixes and security fixes.
-
The major version before the previous one to become end-of-life (EOL), and that release line will not receive any new fixes.
CORE CONCEPTS
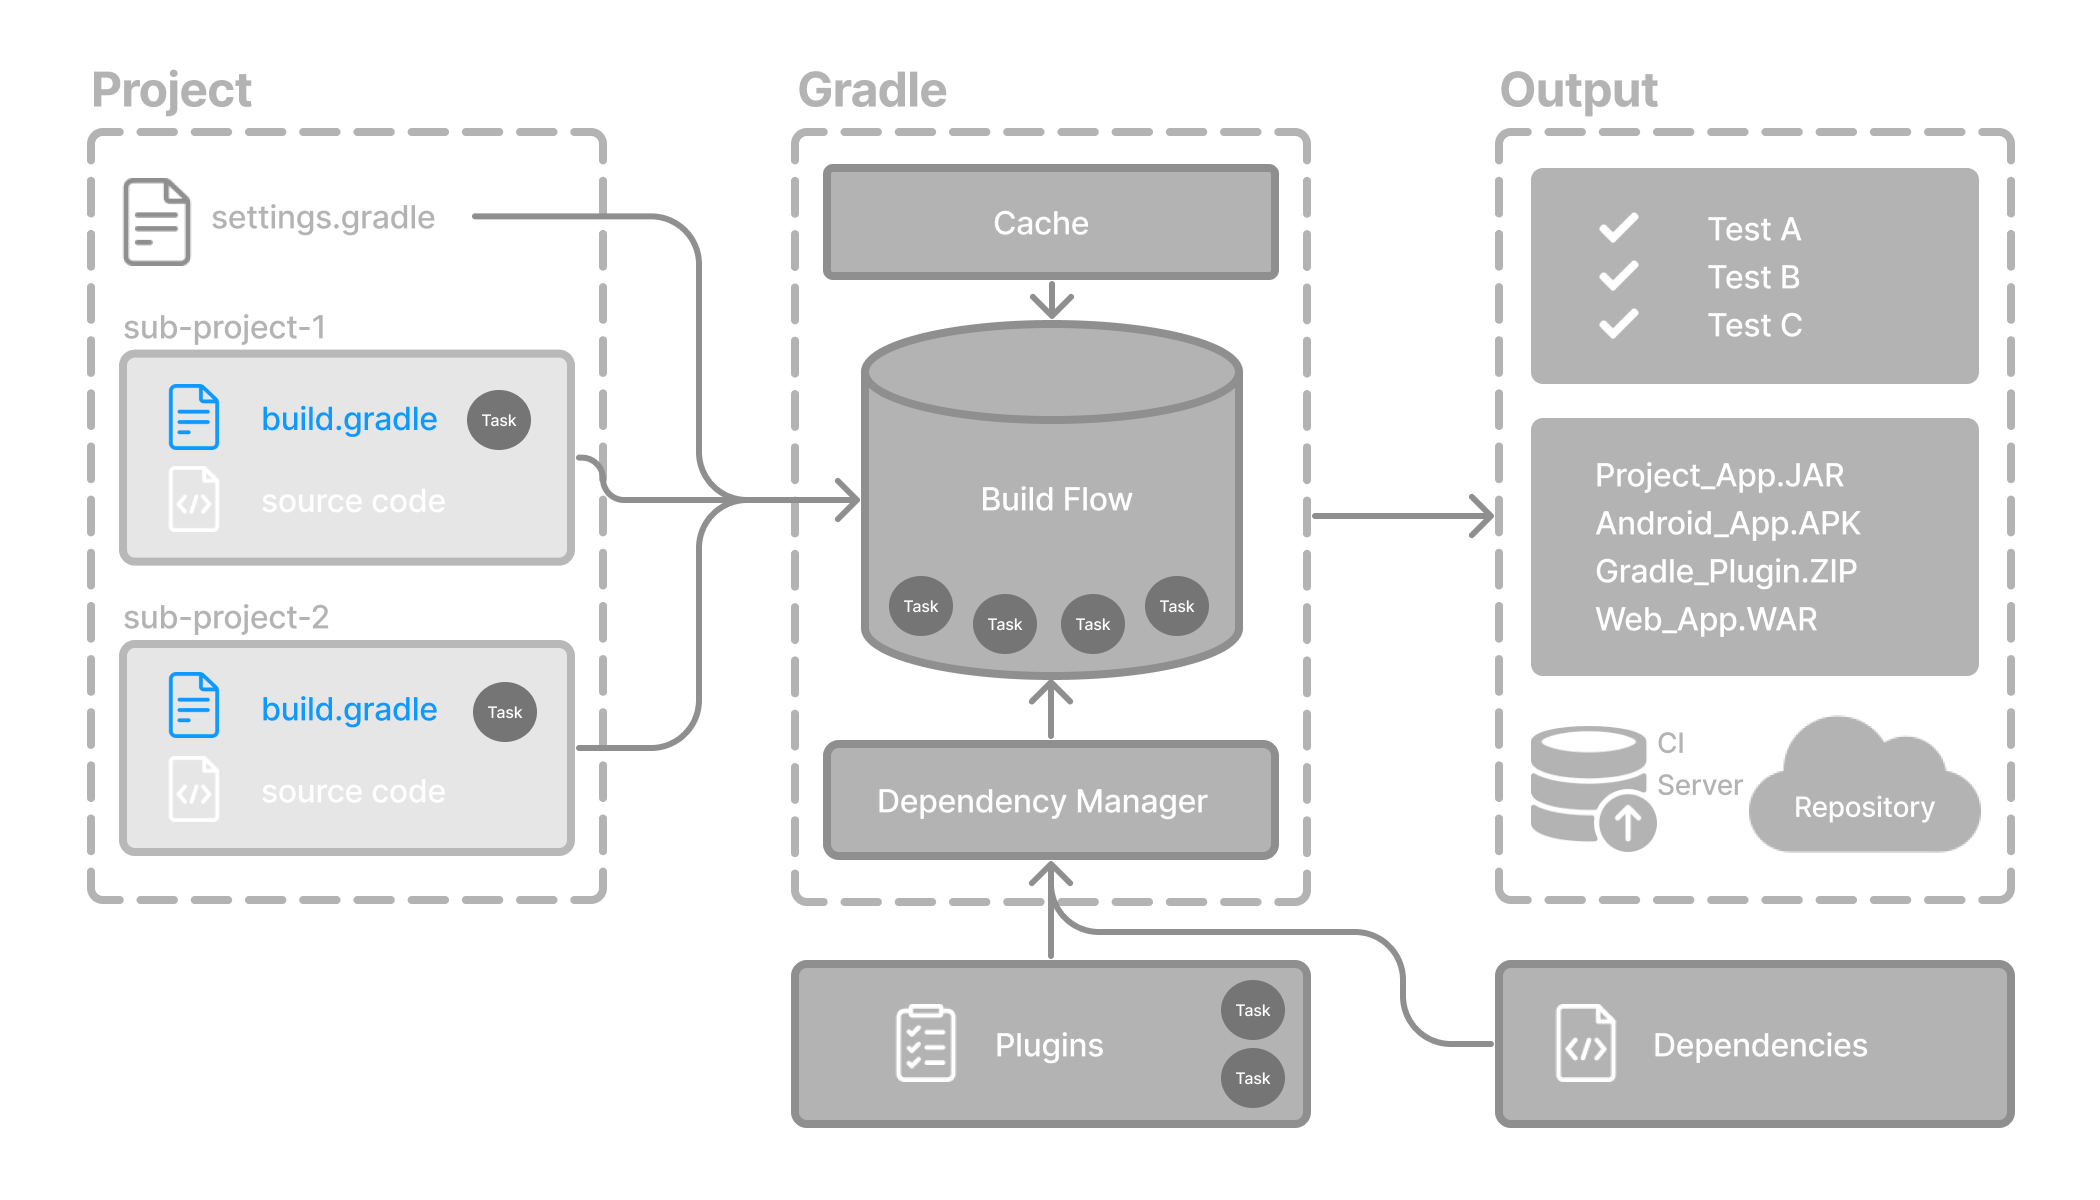
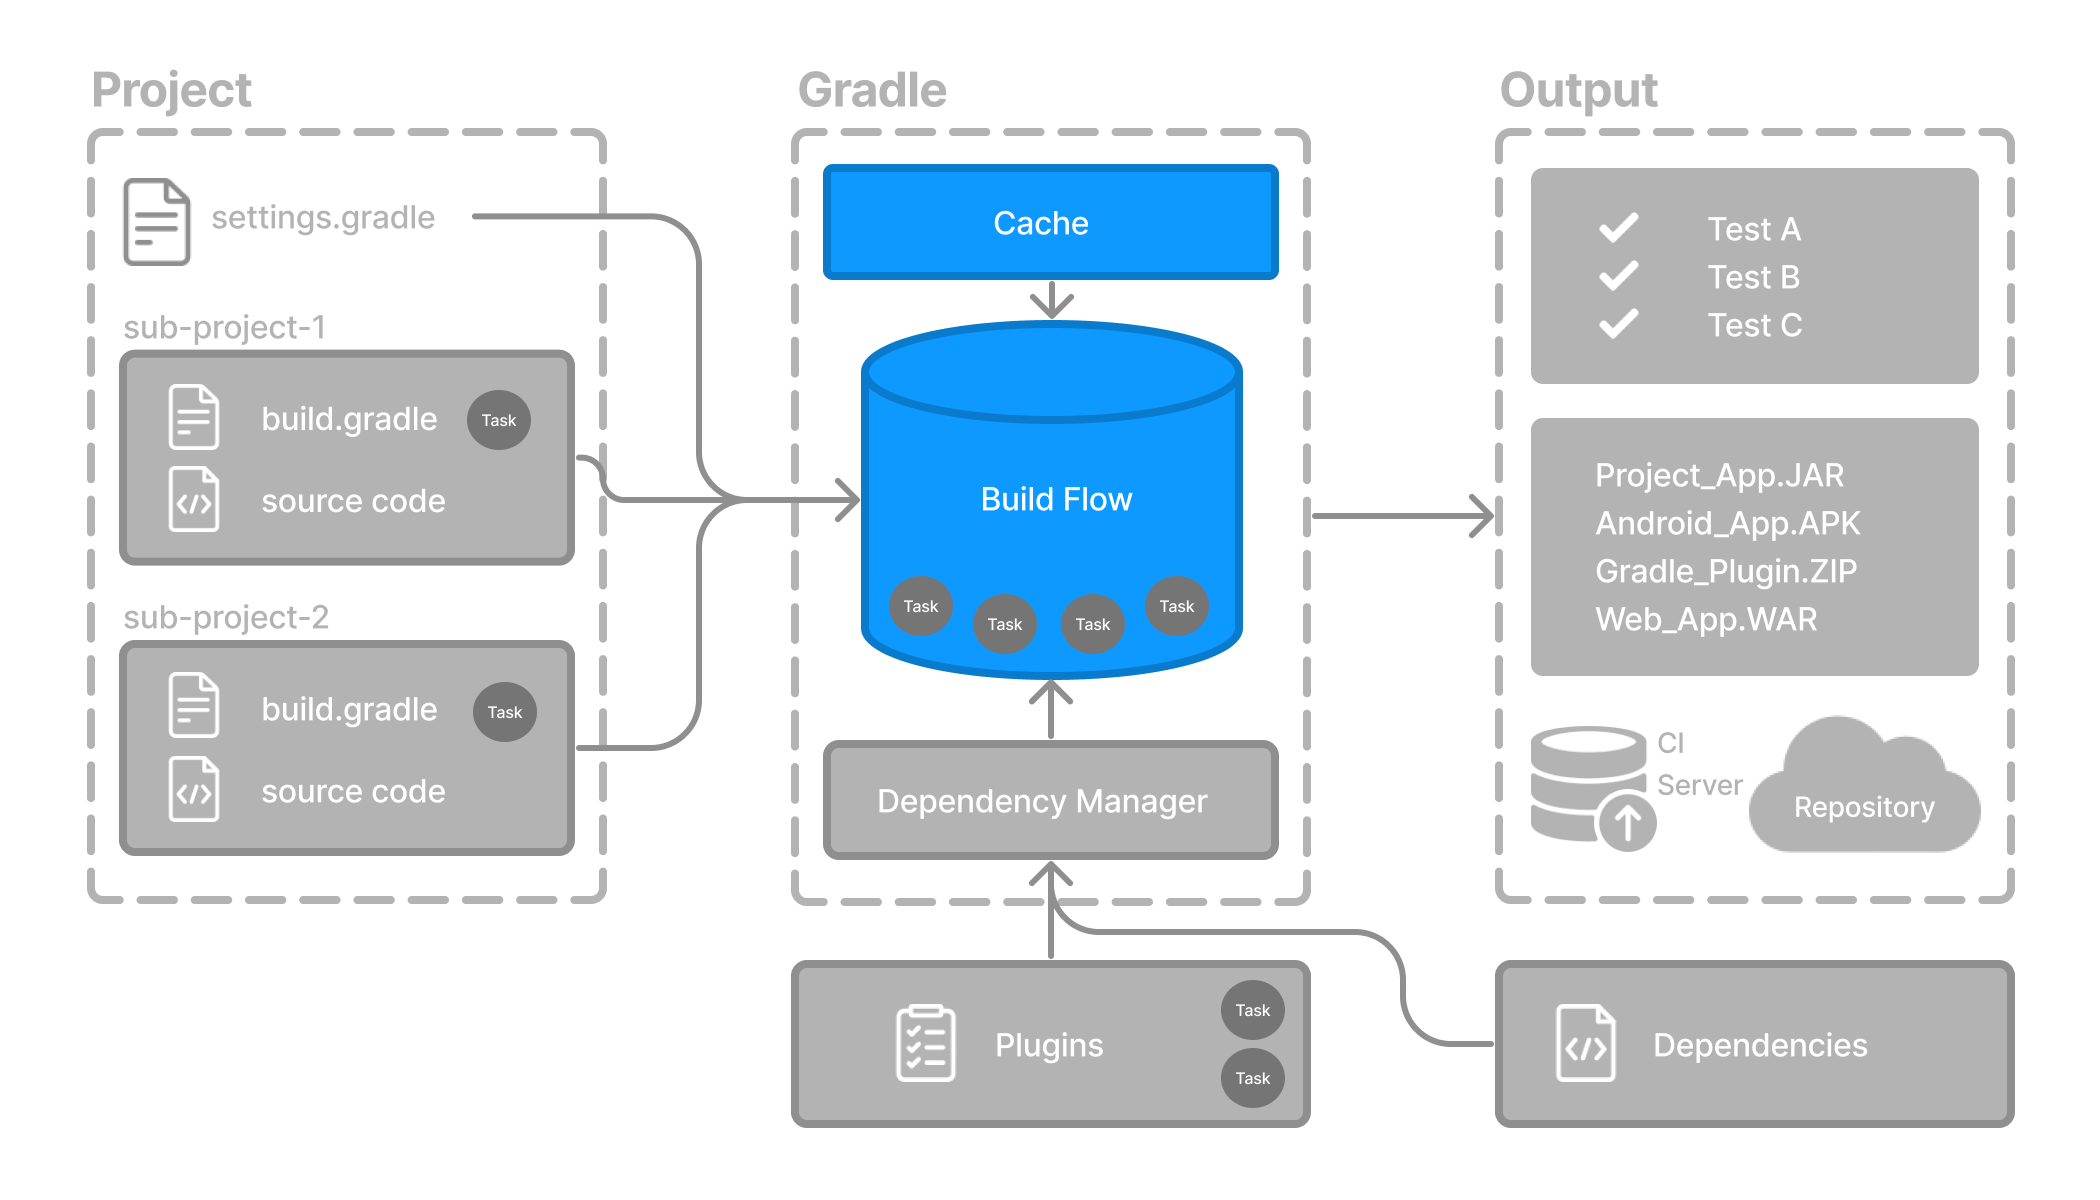
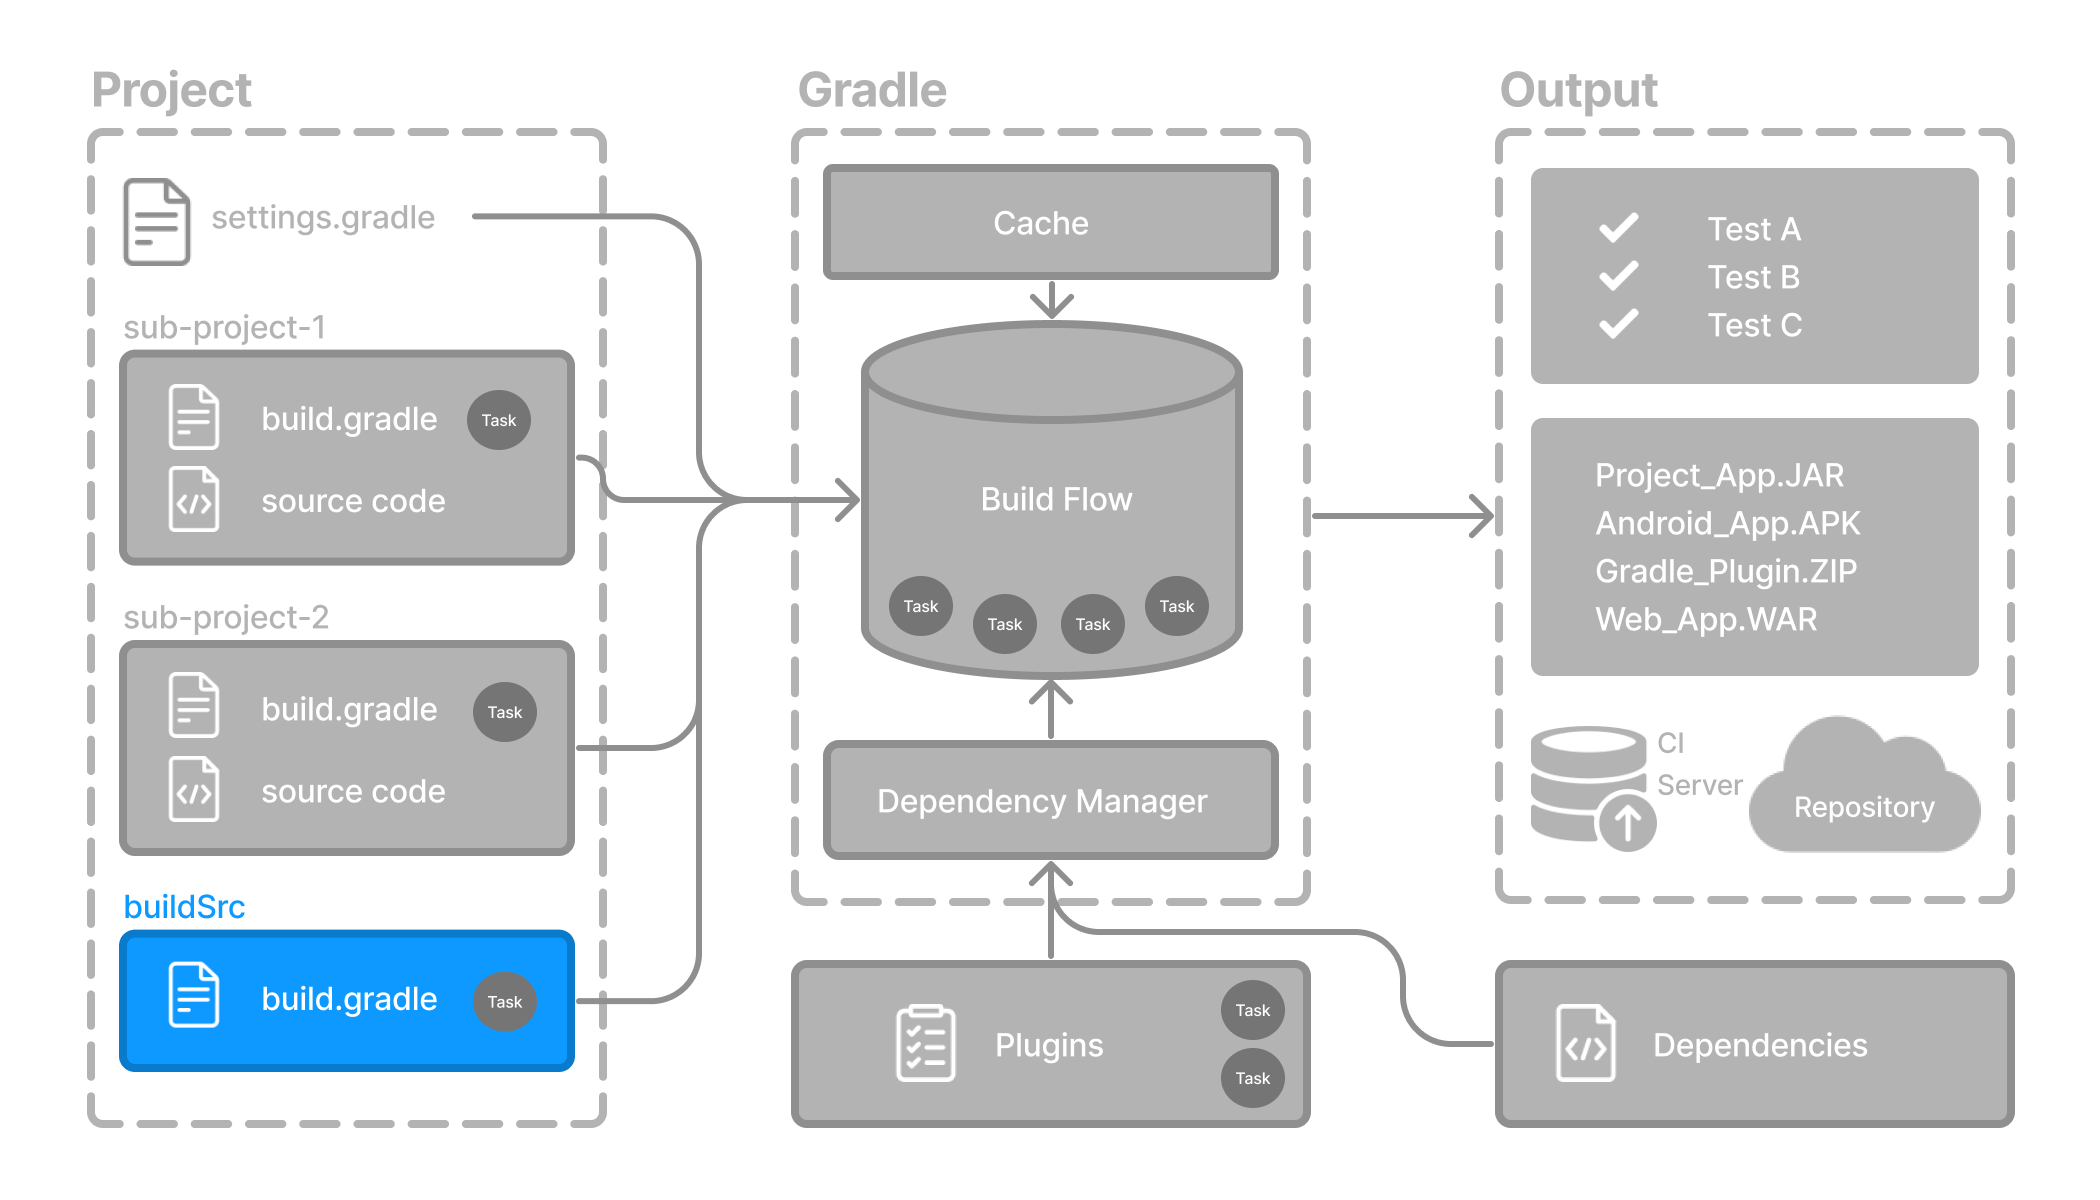
Gradle Basics
Gradle automates building, testing, and deployment of software from information in build scripts.
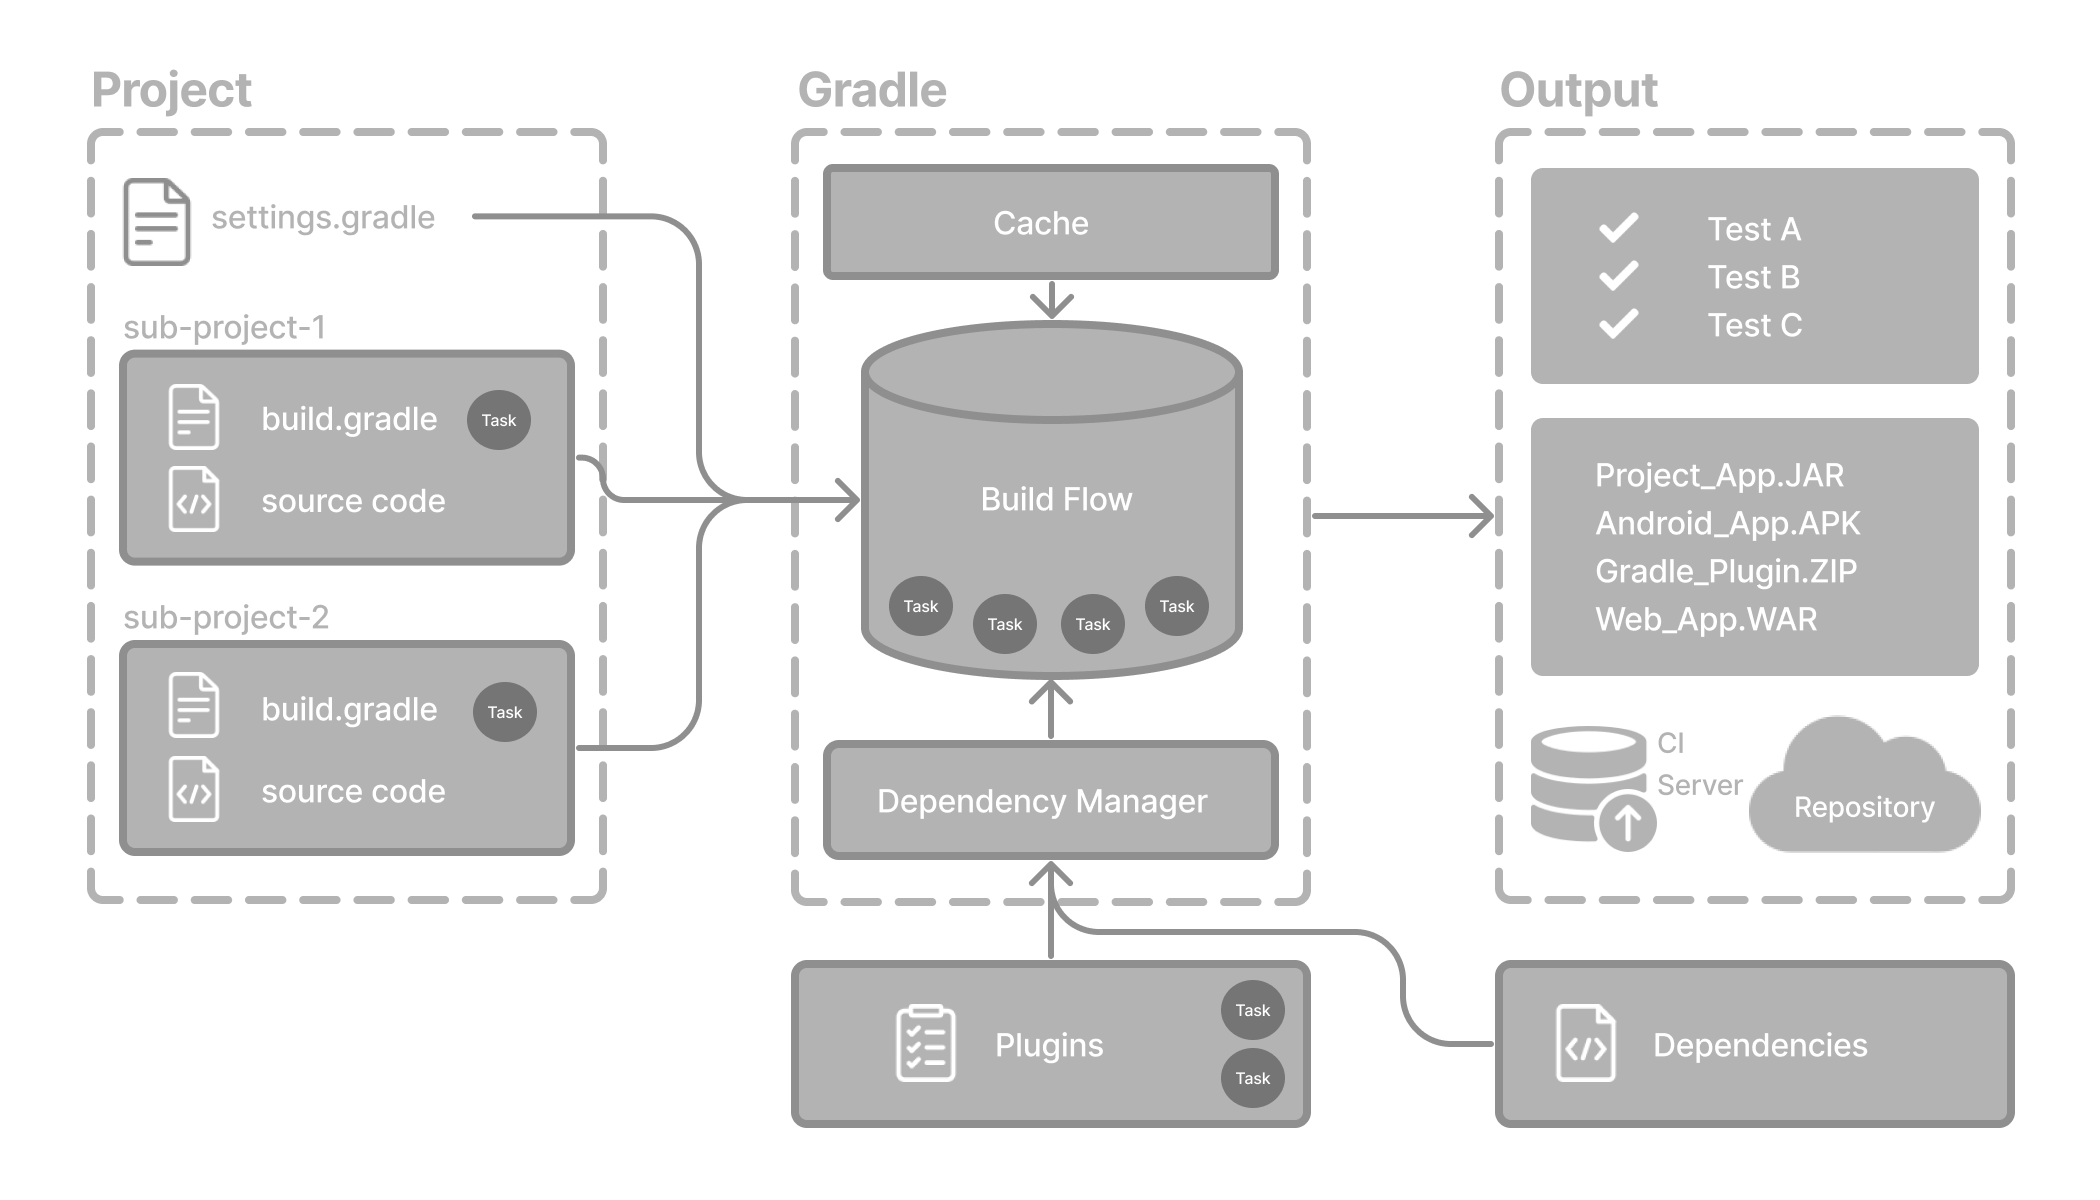
Gradle core concepts
Projects
A Gradle project is a piece of software that can be built, such as an application or a library.
Single project builds include a single project called the root project.
Multi-project builds include one root project and any number of subprojects.
Build Scripts
Build scripts detail to Gradle what steps to take to build the project.
Each project can include one or more build scripts.
Dependency Management
Dependency management is an automated technique for declaring and resolving external resources required by a project.
Each project typically includes a number of external dependencies that Gradle will resolve during the build.
Tasks
Tasks are a basic unit of work such as compiling code or running your test.
Each project contains one or more tasks defined inside a build script or a plugin.
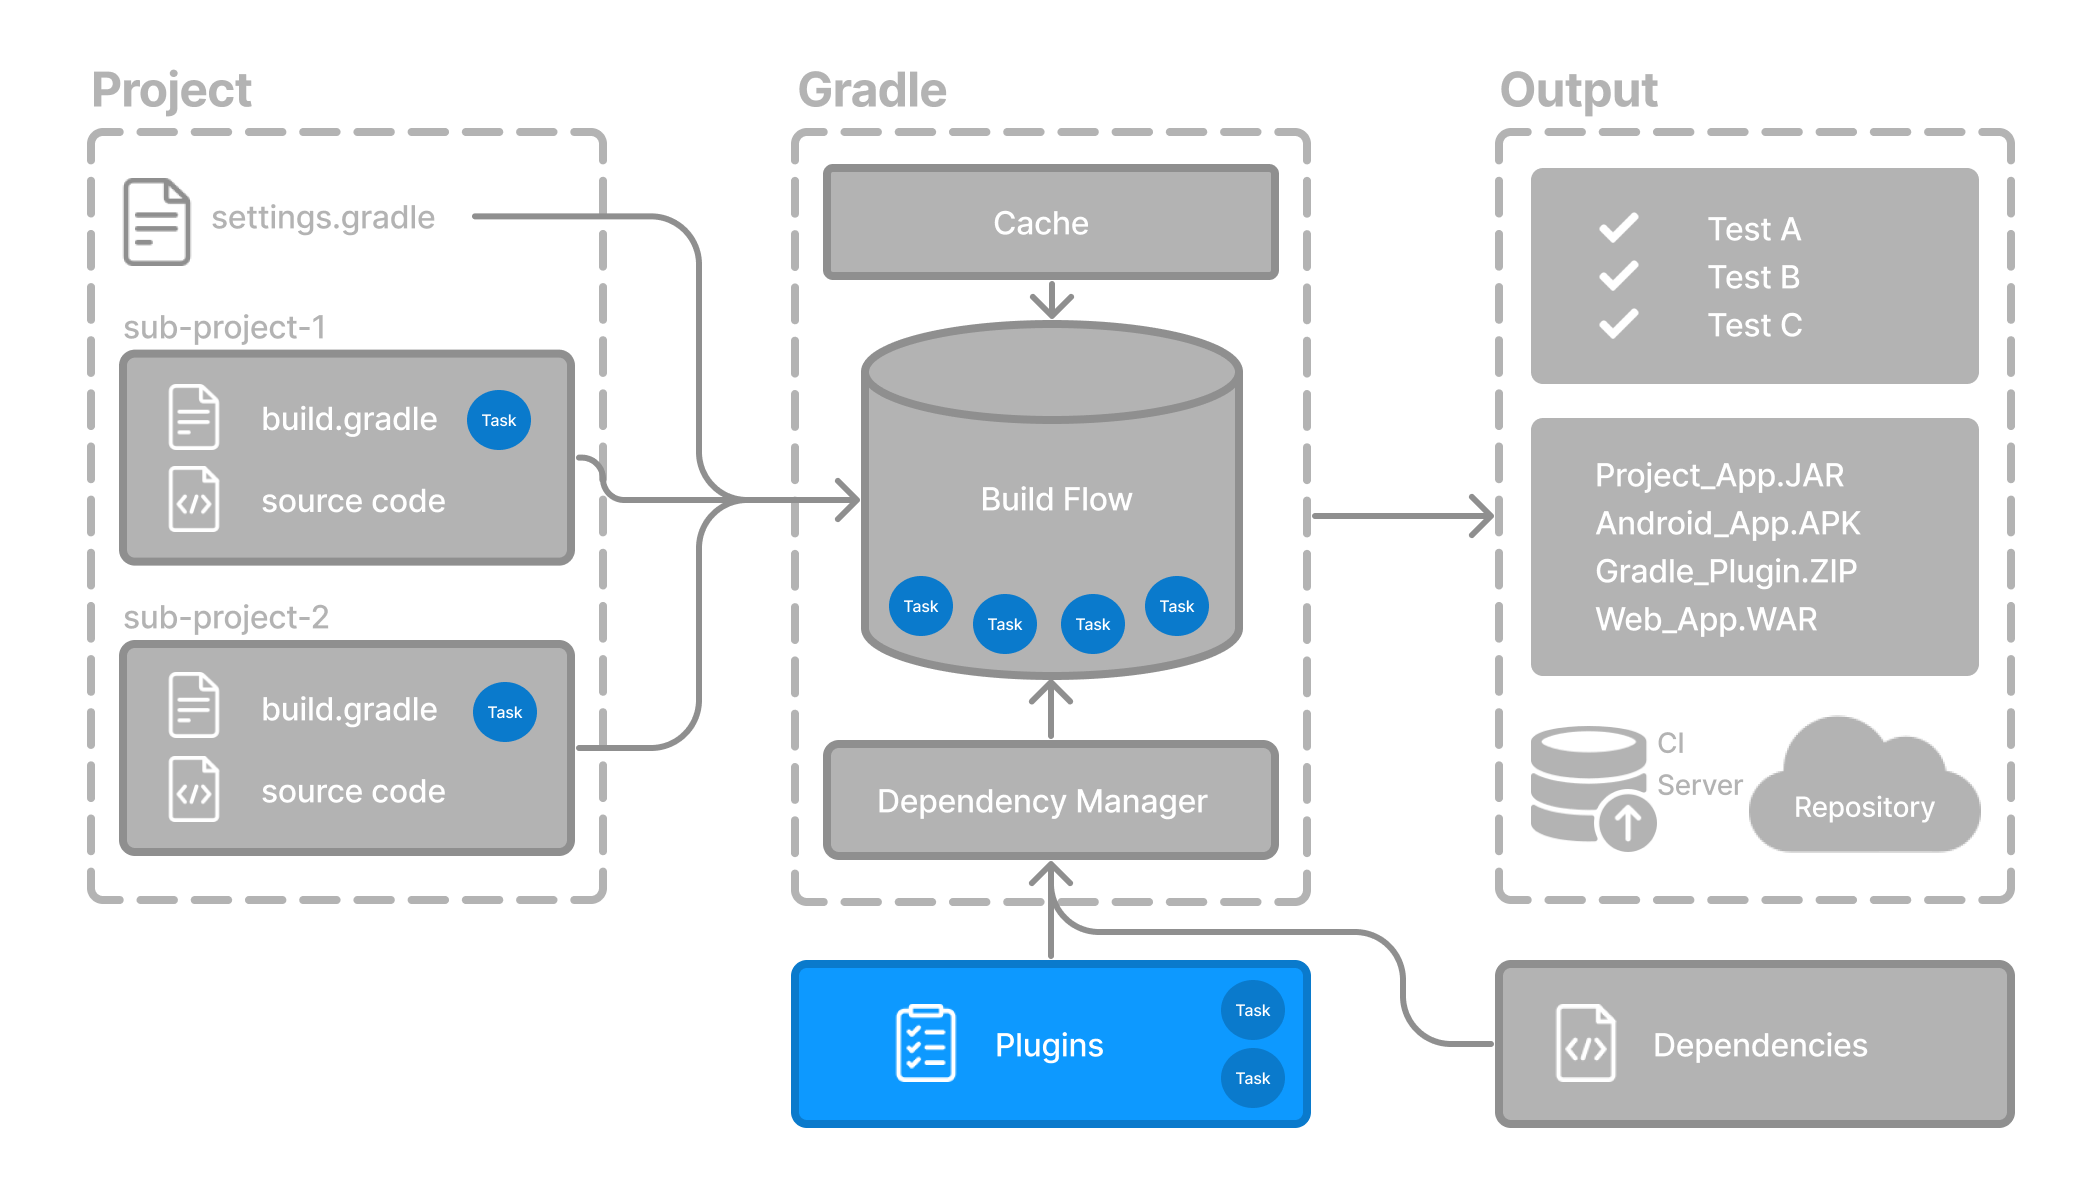
Plugins
Plugins are used to extend Gradle’s capability and optionally contribute tasks to a project.
Gradle project structure
Many developers will interact with Gradle for the first time through an existing project.
The presence of the gradlew and gradlew.bat files in the root directory of a project is a clear indicator that Gradle is used.
A Gradle project will look similar to the following:
project
├── gradle                              // (1)
│   ├── libs.versions.toml              // (2)
│   └── wrapper
│       ├── gradle-wrapper.jar
│       └── gradle-wrapper.properties
├── gradlew                             // (3)
├── gradlew.bat                         // (3)
├── settings.gradle(.kts)               // (4)
├── subproject-a
│   ├── build.gradle(.kts)              // (5)
│   └── src                             // (6)
└── subproject-b
    ├── build.gradle(.kts)              // (5)
└── src // (6)-
Gradle directory to store wrapper files and more
-
Gradle version catalog for dependency management
-
Gradle wrapper scripts
-
Gradle settings file to define a root project name and subprojects
-
Gradle build scripts of the two subprojects -
subproject-aandsubproject-b -
Source code and/or additional files for the projects
Invoking Gradle
IDE
Gradle is built-in to many IDEs including Android Studio, IntelliJ IDEA, Visual Studio Code, Eclipse, and NetBeans.
Gradle can be automatically invoked when you build, clean, or run your app in the IDE.
It is recommended that you consult the manual for the IDE of your choice to learn more about how Gradle can be used and configured.
Command line
Gradle can be invoked in the command line once installed. For example:
$ gradle build|
Note
|
Most projects do not use the installed version of Gradle. |
Gradle Wrapper
The Wrapper is a script that invokes a declared version of Gradle and is the recommended way to execute a Gradle build.
It is found in the project root directory as a gradlew or gradlew.bat file:
$ gradlew build     // Linux or OSX
$ gradlew.bat build  // Windows
Next Step: Learn about the Gradle Wrapper >>
Gradle Wrapper Basics
The recommended way to execute any Gradle build is with the Gradle Wrapper.
The Wrapper script invokes a declared version of Gradle, downloading it beforehand if necessary.
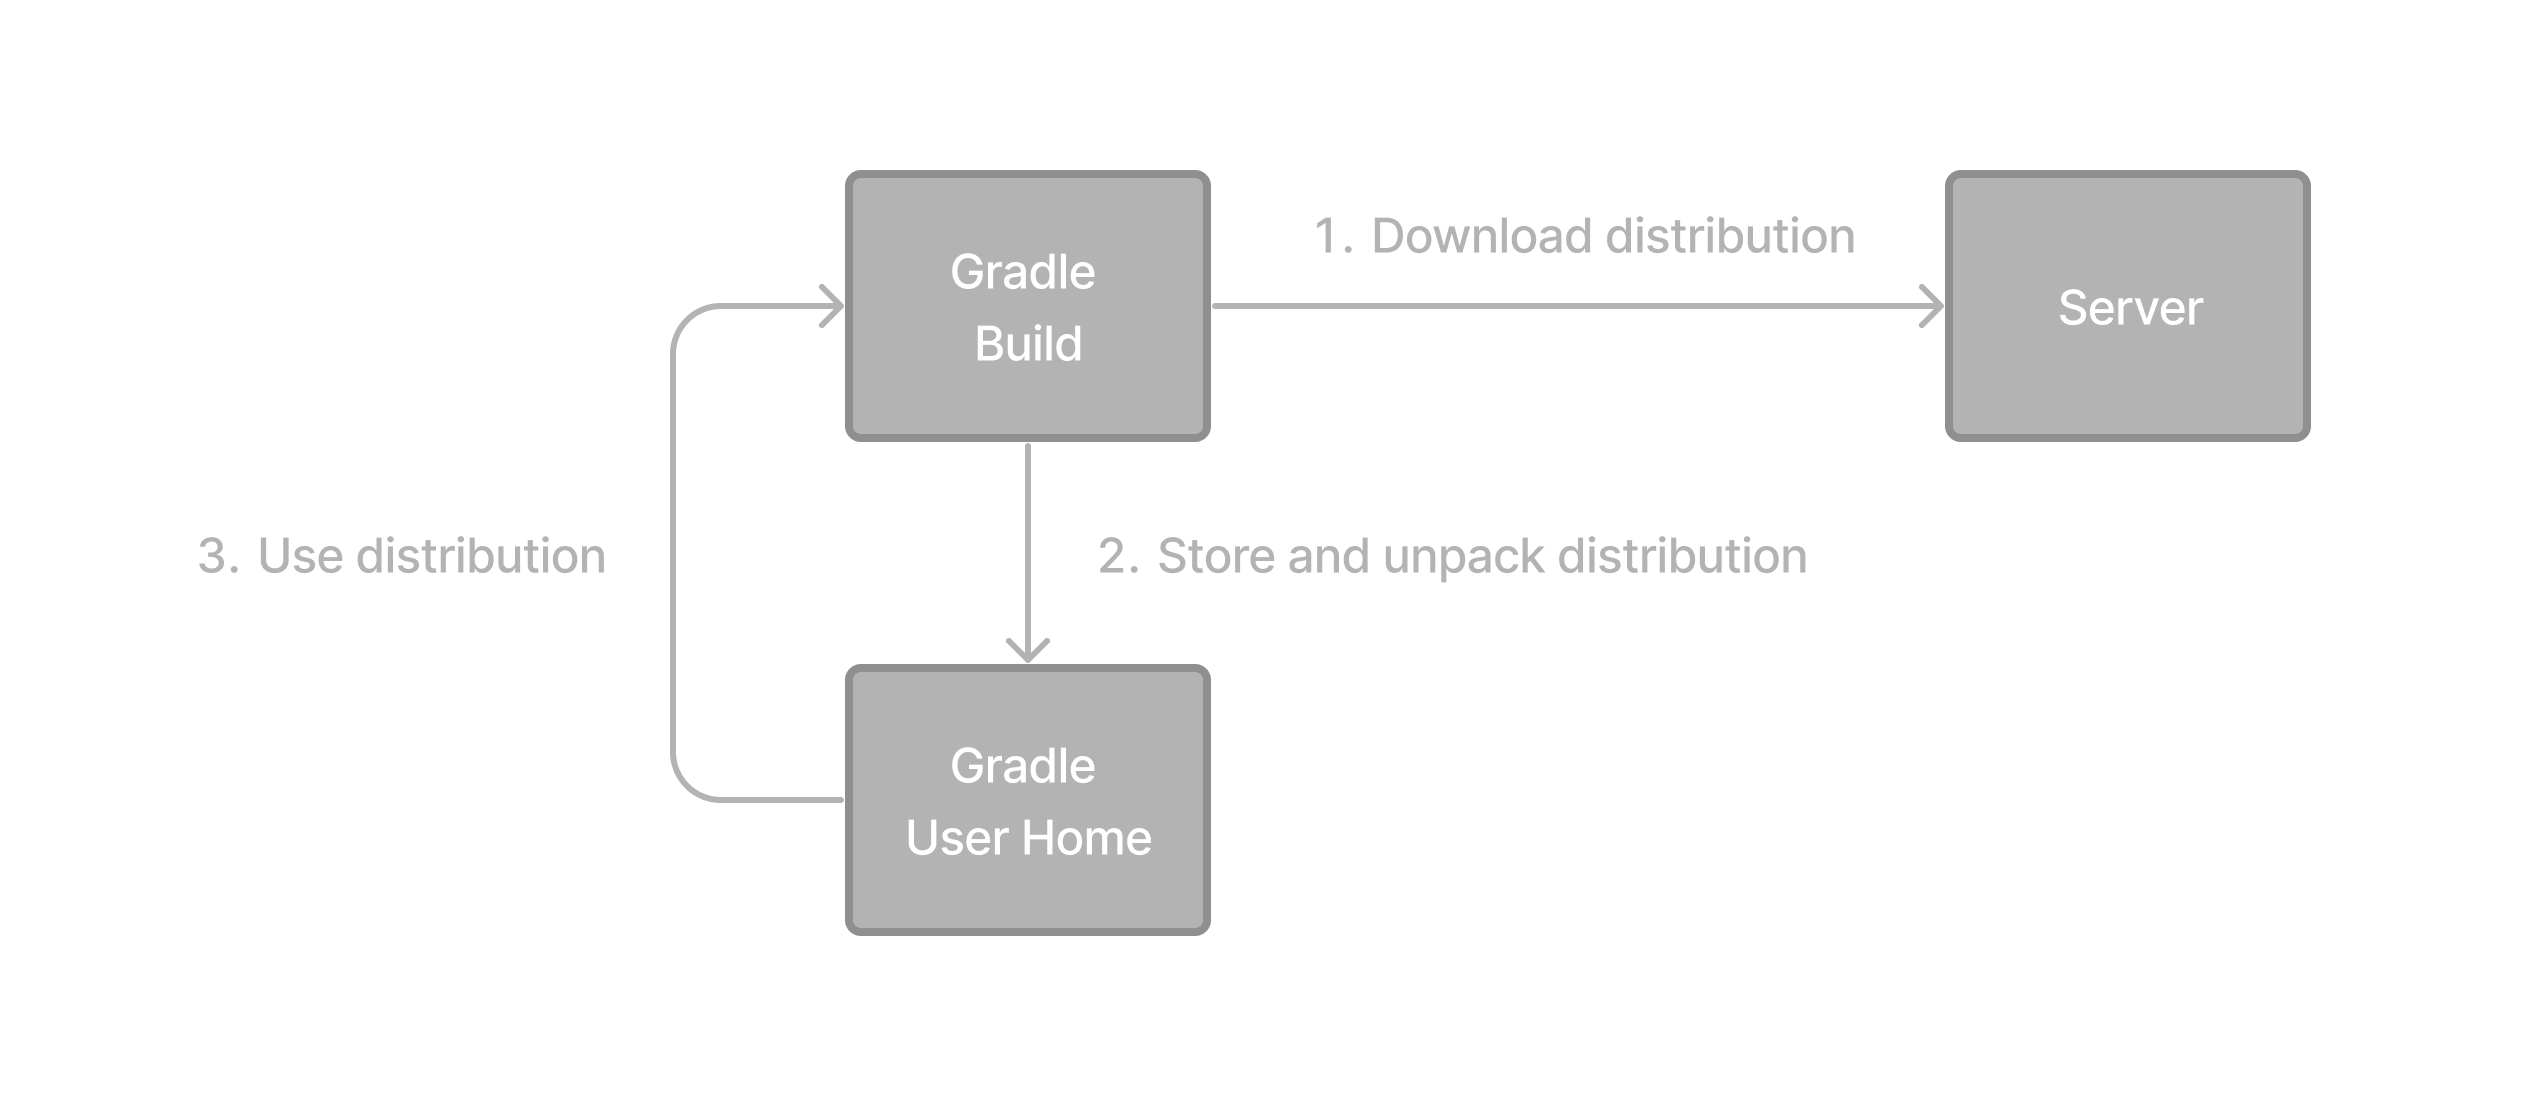
The Wrapper is available as a gradlew or gradlew.bat file.
The Wrapper provides the following benefits:
-
Standardizes a project on a given Gradle version.
-
Provisions the same Gradle version for different users.
-
Provisions the Gradle version for different execution environments (IDEs, CI servers…).
Using the Gradle Wrapper
It is always recommended to execute a build with the Wrapper to ensure a reliable, controlled, and standardized execution of the build.
Depending on the operating system, you run gradlew or gradlew.bat instead of the gradle command.
Typical Gradle invocation:
$ gradle build
To run the Wrapper on a Linux or OSX machine:
$ ./gradlew build
To run the Wrapper on Windows PowerShell:
$ .\gradlew.bat build
The command is run in the same directory that the Wrapper is located in. If you want to run the command in a different directory, you must provide the relative path to the Wrapper:
$ ../gradlew build
The following console output demonstrates the use of the Wrapper on a Windows machine, in the command prompt (cmd), for a Java-based project:
$ gradlew.bat build

Downloading https://services.gradle.org/distributions/gradle-5.0-all.zip
.....................................................................................
Unzipping C:\Documents and Settings\Claudia\.gradle\wrapper\dists\gradle-5.0-all\ac27o8rbd0ic8ih41or9l32mv\gradle-5.0-all.zip to C:\Documents and Settings\Claudia\.gradle\wrapper\dists\gradle-5.0-al\ac27o8rbd0ic8ih41or9l32mv
Set executable permissions for: C:\Documents and Settings\Claudia\.gradle\wrapper\dists\gradle-5.0-all\ac27o8rbd0ic8ih41or9l32mv\gradle-5.0\bin\gradle

BUILD SUCCESSFUL in 12s
1 actionable task: 1 executed
Consult the Gradle Wrapper reference to learn more.
Next Step: Learn about the Gradle CLI >>
Command-Line Interface Basics
The command-line interface is the primary method of interacting with Gradle outside the IDE.
Use of the Gradle Wrapper is highly encouraged.
Substitute ./gradlew (in macOS / Linux) or gradlew.bat (in Windows) for gradle in the following examples.
Executing Gradle on the command line conforms to the following structure:
gradle [taskName...] [--option-name...]
Options are allowed before and after task names.
gradle [--option-name...] [taskName...]
If multiple tasks are specified, you should separate them with a space.
gradle [taskName1 taskName2...] [--option-name...]
Options that accept values can be specified with or without = between the option and argument. The use of = is recommended.
gradle [...] --console=plain
Options that enable behavior have long-form options with inverses specified with --no-. The following are opposites.
gradle [...] --build-cache
gradle [...] --no-build-cache
Many long-form options have short-option equivalents. The following are equivalent:
gradle --help
gradle -h
Command-line usage
The following sections describe the use of the Gradle command-line interface. Some plugins also add their own command line options.
Executing tasks
To execute a task called taskName on the root project, type:
$ gradle :taskName
This will run the single taskName and all of its dependencies.
Specify options for tasks
To pass an option to a task, prefix the option name with -- after the task name:
$ gradle taskName --exampleOption=exampleValue
Consult the Gradle Command Line Interface reference to learn more.
Next Step: Learn about the Settings file >>
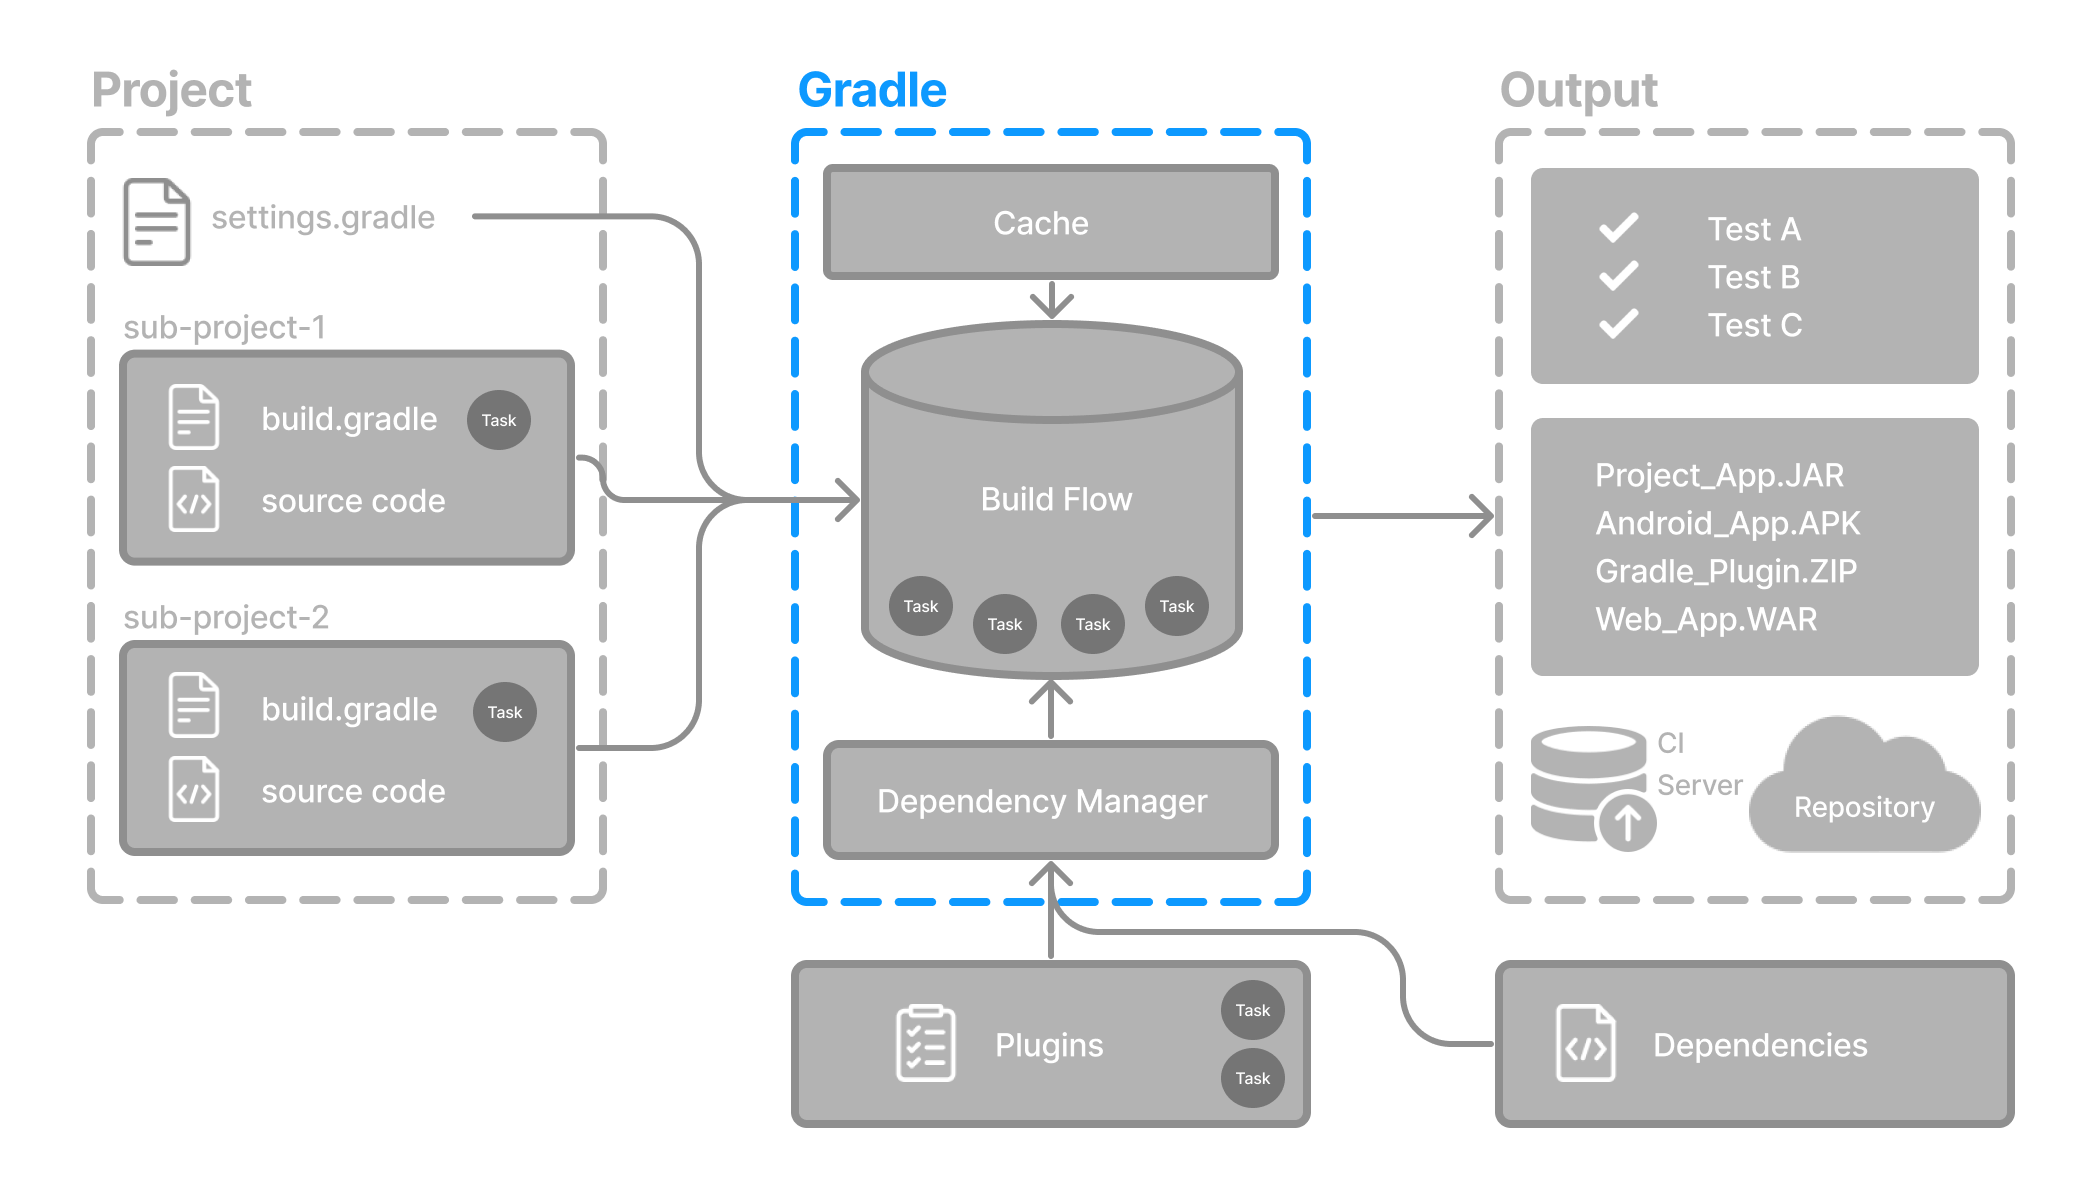
Settings File Basics
The settings file is the entry point of every Gradle project.
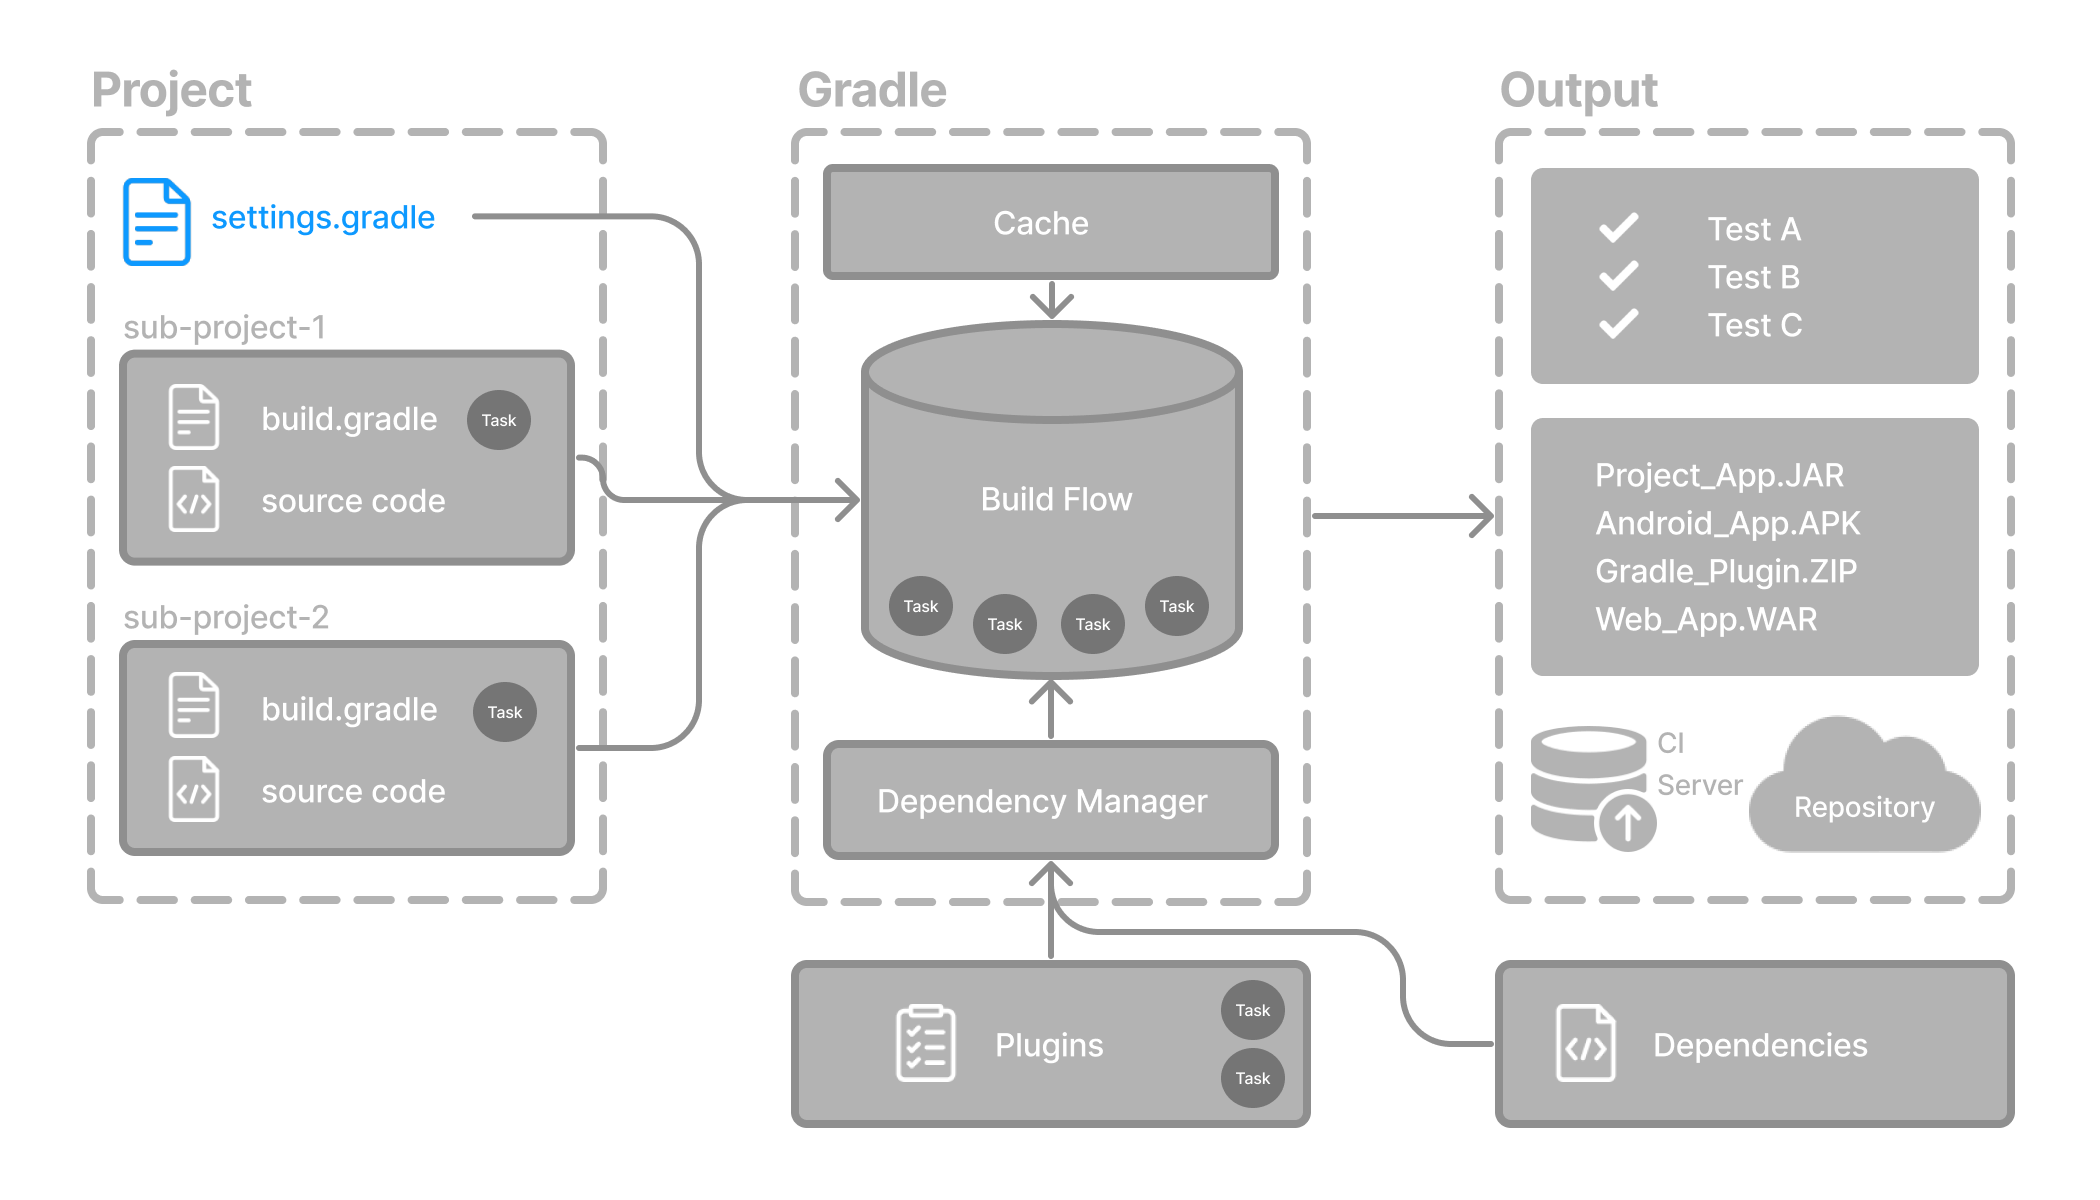
The primary purpose of the settings file is to add subprojects to your build.
Gradle supports single and multi-project builds.
-
For single-project builds, the settings file is optional.
-
For multi-project builds, the settings file is mandatory and declares all subprojects.
Settings script
The settings file is a script.
It is either a settings.gradle file written in Groovy or a settings.gradle.kts file in Kotlin.
The Groovy DSL and the Kotlin DSL are the only accepted languages for Gradle scripts.
The settings file is typically found in the root directory of the project.
Let’s take a look at an example and break it down:
rootProject.name = "root-project"   // (1)

include("sub-project-a")            // (2)
include("sub-project-b")
include("sub-project-c")-
Define the project name.
-
Add subprojects.
rootProject.name = 'root-project'   // (1)

include('sub-project-a')            // (2)
include('sub-project-b')
include('sub-project-c')-
Define the project name.
-
Add subprojects.
1. Define the project name
The settings file defines your project name:
rootProject.name = "root-project"There is only one root project per build.
2. Add subprojects
The settings file defines the structure of the project by including subprojects, if there are any:
include("app")
include("business-logic")
include("data-model")
Consult the Writing Settings File page to learn more.
Next Step: Learn about the Build scripts >>
Build File Basics
Generally, a build script details build configuration, tasks, and plugins.
Every Gradle build comprises at least one build script.
In the build file, two types of dependencies can be added:
-
The libraries and/or plugins on which Gradle and the build script depend.
-
The libraries on which the project sources (i.e., source code) depend.
Build scripts
The build script is either a build.gradle file written in Groovy or a build.gradle.kts file in Kotlin.
The Groovy DSL and the Kotlin DSL are the only accepted languages for Gradle scripts.
Let’s take a look at an example and break it down:
plugins {
    id("application")               // (1)
}

application {
    mainClass = "com.example.Main"  // (2)
}-
Add plugins.
-
Use convention properties.
plugins {
    id 'application'                // (1)
}

application {
    mainClass = 'com.example.Main'  // (2)
}-
Add plugins.
-
Use convention properties.
1. Add plugins
Plugins extend Gradle’s functionality and can contribute tasks to a project.
Adding a plugin to a build is called applying a plugin and makes additional functionality available.
plugins {
    id("application")
}
The application plugin facilitates creating an executable JVM application.
Applying the Application plugin also implicitly applies the Java plugin.
The java plugin adds Java compilation along with testing and bundling capabilities to a project.
2. Use convention properties
A plugin adds tasks to a project. It also adds properties and methods to a project.
The application plugin defines tasks that package and distribute an application, such as the run task.
The Application plugin provides a way to declare the main class of a Java application, which is required to execute the code.
application {
    mainClass = "com.example.Main"
}
In this example, the main class (i.e., the point where the program’s execution begins) is com.example.Main.
Consult the Writing Build Scripts page to learn more.
Next Step: Learn about Dependency Management >>
Dependency Management Basics
Gradle has built-in support for dependency management.
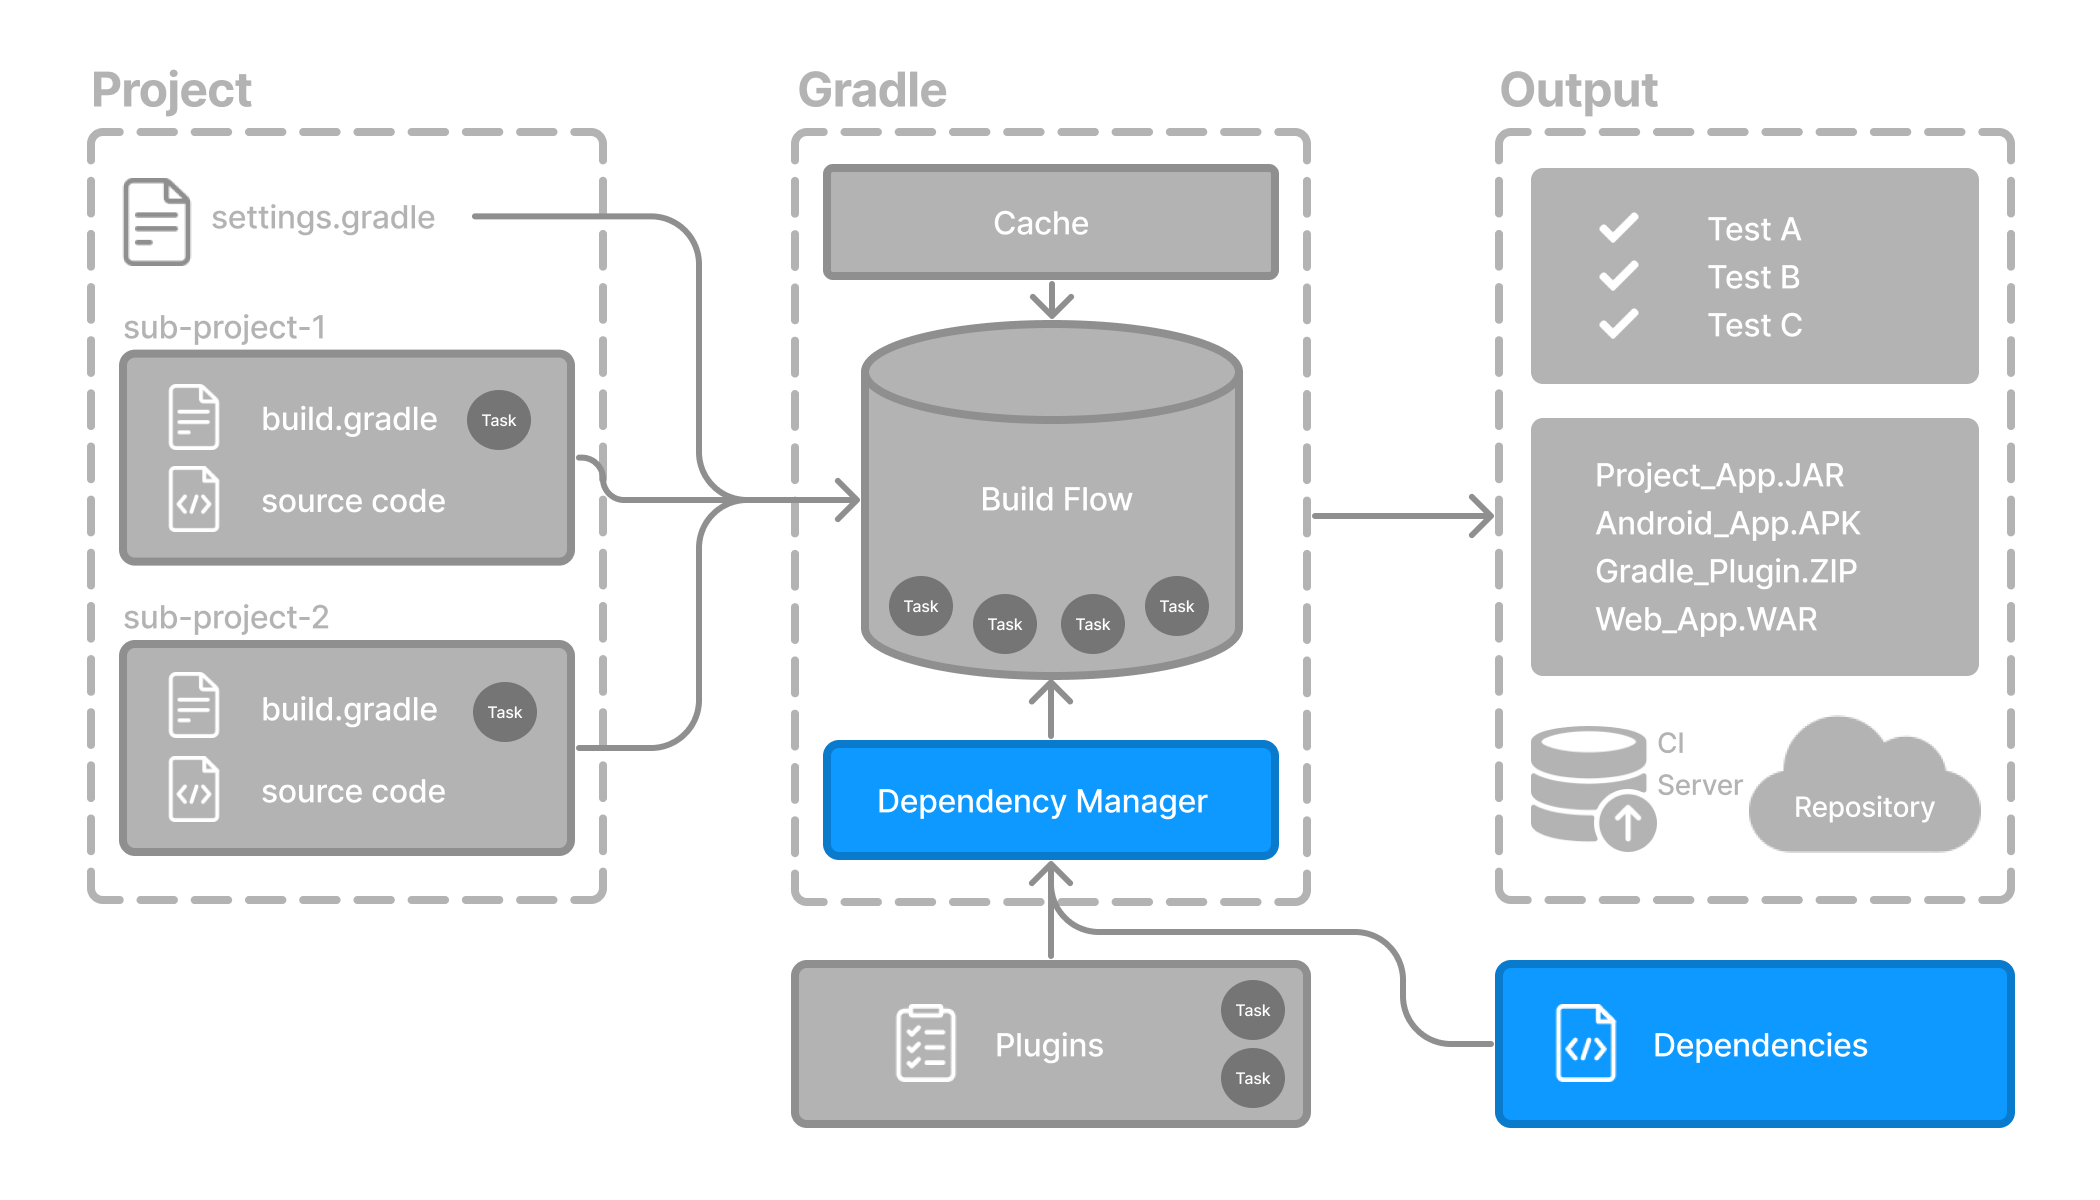
Dependency management is an automated technique for declaring and resolving external resources required by a project.
Gradle build scripts define the process to build projects that may require external dependencies. Dependencies refer to JARs, plugins, libraries, or source code that support building your project.
Version Catalog
Version catalogs provide a way to centralize your dependency declarations in a libs.versions.toml file.
The catalog makes sharing dependencies and version configurations between subprojects simple. It also allows teams to enforce versions of libraries and plugins in large projects.
The version catalog typically contains four sections:
-
[versions] to declare the version numbers that plugins and libraries will reference.
-
[libraries] to define the libraries used in the build files.
-
[bundles] to define a set of dependencies.
-
[plugins] to define plugins.
[versions]
androidGradlePlugin = "7.4.1"
mockito = "2.16.0"

[libraries]
googleMaterial = { group = "com.google.android.material", name = "material", version = "1.1.0-alpha05" }
mockitoCore = { module = "org.mockito:mockito-core", version.ref = "mockito" }

[plugins]
androidApplication = { id = "com.android.application", version.ref = "androidGradlePlugin" }
The file is located in the gradle directory so that it can be used by Gradle and IDEs automatically.
The version catalog should be checked into source control: gradle/libs.versions.toml.
Declaring Your Dependencies
To add a dependency to your project, specify a dependency in the dependencies block of your build.gradle(.kts) file.
The following build.gradle.kts file adds a plugin and two dependencies to the project using the version catalog above:
plugins {
   alias(libs.plugins.androidApplication)  // (1)
}

dependencies {
    // Dependency on a remote binary to compile and run the code
    implementation(libs.googleMaterial)    // (2)

    // Dependency on a remote binary to compile and run the test code
    testImplementation(libs.mockitoCore)   // (3)
}-
Applies the Android Gradle plugin to this project, which adds several features that are specific to building Android apps.
-
Adds the Material dependency to the project. Material Design provides components for creating a user interface in an Android App. This library will be used to compile and run the Kotlin source code in this project.
-
Adds the Mockito dependency to the project. Mockito is a mocking framework for testing Java code. This library will be used to compile and run the test source code in this project.
Dependencies in Gradle are grouped by configurations.
-
The
materiallibrary is added to theimplementationconfiguration, which is used for compiling and running production code. -
The
mockito-corelibrary is added to thetestImplementationconfiguration, which is used for compiling and running test code.
|
Note
|
There are many more configurations available. |
Viewing Project Dependencies
You can view your dependency tree in the terminal using the ./gradlew :app:dependencies command:
$ ./gradlew :app:dependencies

> Task :app:dependencies

------------------------------------------------------------
Project ':app'
------------------------------------------------------------

implementation - Implementation only dependencies for source set 'main'. (n)
\--- com.google.android.material:material:1.1.0-alpha05 (n)

testImplementation - Implementation only dependencies for source set 'test'. (n)
\--- org.mockito:mockito-core:2.16.0 (n)

...
Consult the Dependency Management chapter to learn more.
Next Step: Learn about Tasks >>
Task Basics
A task represents some independent unit of work that a build performs, such as compiling classes, creating a JAR, generating Javadoc, or publishing archives to a repository.
You run a Gradle build task using the gradle command or by invoking the Gradle Wrapper (./gradlew or gradlew.bat) in your project directory:
$ ./gradlew buildAvailable tasks
All available tasks in your project come from Gradle plugins and build scripts.
You can list all the available tasks in the project by running the following command in the terminal:
$ ./gradlew tasksApplication tasks
-----------------
run - Runs this project as a JVM application
Build tasks
-----------
assemble - Assembles the outputs of this project.
build - Assembles and tests this project.
...
Documentation tasks
-------------------
javadoc - Generates Javadoc API documentation for the main source code.
...
Other tasks
-----------
compileJava - Compiles main Java source.
...Running tasks
The run task is executed with ./gradlew run:
$ ./gradlew run

> Task :app:compileJava
> Task :app:processResources NO-SOURCE
> Task :app:classes

> Task :app:run
Hello World!

BUILD SUCCESSFUL in 904ms
2 actionable tasks: 2 executed
In this example Java project, the output of the run task is a Hello World statement printed on the console.
Task dependency
Many times, a task requires another task to run first.
For example, for Gradle to execute the build task, the Java code must first be compiled.
Thus, the build task depends on the compileJava task.
This means that the compileJava task will run before the build task:
$ ./gradlew build

> Task :app:compileJava
> Task :app:processResources NO-SOURCE
> Task :app:classes
> Task :app:jar
> Task :app:startScripts
> Task :app:distTar
> Task :app:distZip
> Task :app:assemble
> Task :app:compileTestJava
> Task :app:processTestResources NO-SOURCE
> Task :app:testClasses
> Task :app:test
> Task :app:check
> Task :app:build

BUILD SUCCESSFUL in 764ms
7 actionable tasks: 7 executed
Build scripts can optionally define task dependencies. Gradle then automatically determines the task execution order.
Consult the Task development chapter to learn more.
Next Step: Learn about Plugins >>
Plugin Basics
Gradle is built on a plugin system. Gradle itself is primarily composed of infrastructure, such as a sophisticated dependency resolution engine. The rest of its functionality comes from plugins.
A plugin is a piece of software that provides additional functionality to the Gradle build system.
Plugins can be applied to a Gradle build script to add new tasks, configurations, or other build-related capabilities:
- The Java Library Plugin -
java-library -
Used to define and build Java libraries. It compiles Java source code with the
compileJavatask, generates Javadoc with thejavadoctask, and packages the compiled classes into a JAR file with thejartask. - The Google Services Gradle Plugin -
com.google.gms:google-services -
Enables Google APIs and Firebase services in your Android application with a configuration block called
googleServices{}and a task calledgenerateReleaseAssets. - The Gradle Bintray Plugin -
com.jfrog.bintray -
Allows you to publish artifacts to Bintray by configuring the plugin using the
bintray{}block.
Plugin distribution
Plugins are distributed in three ways:
-
Core plugins - Gradle develops and maintains a set of Core Plugins.
-
Community plugins - Gradle’s community shares plugins via the Gradle Plugin Portal.
-
Local plugins - Gradle enables users to create custom plugins using APIs.
Applying plugins
Applying a plugin to a project allows the plugin to extend the project’s capabilities.
You apply plugins in the build script using a plugin id (a globally unique identifier / name) and a version:
plugins {
    id «plugin id» version «plugin version»
}
1. Core plugins
Gradle Core plugins are a set of plugins that are included in the Gradle distribution itself. These plugins provide essential functionality for building and managing projects.
Some examples of core plugins include:
-
java: Provides support for building Java projects.
-
groovy: Adds support for compiling and testing Groovy source files.
-
ear: Adds support for building EAR files for enterprise applications.
Core plugins are unique in that they provide short names, such as java for the core JavaPlugin, when applied in build scripts.
They also do not require versions.
To apply the java plugin to a project:
plugins {
    id("java")
}
There are many Gradle Core Plugins users can take advantage of.
2. Community plugins
Community plugins are plugins developed by the Gradle community, rather than being part of the core Gradle distribution. These plugins provide additional functionality that may be specific to certain use cases or technologies.
The Spring Boot Gradle plugin packages executable JAR or WAR archives, and runs Spring Boot Java applications.
To apply the org.springframework.boot plugin to a project:
plugins {
    id("org.springframework.boot") version "3.1.5"
}
Community plugins can be published at the Gradle Plugin Portal, where other Gradle users can easily discover and use them.
3. Local plugins
Custom or local plugins are developed and used within a specific project or organization. These plugins are not shared publicly and are tailored to the specific needs of the project or organization.
Local plugins can encapsulate common build logic, provide integrations with internal systems or tools, or abstract complex functionality into reusable components.
Gradle provides users with the ability to develop custom plugins using APIs. To create your own plugin, you’ll typically follow these steps:
-
Define the plugin class: create a new class that implements the
Plugin<Project>interface.// Define a 'HelloPlugin' plugin class HelloPlugin : Plugin<Project> { override fun apply(project: Project) { // Define the 'hello' task val helloTask = project.tasks.register("hello") { doLast { println("Hello, Gradle!") } } } } -
Build and optionally publish your plugin: generate a JAR file containing your plugin code and optionally publish this JAR to a repository (local or remote) to be used in other projects.
// Publish the plugin plugins { `maven-publish` } publishing { publications { create<MavenPublication>("mavenJava") { from(components["java"]) } } repositories { mavenLocal() } } -
Apply your plugin: when you want to use the plugin, include the plugin ID and version in the
plugins{}block of the build file.// Apply the plugin plugins { id("com.example.hello") version "1.0" }
Consult the Plugin development chapter to learn more.
Next Step: Learn about Incremental Builds and Build Caching >>
Gradle Incremental Builds and Build Caching
Gradle uses two main features to reduce build time: incremental builds and build caching.
Incremental builds
An incremental build is a build that avoids running tasks whose inputs have not changed since the previous build. Re-executing such tasks is unnecessary if they would only re-produce the same output.
For incremental builds to work, tasks must define their inputs and outputs. Gradle will determine whether the input or outputs have changed at build time. If they have changed, Gradle will execute the task. Otherwise, it will skip execution.
Incremental builds are always enabled, and the best way to see them in action is to turn on verbose mode. With verbose mode, each task state is labeled during a build:
$ ./gradlew compileJava --console=verbose

> Task :buildSrc:generateExternalPluginSpecBuilders UP-TO-DATE
> Task :buildSrc:extractPrecompiledScriptPluginPlugins UP-TO-DATE
> Task :buildSrc:compilePluginsBlocks UP-TO-DATE
> Task :buildSrc:generatePrecompiledScriptPluginAccessors UP-TO-DATE
> Task :buildSrc:generateScriptPluginAdapters UP-TO-DATE
> Task :buildSrc:compileKotlin UP-TO-DATE
> Task :buildSrc:compileJava NO-SOURCE
> Task :buildSrc:compileGroovy NO-SOURCE
> Task :buildSrc:pluginDescriptors UP-TO-DATE
> Task :buildSrc:processResources UP-TO-DATE
> Task :buildSrc:classes UP-TO-DATE
> Task :buildSrc:jar UP-TO-DATE
> Task :list:compileJava UP-TO-DATE
> Task :utilities:compileJava UP-TO-DATE
> Task :app:compileJava UP-TO-DATE

BUILD SUCCESSFUL in 374ms
12 actionable tasks: 12 up-to-date
When you run a task that has been previously executed and hasn’t changed, then UP-TO-DATE is printed next to the task.
|
Tip
|
To permanently enable verbose mode, add org.gradle.console=verbose to your gradle.properties file.
|
Build caching
Incremental Builds are a great optimization that helps avoid work already done. If a developer continuously changes a single file, there is likely no need to rebuild all the other files in the project.
However, what happens when the same developer switches to a new branch created last week? The files are rebuilt, even though the developer is building something that has been built before.
This is where a build cache is helpful.
The build cache stores previous build results and restores them when needed. It prevents the redundant work and cost of executing time-consuming and expensive processes.
When the build cache has been used to repopulate the local directory, the tasks are marked as FROM-CACHE:
$ ./gradlew compileJava --build-cache

> Task :buildSrc:generateExternalPluginSpecBuilders UP-TO-DATE
> Task :buildSrc:extractPrecompiledScriptPluginPlugins UP-TO-DATE
> Task :buildSrc:compilePluginsBlocks UP-TO-DATE
> Task :buildSrc:generatePrecompiledScriptPluginAccessors UP-TO-DATE
> Task :buildSrc:generateScriptPluginAdapters UP-TO-DATE
> Task :buildSrc:compileKotlin UP-TO-DATE
> Task :buildSrc:compileJava NO-SOURCE
> Task :buildSrc:compileGroovy NO-SOURCE
> Task :buildSrc:pluginDescriptors UP-TO-DATE
> Task :buildSrc:processResources UP-TO-DATE
> Task :buildSrc:classes UP-TO-DATE
> Task :buildSrc:jar UP-TO-DATE
> Task :list:compileJava FROM-CACHE
> Task :utilities:compileJava FROM-CACHE
> Task :app:compileJava FROM-CACHE

BUILD SUCCESSFUL in 364ms
12 actionable tasks: 3 from cache, 9 up-to-date
Once the local directory has been repopulated, the next execution will mark tasks as UP-TO-DATE and not FROM-CACHE.
The build cache allows you to share and reuse unchanged build and test outputs across teams. This speeds up local and CI builds since cycles are not wasted re-building binaries unaffected by new code changes.
Consult the Build cache chapter to learn more.
Next Step: Learn about Build Scans >>
Build Scans
A build scan is a representation of metadata captured as you run your build.
Build Scans
Gradle captures your build metadata and sends it to the Build Scan Service. The service then transforms the metadata into information you can analyze and share with others.
The information that scans collect can be an invaluable resource when troubleshooting, collaborating on, or optimizing the performance of your builds.
For example, with a build scan, it’s no longer necessary to copy and paste error messages or include all the details about your environment each time you want to ask a question on Stack Overflow, Slack, or the Gradle Forum. Instead, copy the link to your latest build scan.
Enable Build Scans
To enable build scans on a gradle command, add --scan to the command line option:
./gradlew build --scanYou may be prompted to agree to the terms to use Build Scans.
Vist the Build Scans page to learn more.
Next Step: Start the Tutorial >>
OTHER TOPICS
Continuous Builds
Continuous Build allows you to automatically re-execute the requested tasks when file inputs change.
You can execute the build in this mode using the -t or --continuous command-line option.
For example, you can continuously run the test task and all dependent tasks by running:
$ gradle test --continuous
Gradle will behave as if you ran gradle test after a change to sources or tests that contribute to the requested tasks.
This means unrelated changes (such as changes to build scripts) will not trigger a rebuild.
To incorporate build logic changes, the continuous build must be restarted manually.
Continuous build uses file system watching to detect changes to the inputs.
If file system watching does not work on your system, then continuous build won’t work either.
In particular, continuous build does not work when using --no-daemon.
When Gradle detects a change to the inputs, it will not trigger the build immediately.
Instead, it will wait until no additional changes are detected for a certain period of time - the quiet period.
You can configure the quiet period in milliseconds by the Gradle property org.gradle.continuous.quietperiod.
Terminating Continuous Build
If Gradle is attached to an interactive input source, such as a terminal, the continuous build can be exited by pressing CTRL-D (On Microsoft Windows, it is required to also press ENTER or RETURN after CTRL-D).
If Gradle is not attached to an interactive input source (e.g. is running as part of a script), the build process must be terminated (e.g. using the kill command or similar).
If the build is being executed via the Tooling API, the build can be cancelled using the Tooling API’s cancellation mechanism.
Limitations
Under some circumstances, continuous build may not detect changes to inputs.
Creating input directories
Sometimes, creating an input directory that was previously missing does not trigger a build, due to the way file system watching works.
For example, creating the src/main/java directory may not trigger a build.
Similarly, if the input is a filtered file tree and no files are matching the filter, the creation of matching files may not trigger a build.
Inputs of untracked tasks
Changes to the inputs of untracked tasks or tasks that have no outputs may not trigger a build.
Changes to files outside of project directories
Gradle only watches for changes to files inside the project directory. Changes to files outside the project directory will go undetected and not trigger a build.
Build cycles
Gradle starts watching for changes just before a task executes. If a task modifies its own inputs while executing, Gradle will detect the change and trigger a new build. If every time the task executes, the inputs are modified again, the build will be triggered again. This isn’t unique to continuous build. A task that modifies its own inputs will never be considered up-to-date when run "normally" without continuous build.
If your build enters a build cycle like this, you can track down the task by looking at the list of files reported changed by Gradle.
After identifying the file(s) that are changed during each build, you should look for a task that has that file as an input.
In some cases, it may be obvious (e.g., a Java file is compiled with compileJava).
In other cases, you can use --info logging to find the task that is out-of-date due to the identified files.
THE BASICS
Gradle Directories
Gradle uses two main directories to perform and manage its work: the Gradle User Home directory and the Project Root directory.
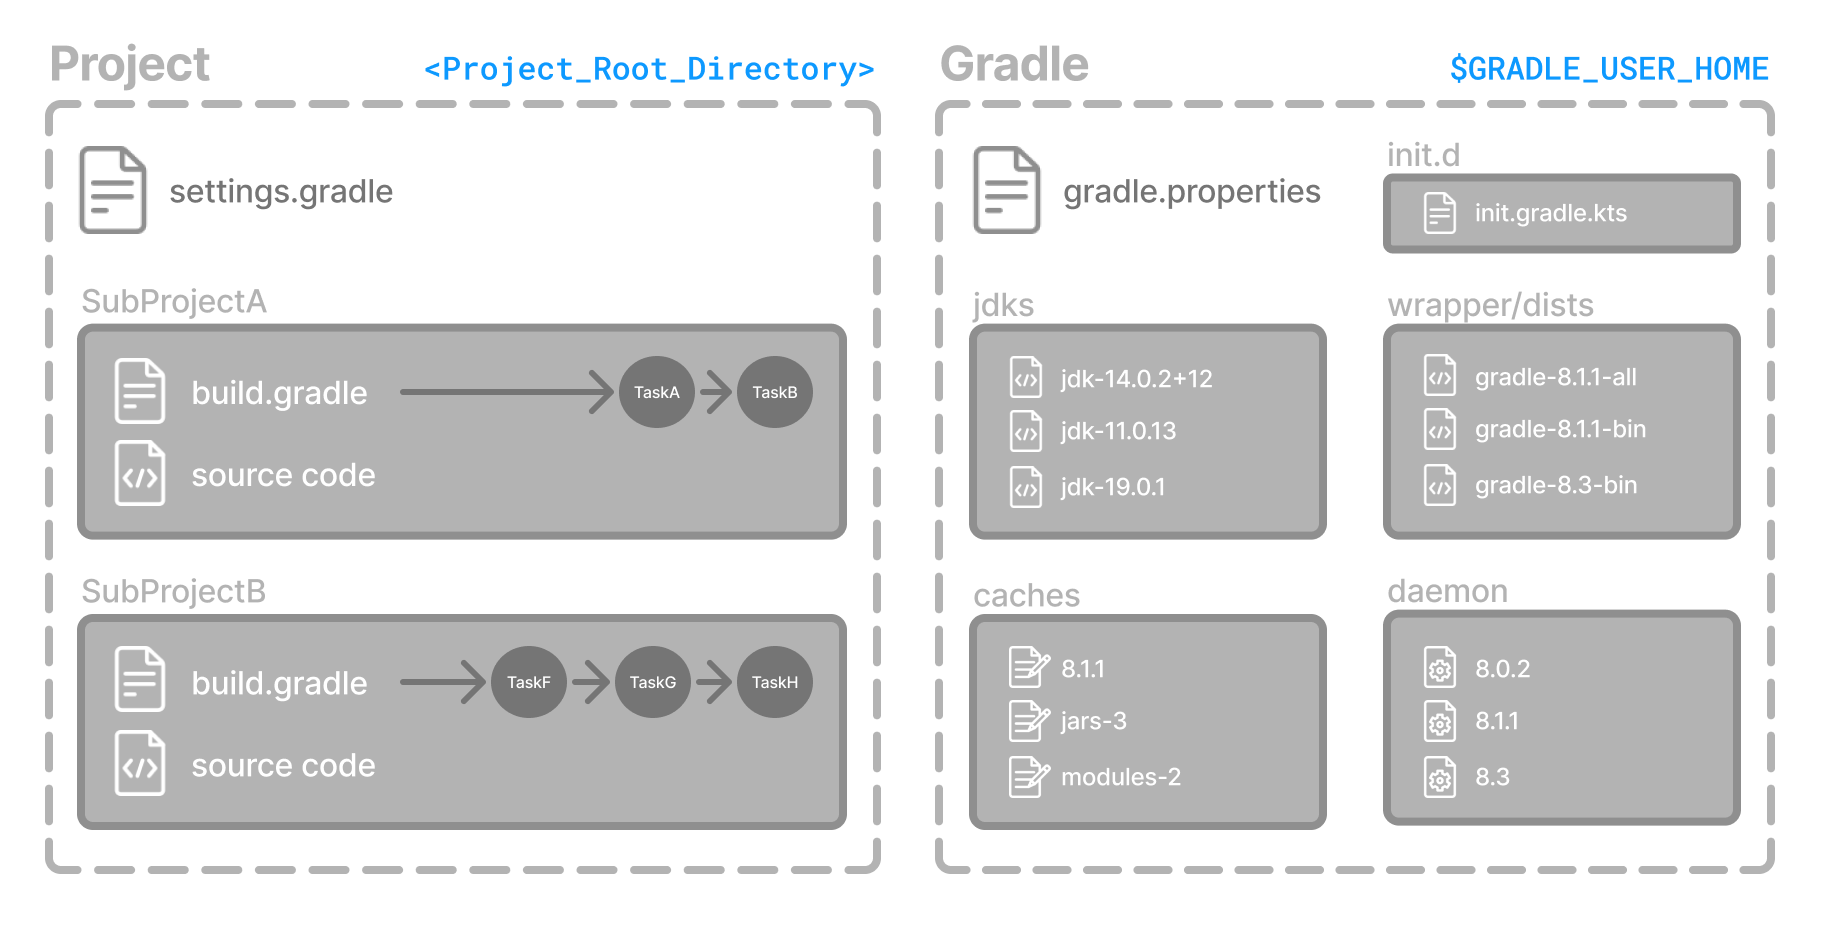
Gradle User Home directory
By default, the Gradle User Home (~/.gradle or C:\Users\<USERNAME>\.gradle) stores global configuration properties, initialization scripts, caches, and log files.
It can be set with the environment variable GRADLE_USER_HOME.
|
Tip
|
Not to be confused with the GRADLE_HOME, the optional installation directory for Gradle.
|
It is roughly structured as follows:
├── caches                  // (1)
│   ├── 4.8                     // (2)
│   ├── 4.9                     // (2)
│   ├── ⋮
│   ├── jars-3                  // (3)
│   └── modules-2               // (3)
├── daemon // (4)
│   ├── ⋮
│   ├── 4.8
│   └── 4.9
├── init.d                  // (5)
│   └── my-setup.gradle
├── jdks                    // (6)
│   ├── ⋮
│   └── jdk-14.0.2+12
├── wrapper
│   └── dists                   // (7)
│       ├── ⋮
│       ├── gradle-4.8-bin
│       ├── gradle-4.9-all
│       └── gradle-4.9-bin
└── gradle.properties       // (8)
-
Global cache directory (for everything that is not project-specific).
-
Version-specific caches (e.g., to support incremental builds).
-
Shared caches (e.g., for artifacts of dependencies).
-
Registry and logs of the Gradle Daemon.
-
Global initialization scripts.
-
JDKs downloaded by the toolchain support.
-
Distributions downloaded by the Gradle Wrapper.
-
Global Gradle configuration properties.
Consult the Gradle Directories reference to learn more.
Project Root directory
The project root directory contains all source files from your project.
It also contains files and directories Gradle generates, such as .gradle and build.
While .gradle is usually checked into source control, the build directory contains the output of your builds as well as transient files Gradle uses to support features like incremental builds.
The anatomy of a typical project root directory looks as follows:
├── .gradle                 // (1)
│   ├── 4.8                     // (2)
│   ├── 4.9                     // (2)
│   └── ⋮
├── build                   // (3)
├── gradle
│   └── wrapper                 // (4)
├── gradle.properties       // (5)
├── gradlew                 // (6)
├── gradlew.bat             // (6)
├── settings.gradle.kts     // (7)
├── subproject-one          // (8)
|   └── build.gradle.kts        // (9)
├── subproject-two          // (8)
|   └── build.gradle.kts        // (9)
└── ⋮
-
Project-specific cache directory generated by Gradle.
-
Version-specific caches (e.g., to support incremental builds).
-
The build directory of this project into which Gradle generates all build artifacts.
-
Contains the JAR file and configuration of the Gradle Wrapper.
-
Project-specific Gradle configuration properties.
-
Scripts for executing builds using the Gradle Wrapper.
-
The project’s settings file where the list of subprojects is defined.
-
Usually, a project is organized into one or multiple subprojects.
-
Each subproject has its own Gradle build script.
Consult the Gradle Directories reference to learn more.
Next Step: Learn how to structure Multi-Project Builds >>
Multi-Project Build Basics
Gradle supports multi-project builds.
While some small projects and monolithic applications may contain a single build file and source tree, it is often more common for a project to have been split into smaller, interdependent modules. The word "interdependent" is vital, as you typically want to link the many modules together through a single build.
Gradle supports this scenario through multi-project builds. This is sometimes referred to as a multi-module project. Gradle refers to modules as subprojects.
A multi-project build consists of one root project and one or more subprojects.
Multi-Project structure
The following represents the structure of a multi-project build that contains two subprojects:
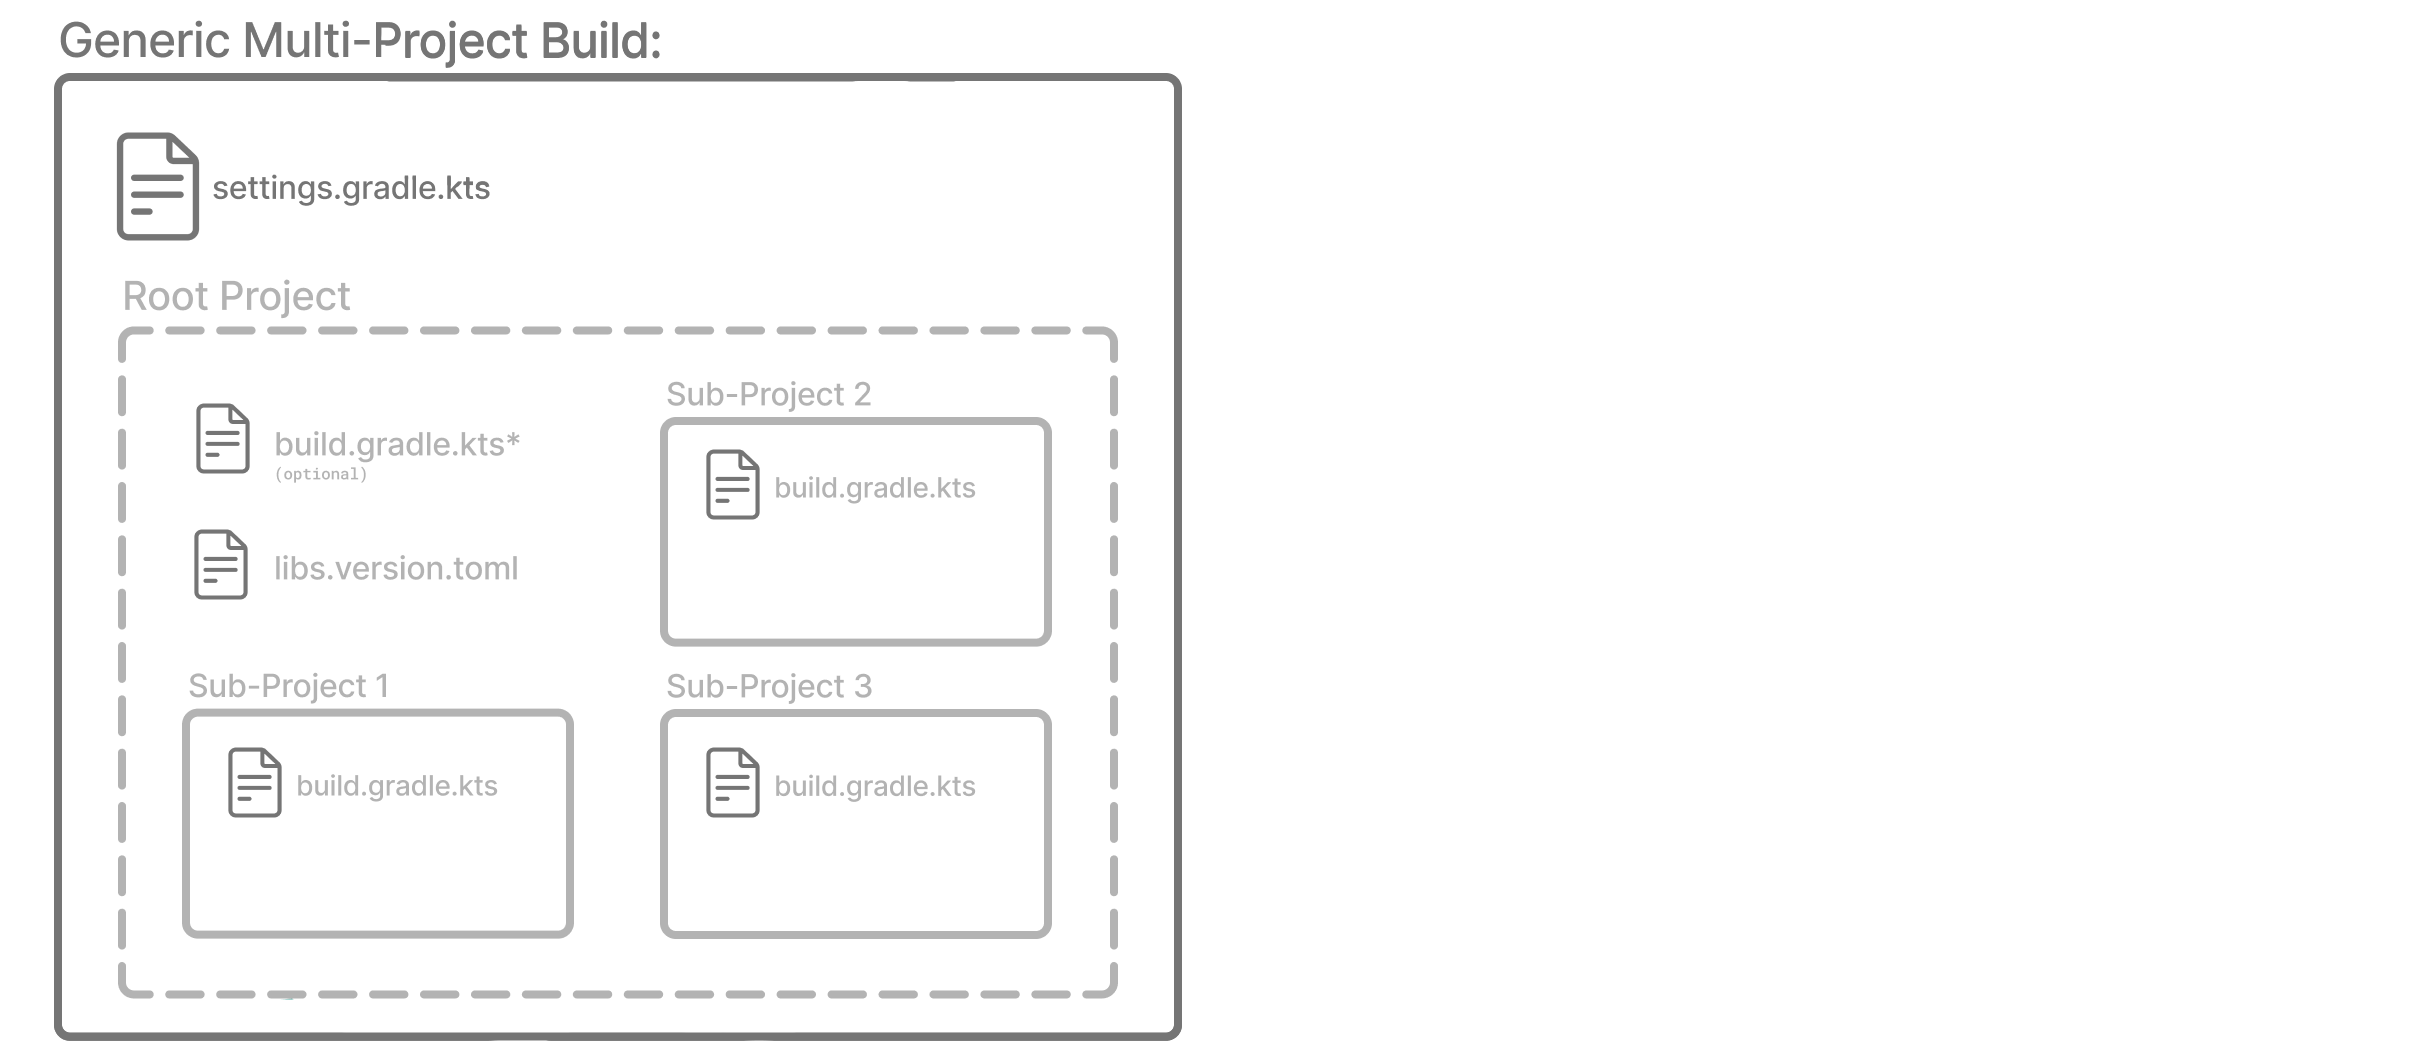
The directory structure should look as follows:
├── .gradle
│   └── ⋮
├── gradle
│   ├── libs.version.toml
│   └── wrapper
├── gradlew
├── gradlew.bat
├── settings.gradle.kts  // (1)
├── sub-project-1
│   └── build.gradle.kts // (2)
├── sub-project-2
│   └── build.gradle.kts // (2)
└── sub-project-3
    └── build.gradle.kts // (2)
-
The
settings.gradle.ktsfile should include all subprojects. -
Each subproject should have its own
build.gradle.ktsfile.
Multi-Project standards
The Gradle community has two standards for multi-project build structures:
-
Multi-Project Builds using buildSrc - where
buildSrcis a subproject-like directory at the Gradle project root containing all the build logic. -
Composite Builds - a build that includes other builds where
build-logicis a build directory at the Gradle project root containing reusable build logic.
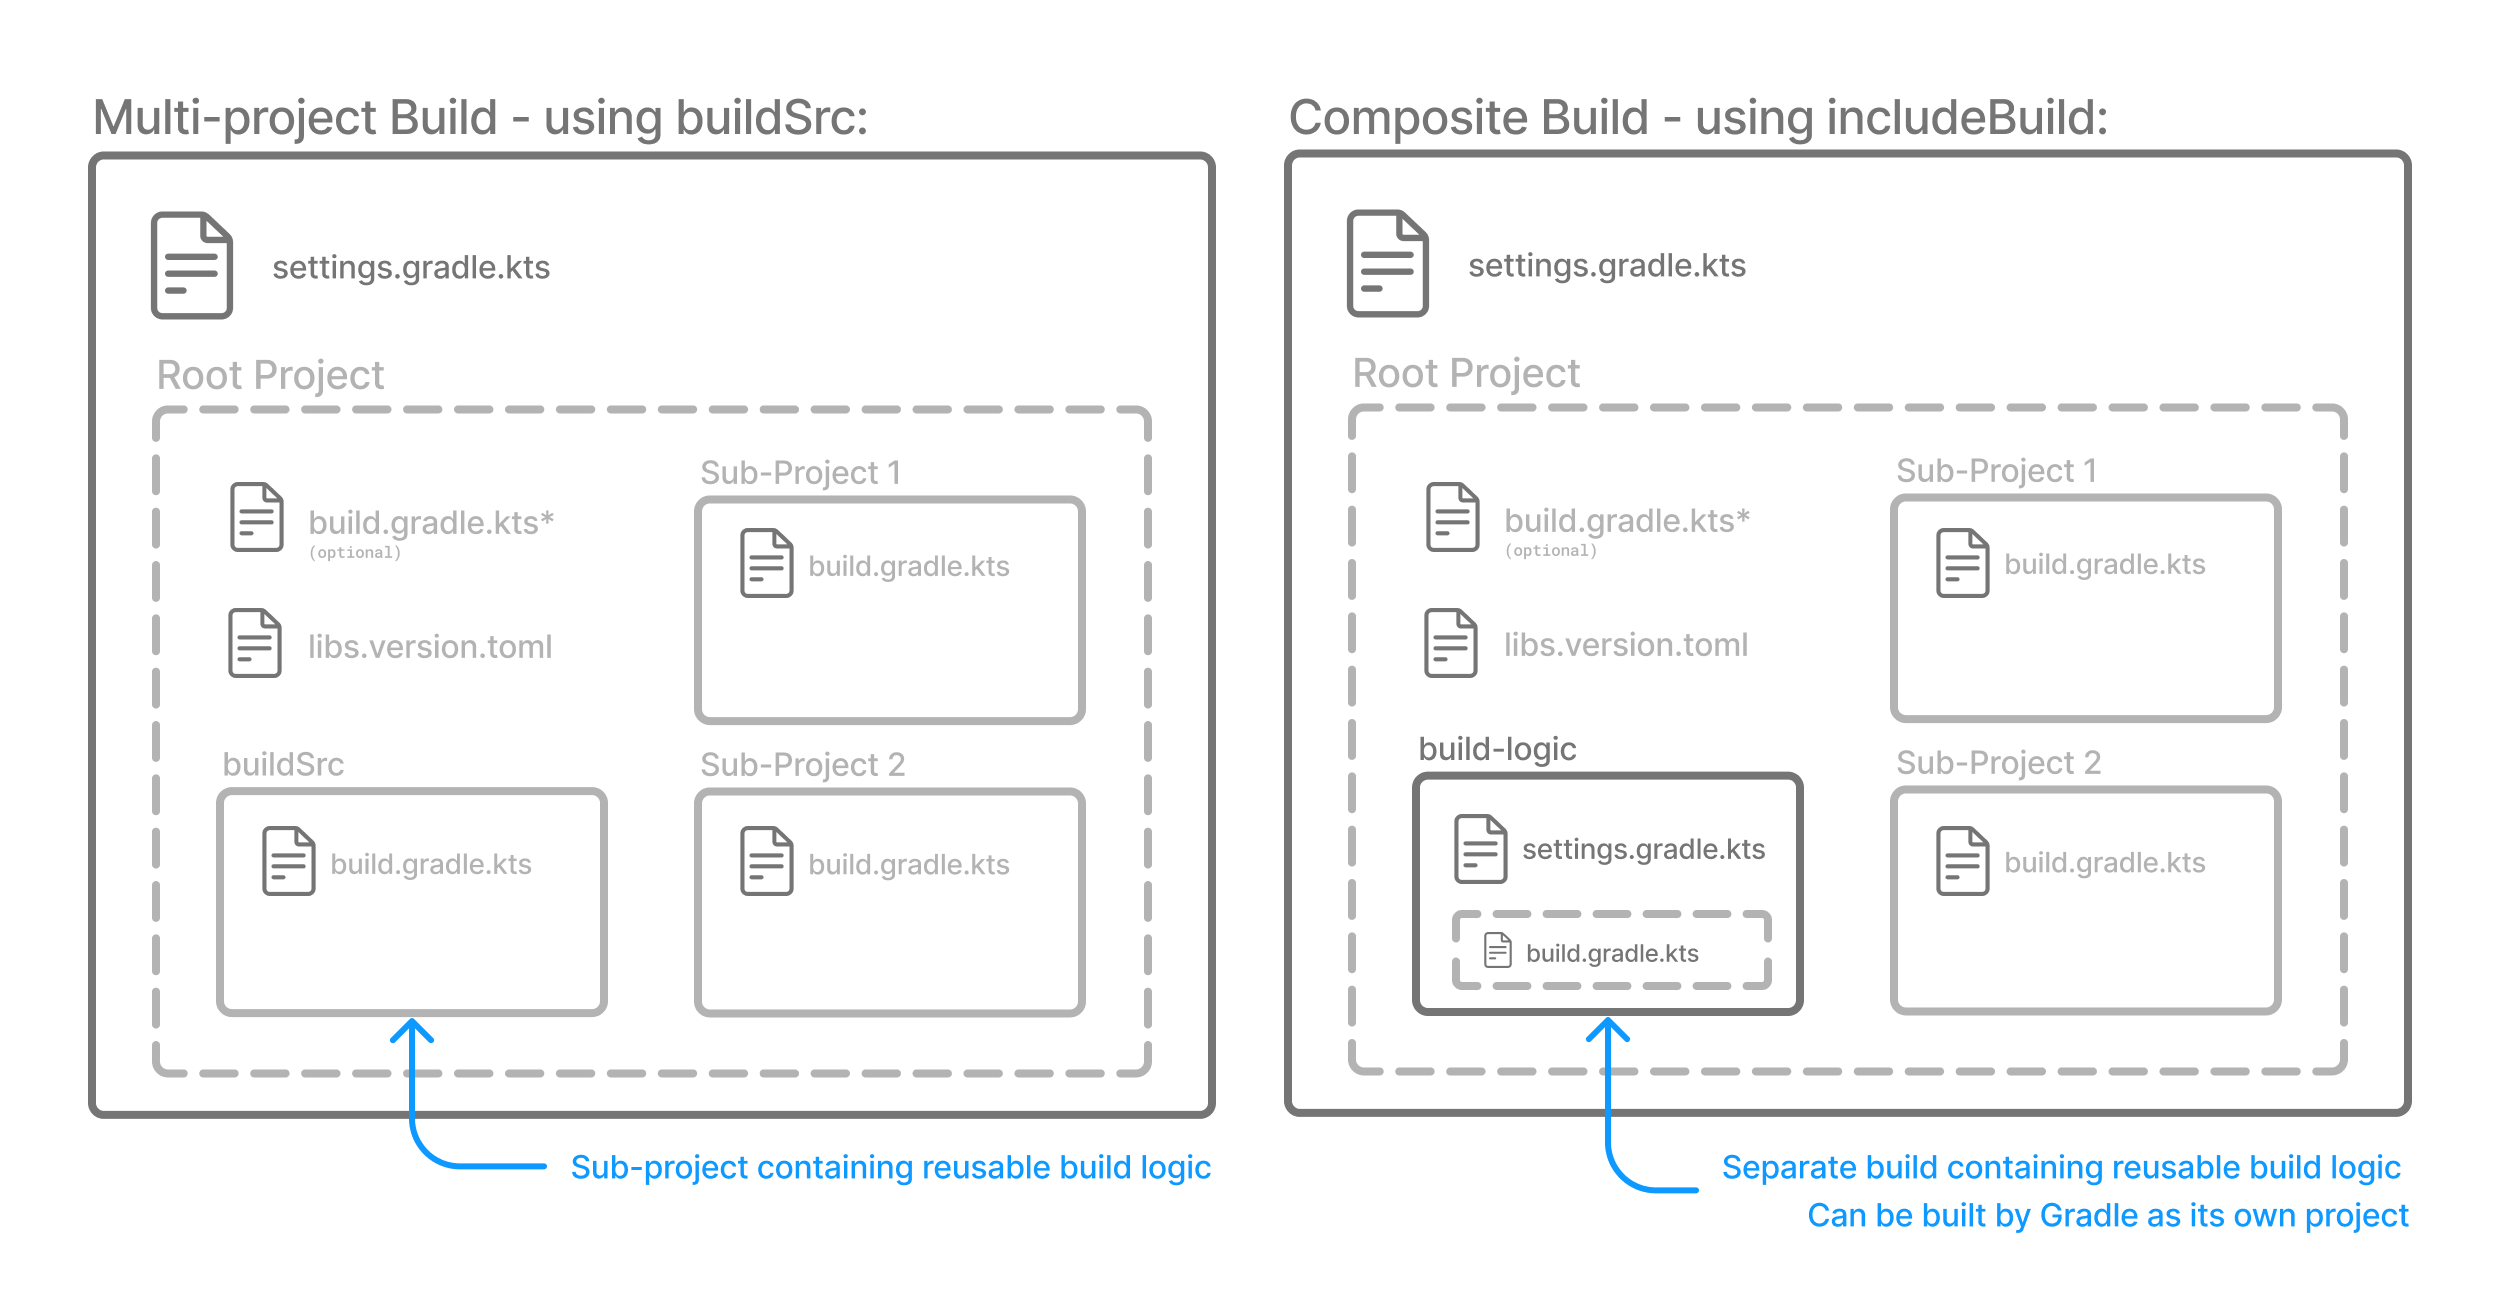
1. Multi-Project Builds using buildSrc
Multi-project builds allow you to organize projects with many modules, wire dependencies between those modules, and easily share common build logic amongst them.
For example, a build that has many modules called mobile-app, web-app, api, lib, and documentation could be structured as follows:
.
├── gradle
├── gradlew
├── settings.gradle.kts
├── buildSrc
│   ├── build.gradle.kts
│   └── src/main/kotlin/shared-build-conventions.gradle.kts
├── mobile-app
│   └── build.gradle.kts
├── web-app
│   └── build.gradle.kts
├── api
│   └── build.gradle.kts
├── lib
│   └── build.gradle.kts
└── documentation
    └── build.gradle.kts
The modules will have dependencies between them such as web-app and mobile-app depending on lib.
This means that in order for Gradle to build web-app or mobile-app, it must build lib first.
In this example, the root settings file will look as follows:
include("mobile-app", "web-app", "api", "lib", "documentation")|
Note
|
The order in which the subprojects (modules) are included does not matter. |
The buildSrc directory is automatically recognized by Gradle.
It is a good place to define and maintain shared configuration or imperative build logic, such as custom tasks or plugins.
buildSrc is automatically included in your build as a special subproject if a build.gradle(.kts) file is found under buildSrc.
If the java plugin is applied to the buildSrc project, the compiled code from buildSrc/src/main/java is put in the classpath of the root build script, making it available to any subproject (web-app, mobile-app, lib, etc…) in the build.
Consult how to declare dependencies between subprojects to learn more.
2. Composite Builds
Composite Builds, also referred to as included builds, are best for sharing logic between builds (not subprojects) or isolating access to shared build logic (i.e., convention plugins).
Let’s take the previous example.
The logic in buildSrc has been turned into a project that contains plugins and can be published and worked on independently of the root project build.
The plugin is moved to its own build called build-logic with a build script and settings file:
.
├── gradle
├── gradlew
├── settings.gradle.kts
├── build-logic
│   ├── settings.gradle.kts
│   └── conventions
│       ├── build.gradle.kts
│       └── src/main/kotlin/shared-build-conventions.gradle.kts
├── mobile-app
│   └── build.gradle.kts
├── web-app
│   └── build.gradle.kts
├── api
│   └── build.gradle.kts
├── lib
│   └── build.gradle.kts
└── documentation
└── build.gradle.kts|
Note
|
The fact that build-logic is located in a subdirectory of the root project is irrelevant. The folder could be located outside the root project if desired.
|
The root settings file includes the entire build-logic build:
pluginManagement {
    includeBuild("build-logic")
}
include("mobile-app", "web-app", "api", "lib", "documentation")
Consult how to create composite builds with includeBuild to learn more.
Multi-Project path
A project path has the following pattern: it starts with an optional colon, which denotes the root project.
The root project, :, is the only project in a path not specified by its name.
The rest of a project path is a colon-separated sequence of project names, where the next project is a subproject of the previous project:
:sub-project-1You can see the project paths when running gradle projects:
------------------------------------------------------------
Root project 'project'
------------------------------------------------------------

Root project 'project'
+--- Project ':sub-project-1'
\--- Project ':sub-project-2'
Project paths usually reflect the filesystem layout, but there are exceptions. Most notably for composite builds.
Identifying project structure
You can use the gradle projects command to identify the project structure.
As an example, let’s use a multi-project build with the following structure:
> gradle -q projects
------------------------------------------------------------
Root project 'multiproject'
------------------------------------------------------------

Root project 'multiproject'
+--- Project ':api'
+--- Project ':services'
|    +--- Project ':services:shared'
|    \--- Project ':services:webservice'
\--- Project ':shared'

To see a list of the tasks of a project, run gradle <project-path>:tasks
For example, try running gradle :api:tasks
Multi-project builds are collections of tasks you can run. The difference is that you may want to control which project’s tasks get executed.
The following sections will cover your two options for executing tasks in a multi-project build.
Executing tasks by name
The command gradle test will execute the test task in any subprojects relative to the current working directory that has that task.
If you run the command from the root project directory, you will run test in api, shared, services:shared and services:webservice.
If you run the command from the services project directory, you will only execute the task in services:shared and services:webservice.
The basic rule behind Gradle’s behavior is to execute all tasks down the hierarchy with this name. And complain if there is no such task found in any of the subprojects traversed.
|
Note
|
Some task selectors, like help or dependencies, will only run the task on the project they are invoked on and not on all the subprojects to reduce the amount of information printed on the screen.
|
Executing tasks by fully qualified name
You can use a task’s fully qualified name to execute a specific task in a particular subproject.
For example: gradle :services:webservice:build will run the build task of the webservice subproject.
The fully qualified name of a task is its project path plus the task name.
This approach works for any task, so if you want to know what tasks are in a particular subproject, use the tasks task, e.g. gradle :services:webservice:tasks.
Multi-Project building and testing
The build task is typically used to compile, test, and check a single project.
In multi-project builds, you may often want to do all of these tasks across various projects.
The buildNeeded and buildDependents tasks can help with this.
In this example, the :services:person-service project depends on both the :api and :shared projects.
The :api project also depends on the :shared project.
Assuming you are working on a single project, the :api project, you have been making changes but have not built the entire project since performing a clean.
You want to build any necessary supporting JARs but only perform code quality and unit tests on the parts of the project you have changed.
The build task does this:
$ gradle :api:build

> Task :shared:compileJava
> Task :shared:processResources
> Task :shared:classes
> Task :shared:jar
> Task :api:compileJava
> Task :api:processResources
> Task :api:classes
> Task :api:jar
> Task :api:assemble
> Task :api:compileTestJava
> Task :api:processTestResources
> Task :api:testClasses
> Task :api:test
> Task :api:check
> Task :api:build

BUILD SUCCESSFUL in 0s
If you have just gotten the latest version of the source from your version control system, which included changes in other projects that :api depends on, you might want to build all the projects you depend on AND test them too.
The buildNeeded task builds AND tests all the projects from the project dependencies of the testRuntime configuration:
$ gradle :api:buildNeeded

> Task :shared:compileJava
> Task :shared:processResources
> Task :shared:classes
> Task :shared:jar
> Task :api:compileJava
> Task :api:processResources
> Task :api:classes
> Task :api:jar
> Task :api:assemble
> Task :api:compileTestJava
> Task :api:processTestResources
> Task :api:testClasses
> Task :api:test
> Task :api:check
> Task :api:build
> Task :shared:assemble
> Task :shared:compileTestJava
> Task :shared:processTestResources
> Task :shared:testClasses
> Task :shared:test
> Task :shared:check
> Task :shared:build
> Task :shared:buildNeeded
> Task :api:buildNeeded

BUILD SUCCESSFUL in 0s
You may want to refactor some part of the :api project used in other projects.
If you make these changes, testing only the :api project is insufficient.
You must test all projects that depend on the :api project.
The buildDependents task tests ALL the projects that have a project dependency (in the testRuntime configuration) on the specified project:
$ gradle :api:buildDependents

> Task :shared:compileJava
> Task :shared:processResources
> Task :shared:classes
> Task :shared:jar
> Task :api:compileJava
> Task :api:processResources
> Task :api:classes
> Task :api:jar
> Task :api:assemble
> Task :api:compileTestJava
> Task :api:processTestResources
> Task :api:testClasses
> Task :api:test
> Task :api:check
> Task :api:build
> Task :services:person-service:compileJava
> Task :services:person-service:processResources
> Task :services:person-service:classes
> Task :services:person-service:jar
> Task :services:person-service:assemble
> Task :services:person-service:compileTestJava
> Task :services:person-service:processTestResources
> Task :services:person-service:testClasses
> Task :services:person-service:test
> Task :services:person-service:check
> Task :services:person-service:build
> Task :services:person-service:buildDependents
> Task :api:buildDependents

BUILD SUCCESSFUL in 0s
Finally, you can build and test everything in all projects. Any task you run in the root project folder will cause that same-named task to be run on all the children.
You can run gradle build to build and test ALL projects.
Consult the Structuring Builds chapter to learn more.
Next Step: Learn about the Gradle Build Lifecycle >>
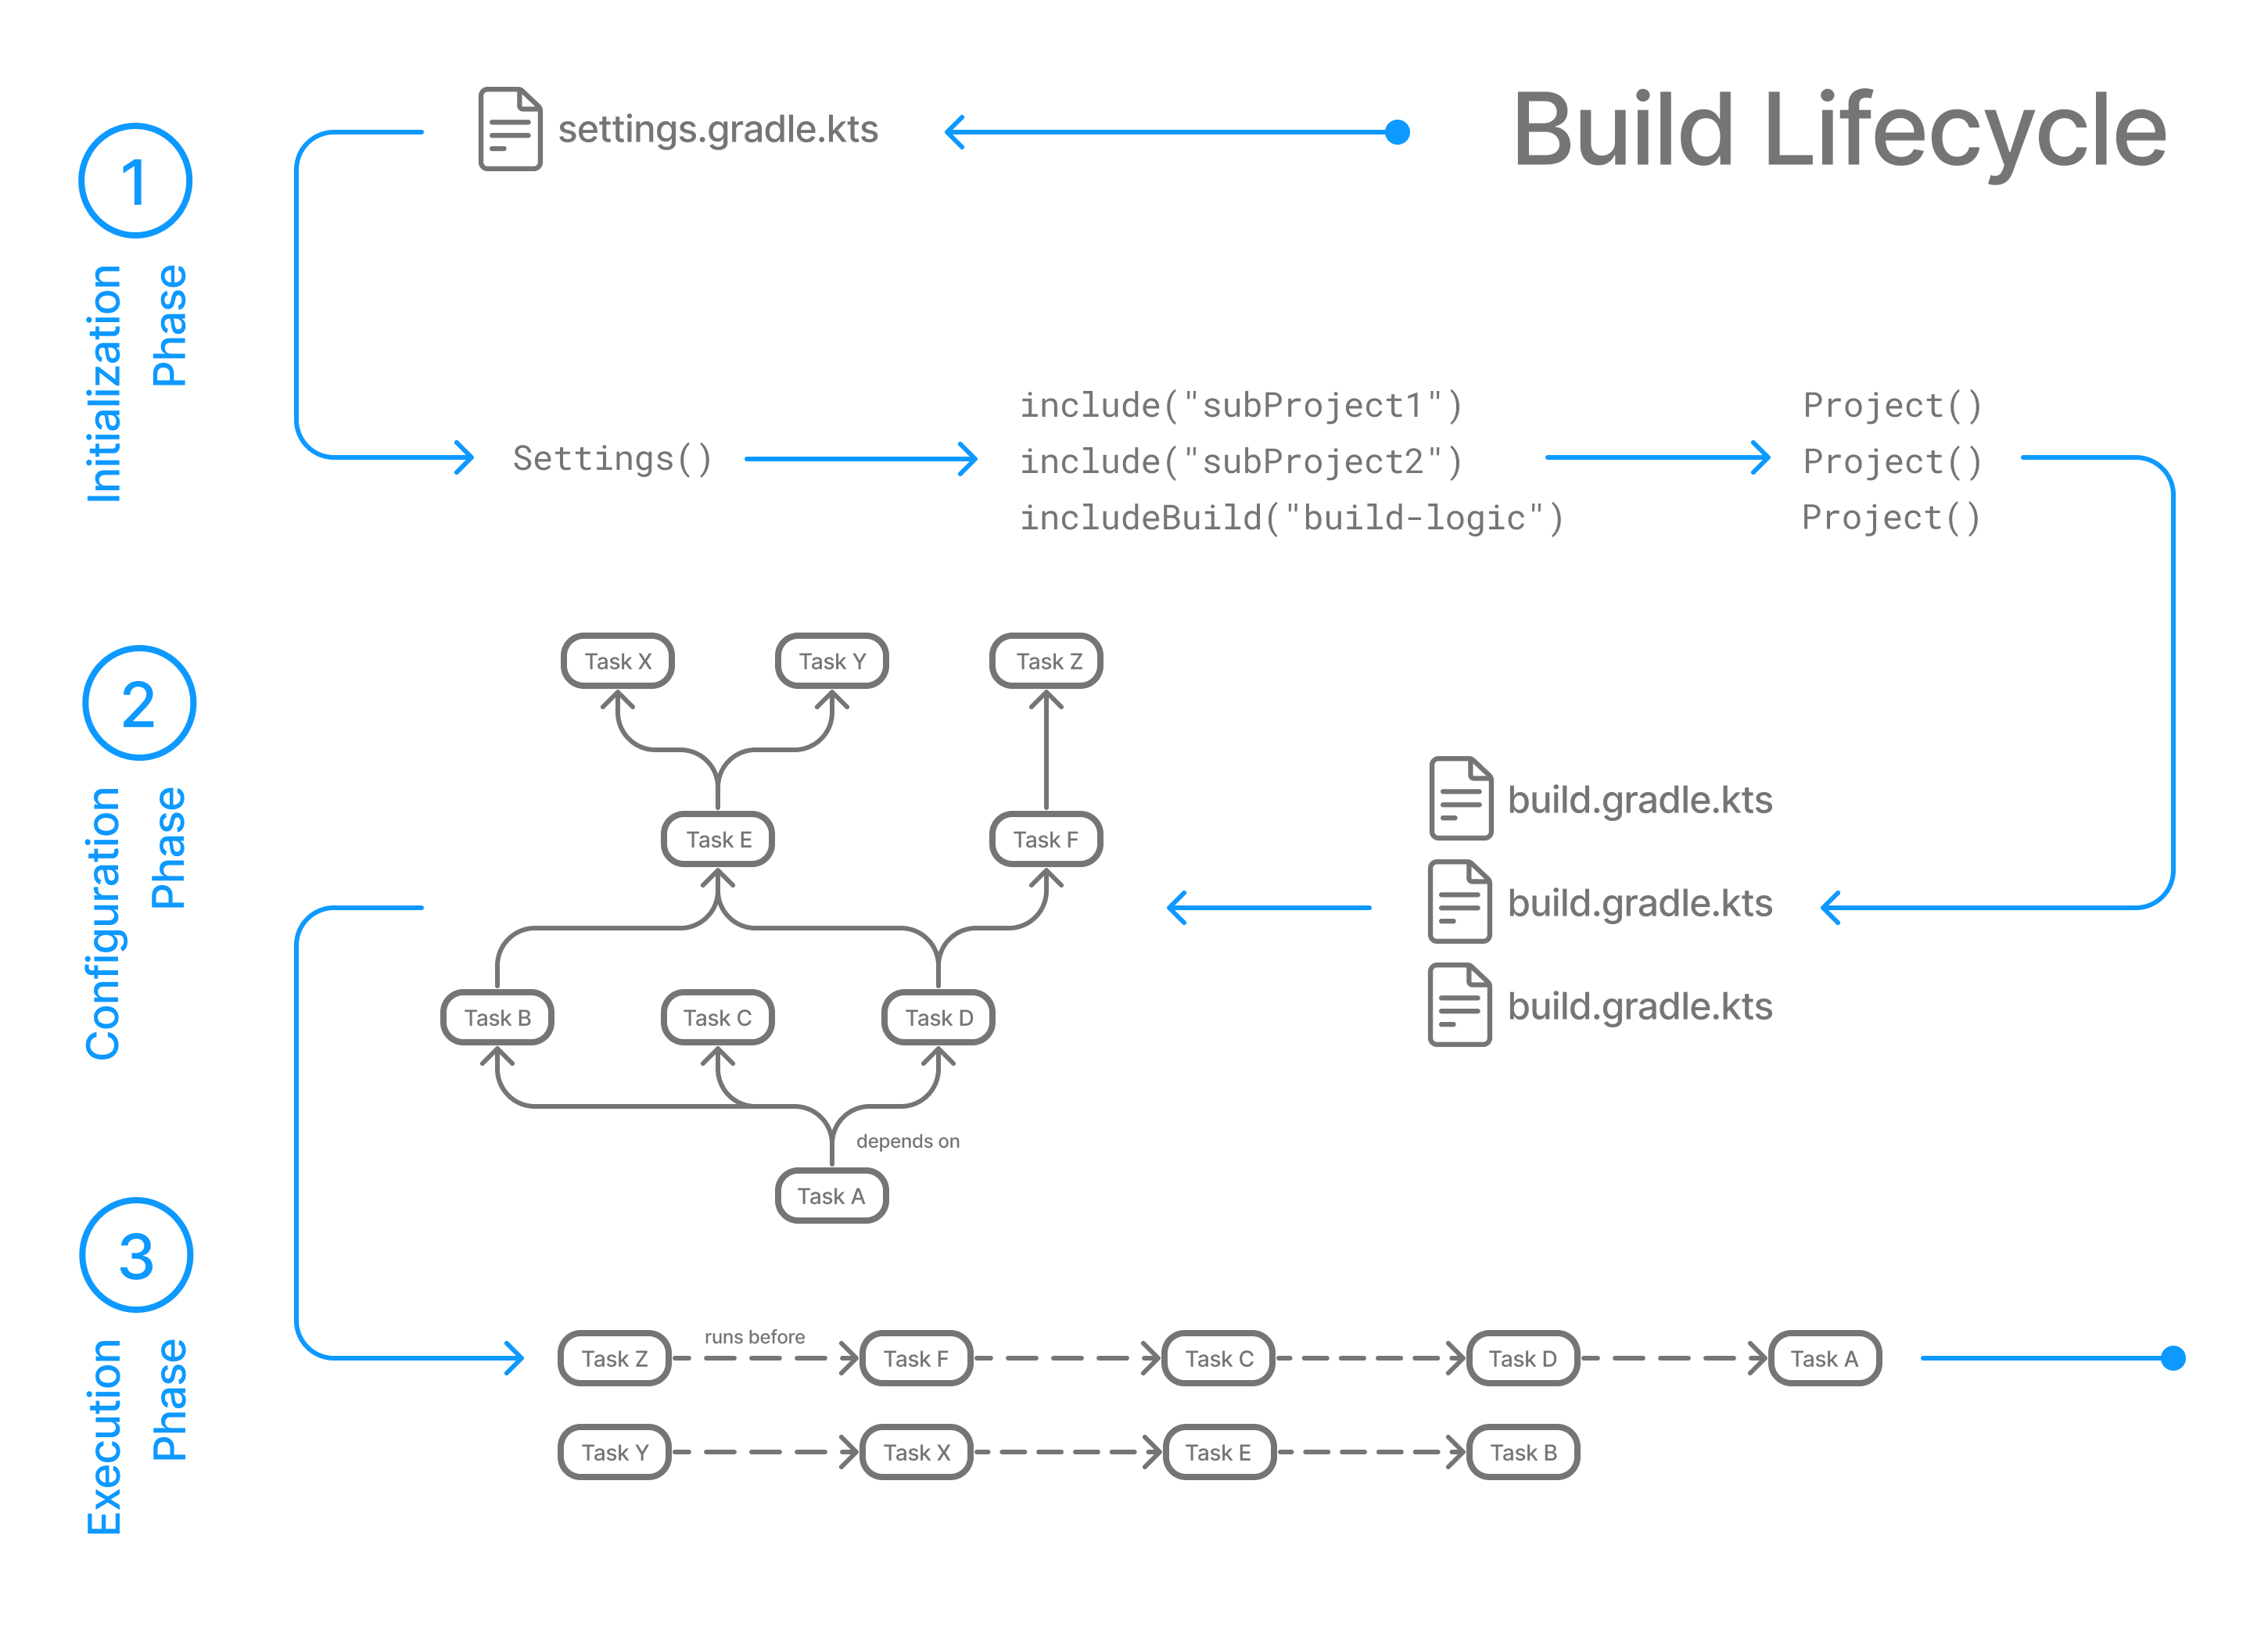
Build Lifecycle
As a build author, you define tasks and dependencies between tasks. Gradle guarantees that these tasks will execute in order of their dependencies.
Your build scripts and plugins configure this dependency graph.
For example, if your project tasks include build, assemble, createDocs, your build script(s) can ensure that they are executed in the order build → assemble → createDoc.
Task Graphs
Gradle builds the task graph before executing any task.
Across all projects in the build, tasks form a Directed Acyclic Graph (DAG).
This diagram shows two example task graphs, one abstract and the other concrete, with dependencies between tasks represented as arrows:
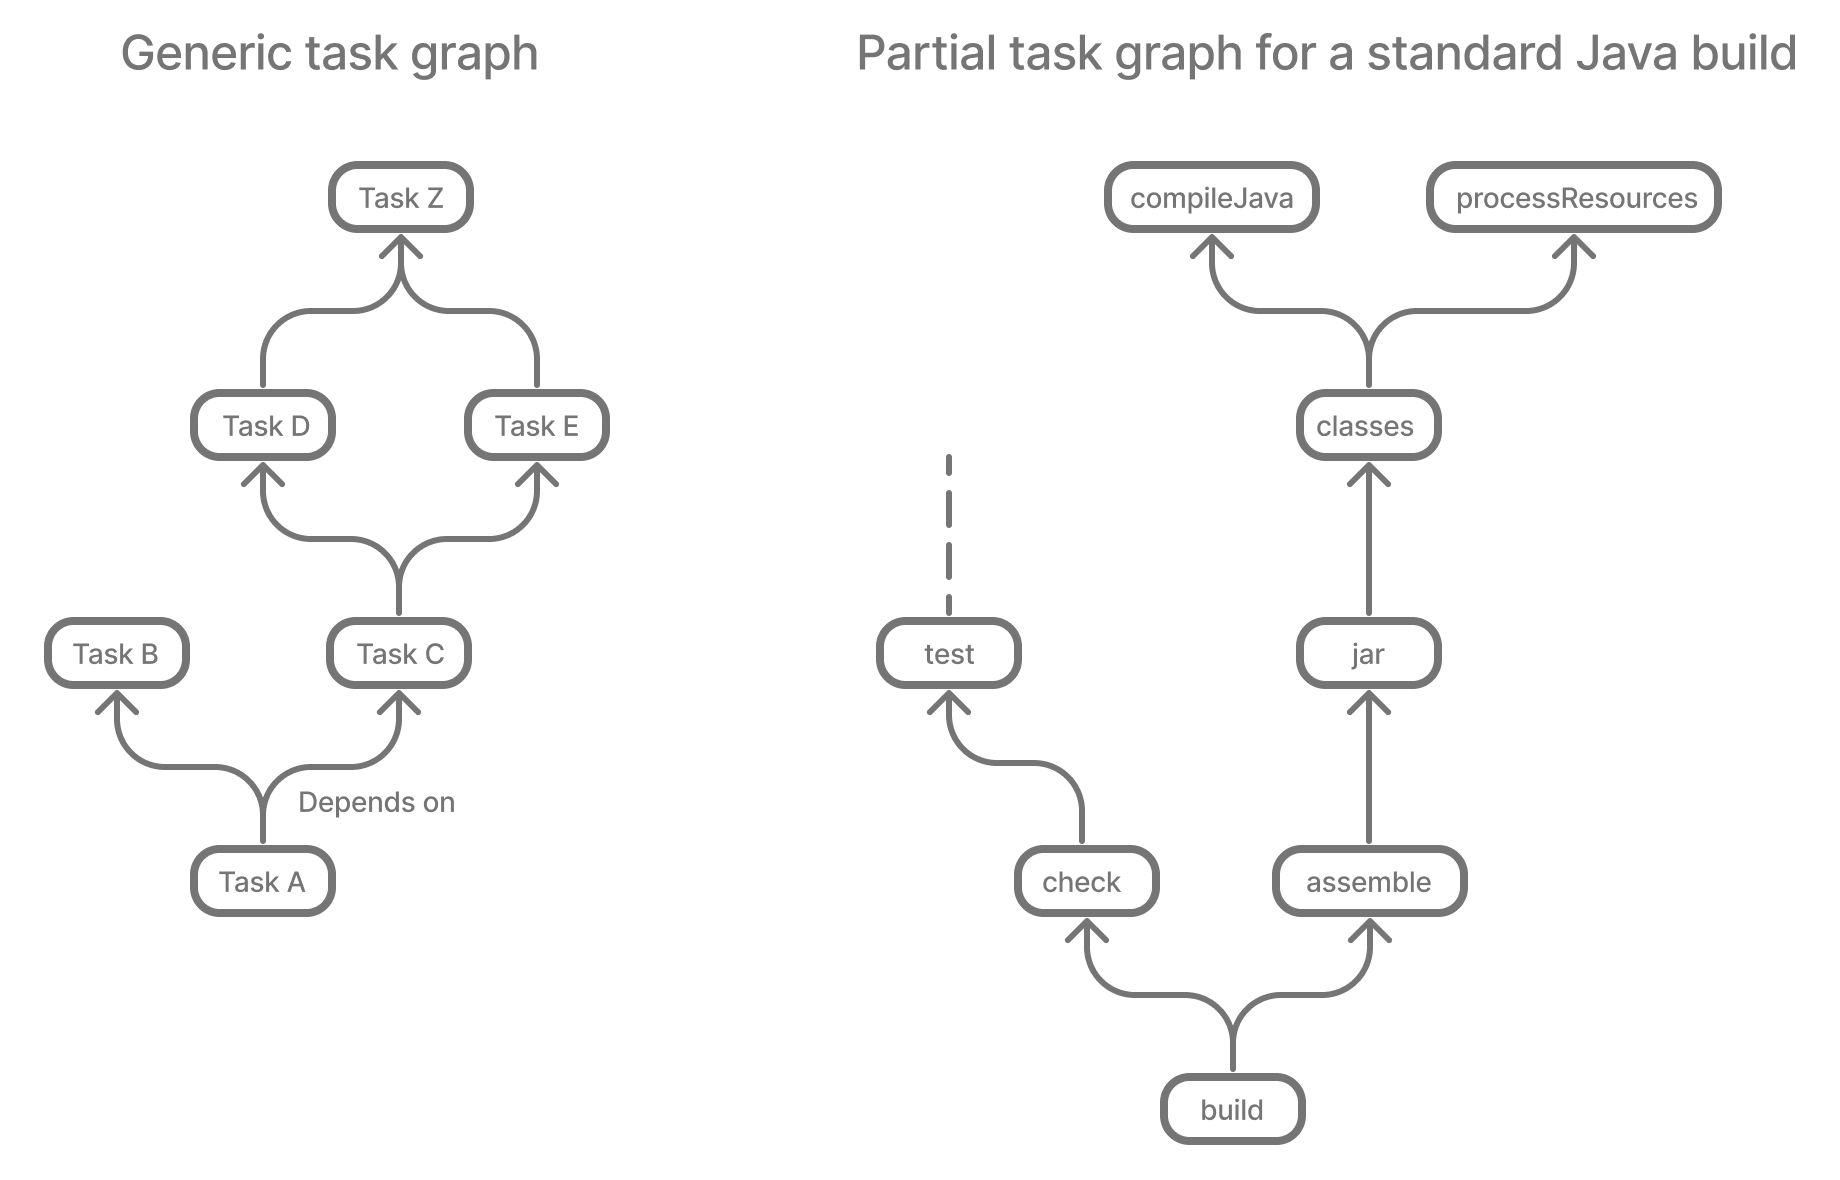
Both plugins and build scripts contribute to the task graph via the task dependency mechanism and annotated inputs/outputs.
Build Phases
A Gradle build has three distinct phases.

Gradle runs these phases in order:
- Phase 1. Initialization
- Phase 2. Configuration
-
-
Evaluates the build scripts,
build.gradle(.kts), of every project participating in the build. -
Creates a task graph for requested tasks.
-
- Phase 3. Execution
-
-
Schedules and executes the selected tasks.
-
Dependencies between tasks determine execution order.
-
Execution of tasks can occur in parallel.
-
Example
The following example shows which parts of settings and build files correspond to various build phases:
rootProject.name = "basic"
println("This is executed during the initialization phase.")println("This is executed during the configuration phase.")
tasks.register("configured") {
println("This is also executed during the configuration phase, because :configured is used in the build.")
}
tasks.register("test") {
doLast {
println("This is executed during the execution phase.")
}
}
tasks.register("testBoth") {
doFirst {
println("This is executed first during the execution phase.")
}
doLast {
println("This is executed last during the execution phase.")
}
println("This is executed during the configuration phase as well, because :testBoth is used in the build.")
}rootProject.name = 'basic'
println 'This is executed during the initialization phase.'println 'This is executed during the configuration phase.'
tasks.register('configured') {
println 'This is also executed during the configuration phase, because :configured is used in the build.'
}
tasks.register('test') {
doLast {
println 'This is executed during the execution phase.'
}
}
tasks.register('testBoth') {
doFirst {
println 'This is executed first during the execution phase.'
}
doLast {
println 'This is executed last during the execution phase.'
}
println 'This is executed during the configuration phase as well, because :testBoth is used in the build.'
}The following command executes the test and testBoth tasks specified above.
Because Gradle only configures requested tasks and their dependencies, the configured task never configures:
> gradle test testBoth
This is executed during the initialization phase.

> Configure project :
This is executed during the configuration phase.
This is executed during the configuration phase as well, because :testBoth is used in the build.

> Task :test
This is executed during the execution phase.

> Task :testBoth
This is executed first during the execution phase.
This is executed last during the execution phase.

BUILD SUCCESSFUL in 0s
2 actionable tasks: 2 executed
> gradle test testBoth
This is executed during the initialization phase.
> Configure project :
This is executed during the configuration phase.
This is executed during the configuration phase as well, because :testBoth is used in the build.
> Task :test
This is executed during the execution phase.
> Task :testBoth
This is executed first during the execution phase.
This is executed last during the execution phase.
BUILD SUCCESSFUL in 0s
2 actionable tasks: 2 executedPhase 1. Initialization
In the initialization phase, Gradle detects the set of projects (root and subprojects) and included builds participating in the build.
Gradle first evaluates the settings file, settings.gradle(.kts), and instantiates a Settings object.
Then, Gradle instantiates Project instances for each project.
Phase 2. Configuration
In the configuration phase, Gradle adds tasks and other properties to the projects found by the initialization phase.
Phase 3. Execution
In the execution phase, Gradle runs tasks.
Gradle uses the task execution graphs generated by the configuration phase to determine which tasks to execute.
Next Step: Learn how to write Settings files >>
Writing Settings Files
The settings file is the entry point of every Gradle build.
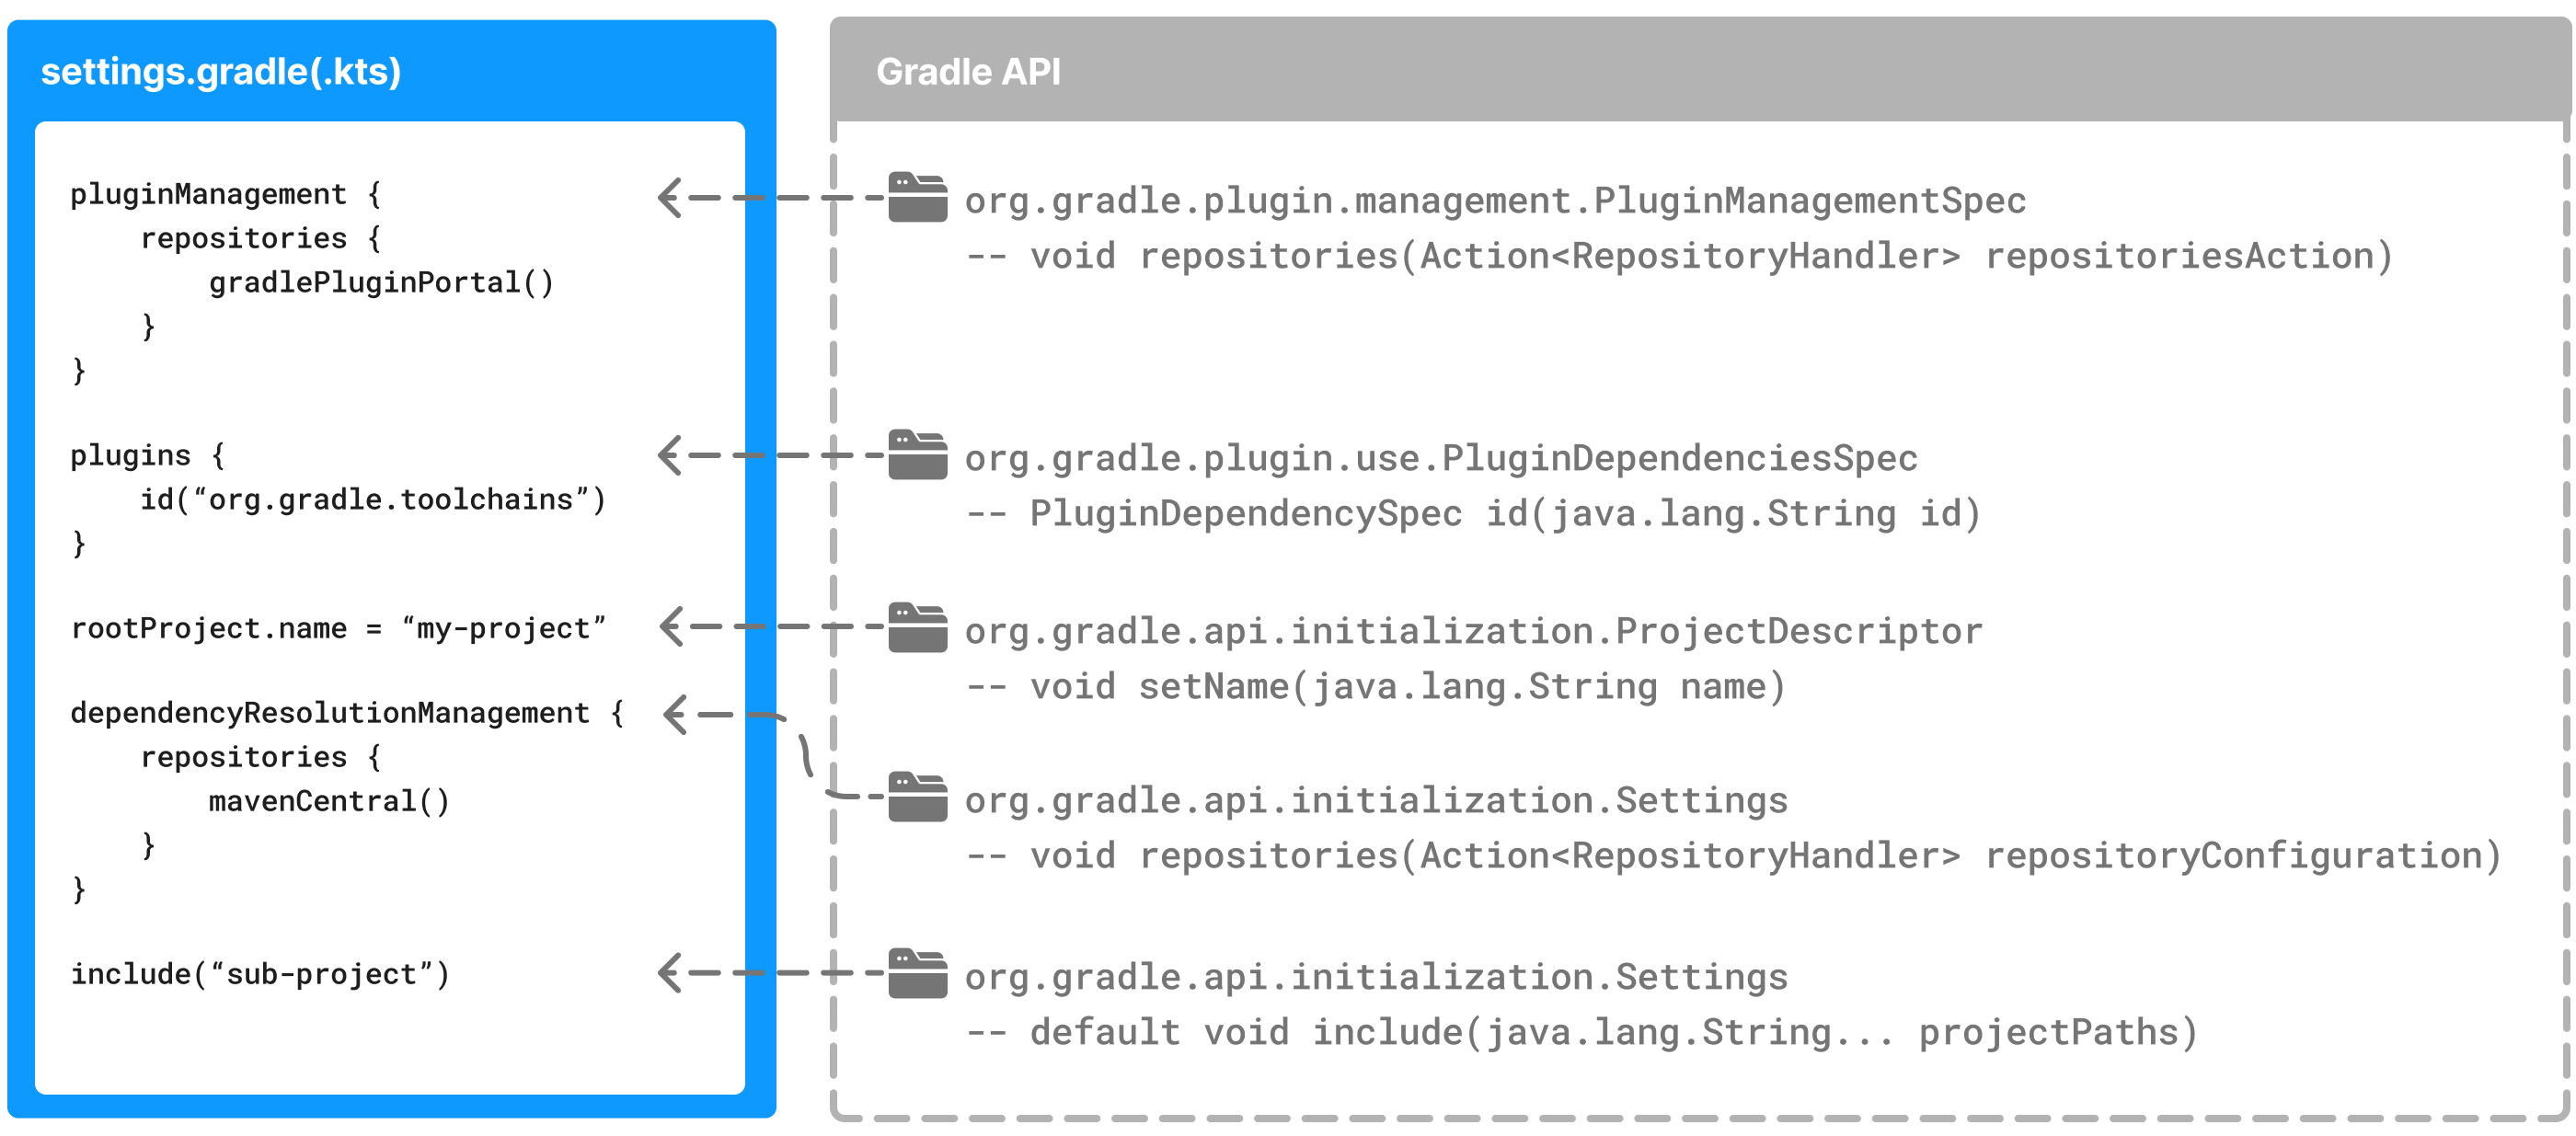
Early in the Gradle Build lifecycle, the initialization phase finds the settings file in your project root directory.
When the settings file settings.gradle(.kts) is found, Gradle instantiates a Settings object.
One of the purposes of the Settings object is to allow you to declare all the projects to be included in the build.
Settings Scripts
The settings script is either a settings.gradle file in Groovy or a settings.gradle.kts file in Kotlin.
Before Gradle assembles the projects for a build, it creates a Settings instance and executes the settings file against it.

As the settings script executes, it configures this Settings.
Therefore, the settings file defines the Settings object.
|
Important
|
There is a one-to-one correspondence between a Settings instance and a settings.gradle(.kts) file.
|
The Settings Object
The Settings object is part of the Gradle API.
Many top-level properties and blocks in a settings script are part of the Settings API.
For example, we can set the root project name in the settings script using the Settings.rootProject property:
settings.rootProject.name = "root"Which is usually shortened to:
rootProject.name = "root"Standard Settings properties
The Settings object exposes a standard set of properties in your settings script.
The following table lists a few commonly used properties:
| Name | Description |
|---|---|
|
The build cache configuration. |
|
The container of plugins that have been applied to the settings. |
|
The root directory of the build. The root directory is the project directory of the root project. |
|
The root project of the build. |
|
Returns this settings object. |
The following table lists a few commonly used methods:
| Name | Description |
|---|---|
|
Adds the given projects to the build. |
|
Includes a build at the specified path to the composite build. |
Settings Script structure
A Settings script is a series of method calls to the Gradle API that often use { … }, a special shortcut in both the Groovy and Kotlin languages.
A { } block is called a lambda in Kotlin or a closure in Groovy.
Simply put, the plugins{ } block is a method invocation in which a Kotlin lambda object or Groovy closure object is passed as the argument.
It is the short form for:
plugins(function() {
    id("plugin")
})
Blocks are mapped to Gradle API methods.
The code inside the function is executed against a this object called a receiver in Kotlin lambda and a delegate in Groovy closure.
Gradle determines the correct this object and invokes the correct corresponding method.
The this of the method invocation id("plugin") object is of type PluginDependenciesSpec.
The settings file is composed of Gradle API calls built on top of the DSLs. Gradle executes the script line by line, top to bottom.
Let’s take a look at an example and break it down:
pluginManagement {                                          // (1)
    repositories {
        gradlePluginPortal()
        google()
    }
}

plugins {                                                   // (2)
    id("org.gradle.toolchains.fake") version "0.6.0"
}

rootProject.name = "root-project"                           // (3)

dependencyResolutionManagement {                            // (4)
    repositories {
        mavenCentral()
    }
}

include("sub-project-a")                                    // (5)
include("sub-project-b")
include("sub-project-c")-
Define the location of plugins
-
Apply plugins.
-
Define the root project name.
-
Define build-wide repositories.
-
Add subprojects to the build.
pluginManagement {                                          // (1)
    repositories {
        gradlePluginPortal()
        google()
    }
}

plugins {                                                   // (2)
    id 'org.gradle.toolchains.fake' version '0.6.0'
}

rootProject.name = 'root-project'                           // (3)

dependencyResolutionManagement {                            // (4)
    repositories {
        mavenCentral()
    }
}

include('sub-project-a')                                    // (5)
include('sub-project-b')
include('sub-project-c')-
Define the location of plugins.
-
Apply plugins.
-
Define the root project name.
-
Define build-wide repositories.
-
Add subprojects to the build.
1. Define the location of plugins
The settings file can optionally define the plugins your project uses with pluginManagement, including binary repositories such as the Gradle Plugin Portal or other Gradle builds using includeBuild:
pluginManagement {
    repositories {
        gradlePluginPortal()
        google()
    }
}
You can also include plugins and plugin dependency resolution strategies in this block.
2. Apply plugins
The settings file can optionally declare the plugins that may be applied later, which can add shared configuration among several builds / subprojects:
Plugins applied to the settings only affect the Settings object.
plugins {
    id("org.gradle.toolchains.fake") version "0.6.0"
}
This is typically used to ensure that all subprojects use the same plugin version.
3. Define the root project name
The settings file defines your project name using the rootProject.name property:
rootProject.name = "root-project"There is only one root project per build.
4. Define build-wide repositories
The settings file can optionally define the locations of components your project relies on (as well as how to resolve them) using repositories such as binary repositories like Maven Central and/or other Gradle builds using includeBuild:
dependencyResolutionManagement {
    repositories {
        mavenCentral()
    }
}
You can also include version catalogs in this section.
5. Add subprojects to the build
The settings file defines the structure of the project by adding all the subprojects using the include statement:
include("app")
include("business-logic")
include("data-model")
Settings File Scripting
There are many more properties and methods on the Settings object that you can use to configure your build.
It’s important to remember that while many Gradle scripts are typically written in short Groovy or Kotlin syntax, every item in the settings script is essentially invoking a method on the Settings object in the Gradle API:
include("app")Is actually:
settings.include("app")Additionally, the full power of the Groovy and Kotlin languages is available to you.
For example, instead of using include many times to add subprojects, you can iterate over the list of directories in the project root folder and include them automatically:
rootDir.listFiles().filter { it.isDirectory && (new File(it, "build.gradle.kts").exists()) }.forEach {
    include(it.name)
}|
Tip
|
This type of logic should be developed in a plugin. |
Next Step: Learn how to write Build scripts >>
Writing Build Scripts
The initialization phase in the Gradle Build lifecycle finds the root project and subprojects included in your project root directory using the settings file.
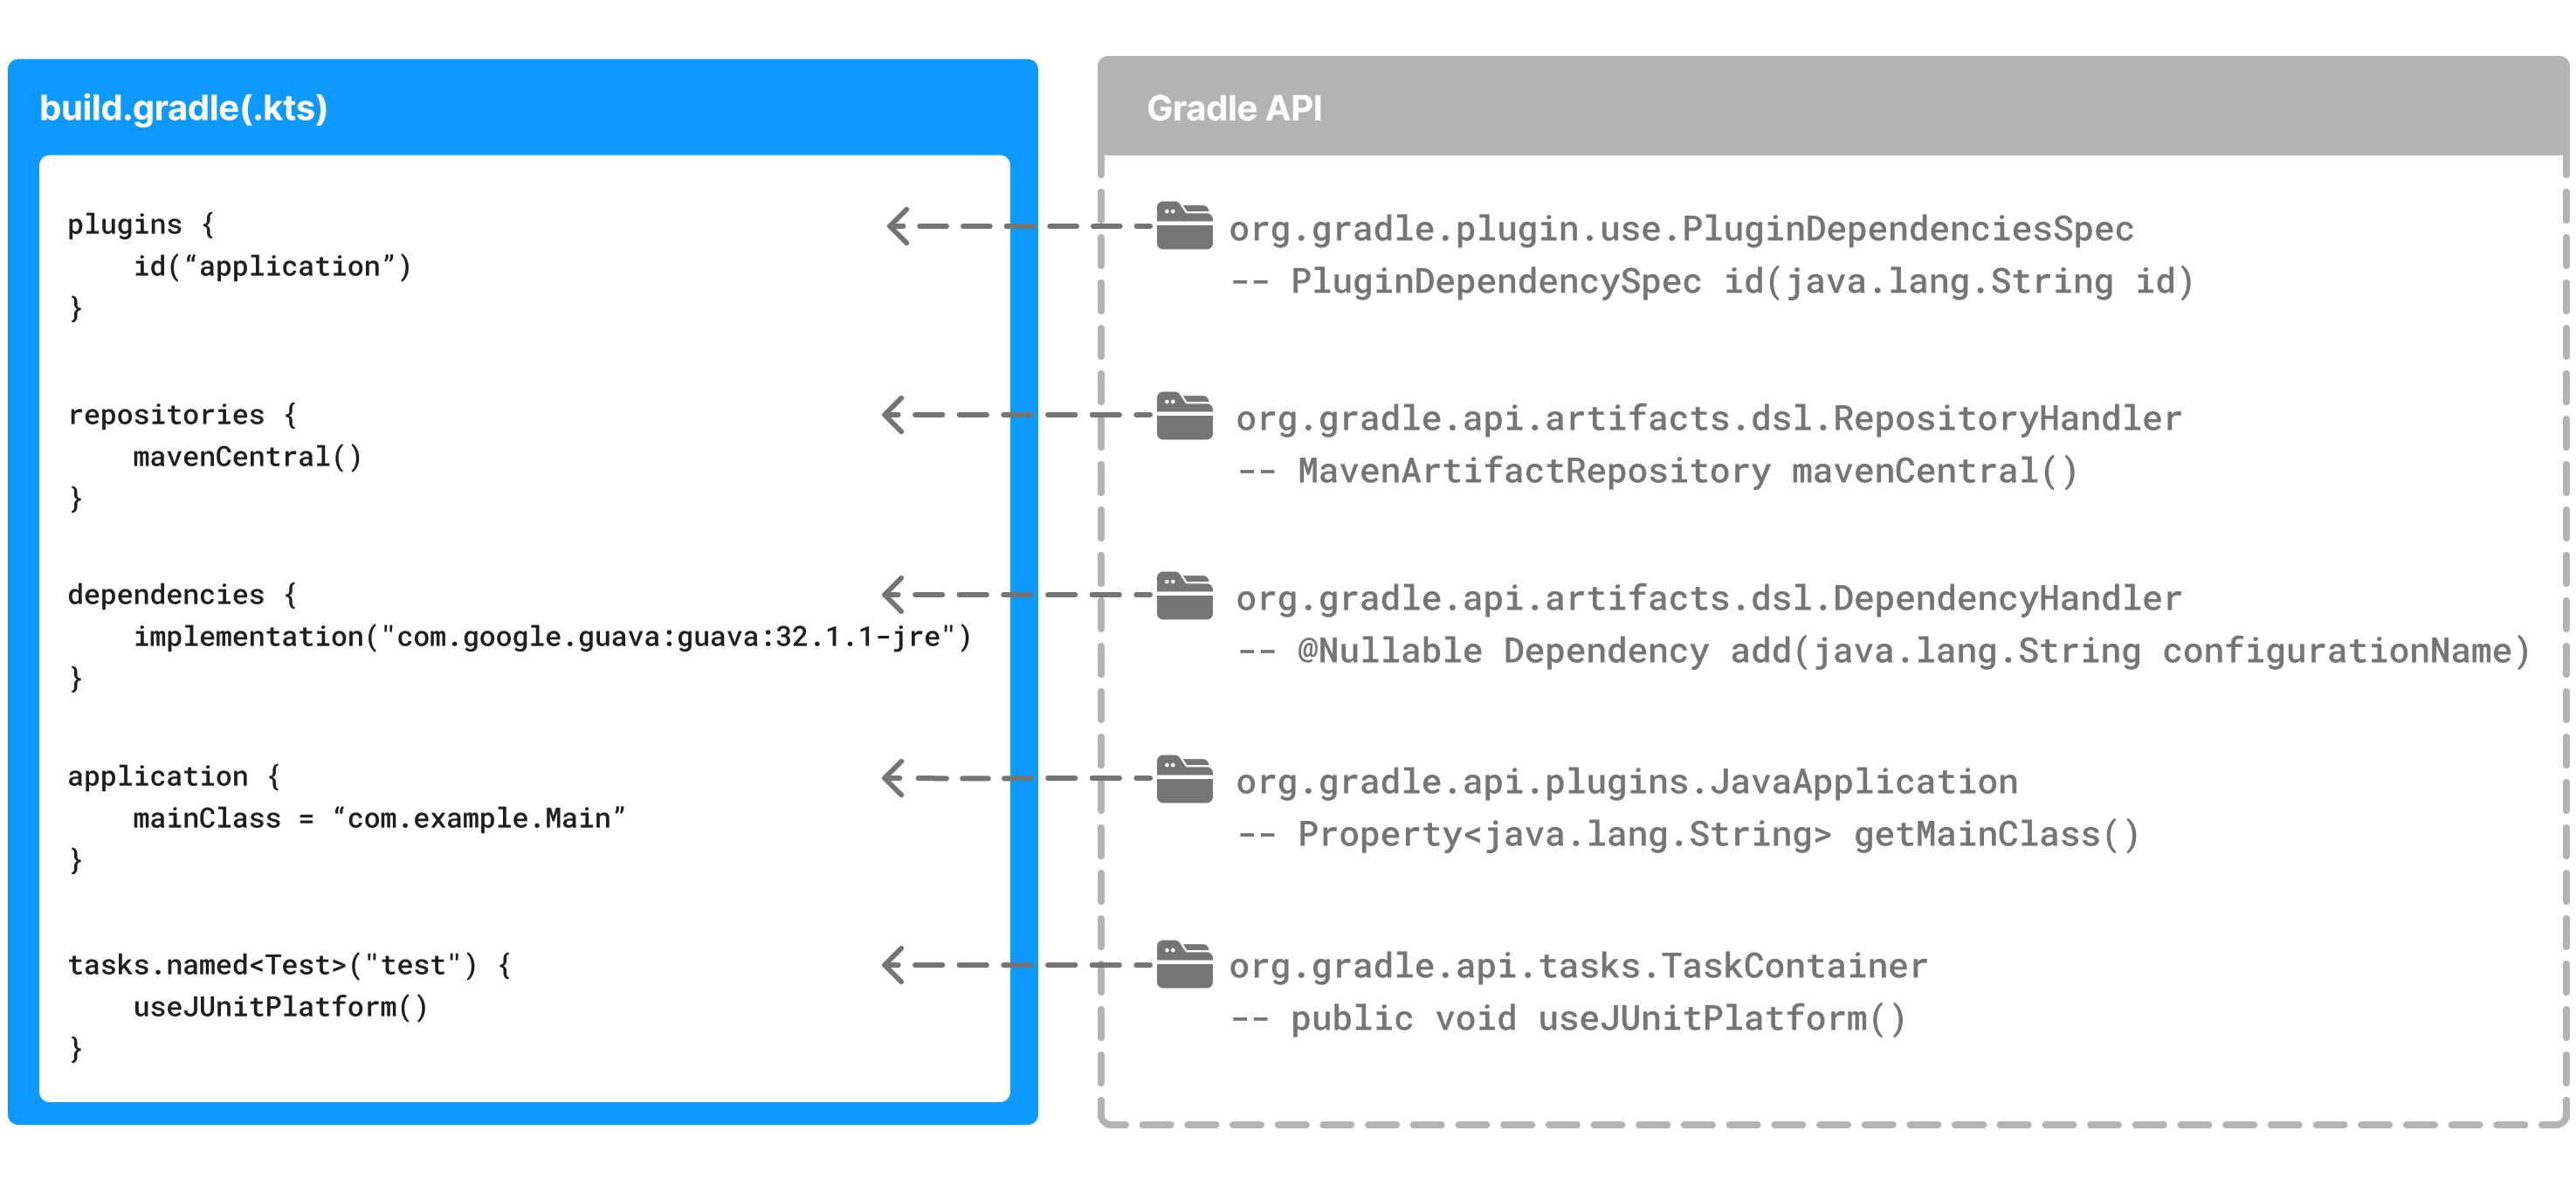
Then, for each project included in the settings file, Gradle creates a Project instance.
Gradle then looks for a corresponding build script file, which is used in the configuration phase.
Build Scripts
Every Gradle build comprises one or more projects; a root project and subprojects.
A project typically corresponds to a software component that needs to be built, like a library or an application. It might represent a library JAR, a web application, or a distribution ZIP assembled from the JARs produced by other projects.
On the other hand, it might represent a thing to be done, such as deploying your application to staging or production environments.
Gradle scripts are written in either Groovy DSL or Kotlin DSL (domain-specific language).
A build script configures a project and is associated with an object of type Project.

As the build script executes, it configures Project.
The build script is either a *.gradle file in Groovy or a *.gradle.kts file in Kotlin.
|
Important
|
Build scripts configure Project objects and their children.
|
The Project object
The Project object is part of the Gradle API:
Many top-level properties and blocks in a build script are part of the Project API.
For example, the following build script uses the Project.name property to print the name of the project:
println(name)
println(project.name)println name
println project.name$ gradle -q check project-api project-api
Both println statements print out the same property.
The first uses the top-level reference to the name property of the Project object.
The second statement uses the project property available to any build script, which returns the associated Project object.
Standard project properties
The Project object exposes a standard set of properties in your build script.
The following table lists a few commonly used properties:
| Name | Type | Description |
|---|---|---|
|
|
The name of the project directory. |
|
|
The fully qualified name of the project. |
|
|
A description for the project. |
|
|
Returns the dependency handler of the project. |
|
|
Returns the repository handler of the project. |
|
|
Provides access to several important locations for a project. |
|
|
The group of this project. |
|
|
The version of this project. |
The following table lists a few commonly used methods:
| Name | Description |
|---|---|
|
Resolves a file path to a URI, relative to the project directory of this project. |
|
Creates a Task with the given name and adds it to this project. |
Build Script structure
The Build script is composed of { … }, a special object in both Groovy and Kotlin.
This object is called a lambda in Kotlin or a closure in Groovy.
Simply put, the plugins{ } block is a method invocation in which a Kotlin lambda object or Groovy closure object is passed as the argument.
It is the short form for:
plugins(function() {
    id("plugin")
})
Blocks are mapped to Gradle API methods.
The code inside the function is executed against a this object called a receiver in Kotlin lambda and a delegate in Groovy closure.
Gradle determines the correct this object and invokes the correct corresponding method.
The this of the method invocation id("plugin") object is of type PluginDependenciesSpec.
The build script is essentially composed of Gradle API calls built on top of the DSLs. Gradle executes the script line by line, top to bottom.
Let’s take a look at an example and break it down:
plugins {                                                               // (1)
    id("org.jetbrains.kotlin.jvm") version "1.9.0"
    id("application")
}

repositories {                                                          // (2)
    mavenCentral()
}

dependencies {                                                          // (3)
    testImplementation("org.jetbrains.kotlin:kotlin-test-junit5")
    testImplementation("org.junit.jupiter:junit-jupiter-engine:5.9.3")
    testRuntimeOnly("org.junit.platform:junit-platform-launcher")
    implementation("com.google.guava:guava:32.1.1-jre")
}

application {                                                           // (4)
    mainClass = "com.example.Main"
}

tasks.named<Test>("test") {                                             // (5)
    useJUnitPlatform()
}-
Apply plugins to the build.
-
Define the locations where dependencies can be found.
-
Add dependencies.
-
Set properties.
-
Register and configure tasks.
plugins {                                                               // (1)
    id 'org.jetbrains.kotlin.jvm' version '1.9.0'
    id 'application'
}

repositories {                                                          // (2)
    mavenCentral()
}

dependencies {                                                          // (3)
    testImplementation 'org.jetbrains.kotlin:kotlin-test-junit5'
    testImplementation 'org.junit.jupiter:junit-jupiter-engine:5.9.3'
    testRuntimeOnly 'org.junit.platform:junit-platform-launcher'
    implementation 'com.google.guava:guava:32.1.1-jre'
}

application {                                                           // (4)
    mainClass = 'com.example.Main'
}

tasks.named('test') {                                                   // (5)
    useJUnitPlatform()
}-
Apply plugins to the build.
-
Define the locations where dependencies can be found.
-
Add dependencies.
-
Set properties.
-
Register and configure tasks.
1. Apply plugins to the build
Plugins are used to extend Gradle. They are also used to modularize and reuse project configurations.
Plugins can be applied using the PluginDependenciesSpec plugins script block.
The plugins block is preferred:
plugins {
    id("org.jetbrains.kotlin.jvm") version "1.9.0"
    id("application")
}
In the example, the application plugin, which is included with Gradle, has been applied, describing our project as a Java application.
The Kotlin gradle plugin, version 1.9.0, has also been applied.
This plugin is not included with Gradle and, therefore, has to be described using a plugin id and a plugin version so that Gradle can find and apply it.
2. Define the locations where dependencies can be found
A project generally has a number of dependencies it needs to do its work. Dependencies include plugins, libraries, or components that Gradle must download for the build to succeed.
The build script lets Gradle know where to look for the binaries of the dependencies. More than one location can be provided:
repositories {
    mavenCentral()
    google()
}
In the example, the guava library and the JetBrains Kotlin plugin (org.jetbrains.kotlin.jvm) will be downloaded from the Maven Central Repository.
3. Add dependencies
A project generally has a number of dependencies it needs to do its work. These dependencies are often libraries of precompiled classes that are imported in the project’s source code.
Dependencies are managed via configurations and are retrieved from repositories.
Use the DependencyHandler returned by Project.getDependencies() method to manage the dependencies.
Use the RepositoryHandler returned by Project.getRepositories() method to manage the repositories.
dependencies {
    implementation("com.google.guava:guava:32.1.1-jre")
}
In the example, the application code uses Google’s guava libraries.
Guava provides utility methods for collections, caching, primitives support, concurrency, common annotations, string processing, I/O, and validations.
4. Set properties
A plugin can add properties and methods to a project using extensions.
The Project object has an associated ExtensionContainer object that contains all the settings and properties for the plugins that have been applied to the project.
In the example, the application plugin added an application property, which is used to detail the main class of our Java application:
application {
    mainClass = "com.example.Main"
}
5. Register and configure tasks
Tasks perform some basic piece of work, such as compiling classes, or running unit tests, or zipping up a WAR file.
While tasks are typically defined in plugins, you may need to register or configure tasks in build scripts.
Registering a task adds the task to your project.
You can register tasks in a project using the TaskContainer.register(java.lang.String) method:
tasks.register<Zip>("zip-reports") {
    from 'Reports/'
    include '*'
    archiveName 'Reports.zip'
    destinationDir(file('/dir'))
}
You may have seen usage of the TaskContainer.create(java.lang.String) method which should be avoided:
tasks.create<Zip>("zip-reports") {
    from 'Reports/'
    include '*'
    archiveName 'Reports.zip'
    destinationDir(file('/dir'))
}|
Tip
|
register(), which enables task configuration avoidance, is preferred over create().
|
You can locate a task to configure it using the TaskCollection.named(java.lang.String) method:
tasks.named<Test>("test") {
    useJUnitPlatform()
}
The example below configures the Javadoc task to automatically generate HTML documentation from Java code:
tasks.named("javadoc").configure {
    exclude 'app/Internal*.java'
    exclude 'app/internal/*'
    exclude 'app/internal/*'
}
Build Scripting
A build script is made up of zero or more statements and script blocks:
println(project.layout.projectDirectory);Statements can include method calls, property assignments, and local variable definitions:
version = '1.0.0.GA'A script block is a method call which takes a closure/lambda as a parameter:
configurations {
}
The closure/lambda configures some delegate object as it executes:
repositories {
    google()
}
A build script is also a Groovy or a Kotlin script:
tasks.register("upper") {
    doLast {
        val someString = "mY_nAmE"
        println("Original: $someString")
        println("Upper case: ${someString.toUpperCase()}")
    }
}tasks.register('upper') {
doLast {
String someString = 'mY_nAmE'
println "Original: $someString"
println "Upper case: ${someString.toUpperCase()}"
}
}$ gradle -q upper Original: mY_nAmE Upper case: MY_NAME
It can contain elements allowed in a Groovy or Kotlin script, such as method definitions and class definitions:
tasks.register("count") {
    doLast {
        repeat(4) { print("$it ") }
    }
}tasks.register('count') {
doLast {
4.times { print "$it " }
}
}$ gradle -q count 0 1 2 3
Flexible task registration
Using the capabilities of the Groovy or Kotlin language, you can register multiple tasks in a loop:
repeat(4) { counter ->
    tasks.register("task$counter") {
        doLast {
            println("I'm task number $counter")
        }
    }
}4.times { counter ->
tasks.register("task$counter") {
doLast {
println "I'm task number $counter"
}
}
}$ gradle -q task1 I'm task number 1
Declare Variables
Build scripts can declare two variables: local variables and extra properties.
Local Variables
Declare local variables with the val keyword. Local variables are only visible in the scope where they have been declared. They are a feature of the underlying Kotlin language.
Declare local variables with the def keyword. Local variables are only visible in the scope where they have been declared. They are a feature of the underlying Groovy language.
val dest = "dest"

tasks.register<Copy>("copy") {
    from("source")
    into(dest)
}def dest = 'dest'
tasks.register('copy', Copy) {
from 'source'
into dest
}Extra Properties
Gradle’s enhanced objects, including projects, tasks, and source sets, can hold user-defined properties.
Add, read, and set extra properties via the owning object’s extra property. Alternatively, you can access extra properties via Kotlin delegated properties using by extra.
Add, read, and set extra properties via the owning object’s ext property. Alternatively, you can use an ext block to add multiple properties simultaneously.
plugins {
    id("java-library")
}

val springVersion by extra("3.1.0.RELEASE")
val emailNotification by extra { "build@master.org" }

sourceSets.all { extra["purpose"] = null }

sourceSets {
    main {
        extra["purpose"] = "production"
    }
    test {
        extra["purpose"] = "test"
    }
    create("plugin") {
        extra["purpose"] = "production"
    }
}

tasks.register("printProperties") {
    val springVersion = springVersion
    val emailNotification = emailNotification
    val productionSourceSets = provider {
        sourceSets.matching { it.extra["purpose"] == "production" }.map { it.name }
    }
    doLast {
        println(springVersion)
        println(emailNotification)
        productionSourceSets.get().forEach { println(it) }
    }
}plugins {
id 'java-library'
}
ext {
springVersion = "3.1.0.RELEASE"
emailNotification = "build@master.org"
}
sourceSets.all { ext.purpose = null }
sourceSets {
main {
purpose = "production"
}
test {
purpose = "test"
}
plugin {
purpose = "production"
}
}
tasks.register('printProperties') {
def springVersion = springVersion
def emailNotification = emailNotification
def productionSourceSets = provider {
sourceSets.matching { it.purpose == "production" }.collect { it.name }
}
doLast {
println springVersion
println emailNotification
productionSourceSets.get().each { println it }
}
}$ gradle -q printProperties 3.1.0.RELEASE build@master.org main plugin
This example adds two extra properties to the project object via by extra. Additionally, this example adds a property named purpose to each source set by setting extra["purpose"] to null. Once added, you can read and set these properties via extra.
This example adds two extra properties to the project object via an ext block. Additionally, this example adds a property named purpose to each source set by setting ext.purpose to null. Once added, you can read and set all these properties just like predefined ones.
Gradle requires special syntax for adding a property so that it can fail fast. For example, this allows Gradle to recognize when a script attempts to set a property that does not exist. You can access extra properties anywhere where you can access their owning object. This gives extra properties a wider scope than local variables. Subprojects can access extra properties on their parent projects.
For more information about extra properties, see ExtraPropertiesExtension in the API documentation.
Configure Arbitrary Objects
The example greet() task shows an example of arbitrary object configuration:
class UserInfo(
    var name: String? = null,
    var email: String? = null
)

tasks.register("configure") {
    val user = UserInfo().apply {
        name = "Isaac Newton"
        email = "isaac@newton.me"
    }
    doLast {
        println(user.name)
        println(user.email)
    }
}class UserInfo {
String name
String email
}
tasks.register('configure') {
def user = configure(new UserInfo()) {
name = "Isaac Newton"
email = "isaac@newton.me"
}
doLast {
println user.name
println user.email
}
}$ gradle -q greet Isaac Newton isaac@newton.me
Closure Delegates
Each closure has a delegate object. Groovy uses this delegate to look up variable and method references to nonlocal variables and closure parameters.
Gradle uses this for configuration closures,
where the delegate object refers to the object being configured.
dependencies {
    assert delegate == project.dependencies
    testImplementation('junit:junit:4.13')
    delegate.testImplementation('junit:junit:4.13')
}
Default imports
To make build scripts more concise, Gradle automatically adds a set of import statements to scripts.
As a result, instead of writing throw new org.gradle.api.tasks.StopExecutionException(), you can write throw new StopExecutionException() instead.
Gradle implicitly adds the following imports to each script:
import org.gradle.*
import org.gradle.api.*
import org.gradle.api.artifacts.*
import org.gradle.api.artifacts.component.*
import org.gradle.api.artifacts.dsl.*
import org.gradle.api.artifacts.ivy.*
import org.gradle.api.artifacts.maven.*
import org.gradle.api.artifacts.query.*
import org.gradle.api.artifacts.repositories.*
import org.gradle.api.artifacts.result.*
import org.gradle.api.artifacts.transform.*
import org.gradle.api.artifacts.type.*
import org.gradle.api.artifacts.verification.*
import org.gradle.api.attributes.*
import org.gradle.api.attributes.java.*
import org.gradle.api.attributes.plugin.*
import org.gradle.api.cache.*
import org.gradle.api.capabilities.*
import org.gradle.api.component.*
import org.gradle.api.configuration.*
import org.gradle.api.credentials.*
import org.gradle.api.distribution.*
import org.gradle.api.distribution.plugins.*
import org.gradle.api.execution.*
import org.gradle.api.file.*
import org.gradle.api.flow.*
import org.gradle.api.initialization.*
import org.gradle.api.initialization.definition.*
import org.gradle.api.initialization.dsl.*
import org.gradle.api.initialization.resolve.*
import org.gradle.api.invocation.*
import org.gradle.api.java.archives.*
import org.gradle.api.jvm.*
import org.gradle.api.launcher.cli.*
import org.gradle.api.logging.*
import org.gradle.api.logging.configuration.*
import org.gradle.api.model.*
import org.gradle.api.plugins.*
import org.gradle.api.plugins.antlr.*
import org.gradle.api.plugins.catalog.*
import org.gradle.api.plugins.jvm.*
import org.gradle.api.plugins.quality.*
import org.gradle.api.plugins.scala.*
import org.gradle.api.problems.*
import org.gradle.api.provider.*
import org.gradle.api.publish.*
import org.gradle.api.publish.ivy.*
import org.gradle.api.publish.ivy.plugins.*
import org.gradle.api.publish.ivy.tasks.*
import org.gradle.api.publish.maven.*
import org.gradle.api.publish.maven.plugins.*
import org.gradle.api.publish.maven.tasks.*
import org.gradle.api.publish.plugins.*
import org.gradle.api.publish.tasks.*
import org.gradle.api.reflect.*
import org.gradle.api.reporting.*
import org.gradle.api.reporting.components.*
import org.gradle.api.reporting.dependencies.*
import org.gradle.api.reporting.dependents.*
import org.gradle.api.reporting.model.*
import org.gradle.api.reporting.plugins.*
import org.gradle.api.resources.*
import org.gradle.api.services.*
import org.gradle.api.specs.*
import org.gradle.api.tasks.*
import org.gradle.api.tasks.ant.*
import org.gradle.api.tasks.application.*
import org.gradle.api.tasks.bundling.*
import org.gradle.api.tasks.compile.*
import org.gradle.api.tasks.diagnostics.*
import org.gradle.api.tasks.diagnostics.configurations.*
import org.gradle.api.tasks.incremental.*
import org.gradle.api.tasks.javadoc.*
import org.gradle.api.tasks.options.*
import org.gradle.api.tasks.scala.*
import org.gradle.api.tasks.testing.*
import org.gradle.api.tasks.testing.junit.*
import org.gradle.api.tasks.testing.junitplatform.*
import org.gradle.api.tasks.testing.testng.*
import org.gradle.api.tasks.util.*
import org.gradle.api.tasks.wrapper.*
import org.gradle.api.toolchain.management.*
import org.gradle.authentication.*
import org.gradle.authentication.aws.*
import org.gradle.authentication.http.*
import org.gradle.build.event.*
import org.gradle.buildinit.*
import org.gradle.buildinit.plugins.*
import org.gradle.buildinit.tasks.*
import org.gradle.caching.*
import org.gradle.caching.configuration.*
import org.gradle.caching.http.*
import org.gradle.caching.local.*
import org.gradle.concurrent.*
import org.gradle.external.javadoc.*
import org.gradle.ide.visualstudio.*
import org.gradle.ide.visualstudio.plugins.*
import org.gradle.ide.visualstudio.tasks.*
import org.gradle.ide.xcode.*
import org.gradle.ide.xcode.plugins.*
import org.gradle.ide.xcode.tasks.*
import org.gradle.ivy.*
import org.gradle.jvm.*
import org.gradle.jvm.application.scripts.*
import org.gradle.jvm.application.tasks.*
import org.gradle.jvm.tasks.*
import org.gradle.jvm.toolchain.*
import org.gradle.language.*
import org.gradle.language.assembler.*
import org.gradle.language.assembler.plugins.*
import org.gradle.language.assembler.tasks.*
import org.gradle.language.base.*
import org.gradle.language.base.artifact.*
import org.gradle.language.base.compile.*
import org.gradle.language.base.plugins.*
import org.gradle.language.base.sources.*
import org.gradle.language.c.*
import org.gradle.language.c.plugins.*
import org.gradle.language.c.tasks.*
import org.gradle.language.cpp.*
import org.gradle.language.cpp.plugins.*
import org.gradle.language.cpp.tasks.*
import org.gradle.language.java.artifact.*
import org.gradle.language.jvm.tasks.*
import org.gradle.language.nativeplatform.*
import org.gradle.language.nativeplatform.tasks.*
import org.gradle.language.objectivec.*
import org.gradle.language.objectivec.plugins.*
import org.gradle.language.objectivec.tasks.*
import org.gradle.language.objectivecpp.*
import org.gradle.language.objectivecpp.plugins.*
import org.gradle.language.objectivecpp.tasks.*
import org.gradle.language.plugins.*
import org.gradle.language.rc.*
import org.gradle.language.rc.plugins.*
import org.gradle.language.rc.tasks.*
import org.gradle.language.scala.tasks.*
import org.gradle.language.swift.*
import org.gradle.language.swift.plugins.*
import org.gradle.language.swift.tasks.*
import org.gradle.maven.*
import org.gradle.model.*
import org.gradle.nativeplatform.*
import org.gradle.nativeplatform.platform.*
import org.gradle.nativeplatform.plugins.*
import org.gradle.nativeplatform.tasks.*
import org.gradle.nativeplatform.test.*
import org.gradle.nativeplatform.test.cpp.*
import org.gradle.nativeplatform.test.cpp.plugins.*
import org.gradle.nativeplatform.test.cunit.*
import org.gradle.nativeplatform.test.cunit.plugins.*
import org.gradle.nativeplatform.test.cunit.tasks.*
import org.gradle.nativeplatform.test.googletest.*
import org.gradle.nativeplatform.test.googletest.plugins.*
import org.gradle.nativeplatform.test.plugins.*
import org.gradle.nativeplatform.test.tasks.*
import org.gradle.nativeplatform.test.xctest.*
import org.gradle.nativeplatform.test.xctest.plugins.*
import org.gradle.nativeplatform.test.xctest.tasks.*
import org.gradle.nativeplatform.toolchain.*
import org.gradle.nativeplatform.toolchain.plugins.*
import org.gradle.normalization.*
import org.gradle.platform.*
import org.gradle.platform.base.*
import org.gradle.platform.base.binary.*
import org.gradle.platform.base.component.*
import org.gradle.platform.base.plugins.*
import org.gradle.plugin.devel.*
import org.gradle.plugin.devel.plugins.*
import org.gradle.plugin.devel.tasks.*
import org.gradle.plugin.management.*
import org.gradle.plugin.use.*
import org.gradle.plugins.ear.*
import org.gradle.plugins.ear.descriptor.*
import org.gradle.plugins.ide.*
import org.gradle.plugins.ide.api.*
import org.gradle.plugins.ide.eclipse.*
import org.gradle.plugins.ide.idea.*
import org.gradle.plugins.signing.*
import org.gradle.plugins.signing.signatory.*
import org.gradle.plugins.signing.signatory.pgp.*
import org.gradle.plugins.signing.type.*
import org.gradle.plugins.signing.type.pgp.*
import org.gradle.process.*
import org.gradle.swiftpm.*
import org.gradle.swiftpm.plugins.*
import org.gradle.swiftpm.tasks.*
import org.gradle.testing.base.*
import org.gradle.testing.base.plugins.*
import org.gradle.testing.jacoco.plugins.*
import org.gradle.testing.jacoco.tasks.*
import org.gradle.testing.jacoco.tasks.rules.*
import org.gradle.testkit.runner.*
import org.gradle.util.*
import org.gradle.vcs.*
import org.gradle.vcs.git.*
import org.gradle.work.*
import org.gradle.workers.*
Next Step: Learn how to use Tasks >>
Using Tasks
The work that Gradle can do on a project is defined by one or more tasks.
A task represents some independent unit of work that a build performs. This might be compiling some classes, creating a JAR, generating Javadoc, or publishing some archives to a repository.
When a user runs ./gradlew build in the command line, Gradle will execute the build task along with any other tasks it depends on.
List available tasks
Gradle provides several default tasks for a project, which are listed by running ./gradlew tasks:
> Task :tasks

------------------------------------------------------------
Tasks runnable from root project 'myTutorial'
------------------------------------------------------------

Build Setup tasks
-----------------
init - Initializes a new Gradle build.
wrapper - Generates Gradle wrapper files.

Help tasks
----------
buildEnvironment - Displays all buildscript dependencies declared in root project 'myTutorial'.
...
Tasks either come from build scripts or plugins.
Once we apply a plugin to our project, such as the application plugin, additional tasks become available:
plugins {
    id("application")
}
$ ./gradlew tasks
> Task :tasks
------------------------------------------------------------
Tasks runnable from project ':app'
------------------------------------------------------------
Application tasks
-----------------
run - Runs this project as a JVM application
Build tasks
-----------
assemble - Assembles the outputs of this project.
build - Assembles and tests this project.
Documentation tasks
-------------------
javadoc - Generates Javadoc API documentation for the main source code.
Other tasks
-----------
compileJava - Compiles main Java source.
...Many of these tasks, such as assemble, build, and run, should be familiar to a developer.
Task classification
There are two classes of tasks that can be executed:
-
Actionable tasks have some action(s) attached to do work in your build:
compileJava. -
Lifecycle tasks are tasks with no actions attached:
assemble,build.
Typically, a lifecycle tasks depends on many actionable tasks, and is used to execute many tasks at once.
Task registration and action
Let’s take a look at a simple "Hello World" task in a build script:
tasks.register("hello") {
    doLast {
        println("Hello world!")
    }
}tasks.register('hello') {
doLast {
println 'Hello world!'
}
}In the example, the build script registers a single task called hello using the TaskContainer API, and adds an action to it.
If the tasks in the project are listed, the hello task is available to Gradle:
$ ./gradlew app:tasks --all

> Task :app:tasks

------------------------------------------------------------
Tasks runnable from project ':app'
------------------------------------------------------------

Other tasks
-----------
compileJava - Compiles main Java source.
compileTestJava - Compiles test Java source.
hello
processResources - Processes main resources.
processTestResources - Processes test resources.
startScripts - Creates OS-specific scripts to run the project as a JVM application.
You can execute the task in the build script with ./gradlew hello:
$ ./gradlew hello
Hello world!
When Gradle executes the hello task, it executes the action provided.
In this case, the action is simply a block containing some code: println("Hello world!").
Task group and description
The hello task from the previous section can be detailed with a description and assigned to a group with the following update:
tasks.register("hello") {
    group = "Custom"
    description = "A lovely greeting task."
    doLast {
        println("Hello world!")
    }
}
Once the task is assigned to a group, it will be listed by ./gradlew tasks:
$ ./gradlew tasks

> Task :tasks

Custom tasks
------------------
hello - A lovely greeting task.
To view information about a task, use the help --task <task-name> command:
$./gradlew help --task hello

> Task :help
Detailed task information for hello

Path
:app:hello

Type
Task (org.gradle.api.Task)

Options
--rerun     Causes the task to be re-run even if up-to-date.

Description
A lovely greeting task.

Group
Custom
As we can see, the hello task belongs to the custom group.
Task dependencies
You can declare tasks that depend on other tasks:
tasks.register("hello") {
    doLast {
        println("Hello world!")
    }
}
tasks.register("intro") {
    dependsOn("hello")
    doLast {
        println("I'm Gradle")
    }
}tasks.register('hello') {
doLast {
println 'Hello world!'
}
}
tasks.register('intro') {
dependsOn tasks.hello
doLast {
println "I'm Gradle"
}
}$ gradle -q intro Hello world! I'm Gradle
The dependency of taskX to taskY may be declared before taskY is defined:
tasks.register("taskX") {
    dependsOn("taskY")
    doLast {
        println("taskX")
    }
}
tasks.register("taskY") {
    doLast {
        println("taskY")
    }
}tasks.register('taskX') {
dependsOn 'taskY'
doLast {
println 'taskX'
}
}
tasks.register('taskY') {
doLast {
println 'taskY'
}
}$ gradle -q taskX taskY taskX
The hello task from the previous example is updated to include a dependency:
tasks.register("hello") {
    group = "Custom"
    description = "A lovely greeting task."
    doLast {
        println("Hello world!")
    }
    dependsOn(tasks.assemble)
}
The hello task now depends on the assemble task, which means that Gradle must execute the assemble task before it can execute the hello task:
$ ./gradlew :app:hello

> Task :app:compileJava UP-TO-DATE
> Task :app:processResources NO-SOURCE
> Task :app:classes UP-TO-DATE
> Task :app:jar UP-TO-DATE
> Task :app:startScripts UP-TO-DATE
> Task :app:distTar UP-TO-DATE
> Task :app:distZip UP-TO-DATE
> Task :app:assemble UP-TO-DATE

> Task :app:hello
Hello world!
Task configuration
Once registered, tasks can be accessed via the TaskProvider API for further configuration.
For instance, you can use this to add dependencies to a task at runtime dynamically:
repeat(4) { counter ->
    tasks.register("task$counter") {
        doLast {
            println("I'm task number $counter")
        }
    }
}
tasks.named("task0") { dependsOn("task2", "task3") }4.times { counter ->
tasks.register("task$counter") {
doLast {
println "I'm task number $counter"
}
}
}
tasks.named('task0') { dependsOn('task2', 'task3') }$ gradle -q task0 I'm task number 2 I'm task number 3 I'm task number 0
Or you can add behavior to an existing task:
tasks.register("hello") {
    doLast {
        println("Hello Earth")
    }
}
tasks.named("hello") {
    doFirst {
        println("Hello Venus")
    }
}
tasks.named("hello") {
    doLast {
        println("Hello Mars")
    }
}
tasks.named("hello") {
    doLast {
        println("Hello Jupiter")
    }
}tasks.register('hello') {
doLast {
println 'Hello Earth'
}
}
tasks.named('hello') {
doFirst {
println 'Hello Venus'
}
}
tasks.named('hello') {
doLast {
println 'Hello Mars'
}
}
tasks.named('hello') {
doLast {
println 'Hello Jupiter'
}
}$ gradle -q hello Hello Venus Hello Earth Hello Mars Hello Jupiter
|
Tip
|
The calls doFirst and doLast can be executed multiple times.
They add an action to the beginning or the end of the task’s actions list.
When the task executes, the actions in the action list are executed in order.
|
Here is an example of the named method being used to configure a task added by a plugin:
tasks.named("dokkaHtml") {
    outputDirectory.set(buildDir.resolve("dokka"))
}
Task types
Gradle tasks are a subclass of Task.
In the build script, the HelloTask class is created by extending DefaultTask:
// Extend the DefaultTask class to create a HelloTask class
abstract class HelloTask : DefaultTask() {
    @TaskAction
    fun hello() {
        println("hello from HelloTask")
    }
}

// Register the hello Task with type HelloTask
tasks.register<HelloTask>("hello") {
    group = "Custom tasks"
    description = "A lovely greeting task."
}
The hello task is registered with the type HelloTask.
Executing our new hello task:
$ ./gradlew hello

> Task :app:hello
hello from HelloTask
Now the hello task is of type HelloTask instead of type Task.
The Gradle help task reveals the change:
$ ./gradlew help --task hello

> Task :help
Detailed task information for hello

Path
:app:hello

Type
HelloTask (Build_gradle$HelloTask)

Options
--rerun     Causes the task to be re-run even if up-to-date.

Description
A lovely greeting task.

Group
Custom tasks
Built-in task types
Gradle provides many built-in task types with common and popular functionality, such as copying or deleting files.
This example task copies *.war files from the source directory to the target directory using the Copy built-in task:
tasks.register("copyTask",Copy) {
    from("source")
    into("target")
    include("*.war")
}
There are many task types developers can take advantage of, including GroovyDoc, Zip, Jar, JacocoReport, Sign, or Delete, which are available in the link:DSL.
Next Step: Learn how to write Tasks >>
Writing Tasks
Gradle tasks are created by extending DefaultTask.
However, the generic DefaultTask provides no action for Gradle.
If users want to extend the capabilities of Gradle and their build script, they must either use a built-in task or create a custom task:
-
Built-in task - Gradle provides built-in utility tasks such as
Copy,Jar,Zip,Delete, etc… -
Custom task - Gradle allows users to subclass
DefaultTaskto create their own task types.
Create a task
The simplest and quickest way to create a custom task is in a build script:
To create a task, inherit from the DefaultTask class and implement a @TaskAction handler:
abstract class CreateFileTask : DefaultTask() {
    @TaskAction
    fun action() {
        val file = File("myfile.txt")
        file.createNewFile()
        file.writeText("HELLO FROM MY TASK")
    }
}
The CreateFileTask implements a simple set of actions.
First, a file called "myfile.txt" is created in the main project.
Then, some text is written to the file.
Register a task
A task is registered in the build script using the TaskContainer.register() method, which allows it to be then used in the build logic.
abstract class CreateFileTask : DefaultTask() {
    @TaskAction
    fun action() {
        val file = File("myfile.txt")
        file.createNewFile()
        file.writeText("HELLO FROM MY TASK")
    }
}

tasks.register<CreateFileTask>("createFileTask")
Task group and description
Setting the group and description properties on your tasks can help users understand how to use your task:
abstract class CreateFileTask : DefaultTask() {
    @TaskAction
    fun action() {
        val file = File("myfile.txt")
        file.createNewFile()
        file.writeText("HELLO FROM MY TASK")
    }
}

tasks.register<CreateFileTask>("createFileTask", ) {
    group = "custom"
    description = "Create myfile.txt in the current directory"
}
Once a task is added to a group, it is visible when listing tasks.
Task input and outputs
For the task to do useful work, it typically needs some inputs. A task typically produces outputs.
abstract class CreateFileTask : DefaultTask() {
    @Input
    val fileText = "HELLO FROM MY TASK"

    @Input
    val fileName = "myfile.txt"

    @OutputFile
    val myFile: File = File(fileName)

    @TaskAction
    fun action() {
        myFile.createNewFile()
        myFile.writeText(fileText)
    }
}

tasks.register<CreateFileTask>("createFileTask") {
    group = "custom"
    description = "Create myfile.txt in the current directory"
}
Configure a task
A task is optionally configured in a build script using the TaskCollection.named() method.
The CreateFileTask class is updated so that the text in the file is configurable:
abstract class CreateFileTask : DefaultTask() {
    @get:Input
    abstract val fileText: Property<String>

    @Input
    val fileName = "myfile.txt"

    @OutputFile
    val myFile: File = File(fileName)

    @TaskAction
    fun action() {
        myFile.createNewFile()
        myFile.writeText(fileText.get())
    }
}

tasks.register<CreateFileTask>("createFileTask") {
    group = "custom"
    description = "Create myfile.txt in the current directory"
    fileText.convention("HELLO FROM THE CREATE FILE TASK METHOD") // Set convention
}

tasks.named<CreateFileTask>("createFileTask") {
    fileText.set("HELLO FROM THE NAMED METHOD") // Override with custom message
}
In the named() method, we find the createFileTask task and set the text that will be written to the file.
When the task is executed:
$ ./gradlew createFileTask

> Configure project :app

> Task :app:createFileTask

BUILD SUCCESSFUL in 5s
2 actionable tasks: 1 executed, 1 up-to-date
A text file called myfile.txt is created in the project root folder:
HELLO FROM THE NAMED METHODConsult the Developing Gradle Tasks chapter to learn more.
Next Step: Learn how to use Plugins >>
Using Plugins
Much of Gradle’s functionality is delivered via plugins, including core plugins distributed with Gradle, third-party plugins, and script plugins defined within builds.
Plugins introduce new tasks (e.g., JavaCompile), domain objects (e.g., SourceSet), conventions (e.g., locating Java source at src/main/java), and extend core or other plugin objects.
Plugins in Gradle are essential for automating common build tasks, integrating with external tools or services, and tailoring the build process to meet specific project needs. They also serve as the primary mechanism for organizing build logic.
Benefits of plugins
Writing many tasks and duplicating configuration blocks in build scripts can get messy. Plugins offer several advantages over adding logic directly to the build script:
-
Promotes Reusability: Reduces the need to duplicate similar logic across projects.
-
Enhances Modularity: Allows for a more modular and organized build script.
-
Encapsulates Logic: Keeps imperative logic separate, enabling more declarative build scripts.
Plugin distribution
You can leverage plugins from Gradle and the Gradle community or create your own.
Plugins are available in three ways:
-
Core plugins - Gradle develops and maintains a set of Core Plugins.
-
Community plugins - Gradle plugins shared in a remote repository such as Maven or the Gradle Plugin Portal.
-
Local plugins - Gradle enables users to create custom plugins using APIs.
Types of plugins
Plugins can be implemented as binary plugins, precompiled script plugins, or script plugins:
- Binary Plugins
-
Binary plugins are compiled plugins typically written in Java or Kotlin DSL that are packaged as JAR files. They are applied to a project using the
plugins {}block. They offer better performance and maintainability compared to script plugins or precompiled script plugins. - Precompiled Script Plugins
-
Precompiled script plugins are Groovy DSL or Kotlin DSL scripts compiled and distributed as Java class files packaged in a library. They are applied to a project using the
plugins {}block. They provide a way to reuse complex logic across projects and allow for better organization of build logic. - Script Plugins
-
Script plugins are Groovy DSL or Kotlin DSL scripts that are applied directly to a Gradle build script using the
apply from:syntax. They are applied inline within a build script to add functionality or customize the build process. They are simple to use.
A plugin often starts as a script plugin (because they are easy to write). Then, as the code becomes more valuable, it’s migrated to a binary plugin that can be easily tested and shared between multiple projects or organizations.
Using plugins
To use the build logic encapsulated in a plugin, Gradle needs to perform two steps.
First, it needs to resolve the plugin, and then it needs to apply the plugin to the target, usually a Project.
-
Resolving a plugin means finding the correct version of the JAR that contains a given plugin and adding it to the script classpath. Once a plugin is resolved, its API can be used in a build script. Script plugins are self-resolving in that they are resolved from the specific file path or URL provided when applying them. Core binary plugins provided as part of the Gradle distribution are automatically resolved.
-
Applying a plugin means executing the plugin’s Plugin.apply(T) on a project.
The plugins DSL is recommended to resolve and apply plugins in one step.
Resolving plugins
Gradle provides the core plugins (e.g., JavaPlugin, GroovyPlugin, MavenPublishPlugin, etc.) as part of its distribution, which means they are automatically resolved.
Core plugins are applied in a build script using the plugin name:
plugins {
    id «plugin name»
}
For example:
plugins {
    id("java")
}
Non-core plugins must be resolved before they can be applied. Non-core plugins are identified by a unique ID and a version in the build file:
plugins {
    id «plugin id» version «plugin version»
}
And the location of the plugin must be specified in the settings file:
pluginManagement {
    repositories {
        gradlePluginPortal()
    }
    maven {
        url 'https://maven.example.com/plugins'
    }
}
There are additional considerations for resolving and applying plugins:
| # | To | Use | For example: |
|---|---|---|---|
Apply a core, community or local plugin to a specific project. |
|
||
Apply common core, community or local plugin to multiple subprojects. |
|
||
Apply a core, community or local plugin needed for the build script itself. |
|
||
Apply a local script plugins. |
|
1. Applying plugins using the plugins{} block
The plugin DSL provides a concise and convenient way to declare plugin dependencies.
The plugins block configures an instance of PluginDependenciesSpec:
plugins {
    application                                     // by name
    java                                            // by name
    id("java")                                      // by id - recommended
    id("org.jetbrains.kotlin.jvm") version "1.9.0"  // by id - recommended
}
Core Gradle plugins are unique in that they provide short names, such as java for the core JavaPlugin.
To apply a core plugin, the short name can be used:
plugins {
    java
}plugins {
id 'java'
}All other binary plugins must use the fully qualified form of the plugin id (e.g., com.github.foo.bar).
To apply a community plugin from Gradle plugin portal, the fully qualified plugin id, a globally unique identifier, must be used:
plugins {
    id("com.jfrog.bintray") version "1.8.5"
}plugins {
id 'com.jfrog.bintray' version '1.8.5'
}See PluginDependenciesSpec for more information on using the Plugin DSL.
Limitations of the plugins DSL
The plugins DSL provides a convenient syntax for users and the ability for Gradle to determine which plugins are used quickly. This allows Gradle to:
-
Optimize the loading and reuse of plugin classes.
-
Provide editors with detailed information about the potential properties and values in the build script.
However, the DSL requires that plugins be defined statically.
There are some key differences between the plugins {} block mechanism and the "traditional" apply() method mechanism.
There are also some constraints and possible limitations.
Constrained Syntax
The plugins {} block does not support arbitrary code.
It is constrained to be idempotent (produce the same result every time) and side effect-free (safe for Gradle to execute at any time).
The form is:
plugins {
    id(«plugin id»)                             // (1)
    id(«plugin id») version «plugin version»    // (2)
}-
for core Gradle plugins or plugins already available to the build script
-
for binary Gradle plugins that need to be resolved
plugins {
    id «plugin id»                            // (1)
    id «plugin id» version «plugin version»   // (2)
}-
for core Gradle plugins or plugins already available to the build script
-
for binary Gradle plugins that need to be resolved
Where «plugin id» and «plugin version» are a string.
Where «plugin id» and «plugin version» must be constant, literal strings.
The plugins{} block must also be a top-level statement in the build script.
It cannot be nested inside another construct (e.g., an if-statement or for-loop).
Only in build scripts and settings file
The plugins{} block can only be used in a project’s build script build.gradle(.kts) and the settings.gradle(.kts) file.
It must appear before any other block.
It cannot be used in script plugins or init scripts.
Applying plugins to all subprojects
Suppose you have a multi-project build, you probably want to apply plugins to some or all of the subprojects in your build but not to the root project.
While the default behavior of the plugins{} block is to immediately resolve and apply the plugins, you can use the apply false syntax to tell Gradle not to apply the plugin to the current project. Then, use the plugins{} block without the version in subprojects' build scripts:
include("hello-a")
include("hello-b")
include("goodbye-c")plugins {
id("com.example.hello") version "1.0.0" apply false
id("com.example.goodbye") version "1.0.0" apply false
}plugins {
id("com.example.hello")
}plugins {
id("com.example.hello")
}plugins {
id("com.example.goodbye")
}include 'hello-a'
include 'hello-b'
include 'goodbye-c'plugins {
id 'com.example.hello' version '1.0.0' apply false
id 'com.example.goodbye' version '1.0.0' apply false
}plugins {
id 'com.example.hello'
}plugins {
id 'com.example.hello'
}plugins {
id 'com.example.goodbye'
}You can also encapsulate the versions of external plugins by composing the build logic using your own convention plugins.
2. Applying plugins from the buildSrc directory
buildSrc is an optional directory at the Gradle project root that contains build logic (i.e., plugins) used in building the main project.
You can apply plugins that reside in a project’s buildSrc directory as long as they have a defined ID.
The following example shows how to tie the plugin implementation class my.MyPlugin, defined in buildSrc, to the id "my-plugin":
plugins {
    `java-gradle-plugin`
}

gradlePlugin {
    plugins {
        create("myPlugins") {
            id = "my-plugin"
            implementationClass = "my.MyPlugin"
        }
    }
}plugins {
id 'java-gradle-plugin'
}
gradlePlugin {
plugins {
myPlugins {
id = 'my-plugin'
implementationClass = 'my.MyPlugin'
}
}
}The plugin can then be applied by ID:
plugins {
    id("my-plugin")
}plugins {
id 'my-plugin'
}3. Applying plugins using the buildscript{} block
The buildscript block is used for:
-
global
dependenciesandrepositoriesrequired for building the project (applied in the subprojects). -
declaring which plugins are available for use in the build script (in the
build.gradle(.kts)file itself).
So when you want to use a library in the build script itself, you must add this library on the script classpath using buildScript:
import org.apache.commons.codec.binary.Base64

buildscript {
    repositories {  // this is where the plugins are located
        mavenCentral()
        google()
    }
    dependencies { // these are the plugins that can be used in subprojects or in the build file itself
        classpath group: 'commons-codec', name: 'commons-codec', version: '1.2' // used in the task below
        classpath 'com.android.tools.build:gradle:4.1.0' // used in subproject
    }
}

tasks.register('encode') {
    doLast {
        def byte[] encodedString = new Base64().encode('hello world\n'.getBytes())
        println new String(encodedString)
    }
}
And you can apply the globally declared dependencies in the subproject that needs it:
plugins {
    id 'com.android.application'
}
Binary plugins published as external jar files can be added to a project by adding the plugin to the build script classpath and then applying the plugin.
External jars can be added to the build script classpath using the buildscript{} block as described in External dependencies for the build script:
buildscript {
    repositories {
        gradlePluginPortal()
    }
    dependencies {
        classpath("com.jfrog.bintray.gradle:gradle-bintray-plugin:1.8.5")
    }
}

apply(plugin = "com.jfrog.bintray")buildscript {
repositories {
gradlePluginPortal()
}
dependencies {
classpath 'com.jfrog.bintray.gradle:gradle-bintray-plugin:1.8.5'
}
}
apply plugin: 'com.jfrog.bintray'4. Applying script plugins using the legacy apply() method
A script plugin is an ad-hoc plugin, typically written and applied in the same build script. It is applied using the legacy application method:
class MyPlugin : Plugin<Project> {
    override fun apply(project: Project) {
        println("Plugin ${this.javaClass.simpleName} applied on ${project.name}")
    }
}

apply<MyPlugin>()
Let’s take a rudimentary example of a plugin written in a file called other.gradle located in the same directory as the build.gradle file:
public class Other implements Plugin<Project> {
    @Override
    void apply(Project project) {
        // Does something
    }
}
First, import the external file using:
apply from: 'other.gradle'Then you can apply it:
apply plugin: OtherScript plugins are automatically resolved and can be applied from a script on the local filesystem or remotely:
apply(from = "other.gradle.kts")apply from: 'other.gradle'Filesystem locations are relative to the project directory, while remote script locations are specified with an HTTP URL. Multiple script plugins (of either form) can be applied to a given target.
Plugin Management
The pluginManagement{} block is used to configure repositories for plugin resolution and to define version constraints for plugins that are applied in the build scripts.
The pluginManagement{} block can be used in a settings.gradle(.kts) file, where it must be the first block in the file:
pluginManagement {
    plugins {
    }
    resolutionStrategy {
    }
    repositories {
    }
}
rootProject.name = "plugin-management"pluginManagement {
plugins {
}
resolutionStrategy {
}
repositories {
}
}
rootProject.name = 'plugin-management'The block can also be used in Initialization Script:
settingsEvaluated {
    pluginManagement {
        plugins {
        }
        resolutionStrategy {
        }
        repositories {
        }
    }
}settingsEvaluated { settings ->
settings.pluginManagement {
plugins {
}
resolutionStrategy {
}
repositories {
}
}
}Custom Plugin Repositories
By default, the plugins{} DSL resolves plugins from the public Gradle Plugin Portal.
Many build authors would also like to resolve plugins from private Maven or Ivy repositories because they contain proprietary implementation details or to have more control over what plugins are available to their builds.
To specify custom plugin repositories, use the repositories{} block inside pluginManagement{}:
pluginManagement {
    repositories {
        maven(url = "./maven-repo")
        gradlePluginPortal()
        ivy(url = "./ivy-repo")
    }
}pluginManagement {
repositories {
maven {
url './maven-repo'
}
gradlePluginPortal()
ivy {
url './ivy-repo'
}
}
}This tells Gradle to first look in the Maven repository at ../maven-repo when resolving plugins and then to check the Gradle Plugin Portal if the plugins are not found in the Maven repository.
If you don’t want the Gradle Plugin Portal to be searched, omit the gradlePluginPortal() line.
Finally, the Ivy repository at ../ivy-repo will be checked.
Plugin Version Management
A plugins{} block inside pluginManagement{} allows all plugin versions for the build to be defined in a single location.
Plugins can then be applied by id to any build script via the plugins{} block.
One benefit of setting plugin versions this way is that the pluginManagement.plugins{} does not have the same constrained syntax as the build script plugins{} block.
This allows plugin versions to be taken from gradle.properties, or loaded via another mechanism.
Managing plugin versions via pluginManagement:
pluginManagement {
  val helloPluginVersion: String by settings
  plugins {
    id("com.example.hello") version "${helloPluginVersion}"
  }
}plugins {
id("com.example.hello")
}helloPluginVersion=1.0.0pluginManagement {
plugins {
id 'com.example.hello' version "${helloPluginVersion}"
}
}plugins {
id 'com.example.hello'
}helloPluginVersion=1.0.0The plugin version is loaded from gradle.properties and configured in the settings script, allowing the plugin to be added to any project without specifying the version.
Plugin Resolution Rules
Plugin resolution rules allow you to modify plugin requests made in plugins{} blocks, e.g., changing the requested version or explicitly specifying the implementation artifact coordinates.
To add resolution rules, use the resolutionStrategy{} inside the pluginManagement{} block:
pluginManagement {
    resolutionStrategy {
        eachPlugin {
            if (requested.id.namespace == "com.example") {
                useModule("com.example:sample-plugins:1.0.0")
            }
        }
    }
    repositories {
        maven {
            url = uri("./maven-repo")
        }
        gradlePluginPortal()
        ivy {
            url = uri("./ivy-repo")
        }
    }
}pluginManagement {
resolutionStrategy {
eachPlugin {
if (requested.id.namespace == 'com.example') {
useModule('com.example:sample-plugins:1.0.0')
}
}
}
repositories {
maven {
url './maven-repo'
}
gradlePluginPortal()
ivy {
url './ivy-repo'
}
}
}This tells Gradle to use the specified plugin implementation artifact instead of its built-in default mapping from plugin ID to Maven/Ivy coordinates.
Custom Maven and Ivy plugin repositories must contain plugin marker artifacts and the artifacts that implement the plugin. Read Gradle Plugin Development Plugin for more information on publishing plugins to custom repositories.
See PluginManagementSpec for complete documentation for using the pluginManagement{} block.
Plugin Marker Artifacts
Since the plugins{} DSL block only allows for declaring plugins by their globally unique plugin id and version properties, Gradle needs a way to look up the coordinates of the plugin implementation artifact.
To do so, Gradle will look for a Plugin Marker Artifact with the coordinates plugin.id:plugin.id.gradle.plugin:plugin.version.
This marker needs to have a dependency on the actual plugin implementation.
Publishing these markers is automated by the java-gradle-plugin.
For example, the following complete sample from the sample-plugins project shows how to publish a com.example.hello plugin and a com.example.goodbye plugin to both an Ivy and Maven repository using the combination of the java-gradle-plugin, the maven-publish plugin, and the ivy-publish plugin.
plugins {
    `java-gradle-plugin`
    `maven-publish`
    `ivy-publish`
}

group = "com.example"
version = "1.0.0"

gradlePlugin {
    plugins {
        create("hello") {
            id = "com.example.hello"
            implementationClass = "com.example.hello.HelloPlugin"
        }
        create("goodbye") {
            id = "com.example.goodbye"
            implementationClass = "com.example.goodbye.GoodbyePlugin"
        }
    }
}

publishing {
    repositories {
        maven {
            url = uri(layout.buildDirectory.dir("maven-repo"))
        }
        ivy {
            url = uri(layout.buildDirectory.dir("ivy-repo"))
        }
    }
}plugins {
id 'java-gradle-plugin'
id 'maven-publish'
id 'ivy-publish'
}
group 'com.example'
version '1.0.0'
gradlePlugin {
plugins {
hello {
id = 'com.example.hello'
implementationClass = 'com.example.hello.HelloPlugin'
}
goodbye {
id = 'com.example.goodbye'
implementationClass = 'com.example.goodbye.GoodbyePlugin'
}
}
}
publishing {
repositories {
maven {
url layout.buildDirectory.dir("maven-repo")
}
ivy {
url layout.buildDirectory.dir("ivy-repo")
}
}
}Running gradle publish in the sample directory creates the following Maven repository layout (the Ivy layout is similar):
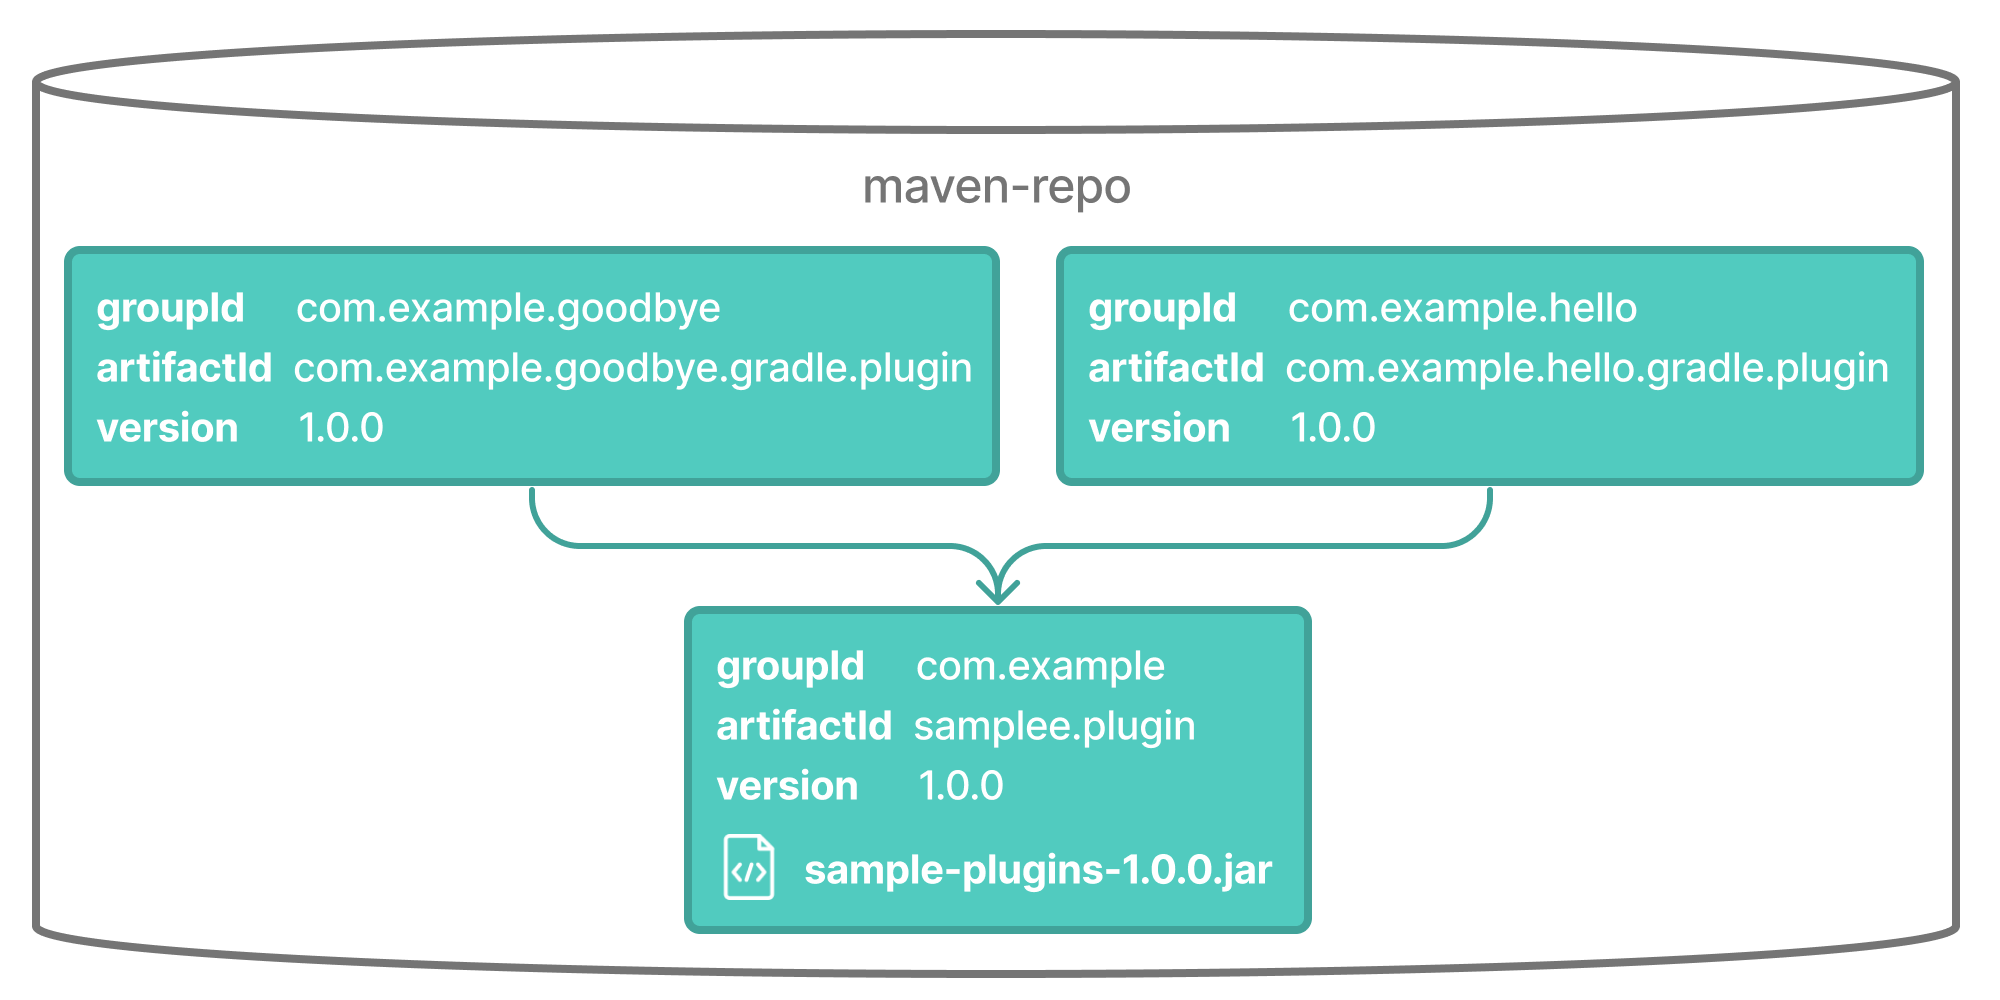
Legacy Plugin Application
With the introduction of the plugins DSL, users should have little reason to use the legacy method of applying plugins. It is documented here in case a build author cannot use the plugin DSL due to restrictions in how it currently works.
apply(plugin = "java")apply plugin: 'java'Plugins can be applied using a plugin id. In the above case, we are using the short name "java" to apply the JavaPlugin.
Rather than using a plugin id, plugins can also be applied by simply specifying the class of the plugin:
apply<JavaPlugin>()apply plugin: JavaPluginThe JavaPlugin symbol in the above sample refers to the JavaPlugin.
This class does not strictly need to be imported as the org.gradle.api.plugins package is automatically imported in all build scripts (see Default imports).
Furthermore, one needs to append the ::class suffix to identify a class literal in Kotlin instead of .class in Java.
Furthermore, it is unnecessary to append .class to identify a class literal in Groovy as it is in Java.
Using a Version Catalog
When a project uses a version catalog, plugins can be referenced via aliases when applied.
Let’s take a look at a simple Version Catalog:
[versions]
intellij-plugin = "1.6"

[plugins]
jetbrains-intellij = { id = "org.jetbrains.intellij", version.ref = "intellij-plugin" }
Then a plugin can be applied to any build script using the alias method:
plugins {
    alias(libs.plugins.jetbrains.intellij)
}|
Tip
|
jetbrains-intellij is available as the Gradle generated safe accessor: jetbrains.intellij.
|
Next Step: Learn how to write Plugins >>
Writing Plugins
If Gradle or the Gradle community does not offer the specific capabilities your project needs, creating your own plugin could be a solution.
Additionally, if you find yourself duplicating build logic across subprojects and need a better way to organize it, custom plugins can help.
Custom plugin
A plugin is any class that implements the Plugin interface.
The example below is the most straightforward plugin, a "hello world" plugin:
import org.gradle.api.Plugin
import org.gradle.api.Project

abstract class SamplePlugin : Plugin<Project> {
    override fun apply(project: Project) {
        project.tasks.create("SampleTask") {
            println("Hello world!")
        }
    }
}
Script plugin
Many plugins start as a script plugin coded in a build script. This offers an easy way to rapidly prototype and experiment when building a plugin. Let’s take a look at an example:
// Define a task
abstract class CreateFileTask : DefaultTask() {                                     // (1)
    @get:Input
    abstract val fileText: Property<String>                                         // (2)

    @Input
    val fileName = "myfile.txt"

    @OutputFile
    val myFile: File = File(fileName)

    @TaskAction
    fun action() {
        myFile.createNewFile()
        myFile.writeText(fileText.get())
    }
}

// Define a plugin
abstract class MyPlugin : Plugin<Project> {                                         // (3)
    override fun apply(project: Project) {
        tasks {
            register("createFileTask", CreateFileTask::class) {
                group = "from my plugin"
                description = "Create myfile.txt in the current directory"
                fileText.set("HELLO FROM MY PLUGIN")
            }
        }
    }
}

// Apply the local plugin
apply<MyPlugin>() // (4)-
Subclass
DefaultTask(). -
Use lazy configuration in the task.
-
Extend the
org.gradle.api.Plugininterface. -
Apply the script plugin.
1. Subclass DefaultTask()
First, build a task by subclassing DefaultTask().
abstract class CreateFileTask : DefaultTask() { }This simple task adds a file to our application’s root directory.
2. Use Lazy Configuration
Gradle has a concept called lazy configuration, which allows task inputs and outputs to be referenced before they are actually set.
This is done via the Property class type.
abstract val fileText: Property<String>One advantage of this mechanism is that you can link the output file of one task to the input file of another, all before the filename has even been decided.
The Property class also knows which task it’s linked to, enabling Gradle to add the required task dependency automatically.
3. Extend the org.gradle.api.Plugin interface
Next, create a new class that extends the org.gradle.api.Plugin interface.
abstract class MyPlugin : Plugin<Project> {
    override fun apply() {}
}
You can add tasks and other logic in the apply() method.
4. Apply the script plugin
Finally, apply the local plugin in the build script.
apply<MyPlugin>()When MyPlugin is applied in the build script, Gradle calls the fun apply() {} method defined in the custom MyPlugin class.
This makes the plugin available to the application.
|
Note
|
Script plugins are NOT recommended. Script plugins offer an easy way to rapidly prototype build logic, before migrating it to a more permanent solution such as convention plugins or binary plugins. |
Convention Plugins
Convention plugins are a way to encapsulate and reuse common build logic in Gradle. They allow you to define a set of conventions for a project, and then apply those conventions to other projects or modules.
The example above has been re-written as a convention plugin stored in buildSrc:
import org.gradle.api.DefaultTask
import org.gradle.api.Plugin
import org.gradle.api.Project
import org.gradle.api.provider.Property
import org.gradle.api.tasks.Input
import org.gradle.api.tasks.OutputFile
import org.gradle.api.tasks.TaskAction
import java.io.File

abstract class CreateFileTask : DefaultTask() {
    @get:Input
    abstract val fileText: Property<String>

    @Input
    val fileName = project.rootDir.toString() + "/myfile.txt"

    @OutputFile
    val myFile: File = File(fileName)

    @TaskAction
    fun action() {
        myFile.createNewFile()
        myFile.writeText(fileText.get())
    }
}

class MyConventionPlugin : Plugin<Project> {
    override fun apply(project: Project) {
        project.tasks.register("createFileTask", CreateFileTask::class.java) {
            group = "from my plugin"
            description = "Create myfile.txt in the current directory"
            fileText.set("HELLO FROM MY PLUGIN")
        }
    }
}
The plugin can be given an id using a gradlePlugin{} block so that it can be referenced in the root:
gradlePlugin {
    plugins {
        create("my-convention-plugin") {
            id = "com.gradle.plugin.my-convention-plugin"
            implementationClass = "com.gradle.plugin.MyConventionPlugin"
        }
    }
}
The gradlePlugin{} block defines the plugins being built by the project.
With the newly created id, the plugin can be applied in other build scripts accordingly:
plugins {
    application
    id("com.gradle.plugin.my-convention-plugin") // Apply the new plugin
}
Binary Plugins
A binary plugin is a plugin that is implemented in a compiled language and is packaged as a JAR file. It is resolved as a dependency rather than compiled from source.
For most use cases, convention plugins must be updated infrequently. Having each developer execute the plugin build as part of their development process is wasteful, and we can instead distribute them as binary dependencies.
There are two ways to update the convention plugin in the example above into a binary plugin.
-
Use composite builds:
settings.gradle.ktsincludeBuild("my-plugin") -
Publish the plugin to a repository:
build.gradle.ktsplugins { id("com.gradle.plugin.myconventionplugin") version "1.0.0" }
Consult the Developing Plugins chapter to learn more.
STRUCTURING BUILDS
Structuring Projects with Gradle
It is important to structure your Gradle project to optimize build performance. A multi-project build is the standard in Gradle.

A multi-project build consists of one root project and one or more subprojects. Gradle can build the root project and any number of the subprojects in a single execution.
Project locations
Multi-project builds contain a single root project in a directory that Gradle views as the root path: ..
Subprojects are located physically under the root path: ./subproject.
A subproject has a path, which denotes the position of that subproject in the multi-project build. In most cases, the project path is consistent with its location in the file system.
The project structure is created in the settings.gradle(.kts) file.
The settings file must be present in the root directory.
A simple multi-project build
Let’s look at a basic multi-project build example that contains a root project and a single subproject.
The root project is called basic-multiproject, located somewhere on your machine.
From Gradle’s perspective, the root is the top-level directory ..
The project contains a single subproject called ./app:
.
├── app
│   ...
│   └── build.gradle.kts
└── settings.gradle.kts
.
├── app
│ ...
│ └── build.gradle
└── settings.gradleThis is the recommended project structure for starting any Gradle project. The build init plugin also generates skeleton projects that follow this structure - a root project with a single subproject:
The settings.gradle(.kts) file describes the project structure to Gradle:
rootProject.name = "basic-multiproject"
include("app")rootProject.name = 'basic-multiproject'
include 'app'In this case, Gradle will look for a build file for the app subproject in the ./app directory.
You can view the structure of a multi-project build by running the projects command:
$ ./gradlew -q projects

------------------------------------------------------------
Root project 'basic-multiproject'
------------------------------------------------------------

Root project 'basic-multiproject'
\--- Project ':app'

To see a list of the tasks of a project, run gradle <project-path>:tasks
For example, try running gradle :app:tasks
In this example, the app subproject is a Java application that applies the application plugin and configures the main class.
The application prints Hello World to the console:
plugins {
    id("application")
}

application {
    mainClass = "com.example.Hello"
}plugins {
id 'application'
}
application {
mainClass = 'com.example.Hello'
}package com.example;
public class Hello {
public static void main(String[] args) {
System.out.println("Hello, world!");
}
}You can run the application by executing the run task from the application plugin in the project root:
$ ./gradlew -q run
Hello, world!
Adding a subproject
In the settings file, you can use the include method to add another subproject to the root project:
include("project1", "project2:child1", "project3:child1")include 'project1', 'project2:child1', 'project3:child1'The include method takes project paths as arguments.
The project path is assumed to be equal to the relative physical file system path.
For example, a path services:api is mapped by default to a folder ./services/api (relative to the project root .).
More examples of how to work with the project path can be found in the DSL documentation of Settings.include(java.lang.String[]).
Let’s add another subproject called lib to the previously created project.
All we need to do is add another include statement in the root settings file:
rootProject.name = "basic-multiproject"
include("app")
include("lib")rootProject.name = 'basic-multiproject'
include 'app'
include 'lib'Gradle will then look for the build file of the new lib subproject in the ./lib/ directory:
.
├── app
│ ...
│ └── build.gradle.kts
├── lib
│ ...
│ └── build.gradle.kts
└── settings.gradle.kts.
├── app
│ ...
│ └── build.gradle
├── lib
│ ...
│ └── build.gradle
└── settings.gradleProject Descriptors
To further describe the project architecture to Gradle, the settings file provides project descriptors.
You can modify these descriptors in the settings file at any time.
To access a descriptor, you can:
include("project-a")
println(rootProject.name)
println(project(":project-a").name)include('project-a')
println rootProject.name
println project(':project-a').nameUsing this descriptor, you can change the name, project directory, and build file of a project:
rootProject.name = "main"
include("project-a")
project(":project-a").projectDir = file("custom/my-project-a")
project(":project-a").buildFileName = "project-a.gradle.kts"rootProject.name = 'main'
include('project-a')
project(':project-a').projectDir = file('custom/my-project-a')
project(':project-a').buildFileName = 'project-a.gradle'Consult the ProjectDescriptor class in the API documentation for more information.
Modifying a subproject path
Let’s take a hypothetical project with the following structure:
.
├── app
│ ...
│ └── build.gradle.kts
├── subs // Gradle may see this as a subproject
│ └── web // Gradle may see this as a subproject
│ └── my-web-module // Intended subproject
│ ...
│ └── build.gradle.kts
└── settings.gradle.kts.
├── app
│ ...
│ └── build.gradle
├── subs // Gradle may see this as a subproject
│ └── web // Gradle may see this as a subproject
│ └── my-web-module // Intended subproject
│ ...
│ └── build.gradle
└── settings.gradleIf your settings.gradle(.kts) looks like this:
include(':subs:web:my-web-module')Gradle sees a subproject with a logical project name of :subs:web:my-web-module and two, possibly unintentional, other subprojects logically named :subs and :subs:web.
This can lead to phantom build directories, especially when using allprojects{} or subproject{}.
To avoid this, you can use:
include(':subs:web:my-web-module')
project(':subs:web:my-web-module').projectDir = "subs/web/my-web-module"So that you only end up with a single subproject named :subs:web:my-web-module.
Or you can use:
include(':my-web-module')
project(':my-web-module').projectDir = "subs/web/my-web-module"So that you only end up with a single subproject named :my-web-module.
So, while the physical project layout is the same, the logical results are different.
Naming recommendations
As your project grows, naming and consistency get increasingly more important. To keep your builds maintainable, we recommend the following:
-
Keep default project names for subprojects: It is possible to configure custom project names in the settings file. However, it’s an unnecessary extra effort for the developers to track which projects belong to what folders.
-
Use lower case hyphenation for all project names: All letters are lowercase, and words are separated with a dash (
-) character. -
Define the root project name in the settings file: The
rootProject.nameeffectively assigns a name to the build, used in reports like Build Scans. If the root project name is not set, the name will be the container directory name, which can be unstable (i.e., you can check out your project in any directory). The name will be generated randomly if the root project name is not set and checked out to a file system’s root (e.g.,/orC:\).
Declaring Dependencies between Subprojects
What if one subproject depends on another subproject? What if one project needs the artifact produced by another project?

This is a common use case for multi-project builds. Gradle offers project dependencies for this.
Depending on another project
Let’s explore a theoretical multi-project build with the following layout:
.
├── api
│ ├── src
│ │ └──...
│ └── build.gradle.kts
├── services
│ └── person-service
│ ├── src
│ │ └──...
│ └── build.gradle.kts
├── shared
│ ├── src
│ │ └──...
│ └── build.gradle.kts
└── settings.gradle.kts.
├── api
│ ├── src
│ │ └──...
│ └── build.gradle
├── services
│ └── person-service
│ ├── src
│ │ └──...
│ └── build.gradle
├── shared
│ ├── src
│ │ └──...
│ └── build.gradle
└── settings.gradleIn this example, there are three subprojects called shared, api, and person-service:
-
The
person-servicesubproject depends on the other two subprojects,sharedandapi. -
The
apisubproject depends on thesharedsubproject.
We use the : separator to define a project path such as services:person-service or :shared.
Consult the DSL documentation of Settings.include(java.lang.String[]) for more information about defining project paths.
rootProject.name = "dependencies-java"
include("api", "shared", "services:person-service")plugins {
id("java")
}
repositories {
mavenCentral()
}
dependencies {
testImplementation("junit:junit:4.13")
}plugins {
id("java")
}
repositories {
mavenCentral()
}
dependencies {
testImplementation("junit:junit:4.13")
implementation(project(":shared"))
}plugins {
id("java")
}
repositories {
mavenCentral()
}
dependencies {
testImplementation("junit:junit:4.13")
implementation(project(":shared"))
implementation(project(":api"))
}rootProject.name = 'basic-dependencies'
include 'api', 'shared', 'services:person-service'plugins {
id 'java'
}
repositories {
mavenCentral()
}
dependencies {
testImplementation "junit:junit:4.13"
}plugins {
id 'java'
}
repositories {
mavenCentral()
}
dependencies {
testImplementation "junit:junit:4.13"
implementation project(':shared')
}plugins {
id 'java'
}
repositories {
mavenCentral()
}
dependencies {
testImplementation "junit:junit:4.13"
implementation project(':shared')
implementation project(':api')
}A project dependency affects execution order. It causes the other project to be built first and adds the output with the classes of the other project to the classpath. It also adds the dependencies of the other project to the classpath.
If you execute ./gradlew :api:compile, first the shared project is built, and then the api project is built.
Depending on artifacts produced by another project
Sometimes, you might want to depend on the output of a specific task within another project rather than the entire project. However, explicitly declaring a task dependency from one project to another is discouraged as it introduces unnecessary coupling between tasks.
The recommended way to model dependencies, where a task in one project depends on the output of another, is to produce the output and mark it as an "outgoing" artifact. Gradle’s dependency management engine allows you to share arbitrary artifacts between projects and build them on demand.
Sharing Build Logic between Subprojects
Subprojects in a multi-project build typically share some common dependencies.
Instead of copying and pasting the same Java version and libraries in each subproject build script, Gradle provides a special directory for storing shared build logic that can be automatically applied to subprojects.
Share logic in buildSrc
buildSrc is a Gradle-recognized and protected directory which comes with some benefits:
-
Reusable Build Logic:
buildSrcallows you to organize and centralize your custom build logic, tasks, and plugins in a structured manner. The code written in buildSrc can be reused across your project, making it easier to maintain and share common build functionality. -
Isolation from the Main Build:
Code placed in
buildSrcis isolated from the other build scripts of your project. This helps keep the main build scripts cleaner and more focused on project-specific configurations. -
Automatic Compilation and Classpath:
The contents of the
buildSrcdirectory are automatically compiled and included in the classpath of your main build. This means that classes and plugins defined in buildSrc can be directly used in your project’s build scripts without any additional configuration. -
Ease of Testing:
Since
buildSrcis a separate build, it allows for easy testing of your custom build logic. You can write tests for your build code, ensuring that it behaves as expected. -
Gradle Plugin Development:
If you are developing custom Gradle plugins for your project,
buildSrcis a convenient place to house the plugin code. This makes the plugins easily accessible within your project.
The buildSrc directory is treated as an included build.
For multi-project builds, there can be only one buildSrc directory, which must be in the root project directory.
|
Note
|
The downside of using buildSrc is that any change to it will invalidate every task in your project and require a rerun.
|
buildSrc uses the same source code conventions applicable to Java, Groovy, and Kotlin projects.
It also provides direct access to the Gradle API.
A typical project including buildSrc has the following layout:
.
├── buildSrc
│ ├── src
│ │ └──main
│ │ └──kotlin
│ │ └──MyCustomTask.kt // (1)
│ ├── shared.gradle.kts // (2)
│ └── build.gradle.kts
├── api
│ ├── src
│ │ └──...
│ └── build.gradle.kts // (3)
├── services
│ └── person-service
│ ├── src
│ │ └──...
│ └── build.gradle.kts // (3)
├── shared
│ ├── src
│ │ └──...
│ └── build.gradle.kts
└── settings.gradle.kts-
Create the
MyCustomTasktask. -
A shared build script.
-
Uses the
MyCustomTasktask and shared build script.
.
├── buildSrc
│ ├── src
│ │ └──main
│ │ └──kotlin
│ │ └──MyCustomTask.groovy // (1)
│ ├── shared.gradle // (2)
│ └── build.gradle
├── api
│ ├── src
│ │ └──...
│ └── build.gradle // (3)
├── services
│ └── person-service
│ ├── src
│ │ └──...
│ └── build.gradle // (3)
├── shared
│ ├── src
│ │ └──...
│ └── build.gradle
└── settings.gradle-
Create the
MyCustomTasktask. -
A shared build script.
-
Uses the
MyCustomTasktask and shared build script.
In the buildSrc, the build script shared.gradle(.kts) is created.
It contains dependencies and other build information that is common to multiple subprojects:
repositories {
mavenCentral()
}
dependencies {
implementation("org.slf4j:slf4j-api:1.7.32")
}repositories {
mavenCentral()
}
dependencies {
implementation 'org.slf4j:slf4j-api:1.7.32'
}In the buildSrc, the MyCustomTask is also created.
It is a helper task that is used as part of the build logic for multiple subprojects:
import org.gradle.api.DefaultTask
import org.gradle.api.tasks.TaskAction
open class MyCustomTask : DefaultTask() {
@TaskAction
fun calculateSum() {
// Custom logic to calculate the sum of two numbers
val num1 = 5
val num2 = 7
val sum = num1 + num2
// Print the result
println("Sum: $sum")
}
}import org.gradle.api.DefaultTask
import org.gradle.api.tasks.TaskAction
class MyCustomTask extends DefaultTask {
@TaskAction
void calculateSum() {
// Custom logic to calculate the sum of two numbers
int num1 = 5
int num2 = 7
int sum = num1 + num2
// Print the result
println "Sum: $sum"
}
}The MyCustomTask task is used in the build script of the api and shared projects.
The task is automatically available because it’s part of buildSrc.
The shared.build(.kts) file is also applied:
// Apply any other configurations specific to your project
// Use the build script defined in buildSrc
apply(from = rootProject.file("buildSrc/shared.gradle"))
// Use the custom task defined in buildSrc
tasks.register<MyCustomTask>("myCustomTask")// Apply any other configurations specific to your project
// Use the build script defined in buildSrc
apply from: rootProject.file('buildSrc/shared.gradle')
// Use the custom task defined in buildSrc
tasks.register('myCustomTask', MyCustomTask)Share logic using convention plugins
Gradle’s recommended way of organizing build logic is to use its plugin system.
We can write a plugin that encapsulates the build logic common to several subprojects in a project. This kind of plugin is called a convention plugin.
While writing plugins is outside the scope of this section, the recommended way to build a Gradle project is to put common build logic in a convention plugin located in the buildSrc.
Let’s take a look at an example project:
.
├── buildSrc
│ ├── src
│ │ └──main
│ │ └──kotlin
│ │ └──myproject.java-conventions.gradle // (1)
│ └── build.gradle.kts
├── api
│ ├── src
│ │ └──...
│ └── build.gradle.kts // (2)
├── services
│ └── person-service
│ ├── src
│ │ └──...
│ └── build.gradle.kts // (2)
├── shared
│ ├── src
│ │ └──...
│ └── build.gradle.kts // (2)
└── settings.gradle.kts-
Create the
myproject.java-conventionsconvention plugin. -
Applies the
myproject.java-conventionsconvention plugin.
.
├── buildSrc
│ ├── src
│ │ └──main
│ │ └──kotlin
│ │ └──myproject.java-conventions.gradle.kts // (1)
│ └── build.gradle
├── api
│ ├── src
│ │ └──...
│ └── build.gradle // (2)
├── services
│ └── person-service
│ ├── src
│ │ └──...
│ └── build.gradle // (2)
├── shared
│ ├── src
│ │ └──...
│ └── build.gradle // (2)
└── settings.gradle-
Create the
myproject.java-conventionsconvention plugin. -
Applies the
myproject.java-conventionsconvention plugin.
This build contains three subprojects:
rootProject.name = "dependencies-java"
include("api", "shared", "services:person-service")rootProject.name = 'dependencies-java'
include 'api', 'shared', 'services:person-service'The source code for the convention plugin created in the buildSrc directory is as follows:
plugins {
id("java")
}
group = "com.example"
version = "1.0"
repositories {
mavenCentral()
}
dependencies {
testImplementation("junit:junit:4.13")
}plugins {
id 'java'
}
group = 'com.example'
version = '1.0'
repositories {
mavenCentral()
}
dependencies {
testImplementation "junit:junit:4.13"
}The convention plugin is applied to the api, shared, and person-service subprojects:
plugins {
id("myproject.java-conventions")
}
dependencies {
implementation(project(":shared"))
}plugins {
id("myproject.java-conventions")
}plugins {
id("myproject.java-conventions")
}
dependencies {
implementation(project(":shared"))
implementation(project(":api"))
}plugins {
id 'myproject.java-conventions'
}
dependencies {
implementation project(':shared')
}plugins {
id 'myproject.java-conventions'
}plugins {
id 'myproject.java-conventions'
}
dependencies {
implementation project(':shared')
implementation project(':api')
}Do not use cross-project configuration
An improper way to share build logic between subprojects is cross-project configuration via the subprojects {} and allprojects {} DSL constructs.
|
Tip
|
Avoid using subprojects {} and allprojects {}.
|
With cross-configuration, build logic can be injected into a subproject which is not obvious when looking at its build script.
In the long run, cross-configuration usually grows in complexity and becomes a burden. Cross-configuration can also introduce configuration-time coupling between projects, which can prevent optimizations like configuration-on-demand from working properly.
Convention plugins versus cross-configuration
The two most common uses of cross-configuration can be better modeled using convention plugins:
-
Applying plugins or other configurations to subprojects of a certain type.
Often, the cross-configuration logic isif subproject is of type X, then configure Y. This is equivalent to applyingX-conventionsplugin directly to a subproject. -
Extracting information from subprojects of a certain type.
This use case can be modeled using outgoing configuration variants.
Composite Builds
A composite build is a build that includes other builds.

A composite build is similar to a Gradle multi-project build, except that instead of including subprojects, entire builds are included.
Composite builds allow you to:
-
Combine builds that are usually developed independently, for instance, when trying out a bug fix in a library that your application uses.
-
Decompose a large multi-project build into smaller, more isolated chunks that can be worked on independently or together as needed.
A build that is included in a composite build is referred to as an included build. Included builds do not share any configuration with the composite build or the other included builds. Each included build is configured and executed in isolation.
Defining a composite build
The following example demonstrates how two Gradle builds, normally developed separately, can be combined into a composite build.
my-composite
├── gradle
├── gradlew
├── settings.gradle.kts
├── build.gradle.kts
├── my-app
│ ├── settings.gradle.kts
│ └── app
│ ├── build.gradle.kts
│ └── src/main/java/org/sample/my-app/Main.java
└── my-utils
├── settings.gradle.kts
├── number-utils
│ ├── build.gradle.kts
│ └── src/main/java/org/sample/numberutils/Numbers.java
└── string-utils
├── build.gradle.kts
└── src/main/java/org/sample/stringutils/Strings.javaThe my-utils multi-project build produces two Java libraries, number-utils and string-utils.
The my-app build produces an executable using functions from those libraries.
The my-app build does not depend directly on my-utils.
Instead, it declares binary dependencies on the libraries produced by my-utils:
plugins {
id("application")
}
application {
mainClass = "org.sample.myapp.Main"
}
dependencies {
implementation("org.sample:number-utils:1.0")
implementation("org.sample:string-utils:1.0")
}plugins {
id 'application'
}
application {
mainClass = 'org.sample.myapp.Main'
}
dependencies {
implementation 'org.sample:number-utils:1.0'
implementation 'org.sample:string-utils:1.0'
}Defining a composite build via --include-build
The --include-build command-line argument turns the executed build into a composite, substituting dependencies from the included build into the executed build.
For example, the output of ./gradlew run --include-build ../my-utils run from my-app:
$ ./gradlew --include-build ../my-utils run link:https://docs.gradle.org/8.7/samples/build-organization/composite-builds/basic/tests/basicCli.out[role=include]
Defining a composite build via the settings file
It’s possible to make the above arrangement persistent by using Settings.includeBuild(java.lang.Object) to declare the included build in the settings.gradle(.kts) file.
The settings file can be used to add subprojects and included builds simultaneously.
Included builds are added by location:
includeBuild("my-utils")In the example, the settings.gradle(.kts) file combines otherwise separate builds:
rootProject.name = "my-composite"
includeBuild("my-app")
includeBuild("my-utils")rootProject.name = 'my-composite'
includeBuild 'my-app'
includeBuild 'my-utils'To execute the run task in the my-app build from my-composite, run ./gradlew my-app:app:run.
You can optionally define a run task in my-composite that depends on my-app:app:run so that you can execute ./gradlew run:
tasks.register("run") {
dependsOn(gradle.includedBuild("my-app").task(":app:run"))
}tasks.register('run') {
dependsOn gradle.includedBuild('my-app').task(':app:run')
}Including builds that define Gradle plugins
A special case of included builds are builds that define Gradle plugins.
These builds should be included using the includeBuild statement inside the pluginManagement {} block of the settings file.
Using this mechanism, the included build may also contribute a settings plugin that can be applied in the settings file itself:
pluginManagement {
includeBuild("../url-verifier-plugin")
}pluginManagement {
includeBuild '../url-verifier-plugin'
}Restrictions on included builds
Most builds can be included in a composite, including other composite builds. There are some restrictions.
In a regular build, Gradle ensures that each project has a unique project path. It makes projects identifiable and addressable without conflicts.
In a composite build, Gradle adds additional qualification to each project from an included build to avoid project path conflicts. The full path to identify a project in a composite build is called a build-tree path. It consists of a build path of an included build and a project path of the project.
By default, build paths and project paths are derived from directory names and structure on disk. Since included builds can be located anywhere on disk, their build path is determined by the name of the containing directory. This can sometimes lead to conflicts.
To summarize, the included builds must fulfill these requirements:
-
Each included build must have a unique build path.
-
Each included build path must not conflict with any project path of the main build.
These conditions guarantee that each project can be uniquely identified even in a composite build.
If conflicts arise, the way to resolve them is by changing the build name of an included build:
includeBuild("some-included-build") {
name = "other-name"
}|
Note
|
When a composite build is included in another composite build, both builds have the same parent. In other words, the nested composite build structure is flattened. |
Interacting with a composite build
Interacting with a composite build is generally similar to a regular multi-project build. Tasks can be executed, tests can be run, and builds can be imported into the IDE.
Executing tasks
Tasks from an included build can be executed from the command-line or IDE in the same way as tasks from a regular multi-project build. Executing a task will result in task dependencies being executed, as well as those tasks required to build dependency artifacts from other included builds.
You can call a task in an included build using a fully qualified path, for example, :included-build-name:project-name:taskName.
Project and task names can be abbreviated.
$ ./gradlew :included-build:subproject-a:compileJava > Task :included-build:subproject-a:compileJava $ ./gradlew :i-b:sA:cJ > Task :included-build:subproject-a:compileJava
To exclude a task from the command line, you need to provide the fully qualified path to the task.
|
Note
|
Included build tasks are automatically executed to generate required dependency artifacts, or the including build can declare a dependency on a task from an included build. |
Importing into the IDE
One of the most useful features of composite builds is IDE integration.
Importing a composite build permits sources from separate Gradle builds to be easily developed together. For every included build, each subproject is included as an IntelliJ IDEA Module or Eclipse Project. Source dependencies are configured, providing cross-build navigation and refactoring.
Declaring dependencies substituted by an included build
By default, Gradle will configure each included build to determine the dependencies it can provide.
The algorithm for doing this is simple.
Gradle will inspect the group and name for the projects in the included build and substitute project dependencies for any external dependency matching ${project.group}:${project.name}.
|
Note
|
By default, substitutions are not registered for the main build. To make the (sub)projects of the main build addressable by |
There are cases when the default substitutions determined by Gradle are insufficient or must be corrected for a particular composite. For these cases, explicitly declaring the substitutions for an included build is possible.
For example, a single-project build called anonymous-library, produces a Java utility library but does not declare a value for the group attribute:
plugins {
java
}plugins {
id 'java'
}When this build is included in a composite, it will attempt to substitute for the dependency module undefined:anonymous-library (undefined being the default value for project.group, and anonymous-library being the root project name).
Clearly, this isn’t useful in a composite build.
To use the unpublished library in a composite build, you can explicitly declare the substitutions that it provides:
includeBuild("anonymous-library") {
dependencySubstitution {
substitute(module("org.sample:number-utils")).using(project(":"))
}
}includeBuild('anonymous-library') {
dependencySubstitution {
substitute module('org.sample:number-utils') using project(':')
}
}With this configuration, the my-app composite build will substitute any dependency on org.sample:number-utils with a dependency on the root project of anonymous-library.
Deactivate included build substitutions for a configuration
If you need to resolve a published version of a module that is also available as part of an included build, you can deactivate the included build substitution rules on the ResolutionStrategy of the Configuration that is resolved. This is necessary because the rules are globally applied in the build, and Gradle does not consider published versions during resolution by default.
For example, we create a separate publishedRuntimeClasspath configuration that gets resolved to the published versions of modules that also exist in one of the local builds.
This is done by deactivating global dependency substitution rules:
configurations.create("publishedRuntimeClasspath") {
resolutionStrategy.useGlobalDependencySubstitutionRules = false
extendsFrom(configurations.runtimeClasspath.get())
isCanBeConsumed = false
attributes.attribute(Usage.USAGE_ATTRIBUTE, objects.named(Usage.JAVA_RUNTIME))
}configurations.create('publishedRuntimeClasspath') {
resolutionStrategy.useGlobalDependencySubstitutionRules = false
extendsFrom(configurations.runtimeClasspath)
canBeConsumed = false
attributes.attribute(Usage.USAGE_ATTRIBUTE, objects.named(Usage, Usage.JAVA_RUNTIME))
}A use-case would be to compare published and locally built JAR files.
Cases where included build substitutions must be declared
Many builds will function automatically as an included build, without declared substitutions. Here are some common cases where declared substitutions are required:
-
When the
archivesBaseNameproperty is used to set the name of the published artifact. -
When a configuration other than
defaultis published. -
When the
MavenPom.addFilter()is used to publish artifacts that don’t match the project name. -
When the
maven-publishorivy-publishplugins are used for publishing and the publication coordinates don’t match${project.group}:${project.name}.
Cases where composite build substitutions won’t work
Some builds won’t function correctly when included in a composite, even when dependency substitutions are explicitly declared.
This limitation is because a substituted project dependency will always point to the default configuration of the target project.
Any time the artifacts and dependencies specified for the default configuration of a project don’t match what is published to a repository, the composite build may exhibit different behavior.
Here are some cases where the published module metadata may be different from the project default configuration:
-
When a configuration other than
defaultis published. -
When the
maven-publishorivy-publishplugins are used. -
When the
POMorivy.xmlfile is tweaked as part of publication.
Builds using these features function incorrectly when included in a composite build.
Depending on tasks in an included build
While included builds are isolated from one another and cannot declare direct dependencies, a composite build can declare task dependencies on its included builds. The included builds are accessed using Gradle.getIncludedBuilds() or Gradle.includedBuild(java.lang.String), and a task reference is obtained via the IncludedBuild.task(java.lang.String) method.
Using these APIs, it is possible to declare a dependency on a task in a particular included build:
tasks.register("run") {
dependsOn(gradle.includedBuild("my-app").task(":app:run"))
}tasks.register('run') {
dependsOn gradle.includedBuild('my-app').task(':app:run')
}Or you can declare a dependency on tasks with a certain path in some or all of the included builds:
tasks.register("publishDeps") {
dependsOn(gradle.includedBuilds.map { it.task(":publishMavenPublicationToMavenRepository") })
}tasks.register('publishDeps') {
dependsOn gradle.includedBuilds*.task(':publishMavenPublicationToMavenRepository')
}Limitations of composite builds
Limitations of the current implementation include:
-
No support for included builds with publications that don’t mirror the project default configuration.
See Cases where composite builds won’t work. -
Multiple composite builds may conflict when run in parallel if more than one includes the same build.
Gradle does not share the project lock of a shared composite build between Gradle invocations to prevent concurrent execution.
Configuration On Demand
Configuration-on-demand attempts to configure only the relevant projects for the requested tasks, i.e., it only evaluates the build script file of projects participating in the build. This way, the configuration time of a large multi-project build can be reduced.
The configuration-on-demand feature is incubating, so only some builds are guaranteed to work correctly. The feature works well for decoupled multi-project builds.
In configuration-on-demand mode, projects are configured as follows:
-
The root project is always configured.
-
The project in the directory where the build is executed is also configured, but only when Gradle is executed without any tasks.
This way, the default tasks behave correctly when projects are configured on demand. -
The standard project dependencies are supported, and relevant projects are configured.
If project A has a compile dependency on project B, then building A causes the configuration of both projects. -
The task dependencies declared via the task path are supported and cause relevant projects to be configured.
Example:someTask.dependsOn(":some-other-project:someOtherTask") -
A task requested via task path from the command line (or tooling API) causes the relevant project to be configured.
For example, buildingproject-a:project-b:someTaskcauses configuration ofproject-b.
Enable configuration-on-demand
You can enable configuration-on-demand using the --configure-on-demand flag or adding org.gradle.configureondemand=true to the gradle.properties file.
To configure on demand with every build run, see Gradle properties.
To configure on demand for a given build, see command-line performance-oriented options.
Decoupled projects
Gradle allows projects to access each other’s configurations and tasks during the configuration and execution phases. While this flexibility empowers build authors, it limits Gradle’s ability to perform optimizations such as parallel project builds and configuration on demand.
Projects are considered decoupled when they interact solely through declared dependencies and task dependencies. Any direct modification or reading of another project’s object creates coupling between the projects. Coupling during configuration can result in flawed build outcomes when using 'configuration on demand', while coupling during execution can affect parallel execution.
One common source of coupling is configuration injection, such as using allprojects{} or subprojects{} in build scripts.
To avoid coupling issues, it’s recommended to:
-
Refrain from referencing other subprojects' build scripts and prefer cross-configuration from the root project.
-
Avoid dynamically changing other projects' configurations during execution.
As Gradle evolves, it aims to provide features that leverage decoupled projects while offering solutions for common use cases like configuration injection without introducing coupling.
Parallel projects
Gradle’s parallel execution feature optimizes CPU utilization to accelerate builds by concurrently executing tasks from different projects.
To enable parallel execution, use the --parallel command-line argument or configure your build environment.
Gradle automatically determines the optimal number of parallel threads based on CPU cores.
During parallel execution, each worker handles a specific project exclusively. Task dependencies are respected, with workers prioritizing upstream tasks. However, tasks may not execute in alphabetical order, as in sequential mode. It’s crucial to correctly declare task dependencies and inputs/outputs to avoid ordering issues.
DEVELOPING TASKS
Understanding Tasks
A task represents some independent unit of work that a build performs, such as compiling classes, creating a JAR, generating Javadoc, or publishing archives to a repository.
Before reading this chapter, it’s recommended that you first read the Learning The Basics and complete the Tutorial.
Listing tasks
All available tasks in your project come from Gradle plugins and build scripts.
You can list all the available tasks in a project by running the following command in the terminal:
$ ./gradlew tasksLet’s take a very basic Gradle project as an example. The project has the following structure:
gradle-project
├── app
│ ├── build.gradle.kts // empty file - no build logic
│ └── ... // some java code
├── settings.gradle.kts // includes app subproject
├── gradle
│ └── ...
├── gradlew
└── gradlew.batgradle-project
├── app
│ ├── build.gradle // empty file - no build logic
│ └── ... // some java code
├── settings.gradle // includes app subproject
├── gradle
│ └── ...
├── gradlew
└── gradlew.batThe settings file contains the following:
rootProject.name = "gradle-project"
include("app")rootProject.name = 'gradle-project'
include('app')Currently, the app subproject’s build file is empty.
To see the tasks available in the app subproject, run ./gradlew :app:tasks:
$ ./gradlew :app:tasks
> Task :app:tasks
------------------------------------------------------------
Tasks runnable from project ':app'
------------------------------------------------------------
Help tasks
----------
buildEnvironment - Displays all buildscript dependencies declared in project ':app'.
dependencies - Displays all dependencies declared in project ':app'.
dependencyInsight - Displays the insight into a specific dependency in project ':app'.
help - Displays a help message.
javaToolchains - Displays the detected java toolchains.
kotlinDslAccessorsReport - Prints the Kotlin code for accessing the currently available project extensions and conventions.
outgoingVariants - Displays the outgoing variants of project ':app'.
projects - Displays the sub-projects of project ':app'.
properties - Displays the properties of project ':app'.
resolvableConfigurations - Displays the configurations that can be resolved in project ':app'.
tasks - Displays the tasks runnable from project ':app'.We observe that only a small number of help tasks are available at the moment. This is because the core of Gradle only provides tasks that analyze your build. Other tasks, such as the those that build your project or compile your code, are added by plugins.
Let’s explore this by adding the Gradle core base plugin to the app build script:
plugins {
id("base")
}plugins {
id('base')
}The base plugin adds central lifecycle tasks.
Now when we run ./gradlew app:tasks, we can see the assemble and build tasks are available:
$ ./gradlew :app:tasks
> Task :app:tasks
------------------------------------------------------------
Tasks runnable from project ':app'
------------------------------------------------------------
Build tasks
-----------
assemble - Assembles the outputs of this project.
build - Assembles and tests this project.
clean - Deletes the build directory.
Help tasks
----------
buildEnvironment - Displays all buildscript dependencies declared in project ':app'.
dependencies - Displays all dependencies declared in project ':app'.
dependencyInsight - Displays the insight into a specific dependency in project ':app'.
help - Displays a help message.
javaToolchains - Displays the detected java toolchains.
outgoingVariants - Displays the outgoing variants of project ':app'.
projects - Displays the sub-projects of project ':app'.
properties - Displays the properties of project ':app'.
resolvableConfigurations - Displays the configurations that can be resolved in project ':app'.
tasks - Displays the tasks runnable from project ':app'.
Verification tasks
------------------
check - Runs all checks.Task outcomes
When Gradle executes a task, it labels the task with outcomes via the console.
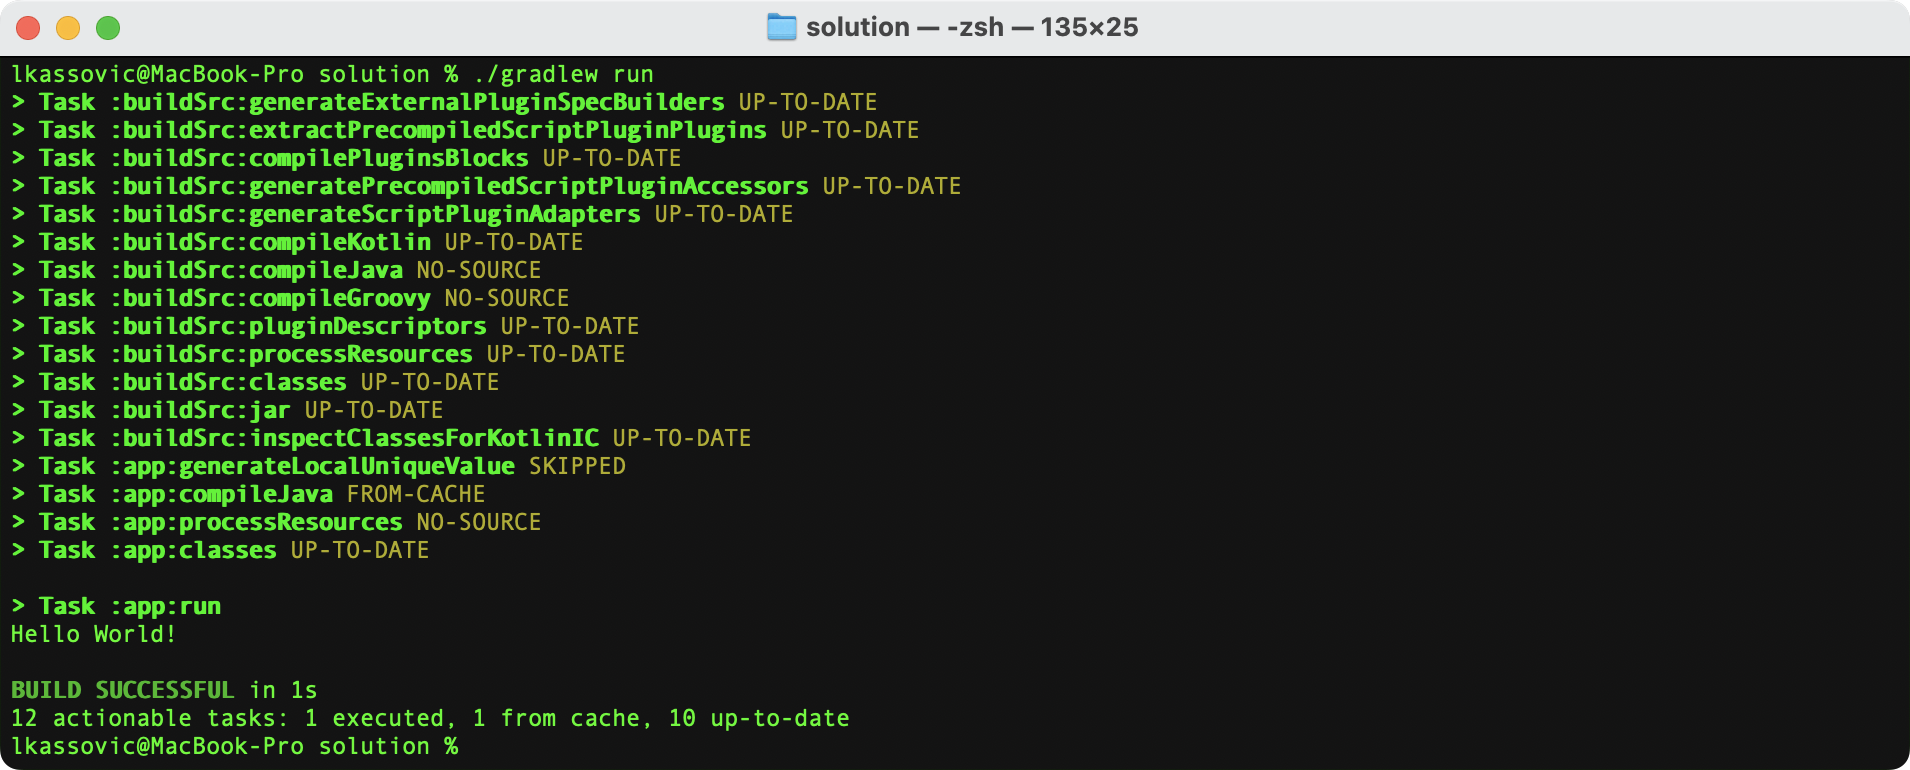
These labels are based on whether a task has actions to execute and if Gradle executed them. Actions include, but are not limited to, compiling code, zipping files, and publishing archives.
(no label)orEXECUTED-
Task executed its actions.
-
Task has actions and Gradle executed them.
-
Task has no actions and some dependencies, and Gradle executed one or more of the dependencies. See also Lifecycle Tasks.
-
UP-TO-DATE-
Task’s outputs did not change.
-
Task has outputs and inputs but they have not changed. See Incremental Build.
-
Task has actions, but the task tells Gradle it did not change its outputs.
-
Task has no actions and some dependencies, but all the dependencies are
UP-TO-DATE,SKIPPEDorFROM-CACHE. See Lifecycle Tasks. -
Task has no actions and no dependencies.
-
FROM-CACHE-
Task’s outputs could be found from a previous execution.
-
Task has outputs restored from the build cache. See Build Cache.
-
SKIPPED-
Task did not execute its actions.
-
Task has been explicitly excluded from the command-line. See Excluding tasks from execution.
-
Task has an
onlyIfpredicate return false. See Using a predicate.
-
NO-SOURCE-
Task did not need to execute its actions.
-
Task has inputs and outputs, but no sources (i.e., inputs were not found).
-
Task group and description
Task groups and descriptions are used to organize and describe tasks.
- Groups
-
Task groups are used to categorize tasks. When you run
./gradlew tasks, tasks are listed under their respective groups, making it easier to understand their purpose and relationship to other tasks. Groups are set using thegroupproperty. - Descriptions
-
Descriptions provide a brief explanation of what a task does. When you run
./gradlew tasks, the descriptions are shown next to each task, helping you understand its purpose and how to use it. Descriptions are set using thedescriptionproperty.
Let’s consider a basic Java application as an example.
The build contains a subproject called app.
Let’s list the available tasks in app at the moment:
$ ./gradlew :app:tasks
> Task :app:tasks
------------------------------------------------------------
Tasks runnable from project ':app'
------------------------------------------------------------
Application tasks
-----------------
run - Runs this project as a JVM application.
Build tasks
-----------
assemble - Assembles the outputs of this project.Here, the :run task is part of the Application group with the description Runs this project as a JVM application.
In code, it would look something like this:
tasks.register("run") {
group = "Application"
description = "Runs this project as a JVM application."
}tasks.register("run") {
group = "Application"
description = "Runs this project as a JVM application."
}Private and hidden tasks
Gradle doesn’t support marking a task as private.
However, tasks will only show up when running :tasks if task.group is set or no other task depends on it.
For instance, the following task will not appear when running ./gradlew :app:tasks because it does not have a group; it is called a hidden task:
tasks.register("helloTask") {
println("Hello")
}tasks.register("helloTask") {
println("Hello")
}Although helloTask is not listed, it can still be executed by Gradle:
$ ./gradlew :app:tasks
> Task :app:tasks
------------------------------------------------------------
Tasks runnable from project ':app'
------------------------------------------------------------
Application tasks
-----------------
run - Runs this project as a JVM application
Build tasks
-----------
assemble - Assembles the outputs of this project.Let’s add a group to the same task:
tasks.register("helloTask") {
group = "Other"
description = "Hello task"
println("Hello")
}tasks.register("helloTask") {
group = "Other"
description = "Hello task"
println("Hello")
}Now that the group is added, the task is visible:
$ ./gradlew :app:tasks
> Task :app:tasks
------------------------------------------------------------
Tasks runnable from project ':app'
------------------------------------------------------------
Application tasks
-----------------
run - Runs this project as a JVM application
Build tasks
-----------
assemble - Assembles the outputs of this project.
Other tasks
-----------
helloTask - Hello taskIn contrast, ./gradlew tasks --all will show all tasks; hidden and visible tasks are listed.
Grouping tasks
If you want to customize which tasks are shown to users when listed, you can group tasks and set the visibility of each group.
|
Note
|
Remember, even if you hide tasks, they are still available, and Gradle can still run them. |
Let’s start with an example built by Gradle init for a Java application with multiple subprojects.
The project structure is as follows:
gradle-project
├── app
│ ├── build.gradle.kts
│ └── src // some java code
│ └── ...
├── utilities
│ ├── build.gradle.kts
│ └── src // some java code
│ └── ...
├── list
│ ├── build.gradle.kts
│ └── src // some java code
│ └── ...
├── buildSrc
│ ├── build.gradle.kts
│ ├── settings.gradle.kts
│ └── src // common build logic
│ └── ...
├── settings.gradle.kts
├── gradle
├── gradlew
└── gradlew.batgradle-project
├── app
│ ├── build.gradle
│ └── src // some java code
│ └── ...
├── utilities
│ ├── build.gradle
│ └── src // some java code
│ └── ...
├── list
│ ├── build.gradle
│ └── src // some java code
│ └── ...
├── buildSrc
│ ├── build.gradle
│ ├── settings.gradle
│ └── src // common build logic
│ └── ...
├── settings.gradle
├── gradle
├── gradlew
└── gradlew.batRun app:tasks to see available tasks in the app subproject:
$ ./gradlew :app:tasks
> Task :app:tasks
------------------------------------------------------------
Tasks runnable from project ':app'
------------------------------------------------------------
Application tasks
-----------------
run - Runs this project as a JVM application
Build tasks
-----------
assemble - Assembles the outputs of this project.
build - Assembles and tests this project.
buildDependents - Assembles and tests this project and all projects that depend on it.
buildNeeded - Assembles and tests this project and all projects it depends on.
classes - Assembles main classes.
clean - Deletes the build directory.
jar - Assembles a jar archive containing the classes of the 'main' feature.
testClasses - Assembles test classes.
Distribution tasks
------------------
assembleDist - Assembles the main distributions
distTar - Bundles the project as a distribution.
distZip - Bundles the project as a distribution.
installDist - Installs the project as a distribution as-is.
Documentation tasks
-------------------
javadoc - Generates Javadoc API documentation for the 'main' feature.
Help tasks
----------
buildEnvironment - Displays all buildscript dependencies declared in project ':app'.
dependencies - Displays all dependencies declared in project ':app'.
dependencyInsight - Displays the insight into a specific dependency in project ':app'.
help - Displays a help message.
javaToolchains - Displays the detected java toolchains.
kotlinDslAccessorsReport - Prints the Kotlin code for accessing the currently available project extensions and conventions.
outgoingVariants - Displays the outgoing variants of project ':app'.
projects - Displays the sub-projects of project ':app'.
properties - Displays the properties of project ':app'.
resolvableConfigurations - Displays the configurations that can be resolved in project ':app'.
tasks - Displays the tasks runnable from project ':app'.
Verification tasks
------------------
check - Runs all checks.
test - Runs the test suite.If we look at the list of tasks available, even for a standard Java project, it’s extensive. Many of these tasks are rarely required directly by developers using the build.
We can configure the :tasks task and limit the tasks shown to a certain group.
Let’s create our own group so that all tasks are hidden by default by updating the app build script:
val myBuildGroup = "my app build" // Create a group name
tasks.register<TaskReportTask>("tasksAll") { // Register the tasksAll task
group = myBuildGroup
description = "Show additional tasks."
setShowDetail(true)
}
tasks.named<TaskReportTask>("tasks") { // Move all existing tasks to the group
displayGroup = myBuildGroup
}def myBuildGroup = "my app build" // Create a group name
tasks.register(TaskReportTask, "tasksAll") { // Register the tasksAll task
group = myBuildGroup
description = "Show additional tasks."
setShowDetail(true)
}
tasks.named(TaskReportTask, "tasks") { // Move all existing tasks to the group
displayGroup = myBuildGroup
}Now, when we list tasks available in app, the list is shorter:
$ ./gradlew :app:tasks
> Task :app:tasks
------------------------------------------------------------
Tasks runnable from project ':app'
------------------------------------------------------------
My app build tasks
------------------
tasksAll - Show additional tasks.Task categories
Gradle distinguishes between two categories of tasks:
-
Lifecycle tasks
-
Actionable tasks
Lifecycle tasks define targets you can call, such as :build your project.
Lifecycle tasks do not provide Gradle with actions.
They must be wired to actionable tasks.
The base Gradle plugin only adds lifecycle tasks.
Actionable tasks define actions for Gradle to take, such as :compileJava, which compiles the Java code of your project.
Actions include creating JARs, zipping files, publishing archives, and much more.
Plugins like the java-library plugin adds actionable tasks.
Let’s update the build script of the previous example, which is currently an empty file so that our app subproject is a Java library:
plugins {
id("java-library")
}plugins {
id('java-library')
}Once again, we list the available tasks to see what new tasks are available:
$ ./gradlew :app:tasks
> Task :app:tasks
------------------------------------------------------------
Tasks runnable from project ':app'
------------------------------------------------------------
Build tasks
-----------
assemble - Assembles the outputs of this project.
build - Assembles and tests this project.
buildDependents - Assembles and tests this project and all projects that depend on it.
buildNeeded - Assembles and tests this project and all projects it depends on.
classes - Assembles main classes.
clean - Deletes the build directory.
jar - Assembles a jar archive containing the classes of the 'main' feature.
testClasses - Assembles test classes.
Documentation tasks
-------------------
javadoc - Generates Javadoc API documentation for the 'main' feature.
Help tasks
----------
buildEnvironment - Displays all buildscript dependencies declared in project ':app'.
dependencies - Displays all dependencies declared in project ':app'.
dependencyInsight - Displays the insight into a specific dependency in project ':app'.
help - Displays a help message.
javaToolchains - Displays the detected java toolchains.
outgoingVariants - Displays the outgoing variants of project ':app'.
projects - Displays the sub-projects of project ':app'.
properties - Displays the properties of project ':app'.
resolvableConfigurations - Displays the configurations that can be resolved in project ':app'.
tasks - Displays the tasks runnable from project ':app'.
Verification tasks
------------------
check - Runs all checks.
test - Runs the test suite.We see that many new tasks are available such as jar and testClasses.
Additionally, the java-library plugin has wired actionable tasks to lifecycle tasks.
If we call the :build task, we can see several tasks have been executed, including the :app:compileJava task.
$./gradlew :app:build
> Task :app:compileJava
> Task :app:processResources NO-SOURCE
> Task :app:classes
> Task :app:jar
> Task :app:assemble
> Task :app:compileTestJava
> Task :app:processTestResources NO-SOURCE
> Task :app:testClasses
> Task :app:test
> Task :app:check
> Task :app:buildThe actionable :compileJava task is wired to the lifecycle :build task.
Incremental tasks
A key feature of Gradle tasks is their incremental nature.
Gradle can reuse results from prior builds.
Therefore, if we’ve built our project before and made only minor changes, rerunning :build will not require Gradle to perform extensive work.
For example, if we modify only the test code in our project, leaving the production code unchanged, executing the build will solely recompile the test code.
Gradle marks the tasks for the production code as UP-TO-DATE, indicating that it remains unchanged since the last successful build:
$./gradlew :app:build
lkassovic@MacBook-Pro temp1 % ./gradlew :app:build
> Task :app:compileJava UP-TO-DATE
> Task :app:processResources NO-SOURCE
> Task :app:classes UP-TO-DATE
> Task :app:jar UP-TO-DATE
> Task :app:assemble UP-TO-DATE
> Task :app:compileTestJava
> Task :app:processTestResources NO-SOURCE
> Task :app:testClasses
> Task :app:test
> Task :app:check UP-TO-DATE
> Task :app:build UP-TO-DATECaching tasks
Gradle can reuse results from past builds using the build cache.
To enable this feature, activate the build cache by using the --build-cache command line parameter or by setting org.gradle.caching=true in your gradle.properties file.
This optimization has the potential to accelerate your builds significantly:
$./gradlew :app:clean :app:build --build-cache
> Task :app:compileJava FROM-CACHE
> Task :app:processResources NO-SOURCE
> Task :app:classes UP-TO-DATE
> Task :app:jar
> Task :app:assemble
> Task :app:compileTestJava FROM-CACHE
> Task :app:processTestResources NO-SOURCE
> Task :app:testClasses UP-TO-DATE
> Task :app:test FROM-CACHE
> Task :app:check UP-TO-DATE
> Task :app:buildWhen Gradle can fetch outputs of a task from the cache, it labels the task with FROM-CACHE.
The build cache is handy if you switch between branches regularly. Gradle supports both local and remote build caches.
Developing tasks
When developing Gradle tasks, you have two choices:
-
Use an existing Gradle task type such as
Zip,Copy, orDelete -
Create your own Gradle task type such as
MyResolveTaskorCustomTaskUsingToolchains.
Task types are simply subclasses of the Gradle Task class.
With Gradle tasks, there are three states to consider:
-
Registering a task - using a task (implemented by you or provided by Gradle) in your build logic.
-
Configuring a task - defining inputs and outputs for a registered task.
-
Implementing a task - creating a custom task class (i.e., custom class type).
Registration is commonly done with the register() method.
Configuring a task is commonly done with the named() method.
Implementing a task is commonly done by extending Gradle’s DefaultTask class:
tasks.register<Copy>("myCopy") // (1)
tasks.named<Copy>("myCopy") { // (2)
from("resources")
into("target")
include("**/*.txt", "**/*.xml", "**/*.properties")
}
abstract class MyCopyTask : DefaultTask() { // (3)
@TaskAction
fun copyFiles() {
val sourceDir = File("sourceDir")
val destinationDir = File("destinationDir")
sourceDir.listFiles()?.forEach { file ->
if (file.isFile && file.extension == "txt") {
file.copyTo(File(destinationDir, file.name))
}
}
}
}-
Register the
myCopytask of typeCopyto let Gradle know we intend to use it in our build logic. -
Configure the registered
myCopytask with the inputs and outputs it needs according to its API. -
Implement a custom task type called
MyCopyTaskwhich extendsDefaultTaskand defines thecopyFilestask action.
tasks.register(Copy, "myCopy") // (1)
tasks.named(Copy, "myCopy") { // (2)
from "resources"
into "target"
include "**/*.txt", "**/*.xml", "**/*.properties"
}
abstract class MyCopyTask extends DefaultTask { // (3)
@TaskAction
void copyFiles() {
fileTree('sourceDir').matching {
include '**/*.txt'
}.forEach { file ->
file.copyTo(file.path.replace('sourceDir', 'destinationDir'))
}
}
}-
Register the
myCopytask of typeCopyto let Gradle know we intend to use it in our build logic. -
Configure the registered
myCopytask with the inputs and outputs it needs according to its API. -
Implement a custom task type called
MyCopyTaskwhich extendsDefaultTaskand defines thecopyFilestask action.
1. Registering tasks
You define actions for Gradle to take by registering tasks in build scripts or plugins.
Tasks are defined using strings for task names:
tasks.register("hello") {
doLast {
println("hello")
}
}tasks.register('hello') {
doLast {
println 'hello'
}
}In the example above, the task is added to the TasksCollection using the register() method in TaskContainer.
2. Configuring tasks
Gradle tasks must be configured to complete their action(s) successfully.
If a task needs to ZIP a file, it must be configured with the file name and location.
You can refer to the API for the Gradle Zip task to learn how to configure it appropriately.
Let’s look at the Copy task provided by Gradle as an example.
We first register a task called myCopy of type Copy in the build script:
tasks.register<Copy>("myCopy")tasks.register('myCopy', Copy)This registers a copy task with no default behavior.
Since the task is of type Copy, a Gradle supported task type, it can be configured using its API.
The following examples show several ways to achieve the same configuration:
1. Using the named() method:
Use named() to configure an existing task registered elsewhere:
tasks.named<Copy>("myCopy") {
from("resources")
into("target")
include("**/*.txt", "**/*.xml", "**/*.properties")
}tasks.named('myCopy') {
from 'resources'
into 'target'
include('**/*.txt', '**/*.xml', '**/*.properties')
}2. Using a configuration block:
Use a block to configure the task immediately upon registering it:
tasks.register<Copy>("copy") {
from("resources")
into("target")
include("**/*.txt", "**/*.xml", "**/*.properties")
}tasks.register('copy', Copy) {
from 'resources'
into 'target'
include('**/*.txt', '**/*.xml', '**/*.properties')
}3. Name method as call:
A popular option that is only supported in Groovy is the shorthand notation:
copy {
from("resources")
into("target")
include("**/*.txt", "**/*.xml", "**/*.properties")
}|
Note
|
This option breaks task configuration avoidance and is not recommended! |
Regardless of the method chosen, the task is configured with the name of the files to be copied and the location of the files.
3. Implementing tasks
Gradle provides many task types including Delete, Javadoc, Copy, Exec, Tar, and Pmd.
You can implement a custom task type if Gradle does not provide a task type that meets your build logic needs.
To create a custom task class, you extend DefaultTask and make the extending class abstract:
abstract class MyCopyTask extends DefaultTask {
}abstract class MyCopyTask : DefaultTask() {
}You can learn more about developing custom task types in Implementing Tasks.
Unresolved directive in userguide_single.adoc - include::lifecycle_tasks.adoc[leveloffset=+2] Unresolved directive in userguide_single.adoc - include::actionable_tasks.adoc[leveloffset=+2] :leveloffset: +2
Configuring Tasks Lazily
Knowing when and where a particular value is configured is difficult to track as a build grows in complexity. Gradle provides several ways to manage this using lazy configuration.
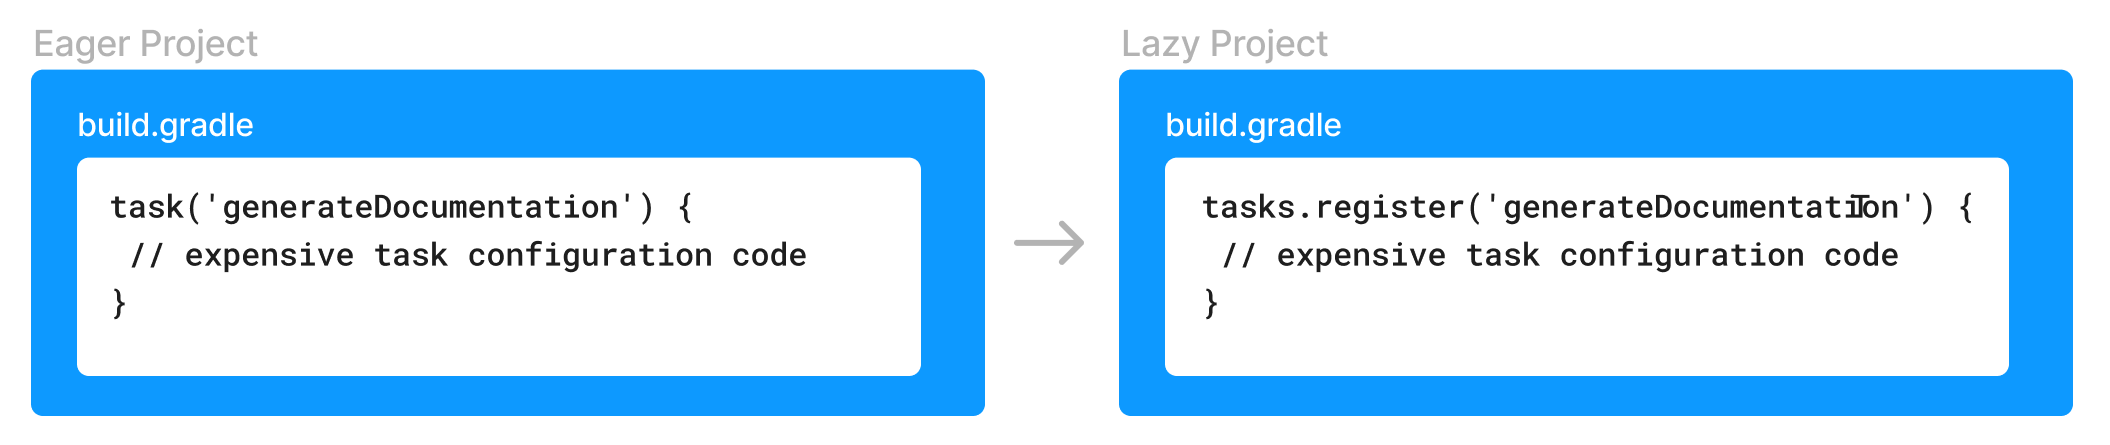
Understanding Lazy properties
Gradle provides lazy properties, which delay calculating a property’s value until it’s actually required.
Lazy properties provide three main benefits:
-
Deferred Value Resolution: Allows wiring Gradle models without needing to know when a property’s value will be known. For example, you may want to set the input source files of a task based on the source directories property of an extension, but the extension property value isn’t known until the build script or some other plugin configures them.
-
Automatic Task Dependency Management: Connects output of one task to input of another, automatically determining task dependencies. Property instances carry information about which task, if any, produces their value. Build authors do not need to worry about keeping task dependencies in sync with configuration changes.
-
Improved Build Performance: Avoids resource-intensive work during configuration, impacting build performance positively. For example, when a configuration value comes from parsing a file but is only used when functional tests are run, using a property instance to capture this means that the file is parsed only when the functional tests are run (and not when
cleanis run, for example).
Gradle represents lazy properties with two interfaces:
- Provider
-
Represents a value that can only be queried and cannot be changed.
-
Properties with these types are read-only.
-
The method Provider.get() returns the current value of the property.
-
A
Providercan be created from anotherProviderusing Provider.map(Transformer). -
Many other types extend
Providerand can be used wherever aProvideris required.
-
- Property
-
Represents a value that can be queried and changed.
-
Properties with these types are configurable.
-
Propertyextends theProviderinterface. -
The method Property.set(T) specifies a value for the property, overwriting whatever value may have been present.
-
The method Property.set(Provider) specifies a
Providerfor the value for the property, overwriting whatever value may have been present. This allows you to wire togetherProviderandPropertyinstances before the values are configured. -
A
Propertycan be created by the factory method ObjectFactory.property(Class).
-
Lazy properties are intended to be passed around and only queried when required. This typically happens during the execution phase.
The following demonstrates a task with a configurable greeting property and a read-only message property:
abstract class Greeting : DefaultTask() { // (1)
@get:Input
abstract val greeting: Property<String> // (2)
@Internal
val message: Provider<String> = greeting.map { it + " from Gradle" } // (3)
@TaskAction
fun printMessage() {
logger.quiet(message.get())
}
}
tasks.register<Greeting>("greeting") {
greeting.set("Hi") // (4)
greeting = "Hi" // (5)
}abstract class Greeting extends DefaultTask { // (1)
@Input
abstract Property<String> getGreeting() // (2)
@Internal
final Provider<String> message = greeting.map { it + ' from Gradle' } // (3)
@TaskAction
void printMessage() {
logger.quiet(message.get())
}
}
tasks.register("greeting", Greeting) {
greeting.set('Hi') // (4)
greeting = 'Hi' // (5)
}-
A task that displays a greeting
-
A configurable greeting
-
Read-only property calculated from the greeting
-
Configure the greeting
-
Alternative notation to calling Property.set()
$ gradle greeting > Task :greeting Hi from Gradle BUILD SUCCESSFUL in 0s 1 actionable task: 1 executed
The Greeting task has a property of type Property<String> to represent the configurable greeting and a property of type Provider<String> to represent the calculated, read-only, message.
The message Provider is created from the greeting Property using the map() method; its value is kept up-to-date as the value of the greeting property changes.
Creating a Property or Provider instance
Neither Provider nor its subtypes, such as Property, are intended to be implemented by a build script or plugin.
Gradle provides factory methods to create instances of these types instead.
In the previous example, two factory methods were presented:
-
ObjectFactory.property(Class) create a new
Propertyinstance. An instance of the ObjectFactory can be referenced from Project.getObjects() or by injectingObjectFactorythrough a constructor or method. -
Provider.map(Transformer) creates a new
Providerfrom an existingProviderorPropertyinstance.
See the Quick Reference for all of the types and factories available.
A Provider can also be created by the factory method ProviderFactory.provider(Callable).
|
Note
|
There are no specific methods to create a provider using a When writing a plugin or build script with Groovy, you can use the Similarly, when writing a plugin or build script with Kotlin, the Kotlin compiler will convert a Kotlin function into a |
Connecting properties together
An important feature of lazy properties is that they can be connected together so that changes to one property are automatically reflected in other properties.
Here is an example where the property of a task is connected to a property of a project extension:
// A project extension
interface MessageExtension {
// A configurable greeting
abstract val greeting: Property<String>
}
// A task that displays a greeting
abstract class Greeting : DefaultTask() {
// Configurable by the user
@get:Input
abstract val greeting: Property<String>
// Read-only property calculated from the greeting
@Internal
val message: Provider<String> = greeting.map { it + " from Gradle" }
@TaskAction
fun printMessage() {
logger.quiet(message.get())
}
}
// Create the project extension
val messages = project.extensions.create<MessageExtension>("messages")
// Create the greeting task
tasks.register<Greeting>("greeting") {
// Attach the greeting from the project extension
// Note that the values of the project extension have not been configured yet
greeting = messages.greeting
}
messages.apply {
// Configure the greeting on the extension
// Note that there is no need to reconfigure the task's `greeting` property. This is automatically updated as the extension property changes
greeting = "Hi"
}// A project extension
interface MessageExtension {
// A configurable greeting
Property<String> getGreeting()
}
// A task that displays a greeting
abstract class Greeting extends DefaultTask {
// Configurable by the user
@Input
abstract Property<String> getGreeting()
// Read-only property calculated from the greeting
@Internal
final Provider<String> message = greeting.map { it + ' from Gradle' }
@TaskAction
void printMessage() {
logger.quiet(message.get())
}
}
// Create the project extension
project.extensions.create('messages', MessageExtension)
// Create the greeting task
tasks.register("greeting", Greeting) {
// Attach the greeting from the project extension
// Note that the values of the project extension have not been configured yet
greeting = messages.greeting
}
messages {
// Configure the greeting on the extension
// Note that there is no need to reconfigure the task's `greeting` property. This is automatically updated as the extension property changes
greeting = 'Hi'
}$ gradle greeting > Task :greeting Hi from Gradle BUILD SUCCESSFUL in 0s 1 actionable task: 1 executed
This example calls the Property.set(Provider) method to attach a Provider to a Property to supply the value of the property.
In this case, the Provider happens to be a Property as well, but you can connect any Provider implementation, for example one created using Provider.map()
Working with files
In Working with Files, we introduced four collection types for File-like objects:
| Read-only Type | Configurable Type |
|---|---|
All of these types are also considered lazy types.
There are more strongly typed models used to represent elements of the file system: Directory and RegularFile. These types shouldn’t be confused with the standard Java File type as they are used to tell Gradle that you expect more specific values such as a directory or a non-directory, regular file.
Gradle provides two specialized Property subtypes for dealing with values of these types:
RegularFileProperty and DirectoryProperty. ObjectFactory has methods to create these: ObjectFactory.fileProperty() and ObjectFactory.directoryProperty().
A DirectoryProperty can also be used to create a lazily evaluated Provider for a Directory and RegularFile via DirectoryProperty.dir(String) and DirectoryProperty.file(String) respectively.
These methods create providers whose values are calculated relative to the location for the DirectoryProperty they were created from.
The values returned from these providers will reflect changes to the DirectoryProperty.
// A task that generates a source file and writes the result to an output directory
abstract class GenerateSource : DefaultTask() {
// The configuration file to use to generate the source file
@get:InputFile
abstract val configFile: RegularFileProperty
// The directory to write source files to
@get:OutputDirectory
abstract val outputDir: DirectoryProperty
@TaskAction
fun compile() {
val inFile = configFile.get().asFile
logger.quiet("configuration file = $inFile")
val dir = outputDir.get().asFile
logger.quiet("output dir = $dir")
val className = inFile.readText().trim()
val srcFile = File(dir, "${className}.java")
srcFile.writeText("public class ${className} { }")
}
}
// Create the source generation task
tasks.register<GenerateSource>("generate") {
// Configure the locations, relative to the project and build directories
configFile = layout.projectDirectory.file("src/config.txt")
outputDir = layout.buildDirectory.dir("generated-source")
}
// Change the build directory
// Don't need to reconfigure the task properties. These are automatically updated as the build directory changes
layout.buildDirectory = layout.projectDirectory.dir("output")// A task that generates a source file and writes the result to an output directory
abstract class GenerateSource extends DefaultTask {
// The configuration file to use to generate the source file
@InputFile
abstract RegularFileProperty getConfigFile()
// The directory to write source files to
@OutputDirectory
abstract DirectoryProperty getOutputDir()
@TaskAction
def compile() {
def inFile = configFile.get().asFile
logger.quiet("configuration file = $inFile")
def dir = outputDir.get().asFile
logger.quiet("output dir = $dir")
def className = inFile.text.trim()
def srcFile = new File(dir, "${className}.java")
srcFile.text = "public class ${className} { ... }"
}
}
// Create the source generation task
tasks.register('generate', GenerateSource) {
// Configure the locations, relative to the project and build directories
configFile = layout.projectDirectory.file('src/config.txt')
outputDir = layout.buildDirectory.dir('generated-source')
}
// Change the build directory
// Don't need to reconfigure the task properties. These are automatically updated as the build directory changes
layout.buildDirectory = layout.projectDirectory.dir('output')$ gradle generate > Task :generate configuration file = /home/user/gradle/samples/src/config.txt output dir = /home/user/gradle/samples/output/generated-source BUILD SUCCESSFUL in 0s 1 actionable task: 1 executed
$ gradle generate > Task :generate configuration file = /home/user/gradle/samples/kotlin/src/config.txt output dir = /home/user/gradle/samples/kotlin/output/generated-source BUILD SUCCESSFUL in 0s 1 actionable task: 1 executed
This example creates providers that represent locations in the project and build directories through Project.getLayout() with ProjectLayout.getBuildDirectory() and ProjectLayout.getProjectDirectory().
To close the loop, note that a DirectoryProperty, or a simple Directory, can be turned into a FileTree that allows the files and directories contained in the directory to be queried with DirectoryProperty.getAsFileTree() or Directory.getAsFileTree().
From a DirectoryProperty or a Directory, you can create FileCollection instances containing a set of the files contained in the directory with DirectoryProperty.files(Object...) or Directory.files(Object...).
Working with task inputs and outputs
Many builds have several tasks connected together, where one task consumes the outputs of another task as an input.
To make this work, we need to configure each task to know where to look for its inputs and where to place its outputs. Ensure that the producing and consuming tasks are configured with the same location and attach task dependencies between the tasks. This can be cumbersome and brittle if any of these values are configurable by a user or configured by multiple plugins, as task properties need to be configured in the correct order and locations, and task dependencies kept in sync as values change.
The Property API makes this easier by keeping track of the value of a property and the task that produces the value.
As an example, consider the following plugin with a producer and consumer task which are wired together:
abstract class Producer : DefaultTask() {
@get:OutputFile
abstract val outputFile: RegularFileProperty
@TaskAction
fun produce() {
val message = "Hello, World!"
val output = outputFile.get().asFile
output.writeText( message)
logger.quiet("Wrote '${message}' to ${output}")
}
}
abstract class Consumer : DefaultTask() {
@get:InputFile
abstract val inputFile: RegularFileProperty
@TaskAction
fun consume() {
val input = inputFile.get().asFile
val message = input.readText()
logger.quiet("Read '${message}' from ${input}")
}
}
val producer = tasks.register<Producer>("producer")
val consumer = tasks.register<Consumer>("consumer")
consumer {
// Connect the producer task output to the consumer task input
// Don't need to add a task dependency to the consumer task. This is automatically added
inputFile = producer.flatMap { it.outputFile }
}
producer {
// Set values for the producer lazily
// Don't need to update the consumer.inputFile property. This is automatically updated as producer.outputFile changes
outputFile = layout.buildDirectory.file("file.txt")
}
// Change the build directory.
// Don't need to update producer.outputFile and consumer.inputFile. These are automatically updated as the build directory changes
layout.buildDirectory = layout.projectDirectory.dir("output")abstract class Producer extends DefaultTask {
@OutputFile
abstract RegularFileProperty getOutputFile()
@TaskAction
void produce() {
String message = 'Hello, World!'
def output = outputFile.get().asFile
output.text = message
logger.quiet("Wrote '${message}' to ${output}")
}
}
abstract class Consumer extends DefaultTask {
@InputFile
abstract RegularFileProperty getInputFile()
@TaskAction
void consume() {
def input = inputFile.get().asFile
def message = input.text
logger.quiet("Read '${message}' from ${input}")
}
}
def producer = tasks.register("producer", Producer)
def consumer = tasks.register("consumer", Consumer)
consumer.configure {
// Connect the producer task output to the consumer task input
// Don't need to add a task dependency to the consumer task. This is automatically added
inputFile = producer.flatMap { it.outputFile }
}
producer.configure {
// Set values for the producer lazily
// Don't need to update the consumer.inputFile property. This is automatically updated as producer.outputFile changes
outputFile = layout.buildDirectory.file('file.txt')
}
// Change the build directory.
// Don't need to update producer.outputFile and consumer.inputFile. These are automatically updated as the build directory changes
layout.buildDirectory = layout.projectDirectory.dir('output')$ gradle consumer > Task :producer Wrote 'Hello, World!' to /home/user/gradle/samples/output/file.txt > Task :consumer Read 'Hello, World!' from /home/user/gradle/samples/output/file.txt BUILD SUCCESSFUL in 0s 2 actionable tasks: 2 executed
$ gradle consumer > Task :producer Wrote 'Hello, World!' to /home/user/gradle/samples/kotlin/output/file.txt > Task :consumer Read 'Hello, World!' from /home/user/gradle/samples/kotlin/output/file.txt BUILD SUCCESSFUL in 0s 2 actionable tasks: 2 executed
In the example above, the task outputs and inputs are connected before any location is defined. The setters can be called at any time before the task is executed, and the change will automatically affect all related input and output properties.
Another important thing to note in this example is the absence of any explicit task dependency.
Task outputs represented using Providers keep track of which task produces their value, and using them as task inputs will implicitly add the correct task dependencies.
Implicit task dependencies also work for input properties that are not files:
abstract class Producer : DefaultTask() {
@get:OutputFile
abstract val outputFile: RegularFileProperty
@TaskAction
fun produce() {
val message = "Hello, World!"
val output = outputFile.get().asFile
output.writeText( message)
logger.quiet("Wrote '${message}' to ${output}")
}
}
abstract class Consumer : DefaultTask() {
@get:Input
abstract val message: Property<String>
@TaskAction
fun consume() {
logger.quiet(message.get())
}
}
val producer = tasks.register<Producer>("producer") {
// Set values for the producer lazily
// Don't need to update the consumer.inputFile property. This is automatically updated as producer.outputFile changes
outputFile = layout.buildDirectory.file("file.txt")
}
tasks.register<Consumer>("consumer") {
// Connect the producer task output to the consumer task input
// Don't need to add a task dependency to the consumer task. This is automatically added
message = producer.flatMap { it.outputFile }.map { it.asFile.readText() }
}abstract class Producer extends DefaultTask {
@OutputFile
abstract RegularFileProperty getOutputFile()
@TaskAction
void produce() {
String message = 'Hello, World!'
def output = outputFile.get().asFile
output.text = message
logger.quiet("Wrote '${message}' to ${output}")
}
}
abstract class Consumer extends DefaultTask {
@Input
abstract Property<String> getMessage()
@TaskAction
void consume() {
logger.quiet(message.get())
}
}
def producer = tasks.register('producer', Producer) {
// Set values for the producer lazily
// Don't need to update the consumer.inputFile property. This is automatically updated as producer.outputFile changes
outputFile = layout.buildDirectory.file('file.txt')
}
tasks.register('consumer', Consumer) {
// Connect the producer task output to the consumer task input
// Don't need to add a task dependency to the consumer task. This is automatically added
message = producer.flatMap { it.outputFile }.map { it.asFile.text }
}$ gradle consumer > Task :producer Wrote 'Hello, World!' to /home/user/gradle/samples/build/file.txt > Task :consumer Hello, World! BUILD SUCCESSFUL in 0s 2 actionable tasks: 2 executed
$ gradle consumer > Task :producer Wrote 'Hello, World!' to /home/user/gradle/samples/kotlin/build/file.txt > Task :consumer Hello, World! BUILD SUCCESSFUL in 0s 2 actionable tasks: 2 executed
Working with collections
Gradle provides two lazy property types to help configure Collection properties.
These work exactly like any other Provider and, just like file providers, they have additional modeling around them:
-
For
Listvalues the interface is called ListProperty.
You can create a newListPropertyusing ObjectFactory.listProperty(Class) and specifying the element type. -
For
Setvalues the interface is called SetProperty.
You can create a newSetPropertyusing ObjectFactory.setProperty(Class) and specifying the element type.
This type of property allows you to overwrite the entire collection value with HasMultipleValues.set(Iterable) and HasMultipleValues.set(Provider) or add new elements through the various add methods:
-
HasMultipleValues.add(T): Add a single element to the collection
-
HasMultipleValues.add(Provider): Add a lazily calculated element to the collection
-
HasMultipleValues.addAll(Provider): Add a lazily calculated collection of elements to the list
Just like every Provider, the collection is calculated when Provider.get() is called. The following example shows the ListProperty in action:
abstract class Producer : DefaultTask() {
@get:OutputFile
abstract val outputFile: RegularFileProperty
@TaskAction
fun produce() {
val message = "Hello, World!"
val output = outputFile.get().asFile
output.writeText( message)
logger.quiet("Wrote '${message}' to ${output}")
}
}
abstract class Consumer : DefaultTask() {
@get:InputFiles
abstract val inputFiles: ListProperty<RegularFile>
@TaskAction
fun consume() {
inputFiles.get().forEach { inputFile ->
val input = inputFile.asFile
val message = input.readText()
logger.quiet("Read '${message}' from ${input}")
}
}
}
val producerOne = tasks.register<Producer>("producerOne")
val producerTwo = tasks.register<Producer>("producerTwo")
tasks.register<Consumer>("consumer") {
// Connect the producer task outputs to the consumer task input
// Don't need to add task dependencies to the consumer task. These are automatically added
inputFiles.add(producerOne.get().outputFile)
inputFiles.add(producerTwo.get().outputFile)
}
// Set values for the producer tasks lazily
// Don't need to update the consumer.inputFiles property. This is automatically updated as producer.outputFile changes
producerOne { outputFile = layout.buildDirectory.file("one.txt") }
producerTwo { outputFile = layout.buildDirectory.file("two.txt") }
// Change the build directory.
// Don't need to update the task properties. These are automatically updated as the build directory changes
layout.buildDirectory = layout.projectDirectory.dir("output")abstract class Producer extends DefaultTask {
@OutputFile
abstract RegularFileProperty getOutputFile()
@TaskAction
void produce() {
String message = 'Hello, World!'
def output = outputFile.get().asFile
output.text = message
logger.quiet("Wrote '${message}' to ${output}")
}
}
abstract class Consumer extends DefaultTask {
@InputFiles
abstract ListProperty<RegularFile> getInputFiles()
@TaskAction
void consume() {
inputFiles.get().each { inputFile ->
def input = inputFile.asFile
def message = input.text
logger.quiet("Read '${message}' from ${input}")
}
}
}
def producerOne = tasks.register('producerOne', Producer)
def producerTwo = tasks.register('producerTwo', Producer)
tasks.register('consumer', Consumer) {
// Connect the producer task outputs to the consumer task input
// Don't need to add task dependencies to the consumer task. These are automatically added
inputFiles.add(producerOne.get().outputFile)
inputFiles.add(producerTwo.get().outputFile)
}
// Set values for the producer tasks lazily
// Don't need to update the consumer.inputFiles property. This is automatically updated as producer.outputFile changes
producerOne.configure { outputFile = layout.buildDirectory.file('one.txt') }
producerTwo.configure { outputFile = layout.buildDirectory.file('two.txt') }
// Change the build directory.
// Don't need to update the task properties. These are automatically updated as the build directory changes
layout.buildDirectory = layout.projectDirectory.dir('output')$ gradle consumer > Task :producerOne Wrote 'Hello, World!' to /home/user/gradle/samples/output/one.txt > Task :producerTwo Wrote 'Hello, World!' to /home/user/gradle/samples/output/two.txt > Task :consumer Read 'Hello, World!' from /home/user/gradle/samples/output/one.txt Read 'Hello, World!' from /home/user/gradle/samples/output/two.txt BUILD SUCCESSFUL in 0s 3 actionable tasks: 3 executed
$ gradle consumer > Task :producerOne Wrote 'Hello, World!' to /home/user/gradle/samples/kotlin/output/one.txt > Task :producerTwo Wrote 'Hello, World!' to /home/user/gradle/samples/kotlin/output/two.txt > Task :consumer Read 'Hello, World!' from /home/user/gradle/samples/kotlin/output/one.txt Read 'Hello, World!' from /home/user/gradle/samples/kotlin/output/two.txt BUILD SUCCESSFUL in 0s 3 actionable tasks: 3 executed
Working with maps
Gradle provides a lazy MapProperty type to allow Map values to be configured.
You can create a MapProperty instance using ObjectFactory.mapProperty(Class, Class).
Similar to other property types, a MapProperty has a set() method that you can use to specify the value for the property.
Some additional methods allow entries with lazy values to be added to the map.
abstract class Generator: DefaultTask() {
@get:Input
abstract val properties: MapProperty<String, Int>
@TaskAction
fun generate() {
properties.get().forEach { entry ->
logger.quiet("${entry.key} = ${entry.value}")
}
}
}
// Some values to be configured later
var b = 0
var c = 0
tasks.register<Generator>("generate") {
properties.put("a", 1)
// Values have not been configured yet
properties.put("b", providers.provider { b })
properties.putAll(providers.provider { mapOf("c" to c, "d" to c + 1) })
}
// Configure the values. There is no need to reconfigure the task
b = 2
c = 3abstract class Generator extends DefaultTask {
@Input
abstract MapProperty<String, Integer> getProperties()
@TaskAction
void generate() {
properties.get().each { key, value ->
logger.quiet("${key} = ${value}")
}
}
}
// Some values to be configured later
def b = 0
def c = 0
tasks.register('generate', Generator) {
properties.put("a", 1)
// Values have not been configured yet
properties.put("b", providers.provider { b })
properties.putAll(providers.provider { [c: c, d: c + 1] })
}
// Configure the values. There is no need to reconfigure the task
b = 2
c = 3$ gradle generate > Task :generate a = 1 b = 2 c = 3 d = 4 BUILD SUCCESSFUL in 0s 1 actionable task: 1 executed
Applying a convention to a property
Often, you want to apply some convention, or default value to a property to be used if no value has been configured.
You can use the convention() method for this.
This method accepts either a value or a Provider, and this will be used as the value until some other value is configured.
tasks.register("show") {
val property = objects.property(String::class)
// Set a convention
property.convention("convention 1")
println("value = " + property.get())
// Can replace the convention
property.convention("convention 2")
println("value = " + property.get())
property.set("explicit value")
// Once a value is set, the convention is ignored
property.convention("ignored convention")
doLast {
println("value = " + property.get())
}
}tasks.register("show") {
def property = objects.property(String)
// Set a convention
property.convention("convention 1")
println("value = " + property.get())
// Can replace the convention
property.convention("convention 2")
println("value = " + property.get())
property.set("explicit value")
// Once a value is set, the convention is ignored
property.convention("ignored convention")
doLast {
println("value = " + property.get())
}
}$ gradle show value = convention 1 value = convention 2 > Task :show value = explicit value BUILD SUCCESSFUL in 0s 1 actionable task: 1 executed
Making a property unmodifiable
Most properties of a task or project are intended to be configured by plugins or build scripts so that they can use specific values for that build.
For example, a property that specifies the output directory for a compilation task may start with a value specified by a plugin. Then a build script might change the value to some custom location, then this value is used by the task when it runs. However, once the task starts to run, we want to prevent further property changes. This way we avoid errors that result from different consumers, such as the task action, Gradle’s up-to-date checks, build caching, or other tasks, using different values for the property.
Lazy properties provide several methods that you can use to disallow changes to their value once the value has been configured. The finalizeValue() method calculates the final value for the property and prevents further changes to the property.
libVersioning.version.finalizeValue()When the property’s value comes from a Provider, the provider is queried for its current value, and the result becomes the final value for the property.
This final value replaces the provider and the property no longer tracks the value of the provider.
Calling this method also makes a property instance unmodifiable and any further attempts to change the value of the property will fail.
Gradle automatically makes the properties of a task final when the task starts execution.
The finalizeValueOnRead() method is similar, except that the property’s final value is not calculated until the value of the property is queried.
modifiedFiles.finalizeValueOnRead()In other words, this method calculates the final value lazily as required, whereas finalizeValue() calculates the final value eagerly.
This method can be used when the value may be expensive to calculate or may not have been configured yet.
You also want to ensure that all consumers of the property see the same value when they query the value.
Using the Provider API
Guidelines to be successful with the Provider API:
-
The Property and Provider types have all of the overloads you need to query or configure a value. For this reason, you should follow the following guidelines:
-
Avoid simplifying calls like
obj.getProperty().get()andobj.getProperty().set(T)in your code by introducing additional getters and setters. -
When migrating your plugin to use providers, follow these guidelines:
-
If it’s a new property, expose it as a Property or Provider using a single getter.
-
If it’s incubating, change it to use a Property or Provider using a single getter.
-
If it’s a stable property, add a new Property or Provider and deprecate the old one. You should wire the old getter/setters into the new property as appropriate.
-
Provider Files API Reference
Use these types for read-only values:
- Provider<RegularFile>
-
File on disk
- Provider<Directory>
-
Directory on disk
- FileCollection
-
Unstructured collection of files
- FileTree
-
Hierarchy of files
- Factories
-
-
Project.fileTree(Object) will produce a ConfigurableFileTree, or you can use Project.zipTree(Object) and Project.tarTree(Object)
-
Property Files API Reference
Use these types for mutable values:
- RegularFileProperty
-
File on disk
- Factories
- DirectoryProperty
-
Directory on disk
- Factories
- ConfigurableFileCollection
-
Unstructured collection of files
- Factories
- ConfigurableFileTree
-
Hierarchy of files
- Factories
- SourceDirectorySet
-
Hierarchy of source directories
Lazy Collections API Reference
Use these types for mutable values:
- ListProperty<T>
-
a property whose value is
List<T>- Factories
- SetProperty<T>
-
a property whose value is
Set<T>- Factories
Lazy Objects API Reference
Use these types for read only values:
- Provider<T>
-
a property whose value is an instance of
T- Factories
-
-
ProviderFactory.provider(Callable). Always prefer one of the other factory methods over this method.
Use these types for mutable values:
- Property<T>
-
a property whose value is an instance of
T- Factories
Developing Parallel Tasks
Gradle provides an API that can split tasks into sections that can be executed in parallel.
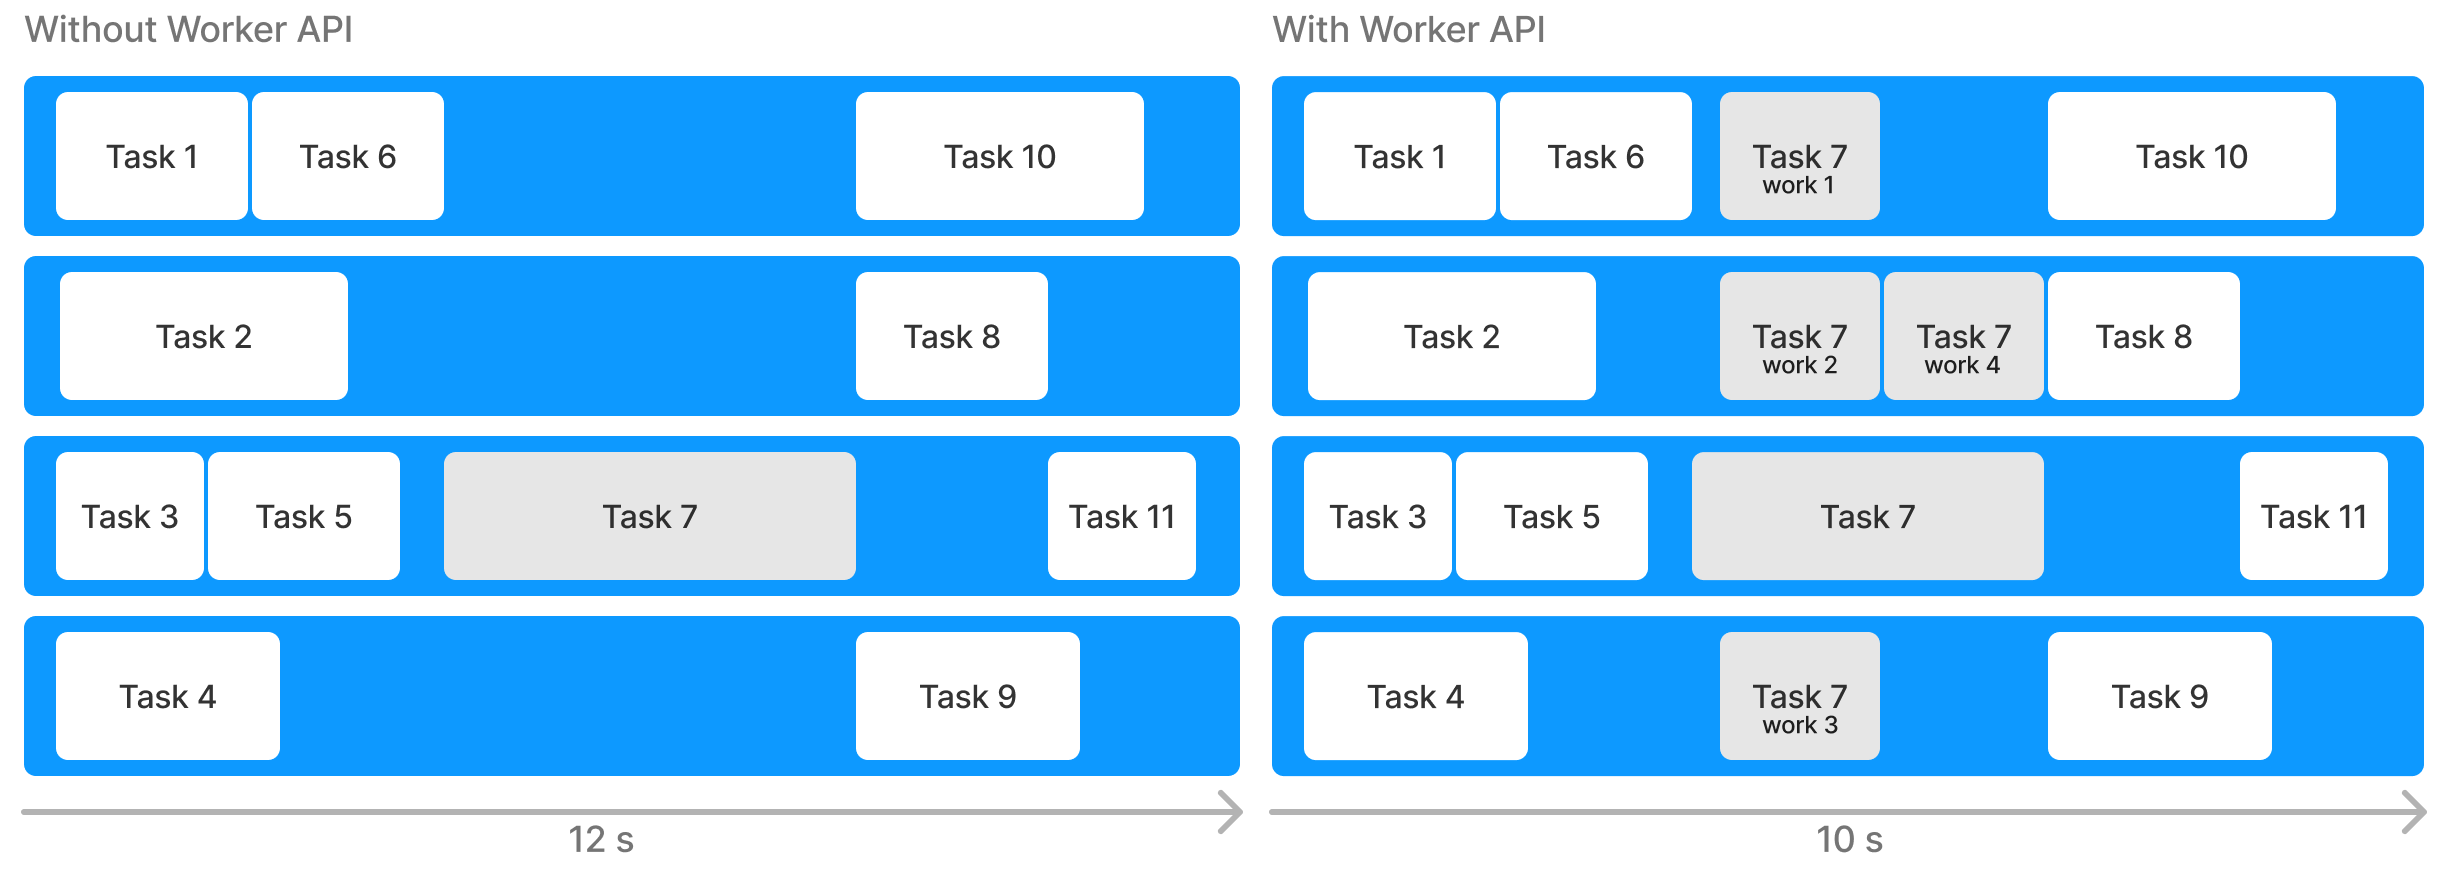
This allows Gradle to fully utilize the resources available and complete builds faster.
The Worker API
The Worker API provides the ability to break up the execution of a task action into discrete units of work and then execute that work concurrently and asynchronously.
Worker API example
The best way to understand how to use the API is to go through the process of converting an existing custom task to use the Worker API:
-
You’ll start by creating a custom task class that generates MD5 hashes for a configurable set of files.
-
Then, you’ll convert this custom task to use the Worker API.
-
Then, we’ll explore running the task with different levels of isolation.
In the process, you’ll learn about the basics of the Worker API and the capabilities it provides.
Step 1. Create a custom task class
First, create a custom task that generates MD5 hashes of a configurable set of files.
In a new directory, create a buildSrc/build.gradle(.kts) file:
repositories {
mavenCentral()
}
dependencies {
implementation("commons-io:commons-io:2.5")
implementation("commons-codec:commons-codec:1.9") // (1)
}repositories {
mavenCentral()
}
dependencies {
implementation 'commons-io:commons-io:2.5'
implementation 'commons-codec:commons-codec:1.9' // (1)
}-
Your custom task class will use Apache Commons Codec to generate MD5 hashes.
Next, create a custom task class in your buildSrc/src/main/java directory.
You should name this class CreateMD5:
import org.apache.commons.codec.digest.DigestUtils;
import org.apache.commons.io.FileUtils;
import org.gradle.api.file.DirectoryProperty;
import org.gradle.api.file.RegularFile;
import org.gradle.api.provider.Provider;
import org.gradle.api.tasks.OutputDirectory;
import org.gradle.api.tasks.SourceTask;
import org.gradle.api.tasks.TaskAction;
import org.gradle.workers.WorkerExecutor;
import java.io.File;
import java.io.FileInputStream;
import java.io.InputStream;
abstract public class CreateMD5 extends SourceTask { // (1)
@OutputDirectory
abstract public DirectoryProperty getDestinationDirectory(); // (2)
@TaskAction
public void createHashes() {
for (File sourceFile : getSource().getFiles()) { // (3)
try {
InputStream stream = new FileInputStream(sourceFile);
System.out.println("Generating MD5 for " + sourceFile.getName() + "...");
// Artificially make this task slower.
Thread.sleep(3000); // (4)
Provider<RegularFile> md5File = getDestinationDirectory().file(sourceFile.getName() + ".md5"); // (5)
FileUtils.writeStringToFile(md5File.get().getAsFile(), DigestUtils.md5Hex(stream), (String) null);
} catch (Exception e) {
throw new RuntimeException(e);
}
}
}
}-
SourceTask is a convenience type for tasks that operate on a set of source files.
-
The task output will go into a configured directory.
-
The task iterates over all the files defined as "source files" and creates an MD5 hash of each.
-
Insert an artificial sleep to simulate hashing a large file (the sample files won’t be that large).
-
The MD5 hash of each file is written to the output directory into a file of the same name with an "md5" extension.
Next, create a build.gradle(.kts) that registers your new CreateMD5 task:
plugins { id("base") } // (1)
tasks.register<CreateMD5>("md5") {
destinationDirectory = project.layout.buildDirectory.dir("md5") // (2)
source(project.layout.projectDirectory.file("src")) // (3)
}plugins { id 'base' } // (1)
tasks.register("md5", CreateMD5) {
destinationDirectory = project.layout.buildDirectory.dir("md5") // (2)
source(project.layout.projectDirectory.file('src')) // (3)
}-
Apply the
baseplugin so that you’ll have acleantask to use to remove the output. -
MD5 hash files will be written to
build/md5. -
This task will generate MD5 hash files for every file in the
srcdirectory.
You will need some source to generate MD5 hashes from.
Create three files in the src directory:
Intellectual growth should commence at birth and cease only at death.I was born not knowing and have had only a little time to change that here and there.Intelligence is the ability to adapt to change.At this point, you can test your task by running it ./gradlew md5:
$ gradle md5
The output should look similar to:
> Task :md5 Generating MD5 for einstein.txt... Generating MD5 for feynman.txt... Generating MD5 for hawking.txt... BUILD SUCCESSFUL in 9s 3 actionable tasks: 3 executed
In the build/md5 directory, you should now see corresponding files with an md5 extension containing MD5 hashes of the files from the src directory.
Notice that the task takes at least 9 seconds to run because it hashes each file one at a time (i.e., three files at ~3 seconds apiece).
Step 2. Convert to the Worker API
Although this task processes each file in sequence, the processing of each file is independent of any other file. This work can be done in parallel and take advantage of multiple processors. This is where the Worker API can help.
To use the Worker API, you need to define an interface that represents the parameters of each unit of work and extends org.gradle.workers.WorkParameters.
For the generation of MD5 hash files, the unit of work will require two parameters:
-
the file to be hashed and,
-
the file to write the hash to.
There is no need to create a concrete implementation because Gradle will generate one for us at runtime.
import org.gradle.api.file.RegularFileProperty;
import org.gradle.workers.WorkParameters;
public interface MD5WorkParameters extends WorkParameters {
RegularFileProperty getSourceFile(); // (1)
RegularFileProperty getMD5File();
}-
Use
Propertyobjects to represent the source and MD5 hash files.
Then, you need to refactor the part of your custom task that does the work for each individual file into a separate class.
This class is your "unit of work" implementation, and it should be an abstract class that extends org.gradle.workers.WorkAction:
import org.apache.commons.codec.digest.DigestUtils;
import org.apache.commons.io.FileUtils;
import org.gradle.workers.WorkAction;
import java.io.File;
import java.io.FileInputStream;
import java.io.InputStream;
public abstract class GenerateMD5 implements WorkAction<MD5WorkParameters> { // (1)
@Override
public void execute() {
try {
File sourceFile = getParameters().getSourceFile().getAsFile().get();
File md5File = getParameters().getMD5File().getAsFile().get();
InputStream stream = new FileInputStream(sourceFile);
System.out.println("Generating MD5 for " + sourceFile.getName() + "...");
// Artificially make this task slower.
Thread.sleep(3000);
FileUtils.writeStringToFile(md5File, DigestUtils.md5Hex(stream), (String) null);
} catch (Exception e) {
throw new RuntimeException(e);
}
}
}-
Do not implement the
getParameters()method - Gradle will inject this at runtime.
Now, change your custom task class to submit work to the WorkerExecutor instead of doing the work itself.
import org.gradle.api.Action;
import org.gradle.api.file.RegularFile;
import org.gradle.api.provider.Provider;
import org.gradle.api.tasks.*;
import org.gradle.workers.*;
import org.gradle.api.file.DirectoryProperty;
import javax.inject.Inject;
import java.io.File;
abstract public class CreateMD5 extends SourceTask {
@OutputDirectory
abstract public DirectoryProperty getDestinationDirectory();
@Inject
abstract public WorkerExecutor getWorkerExecutor(); // (1)
@TaskAction
public void createHashes() {
WorkQueue workQueue = getWorkerExecutor().noIsolation(); // (2)
for (File sourceFile : getSource().getFiles()) {
Provider<RegularFile> md5File = getDestinationDirectory().file(sourceFile.getName() + ".md5");
workQueue.submit(GenerateMD5.class, parameters -> { // (3)
parameters.getSourceFile().set(sourceFile);
parameters.getMD5File().set(md5File);
});
}
}
}-
The WorkerExecutor service is required in order to submit your work. Create an abstract getter method annotated
javax.inject.Inject, and Gradle will inject the service at runtime when the task is created. -
Before submitting work, get a
WorkQueueobject with the desired isolation mode (described below). -
When submitting the unit of work, specify the unit of work implementation, in this case
GenerateMD5, and configure its parameters.
At this point, you should be able to rerun your task:
$ gradle clean md5 > Task :md5 Generating MD5 for einstein.txt... Generating MD5 for feynman.txt... Generating MD5 for hawking.txt... BUILD SUCCESSFUL in 3s 3 actionable tasks: 3 executed
The results should look the same as before, although the MD5 hash files may be generated in a different order since the units of work are executed in parallel. This time, however, the task runs much faster. This is because the Worker API executes the MD5 calculation for each file in parallel rather than in sequence.
Step 3. Change the isolation mode
The isolation mode controls how strongly Gradle will isolate items of work from each other and the rest of the Gradle runtime.
There are three methods on WorkerExecutor that control this:
-
noIsolation() -
classLoaderIsolation() -
processIsolation()
The noIsolation() mode is the lowest level of isolation and will prevent a unit of work from changing the project state.
This is the fastest isolation mode because it requires the least overhead to set up and execute the work item.
However, it will use a single shared classloader for all units of work.
This means that each unit of work can affect one another through static class state.
It also means that every unit of work uses the same version of libraries on the buildscript classpath.
If you wanted the user to be able to configure the task to run with a different (but compatible) version of the
Apache Commons Codec library, you would need to use a different isolation mode.
First, you must change the dependency in buildSrc/build.gradle to be compileOnly.
This tells Gradle that it should use this dependency when building the classes, but should not put it on the build script classpath:
repositories {
mavenCentral()
}
dependencies {
implementation("commons-io:commons-io:2.5")
compileOnly("commons-codec:commons-codec:1.9")
}repositories {
mavenCentral()
}
dependencies {
implementation 'commons-io:commons-io:2.5'
compileOnly 'commons-codec:commons-codec:1.9'
}Next, change the CreateMD5 task to allow the user to configure the version of the codec library that they want to use.
It will resolve the appropriate version of the library at runtime and configure the workers to use this version.
The classLoaderIsolation() method tells Gradle to run this work in a thread with an isolated classloader:
import org.gradle.api.Action;
import org.gradle.api.file.ConfigurableFileCollection;
import org.gradle.api.file.DirectoryProperty;
import org.gradle.api.file.RegularFile;
import org.gradle.api.provider.Provider;
import org.gradle.api.tasks.*;
import org.gradle.process.JavaForkOptions;
import org.gradle.workers.*;
import javax.inject.Inject;
import java.io.File;
import java.util.Set;
abstract public class CreateMD5 extends SourceTask {
@InputFiles
abstract public ConfigurableFileCollection getCodecClasspath(); // (1)
@OutputDirectory
abstract public DirectoryProperty getDestinationDirectory();
@Inject
abstract public WorkerExecutor getWorkerExecutor();
@TaskAction
public void createHashes() {
WorkQueue workQueue = getWorkerExecutor().classLoaderIsolation(workerSpec -> {
workerSpec.getClasspath().from(getCodecClasspath()); // (2)
});
for (File sourceFile : getSource().getFiles()) {
Provider<RegularFile> md5File = getDestinationDirectory().file(sourceFile.getName() + ".md5");
workQueue.submit(GenerateMD5.class, parameters -> {
parameters.getSourceFile().set(sourceFile);
parameters.getMD5File().set(md5File);
});
}
}
}-
Expose an input property for the codec library classpath.
-
Configure the classpath on the ClassLoaderWorkerSpec when creating the work queue.
Next, you need to configure your build so that it has a repository to look up the codec version at task execution time. We also create a dependency to resolve our codec library from this repository:
plugins { id("base") }
repositories {
mavenCentral() // (1)
}
val codec = configurations.create("codec") { // (2)
attributes {
attribute(Usage.USAGE_ATTRIBUTE, objects.named(Usage.JAVA_RUNTIME))
}
isVisible = false
isCanBeConsumed = false
}
dependencies {
codec("commons-codec:commons-codec:1.10") // (3)
}
tasks.register<CreateMD5>("md5") {
codecClasspath.from(codec) // (4)
destinationDirectory = project.layout.buildDirectory.dir("md5")
source(project.layout.projectDirectory.file("src"))
}plugins { id 'base' }
repositories {
mavenCentral() // (1)
}
configurations.create('codec') { // (2)
attributes {
attribute(Usage.USAGE_ATTRIBUTE, objects.named(Usage, Usage.JAVA_RUNTIME))
}
visible = false
canBeConsumed = false
}
dependencies {
codec 'commons-codec:commons-codec:1.10' // (3)
}
tasks.register('md5', CreateMD5) {
codecClasspath.from(configurations.codec) // (4)
destinationDirectory = project.layout.buildDirectory.dir('md5')
source(project.layout.projectDirectory.file('src'))
}-
Add a repository to resolve the codec library - this can be a different repository than the one used to build the
CreateMD5task class. -
Add a configuration to resolve our codec library version.
-
Configure an alternate, compatible version of Apache Commons Codec.
-
Configure the
md5task to use the configuration as its classpath. Note that the configuration will not be resolved until the task is executed.
Now, if you run your task, it should work as expected using the configured version of the codec library:
$ gradle clean md5 > Task :md5 Generating MD5 for einstein.txt... Generating MD5 for feynman.txt... Generating MD5 for hawking.txt... BUILD SUCCESSFUL in 3s 3 actionable tasks: 3 executed
Step 4. Create a Worker Daemon
Sometimes, it is desirable to utilize even greater levels of isolation when executing items of work. For instance, external libraries may rely on certain system properties to be set, which may conflict between work items. Or a library might not be compatible with the version of JDK that Gradle is running with and may need to be run with a different version.
The Worker API can accommodate this using the processIsolation() method that causes the work to execute in a separate "worker daemon".
These worker daemon processes will persist across builds and can be reused during subsequent builds.
However, if system resources get low, Gradle will stop unused worker daemons.
To utilize a worker daemon, use the processIsolation() method when creating the WorkQueue.
You may also want to configure custom settings for the new process:
import org.gradle.api.Action;
import org.gradle.api.file.ConfigurableFileCollection;
import org.gradle.api.file.DirectoryProperty;
import org.gradle.api.file.RegularFile;
import org.gradle.api.provider.Provider;
import org.gradle.api.tasks.*;
import org.gradle.process.JavaForkOptions;
import org.gradle.workers.*;
import javax.inject.Inject;
import java.io.File;
import java.util.Set;
abstract public class CreateMD5 extends SourceTask {
@InputFiles
abstract public ConfigurableFileCollection getCodecClasspath(); // (1)
@OutputDirectory
abstract public DirectoryProperty getDestinationDirectory();
@Inject
abstract public WorkerExecutor getWorkerExecutor();
@TaskAction
public void createHashes() {
// (1)
WorkQueue workQueue = getWorkerExecutor().processIsolation(workerSpec -> {
workerSpec.getClasspath().from(getCodecClasspath());
workerSpec.forkOptions(options -> {
options.setMaxHeapSize("64m"); // (2)
});
});
for (File sourceFile : getSource().getFiles()) {
Provider<RegularFile> md5File = getDestinationDirectory().file(sourceFile.getName() + ".md5");
workQueue.submit(GenerateMD5.class, parameters -> {
parameters.getSourceFile().set(sourceFile);
parameters.getMD5File().set(md5File);
});
}
}
}-
Change the isolation mode to
PROCESS. -
Set up the JavaForkOptions for the new process.
Now, you should be able to run your task, and it will work as expected but using worker daemons instead:
$ gradle clean md5 > Task :md5 Generating MD5 for einstein.txt... Generating MD5 for feynman.txt... Generating MD5 for hawking.txt... BUILD SUCCESSFUL in 3s 3 actionable tasks: 3 executed
Note that the execution time may be high. This is because Gradle has to start a new process for each worker daemon, which is expensive.
However, if you run your task a second time, you will see that it runs much faster. This is because the worker daemon(s) started during the initial build have persisted and are available for use immediately during subsequent builds:
$ gradle clean md5 > Task :md5 Generating MD5 for einstein.txt... Generating MD5 for feynman.txt... Generating MD5 for hawking.txt... BUILD SUCCESSFUL in 1s 3 actionable tasks: 3 executed
Isolation modes
Gradle provides three isolation modes that can be configured when creating a WorkQueue and are specified using one of the following methods on WorkerExecutor:
WorkerExecutor.noIsolation()-
This states that the work should be run in a thread with minimal isolation.
For instance, it will share the same classloader that the task is loaded from. This is the fastest level of isolation. WorkerExecutor.classLoaderIsolation()-
This states that the work should be run in a thread with an isolated classloader.
The classloader will have the classpath from the classloader that the unit of work implementation class was loaded from as well as any additional classpath entries added throughClassLoaderWorkerSpec.getClasspath(). WorkerExecutor.processIsolation()-
This states that the work should be run with a maximum isolation level by executing the work in a separate process.
The classloader of the process will use the classpath from the classloader that the unit of work was loaded from as well as any additional classpath entries added throughClassLoaderWorkerSpec.getClasspath(). Furthermore, the process will be a worker daemon that will stay alive and can be reused for future work items with the same requirements. This process can be configured with different settings than the Gradle JVM using ProcessWorkerSpec.forkOptions(org.gradle.api.Action).
Worker Daemons
When using processIsolation(), Gradle will start a long-lived worker daemon process that can be reused for future work items.
// Create a WorkQueue with process isolation
val workQueue = workerExecutor.processIsolation() {
// Configure the options for the forked process
forkOptions {
maxHeapSize = "512m"
systemProperty("org.gradle.sample.showFileSize", "true")
}
}
// Create and submit a unit of work for each file
source.forEach { file ->
workQueue.submit(ReverseFile::class) {
fileToReverse = file
destinationDir = outputDir
}
}// Create a WorkQueue with process isolation
WorkQueue workQueue = workerExecutor.processIsolation() { ProcessWorkerSpec spec ->
// Configure the options for the forked process
forkOptions { JavaForkOptions options ->
options.maxHeapSize = "512m"
options.systemProperty "org.gradle.sample.showFileSize", "true"
}
}
// Create and submit a unit of work for each file
source.each { file ->
workQueue.submit(ReverseFile.class) { ReverseParameters parameters ->
parameters.fileToReverse = file
parameters.destinationDir = outputDir
}
}When a unit of work for a worker daemon is submitted, Gradle will first look to see if a compatible, idle daemon already exists. If so, it will send the unit of work to the idle daemon, marking it as busy. If not, it will start a new daemon. When evaluating compatibility, Gradle looks at a number of criteria, all of which can be controlled through ProcessWorkerSpec.forkOptions(org.gradle.api.Action).
By default, a worker daemon starts with a maximum heap of 512MB. This can be changed by adjusting the workers' fork options.
- executable
-
A daemon is considered compatible only if it uses the same Java executable.
- classpath
-
A daemon is considered compatible if its classpath contains all the classpath entries requested.
Note that a daemon is considered compatible only if the classpath exactly matches the requested classpath. - heap settings
-
A daemon is considered compatible if it has at least the same heap size settings as requested.
In other words, a daemon that has higher heap settings than requested would be considered compatible. - jvm arguments
-
A daemon is compatible if it has set all the JVM arguments requested.
Note that a daemon is compatible if it has additional JVM arguments beyond those requested (except for those treated especially, such as heap settings, assertions, debug, etc.). - system properties
-
A daemon is considered compatible if it has set all the system properties requested with the same values.
Note that a daemon is compatible if it has additional system properties beyond those requested. - environment variables
-
A daemon is considered compatible if it has set all the environment variables requested with the same values.
Note that a daemon is compatible if it has more environment variables than requested. - bootstrap classpath
-
A daemon is considered compatible if it contains all the bootstrap classpath entries requested.
Note that a daemon is compatible if it has more bootstrap classpath entries than requested. - debug
-
A daemon is considered compatible only if debug is set to the same value as requested (
trueorfalse). - enable assertions
-
A daemon is considered compatible only if enable assertions are set to the same value as requested (
trueorfalse). - default character encoding
-
A daemon is considered compatible only if the default character encoding is set to the same value as requested.
Worker daemons will remain running until the build daemon that started them is stopped or system memory becomes scarce. When system memory is low, Gradle will stop worker daemons to minimize memory consumption.
|
Note
|
A step-by-step description of converting a normal task action to use the worker API can be found in the section on developing parallel tasks. |
Cancellation and timeouts
To support cancellation (e.g., when the user stops the build with CTRL+C) and task timeouts, custom tasks should react to interrupting their executing thread. The same is true for work items submitted via the worker API. If a task does not respond to an interrupt within 10s, the daemon will shut down to free up system resources.
Advanced Tasks
Incremental tasks
In Gradle, implementing a task that skips execution when its inputs and outputs are already UP-TO-DATE is simple and efficient, thanks to the Incremental Build feature.
However, there are times when only a few input files have changed since the last execution, and it is best to avoid reprocessing all the unchanged inputs. This situation is common in tasks that transform input files into output files on a one-to-one basis.
To optimize your build process you can use an incremental task. This approach ensures that only out-of-date input files are processed, improving build performance.
Implementing an incremental task
For a task to process inputs incrementally, that task must contain an incremental task action.
This is a task action method that has a single InputChanges parameter. That parameter tells Gradle that the action only wants to process the changed inputs.
In addition, the task needs to declare at least one incremental file input property by using either @Incremental or @SkipWhenEmpty:
public class IncrementalReverseTask : DefaultTask() {
@get:Incremental
@get:InputDirectory
val inputDir: DirectoryProperty = project.objects.directoryProperty()
@get:OutputDirectory
val outputDir: DirectoryProperty = project.objects.directoryProperty()
@get:Input
val inputProperty: RegularFileProperty = project.objects.fileProperty() // File input property
@TaskAction
fun execute(inputs: InputChanges) { // InputChanges parameter
val msg = if (inputs.isIncremental) "CHANGED inputs are out of date"
else "ALL inputs are out of date"
println(msg)
}
}class IncrementalReverseTask extends DefaultTask {
@Incremental
@InputDirectory
def File inputDir
@OutputDirectory
def File outputDir
@Input
def inputProperty // File input property
@TaskAction
void execute(InputChanges inputs) { // InputChanges parameter
println inputs.incremental ? "CHANGED inputs are out of date"
: "ALL inputs are out of date"
}
}|
Important
|
To query incremental changes for an input file property, that property must always return the same instance.
The easiest way to accomplish this is to use one of the following property types: You can learn more about |
The incremental task action can use InputChanges.getFileChanges() to find out what files have changed for a given file-based input property, be it of type RegularFileProperty, DirectoryProperty or ConfigurableFileCollection.
The method returns an Iterable of type FileChanges, which in turn can be queried for the following:
-
the affected file
-
the change type (
ADDED,REMOVEDorMODIFIED) -
the normalized path of the changed file
-
the file type of the changed file
The following example demonstrates an incremental task that has a directory input. It assumes that the directory contains a collection of text files and copies them to an output directory, reversing the text within each file:
abstract class IncrementalReverseTask : DefaultTask() {
@get:Incremental
@get:PathSensitive(PathSensitivity.NAME_ONLY)
@get:InputDirectory
abstract val inputDir: DirectoryProperty
@get:OutputDirectory
abstract val outputDir: DirectoryProperty
@get:Input
abstract val inputProperty: Property<String>
@TaskAction
fun execute(inputChanges: InputChanges) {
println(
if (inputChanges.isIncremental) "Executing incrementally"
else "Executing non-incrementally"
)
inputChanges.getFileChanges(inputDir).forEach { change ->
if (change.fileType == FileType.DIRECTORY) return@forEach
println("${change.changeType}: ${change.normalizedPath}")
val targetFile = outputDir.file(change.normalizedPath).get().asFile
if (change.changeType == ChangeType.REMOVED) {
targetFile.delete()
} else {
targetFile.writeText(change.file.readText().reversed())
}
}
}
}abstract class IncrementalReverseTask extends DefaultTask {
@Incremental
@PathSensitive(PathSensitivity.NAME_ONLY)
@InputDirectory
abstract DirectoryProperty getInputDir()
@OutputDirectory
abstract DirectoryProperty getOutputDir()
@Input
abstract Property<String> getInputProperty()
@TaskAction
void execute(InputChanges inputChanges) {
println(inputChanges.incremental
? 'Executing incrementally'
: 'Executing non-incrementally'
)
inputChanges.getFileChanges(inputDir).each { change ->
if (change.fileType == FileType.DIRECTORY) return
println "${change.changeType}: ${change.normalizedPath}"
def targetFile = outputDir.file(change.normalizedPath).get().asFile
if (change.changeType == ChangeType.REMOVED) {
targetFile.delete()
} else {
targetFile.text = change.file.text.reverse()
}
}
}
}|
Note
|
The type of the inputDir property, its annotations, and the execute() action use getFileChanges() to process the subset of files that have changed since the last build.
The action deletes a target file if the corresponding input file has been removed.
|
If, for some reason, the task is executed non-incrementally (by running with --rerun-tasks, for example), all files are reported as ADDED, irrespective of the previous state.
In this case, Gradle automatically removes the previous outputs, so the incremental task must only process the given files.
For a simple transformer task like the above example, the task action must generate output files for any out-of-date inputs and delete output files for any removed inputs.
|
Important
|
A task may only contain a single incremental task action. |
Which inputs are considered out of date?
When a task has been previously executed, and the only changes since that execution are to incremental input file properties, Gradle can intelligently determine which input files need to be processed, a concept known as incremental execution.
In this scenario, the InputChanges.getFileChanges() method, available in the org.gradle.work.InputChanges class, provides details for all input files associated with the given property that have been ADDED, REMOVED or MODIFIED.
However, there are many cases where Gradle cannot determine which input files need to be processed (i.e., non-incremental execution). Examples include:
-
There is no history available from a previous execution.
-
You are building with a different version of Gradle. Currently, Gradle does not use task history from a different version.
-
An
upToDateWhencriterion added to the task returnsfalse. -
An input property has changed since the previous execution.
-
A non-incremental input file property has changed since the previous execution.
-
One or more output files have changed since the previous execution.
In these cases, Gradle will report all input files as ADDED, and the getFileChanges() method will return details for all the files that comprise the given input property.
You can check if the task execution is incremental or not with the InputChanges.isIncremental() method.
An incremental task in action
Consider an instance of IncrementalReverseTask executed against a set of inputs for the first time.
In this case, all inputs will be considered ADDED, as shown here:
tasks.register<IncrementalReverseTask>("incrementalReverse") {
inputDir = file("inputs")
outputDir = layout.buildDirectory.dir("outputs")
inputProperty = project.findProperty("taskInputProperty") as String? ?: "original"
}tasks.register('incrementalReverse', IncrementalReverseTask) {
inputDir = file('inputs')
outputDir = layout.buildDirectory.dir("outputs")
inputProperty = project.properties['taskInputProperty'] ?: 'original'
}The build layout:
.
├── build.gradle
└── inputs
├── 1.txt
├── 2.txt
└── 3.txt$ gradle -q incrementalReverse
Executing non-incrementally
ADDED: 1.txt
ADDED: 2.txt
ADDED: 3.txtNaturally, when the task is executed again with no changes, then the entire task is UP-TO-DATE, and the task action is not executed:
$ gradle incrementalReverse
> Task :incrementalReverse UP-TO-DATE
BUILD SUCCESSFUL in 0s
1 actionable task: 1 up-to-dateWhen an input file is modified in some way or a new input file is added, then re-executing the task results in those files being returned by InputChanges.getFileChanges().
The following example modifies the content of one file and adds another before running the incremental task:
tasks.register("updateInputs") {
val inputsDir = layout.projectDirectory.dir("inputs")
outputs.dir(inputsDir)
doLast {
inputsDir.file("1.txt").asFile.writeText("Changed content for existing file 1.")
inputsDir.file("4.txt").asFile.writeText("Content for new file 4.")
}
}tasks.register('updateInputs') {
def inputsDir = layout.projectDirectory.dir('inputs')
outputs.dir(inputsDir)
doLast {
inputsDir.file('1.txt').asFile.text = 'Changed content for existing file 1.'
inputsDir.file('4.txt').asFile.text = 'Content for new file 4.'
}
}$ gradle -q updateInputs incrementalReverse Executing incrementally MODIFIED: 1.txt ADDED: 4.txt
|
Note
|
The various mutation tasks (updateInputs, removeInput, etc) are only present to demonstrate the behavior of incremental tasks.
They should not be viewed as the kinds of tasks or task implementations you should have in your own build scripts.
|
When an existing input file is removed, then re-executing the task results in that file being returned by InputChanges.getFileChanges() as REMOVED.
The following example removes one of the existing files before executing the incremental task:
tasks.register<Delete>("removeInput") {
delete("inputs/3.txt")
}tasks.register('removeInput', Delete) {
delete 'inputs/3.txt'
}$ gradle -q removeInput incrementalReverse Executing incrementally REMOVED: 3.txt
Gradle cannot determine which input files are out-of-date when an output file is deleted (or modified).
In this case, details for all the input files for the given property are returned by InputChanges.getFileChanges().
The following example removes one of the output files from the build directory.
However, all the input files are considered to be ADDED:
tasks.register<Delete>("removeOutput") {
delete(layout.buildDirectory.file("outputs/1.txt"))
}tasks.register('removeOutput', Delete) {
delete layout.buildDirectory.file("outputs/1.txt")
}$ gradle -q removeOutput incrementalReverse Executing non-incrementally ADDED: 1.txt ADDED: 2.txt ADDED: 3.txt
The last scenario we want to cover concerns what happens when a non-file-based input property is modified.
In such cases, Gradle cannot determine how the property impacts the task outputs, so the task is executed non-incrementally.
This means that all input files for the given property are returned by InputChanges.getFileChanges() and they are all treated as ADDED.
The following example sets the project property taskInputProperty to a new value when running the incrementalReverse task.
That project property is used to initialize the task’s inputProperty property, as you can see in the first example of this section.
Here is the expected output in this case:
$ gradle -q -PtaskInputProperty=changed incrementalReverse Executing non-incrementally ADDED: 1.txt ADDED: 2.txt ADDED: 3.txt
Command Line options
Sometimes, a user wants to declare the value of an exposed task property on the command line instead of the build script. Passing property values on the command line is particularly helpful if they change more frequently.
The task API supports a mechanism for marking a property to automatically generate a corresponding command line parameter with a specific name at runtime.
Step 1. Declare a command-line option
To expose a new command line option for a task property, annotate the corresponding setter method of a property with Option:
@Option(option = "flag", description = "Sets the flag")An option requires a mandatory identifier. You can provide an optional description.
A task can expose as many command line options as properties available in the class.
Options may be declared in superinterfaces of the task class as well. If multiple interfaces declare the same property but with different option flags, they will both work to set the property.
In the example below, the custom task UrlVerify verifies whether a URL can be resolved by making an HTTP call and checking the response code. The URL to be verified is configurable through the property url.
The setter method for the property is annotated with @Option:
import org.gradle.api.tasks.options.Option;
public class UrlVerify extends DefaultTask {
private String url;
@Option(option = "url", description = "Configures the URL to be verified.")
public void setUrl(String url) {
this.url = url;
}
@Input
public String getUrl() {
return url;
}
@TaskAction
public void verify() {
getLogger().quiet("Verifying URL '{}'", url);
// verify URL by making a HTTP call
}
}All options declared for a task can be rendered as console output by running the help task and the --task option.
Step 2. Use an option on the command line
There are a few rules for options on the command line:
-
The option uses a double-dash as a prefix, e.g.,
--url. A single dash does not qualify as valid syntax for a task option. -
The option argument follows directly after the task declaration, e.g.,
verifyUrl --url=http://www.google.com/. -
Multiple task options can be declared in any order on the command line following the task name.
Building upon the earlier example, the build script creates a task instance of type UrlVerify and provides a value from the command line through the exposed option:
tasks.register<UrlVerify>("verifyUrl")tasks.register('verifyUrl', UrlVerify)$ gradle -q verifyUrl --url=http://www.google.com/ Verifying URL 'http://www.google.com/'
Supported data types for options
Gradle limits the data types that can be used for declaring command line options.
The use of the command line differs per type:
boolean,Boolean,Property<Boolean>-
Describes an option with the value
trueorfalse.
Passing the option on the command line treats the value astrue. For example,--fooequates totrue.
The absence of the option uses the default value of the property. For each boolean option, an opposite option is created automatically. For example,--no-foois created for the provided option--fooand--baris created for--no-bar. Options whose name starts with--noare disabled options and set the option value tofalse. An opposite option is only created if no option with the same name already exists for the task. Double,Property<Double>-
Describes an option with a double value.
Passing the option on the command line also requires a value, e.g.,--factor=2.2or--factor 2.2. Integer,Property<Integer>-
Describes an option with an integer value.
Passing the option on the command line also requires a value, e.g.,--network-timeout=5000or--network-timeout 5000. Long,Property<Long>-
Describes an option with a long value.
Passing the option on the command line also requires a value, e.g.,--threshold=2147483648or--threshold 2147483648. String,Property<String>-
Describes an option with an arbitrary String value.
Passing the option on the command line also requires a value, e.g.,--container-id=2x94heldor--container-id 2x94held. enum,Property<enum>-
Describes an option as an enumerated type.
Passing the option on the command line also requires a value e.g.,--log-level=DEBUGor--log-level debug.
The value is not case-sensitive. List<T>whereTisDouble,Integer,Long,String,enum-
Describes an option that can take multiple values of a given type.
The values for the option have to be provided as multiple declarations, e.g.,--image-id=123 --image-id=456.
Other notations, such as comma-separated lists or multiple values separated by a space character, are currently not supported. ListProperty<T>,SetProperty<T>whereTisDouble,Integer,Long,String,enum-
Describes an option that can take multiple values of a given type.
The values for the option have to be provided as multiple declarations, e.g.,--image-id=123 --image-id=456.
Other notations, such as comma-separated lists or multiple values separated by a space character, are currently not supported. DirectoryProperty,RegularFileProperty-
Describes an option with a file system element.
Passing the option on the command line also requires a value representing a path, e.g.,--output-file=file.txtor--output-dir outputDir.
Relative paths are resolved relative to the project directory of the project that owns this property instance. SeeFileSystemLocationProperty.set().
Documenting available values for an option
Theoretically, an option for a property type String or List<String> can accept any arbitrary value.
Accepted values for such an option can be documented programmatically with the help of the annotation OptionValues:
@OptionValues('file')This annotation may be assigned to any method that returns a List of one of the supported data types.
You need to specify an option identifier to indicate the relationship between the option and available values.
|
Note
|
Passing a value on the command line not supported by the option does not fail the build or throw an exception. You must implement custom logic for such behavior in the task action. |
The example below demonstrates the use of multiple options for a single task.
The task implementation provides a list of available values for the option output-type:
import org.gradle.api.tasks.options.Option;
import org.gradle.api.tasks.options.OptionValues;
public abstract class UrlProcess extends DefaultTask {
private String url;
private OutputType outputType;
@Input
@Option(option = "http", description = "Configures the http protocol to be allowed.")
public abstract Property<Boolean> getHttp();
@Option(option = "url", description = "Configures the URL to send the request to.")
public void setUrl(String url) {
if (!getHttp().getOrElse(true) && url.startsWith("http://")) {
throw new IllegalArgumentException("HTTP is not allowed");
} else {
this.url = url;
}
}
@Input
public String getUrl() {
return url;
}
@Option(option = "output-type", description = "Configures the output type.")
public void setOutputType(OutputType outputType) {
this.outputType = outputType;
}
@OptionValues("output-type")
public List<OutputType> getAvailableOutputTypes() {
return new ArrayList<OutputType>(Arrays.asList(OutputType.values()));
}
@Input
public OutputType getOutputType() {
return outputType;
}
@TaskAction
public void process() {
getLogger().quiet("Writing out the URL response from '{}' to '{}'", url, outputType);
// retrieve content from URL and write to output
}
private static enum OutputType {
CONSOLE, FILE
}
}Listing command line options
Command line options using the annotations Option and OptionValues are self-documenting.
You will see declared options and their available values reflected in the console output of the help task.
The output renders options alphabetically, except for boolean disable options, which appear following the enable option:
$ gradle -q help --task processUrl
Detailed task information for processUrl
Path
:processUrl
Type
UrlProcess (UrlProcess)
Options
--http Configures the http protocol to be allowed.
--no-http Disables option --http.
--output-type Configures the output type.
Available values are:
CONSOLE
FILE
--url Configures the URL to send the request to.
--rerun Causes the task to be re-run even if up-to-date.
Description
-
Group
-
Limitations
Support for declaring command line options currently comes with a few limitations.
-
Command line options can only be declared for custom tasks via annotation. There’s no programmatic equivalent for defining options.
-
Options cannot be declared globally, e.g., on a project level or as part of a plugin.
-
When assigning an option on the command line, the task exposing the option needs to be spelled out explicitly, e.g.,
gradle check --tests abcdoes not work even though thechecktask depends on thetesttask. -
If you specify a task option name that conflicts with the name of a built-in Gradle option, use the
--delimiter before calling your task to reference that option. For more information, see Disambiguate Task Options from Built-in Options.
Verification failures
Normally, exceptions thrown during task execution result in a failure that immediately terminates a build.
The outcome of the task will be FAILED, the result of the build will be FAILED, and no further tasks will be executed.
When running with the --continue flag, Gradle will continue to run other requested tasks in the build after encountering a task failure.
However, any tasks that depend on a failed task will not be executed.
There is a special type of exception that behaves differently when downstream tasks only rely on the outputs of a failing task.
A task can throw a subtype of VerificationException to indicate that it has failed in a controlled manner such that its output is still valid for consumers.
A task depends on the outcome of another task when it directly depends on it using dependsOn.
When Gradle is run with --continue, consumer tasks that depend on a producer task’s output (via a relationship between task inputs and outputs) can still run after the consumer fails.
A failed unit test, for instance, will cause a failing outcome for the test task.
However, this doesn’t prevent another task from reading and processing the (valid) test results the task produced.
Verification failures are used in exactly this manner by the Test Report Aggregation Plugin.
Verification failures are also useful for tasks that need to report a failure even after producing useful output consumable by other tasks.
val process = tasks.register("process") {
val outputFile = layout.buildDirectory.file("processed.log")
outputs.files(outputFile) // (1)
doLast {
val logFile = outputFile.get().asFile
logFile.appendText("Step 1 Complete.") // (2)
throw VerificationException("Process failed!") // (3)
logFile.appendText("Step 2 Complete.") // (4)
}
}
tasks.register("postProcess") {
inputs.files(process) // (5)
doLast {
println("Results: ${inputs.files.singleFile.readText()}") // (6)
}
}tasks.register("process") {
def outputFile = layout.buildDirectory.file("processed.log")
outputs.files(outputFile) // (1)
doLast {
def logFile = outputFile.get().asFile
logFile << "Step 1 Complete." // (2)
throw new VerificationException("Process failed!") // (3)
logFile << "Step 2 Complete." // (4)
}
}
tasks.register("postProcess") {
inputs.files(tasks.named("process")) // (5)
doLast {
println("Results: ${inputs.files.singleFile.text}") // (6)
}
}$ gradle postProcess --continue > Task :process FAILED > Task :postProcess Results: Step 1 Complete. 2 actionable tasks: 2 executed FAILURE: Build failed with an exception.
-
Register Output: The
processtask writes its output to a log file. -
Modify Output: The task writes to its output file as it executes.
-
Task Failure: The task throws a
VerificationExceptionand fails at this point. -
Continue to Modify Output: This line never runs due to the exception stopping the task.
-
Consume Output: The
postProcesstask depends on the output of theprocesstask due to using that task’s outputs as its own inputs. -
Use Partial Result: With the
--continueflag set, Gradle still runs the requestedpostProcesstask despite theprocesstask’s failure.postProcesscan read and display the partial (though still valid) result.
DEVELOPING PLUGINS
Understanding Plugins
Gradle comes with a set of powerful core systems such as dependency management, task execution, and project configuration. But everything else it can do is supplied by plugins.
Plugins encapsulate logic for specific tasks or integrations, such as compiling code, running tests, or deploying artifacts. By applying plugins, users can easily add new features to their build process without having to write complex code from scratch.
This plugin-based approach allows Gradle to be lightweight and modular. It also promotes code reuse and maintainability, as plugins can be shared across projects or within an organization.
Before reading this chapter, it’s recommended that you first read the Learning The Basics and complete the Tutorial.
Plugins Introduction
Plugins can be sourced from Gradle or the Gradle community. But when users want to organize their build logic or need specific build capabilities not provided by existing plugins, they can develop their own.
As such, we distinguish between three different kinds of plugins:
-
Core Plugins - plugins that come from Gradle.
-
Community Plugins - plugins that come from Gradle Plugin Portal or a public repository.
-
Local or Custom Plugins - plugins that you develop yourself.
Core Plugins
The term core plugin refers to a plugin that is part of the Gradle distribution such as the Java Library Plugin. They are always available.
Community Plugins
The term community plugin refers to a plugin published to the Gradle Plugin Portal (or another public repository) such as the Spotless Plugin.
Local or Custom Plugins
The term local or custom plugin refers to a plugin you write yourself for your own build.
Custom plugins
There are three types of custom plugins:
| # | Type | Location: | Most likely: | Benefit: |
|---|---|---|---|---|
Build script or script |
A local plugin |
Plugin is automatically compiled and included in the classpath of the build script. |
||
A convention plugin |
Plugin is automatically compiled, tested, and available on the classpath of the build script. The plugin is visible to every build script used by the build. |
|||
Standalone project |
A shared plugin |
Plugin JAR is produced and published. The plugin can be used in multiple builds and shared with others. |
Build script and Script plugins
Build script plugins are typically small, local plugins written in build files for tasks specific to a single build or project and do not need to be reused across multiple projects. Build script plugins are not recommended but many other forms of plugins evolve from build script plugins.
To create a Gradle plugin, you need to write a class that implements the Plugin interface in one of your build files.
The following sample creates a GreetingPlugin, which adds a hello task to a project:
class GreetingPlugin : Plugin<Project> {
override fun apply(project: Project) {
project.task("hello") {
doLast {
println("Hello from the GreetingPlugin")
}
}
}
}
// Apply the plugin
apply<GreetingPlugin>()class GreetingPlugin implements Plugin<Project> {
void apply(Project project) {
project.task('hello') {
doLast {
println 'Hello from the GreetingPlugin'
}
}
}
}
// Apply the plugin
apply plugin: GreetingPlugin$ gradle -q hello Hello from the GreetingPlugin
The Project object is passed as a parameter in apply(), which the plugin can use to configure the project however it needs to (such as adding tasks, configuring dependencies, etc.)
Script plugins are similar to build script plugin, however, the plugin definition is simply done in a separate script which is then applied to the build file using apply(from = " ") or apply from: '':
Script plugins are not recommended.
class GreetingScriptPlugin : Plugin<Project> {
override fun apply(project: Project) {
project.task("hi") {
doLast {
println("Hi from the GreetingScriptPlugin")
}
}
}
}
// Apply the plugin
apply<GreetingScriptPlugin>()class GreetingScriptPlugin implements Plugin<Project> {
void apply(Project project) {
project.task('hi') {
doLast {
println 'Hi from the GreetingScriptPlugin'
}
}
}
}
// Apply the plugin
apply plugin: GreetingScriptPluginapply(from = "other.gradle.kts")apply from: 'other.gradle'$ gradle -q hi Hi from the GreetingScriptPlugin
Precompiled script plugins
Precompiled script plugins are compiled into class files and packaged into a JAR before they are executed. These plugins use the Groovy or Kotlin DSL instead of pure Java, Kotlin, or Groovy. They are best used as convention plugins that share build logic across projects or as a way to neatly organize build logic.
To create a precompiled script plugin, you can:
-
Use Gradle’s Kotlin DSL - The plugin is a
.gradle.ktsfile, and applyid("kotlin-dsl"). -
Use Gradle’s Groovy DSL - The plugin is a
.gradlefile, and applyid("groovy-gradle-plugin").
To apply a precompiled script plugin, you need to know its ID. The ID is derived from the plugin script’s filename and its (optional) package declaration.
For example, the script src/main/*/java-library.gradle(.kts) has a plugin ID of java-library (assuming it has no package declaration).
Likewise, src/main/*/my/java-library.gradle(.kts) has a plugin ID of my.java-library as long as it has a package declaration of my.
Precompiled script plugin names have two important limitations:
-
They cannot start with
org.gradle. -
They cannot have the same name as a core plugin.
When the plugin is applied to a project, Gradle creates an instance of the plugin class and calls the instance’s Plugin.apply() method.
|
Note
|
A new instance of a Plugin is created within each project applying that plugin.
|
Let’s rewrite the GreetingPlugin script plugin as a precompiled script plugin.
Since we are using the Groovy or Kotlin DSL, the file essentially becomes the plugin.
The original script plugin simply created a hello task which printed a greeting, this is what we will do in the pre-compiled script plugin:
tasks.register("hello") {
doLast {
println("Hello from the convention GreetingPlugin")
}
}tasks.register("hello") {
doLast {
println("Hello from the convention GreetingPlugin")
}
}The GreetingPlugin can now be applied in other subprojects' builds by using its ID:
plugins {
application
id("GreetingPlugin")
}plugins {
id 'application'
id('GreetingPlugin')
}$ gradle -q hello Hello from the convention GreetingPlugin
Convention plugins
A convention plugin is typically a precompiled script plugin that configures existing core and community plugins with your own conventions (i.e. default values) such as setting the Java version by using java.toolchain.languageVersion = JavaLanguageVersion.of(17).
Convention plugins are also used to enforce project standards and help streamline the build process.
They can apply and configure plugins, create new tasks and extensions, set dependencies, and much more.
Let’s take an example build with three subprojects: one for data-model, one for database-logic and one for app code.
The project has the following structure:
.
├── buildSrc
│ ├── src
│ │ └──...
│ └── build.gradle.kts
├── data-model
│ ├── src
│ │ └──...
│ └── build.gradle.kts
├── database-logic
│ ├── src
│ │ └──...
│ └── build.gradle.kts
├── app
│ ├── src
│ │ └──...
│ └── build.gradle.kts
└── settings.gradle.ktsThe build file of the database-logic subproject is as follows:
plugins {
id("java-library")
id("org.jetbrains.kotlin.jvm") version "1.9.23"
}
repositories {
mavenCentral()
}
java {
toolchain.languageVersion.set(JavaLanguageVersion.of(11))
}
tasks.test {
useJUnitPlatform()
}
kotlin {
jvmToolchain(11)
}
// More build logicplugins {
id 'java-library'
id 'org.jetbrains.kotlin.jvm' version '1.9.23'
}
repositories {
mavenCentral()
}
java {
toolchain.languageVersion.set(JavaLanguageVersion.of(11))
}
tasks.test {
useJUnitPlatform()
}
kotlin {
jvmToolchain {
languageVersion.set(JavaLanguageVersion.of(11))
}
}
// More build logicWe apply the java-library plugin and add the org.jetbrains.kotlin.jvm plugin for Kotlin support.
We also configure Kotlin, Java, tests and more.
Our build file is beginning to grow…
The more plugins we apply and the more plugins we configure, the larger it gets.
There’s also repetition in the build files of the app and data-model subprojects, especially when configuring common extensions like setting the Java version and Kotlin support.
To address this, we use convention plugins. This allows us to avoid repeating configuration in each build file and keeps our build scripts more concise and maintainable. In convention plugins, we can encapsulate arbitrary build configuration or custom build logic.
To develop a convention plugin, we recommend using buildSrc – which represents a completely separate Gradle build.
buildSrc has its own settings file to define where dependencies of this build are located.
We add a Kotlin script called my-java-library.gradle.kts inside the buildSrc/src/main/kotlin directory.
Or conversely, a Groovy script called my-java-library.gradle inside the buildSrc/src/main/groovy directory.
We put all the plugin application and configuration from the database-logic build file into it:
plugins {
id("java-library")
id("org.jetbrains.kotlin.jvm")
}
repositories {
mavenCentral()
}
java {
toolchain.languageVersion.set(JavaLanguageVersion.of(11))
}
tasks.test {
useJUnitPlatform()
}
kotlin {
jvmToolchain(11)
}plugins {
id 'java-library'
id 'org.jetbrains.kotlin.jvm'
}
repositories {
mavenCentral()
}
java {
toolchain.languageVersion.set(JavaLanguageVersion.of(11))
}
tasks.test {
useJUnitPlatform()
}
kotlin {
jvmToolchain {
languageVersion.set(JavaLanguageVersion.of(11))
}
}The name of the file my-java-library is the ID of our brand-new plugin, which we can now use in all of our subprojects.
|
Tip
|
Why is the version of id 'org.jetbrains.kotlin.jvm' missing? See Applying External Plugins to Pre-Compiled Script Plugins.
|
The database-logic build file becomes much simpler by removing all the redundant build logic and applying our convention my-java-library plugin instead:
plugins {
id("my-java-library")
}plugins {
id('my-java-library')
}This convention plugin enables us to easily share common configurations across all our build files. Any modifications can be made in one place, simplifying maintenance.
Binary plugins
Binary plugins in Gradle are plugins that are built as standalone JAR files and applied to a project using the plugins{} block in the build script.
Let’s move our GreetingPlugin to a standalone project so that we can publish it and share it with others.
The plugin is essentially moved from the buildSrc folder to its own build called greeting-plugin.
|
Note
|
You can publish the plugin from buildSrc, but this is not recommended practice. Plugins that are ready for publication should be in their own build.
|
greeting-plugin is simply a Java project that produces a JAR containing the plugin classes.
The easiest way to package and publish a plugin to a repository is to use the Gradle Plugin Development Plugin. This plugin provides the necessary tasks and configurations (including the plugin metadata) to compile your script into a plugin that can be applied in other builds.
Here is a simple build script for the greeting-plugin project using the Gradle Plugin Development Plugin:
plugins {
`java-gradle-plugin`
}
gradlePlugin {
plugins {
create("simplePlugin") {
id = "org.example.greeting"
implementationClass = "org.example.GreetingPlugin"
}
}
}plugins {
id 'java-gradle-plugin'
}
gradlePlugin {
plugins {
simplePlugin {
id = 'org.example.greeting'
implementationClass = 'org.example.GreetingPlugin'
}
}
}For more on publishing plugins, see Publishing Plugins.
Project vs Settings vs Init plugins
In the example used through this section, the plugin accepts the Project type as a type parameter. Alternatively, the plugin can accept a parameter of type Settings to be applied in a settings script, or a parameter of type Gradle to be applied in an initialization script.
The difference between these types of plugins lies in the scope of their application:
- Project Plugin
-
A project plugin is a plugin that is applied to a specific project in a build. It can customize the build logic, add tasks, and configure the project-specific settings.
- Settings Plugin
-
A settings plugin is a plugin that is applied in the
settings.gradleorsettings.gradle.ktsfile. It can configure settings that apply to the entire build, such as defining which projects are included in the build, configuring build script repositories, and applying common configurations to all projects. - Init Plugin
-
An init plugin is a plugin that is applied in the
init.gradleorinit.gradle.ktsfile. It can configure settings that apply globally to all Gradle builds on a machine, such as configuring the Gradle version, setting up default repositories, or applying common plugins to all builds.
Understanding Implementation Options for Plugins
The choice between script, precompiled script, or binary plugins depends on your specific requirements and preferences.
Script Plugins are simple and easy to write as they are written directly in the build script. They are written in Kotlin DSL or Groovy DSL. They are suitable for small, one-off tasks or for quick experimentation. However, they can become hard to maintain as the build script grows in size and complexity.
Precompiled Script Plugins are Kotlin DSL scripts compiled into Java class files packaged in a library. They offer better performance and maintainability compared to script plugins, and they can be reused across different projects. You can also write them in Groovy DSL but that is not recommended.
Binary Plugins are full-fledged plugins written in Java or Kotlin, compiled into JAR files, and published to a repository. They offer the best performance, maintainability, and reusability. They are suitable for complex build logic that needs to be shared across projects, builds, and teams. You can also write them in Scala or Groovy but that is not recommended.
Here is a breakdown of all options for implementing Gradle plugins:
| # | Using: | Type: | The Plugin is: | Created by applying: | Recommended? |
|---|---|---|---|---|---|
1 |
Kotlin DSL |
Script plugin |
in a |
|
No[1] |
2 |
Groovy DSL |
Script plugin |
in a |
|
No[1] |
3 |
Kotlin DSL |
Pre-compiled script plugin |
a |
|
Yes[2] |
4 |
Groovy DSL |
Pre-compiled script plugin |
a |
|
No[3] |
5 |
Kotlin DSL |
Binary plugin |
a |
|
Yes[2] |
6 |
Groovy DSL |
Binary plugin |
a |
|
No[2] |
7 |
Java |
Binary plugin |
an abstract class that implements the |
|
Yes[2] |
8 |
Kotlin |
Binary plugin |
an abstract class that implements the |
|
Yes[2] |
9 |
Groovy |
Binary plugin |
an abstract class that implements the |
|
No[2] |
10 |
Scala |
Binary plugin |
an abstract class that implements the |
|
No[2] |
If you suspect issues with your plugin code, try creating a Build Scan to identify bottlenecks. The Gradle profiler can help automate Build Scan generation and gather more low-level information.
Implementing Pre-compiled Script Plugins
A precompiled script plugin is typically a Kotlin script that has been compiled and distributed as Java class files packaged in a library. These scripts are intended to be consumed as binary Gradle plugins and are recommended for use as convention plugins.
A convention plugin is a plugin that normaly configures existing core and community plugins with your own conventions (i.e. default values) such as setting the Java version by using java.toolchain.languageVersion = JavaLanguageVersion.of(17).
Convention plugins are also used to enforce project standards and help streamline the build process.
They can apply and configure plugins, create new tasks and extensions, set dependencies, and much more.
Setting the plugin ID
The plugin ID for a precompiled script is derived from its file name and optional package declaration.
For example, a script named code-quality.gradle(.kts) located in src/main/groovy (or src/main/kotlin) without a package declaration would be exposed as the code-quality plugin:
plugins {
id("code-quality")
}On the other hand, a script named code-quality.gradle(.kts) located in src/main/groovy/my (or src/main/kotlin/my) with the package declaration my would be exposed as the my.code-quality plugin:
plugins {
id("my.code-quality")
}Working with files
You should use Gradle’s managed properties. This will enable lazy configuration so that the actual location will only be resolved when the file is needed and can be reconfigured at any time during build configuration.
Let’s start by creating a convention plugin called greetings:
// Create extension object
interface GreetingPluginExtension {
val message: Property<String>
}// Create extension object
interface GreetingPluginExtension {
Property<String> getMessage()
}You can find out more about working with files lazily in Working with Files.
Making a plugin configurable using extensions
Extension objects are commonly used in plugins to expose configuration options and additional functionality to build scripts.
When you apply a plugin that defines an extension, you can access the extension object and configure its properties or call its methods to customize the behavior of the plugin or tasks provided by the plugin.
A Project has an associated ExtensionContainer object that contains all the settings and properties for the plugins that have been applied to the project. You can provide configuration for your plugin by adding an extension object to this container.
Let’s update our greetings example:
// Create extension object
interface GreetingPluginExtension {
val message: Property<String>
}
// Add the 'greeting' extension object to project
val extension = project.extensions.create<GreetingPluginExtension>("greeting")// Create extension object
interface GreetingPluginExtension {
Property<String> getMessage()
}
// Add the 'greeting' extension object to project
def extension = project.extensions.create("greeting", GreetingPluginExtension)You can set the value of the message property directly with extension.message.set("Hi from Gradle,").
However, the GreetingPluginExtension object becomes available as a project property with the same name as the extension object.
You can now access message like so:
// Where the<GreetingPluginExtension>() is equivalent to project.extensions.getByType(GreetingPluginExtension::class.java)
the<GreetingPluginExtension>().message.set("Hi from Gradle")extensions.findByType(GreetingPluginExtension).message.set("Hi from Gradle")If you apply the greetings plugin, you can set the convention in your build script:
plugins {
application
id("greetings")
}
greeting {
message = "Hello from Gradle"
}plugins {
id 'application'
id('greetings')
}
configure(greeting) {
message = "Hello from Gradle"
}Adding default configuration as conventions
In plugins, you can define default values, also known as conventions, using the project object.
Convention properties are properties that are initialized with default values but can be overridden:
// Create extension object
interface GreetingPluginExtension {
val message: Property<String>
}
// Add the 'greeting' extension object to project
val extension = project.extensions.create<GreetingPluginExtension>("greeting")
// Set a default value for 'message'
extension.message.convention("Hello from Gradle")// Create extension object
interface GreetingPluginExtension {
Property<String> getMessage()
}
// Add the 'greeting' extension object to project
def extension = project.extensions.create("greeting", GreetingPluginExtension)
// Set a default value for 'message'
extension.message.convention("Hello from Gradle")extension.message.convention(…) sets a convention for the message property of the extension.
This convention specifies that the value of message should default to the content of a file named defaultGreeting.txt located in the build directory of the project.
If the message property is not explicitly set, its value will be automatically set to the content of defaultGreeting.txt.
Mapping extension properties to task properties
Using an extension and mapping it to a custom task’s input/output properties is common in plugins.
In this example, the message property of the GreetingPluginExtension is mapped to the message property of the GreetingTask as an input:
// Create extension object
interface GreetingPluginExtension {
val message: Property<String>
}
// Add the 'greeting' extension object to project
val extension = project.extensions.create<GreetingPluginExtension>("greeting")
// Set a default value for 'message'
extension.message.convention("Hello from Gradle")
// Create a greeting task
abstract class GreetingTask : DefaultTask() {
@Input
val message = project.objects.property<String>()
@TaskAction
fun greet() {
println("Message: ${message.get()}")
}
}
// Register the task and set the convention
tasks.register<GreetingTask>("hello") {
message.convention(extension.message)
}// Create extension object
interface GreetingPluginExtension {
Property<String> getMessage()
}
// Add the 'greeting' extension object to project
def extension = project.extensions.create("greeting", GreetingPluginExtension)
// Set a default value for 'message'
extension.message.convention("Hello from Gradle")
// Create a greeting task
abstract class GreetingTask extends DefaultTask {
@Input
abstract Property<String> getMessage()
@TaskAction
void greet() {
println("Message: ${message.get()}")
}
}
// Register the task and set the convention
tasks.register("hello", GreetingTask) {
message.convention(extension.message)
}$ gradle -q hello Message: Hello from Gradle
This means that changes to the extension’s message property will trigger the task to be considered out-of-date, ensuring that the task is re-executed with the new message.
You can find out more about types that you can use in task implementations and extensions in Lazy Configuration.
Applying external plugins
In order to apply an external plugin in a precompiled script plugin, it has to be added to the plugin project’s implementation classpath in the plugin’s build file:
plugins {
`kotlin-dsl`
}
repositories {
mavenCentral()
}
dependencies {
implementation("com.bmuschko:gradle-docker-plugin:6.4.0")
}plugins {
id 'groovy-gradle-plugin'
}
repositories {
mavenCentral()
}
dependencies {
implementation 'com.bmuschko:gradle-docker-plugin:6.4.0'
}It can then be applied in the precompiled script plugin:
plugins {
id("com.bmuschko.docker-remote-api")
}plugins {
id 'com.bmuschko.docker-remote-api'
}The plugin version in this case is defined in the dependency declaration.
Implementing Binary Plugins
Binary plugins refer to plugins that are compiled and distributed as JAR files. These plugins are usually written in Java or Kotlin and provide custom functionality or tasks to a Gradle build.
Using the Plugin Development plugin
The Gradle Plugin Development plugin can be used to assist in developing Gradle plugins.
This plugin will automatically apply the Java Plugin, add the gradleApi() dependency to the api configuration, generate the required plugin descriptors in the resulting JAR file, and configure the Plugin Marker Artifact to be used when publishing.
To apply and configure the plugin, add the following code to your build file:
plugins {
`java-gradle-plugin`
}
gradlePlugin {
plugins {
create("simplePlugin") {
id = "org.example.greeting"
implementationClass = "org.example.GreetingPlugin"
}
}
}plugins {
id 'java-gradle-plugin'
}
gradlePlugin {
plugins {
simplePlugin {
id = 'org.example.greeting'
implementationClass = 'org.example.GreetingPlugin'
}
}
}Writing and using custom task types is recommended when developing plugins as it automatically benefits from incremental builds.
As an added benefit of applying the plugin to your project, the task validatePlugins automatically checks for an existing input/output annotation for every public property defined in a custom task type implementation.
Creating a plugin ID
Plugin IDs are meant to be globally unique, similar to Java package names (i.e., a reverse domain name). This format helps prevent naming collisions and allows grouping plugins with similar ownership.
An explicit plugin identifier simplifies applying the plugin to a project.
Your plugin ID should combine components that reflect the namespace (a reasonable pointer to you or your organization) and the name of the plugin it provides.
For example, if your Github account is named foo and your plugin is named bar, a suitable plugin ID might be com.github.foo.bar.
Similarly, if the plugin was developed at the baz organization, the plugin ID might be org.baz.bar.
Plugin IDs should adhere to the following guidelines:
-
May contain any alphanumeric character, '.', and '-'.
-
Must contain at least one '.' character separating the namespace from the plugin’s name.
-
Conventionally use a lowercase reverse domain name convention for the namespace.
-
Conventionally use only lowercase characters in the name.
-
org.gradle,com.gradle, andcom.gradlewarenamespaces may not be used. -
Cannot start or end with a '.' character.
-
Cannot contain consecutive '.' characters (i.e., '..').
A namespace that identifies ownership and a name is sufficient for a plugin ID.
When bundling multiple plugins in a single JAR artifact, adhering to the same naming conventions is recommended. This practice helps logically group related plugins.
There is no limit to the number of plugins that can be defined and registered (by different identifiers) within a single project.
The identifiers for plugins written as a class should be defined in the project’s build script containing the plugin classes.
For this, the java-gradle-plugin needs to be applied:
plugins {
id("java-gradle-plugin")
}
gradlePlugin {
plugins {
create("androidApplicationPlugin") {
id = "com.android.application"
implementationClass = "com.android.AndroidApplicationPlugin"
}
create("androidLibraryPlugin") {
id = "com.android.library"
implementationClass = "com.android.AndroidLibraryPlugin"
}
}
}plugins {
id 'java-gradle-plugin'
}
gradlePlugin {
plugins {
androidApplicationPlugin {
id = 'com.android.application'
implementationClass = 'com.android.AndroidApplicationPlugin'
}
androidLibraryPlugin {
id = 'com.android.library'
implementationClass = 'com.android.AndroidLibraryPlugin'
}
}
}Working with files
When developing plugins, it’s a good idea to be flexible when accepting input configuration for file locations.
It is recommended to use Gradle’s managed properties and project.layout to select file or directory locations.
This will enable lazy configuration so that the actual location will only be resolved when the file is needed and can be reconfigured at any time during build configuration.
This Gradle build file defines a task GreetingToFileTask that writes a greeting to a file.
It also registers two tasks: greet, which creates the file with the greeting, and sayGreeting, which prints the file’s contents.
The greetingFile property is used to specify the file path for the greeting:
abstract class GreetingToFileTask : DefaultTask() {
@get:OutputFile
abstract val destination: RegularFileProperty
@TaskAction
fun greet() {
val file = destination.get().asFile
file.parentFile.mkdirs()
file.writeText("Hello!")
}
}
val greetingFile = objects.fileProperty()
tasks.register<GreetingToFileTask>("greet") {
destination = greetingFile
}
tasks.register("sayGreeting") {
dependsOn("greet")
val greetingFile = greetingFile
doLast {
val file = greetingFile.get().asFile
println("${file.readText()} (file: ${file.name})")
}
}
greetingFile = layout.buildDirectory.file("hello.txt")abstract class GreetingToFileTask extends DefaultTask {
@OutputFile
abstract RegularFileProperty getDestination()
@TaskAction
def greet() {
def file = getDestination().get().asFile
file.parentFile.mkdirs()
file.write 'Hello!'
}
}
def greetingFile = objects.fileProperty()
tasks.register('greet', GreetingToFileTask) {
destination = greetingFile
}
tasks.register('sayGreeting') {
dependsOn greet
doLast {
def file = greetingFile.get().asFile
println "${file.text} (file: ${file.name})"
}
}
greetingFile = layout.buildDirectory.file('hello.txt')$ gradle -q sayGreeting Hello! (file: hello.txt)
In this example, we configure the greet task destination property as a closure/provider, which is evaluated with
the Project.file(java.lang.Object) method to turn the return value of the closure/provider into a File object at the last minute.
Note that we specify the greetingFile property value after the task configuration.
This lazy evaluation is a key benefit of accepting any value when setting a file property and then resolving that value when reading the property.
You can learn more about working with files lazily in Working with Files.
Making a plugin configurable using extensions
Most plugins offer configuration options for build scripts and other plugins to customize how the plugin works. Plugins do this using extension objects.
A Project has an associated ExtensionContainer object that contains all the settings and properties for the plugins that have been applied to the project. You can provide configuration for your plugin by adding an extension object to this container.
An extension object is simply an object with Java Bean properties representing the configuration.
Let’s add a greeting extension object to the project, which allows you to configure the greeting:
interface GreetingPluginExtension {
val message: Property<String>
}
class GreetingPlugin : Plugin<Project> {
override fun apply(project: Project) {
// Add the 'greeting' extension object
val extension = project.extensions.create<GreetingPluginExtension>("greeting")
// Add a task that uses configuration from the extension object
project.task("hello") {
doLast {
println(extension.message.get())
}
}
}
}
apply<GreetingPlugin>()
// Configure the extension
the<GreetingPluginExtension>().message = "Hi from Gradle"interface GreetingPluginExtension {
Property<String> getMessage()
}
class GreetingPlugin implements Plugin<Project> {
void apply(Project project) {
// Add the 'greeting' extension object
def extension = project.extensions.create('greeting', GreetingPluginExtension)
// Add a task that uses configuration from the extension object
project.task('hello') {
doLast {
println extension.message.get()
}
}
}
}
apply plugin: GreetingPlugin
// Configure the extension
greeting.message = 'Hi from Gradle'$ gradle -q hello Hi from Gradle
In this example, GreetingPluginExtension is an object with a property called message.
The extension object is added to the project with the name greeting.
This object becomes available as a project property with the same name as the extension object.
the<GreetingPluginExtension>() is equivalent to project.extensions.getByType(GreetingPluginExtension::class.java).
Often, you have several related properties you need to specify on a single plugin. Gradle adds a configuration block for each extension object, so you can group settings:
interface GreetingPluginExtension {
val message: Property<String>
val greeter: Property<String>
}
class GreetingPlugin : Plugin<Project> {
override fun apply(project: Project) {
val extension = project.extensions.create<GreetingPluginExtension>("greeting")
project.task("hello") {
doLast {
println("${extension.message.get()} from ${extension.greeter.get()}")
}
}
}
}
apply<GreetingPlugin>()
// Configure the extension using a DSL block
configure<GreetingPluginExtension> {
message = "Hi"
greeter = "Gradle"
}interface GreetingPluginExtension {
Property<String> getMessage()
Property<String> getGreeter()
}
class GreetingPlugin implements Plugin<Project> {
void apply(Project project) {
def extension = project.extensions.create('greeting', GreetingPluginExtension)
project.task('hello') {
doLast {
println "${extension.message.get()} from ${extension.greeter.get()}"
}
}
}
}
apply plugin: GreetingPlugin
// Configure the extension using a DSL block
greeting {
message = 'Hi'
greeter = 'Gradle'
}$ gradle -q hello Hi from Gradle
In this example, several settings can be grouped within the configure<GreetingPluginExtension> block.
The configure function is used to configure an extension object.
It provides a convenient way to set properties or apply configurations to these objects.
The type used in the build script’s configure function (GreetingPluginExtension) must match the extension type.
Then, when the block is executed, the receiver of the block is the extension.
In this example, several settings can be grouped within the greeting closure. The name of the closure block in the build script (greeting) must match the extension object name.
Then, when the closure is executed, the fields on the extension object will be mapped to the variables within the closure based on the standard Groovy closure delegate feature.
Declaring a DSL configuration container
Using an extension object extends the Gradle DSL to add a project property and DSL block for the plugin. Because an extension object is a regular object, you can provide your own DSL nested inside the plugin block by adding properties and methods to the extension object.
Let’s consider the following build script for illustration purposes.
plugins {
id("org.myorg.server-env")
}
environments {
create("dev") {
url = "http://localhost:8080"
}
create("staging") {
url = "http://staging.enterprise.com"
}
create("production") {
url = "http://prod.enterprise.com"
}
}plugins {
id 'org.myorg.server-env'
}
environments {
dev {
url = 'http://localhost:8080'
}
staging {
url = 'http://staging.enterprise.com'
}
production {
url = 'http://prod.enterprise.com'
}
}The DSL exposed by the plugin exposes a container for defining a set of environments. Each environment the user configures has an arbitrary but declarative name and is represented with its own DSL configuration block. The example above instantiates a development, staging, and production environment, including its respective URL.
Each environment must have a data representation in code to capture the values. The name of an environment is immutable and can be passed in as a constructor parameter. Currently, the only other parameter the data object stores is a URL.
The following ServerEnvironment object fulfills those requirements:
abstract public class ServerEnvironment {
private final String name;
@javax.inject.Inject
public ServerEnvironment(String name) {
this.name = name;
}
public String getName() {
return name;
}
abstract public Property<String> getUrl();
}Gradle exposes the factory method ObjectFactory.domainObjectContainer(Class, NamedDomainObjectFactory) to create a container of data objects. The parameter the method takes is the class representing the data. The created instance of type NamedDomainObjectContainer can be exposed to the end user by adding it to the extension container with a specific name.
It’s common for a plugin to post-process the captured values within the plugin implementation, e.g., to configure tasks:
public class ServerEnvironmentPlugin implements Plugin<Project> {
@Override
public void apply(final Project project) {
ObjectFactory objects = project.getObjects();
NamedDomainObjectContainer<ServerEnvironment> serverEnvironmentContainer =
objects.domainObjectContainer(ServerEnvironment.class, name -> objects.newInstance(ServerEnvironment.class, name));
project.getExtensions().add("environments", serverEnvironmentContainer);
serverEnvironmentContainer.all(serverEnvironment -> {
String env = serverEnvironment.getName();
String capitalizedServerEnv = env.substring(0, 1).toUpperCase() + env.substring(1);
String taskName = "deployTo" + capitalizedServerEnv;
project.getTasks().register(taskName, Deploy.class, task -> task.getUrl().set(serverEnvironment.getUrl()));
});
}
}In the example above, a deployment task is created dynamically for every user-configured environment.
You can find out more about implementing project extensions in Developing Custom Gradle Types.
Modeling DSL-like APIs
DSLs exposed by plugins should be readable and easy to understand.
For example, let’s consider the following extension provided by a plugin. In its current form, it offers a "flat" list of properties for configuring the creation of a website:
plugins {
id("org.myorg.site")
}
site {
outputDir = layout.buildDirectory.file("mysite")
websiteUrl = "https://gradle.org"
vcsUrl = "https://github.com/gradle/gradle-site-plugin"
}plugins {
id 'org.myorg.site'
}
site {
outputDir = layout.buildDirectory.file("mysite")
websiteUrl = 'https://gradle.org'
vcsUrl = 'https://github.com/gradle/gradle-site-plugin'
}As the number of exposed properties grows, you should introduce a nested, more expressive structure.
The following code snippet adds a new configuration block named customData as part of the extension.
This provides a stronger indication of what those properties mean:
plugins {
id("org.myorg.site")
}
site {
outputDir = layout.buildDirectory.file("mysite")
customData {
websiteUrl = "https://gradle.org"
vcsUrl = "https://github.com/gradle/gradle-site-plugin"
}
}plugins {
id 'org.myorg.site'
}
site {
outputDir = layout.buildDirectory.file("mysite")
customData {
websiteUrl = 'https://gradle.org'
vcsUrl = 'https://github.com/gradle/gradle-site-plugin'
}
}Implementing the backing objects for such an extension is simple.
First, introduce a new data object for managing the properties websiteUrl and vcsUrl:
abstract public class CustomData {
abstract public Property<String> getWebsiteUrl();
abstract public Property<String> getVcsUrl();
}In the extension, create an instance of the CustomData class and a method to delegate the captured values to the data instance.
To configure underlying data objects, define a parameter of type Action.
The following example demonstrates the use of Action in an extension definition:
abstract public class SiteExtension {
abstract public RegularFileProperty getOutputDir();
@Nested
abstract public CustomData getCustomData();
public void customData(Action<? super CustomData> action) {
action.execute(getCustomData());
}
}Mapping extension properties to task properties
Plugins commonly use an extension to capture user input from the build script and map it to a custom task’s input/output properties. The build script author interacts with the extension’s DSL, while the plugin implementation handles the underlying logic:
// Extension class to capture user input
class MyExtension {
@Input
var inputParameter: String? = null
}
// Custom task that uses the input from the extension
class MyCustomTask : org.gradle.api.DefaultTask() {
@Input
var inputParameter: String? = null
@TaskAction
fun executeTask() {
println("Input parameter: $inputParameter")
}
}
// Plugin class that configures the extension and task
class MyPlugin : Plugin<Project> {
override fun apply(project: Project) {
// Create and configure the extension
val extension = project.extensions.create("myExtension", MyExtension::class.java)
// Create and configure the custom task
project.tasks.register("myTask", MyCustomTask::class.java) {
group = "custom"
inputParameter = extension.inputParameter
}
}
}// Extension class to capture user input
class MyExtension {
@Input
String inputParameter = null
}
// Custom task that uses the input from the extension
class MyCustomTask extends DefaultTask {
@Input
String inputParameter = null
@TaskAction
def executeTask() {
println("Input parameter: $inputParameter")
}
}
// Plugin class that configures the extension and task
class MyPlugin implements Plugin<Project> {
void apply(Project project) {
// Create and configure the extension
def extension = project.extensions.create("myExtension", MyExtension)
// Create and configure the custom task
project.tasks.register("myTask", MyCustomTask) {
group = "custom"
inputParameter = extension.inputParameter
}
}
}In this example, the MyExtension class defines an inputParameter property that can be set in the build script.
The MyPlugin class configures this extension and uses its inputParameter value to configure the MyCustomTask task.
The MyCustomTask task then uses this input parameter in its logic.
You can learn more about types you can use in task implementations and extensions in Lazy Configuration.
Adding default configuration with conventions
Plugins should provide sensible defaults and standards in a specific context, reducing the number of decisions users need to make.
Using the project object, you can define default values.
These are known as conventions.
Conventions are properties that are initialized with default values and can be overridden by the user in their build script. For example:
interface GreetingPluginExtension {
val message: Property<String>
}
class GreetingPlugin : Plugin<Project> {
override fun apply(project: Project) {
// Add the 'greeting' extension object
val extension = project.extensions.create<GreetingPluginExtension>("greeting")
extension.message.convention("Hello from GreetingPlugin")
// Add a task that uses configuration from the extension object
project.task("hello") {
doLast {
println(extension.message.get())
}
}
}
}
apply<GreetingPlugin>()interface GreetingPluginExtension {
Property<String> getMessage()
}
class GreetingPlugin implements Plugin<Project> {
void apply(Project project) {
// Add the 'greeting' extension object
def extension = project.extensions.create('greeting', GreetingPluginExtension)
extension.message.convention('Hello from GreetingPlugin')
// Add a task that uses configuration from the extension object
project.task('hello') {
doLast {
println extension.message.get()
}
}
}
}
apply plugin: GreetingPlugin$ gradle -q hello Hello from GreetingPlugin
In this example, GreetingPluginExtension is a class that represents the convention.
The message property is the convention property with a default value of 'Hello from GreetingPlugin'.
Users can override this value in their build script:
GreetingPluginExtension {
message = "Custom message"
}GreetingPluginExtension {
message = 'Custom message'
}$ gradle -q hello
Custom messageSeparating capabilities from conventions
Separating capabilities from conventions in plugins allows users to choose which tasks and conventions to apply.
For example, the Java Base plugin provides un-opinionated (i.e., generic) functionality like SourceSets, while the Java plugin adds tasks and conventions familiar to Java developers like classes, jar or javadoc.
When designing your own plugins, consider developing two plugins — one for capabilities and another for conventions — to offer flexibility to users.
In the example below, MyPlugin contains conventions, and MyBasePlugin defines capabilities.
Then, MyPlugin applies MyBasePlugin, this is called plugin composition.
To apply a plugin from another one:
import org.gradle.api.Plugin;
import org.gradle.api.Project;
public class MyBasePlugin implements Plugin<Project> {
public void apply(Project project) {
// define capabilities
}
}import org.gradle.api.Plugin;
import org.gradle.api.Project;
public class MyPlugin implements Plugin<Project> {
public void apply(Project project) {
project.getPlugins().apply(MyBasePlugin.class);
// define conventions
}
}Reacting to plugins
A common pattern in Gradle plugin implementations is configuring the runtime behavior of existing plugins and tasks in a build.
For example, a plugin could assume that it is applied to a Java-based project and automatically reconfigure the standard source directory:
public class InhouseStrongOpinionConventionJavaPlugin implements Plugin<Project> {
public void apply(Project project) {
// Careful! Eagerly appyling plugins has downsides, and is not always recommended.
project.getPlugins().apply(JavaPlugin.class);
SourceSetContainer sourceSets = project.getExtensions().getByType(SourceSetContainer.class);
SourceSet main = sourceSets.getByName(SourceSet.MAIN_SOURCE_SET_NAME);
main.getJava().setSrcDirs(Arrays.asList("src"));
}
}The drawback to this approach is that it automatically forces the project to apply the Java plugin, imposing a strong opinion on it (i.e., reducing flexibility and generality). In practice, the project applying the plugin might not even deal with Java code.
Instead of automatically applying the Java plugin, the plugin could react to the fact that the consuming project applies the Java plugin. Only if that is the case, then a certain configuration is applied:
public class InhouseConventionJavaPlugin implements Plugin<Project> {
public void apply(Project project) {
project.getPlugins().withType(JavaPlugin.class, javaPlugin -> {
SourceSetContainer sourceSets = project.getExtensions().getByType(SourceSetContainer.class);
SourceSet main = sourceSets.getByName(SourceSet.MAIN_SOURCE_SET_NAME);
main.getJava().setSrcDirs(Arrays.asList("src"));
});
}
}Reacting to plugins is preferred over applying plugins if there is no good reason to assume that the consuming project has the expected setup.
The same concept applies to task types:
public class InhouseConventionWarPlugin implements Plugin<Project> {
public void apply(Project project) {
project.getTasks().withType(War.class).configureEach(war ->
war.setWebXml(project.file("src/someWeb.xml")));
}
}Reacting to build features
Plugins can access the status of build features in the build. The Build Features API allows checking whether the user requested a particular Gradle feature and if it is active in the current build. An example of a build feature is the configuration cache.
There are two main use cases:
-
Using the status of build features in reports or statistics.
-
Incrementally adopting experimental Gradle features by disabling incompatible plugin functionality.
Below is an example of a plugin that utilizes both of the cases.
public abstract class MyPlugin implements Plugin<Project> {
@Inject
protected abstract BuildFeatures getBuildFeatures(); // (1)
@Override
public void apply(Project p) {
BuildFeatures buildFeatures = getBuildFeatures();
Boolean configCacheRequested = buildFeatures.getConfigurationCache().getRequested() // (2)
.getOrNull(); // could be null if user did not opt in nor opt out
String configCacheUsage = describeFeatureUsage(configCacheRequested);
MyReport myReport = new MyReport();
myReport.setConfigurationCacheUsage(configCacheUsage);
boolean isolatedProjectsActive = buildFeatures.getIsolatedProjects().getActive() // (3)
.get(); // the active state is always defined
if (!isolatedProjectsActive) {
myOptionalPluginLogicIncompatibleWithIsolatedProjects();
}
}
private String describeFeatureUsage(Boolean requested) {
return requested == null ? "no preference" : requested ? "opt-in" : "opt-out";
}
private void myOptionalPluginLogicIncompatibleWithIsolatedProjects() {
}
}-
The
BuildFeaturesservice can be injected into plugins, tasks, and other managed types. -
Accessing the
requestedstatus of a feature for reporting. -
Using the
activestatus of a feature to disable incompatible functionality.
Build feature properties
A BuildFeature status properties are represented with Provider<Boolean> types.
The BuildFeature.getRequested() status of a build feature determines if the user requested to enable or disable the feature.
When the requested provider value is:
-
true— the user opted in for using the feature -
false— the user opted out from using the feature -
undefined— the user neither opted in nor opted out from using the feature
The BuildFeature.getActive() status of a build feature is always defined.
It represents the effective state of the feature in the build.
When the active provider value is:
-
true— the feature may affect the build behavior in a way specific to the feature -
false— the feature will not affect the build behavior
Note that the active status does not depend on the requested status.
Even if the user requests a feature, it may still not be active due to other build options being used in the build.
Gradle can also activate a feature by default, even if the user did not specify a preference.
Providing default dependencies
The implementation of a plugin sometimes requires the use of an external dependency.
You might want to automatically download an artifact using Gradle’s dependency management mechanism and later use it in the action of a task type declared in the plugin. Ideally, the plugin implementation does not need to ask the user for the coordinates of that dependency - it can simply predefine a sensible default version.
Let’s look at an example of a plugin that downloads files containing data for further processing. The plugin implementation declares a custom configuration that allows for assigning those external dependencies with dependency coordinates:
public class DataProcessingPlugin implements Plugin<Project> {
public void apply(Project project) {
Configuration dataFiles = project.getConfigurations().create("dataFiles", c -> {
c.setVisible(false);
c.setCanBeConsumed(false);
c.setCanBeResolved(true);
c.setDescription("The data artifacts to be processed for this plugin.");
c.defaultDependencies(d -> d.add(project.getDependencies().create("org.myorg:data:1.4.6")));
});
project.getTasks().withType(DataProcessing.class).configureEach(
dataProcessing -> dataProcessing.getDataFiles().from(dataFiles));
}
}abstract public class DataProcessing extends DefaultTask {
@InputFiles
abstract public ConfigurableFileCollection getDataFiles();
@TaskAction
public void process() {
System.out.println(getDataFiles().getFiles());
}
}This approach is convenient for the end user as there is no need to actively declare a dependency. The plugin already provides all the details about this implementation.
But what if the user wants to redefine the default dependency?
No problem. The plugin also exposes the custom configuration that can be used to assign a different dependency. Effectively, the default dependency is overwritten:
plugins {
id("org.myorg.data-processing")
}
dependencies {
dataFiles("org.myorg:more-data:2.6")
}plugins {
id 'org.myorg.data-processing'
}
dependencies {
dataFiles 'org.myorg:more-data:2.6'
}You will find that this pattern works well for tasks that require an external dependency when the task’s action is executed.
You can go further and abstract the version to be used for the external dependency by exposing an extension property (e.g.
toolVersion in the JaCoCo plugin).
Minimizing the use of external libraries
Using external libraries in your Gradle projects can bring great convenience, but be aware that they can introduce complex dependency graphs.
Gradle’s buildEnvironment task can help you visualize these dependencies, including those of your plugins.
Keep in mind that plugins share the same classloader, so conflicts may arise with different versions of the same library.
To demonstrate let’s assume the following build script:
plugins {
id("org.asciidoctor.jvm.convert") version "4.0.2"
}plugins {
id 'org.asciidoctor.jvm.convert' version '4.0.2'
}The output of the task clearly indicates the classpath of the classpath configuration:
$ gradle buildEnvironment
> Task :buildEnvironment
------------------------------------------------------------
Root project 'external-libraries'
------------------------------------------------------------
classpath
\--- org.asciidoctor.jvm.convert:org.asciidoctor.jvm.convert.gradle.plugin:4.0.2
\--- org.asciidoctor:asciidoctor-gradle-jvm:4.0.2
+--- org.ysb33r.gradle:grolifant-rawhide:3.0.0
| \--- org.tukaani:xz:1.6
+--- org.ysb33r.gradle:grolifant-herd:3.0.0
| +--- org.tukaani:xz:1.6
| +--- org.ysb33r.gradle:grolifant40:3.0.0
| | +--- org.tukaani:xz:1.6
| | +--- org.apache.commons:commons-collections4:4.4
| | +--- org.ysb33r.gradle:grolifant-core:3.0.0
| | | +--- org.tukaani:xz:1.6
| | | +--- org.apache.commons:commons-collections4:4.4
| | | \--- org.ysb33r.gradle:grolifant-rawhide:3.0.0 (*)
| | \--- org.ysb33r.gradle:grolifant-rawhide:3.0.0 (*)
| +--- org.ysb33r.gradle:grolifant50:3.0.0
| | +--- org.tukaani:xz:1.6
| | +--- org.ysb33r.gradle:grolifant40:3.0.0 (*)
| | +--- org.ysb33r.gradle:grolifant-core:3.0.0 (*)
| | \--- org.ysb33r.gradle:grolifant40-legacy-api:3.0.0
| | +--- org.tukaani:xz:1.6
| | +--- org.apache.commons:commons-collections4:4.4
| | +--- org.ysb33r.gradle:grolifant-core:3.0.0 (*)
| | \--- org.ysb33r.gradle:grolifant40:3.0.0 (*)
| +--- org.ysb33r.gradle:grolifant60:3.0.0
| | +--- org.tukaani:xz:1.6
| | +--- org.ysb33r.gradle:grolifant40:3.0.0 (*)
| | +--- org.ysb33r.gradle:grolifant50:3.0.0 (*)
| | +--- org.ysb33r.gradle:grolifant-core:3.0.0 (*)
| | \--- org.ysb33r.gradle:grolifant-rawhide:3.0.0 (*)
| +--- org.ysb33r.gradle:grolifant70:3.0.0
| | +--- org.tukaani:xz:1.6
| | +--- org.ysb33r.gradle:grolifant40:3.0.0 (*)
| | +--- org.ysb33r.gradle:grolifant50:3.0.0 (*)
| | +--- org.ysb33r.gradle:grolifant60:3.0.0 (*)
| | \--- org.ysb33r.gradle:grolifant-core:3.0.0 (*)
| +--- org.ysb33r.gradle:grolifant80:3.0.0
| | +--- org.tukaani:xz:1.6
| | +--- org.ysb33r.gradle:grolifant40:3.0.0 (*)
| | +--- org.ysb33r.gradle:grolifant50:3.0.0 (*)
| | +--- org.ysb33r.gradle:grolifant60:3.0.0 (*)
| | +--- org.ysb33r.gradle:grolifant70:3.0.0 (*)
| | \--- org.ysb33r.gradle:grolifant-core:3.0.0 (*)
| +--- org.ysb33r.gradle:grolifant-core:3.0.0 (*)
| \--- org.ysb33r.gradle:grolifant-rawhide:3.0.0 (*)
+--- org.asciidoctor:asciidoctor-gradle-base:4.0.2
| \--- org.ysb33r.gradle:grolifant-herd:3.0.0 (*)
\--- org.asciidoctor:asciidoctorj-api:2.5.7
(*) - Indicates repeated occurrences of a transitive dependency subtree. Gradle expands transitive dependency subtrees only once per project; repeat occurrences only display the root of the subtree, followed by this annotation.
A web-based, searchable dependency report is available by adding the --scan option.
BUILD SUCCESSFUL in 0s
1 actionable task: 1 executed
A Gradle plugin does not run in its own, isolated classloader, so you must consider whether you truly need a library or if a simpler solution suffices.
For logic that is executed as part of task execution, use the Worker API that allows you to isolate libraries.
Providing multiple variants of a plugin
The most convenient way to configure additional plugin variants is to use feature variants, a concept available in all Gradle projects that apply one of the Java plugins:
dependencies {
implementation 'com.google.guava:guava:30.1-jre' // Regular dependency
featureVariant 'com.google.guava:guava-gwt:30.1-jre' // Feature variant dependency
}In the following example, each plugin variant is developed in isolation. A separate source set is compiled and packaged in a separate jar for each variant.
The following sample demonstrates how to add a variant that is compatible with Gradle 7.0+ while the "main" variant is compatible with older versions:
val gradle7 = sourceSets.create("gradle7")
java {
registerFeature(gradle7.name) {
usingSourceSet(gradle7)
capability(project.group.toString(), project.name, project.version.toString()) // (1)
}
}
configurations.configureEach {
if (isCanBeConsumed && name.startsWith(gradle7.name)) {
attributes {
attribute(GradlePluginApiVersion.GRADLE_PLUGIN_API_VERSION_ATTRIBUTE, // (2)
objects.named("7.0"))
}
}
}
tasks.named<Copy>(gradle7.processResourcesTaskName) { // (3)
val copyPluginDescriptors = rootSpec.addChild()
copyPluginDescriptors.into("META-INF/gradle-plugins")
copyPluginDescriptors.from(tasks.pluginDescriptors)
}
dependencies {
"gradle7CompileOnly"(gradleApi()) // (4)
}def gradle7 = sourceSets.create('gradle7')
java {
registerFeature(gradle7.name) {
usingSourceSet(gradle7)
capability(project.group.toString(), project.name, project.version.toString()) // (1)
}
}
configurations.configureEach {
if (canBeConsumed && name.startsWith(gradle7.name)) {
attributes {
attribute(GradlePluginApiVersion.GRADLE_PLUGIN_API_VERSION_ATTRIBUTE, // (2)
objects.named(GradlePluginApiVersion, '7.0'))
}
}
}
tasks.named(gradle7.processResourcesTaskName) { // (3)
def copyPluginDescriptors = rootSpec.addChild()
copyPluginDescriptors.into('META-INF/gradle-plugins')
copyPluginDescriptors.from(tasks.pluginDescriptors)
}
dependencies {
gradle7CompileOnly(gradleApi()) // (4)
}|
Note
|
Only Gradle versions 7 or higher can be explicitly targeted by a variant, as support for this was only added in Gradle 7. |
First, we declare a separate source set and a feature variant for our Gradle7 plugin variant. Then, we do some specific wiring to turn the feature into a proper Gradle plugin variant:
-
Assign the implicit capability that corresponds to the components GAV to the variant.
-
Assign the Gradle API version attribute to all consumable configurations of our Gradle7 variant. Gradle uses this information to determine which variant to select during plugin resolution.
-
Configure the
processGradle7Resourcestask to ensure the plugin descriptor file is added to the Gradle7 variant Jar. -
Add a dependency to the
gradleApi()for our new variant so that the API is visible during compilation time.
Note that there is currently no convenient way to access the API of other Gradle versions as the one you are building the plugin with. Ideally, every variant should be able to declare a dependency on the API of the minimal Gradle version it supports. This will be improved in the future.
The above snippet assumes that all variants of your plugin have the plugin class at the same location.
That is, if your plugin class is org.example.GreetingPlugin, you need to create a second variant of that class in src/gradle7/java/org/example.
Using version-specific variants of multi-variant plugins
Given a dependency on a multi-variant plugin, Gradle will automatically choose its variant that best matches the current Gradle version when it resolves any of:
-
plugins specified in the
plugins {}block; -
buildscriptclasspath dependencies; -
dependencies in the root project of the build source (
buildSrc) that appear on the compile or runtime classpath; -
dependencies in a project that applies the Java Gradle Plugin Development plugin or the Kotlin DSL plugin, appearing on the compile or runtime classpath.
The best matching variant is the variant that targets the highest Gradle API version and does not exceed the current build’s Gradle version.
In all other cases, a plugin variant that does not specify the supported Gradle API version is preferred if such a variant is present.
In projects that use plugins as dependencies, requesting the variants of plugin dependencies that support a different Gradle version is possible. This allows a multi-variant plugin that depends on other plugins to access their APIs, which are exclusively provided in their version-specific variants.
This snippet makes the plugin variant gradle7 defined above consume the matching variants of its dependencies on other multi-variant plugins:
configurations.configureEach {
if (isCanBeResolved && name.startsWith(gradle7.name)) {
attributes {
attribute(GradlePluginApiVersion.GRADLE_PLUGIN_API_VERSION_ATTRIBUTE,
objects.named("7.0"))
}
}
}configurations.configureEach {
if (canBeResolved && name.startsWith(gradle7.name)) {
attributes {
attribute(GradlePluginApiVersion.GRADLE_PLUGIN_API_VERSION_ATTRIBUTE,
objects.named(GradlePluginApiVersion, '7.0'))
}
}
}Reporting problems
Plugins can report problems through Gradle’s problem-reporting APIs. The APIs report rich, structured information about problems happening during the build. This information can be used by different user interfaces such as Gradle’s console output, Build Scans, or IDEs to communicate problems to the user in the most appropriate way.
The following example shows an issue reported from a plugin:
public class ProblemReportingPlugin implements Plugin<Project> {
private final ProblemReporter problemReporter;
@Inject
public ProblemReportingPlugin(Problems problems) { // (1)
this.problemReporter = problems.forNamespace("org.myorg"); // (2)
}
public void apply(Project project) {
this.problemReporter.reporting(builder -> builder // (3)
.label("Plugin 'x' is deprecated")
.details("The plugin 'x' is deprecated since version 2.5")
.solution("Please use plugin 'y'")
.severity(Severity.WARNING)
);
}
}-
The
Problemservice is injected into the plugin. -
A problem reporter, is created for the plugin. While the namespace is up to the plugin author, it is recommended that the plugin ID be used.
-
A problem is reported. This problem is recoverable so that the build will continue.
For a full example, see our end-to-end sample.
Problem building
When reporting a problem, a wide variety of information can be provided. The ProblemSpec describes all the information that can be provided.
Reporting problems
When it comes to reporting problems, we support three different modes:
-
Reporting a problem is used for reporting problems that are recoverable, and the build should continue.
-
Throwing a problem is used for reporting problems that are not recoverable, and the build should fail.
-
Rethrowing a problem is used to wrap an already thrown exception. Otherwise, the behavior is the same as
Throwing.
For more details, see the ProblemReporter documentation.
Problem aggregation
When reporting problems, Gradle will aggregate similar problems by sending them through the Tooling API based on the problem’s category label.
-
When a problem is reported, the first occurrence is going to be reported as a ProblemDescriptor, containing the complete information about the problem.
-
Any subsequent occurrences of the same problem will be reported as a ProblemAggregationDescriptor. This descriptor will arrive at the end of the build and contain the number of occurrences of the problem.
-
If for any bucket (i.e., category and label pairing), the number of collected occurrences is greater than 10.000, then it will be sent immediately instead of at the end of the build.
Testing Gradle plugins
Testing plays a crucial role in the development process by ensuring reliable and high-quality software. This principle applies to build code, including Gradle plugins.
The sample project
This section revolves around a sample project called the "URL verifier plugin".
This plugin creates a task named verifyUrl that checks whether a given URL can be resolved via HTTP GET.
The end user can provide the URL via an extension named verification.
The following build script assumes that the plugin JAR file has been published to a binary repository. The script demonstrates how to apply the plugin to the project and configure its exposed extension:
plugins {
id("org.myorg.url-verifier") // (1)
}
verification {
url = "https://www.google.com/" // (2)
}plugins {
id 'org.myorg.url-verifier' // (1)
}
verification {
url = 'https://www.google.com/' // (2)
}-
Applies the plugin to the project
-
Configures the URL to be verified through the exposed extension
Executing the verifyUrl task renders a success message if the HTTP GET call to the configured URL returns with a 200 response code:
$ gradle verifyUrl
> Task :verifyUrl
Successfully resolved URL 'https://www.google.com/'
BUILD SUCCESSFUL in 0s
5 actionable tasks: 5 executedBefore diving into the code, let’s first revisit the different types of tests and the tooling that supports implementing them.
The importance of testing
Testing is a crucial part of the software development life cycle, ensuring that software functions correctly and meets quality standards before release. Automated testing allows developers to refactor and improve code with confidence.
The testing pyramid
- Manual Testing
-
While manual testing is straightforward, it is error-prone and requires human effort. For Gradle plugins, manual testing involves using the plugin in a build script.
- Automated Testing
-
Automated testing includes unit, integration, and functional testing.
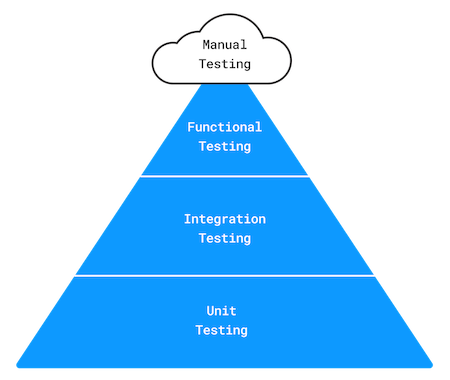
The testing pyramid introduced by Mike Cohen in his book Succeeding with Agile: Software Development Using Scrum describes three types of automated tests:
-
Unit Testing: Verifies the smallest units of code, typically methods, in isolation. It uses Stubs or Mocks to isolate code from external dependencies.
-
Integration Testing: Validates that multiple units or components work together.
-
Functional Testing: Tests the system from the end user’s perspective, ensuring correct functionality. End-to-end tests for Gradle plugins simulate a build, apply the plugin, and execute specific tasks to verify functionality.
Tooling support
Testing Gradle plugins, both manually and automatically, is simplified with the appropriate tools. The table below provides a summary of each testing approach. You can choose any test framework you’re comfortable with.
For detailed explanations and code examples, refer to the specific sections below:
| Test type | Tooling support |
|---|---|
Any JVM-based test framework |
|
Any JVM-based test framework |
|
Any JVM-based test framework and Gradle TestKit |
Setting up manual tests
The composite builds feature of Gradle makes it easy to test a plugin manually. The standalone plugin project and the consuming project can be combined into a single unit, making it straightforward to try out or debug changes without re-publishing the binary file:
.
├── include-plugin-build // (1)
│ ├── build.gradle
│ └── settings.gradle
└── url-verifier-plugin // (2)
├── build.gradle
├── settings.gradle
└── src
-
Consuming project that includes the plugin project
-
The plugin project
There are two ways to include a plugin project in a consuming project:
-
By using the command line option
--include-build. -
By using the method
includeBuildinsettings.gradle.
The following code snippet demonstrates the use of the settings file:
pluginManagement {
includeBuild("../url-verifier-plugin")
}pluginManagement {
includeBuild '../url-verifier-plugin'
}The command line output of the verifyUrl task from the project include-plugin-build looks exactly the same as shown in the introduction, except that it now executes as part of a composite build.
Manual testing has its place in the development process, but it is not a replacement for automated testing.
Setting up automated tests
Setting up a suite of tests early on is crucial to the success of your plugin. Automated tests become an invaluable safety net when upgrading the plugin to a new Gradle version or enhancing/refactoring the code.
Organizing test source code
We recommend implementing a good distribution of unit, integration, and functional tests to cover the most important use cases. Separating the source code for each test type automatically results in a project that is more maintainable and manageable.
By default, the Java project creates a convention for organizing unit tests in the directory src/test/java.
Additionally, if you apply the Groovy plugin, source code under the directory src/test/groovy is considered for compilation (with the same standard for Kotlin under the directory src/test/kotlin).
Consequently, source code directories for other test types should follow a similar pattern:
.
└── src
├── functionalTest
│ └── groovy // (1)
├── integrationTest
│ └── groovy // (2)
├── main
│ ├── java // (3)
└── test
└── groovy // (4)
-
Source directory containing functional tests
-
Source directory containing integration tests
-
Source directory containing production source code
-
Source directory containing unit tests
|
Note
|
The directories src/integrationTest/groovy and src/functionalTest/groovy are not based on an existing standard convention for Gradle projects.
You are free to choose any project layout that works best for you.
|
You can configure the source directories for compilation and test execution.
The Test Suite plugin provides a DSL and API to model multiple groups of automated tests into test suites in JVM-based projects. You can also rely on third-party plugins for convenience, such as the Nebula Facet plugin or the TestSets plugin.
Modeling test types
|
Note
|
A new configuration DSL for modeling the below integrationTest suite is available via the incubating JVM Test Suite plugin.
|
In Gradle, source code directories are represented using the concept of source sets. A source set is configured to point to one or more directories containing source code. When you define a source set, Gradle automatically sets up compilation tasks for the specified directories.
A pre-configured source set can be created with one line of build script code. The source set automatically registers configurations to define dependencies for the sources of the source set:
// Define a source set named 'test' for test sources
sourceSets {
test {
java {
srcDirs = ['src/test/java']
}
}
}
// Specify a test implementation dependency on JUnit
dependencies {
testImplementation 'junit:junit:4.12'
}We use that to define an integrationTestImplementation dependency to the project itself, which represents the "main" variant of our project (i.e., the compiled plugin code):
val integrationTest by sourceSets.creating
dependencies {
"integrationTestImplementation"(project)
}def integrationTest = sourceSets.create("integrationTest")
dependencies {
integrationTestImplementation(project)
}Source sets are responsible for compiling source code, but they do not deal with executing the bytecode. For test execution, a corresponding task of type Test needs to be established. The following setup shows the execution of integration tests, referencing the classes and runtime classpath of the integration test source set:
val integrationTestTask = tasks.register<Test>("integrationTest") {
description = "Runs the integration tests."
group = "verification"
testClassesDirs = integrationTest.output.classesDirs
classpath = integrationTest.runtimeClasspath
mustRunAfter(tasks.test)
}
tasks.check {
dependsOn(integrationTestTask)
}def integrationTestTask = tasks.register("integrationTest", Test) {
description = 'Runs the integration tests.'
group = "verification"
testClassesDirs = integrationTest.output.classesDirs
classpath = integrationTest.runtimeClasspath
mustRunAfter(tasks.named('test'))
}
tasks.named('check') {
dependsOn(integrationTestTask)
}Configuring a test framework
Gradle does not dictate the use of a specific test framework. Popular choices include JUnit, TestNG and Spock. Once you choose an option, you have to add its dependency to the compile classpath for your tests.
The following code snippet shows how to use Spock for implementing tests:
repositories {
mavenCentral()
}
dependencies {
testImplementation(platform("org.spockframework:spock-bom:2.2-groovy-3.0"))
testImplementation("org.spockframework:spock-core")
testRuntimeOnly("org.junit.platform:junit-platform-launcher")
"integrationTestImplementation"(platform("org.spockframework:spock-bom:2.2-groovy-3.0"))
"integrationTestImplementation"("org.spockframework:spock-core")
"integrationTestRuntimeOnly"("org.junit.platform:junit-platform-launcher")
"functionalTestImplementation"(platform("org.spockframework:spock-bom:2.2-groovy-3.0"))
"functionalTestImplementation"("org.spockframework:spock-core")
"functionalTestRuntimeOnly"("org.junit.platform:junit-platform-launcher")
}
tasks.withType<Test>().configureEach {
// Using JUnitPlatform for running tests
useJUnitPlatform()
}repositories {
mavenCentral()
}
dependencies {
testImplementation platform("org.spockframework:spock-bom:2.2-groovy-3.0")
testImplementation 'org.spockframework:spock-core'
testRuntimeOnly 'org.junit.platform:junit-platform-launcher'
integrationTestImplementation platform("org.spockframework:spock-bom:2.2-groovy-3.0")
integrationTestImplementation 'org.spockframework:spock-core'
integrationTestRuntimeOnly 'org.junit.platform:junit-platform-launcher'
functionalTestImplementation platform("org.spockframework:spock-bom:2.2-groovy-3.0")
functionalTestImplementation 'org.spockframework:spock-core'
functionalTestRuntimeOnly 'org.junit.platform:junit-platform-launcher'
}
tasks.withType(Test).configureEach {
// Using JUnitPlatform for running tests
useJUnitPlatform()
}|
Note
|
Spock is a Groovy-based BDD test framework that even includes APIs for creating Stubs and Mocks. The Gradle team prefers Spock over other options for its expressiveness and conciseness. |
Implementing automated tests
This section discusses representative implementation examples for unit, integration, and functional tests. All test classes are based on the use of Spock, though it should be relatively easy to adapt the code to a different test framework.
Implementing unit tests
The URL verifier plugin emits HTTP GET calls to check if a URL can be resolved successfully.
The method DefaultHttpCaller.get(String) is responsible for calling a given URL and returns an instance of type HttpResponse. HttpResponse is a POJO containing information about the HTTP response code and message:
package org.myorg.http;
public class HttpResponse {
private int code;
private String message;
public HttpResponse(int code, String message) {
this.code = code;
this.message = message;
}
public int getCode() {
return code;
}
public String getMessage() {
return message;
}
@Override
public String toString() {
return "HTTP " + code + ", Reason: " + message;
}
}The class HttpResponse represents a good candidate for a unit test.
It does not reach out to any other classes nor does it use the Gradle API.
package org.myorg.http
import spock.lang.Specification
class HttpResponseTest extends Specification {
private static final int OK_HTTP_CODE = 200
private static final String OK_HTTP_MESSAGE = 'OK'
def "can access information"() {
when:
def httpResponse = new HttpResponse(OK_HTTP_CODE, OK_HTTP_MESSAGE)
then:
httpResponse.code == OK_HTTP_CODE
httpResponse.message == OK_HTTP_MESSAGE
}
def "can get String representation"() {
when:
def httpResponse = new HttpResponse(OK_HTTP_CODE, OK_HTTP_MESSAGE)
then:
httpResponse.toString() == "HTTP $OK_HTTP_CODE, Reason: $OK_HTTP_MESSAGE"
}
}|
Important
|
When writing unit tests, it’s important to test boundary conditions and various forms of invalid input. Try to extract as much logic as possible from classes that use the Gradle API to make it testable as unit tests. It will result in maintainable code and faster test execution. |
You can use the ProjectBuilder class to create Project instances to use when you test your plugin implementation.
public class GreetingPluginTest {
@Test
public void greeterPluginAddsGreetingTaskToProject() {
Project project = ProjectBuilder.builder().build();
project.getPluginManager().apply("org.example.greeting");
assertTrue(project.getTasks().getByName("hello") instanceof GreetingTask);
}
}Implementing integration tests
Let’s look at a class that reaches out to another system, the piece of code that emits the HTTP calls.
At the time of executing a test for the class DefaultHttpCaller, the runtime environment needs to be able to reach out to the internet:
package org.myorg.http;
import java.io.IOException;
import java.net.HttpURLConnection;
import java.net.URL;
public class DefaultHttpCaller implements HttpCaller {
@Override
public HttpResponse get(String url) {
try {
HttpURLConnection connection = (HttpURLConnection) new URL(url).openConnection();
connection.setConnectTimeout(5000);
connection.setRequestMethod("GET");
connection.connect();
int code = connection.getResponseCode();
String message = connection.getResponseMessage();
return new HttpResponse(code, message);
} catch (IOException e) {
throw new HttpCallException(String.format("Failed to call URL '%s' via HTTP GET", url), e);
}
}
}Implementing an integration test for DefaultHttpCaller doesn’t look much different from the unit test shown in the previous section:
package org.myorg.http
import spock.lang.Specification
import spock.lang.Subject
class DefaultHttpCallerIntegrationTest extends Specification {
@Subject HttpCaller httpCaller = new DefaultHttpCaller()
def "can make successful HTTP GET call"() {
when:
def httpResponse = httpCaller.get('https://www.google.com/')
then:
httpResponse.code == 200
httpResponse.message == 'OK'
}
def "throws exception when calling unknown host via HTTP GET"() {
when:
httpCaller.get('https://www.wedonotknowyou123.com/')
then:
def t = thrown(HttpCallException)
t.message == "Failed to call URL 'https://www.wedonotknowyou123.com/' via HTTP GET"
t.cause instanceof UnknownHostException
}
}Implementing functional tests
Functional tests verify the correctness of the plugin end-to-end.
In practice, this means applying, configuring, and executing the functionality of the plugin implementation.
The UrlVerifierPlugin class exposes an extension and a task instance that uses the URL value configured by the end user:
package org.myorg;
import org.gradle.api.Plugin;
import org.gradle.api.Project;
import org.myorg.tasks.UrlVerify;
public class UrlVerifierPlugin implements Plugin<Project> {
@Override
public void apply(Project project) {
UrlVerifierExtension extension = project.getExtensions().create("verification", UrlVerifierExtension.class);
UrlVerify verifyUrlTask = project.getTasks().create("verifyUrl", UrlVerify.class);
verifyUrlTask.getUrl().set(extension.getUrl());
}
}Every Gradle plugin project should apply the plugin development plugin to reduce boilerplate code. By applying the plugin development plugin, the test source set is preconfigured for the use with TestKit. If we want to use a custom source set for functional tests and leave the default test source set for only unit tests, we can configure the plugin development plugin to look for TestKit tests elsewhere.
gradlePlugin {
testSourceSets(functionalTest)
}gradlePlugin {
testSourceSets(sourceSets.functionalTest)
}Functional tests for Gradle plugins use an instance of GradleRunner to execute the build under test.
GradleRunner is an API provided by TestKit, which internally uses the Tooling API to execute the build.
The following example applies the plugin to the build script under test, configures the extension and executes the build with the task verifyUrl.
Please see the TestKit documentation to get more familiar with the functionality of TestKit.
package org.myorg
import org.gradle.testkit.runner.GradleRunner
import spock.lang.Specification
import spock.lang.TempDir
import static org.gradle.testkit.runner.TaskOutcome.SUCCESS
class UrlVerifierPluginFunctionalTest extends Specification {
@TempDir File testProjectDir
File buildFile
def setup() {
buildFile = new File(testProjectDir, 'build.gradle')
buildFile << """
plugins {
id 'org.myorg.url-verifier'
}
"""
}
def "can successfully configure URL through extension and verify it"() {
buildFile << """
verification {
url = 'https://www.google.com/'
}
"""
when:
def result = GradleRunner.create()
.withProjectDir(testProjectDir)
.withArguments('verifyUrl')
.withPluginClasspath()
.build()
then:
result.output.contains("Successfully resolved URL 'https://www.google.com/'")
result.task(":verifyUrl").outcome == SUCCESS
}
}IDE integration
TestKit determines the plugin classpath by running a specific Gradle task.
You will need to execute the assemble task to initially generate the plugin classpath or to reflect changes to it even when running TestKit-based functional tests from the IDE.
Some IDEs provide a convenience option to delegate the "test classpath generation and execution" to the build. In IntelliJ, you can find this option under Preferences… > Build, Execution, Deployment > Build Tools > Gradle > Runner > Delegate IDE build/run actions to Gradle.
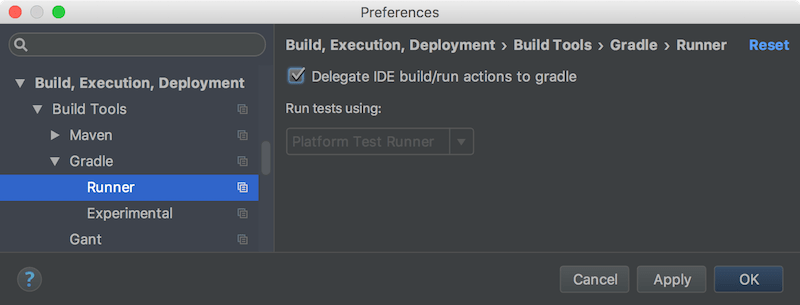
Publishing Plugins to the Gradle Plugin Portal
Publishing a plugin is the primary way to make it available for others to use. While you can publish to a private repository to restrict access, publishing to the Gradle Plugin Portal makes your plugin available to anyone in the world.
This guide shows you how to use the com.gradle.plugin-publish plugin to publish plugins to the Gradle Plugin Portal using a convenient DSL.
This approach streamlines configuration steps and provides validation checks to ensure your plugin meets the Gradle Plugin Portal’s criteria.
Prerequisites
You’ll need an existing Gradle plugin project for this tutorial. If you don’t have one, use the Greeting plugin sample.
Attempting to publish this plugin will safely fail with a permission error, so don’t worry about cluttering up the Gradle Plugin Portal with a trivial example plugin.
Account setup
Before publishing your plugin, you must create an account on the Gradle Plugin Portal. Follow the instructions on the registration page to create an account and obtain an API key from your profile page’s "API Keys" tab.
Store your API key in your Gradle configuration (gradle.publish.key and gradle.publish.secret) or use a plugin like Seauc Credentials plugin or Gradle Credentials plugin for secure management.
It is common practice to copy and paste the text into your $HOME/.gradle/gradle.properties file, but you can also place it in any other valid location.
All the plugin requires is that the gradle.publish.key and gradle.publish.secret are available as project properties when the appropriate Plugin Portal tasks are executed.
If you are concerned about placing your credentials in gradle.properties, check out the Seauc Credentials plugin or the Gradle Credentials plugin.
Adding the Plugin Publishing Plugin
To publish your plugin, add the com.gradle.plugin-publish plugin to your project’s build.gradle or build.gradle.kts file:
plugins {
id("com.gradle.plugin-publish") version "1.2.1"
}plugins {
id 'com.gradle.plugin-publish' version '1.2.1'
}The latest version of the Plugin Publishing Plugin can be found on the Gradle Plugin Portal.
|
Note
|
Since version 1.0.0 the Plugin Publish Plugin automatically applies the Java Gradle Plugin Development Plugin (assists with developing Gradle plugins) and the Maven Publish Plugin (generates plugin publication metadata). If using older versions of the Plugin Publish Plugin, these helper plugins must be applied explicitly. |
Configuring the Plugin Publishing Plugin
Configure the com.gradle.plugin-publish plugin in your build.gradle or build.gradle.kts file.
group = "io.github.johndoe" // (1)
version = "1.0" // (2)
gradlePlugin { // (3)
website = "<substitute your project website>" // (4)
vcsUrl = "<uri to project source repository>" // (5)
// ... // (6)
}group = 'io.github.johndoe' // (1)
version = '1.0' // (2)
gradlePlugin { // (3)
website = '<substitute your project website>' // (4)
vcsUrl = '<uri to project source repository>' // (5)
// ... // (6)
}-
Make sure your project has a
groupset which is used to identify the artifacts (jar and metadata) you publish for your plugins in the repository of the Gradle Plugin Portal and which is descriptive of the plugin author or the organization the plugins belong too. -
Set the version of your project, which will also be used as the version of your plugins.
-
Use the
gradlePluginblock provided by the Java Gradle Plugin Development Plugin to configure further options for your plugin publication. -
Set the website for your plugin’s project.
-
Provide the source repository URI so that others can find it, if they want to contribute.
-
Set specific properties for each plugin you want to publish; see next section.
Define common properties for all plugins, such as group, version, website, and source repository, using the gradlePlugin{} block:
gradlePlugin { // (1)
// ... // (2)
plugins { // (3)
create("greetingsPlugin") { // (4)
id = "<your plugin identifier>" // (5)
displayName = "<short displayable name for plugin>" // (6)
description = "<human-readable description of what your plugin is about>" // (7)
tags = listOf("tags", "for", "your", "plugins") // (8)
implementationClass = "<your plugin class>"
}
}
}gradlePlugin { // (1)
// ... // (2)
plugins { // (3)
greetingsPlugin { // (4)
id = '<your plugin identifier>' // (5)
displayName = '<short displayable name for plugin>' // (6)
description = '<human-readable description of what your plugin is about>' // (7)
tags.set(['tags', 'for', 'your', 'plugins']) // (8)
implementationClass = '<your plugin class>'
}
}
}-
Plugin specific configuration also goes into the
gradlePluginblock. -
This is where we previously added global properties.
-
Each plugin you publish will have its own block inside
plugins. -
The name of a plugin block must be unique for each plugin you publish; this is a property used only locally by your build and will not be part of the publication.
-
Set the unique
idof the plugin, as it will be identified in the publication. -
Set the plugin name in human-readable form.
-
Set a description to be displayed on the portal. It provides useful information to people who want to use your plugin.
-
Specifies the categories your plugin covers. It makes the plugin more likely to be discovered by people needing its functionality.
For example, consider the configuration for the GradleTest plugin, already published to the Gradle Plugin Portal.
gradlePlugin {
website = "https://github.com/ysb33r/gradleTest"
vcsUrl = "https://github.com/ysb33r/gradleTest.git"
plugins {
create("gradletestPlugin") {
id = "org.ysb33r.gradletest"
displayName = "Plugin for compatibility testing of Gradle plugins"
description = "A plugin that helps you test your plugin against a variety of Gradle versions"
tags = listOf("testing", "integrationTesting", "compatibility")
implementationClass = "org.ysb33r.gradle.gradletest.GradleTestPlugin"
}
}
}gradlePlugin {
website = 'https://github.com/ysb33r/gradleTest'
vcsUrl = 'https://github.com/ysb33r/gradleTest.git'
plugins {
gradletestPlugin {
id = 'org.ysb33r.gradletest'
displayName = 'Plugin for compatibility testing of Gradle plugins'
description = 'A plugin that helps you test your plugin against a variety of Gradle versions'
tags.addAll('testing', 'integrationTesting', 'compatibility')
implementationClass = 'org.ysb33r.gradle.gradletest.GradleTestPlugin'
}
}
}If you browse the associated page on the Gradle Plugin Portal for the GradleTest plugin, you will see how the specified metadata is displayed.
Sources & Javadoc
The Plugin Publish Plugin automatically generates and publishes the Javadoc, and sources JARs for your plugin publication.
Sign artifacts
Starting from version 1.0.0 of Plugin Publish Plugin, the signing of published plugin artifacts has been made automatic.
To enable it, all that’s needed is to apply the signing plugin in your build.
Shadow dependencies
Starting from version 1.0.0 of Plugin Publish Plugin, shadowing your plugin’s dependencies (ie, publishing it as a fat jar) has been made automatic.
To enable it, all that’s needed is to apply the com.github.johnrengelman.shadow plugin in your build.
Publishing the plugin
If you publish your plugin internally for use within your organization, you can publish it like any other code artifact. See the Ivy and Maven chapters on publishing artifacts.
If you are interested in publishing your plugin to be used by the wider Gradle community, you can publish it to Gradle Plugin Portal. This site provides the ability to search for and gather information about plugins contributed by the Gradle community. Please refer to the corresponding section on making your plugin available on this site.
Publish locally
To check how the artifacts of your published plugin look or to use it only locally or internally in your company, you can publish it to any Maven repository, including a local folder.
You only need to configure repositories for publishing.
Then, you can run the publish task to publish your plugin to all repositories you have defined (but not the Gradle Plugin Portal).
publishing {
repositories {
maven {
name = "localPluginRepository"
url = uri("../local-plugin-repository")
}
}
}publishing {
repositories {
maven {
name = 'localPluginRepository'
url = '../local-plugin-repository'
}
}
}To use the repository in another build, add it to the repositories of the pluginManagement {} block in your settings.gradle(.kts) file.
Publish to the Plugin Portal
Publish the plugin by using the publishPlugin task:
$ ./gradlew publishPlugins
You can validate your plugins before publishing using the --validate-only flag:
$ ./gradlew publishPlugins --validate-only
If you have not configured your gradle.properties for the Gradle Plugin Portal, you can specify them on the command-line:
$ ./gradlew publishPlugins -Pgradle.publish.key=<key> -Pgradle.publish.secret=<secret>
|
Note
|
You will encounter a permission failure if you attempt to publish the example Greeting Plugin with the ID used in this section. That’s expected and ensures the portal won’t be overrun with multiple experimental and duplicate greeting-type plugins. |
After approval, your plugin will be available on the Gradle Plugin Portal for others to discover and use.
Consume the published plugin
Once you successfully publish a plugin, it won’t immediately appear on the Portal. It also needs to pass an approval process, which is manual and relatively slow for the initial version of your plugin, but is fully automatic for subsequent versions. For further details, see here.
Once your plugin is approved, you can find instructions for its use at a URL of the form https://plugins.gradle.org/plugin/<your-plugin-id>. For example, the Greeting Plugin example is already on the portal at https://plugins.gradle.org/plugin/org.example.greeting.
Plugins published without Gradle Plugin Portal
If your plugin was published without using the Java Gradle Plugin Development Plugin, the publication will be lacking Plugin Marker Artifact, which is needed for plugins DSL to locate the plugin.
In this case, the recommended way to resolve the plugin in another project is to add a resolutionStrategy section to the pluginManagement {} block of the project’s settings file, as shown below.
resolutionStrategy {
eachPlugin {
if (requested.id.namespace == "org.example") {
useModule("org.example:custom-plugin:${requested.version}")
}
}
}resolutionStrategy {
eachPlugin {
if (requested.id.namespace == 'org.example') {
useModule("org.example:custom-plugin:${requested.version}")
}
}
}BEST PRACTICES
Organizing Gradle Projects
Source code and build logic of every software project should be organized in a meaningful way. This page lays out the best practices that lead to readable, maintainable projects. The following sections also touch on common problems and how to avoid them.
Separate language-specific source files
Gradle’s language plugins establish conventions for discovering and compiling source code.
For example, a project applying the Java plugin will automatically compile the code in the directory src/main/java.
Other language plugins follow the same pattern.
The last portion of the directory path usually indicates the expected language of the source files.
Some compilers are capable of cross-compiling multiple languages in the same source directory.
The Groovy compiler can handle the scenario of mixing Java and Groovy source files located in src/main/groovy.
Gradle recommends that you place sources in directories according to their language, because builds are more performant and both the user and build can make stronger assumptions.
The following source tree contains Java and Kotlin source files. Java source files live in src/main/java, whereas Kotlin source files live in src/main/kotlin.
.
├── build.gradle.kts
└── src
└── main
├── java
│ └── HelloWorld.java
└── kotlin
└── Utils.kt.
├── build.gradle
└── src
└── main
├── java
│ └── HelloWorld.java
└── kotlin
└── Utils.ktSeparate source files per test type
It’s very common that a project defines and executes different types of tests e.g. unit tests, integration tests, functional tests or smoke tests. Optimally, the test source code for each test type should be stored in dedicated source directories. Separated test source code has a positive impact on maintainability and separation of concerns as you can run test types independent from each other.
Have a look at the sample that demonstrates how a separate integration tests configuration can be added to a Java-based project.
Use standard conventions as much as possible
All Gradle core plugins follow the software engineering paradigm convention over configuration. The plugin logic provides users with sensible defaults and standards, the conventions, in a certain context. Let’s take the Java plugin as an example.
-
It defines the directory
src/main/javaas the default source directory for compilation. -
The output directory for compiled source code and other artifacts (like the JAR file) is
build.
By sticking to the default conventions, new developers to the project immediately know how to find their way around. While those conventions can be reconfigured, it makes it harder to build script users and authors to manage the build logic and its outcome. Try to stick to the default conventions as much as possible except if you need to adapt to the layout of a legacy project. Refer to the reference page of the relevant plugin to learn about its default conventions.
Always define a settings file
Gradle tries to locate a settings.gradle (Groovy DSL) or a settings.gradle.kts (Kotlin DSL) file with every invocation of the build.
For that purpose, the runtime walks the hierarchy of the directory tree up to the root directory.
The algorithm stops searching as soon as it finds the settings file.
Always add a settings.gradle to the root directory of your build to avoid the initial performance impact.
The file can either be empty or define the desired name of the project.
A multi-project build must have a settings.gradle(.kts) file in the root project of the multi-project hierarchy.
It is required because the settings file defines which projects are taking part in a multi-project build.
Besides defining included projects, you might need it to add libraries to your build script classpath.
The following example shows a standard Gradle project layout:
.
├── settings.gradle.kts
├── subproject-one
│ └── build.gradle.kts
└── subproject-two
└── build.gradle.kts.
├── settings.gradle
├── subproject-one
│ └── build.gradle
└── subproject-two
└── build.gradleUse buildSrc to abstract imperative logic
Complex build logic is usually a good candidate for being encapsulated either as custom task or binary plugin.
Custom task and plugin implementations should not live in the build script.
It is very convenient to use buildSrc for that purpose as long as the code does not need to be shared among multiple, independent projects.
The directory buildSrc is treated as an included build. Upon discovery of the directory, Gradle automatically compiles and tests this code and puts it in the classpath of your build script.
For multi-project builds there can be only one buildSrc directory, which has to sit in the root project directory.
buildSrc should be preferred over script plugins as it is easier to maintain, refactor and test the code.
buildSrc uses the same source code conventions applicable to Java and Groovy projects.
It also provides direct access to the Gradle API. Additional dependencies can be declared in a dedicated build.gradle under buildSrc.
repositories {
mavenCentral()
}
dependencies {
testImplementation("junit:junit:4.13")
}repositories {
mavenCentral()
}
dependencies {
testImplementation 'junit:junit:4.13'
}A typical project including buildSrc has the following layout.
Any code under buildSrc should use a package similar to application code.
Optionally, the buildSrc directory can host a build script if additional configuration is needed (e.g. to apply plugins or to declare dependencies).
.
├── buildSrc
│ ├── build.gradle.kts
│ └── src
│ ├── main
│ │ └── java
│ │ └── com
│ │ └── enterprise
│ │ ├── Deploy.java
│ │ └── DeploymentPlugin.java
│ └── test
│ └── java
│ └── com
│ └── enterprise
│ └── DeploymentPluginTest.java
├── settings.gradle.kts
├── subproject-one
│ └── build.gradle.kts
└── subproject-two
└── build.gradle.kts.
├── buildSrc
│ ├── build.gradle
│ └── src
│ ├── main
│ │ └── java
│ │ └── com
│ │ └── enterprise
│ │ ├── Deploy.java
│ │ └── DeploymentPlugin.java
│ └── test
│ └── java
│ └── com
│ └── enterprise
│ └── DeploymentPluginTest.java
├── settings.gradle
├── subproject-one
│ └── build.gradle
└── subproject-two
└── build.gradle|
Note
|
A change in Thus, when making small incremental changes, the |
Declare properties in gradle.properties file
In Gradle, properties can be defined in the build script, in a gradle.properties file or as parameters on the command line.
It’s common to declare properties on the command line for ad-hoc scenarios.
For example you may want to pass in a specific property value to control runtime behavior just for this one invocation of the build.
Properties in a build script can easily become a maintenance headache and convolute the build script logic.
The gradle.properties helps with keeping properties separate from the build script and should be explored as viable option.
It’s a good location for placing properties that control the build environment.
A typical project setup places the gradle.properties file in the root directory of the build.
Alternatively, the file can also live in the GRADLE_USER_HOME directory if you want it to apply to all builds on your machine.
.
├── gradle.properties
└── settings.gradle.kts
├── subproject-a
│ └── build.gradle.kts
└── subproject-b
└── build.gradle.kts.
├── gradle.properties
└── settings.gradle
├── subproject-a
│ └── build.gradle
└── subproject-b
└── build.gradleAvoid overlapping task outputs
Tasks should define inputs and outputs to get the performance benefits of incremental build functionality. When declaring the outputs of a task, make sure that the directory for writing outputs is unique among all the tasks in your project.
Intermingling or overwriting output files produced by different tasks compromises up-to-date checking causing slower builds. In turn, these filesystem changes may prevent Gradle’s build cache from properly identifying and caching what would otherwise be cacheable tasks.
Standardizing builds with a custom Gradle distribution
Often enterprises want to standardize the build platform for all projects in the organization by defining common conventions or rules. You can achieve that with the help of initialization scripts. Initialization scripts make it extremely easy to apply build logic across all projects on a single machine. For example, to declare a in-house repository and its credentials.
There are some drawbacks to the approach. First of all, you will have to communicate the setup process across all developers in the company. Furthermore, updating the initialization script logic uniformly can prove challenging.
Custom Gradle distributions are a practical solution to this very problem. A custom Gradle distribution is comprised of the standard Gradle distribution plus one or many custom initialization scripts. The initialization scripts come bundled with the distribution and are applied every time the build is run. Developers only need to point their checked-in Wrapper files to the URL of the custom Gradle distribution.
Custom Gradle distributions may also contain a gradle.properties file in the root of the distribution, which provide an organization-wide set of properties that control the build environment.
The following steps are typical for creating a custom Gradle distribution:
-
Implement logic for downloading and repackaging a Gradle distribution.
-
Define one or many initialization scripts with the desired logic.
-
Bundle the initialization scripts with the Gradle distribution.
-
Upload the Gradle distribution archive to a HTTP server.
-
Change the Wrapper files of all projects to point to the URL of the custom Gradle distribution.
plugins {
id 'base'
}
// This is defined in buildSrc
import org.gradle.distribution.DownloadGradle
version = '0.1'
tasks.register('downloadGradle', DownloadGradle) {
description = 'Downloads the Gradle distribution with a given version.'
gradleVersion = '4.6'
}
tasks.register('createCustomGradleDistribution', Zip) {
description = 'Builds custom Gradle distribution and bundles initialization scripts.'
dependsOn downloadGradle
def projectVersion = project.version
archiveFileName = downloadGradle.gradleVersion.map { gradleVersion ->
"mycompany-gradle-${gradleVersion}-${projectVersion}-bin.zip"
}
from zipTree(downloadGradle.destinationFile)
from('src/init.d') {
into "${downloadGradle.distributionNameBase.get()}/init.d"
}
}Best practices for authoring maintainable builds
Gradle has a rich API with several approaches to creating build logic. The associated flexibility can easily lead to unnecessarily complex builds with custom code commonly added directly to build scripts. In this chapter, we present several best practices that will help you develop expressive and maintainable builds that are easy to use.
|
Note
|
The third-party Gradle lint plugin helps with enforcing a desired code style in build scripts if that’s something that would interest you. |
Avoid using imperative logic in scripts
The Gradle runtime does not enforce a specific style for build logic. For that very reason, it’s easy to end up with a build script that mixes declarative DSL elements with imperative, procedural code. Let’s talk about some concrete examples.
-
Declarative code: Built-in, language-agnostic DSL elements (e.g. Project.dependencies{} or Project.repositories{}) or DSLs exposed by plugins
-
Imperative code: Conditional logic or very complex task action implementations
The end goal of every build script should be to only contain declarative language elements which makes the code easier to understand and maintain. Imperative logic should live in binary plugins and which in turn is applied to the build script. As a side product, you automatically enable your team to reuse the plugin logic in other projects if you publish the artifact to a binary repository.
The following sample build shows a negative example of using conditional logic directly in the build script. While this code snippet is small, it is easy to imagine a full-blown build script using numerous procedural statements and the impact it would have on readability and maintainability. By moving the code into a class, it can also be tested individually.
if (project.findProperty("releaseEngineer") != null) {
tasks.register("release") {
doLast {
logger.quiet("Releasing to production...")
// release the artifact to production
}
}
}if (project.findProperty('releaseEngineer') != null) {
tasks.register('release') {
doLast {
logger.quiet 'Releasing to production...'
// release the artifact to production
}
}
}Let’s compare the build script with the same logic implemented as a binary plugin.
The code might look more involved at first but clearly looks more like typical application code.
This particular plugin class lives in the buildSrc directory which makes it available to the build script automatically.
package com.enterprise;
import org.gradle.api.Action;
import org.gradle.api.Plugin;
import org.gradle.api.Project;
import org.gradle.api.Task;
import org.gradle.api.tasks.TaskProvider;
public class ReleasePlugin implements Plugin<Project> {
private static final String RELEASE_ENG_ROLE_PROP = "releaseEngineer";
private static final String RELEASE_TASK_NAME = "release";
@Override
public void apply(Project project) {
if (project.findProperty(RELEASE_ENG_ROLE_PROP) != null) {
Task task = project.getTasks().create(RELEASE_TASK_NAME);
task.doLast(new Action<Task>() {
@Override
public void execute(Task task) {
task.getLogger().quiet("Releasing to production...");
// release the artifact to production
}
});
}
}
}Now that the build logic has been translated into a plugin, you can apply it in the build script. The build script has been shrunk from 8 lines of code to a one liner.
plugins {
id("com.enterprise.release")
}plugins {
id 'com.enterprise.release'
}Avoid using internal Gradle APIs
Use of Gradle internal APIs in plugins and build scripts has the potential to break builds when either Gradle or plugins change.
The following packages are listed in the
Gradle public API definition
and the
Kotlin DSL API definition, except any subpackage with internal in the name.
org.gradle org.gradle.api.* org.gradle.authentication.* org.gradle.build.* org.gradle.buildinit.* org.gradle.caching.* org.gradle.concurrent.* org.gradle.deployment.* org.gradle.external.javadoc.* org.gradle.ide.* org.gradle.ivy.* org.gradle.jvm.* org.gradle.language.* org.gradle.maven.* org.gradle.nativeplatform.* org.gradle.normalization.* org.gradle.platform.* org.gradle.plugin.devel.* org.gradle.plugin.use org.gradle.plugin.management org.gradle.plugins.* org.gradle.process.* org.gradle.testfixtures.* org.gradle.testing.jacoco.* org.gradle.tooling.* org.gradle.swiftpm.* org.gradle.model.* org.gradle.testkit.* org.gradle.testing.* org.gradle.vcs.* org.gradle.work.* org.gradle.workers.* org.gradle.util.*
org.gradle.kotlin.dsl org.gradle.kotlin.dsl.precompile
Alternatives for oft-used internal APIs
To provide a nested DSL for your custom task, don’t use org.gradle.internal.reflect.Instantiator; use ObjectFactory instead.
It may also be helpful to read the chapter on lazy configuration.
Don’t use org.gradle.api.internal.ConventionMapping.
Use Provider and/or Property.
You can find an example for capturing user input to configure runtime behavior in the implementing plugins section.
Instead of org.gradle.internal.os.OperatingSystem, use another method to detect operating system, such as Apache commons-lang SystemUtils or System.getProperty("os.name").
Use other collections or I/O frameworks instead of org.gradle.util.CollectionUtils, org.gradle.util.internal.GFileUtils, and other classes under org.gradle.util.*.
Follow conventions when declaring tasks
The task API gives a build author a lot of flexibility to declare tasks in a build script. For optimal readability and maintainability follow these rules:
-
The task type should be the only key-value pair within the parentheses after the task name.
-
Other configuration should be done within the task’s configuration block.
-
Task actions added when declaring a task should only be declared with the methods Task.doFirst{} or Task.doLast{}.
-
When declaring an ad-hoc task — one that doesn’t have an explicit type — you should use Task.doLast{} if you’re only declaring a single action.
-
A task should define a group and description.
import com.enterprise.DocsGenerate
tasks.register<DocsGenerate>("generateHtmlDocs") {
group = JavaBasePlugin.DOCUMENTATION_GROUP
description = "Generates the HTML documentation for this project."
title = "Project docs"
outputDir = layout.buildDirectory.dir("docs")
}
tasks.register("allDocs") {
group = JavaBasePlugin.DOCUMENTATION_GROUP
description = "Generates all documentation for this project."
dependsOn("generateHtmlDocs")
doLast {
logger.quiet("Generating all documentation...")
}
}import com.enterprise.DocsGenerate
def generateHtmlDocs = tasks.register('generateHtmlDocs', DocsGenerate) {
group = JavaBasePlugin.DOCUMENTATION_GROUP
description = 'Generates the HTML documentation for this project.'
title = 'Project docs'
outputDir = layout.buildDirectory.dir('docs')
}
tasks.register('allDocs') {
group = JavaBasePlugin.DOCUMENTATION_GROUP
description = 'Generates all documentation for this project.'
dependsOn generateHtmlDocs
doLast {
logger.quiet('Generating all documentation...')
}
}Improve task discoverability
Even new users to a build should to be able to find crucial information quickly and effortlessly. In Gradle you can declare a group and a description for any task of the build. The tasks report uses the assigned values to organize and render the task for easy discoverability. Assigning a group and description is most helpful for any task that you expect build users to invoke.
The example task generateDocs generates documentation for a project in the form of HTML pages.
The task should be organized underneath the bucket Documentation.
The description should express its intent.
tasks.register("generateDocs") {
group = "Documentation"
description = "Generates the HTML documentation for this project."
doLast {
// action implementation
}
}tasks.register('generateDocs') {
group = 'Documentation'
description = 'Generates the HTML documentation for this project.'
doLast {
// action implementation
}
}The output of the tasks report reflects the assigned values.
> gradle tasks > Task :tasks Documentation tasks ------------------- generateDocs - Generates the HTML documentation for this project.
Minimize logic executed during the configuration phase
It’s important for every build script developer to understand the different phases of the build lifecycle and their implications on performance and evaluation order of build logic. During the configuration phase the project and its domain objects should be configured, whereas the execution phase only executes the actions of the task(s) requested on the command line plus their dependencies. Be aware that any code that is not part of a task action will be executed with every single run of the build. A build scan can help you with identifying the time spent during each of the lifecycle phases. It’s an invaluable tool for diagnosing common performance issues.
Let’s consider the following incantation of the anti-pattern described above.
In the build script you can see that the dependencies assigned to the configuration printArtifactNames are resolved outside of the task action.
dependencies {
implementation("log4j:log4j:1.2.17")
}
tasks.register("printArtifactNames") {
// always executed
val libraryNames = configurations.compileClasspath.get().map { it.name }
doLast {
logger.quiet(libraryNames.joinToString())
}
}dependencies {
implementation 'log4j:log4j:1.2.17'
}
tasks.register('printArtifactNames') {
// always executed
def libraryNames = configurations.compileClasspath.collect { it.name }
doLast {
logger.quiet libraryNames
}
}The code for resolving the dependencies should be moved into the task action to avoid the performance impact of resolving the dependencies before they are actually needed.
dependencies {
implementation("log4j:log4j:1.2.17")
}
tasks.register("printArtifactNames") {
val compileClasspath: FileCollection = configurations.compileClasspath.get()
doLast {
val libraryNames = compileClasspath.map { it.name }
logger.quiet(libraryNames.joinToString())
}
}dependencies {
implementation 'log4j:log4j:1.2.17'
}
tasks.register('printArtifactNames') {
FileCollection compileClasspath = configurations.compileClasspath
doLast {
def libraryNames = compileClasspath.collect { it.name }
logger.quiet libraryNames
}
}Avoid using the GradleBuild task type
The GradleBuild task type allows a build script to define a task that invokes another Gradle build. The use of this type is generally discouraged. There are some corner cases where the invoked build doesn’t expose the same runtime behavior as from the command line or through the Tooling API leading to unexpected results.
Usually, there’s a better way to model the requirement. The appropriate approach depends on the problem at hand. Here’re some options:
-
Model the build as multi-project build if the intention is to execute tasks from different modules as unified build.
-
Use composite builds for projects that are physically separated but should occasionally be built as a single unit.
Avoid inter-project configuration
Gradle does not restrict build script authors from reaching into the domain model from one project into another one in a multi-project build. Strongly-coupled projects hurts build execution performance as well as readability and maintainability of code.
The following practices should be avoided:
-
Explicitly depending on a task from another project via Task.dependsOn(java.lang.Object...).
-
Setting property values or calling methods on domain objects from another project.
-
Executing another portion of the build with GradleBuild.
-
Declaring unnecessary project dependencies.
Externalize and encrypt your passwords
Most builds need to consume one or many passwords.
The reasons for this need may vary.
Some builds need a password for publishing artifacts to a secured binary repository, other builds need a password for downloading binary files.
Passwords should always kept safe to prevent fraud.
Under no circumstance should you add the password to the build script in plain text or declare it in gradle.properties file in the project’s directory.
Those files usually live in a version control repository and can be viewed by anyone that has access to it.
Passwords together with any other sensitive data should be kept external from the version controlled project files.
Gradle exposes an API for providing credentials in ProviderFactory
as well as Artifact Repositories
that allows to supply credential values using Gradle properties
when they are needed by the build. This way the credentials can be stored in the gradle.properties file that
resides in the user’s home directory or be injected to the build using command line arguments or environment variables.
If you store sensitive credentials in user home’s gradle.properties, consider encrypting them. At the moment Gradle does not provide a built-in mechanism for encrypting, storing and accessing passwords.
A good solution for solving this problem is the Gradle Credentials plugin.
Don’t anticipate configuration creation
Gradle will create certain configurations, such as default or archives, using a "check if needed" strategy.
That means it will only create these configurations if they do not already exist.
You should not ever create these configurations yourself. Names such as these, and the names of configurations associated with source sets, should be considered implicitly "reserved". The exact list of reserved names depends on which plugins are applied and how your build is configured.
This situation will be announced with the following deprecation warnings:
Configuration customCompileClasspath already exists with permitted usage(s):
Consumable - this configuration can be selected by another project as a dependency
Resolvable - this configuration can be resolved by this project to a set of files
Declarable - this configuration can have dependencies added to it
Yet Gradle expected to create it with the usage(s):
Resolvable - this configuration can be resolved by this project to a set of filesGradle will then attempt to mutate the allowed usage to match the expected usage and will emit a second warning:
Gradle will mutate the usage of this configuration to match the expected usage. This may cause unexpected behavior. Creating configurations with reserved names has been deprecated. This is scheduled to be removed in Gradle 9.0. Create source sets prior to creating or accessing the configurations associated with them.Some configurations may have their usage locked against mutation. In this case your build will fail and this warning will be immediately followed by an exception with the message:
Gradle cannot mutate the usage of configuration 'customCompileClasspath' because it is locked.If you encounter this error you must either:
-
Change the name of your configuration to avoid the conflict.
-
If changing the name is not possible, ensure the allowed usage (consumable, resolvable, declarable against) for your configuration is aligned with Gradle’s expectations.
As a best practice, you should not "anticipate" configuration creation - let Gradle create the configuration first and then adjust it. Or, if possible, use non-conflicting names for your custom configurations by renaming them when you see this warning.
OTHER TOPICS
Gradle-managed Directories
Gradle uses two main directories to perform and manage its work: the Gradle User Home directory and the Project Root directory.
Gradle User Home directory
By default, the Gradle User Home (~/.gradle or C:\Users\<USERNAME>\.gradle) stores global configuration properties, initialization scripts, caches, and log files.
It can be set with the environment variable GRADLE_USER_HOME.
|
Tip
|
Not to be confused with the GRADLE_HOME, the optional installation directory for Gradle.
|
It is roughly structured as follows:
├── caches // (1) │ ├── 4.8 // (2) │ ├── 4.9 // (2) │ ├── ⋮ │ ├── jars-3 // (3) │ └── modules-2 // (3) ├── daemon // (4) │ ├── ⋮ │ ├── 4.8 │ └── 4.9 ├── init.d // (5) │ └── my-setup.gradle ├── jdks // (6) │ ├── ⋮ │ └── jdk-14.0.2+12 ├── wrapper │ └── dists // (7) │ ├── ⋮ │ ├── gradle-4.8-bin │ ├── gradle-4.9-all │ └── gradle-4.9-bin └── gradle.properties // (8)
-
Global cache directory (for everything that is not project-specific).
-
Version-specific caches (e.g., to support incremental builds).
-
Shared caches (e.g., for artifacts of dependencies).
-
Registry and logs of the Gradle Daemon.
-
Global initialization scripts.
-
JDKs downloaded by the toolchain support.
-
Distributions downloaded by the Gradle Wrapper.
-
Global Gradle configuration properties.
Cleanup of caches and distributions
Gradle automatically cleans its user home directory.
By default, the cleanup runs in the background when the Gradle daemon is stopped or shut down.
If using --no-daemon, it runs in the foreground after the build session.
The following cleanup strategies are applied periodically (by default, once every 24 hours):
-
Version-specific caches in all
caches/<GRADLE_VERSION>/directories are checked for whether they are still in use.If not, directories for release versions are deleted after 30 days of inactivity, and snapshot versions after 7 days.
-
Shared caches in
caches/(e.g.,jars-*) are checked for whether they are still in use.If no Gradle version still uses them, they are deleted.
-
Files in shared caches used by the current Gradle version in
caches/(e.g.,jars-3ormodules-2) are checked for when they were last accessed.Depending on whether the file can be recreated locally or downloaded from a remote repository, it will be deleted after 7 or 30 days, respectively.
-
Gradle distributions in
wrapper/dists/are checked for whether they are still in use, i.e., whether there’s a corresponding version-specific cache directory.Unused distributions are deleted.
Configuring cleanup of caches and distributions
The retention periods of the various caches can be configured.
Caches are classified into four categories:
-
Released wrapper distributions: Distributions and related version-specific caches corresponding to released versions (e.g.,
4.6.2or8.0).Default retention for unused versions is 30 days.
-
Snapshot wrapper distributions: Distributions and related version-specific caches corresponding to snapshot versions (e.g.
7.6-20221130141522+0000).Default retention for unused versions is 7 days.
-
Downloaded resources: Shared caches downloaded from a remote repository (e.g., cached dependencies).
Default retention for unused resources is 30 days.
-
Created resources: Shared caches that Gradle creates during a build (e.g., artifact transforms).
Default retention for unused resources is 7 days.
The retention period for each category can be configured independently via an init script in Gradle User Home:
beforeSettings {
caches {
releasedWrappers.setRemoveUnusedEntriesAfterDays(45)
snapshotWrappers.setRemoveUnusedEntriesAfterDays(10)
downloadedResources.setRemoveUnusedEntriesAfterDays(45)
createdResources.setRemoveUnusedEntriesAfterDays(10)
}
}beforeSettings { settings ->
settings.caches {
releasedWrappers.removeUnusedEntriesAfterDays = 45
snapshotWrappers.removeUnusedEntriesAfterDays = 10
downloadedResources.removeUnusedEntriesAfterDays = 45
createdResources.removeUnusedEntriesAfterDays = 10
}
}The frequency at which cache cleanup is invoked is also configurable.
There are three possible settings:
-
DEFAULT: Cleanup is performed periodically in the background (currently once every 24 hours).
-
DISABLED: Never cleanup Gradle User Home.
This is useful in cases where Gradle User Home is ephemeral or delaying cleanup is desirable until an explicit point.
-
ALWAYS: Cleanup is performed at the end of each build session.
This is useful in cases where it’s desirable to ensure that cleanup has occurred before proceeding.
However, this performs cache cleanup during the build (rather than in the background), which can be expensive, so this option should only be used when necessary.
To disable cache cleanup:
beforeSettings {
caches {
cleanup = Cleanup.DISABLED
}
}beforeSettings { settings ->
settings.caches {
cleanup = Cleanup.DISABLED
}
}|
Note
|
Cache cleanup settings can only be configured via init scripts and should be placed under the init.d directory in Gradle User Home.
This effectively couples the configuration of cache cleanup to the Gradle User Home those settings apply to and limits the possibility of different conflicting settings from different projects being applied to the same directory.
|
Multiple versions of Gradle sharing a Gradle User Home
It is common to share a single Gradle User Home between multiple versions of Gradle.
As stated above, caches in Gradle User Home are version-specific. Different versions of Gradle will perform maintenance on only the version-specific caches associated with each version.
On the other hand, some caches are shared between versions (e.g., the dependency artifact cache or the artifact transform cache).
Beginning with Gradle version 8.0, the cache cleanup settings can be configured to custom retention periods. However, older versions have fixed retention periods (7 or 30 days, depending on the cache). These shared caches could be accessed by versions of Gradle with different settings to retain cache artifacts.
This means that:
-
If the retention period is not customized, all versions that perform cleanup will have the same retention periods. There will be no effect due to sharing a Gradle User Home with multiple versions.
-
If the retention period is customized for Gradle versions greater than or equal to version 8.0 to use retention periods shorter than the previously fixed periods, there will also be no effect.
The versions of Gradle aware of these settings will cleanup artifacts earlier than the previously fixed retention periods, and older versions will effectively not participate in the cleanup of shared caches.
-
If the retention period is customized for Gradle versions greater than or equal to version 8.0 to use retention periods longer than the previously fixed periods, the older versions of Gradle may clean the shared caches earlier than what is configured.
In this case, if it is desirable to maintain these shared cache entries for newer versions for longer retention periods, they will not be able to share a Gradle User Home with older versions. They will need to use a separate directory.
Another consideration when sharing the Gradle User Home with versions of Gradle before version 8.0 is that the DSL elements to configure the cache retention settings are unavailable in earlier versions, so this must be accounted for in any init script shared between versions. This can easily be handled by conditionally applying a version-compliant script.
|
Note
|
The version-compliant script should reside somewhere other than the init.d directory (such as a sub-directory), so it is not automatically applied.
|
To configure cache cleanup in a version-safe manner:
if (GradleVersion.current() >= GradleVersion.version("8.0")) {
apply(from = "gradle8/cache-settings.gradle.kts")
}if (GradleVersion.current() >= GradleVersion.version('8.0')) {
apply from: "gradle8/cache-settings.gradle"
}Version-compliant cache configuration script:
beforeSettings {
caches {
releasedWrappers { setRemoveUnusedEntriesAfterDays(45) }
snapshotWrappers { setRemoveUnusedEntriesAfterDays(10) }
downloadedResources { setRemoveUnusedEntriesAfterDays(45) }
createdResources { setRemoveUnusedEntriesAfterDays(10) }
}
}beforeSettings { settings ->
settings.caches {
releasedWrappers.removeUnusedEntriesAfterDays = 45
snapshotWrappers.removeUnusedEntriesAfterDays = 10
downloadedResources.removeUnusedEntriesAfterDays = 45
createdResources.removeUnusedEntriesAfterDays = 10
}
}Cache marking
Beginning with Gradle version 8.1, Gradle supports marking caches with a CACHEDIR.TAG file.
It follows the format described in the Cache Directory Tagging Specification. The purpose of this file is to allow tools to identify the directories that do not need to be searched or backed up.
By default, the directories caches, wrapper/dists, daemon, and jdks in the Gradle User Home are marked with this file.
Configuring cache marking
The cache marking feature can be configured via an init script in the Gradle User Home:
beforeSettings {
caches {
// Disable cache marking for all caches
markingStrategy = MarkingStrategy.NONE
}
}beforeSettings { settings ->
settings.caches {
// Disable cache marking for all caches
markingStrategy = MarkingStrategy.NONE
}
}|
Note
|
Cache marking settings can only be configured via init scripts and should be placed under the init.d directory in Gradle User Home. This effectively couples the configuration of cache marking to the Gradle User Home to which those settings apply and limits the possibility of different conflicting settings from different projects being applied to the same directory.
|
Project Root directory
The project root directory contains all source files from your project.
It also contains files and directories Gradle generates, such as .gradle and build.
While the former are usually checked into source control, the latter are transient files Gradle uses to support features like incremental builds.
The anatomy of a typical project root directory looks as follows:
├── .gradle // (1) │ ├── 4.8 // (2) │ ├── 4.9 // (2) │ └── ⋮ ├── build // (3) ├── gradle │ └── wrapper // (4) ├── gradle.properties // (5) ├── gradlew // (6) ├── gradlew.bat // (6) ├── settings.gradle.kts // (7) ├── subproject-one // (8) | └── build.gradle.kts // (9) ├── subproject-two // (8) | └── build.gradle.kts // (9) └── ⋮
-
Project-specific cache directory generated by Gradle.
-
Version-specific caches (e.g., to support incremental builds).
-
The build directory of this project into which Gradle generates all build artifacts.
-
Contains the JAR file and configuration of the Gradle Wrapper.
-
Project-specific Gradle configuration properties.
-
Scripts for executing builds using the Gradle Wrapper.
-
The project’s settings file where the list of subprojects is defined.
-
Usually, a project is organized into one or multiple subprojects.
-
Each subproject has its own Gradle build script.
Project cache cleanup
From version 4.10 onwards, Gradle automatically cleans the project-specific cache directory.
After building the project, version-specific cache directories in .gradle/8.7/ are checked periodically (at most, every 24 hours) to determine whether they are still in use.
They are deleted if they haven’t been used for 7 days.
Next Step: Learn about the Gradle Build Lifecycle >>
Working With Files
Almost every Gradle build interacts with files in some way: think source files, file dependencies, reports and so on. That’s why Gradle comes with a comprehensive API that makes it simple to perform the file operations you need.
The API has two parts to it:
-
Specifying which files and directories to process
-
Specifying what to do with them
The File paths in depth section covers the first of these in detail, while subsequent sections, like File copying in depth, cover the second. To begin with, we’ll show you examples of the most common scenarios that users encounter.
Copying a single file
You copy a file by creating an instance of Gradle’s builtin Copy task and configuring it with the location of the file and where you want to put it. This example mimics copying a generated report into a directory that will be packed into an archive, such as a ZIP or TAR:
tasks.register<Copy>("copyReport") {
from(layout.buildDirectory.file("reports/my-report.pdf"))
into(layout.buildDirectory.dir("toArchive"))
}tasks.register('copyReport', Copy) {
from layout.buildDirectory.file("reports/my-report.pdf")
into layout.buildDirectory.dir("toArchive")
}The ProjectLayout class is used to find a file or directory path relative to the current project. This is a common way to make build scripts work regardless of the project path. The file and directory paths are then used to specify what file to copy using Copy.from(java.lang.Object…) and which directory to copy it to using Copy.into(java.lang.Object).
Although hard-coded paths make for simple examples, they also make the build brittle. It’s better to use a reliable, single source of truth, such as a task or shared project property. In the following modified example, we use a report task defined elsewhere that has the report’s location stored in its outputFile property:
tasks.register<Copy>("copyReport2") {
from(myReportTask.flatMap { it.outputFile })
into(archiveReportsTask.flatMap { it.dirToArchive })
}tasks.register('copyReport2', Copy) {
from myReportTask.outputFile
into archiveReportsTask.dirToArchive
}We have also assumed that the reports will be archived by archiveReportsTask, which provides us with the directory that will be archived and hence where we want to put the copies of the reports.
Copying multiple files
You can extend the previous examples to multiple files very easily by providing multiple arguments to from():
tasks.register<Copy>("copyReportsForArchiving") {
from(layout.buildDirectory.file("reports/my-report.pdf"), layout.projectDirectory.file("src/docs/manual.pdf"))
into(layout.buildDirectory.dir("toArchive"))
}tasks.register('copyReportsForArchiving', Copy) {
from layout.buildDirectory.file("reports/my-report.pdf"), layout.projectDirectory.file("src/docs/manual.pdf")
into layout.buildDirectory.dir("toArchive")
}Two files are now copied into the archive directory. You can also use multiple from() statements to do the same thing, as shown in the first example of the section File copying in depth.
Now consider another example: what if you want to copy all the PDFs in a directory without having to specify each one? To do this, attach inclusion and/or exclusion patterns to the copy specification. Here we use a string pattern to include PDFs only:
tasks.register<Copy>("copyPdfReportsForArchiving") {
from(layout.buildDirectory.dir("reports"))
include("*.pdf")
into(layout.buildDirectory.dir("toArchive"))
}tasks.register('copyPdfReportsForArchiving', Copy) {
from layout.buildDirectory.dir("reports")
include "*.pdf"
into layout.buildDirectory.dir("toArchive")
}One thing to note, as demonstrated in the following diagram, is that only the PDFs that reside directly in the reports directory are copied:
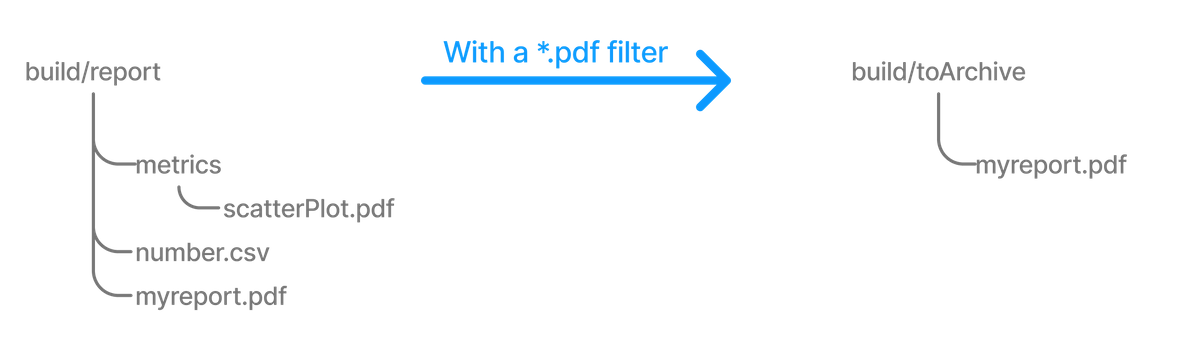
You can include files in subdirectories by using an Ant-style glob pattern (**/*), as done in this updated example:
tasks.register<Copy>("copyAllPdfReportsForArchiving") {
from(layout.buildDirectory.dir("reports"))
include("**/*.pdf")
into(layout.buildDirectory.dir("toArchive"))
}tasks.register('copyAllPdfReportsForArchiving', Copy) {
from layout.buildDirectory.dir("reports")
include "**/*.pdf"
into layout.buildDirectory.dir("toArchive")
}This task has the following effect:
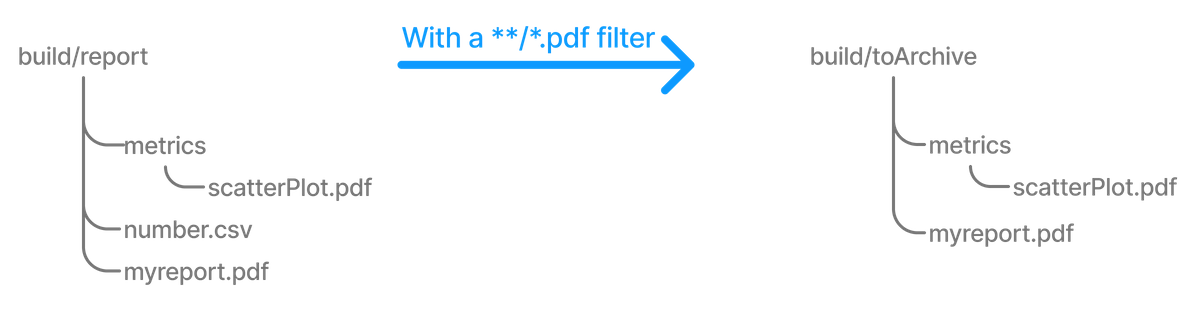
One thing to bear in mind is that a deep filter like this has the side effect of copying the directory structure below reports as well as the files. If you just want to copy the files without the directory structure, you need to use an explicit fileTree(dir) { includes }.files expression. We talk more about the difference between file trees and file collections in the File trees section.
This is just one of the variations in behavior you’re likely to come across when dealing with file operations in Gradle builds. Fortunately, Gradle provides elegant solutions to almost all those use cases. Read the in-depth sections later in the chapter for more detail on how the file operations work in Gradle and what options you have for configuring them.
Copying directory hierarchies
You may have a need to copy not just files, but the directory structure they reside in as well. This is the default behavior when you specify a directory as the from() argument, as demonstrated by the following example that copies everything in the reports directory, including all its subdirectories, to the destination:
tasks.register<Copy>("copyReportsDirForArchiving") {
from(layout.buildDirectory.dir("reports"))
into(layout.buildDirectory.dir("toArchive"))
}tasks.register('copyReportsDirForArchiving', Copy) {
from layout.buildDirectory.dir("reports")
into layout.buildDirectory.dir("toArchive")
}The key aspect that users struggle with is controlling how much of the directory structure goes to the destination. In the above example, do you get a toArchive/reports directory or does everything in reports go straight into toArchive? The answer is the latter. If a directory is part of the from() path, then it won’t appear in the destination.
So how do you ensure that reports itself is copied across, but not any other directory in ${layout.buildDirectory}? The answer is to add it as an include pattern:
tasks.register<Copy>("copyReportsDirForArchiving2") {
from(layout.buildDirectory) {
include("reports/**")
}
into(layout.buildDirectory.dir("toArchive"))
}tasks.register('copyReportsDirForArchiving2', Copy) {
from(layout.buildDirectory) {
include "reports/**"
}
into layout.buildDirectory.dir("toArchive")
}You’ll get the same behavior as before except with one extra level of directory in the destination, i.e. toArchive/reports.
One thing to note is how the include() directive applies only to the from(), whereas the directive in the previous section applied to the whole task.
These different levels of granularity in the copy specification allow you to easily handle most requirements that you will come across.
You can learn more about this in the section on child specifications.
Creating archives (zip, tar, etc.)
From the perspective of Gradle, packing files into an archive is effectively a copy in which the destination is the archive file rather than a directory on the file system. This means that creating archives looks a lot like copying, with all of the same features!
The simplest case involves archiving the entire contents of a directory, which this example demonstrates by creating a ZIP of the toArchive directory:
tasks.register<Zip>("packageDistribution") {
archiveFileName = "my-distribution.zip"
destinationDirectory = layout.buildDirectory.dir("dist")
from(layout.buildDirectory.dir("toArchive"))
}tasks.register('packageDistribution', Zip) {
archiveFileName = "my-distribution.zip"
destinationDirectory = layout.buildDirectory.dir('dist')
from layout.buildDirectory.dir("toArchive")
}Notice how we specify the destination and name of the archive instead of an into(): both are required. You often won’t see them explicitly set, because most projects apply the Base Plugin. It provides some conventional values for those properties. The next example demonstrates this and you can learn more about the conventions in the archive naming section.
Each type of archive has its own task type, the most common ones being Zip, Tar and Jar. They all share most of the configuration options of Copy, including filtering and renaming.
One of the most common scenarios involves copying files into specified subdirectories of the archive. For example, let’s say you want to package all PDFs into a docs directory in the root of the archive. This docs directory doesn’t exist in the source location, so you have to create it as part of the archive. You do this by adding an into() declaration for just the PDFs:
plugins {
base
}
version = "1.0.0"
tasks.register<Zip>("packageDistribution") {
from(layout.buildDirectory.dir("toArchive")) {
exclude("**/*.pdf")
}
from(layout.buildDirectory.dir("toArchive")) {
include("**/*.pdf")
into("docs")
}
}plugins {
id 'base'
}
version = "1.0.0"
tasks.register('packageDistribution', Zip) {
from(layout.buildDirectory.dir("toArchive")) {
exclude "**/*.pdf"
}
from(layout.buildDirectory.dir("toArchive")) {
include "**/*.pdf"
into "docs"
}
}As you can see, you can have multiple from() declarations in a copy specification, each with its own configuration. See Using child copy specifications for more information on this feature.
Unpacking archives
Archives are effectively self-contained file systems, so unpacking them is a case of copying the files from that file system onto the local file system — or even into another archive. Gradle enables this by providing some wrapper functions that make archives available as hierarchical collections of files (file trees).
The two functions of interest are Project.zipTree(java.lang.Object) and Project.tarTree(java.lang.Object), which produce a FileTree from a corresponding archive file. That file tree can then be used in a from() specification, like so:
tasks.register<Copy>("unpackFiles") {
from(zipTree("src/resources/thirdPartyResources.zip"))
into(layout.buildDirectory.dir("resources"))
}tasks.register('unpackFiles', Copy) {
from zipTree("src/resources/thirdPartyResources.zip")
into layout.buildDirectory.dir("resources")
}As with a normal copy, you can control which files are unpacked via filters and even rename files as they are unpacked.
More advanced processing can be handled by the eachFile() method. For example, you might need to extract different subtrees of the archive into different paths within the destination directory. The following sample uses the method to extract the files within the archive’s libs directory into the root destination directory, rather than into a libs subdirectory:
tasks.register<Copy>("unpackLibsDirectory") {
from(zipTree("src/resources/thirdPartyResources.zip")) {
include("libs/**") // (1)
eachFile {
relativePath = RelativePath(true, *relativePath.segments.drop(1).toTypedArray()) // (2)
}
includeEmptyDirs = false // (3)
}
into(layout.buildDirectory.dir("resources"))
}tasks.register('unpackLibsDirectory', Copy) {
from(zipTree("src/resources/thirdPartyResources.zip")) {
include "libs/**" // (1)
eachFile { fcd ->
fcd.relativePath = new RelativePath(true, fcd.relativePath.segments.drop(1)) // (2)
}
includeEmptyDirs = false // (3)
}
into layout.buildDirectory.dir("resources")
}-
Extracts only the subset of files that reside in the
libsdirectory -
Remaps the path of the extracting files into the destination directory by dropping the
libssegment from the file path -
Ignores the empty directories resulting from the remapping, see Caution note below
|
Caution
|
You can not change the destination path of empty directories with this technique. You can learn more in this issue. |
If you’re a Java developer and are wondering why there is no jarTree() method, that’s because zipTree() works perfectly well for JARs, WARs and EARs.
Creating "uber" or "fat" JARs
In the Java space, applications and their dependencies typically used to be packaged as separate JARs within a single distribution archive. That still happens, but there is another approach that is now common: placing the classes and resources of the dependencies directly into the application JAR, creating what is known as an uber or fat JAR.
Gradle makes this approach easy to accomplish. Consider the aim: to copy the contents of other JAR files into the application JAR. All you need for this is the Project.zipTree(java.lang.Object) method and the Jar task, as demonstrated by the uberJar task in the following example:
plugins {
java
}
version = "1.0.0"
repositories {
mavenCentral()
}
dependencies {
implementation("commons-io:commons-io:2.6")
}
tasks.register<Jar>("uberJar") {
archiveClassifier = "uber"
from(sourceSets.main.get().output)
dependsOn(configurations.runtimeClasspath)
from({
configurations.runtimeClasspath.get().filter { it.name.endsWith("jar") }.map { zipTree(it) }
})
}plugins {
id 'java'
}
version = '1.0.0'
repositories {
mavenCentral()
}
dependencies {
implementation 'commons-io:commons-io:2.6'
}
tasks.register('uberJar', Jar) {
archiveClassifier = 'uber'
from sourceSets.main.output
dependsOn configurations.runtimeClasspath
from {
configurations.runtimeClasspath.findAll { it.name.endsWith('jar') }.collect { zipTree(it) }
}
}In this case, we’re taking the runtime dependencies of the project — configurations.runtimeClasspath.files — and wrapping each of the JAR files with the zipTree() method. The result is a collection of ZIP file trees, the contents of which are copied into the uber JAR alongside the application classes.
Creating directories
Many tasks need to create directories to store the files they generate, which is why Gradle automatically manages this aspect of tasks when they explicitly define file and directory outputs. You can learn about this feature in the incremental build section of the user manual. All core Gradle tasks ensure that any output directories they need are created if necessary using this mechanism.
In cases where you need to create a directory manually, you can use the standard Files.createDirectories or File.mkdirs methods from within your build scripts or custom task implementations. Here’s a simple example that creates a single images directory in the project folder:
tasks.register("ensureDirectory") {
// Store target directory into a variable to avoid project reference in the configuration cache
val directory = file("images")
doLast {
Files.createDirectories(directory.toPath())
}
}tasks.register('ensureDirectory') {
// Store target directory into a variable to avoid project reference in the configuration cache
def directory = file("images")
doLast {
Files.createDirectories(directory.toPath())
}
}As described in the Apache Ant manual, the mkdir task will automatically create all necessary directories in the given path and will do nothing if the directory already exists.
Moving files and directories
Gradle has no API for moving files and directories around, but you can use the Apache Ant integration to easily do that, as shown in this example:
tasks.register("moveReports") {
// Store the build directory into a variable to avoid project reference in the configuration cache
val dir = buildDir
doLast {
ant.withGroovyBuilder {
"move"("file" to "${dir}/reports", "todir" to "${dir}/toArchive")
}
}
}tasks.register('moveReports') {
// Store the build directory into a variable to avoid project reference in the configuration cache
def dir = buildDir
doLast {
ant.move file: "${dir}/reports",
todir: "${dir}/toArchive"
}
}This is not a common requirement and should be used sparingly as you lose information and can easily break a build. It’s generally preferable to copy directories and files instead.
Renaming files on copy
The files used and generated by your builds sometimes don’t have names that suit, in which case you want to rename those files as you copy them. Gradle allows you to do this as part of a copy specification using the rename() configuration.
The following example removes the "-staging" marker from the names of any files that have it:
tasks.register<Copy>("copyFromStaging") {
from("src/main/webapp")
into(layout.buildDirectory.dir("explodedWar"))
rename("(.+)-staging(.+)", "$1$2")
}tasks.register('copyFromStaging', Copy) {
from "src/main/webapp"
into layout.buildDirectory.dir('explodedWar')
rename '(.+)-staging(.+)', '$1$2'
}You can use regular expressions for this, as in the above example, or closures that use more complex logic to determine the target filename. For example, the following task truncates filenames:
tasks.register<Copy>("copyWithTruncate") {
from(layout.buildDirectory.dir("reports"))
rename { filename: String ->
if (filename.length > 10) {
filename.slice(0..7) + "~" + filename.length
}
else filename
}
into(layout.buildDirectory.dir("toArchive"))
}tasks.register('copyWithTruncate', Copy) {
from layout.buildDirectory.dir("reports")
rename { String filename ->
if (filename.size() > 10) {
return filename[0..7] + "~" + filename.size()
}
else return filename
}
into layout.buildDirectory.dir("toArchive")
}As with filtering, you can also apply renaming to a subset of files by configuring it as part of a child specification on a from().
Deleting files and directories
You can easily delete files and directories using either the Delete task or the Project.delete(org.gradle.api.Action) method. In both cases, you specify which files and directories to delete in a way supported by the Project.files(java.lang.Object…) method.
For example, the following task deletes the entire contents of a build’s output directory:
tasks.register<Delete>("myClean") {
delete(buildDir)
}tasks.register('myClean', Delete) {
delete buildDir
}If you want more control over which files are deleted, you can’t use inclusions and exclusions in the same way as for copying files.
Instead, you have to use the builtin filtering mechanisms of FileCollection and FileTree.
The following example does just that to clear out temporary files from a source directory:
tasks.register<Delete>("cleanTempFiles") {
delete(fileTree("src").matching {
include("**/*.tmp")
})
}tasks.register('cleanTempFiles', Delete) {
delete fileTree("src").matching {
include "**/*.tmp"
}
}You’ll learn more about file collections and file trees in the next section.
File paths in depth
In order to perform some action on a file, you need to know where it is, and that’s the information provided by file paths. Gradle builds on the standard Java File class, which represents the location of a single file, and provides new APIs for dealing with collections of paths. This section shows you how to use the Gradle APIs to specify file paths for use in tasks and file operations.
But first, an important note on using hard-coded file paths in your builds.
On hard-coded file paths
Many examples in this chapter use hard-coded paths as string literals. This makes them easy to understand, but it’s not good practice for real builds. The problem is that paths often change and the more places you need to change them, the more likely you are to miss one and break the build.
Where possible, you should use tasks, task properties, and project properties — in that order of preference — to configure file paths. For example, if you were to create a task that packages the compiled classes of a Java application, you should aim for something like this:
val archivesDirPath = layout.buildDirectory.dir("archives")
tasks.register<Zip>("packageClasses") {
archiveAppendix = "classes"
destinationDirectory = archivesDirPath
from(tasks.compileJava)
}def archivesDirPath = layout.buildDirectory.dir('archives')
tasks.register('packageClasses', Zip) {
archiveAppendix = "classes"
destinationDirectory = archivesDirPath
from compileJava
}See how we’re using the compileJava task as the source of the files to package and we’ve created a project property archivesDirPath to store the location where we put archives, on the basis we’re likely to use it elsewhere in the build.
Using a task directly as an argument like this relies on it having defined outputs, so it won’t always be possible.
In addition, this example could be improved further by relying on the Java plugin’s convention for destinationDirectory rather than overriding it, but it does demonstrate the use of project properties.
Single files and directories
Gradle provides the Project.file(java.lang.Object) method for specifying the location of a single file or directory. Relative paths are resolved relative to the project directory, while absolute paths remain unchanged.
|
Caution
|
Never use |
Here are some examples of using the file() method with different types of argument:
// Using a relative path
var configFile = file("src/config.xml")
// Using an absolute path
configFile = file(configFile.absolutePath)
// Using a File object with a relative path
configFile = file(File("src/config.xml"))
// Using a java.nio.file.Path object with a relative path
configFile = file(Paths.get("src", "config.xml"))
// Using an absolute java.nio.file.Path object
configFile = file(Paths.get(System.getProperty("user.home")).resolve("global-config.xml"))// Using a relative path
File configFile = file('src/config.xml')
// Using an absolute path
configFile = file(configFile.absolutePath)
// Using a File object with a relative path
configFile = file(new File('src/config.xml'))
// Using a java.nio.file.Path object with a relative path
configFile = file(Paths.get('src', 'config.xml'))
// Using an absolute java.nio.file.Path object
configFile = file(Paths.get(System.getProperty('user.home')).resolve('global-config.xml'))As you can see, you can pass strings, File instances and Path instances to the file() method, all of which result in an absolute File object. You can find other options for argument types in the reference guide, linked in the previous paragraph.
What happens in the case of multi-project builds? The file() method will always turn relative paths into paths that are relative to the current project directory, which may be a child project. If you want to use a path that’s relative to the root project directory, then you need to use the special Project.getRootDir() property to construct an absolute path, like so:
val configFile = file("$rootDir/shared/config.xml")File configFile = file("$rootDir/shared/config.xml")Let’s say you’re working on a multi-project build in a dev/projects/AcmeHealth directory. You use the above example in the build of the library you’re fixing — at AcmeHealth/subprojects/AcmePatientRecordLib/build.gradle. The file path will resolve to the absolute version of dev/projects/AcmeHealth/shared/config.xml.
The file() method can be used to configure any task that has a property of type File. Many tasks, though, work on multiple files, so we look at how to specify sets of files next.
File collections
A file collection is simply a set of file paths that’s represented by the FileCollection interface. Any file paths.
It’s important to understand that the file paths don’t have to be related in any way, so they don’t have to be in the same directory or even have a shared parent directory.
You will also find that many parts of the Gradle API use FileCollection, such as the copying API discussed later in this chapter and dependency configurations.
The recommended way to specify a collection of files is to use the ProjectLayout.files(java.lang.Object...) method, which returns a FileCollection instance.
This method is very flexible and allows you to pass multiple strings, File instances, collections of strings, collections of Files, and more.
You can even pass in tasks as arguments if they have defined outputs.
Learn about all the supported argument types in the reference guide.
|
Caution
|
files() properly handle relative paths and File(relative path) instances, resolving them relative to the project directory.
|
As with the Project.file(java.lang.Object) method covered in the previous section, all relative paths are evaluated relative to the current project directory. The following example demonstrates some of the variety of argument types you can use — strings, File instances, a list and a Path:
val collection: FileCollection = layout.files(
"src/file1.txt",
File("src/file2.txt"),
listOf("src/file3.csv", "src/file4.csv"),
Paths.get("src", "file5.txt")
)FileCollection collection = layout.files('src/file1.txt',
new File('src/file2.txt'),
['src/file3.csv', 'src/file4.csv'],
Paths.get('src', 'file5.txt'))File collections have some important attributes in Gradle. They can be:
-
created lazily
-
iterated over
-
filtered
-
combined
Lazy creation of a file collection is useful when you need to evaluate the files that make up a collection at the time a build runs. In the following example, we query the file system to find out what files exist in a particular directory and then make those into a file collection:
tasks.register("list") {
val projectDirectory = layout.projectDirectory
doLast {
var srcDir: File? = null
val collection = projectDirectory.files({
srcDir?.listFiles()
})
srcDir = projectDirectory.file("src").asFile
println("Contents of ${srcDir.name}")
collection.map { it.relativeTo(projectDirectory.asFile) }.sorted().forEach { println(it) }
srcDir = projectDirectory.file("src2").asFile
println("Contents of ${srcDir.name}")
collection.map { it.relativeTo(projectDirectory.asFile) }.sorted().forEach { println(it) }
}
}tasks.register('list') {
Directory projectDirectory = layout.projectDirectory
doLast {
File srcDir
// Create a file collection using a closure
collection = projectDirectory.files { srcDir.listFiles() }
srcDir = projectDirectory.file('src').asFile
println "Contents of $srcDir.name"
collection.collect { projectDirectory.asFile.relativePath(it) }.sort().each { println it }
srcDir = projectDirectory.file('src2').asFile
println "Contents of $srcDir.name"
collection.collect { projectDirectory.asFile.relativePath(it) }.sort().each { println it }
}
}gradle -q list> gradle -q list Contents of src src/dir1 src/file1.txt Contents of src2 src2/dir1 src2/dir2
The key to lazy creation is passing a closure (in Groovy) or a Provider (in Kotlin) to the files() method. Your closure/provider simply needs to return a value of a type accepted by files(), such as List<File>, String, FileCollection, etc.
Iterating over a file collection can be done through the each() method (in Groovy) or forEach method (in Kotlin) on the collection or using the collection in a for loop. In both approaches, the file collection is treated as a set of File instances, i.e. your iteration variable will be of type File.
The following example demonstrates such iteration as well as how you can convert file collections to other types using the as operator or supported properties:
// Iterate over the files in the collection
collection.forEach { file: File ->
println(file.name)
}
// Convert the collection to various types
val set: Set<File> = collection.files
val list: List<File> = collection.toList()
val path: String = collection.asPath
val file: File = collection.singleFile
// Add and subtract collections
val union = collection + projectLayout.files("src/file2.txt")
val difference = collection - projectLayout.files("src/file2.txt")// Iterate over the files in the collection
collection.each { File file ->
println file.name
}
// Convert the collection to various types
Set set = collection.files
Set set2 = collection as Set
List list = collection as List
String path = collection.asPath
File file = collection.singleFile
// Add and subtract collections
def union = collection + projectLayout.files('src/file2.txt')
def difference = collection - projectLayout.files('src/file2.txt')You can also see at the end of the example how to combine file collections using the + and - operators to merge and subtract them. An important feature of the resulting file collections is that they are live. In other words, when you combine file collections in this way, the result always reflects what’s currently in the source file collections, even if they change during the build.
For example, imagine collection in the above example gains an extra file or two after union is created. As long as you use union after those files are added to collection, union will also contain those additional files. The same goes for the different file collection.
Live collections are also important when it comes to filtering. If you want to use a subset of a file collection, you can take advantage of the FileCollection.filter(org.gradle.api.specs.Spec) method to determine which files to "keep". In the following example, we create a new collection that consists of only the files that end with .txt in the source collection:
val textFiles: FileCollection = collection.filter { f: File ->
f.name.endsWith(".txt")
}FileCollection textFiles = collection.filter { File f ->
f.name.endsWith(".txt")
}gradle -q filterTextFiles> gradle -q filterTextFiles src/file1.txt src/file2.txt src/file5.txt
If collection changes at any time, either by adding or removing files from itself, then textFiles will immediately reflect the change because it is also a live collection. Note that the closure you pass to filter() takes a File as an argument and should return a boolean.
File trees
A file tree is a file collection that retains the directory structure of the files it contains and has the type FileTree. This means that all the paths in a file tree must have a shared parent directory. The following diagram highlights the distinction between file trees and file collections in the common case of copying files:
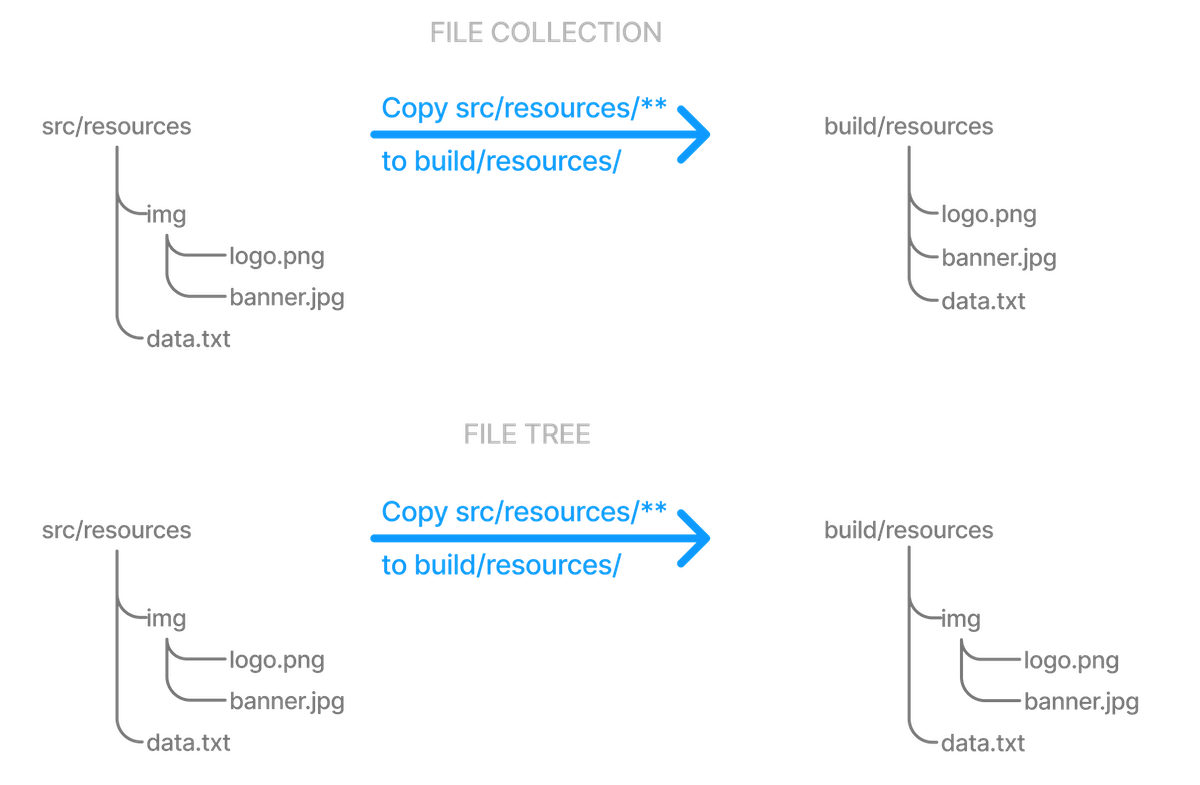
|
Note
|
Although FileTree extends FileCollection (an is-a relationship), their behaviors do differ. In other words, you can use a file tree wherever a file collection is required, but remember: a file collection is a flat list/set of files, while a file tree is a file and directory hierarchy. To convert a file tree to a flat collection, use the FileTree.getFiles() property.
|
The simplest way to create a file tree is to pass a file or directory path to the Project.fileTree(java.lang.Object) method. This will create a tree of all the files and directories in that base directory (but not the base directory itself). The following example demonstrates how to use the basic method and, in addition, how to filter the files and directories using Ant-style patterns:
// Create a file tree with a base directory
var tree: ConfigurableFileTree = fileTree("src/main")
// Add include and exclude patterns to the tree
tree.include("**/*.java")
tree.exclude("**/Abstract*")
// Create a tree using closure
tree = fileTree("src") {
include("**/*.java")
}
// Create a tree using a map
tree = fileTree("dir" to "src", "include" to "**/*.java")
tree = fileTree("dir" to "src", "includes" to listOf("**/*.java", "**/*.xml"))
tree = fileTree("dir" to "src", "include" to "**/*.java", "exclude" to "**/*test*/**")// Create a file tree with a base directory
ConfigurableFileTree tree = fileTree(dir: 'src/main')
// Add include and exclude patterns to the tree
tree.include '**/*.java'
tree.exclude '**/Abstract*'
// Create a tree using closure
tree = fileTree('src') {
include '**/*.java'
}
// Create a tree using a map
tree = fileTree(dir: 'src', include: '**/*.java')
tree = fileTree(dir: 'src', includes: ['**/*.java', '**/*.xml'])
tree = fileTree(dir: 'src', include: '**/*.java', exclude: '**/*test*/**')You can see more examples of supported patterns in the API docs for PatternFilterable. Also, see the API documentation for fileTree() to see what types you can pass as the base directory.
By default, fileTree() returns a FileTree instance that applies some default exclude patterns for convenience — the same defaults as Ant in fact. For the complete default exclude list, see the Ant manual.
If those default excludes prove problematic, you can workaround the issue by changing the default excludes in the settings script:
import org.apache.tools.ant.DirectoryScanner
DirectoryScanner.removeDefaultExclude("**/.git")
DirectoryScanner.removeDefaultExclude("**/.git/**")import org.apache.tools.ant.DirectoryScanner
DirectoryScanner.removeDefaultExclude('**/.git')
DirectoryScanner.removeDefaultExclude('**/.git/**')|
Note
|
Currently, Gradle’s default excludes are configured via Ant’s DirectoryScanner class.
|
|
Important
|
Gradle does not support changing default excludes during the execution phase. |
You can do many of the same things with file trees that you can with file collections:
-
iterate over them (depth first)
-
filter them (using FileTree.matching(org.gradle.api.Action) and Ant-style patterns)
-
merge them
You can also traverse file trees using the FileTree.visit(org.gradle.api.Action) method. All of these techniques are demonstrated in the following example:
// Iterate over the contents of a tree
tree.forEach{ file: File ->
println(file)
}
// Filter a tree
val filtered: FileTree = tree.matching {
include("org/gradle/api/**")
}
// Add trees together
val sum: FileTree = tree + fileTree("src/test")
// Visit the elements of the tree
tree.visit {
println("${this.relativePath} => ${this.file}")
}// Iterate over the contents of a tree
tree.each {File file ->
println file
}
// Filter a tree
FileTree filtered = tree.matching {
include 'org/gradle/api/**'
}
// Add trees together
FileTree sum = tree + fileTree(dir: 'src/test')
// Visit the elements of the tree
tree.visit {element ->
println "$element.relativePath => $element.file"
}We’ve discussed how to create your own file trees and file collections, but it’s also worth bearing in mind that many Gradle plugins provide their own instances of file trees, such as Java’s source sets. These can be used and manipulated in exactly the same way as the file trees you create yourself.
Another specific type of file tree that users commonly need is the archive, i.e. ZIP files, TAR files, etc. We look at those next.
Using archives as file trees
An archive is a directory and file hierarchy packed into a single file. In other words, it’s a special case of a file tree, and that’s exactly how Gradle treats archives. Instead of using the fileTree() method, which only works on normal file systems, you use the Project.zipTree(java.lang.Object) and Project.tarTree(java.lang.Object) methods to wrap archive files of the corresponding type (note that JAR, WAR and EAR files are ZIPs). Both methods return FileTree instances that you can then use in the same way as normal file trees. For example, you can extract some or all of the files of an archive by copying its contents to some directory on the file system. Or you can merge one archive into another.
Here are some simple examples of creating archive-based file trees:
// Create a ZIP file tree using path
val zip: FileTree = zipTree("someFile.zip")
// Create a TAR file tree using path
val tar: FileTree = tarTree("someFile.tar")
// tar tree attempts to guess the compression based on the file extension
// however if you must specify the compression explicitly you can:
val someTar: FileTree = tarTree(resources.gzip("someTar.ext"))// Create a ZIP file tree using path
FileTree zip = zipTree('someFile.zip')
// Create a TAR file tree using path
FileTree tar = tarTree('someFile.tar')
//tar tree attempts to guess the compression based on the file extension
//however if you must specify the compression explicitly you can:
FileTree someTar = tarTree(resources.gzip('someTar.ext'))You can see a practical example of extracting an archive file in among the common scenarios we cover.
Understanding implicit conversion to file collections
Many objects in Gradle have properties which accept a set of input files.
For example, the JavaCompile task has a source property that defines the source files to compile.
You can set the value of this property using any of the types supported by the files() method, as mentioned in the API docs.
This means you can, for example, set the property to a File, String, collection, FileCollection or even a closure or Provider.
This is a feature of specific tasks!
That means implicit conversion will not happen for just any task that has a FileCollection or FileTree property.
If you want to know whether implicit conversion happens in a particular situation, you will need to read the relevant documentation, such as the corresponding task’s API docs.
Alternatively, you can remove all doubt by explicitly using ProjectLayout.files(java.lang.Object...) in your build.
Here are some examples of the different types of arguments that the source property can take:
tasks.register<JavaCompile>("compile") {
// Use a File object to specify the source directory
source = fileTree(file("src/main/java"))
// Use a String path to specify the source directory
source = fileTree("src/main/java")
// Use a collection to specify multiple source directories
source = fileTree(listOf("src/main/java", "../shared/java"))
// Use a FileCollection (or FileTree in this case) to specify the source files
source = fileTree("src/main/java").matching { include("org/gradle/api/**") }
// Using a closure to specify the source files.
setSource({
// Use the contents of each zip file in the src dir
file("src").listFiles().filter { it.name.endsWith(".zip") }.map { zipTree(it) }
})
}tasks.register('compile', JavaCompile) {
// Use a File object to specify the source directory
source = file('src/main/java')
// Use a String path to specify the source directory
source = 'src/main/java'
// Use a collection to specify multiple source directories
source = ['src/main/java', '../shared/java']
// Use a FileCollection (or FileTree in this case) to specify the source files
source = fileTree(dir: 'src/main/java').matching { include 'org/gradle/api/**' }
// Using a closure to specify the source files.
source = {
// Use the contents of each zip file in the src dir
file('src').listFiles().findAll {it.name.endsWith('.zip')}.collect { zipTree(it) }
}
}One other thing to note is that properties like source have corresponding methods in core Gradle tasks. Those methods follow the convention of appending to collections of values rather than replacing them. Again, this method accepts any of the types supported by the files() method, as shown here:
tasks.named<JavaCompile>("compile") {
// Add some source directories use String paths
source("src/main/java", "src/main/groovy")
// Add a source directory using a File object
source(file("../shared/java"))
// Add some source directories using a closure
setSource({ file("src/test/").listFiles() })
}compile {
// Add some source directories use String paths
source 'src/main/java', 'src/main/groovy'
// Add a source directory using a File object
source file('../shared/java')
// Add some source directories using a closure
source { file('src/test/').listFiles() }
}As this is a common convention, we recommend that you follow it in your own custom tasks. Specifically, if you plan to add a method to configure a collection-based property, make sure the method appends rather than replaces values.
File copying in depth
The basic process of copying files in Gradle is a simple one:
-
Define a task of type Copy
-
Specify which files (and potentially directories) to copy
-
Specify a destination for the copied files
But this apparent simplicity hides a rich API that allows fine-grained control of which files are copied, where they go, and what happens to them as they are copied — renaming of the files and token substitution of file content are both possibilities, for example.
Let’s start with the last two items on the list, which form what is known as a copy specification. This is formally based on the CopySpec interface, which the Copy task implements, and offers:
-
A CopySpec.from(java.lang.Object…) method to define what to copy
-
An CopySpec.into(java.lang.Object) method to define the destination
CopySpec has several additional methods that allow you to control the copying process, but these two are the only required ones. into() is straightforward, requiring a directory path as its argument in any form supported by the Project.file(java.lang.Object) method. The from() configuration is far more flexible.
Not only does from() accept multiple arguments, it also allows several different types of argument. For example, some of the most common types are:
-
A
String— treated as a file path or, if it starts with "file://", a file URI -
A
File— used as a file path -
A
FileCollectionorFileTree— all files in the collection are included in the copy -
A task — the files or directories that form a task’s defined outputs are included
In fact, from() accepts all the same arguments as Project.files(java.lang.Object…) so see that method for a more detailed list of acceptable types.
Something else to consider is what type of thing a file path refers to:
-
A file — the file is copied as is
-
A directory — this is effectively treated as a file tree: everything in it, including subdirectories, is copied. However, the directory itself is not included in the copy.
-
A non-existent file — the path is ignored
Here is an example that uses multiple from() specifications, each with a different argument type. You will probably also notice that into() is configured lazily using a closure (in Groovy) or a Provider (in Kotlin) — a technique that also works with from():
tasks.register<Copy>("anotherCopyTask") {
// Copy everything under src/main/webapp
from("src/main/webapp")
// Copy a single file
from("src/staging/index.html")
// Copy the output of a task
from(copyTask)
// Copy the output of a task using Task outputs explicitly.
from(tasks["copyTaskWithPatterns"].outputs)
// Copy the contents of a Zip file
from(zipTree("src/main/assets.zip"))
// Determine the destination directory later
into({ getDestDir() })
}tasks.register('anotherCopyTask', Copy) {
// Copy everything under src/main/webapp
from 'src/main/webapp'
// Copy a single file
from 'src/staging/index.html'
// Copy the output of a task
from copyTask
// Copy the output of a task using Task outputs explicitly.
from copyTaskWithPatterns.outputs
// Copy the contents of a Zip file
from zipTree('src/main/assets.zip')
// Determine the destination directory later
into { getDestDir() }
}Note that the lazy configuration of into() is different from a child specification, even though the syntax is similar. Keep an eye on the number of arguments to distinguish between them.
Filtering files
You’ve already seen that you can filter file collections and file trees directly in a Copy task, but you can also apply filtering in any copy specification through the CopySpec.include(java.lang.String…) and CopySpec.exclude(java.lang.String…) methods.
Both of these methods are normally used with Ant-style include or exclude patterns, as described in PatternFilterable. You can also perform more complex logic by using a closure that takes a FileTreeElement and returns true if the file should be included or false otherwise. The following example demonstrates both forms, ensuring that only .html and .jsp files are copied, except for those .html files with the word "DRAFT" in their content:
tasks.register<Copy>("copyTaskWithPatterns") {
from("src/main/webapp")
into(layout.buildDirectory.dir("explodedWar"))
include("**/*.html")
include("**/*.jsp")
exclude { details: FileTreeElement ->
details.file.name.endsWith(".html") &&
details.file.readText().contains("DRAFT")
}
}tasks.register('copyTaskWithPatterns', Copy) {
from 'src/main/webapp'
into layout.buildDirectory.dir('explodedWar')
include '**/*.html'
include '**/*.jsp'
exclude { FileTreeElement details ->
details.file.name.endsWith('.html') &&
details.file.text.contains('DRAFT')
}
}A question you may ask yourself at this point is what happens when inclusion and exclusion patterns overlap? Which pattern wins? Here are the basic rules:
-
If there are no explicit inclusions or exclusions, everything is included
-
If at least one inclusion is specified, only files and directories matching the patterns are included
-
Any exclusion pattern overrides any inclusions, so if a file or directory matches at least one exclusion pattern, it won’t be included, regardless of the inclusion patterns
Bear these rules in mind when creating combined inclusion and exclusion specifications so that you end up with the exact behavior you want.
Note that the inclusions and exclusions in the above example will apply to all from() configurations. If you want to apply filtering to a subset of the copied files, you’ll need to use child specifications.
Renaming files
The example of how to rename files on copy gives you most of the information you need to perform this operation. It demonstrates the two options for renaming:
-
Using a regular expression
-
Using a closure
Regular expressions are a flexible approach to renaming, particularly as Gradle supports regex groups that allow you to remove and replaces parts of the source filename. The following example shows how you can remove the string "-staging" from any filename that contains it using a simple regular expression:
tasks.register<Copy>("rename") {
from("src/main/webapp")
into(layout.buildDirectory.dir("explodedWar"))
// Use a regular expression to map the file name
rename("(.+)-staging(.+)", "$1$2")
rename("(.+)-staging(.+)".toRegex().pattern, "$1$2")
// Use a closure to convert all file names to upper case
rename { fileName: String ->
fileName.toUpperCase()
}
}tasks.register('rename', Copy) {
from 'src/main/webapp'
into layout.buildDirectory.dir('explodedWar')
// Use a regular expression to map the file name
rename '(.+)-staging(.+)', '$1$2'
rename(/(.+)-staging(.+)/, '$1$2')
// Use a closure to convert all file names to upper case
rename { String fileName ->
fileName.toUpperCase()
}
}You can use any regular expression supported by the Java Pattern class and the substitution string (the second argument of rename() works on the same principles as the Matcher.appendReplacement() method.
There are two common issues people come across when using regular expressions in this context:
-
If you use a slashy string (those delimited by '/') for the first argument, you must include the parentheses for
rename()as shown in the above example. -
It’s safest to use single quotes for the second argument, otherwise you need to escape the '$' in group substitutions, i.e.
"\$1\$2".
The first is a minor inconvenience, but slashy strings have the advantage that you don’t have to escape backslash ('\') characters in the regular expression. The second issue stems from Groovy’s support for embedded expressions using ${ } syntax in double-quoted and slashy strings.
The closure syntax for rename() is straightforward and can be used for any requirements that simple regular expressions can’t handle. You’re given the name of a file and you return a new name for that file, or null if you don’t want to change the name. Do be aware that the closure will be executed for every file that’s copied, so try to avoid expensive operations where possible.
Filtering file content (token substitution, templating, etc.)
Not to be confused with filtering which files are copied, file content filtering allows you to transform the content of files while they are being copied. This can involve basic templating that uses token substitution, removal of lines of text, or even more complex filtering using a full-blown template engine.
The following example demonstrates several forms of filtering, including token substitution using the CopySpec.expand(java.util.Map) method and another using CopySpec.filter(java.lang.Class) with an Ant filter:
import org.apache.tools.ant.filters.FixCrLfFilter
import org.apache.tools.ant.filters.ReplaceTokens
tasks.register<Copy>("filter") {
from("src/main/webapp")
into(layout.buildDirectory.dir("explodedWar"))
// Substitute property tokens in files
expand("copyright" to "2009", "version" to "2.3.1")
// Use some of the filters provided by Ant
filter(FixCrLfFilter::class)
filter(ReplaceTokens::class, "tokens" to mapOf("copyright" to "2009", "version" to "2.3.1"))
// Use a closure to filter each line
filter { line: String ->
"[$line]"
}
// Use a closure to remove lines
filter { line: String ->
if (line.startsWith('-')) null else line
}
filteringCharset = "UTF-8"
}import org.apache.tools.ant.filters.FixCrLfFilter
import org.apache.tools.ant.filters.ReplaceTokens
tasks.register('filter', Copy) {
from 'src/main/webapp'
into layout.buildDirectory.dir('explodedWar')
// Substitute property tokens in files
expand(copyright: '2009', version: '2.3.1')
// Use some of the filters provided by Ant
filter(FixCrLfFilter)
filter(ReplaceTokens, tokens: [copyright: '2009', version: '2.3.1'])
// Use a closure to filter each line
filter { String line ->
"[$line]"
}
// Use a closure to remove lines
filter { String line ->
line.startsWith('-') ? null : line
}
filteringCharset = 'UTF-8'
}The filter() method has two variants, which behave differently:
-
one takes a
FilterReaderand is designed to work with Ant filters, such asReplaceTokens -
one takes a closure or Transformer that defines the transformation for each line of the source file
Note that both variants assume the source files are text based. When you use the ReplaceTokens class with filter(), the result is a template engine that replaces tokens of the form @tokenName@ (the Ant-style token) with values that you define.
The expand() method treats the source files as Groovy templates, which evaluate and expand expressions of the form ${expression}. You can pass in property names and values that are then expanded in the source files. expand() allows for more than basic token substitution as the embedded expressions are full-blown Groovy expressions.
|
Note
|
It’s good practice to specify the character set when reading and writing the file, otherwise the transformations won’t work properly for non-ASCII text. You configure the character set with the CopySpec.setFilteringCharset(String) property. If it’s not specified, the JVM default character set is used, which is likely to be different from the one you want. |
Setting file permissions
For any CopySpec involved in copying files, may it be the Copy task itself, or any child specifications, you can explicitly set the permissions the destination files will have, via the CopySpec.filePermissions {} configurations block.
You can do the same for directories too, independently of files, via the CopySpec.dirPermissions {} configurations block.
|
Note
|
Not setting permissions explicitly will preserve the permissions of the original files or directories. |
tasks.register<Copy>("permissions") {
from("src/main/webapp")
into(layout.buildDirectory.dir("explodedWar"))
filePermissions {
user {
read = true
execute = true
}
other.execute = false
}
dirPermissions {
unix("r-xr-x---")
}
}tasks.register('permissions', Copy) {
from 'src/main/webapp'
into layout.buildDirectory.dir('explodedWar')
filePermissions {
user {
read = true
execute = true
}
other.execute = false
}
dirPermissions {
unix('r-xr-x---')
}
}For a detailed description of file permissions see FilePermissions and UserClassFilePermissions. For details on the convenience method used in the samples see ConfigurableFilePermissions.unix(String).
Using empty configuration blocks for file or directory permissions still sets them explicitly, just to fixed default values. In fact everything that’s inside one of these configurations blocks is relative to the default values. Default permissions differ for files and directories:
-
file: read & write for owner, read for group, read for other (0644, rw-r—r--)
-
directory: read, write & execute for owner, read & execute for group, read & execute for other (0755, rwxr-xr-x)
Using the CopySpec class
A copy specification (or copy spec for short) determines what gets copied to where, and what happens to files during the copy. You’ve alread seen many examples in the form of configuration for Copy and archiving tasks. But copy specs have two attributes that are worth covering in more detail:
-
They can be independent of tasks
-
They are hierarchical
The first of these attributes allows you to share copy specs within a build. The second provides fine-grained control within the overall copy specification.
Sharing copy specs
Consider a build that has several tasks that copy a project’s static website resources or add them to an archive. One task might copy the resources to a folder for a local HTTP server and another might package them into a distribution. You could manually specify the file locations and appropriate inclusions each time they are needed, but human error is more likely to creep in, resulting in inconsistencies between tasks.
One solution Gradle provides is the Project.copySpec(org.gradle.api.Action) method. This allows you to create a copy spec outside of a task, which can then be attached to an appropriate task using the CopySpec.with(org.gradle.api.file.CopySpec…) method. The following example demonstrates how this is done:
val webAssetsSpec: CopySpec = copySpec {
from("src/main/webapp")
include("**/*.html", "**/*.png", "**/*.jpg")
rename("(.+)-staging(.+)", "$1$2")
}
tasks.register<Copy>("copyAssets") {
into(layout.buildDirectory.dir("inPlaceApp"))
with(webAssetsSpec)
}
tasks.register<Zip>("distApp") {
archiveFileName = "my-app-dist.zip"
destinationDirectory = layout.buildDirectory.dir("dists")
from(appClasses)
with(webAssetsSpec)
}CopySpec webAssetsSpec = copySpec {
from 'src/main/webapp'
include '**/*.html', '**/*.png', '**/*.jpg'
rename '(.+)-staging(.+)', '$1$2'
}
tasks.register('copyAssets', Copy) {
into layout.buildDirectory.dir("inPlaceApp")
with webAssetsSpec
}
tasks.register('distApp', Zip) {
archiveFileName = 'my-app-dist.zip'
destinationDirectory = layout.buildDirectory.dir('dists')
from appClasses
with webAssetsSpec
}Both the copyAssets and distApp tasks will process the static resources under src/main/webapp, as specified by webAssetsSpec.
|
Note
|
The configuration defined by This can be confusing to understand, so it’s probably best to treat |
If you encounter a scenario in which you want to apply the same copy configuration to different sets of files, then you can share the configuration block directly without using copySpec(). Here’s an example that has two independent tasks that happen to want to process image files only:
val webAssetPatterns = Action<CopySpec> {
include("**/*.html", "**/*.png", "**/*.jpg")
}
tasks.register<Copy>("copyAppAssets") {
into(layout.buildDirectory.dir("inPlaceApp"))
from("src/main/webapp", webAssetPatterns)
}
tasks.register<Zip>("archiveDistAssets") {
archiveFileName = "distribution-assets.zip"
destinationDirectory = layout.buildDirectory.dir("dists")
from("distResources", webAssetPatterns)
}def webAssetPatterns = {
include '**/*.html', '**/*.png', '**/*.jpg'
}
tasks.register('copyAppAssets', Copy) {
into layout.buildDirectory.dir("inPlaceApp")
from 'src/main/webapp', webAssetPatterns
}
tasks.register('archiveDistAssets', Zip) {
archiveFileName = 'distribution-assets.zip'
destinationDirectory = layout.buildDirectory.dir('dists')
from 'distResources', webAssetPatterns
}In this case, we assign the copy configuration to its own variable and apply it to whatever from() specification we want. This doesn’t just work for inclusions, but also exclusions, file renaming, and file content filtering.
Using child specifications
If you only use a single copy spec, the file filtering and renaming will apply to all the files that are copied. Sometimes this is what you want, but not always. Consider the following example that copies files into a directory structure that can be used by a Java Servlet container to deliver a website:
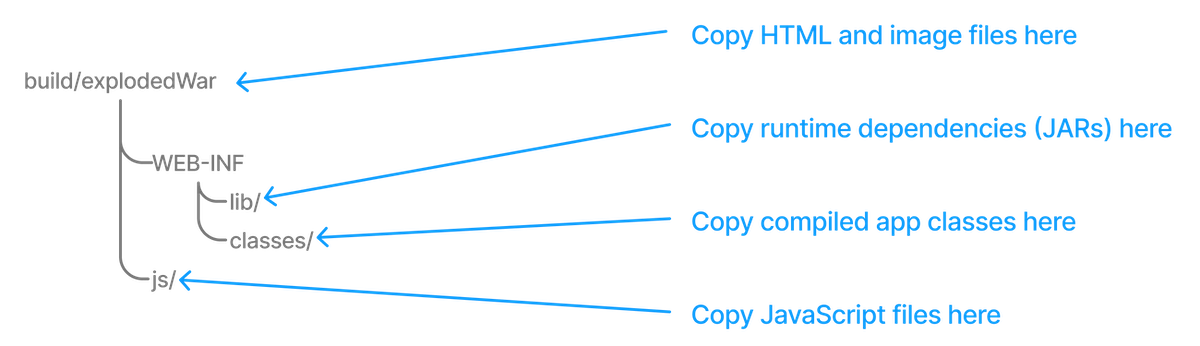
This is not a straightforward copy as the WEB-INF directory and its subdirectories don’t exist within the project, so they must be created during the copy. In addition, we only want HTML and image files going directly into the root folder — build/explodedWar — and only JavaScript files going into the js directory. So we need separate filter patterns for those two sets of files.
The solution is to use child specifications, which can be applied to both from() and into() declarations. The following task definition does the necessary work:
tasks.register<Copy>("nestedSpecs") {
into(layout.buildDirectory.dir("explodedWar"))
exclude("**/*staging*")
from("src/dist") {
include("**/*.html", "**/*.png", "**/*.jpg")
}
from(sourceSets.main.get().output) {
into("WEB-INF/classes")
}
into("WEB-INF/lib") {
from(configurations.runtimeClasspath)
}
}tasks.register('nestedSpecs', Copy) {
into layout.buildDirectory.dir("explodedWar")
exclude '**/*staging*'
from('src/dist') {
include '**/*.html', '**/*.png', '**/*.jpg'
}
from(sourceSets.main.output) {
into 'WEB-INF/classes'
}
into('WEB-INF/lib') {
from configurations.runtimeClasspath
}
}Notice how the src/dist configuration has a nested inclusion specification: that’s the child copy spec. You can of course add content filtering and renaming here as required. A child copy spec is still a copy spec.
The above example also demonstrates how you can copy files into a subdirectory of the destination either by using a child into() on a from() or a child from() on an into(). Both approaches are acceptable, but you may want to create and follow a convention to ensure consistency across your build files.
|
Note
|
Don’t get your |
One final thing to be aware of is that a child copy spec inherits its destination path, include patterns, exclude patterns, copy actions, name mappings and filters from its parent. So be careful where you place your configuration.
Copying files in your own tasks
|
Warning
|
Using the Project.copy method at execution time, as described here, is not compatible with the configuration cache.
A possible solution is to implement the task as a proper class and use FileSystemOperations.copy method instead, as described in the configuration cache chapter.
|
There might be occasions when you want to copy files or directories as part of a task. For example, a custom archiving task based on an unsupported archive format might want to copy files to a temporary directory before they are then archived. You still want to take advantage of Gradle’s copy API, but without introducing an extra Copy task.
The solution is to use the Project.copy(org.gradle.api.Action) method. It works the same way as the Copy task by configuring it with a copy spec. Here’s a trivial example:
tasks.register("copyMethod") {
doLast {
copy {
from("src/main/webapp")
into(layout.buildDirectory.dir("explodedWar"))
include("**/*.html")
include("**/*.jsp")
}
}
}tasks.register('copyMethod') {
doLast {
copy {
from 'src/main/webapp'
into layout.buildDirectory.dir('explodedWar')
include '**/*.html'
include '**/*.jsp'
}
}
}The above example demonstrates the basic syntax and also highlights two major limitations of using the copy() method:
-
The
copy()method is not incremental. The example’scopyMethodtask will always execute because it has no information about what files make up the task’s inputs. You have to manually define the task inputs and outputs. -
Using a task as a copy source, i.e. as an argument to
from(), won’t set up an automatic task dependency between your task and that copy source. As such, if you are using thecopy()method as part of a task action, you must explicitly declare all inputs and outputs in order to get the correct behavior.
The following example shows you how to workaround these limitations by using the dynamic API for task inputs and outputs:
tasks.register("copyMethodWithExplicitDependencies") {
// up-to-date check for inputs, plus add copyTask as dependency
inputs.files(copyTask)
.withPropertyName("inputs")
.withPathSensitivity(PathSensitivity.RELATIVE)
outputs.dir("some-dir") // up-to-date check for outputs
.withPropertyName("outputDir")
doLast {
copy {
// Copy the output of copyTask
from(copyTask)
into("some-dir")
}
}
}tasks.register('copyMethodWithExplicitDependencies') {
// up-to-date check for inputs, plus add copyTask as dependency
inputs.files(copyTask)
.withPropertyName("inputs")
.withPathSensitivity(PathSensitivity.RELATIVE)
outputs.dir('some-dir') // up-to-date check for outputs
.withPropertyName("outputDir")
doLast {
copy {
// Copy the output of copyTask
from copyTask
into 'some-dir'
}
}
}These limitations make it preferable to use the Copy task wherever possible, because of its builtin support for incremental building and task dependency inference. That is why the copy() method is intended for use by custom tasks that need to copy files as part of their function. Custom tasks that use the copy() method should declare the necessary inputs and outputs relevant to the copy action.
Mirroring directories and file collections with the Sync task
The Sync task, which extends the Copy task, copies the source files into the destination directory and then removes any files from the destination directory which it did not copy. In other words, it synchronizes the contents of a directory with its source. This can be useful for doing things such as installing your application, creating an exploded copy of your archives, or maintaining a copy of the project’s dependencies.
Here is an example which maintains a copy of the project’s runtime dependencies in the build/libs directory.
tasks.register<Sync>("libs") {
from(configurations["runtime"])
into(layout.buildDirectory.dir("libs"))
}tasks.register('libs', Sync) {
from configurations.runtime
into layout.buildDirectory.dir('libs')
}You can also perform the same function in your own tasks with the Project.sync(org.gradle.api.Action) method.
Deploying single files into application servers
When working with application servers, you can use a Copy task to deploy the application archive (e.g. a WAR file).
Since you are deploying a single file, the destination directory of the Copy is the whole deployment directory.
The deployment directory sometimes does contain unreadable files like named pipes, so Gradle may have problems doing up-to-date checks.
In order to support this use-case, you can use Task.doNotTrackState().
plugins {
war
}
tasks.register<Copy>("deployToTomcat") {
from(tasks.war)
into(layout.projectDirectory.dir("tomcat/webapps"))
doNotTrackState("Deployment directory contains unreadable files")
}plugins {
id 'war'
}
tasks.register("deployToTomcat", Copy) {
from war
into layout.projectDirectory.dir('tomcat/webapps')
doNotTrackState("Deployment directory contains unreadable files")
}Installing executables
When you are building a standalone executable, you may want to install this file on your system, so it ends up in your path.
You can use a Copy task to install the executable into shared directories like /usr/local/bin.
The installation directory probably contains many other executables, some of which may even be unreadable by Gradle.
To support the unreadable files in the Copy task’s destination directory and to avoid time consuming up-to-date checks, you can use Task.doNotTrackState().
tasks.register<Copy>("installExecutable") {
from("build/my-binary")
into("/usr/local/bin")
doNotTrackState("Installation directory contains unrelated files")
}tasks.register("installExecutable", Copy) {
from "build/my-binary"
into "/usr/local/bin"
doNotTrackState("Installation directory contains unrelated files")
}Archive creation in depth
Archives are essentially self-contained file systems and Gradle treats them as such. This is why working with archives is very similar to working with files and directories, including such things as file permissions.
Out of the box, Gradle supports creation of both ZIP and TAR archives, and by extension Java’s JAR, WAR and EAR formats — Java’s archive formats are all ZIPs. Each of these formats has a corresponding task type to create them: Zip, Tar, Jar, War, and Ear. These all work the same way and are based on copy specifications, just like the Copy task.
Creating an archive file is essentially a file copy in which the destination is implicit, i.e. the archive file itself. Here’s a basic example that specifies the path and name of the target archive file:
tasks.register<Zip>("packageDistribution") {
archiveFileName = "my-distribution.zip"
destinationDirectory = layout.buildDirectory.dir("dist")
from(layout.buildDirectory.dir("toArchive"))
}tasks.register('packageDistribution', Zip) {
archiveFileName = "my-distribution.zip"
destinationDirectory = layout.buildDirectory.dir('dist')
from layout.buildDirectory.dir("toArchive")
}In the next section you’ll learn about convention-based archive names, which can save you from always configuring the destination directory and archive name.
The full power of copy specifications are available to you when creating archives, which means you can do content filtering, file renaming or anything else that is covered in the previous section. A particularly common requirement is copying files into subdirectories of the archive that don’t exist in the source folders, something that can be achieved with into() child specifications.
Gradle does of course allow you create as many archive tasks as you want, but it’s worth bearing in mind that many convention-based plugins provide their own. For example, the Java plugin adds a jar task for packaging a project’s compiled classes and resources in a JAR. Many of these plugins provide sensible conventions for the names of archives as well as the copy specifications used. We recommend you use these tasks wherever you can, rather than overriding them with your own.
Archive naming
Gradle has several conventions around the naming of archives and where they are created based on the plugins your project uses. The main convention is provided by the Base Plugin, which defaults to creating archives in the layout.buildDirectory.dir("distributions") directory and typically uses archive names of the form [projectName]-[version].[type].
The following example comes from a project named archive-naming, hence the myZip task creates an archive named archive-naming-1.0.zip:
plugins {
base
}
version = "1.0"
tasks.register<Zip>("myZip") {
from("somedir")
val projectDir = layout.projectDirectory.asFile
doLast {
println(archiveFileName.get())
println(destinationDirectory.get().asFile.relativeTo(projectDir))
println(archiveFile.get().asFile.relativeTo(projectDir))
}
}plugins {
id 'base'
}
version = 1.0
tasks.register('myZip', Zip) {
from 'somedir'
File projectDir = layout.projectDirectory.asFile
doLast {
println archiveFileName.get()
println projectDir.relativePath(destinationDirectory.get().asFile)
println projectDir.relativePath(archiveFile.get().asFile)
}
}gradle -q myZip> gradle -q myZip archive-naming-1.0.zip build/distributions build/distributions/archive-naming-1.0.zip
Note that the name of the archive does not derive from the name of the task that creates it.
If you want to change the name and location of a generated archive file, you can provide values for the archiveFileName and destinationDirectory properties of the corresponding task.
These override any conventions that would otherwise apply.
Alternatively, you can make use of the default archive name pattern provided by AbstractArchiveTask.getArchiveFileName(): [archiveBaseName]-[archiveAppendix]-[archiveVersion]-[archiveClassifier].[archiveExtension]. You can set each of these properties on the task separately if you wish. Note that the Base Plugin uses the convention of project name for archiveBaseName, project version for archiveVersion and the archive type for archiveExtension. It does not provide values for the other properties.
This example — from the same project as the one above — configures just the archiveBaseName property, overriding the default value of the project name:
tasks.register<Zip>("myCustomZip") {
archiveBaseName = "customName"
from("somedir")
doLast {
println(archiveFileName.get())
}
}tasks.register('myCustomZip', Zip) {
archiveBaseName = 'customName'
from 'somedir'
doLast {
println archiveFileName.get()
}
}gradle -q myCustomZip> gradle -q myCustomZip customName-1.0.zip
You can also override the default archiveBaseName value for all the archive tasks in your build by using the project property archivesBaseName, as demonstrated by the following example:
plugins {
base
}
version = "1.0"
base {
archivesName = "gradle"
distsDirectory = layout.buildDirectory.dir("custom-dist")
libsDirectory = layout.buildDirectory.dir("custom-libs")
}
val myZip by tasks.registering(Zip::class) {
from("somedir")
}
val myOtherZip by tasks.registering(Zip::class) {
archiveAppendix = "wrapper"
archiveClassifier = "src"
from("somedir")
}
tasks.register("echoNames") {
val projectNameString = project.name
val archiveFileName = myZip.flatMap { it.archiveFileName }
val myOtherArchiveFileName = myOtherZip.flatMap { it.archiveFileName }
doLast {
println("Project name: $projectNameString")
println(archiveFileName.get())
println(myOtherArchiveFileName.get())
}
}plugins {
id 'base'
}
version = 1.0
base {
archivesName = "gradle"
distsDirectory = layout.buildDirectory.dir('custom-dist')
libsDirectory = layout.buildDirectory.dir('custom-libs')
}
def myZip = tasks.register('myZip', Zip) {
from 'somedir'
}
def myOtherZip = tasks.register('myOtherZip', Zip) {
archiveAppendix = 'wrapper'
archiveClassifier = 'src'
from 'somedir'
}
tasks.register('echoNames') {
def projectNameString = project.name
def archiveFileName = myZip.flatMap { it.archiveFileName }
def myOtherArchiveFileName = myOtherZip.flatMap { it.archiveFileName }
doLast {
println "Project name: $projectNameString"
println archiveFileName.get()
println myOtherArchiveFileName.get()
}
}gradle -q echoNames> gradle -q echoNames Project name: archives-changed-base-name gradle-1.0.zip gradle-wrapper-1.0-src.zip
You can find all the possible archive task properties in the API documentation for AbstractArchiveTask, but we have also summarized the main ones here:
archiveFileName—Property<String>, default:archiveBaseName-archiveAppendix-archiveVersion-archiveClassifier.archiveExtension-
The complete file name of the generated archive. If any of the properties in the default value are empty, their '-' separator is dropped.
archiveFile—Provider<RegularFile>, read-only, default:destinationDirectory/archiveFileName-
The absolute file path of the generated archive.
destinationDirectory—DirectoryProperty, default: depends on archive type-
The target directory in which to put the generated archive. By default, JARs and WARs go into
layout.buildDirectory.dir("libs"). ZIPs and TARs go intolayout.buildDirectory.dir("distributions"). archiveBaseName—Property<String>, default:project.name-
The base name portion of the archive file name, typically a project name or some other descriptive name for what it contains.
archiveAppendix—Property<String>, default:null-
The appendix portion of the archive file name that comes immediately after the base name. It is typically used to distinguish between different forms of content, such as code and docs, or a minimal distribution versus a full or complete one.
archiveVersion—Property<String>, default:project.version-
The version portion of the archive file name, typically in the form of a normal project or product version.
archiveClassifier—Property<String>, default:null-
The classifier portion of the archive file name. Often used to distinguish between archives that target different platforms.
archiveExtension—Property<String>, default: depends on archive type and compression type-
The filename extension for the archive. By default, this is set based on the archive task type and the compression type (if you’re creating a TAR). Will be one of:
zip,jar,war,tar,tgzortbz2. You can of course set this to a custom extension if you wish.
Sharing content between multiple archives
As described earlier, you can use the Project.copySpec(org.gradle.api.Action) method to share content between archives.
Reproducible builds
Sometimes it’s desirable to recreate archives exactly the same, byte for byte, on different machines. You want to be sure that building an artifact from source code produces the same result no matter when and where it is built. This is necessary for projects like reproducible-builds.org.
Reproducing the same byte-for-byte archive poses some challenges since the order of the files in an archive is influenced by the underlying file system. Each time a ZIP, TAR, JAR, WAR or EAR is built from source, the order of the files inside the archive may change. Files that only have a different timestamp also causes differences in archives from build to build. All AbstractArchiveTask (e.g. Jar, Zip) tasks shipped with Gradle include support for producing reproducible archives.
For example, to make a Zip task reproducible you need to set Zip.isReproducibleFileOrder() to true and Zip.isPreserveFileTimestamps() to false. In order to make all archive tasks in your build reproducible, consider adding the following configuration to your build file:
tasks.withType<AbstractArchiveTask>().configureEach {
isPreserveFileTimestamps = false
isReproducibleFileOrder = true
}tasks.withType(AbstractArchiveTask).configureEach {
preserveFileTimestamps = false
reproducibleFileOrder = true
}Often you will want to publish an archive, so that it is usable from another project. This process is described in Cross-Project publications.
Logging
The log is the main 'UI' of a build tool. If it is too verbose, real warnings and problems are easily hidden by this. On the other hand you need relevant information for figuring out if things have gone wrong. Gradle defines 6 log levels, as shown in Log levels. There are two Gradle-specific log levels, in addition to the ones you might normally see. Those levels are QUIET and LIFECYCLE. The latter is the default, and is used to report build progress.
Log levels
| ERROR |
Error messages |
| QUIET |
Important information messages |
| WARNING |
Warning messages |
| LIFECYCLE |
Progress information messages |
| INFO |
Information messages |
| DEBUG |
Debug messages |
|
Note
|
The rich components of the console (build status and work in progress area) are displayed regardless of the log level used. Before Gradle 4.0 those rich components were only displayed at log level LIFECYCLE or below.
|
Choosing a log level
You can use the command line switches shown in Log level command-line options to choose different log levels. You can also configure the log level using gradle.properties, see Gradle properties. In Stacktrace command-line options you find the command line switches which affect stacktrace logging.
| Option | Outputs Log Levels |
|---|---|
|
QUIET and higher |
|
WARN and higher |
no logging options |
LIFECYCLE and higher |
|
INFO and higher |
|
DEBUG and higher (that is, all log messages) |
|
Caution
|
The DEBUG log level can expose security sensitive information to the console.
|
Stacktrace command-line options
-sor--stacktrace-
Truncated stacktraces are printed. We recommend this over full stacktraces. Groovy full stacktraces are extremely verbose (Due to the underlying dynamic invocation mechanisms. Yet they usually do not contain relevant information for what has gone wrong in your code.) This option renders stacktraces for deprecation warnings.
-Sor--full-stacktrace-
The full stacktraces are printed out. This option renders stacktraces for deprecation warnings.
- <No stacktrace options>
-
No stacktraces are printed to the console in case of a build error (e.g. a compile error). Only in case of internal exceptions will stacktraces be printed. If the
DEBUGlog level is chosen, truncated stacktraces are always printed.
Logging Sensitive Information
Running Gradle with the DEBUG log level can expose security sensitive information to the console and build log.
This information can include but is not limited to:
-
Environment variables
-
Private repository credentials
-
Build cache & Develocity Credentials
-
Plugin Portal publishing credentials
The DEBUG log level should not be used when running on public Continuous Integration services. Build logs for public Continuous Integration services are world-viewable and can expose this sensitive information. Depending upon your organization’s threat model, logging sensitive credentials in private CI may also be a vulnerability. Please discuss this with your organization’s security team.
Some CI providers attempt to scrub sensitive credentials from logs; however, this will be imperfect and usually only scrubs exact-matches of pre-configured secrets.
If you believe a Gradle Plugin may be exposing sensitive information, please contact security@gradle.com for disclosure assistance.
Writing your own log messages
A simple option for logging in your build file is to write messages to standard output. Gradle redirects anything written to standard output to its logging system at the QUIET log level.
println("A message which is logged at QUIET level")println 'A message which is logged at QUIET level'Gradle also provides a logger property to a build script, which is an instance of Logger. This interface extends the SLF4J Logger interface and adds a few Gradle specific methods to it. Below is an example of how this is used in the build script:
logger.quiet("An info log message which is always logged.")
logger.error("An error log message.")
logger.warn("A warning log message.")
logger.lifecycle("A lifecycle info log message.")
logger.info("An info log message.")
logger.debug("A debug log message.")
logger.trace("A trace log message.") // Gradle never logs TRACE level logslogger.quiet('An info log message which is always logged.')
logger.error('An error log message.')
logger.warn('A warning log message.')
logger.lifecycle('A lifecycle info log message.')
logger.info('An info log message.')
logger.debug('A debug log message.')
logger.trace('A trace log message.') // Gradle never logs TRACE level logsUse the typical SLF4J pattern to replace a placeholder with an actual value as part of the log message.
logger.info("A {} log message", "info")logger.info('A {} log message', 'info')You can also hook into Gradle’s logging system from within other classes used in the build (classes from the buildSrc directory for example). Simply use an SLF4J logger. You can use this logger the same way as you use the provided logger in the build script.
import org.slf4j.LoggerFactory
val slf4jLogger = LoggerFactory.getLogger("some-logger")
slf4jLogger.info("An info log message logged using SLF4j")import org.slf4j.LoggerFactory
def slf4jLogger = LoggerFactory.getLogger('some-logger')
slf4jLogger.info('An info log message logged using SLF4j')Logging from external tools and libraries
Internally, Gradle uses Ant and Ivy. Both have their own logging system. Gradle redirects their logging output into the Gradle logging system. There is a 1:1 mapping from the Ant/Ivy log levels to the Gradle log levels, except the Ant/Ivy TRACE log level, which is mapped to Gradle DEBUG log level. This means the default Gradle log level will not show any Ant/Ivy output unless it is an error or a warning.
There are many tools out there which still use standard output for logging. By default, Gradle redirects standard output to the QUIET log level and standard error to the ERROR level. This behavior is configurable. The project object provides a LoggingManager, which allows you to change the log levels that standard out or error are redirected to when your build script is evaluated.
logging.captureStandardOutput(LogLevel.INFO)
println("A message which is logged at INFO level")logging.captureStandardOutput LogLevel.INFO
println 'A message which is logged at INFO level'To change the log level for standard out or error during task execution, tasks also provide a LoggingManager.
tasks.register("logInfo") {
logging.captureStandardOutput(LogLevel.INFO)
doFirst {
println("A task message which is logged at INFO level")
}
}tasks.register('logInfo') {
logging.captureStandardOutput LogLevel.INFO
doFirst {
println 'A task message which is logged at INFO level'
}
}Gradle also provides integration with the Java Util Logging, Jakarta Commons Logging and Log4j logging toolkits. Any log messages which your build classes write using these logging toolkits will be redirected to Gradle’s logging system.
Changing what Gradle logs
|
Warning
|
The configuration cache limits the ability to customize Gradle’s logging UI. The custom logger can only implement supported listener interfaces. These interfaces do not receive events when the configuration cache entry is reused, because the whole configuration phase is skipped. |
You can replace much of Gradle’s logging UI with your own. You might do this, for example, if you want to customize the UI in some way - to log more or less information, or to change the formatting. You replace the logging using the Gradle.useLogger(java.lang.Object) method. This is accessible from a build script, or an init script, or via the embedding API. Note that this completely disables Gradle’s default output. Below is an example init script which changes how task execution and build completion is logged.
useLogger(CustomEventLogger())
@Suppress("deprecation")
class CustomEventLogger() : BuildAdapter(), TaskExecutionListener {
override fun beforeExecute(task: Task) {
println("[${task.name}]")
}
override fun afterExecute(task: Task, state: TaskState) {
println()
}
override fun buildFinished(result: BuildResult) {
println("build completed")
if (result.failure != null) {
(result.failure as Throwable).printStackTrace()
}
}
}useLogger(new CustomEventLogger())
@SuppressWarnings("deprecation")
class CustomEventLogger extends BuildAdapter implements TaskExecutionListener {
void beforeExecute(Task task) {
println "[$task.name]"
}
void afterExecute(Task task, TaskState state) {
println()
}
void buildFinished(BuildResult result) {
println 'build completed'
if (result.failure != null) {
result.failure.printStackTrace()
}
}
}$ gradle -I customLogger.init.gradle.kts build > Task :compile [compile] compiling source > Task :testCompile [testCompile] compiling test source > Task :test [test] running unit tests > Task :build [build] build completed 3 actionable tasks: 3 executed
$ gradle -I customLogger.init.gradle build > Task :compile [compile] compiling source > Task :testCompile [testCompile] compiling test source > Task :test [test] running unit tests > Task :build [build] build completed 3 actionable tasks: 3 executed
Your logger can implement any of the listener interfaces listed below. When you register a logger, only the logging for the interfaces that it implements is replaced. Logging for the other interfaces is left untouched. You can find out more about the listener interfaces in Build lifecycle events.
Avoiding traps
Groovy script variables
For users of the Groovy DSL it is important to understand how Groovy deals with script variables. Groovy has two types of script variables. One with a local scope and one with a script-wide scope.
Example: Variables scope: local and script wide
String localScope1 = 'localScope1'
def localScope2 = 'localScope2'
scriptScope = 'scriptScope'
println localScope1
println localScope2
println scriptScope
closure = {
println localScope1
println localScope2
println scriptScope
}
def method() {
try {
localScope1
} catch (MissingPropertyException e) {
println 'localScope1NotAvailable'
}
try {
localScope2
} catch(MissingPropertyException e) {
println 'localScope2NotAvailable'
}
println scriptScope
}
closure.call()
method()groovy scope.groovy> groovy scope.groovy localScope1 localScope2 scriptScope localScope1 localScope2 scriptScope localScope1NotAvailable localScope2NotAvailable scriptScope
Variables which are declared with a type modifier are visible within closures but not visible within methods.
Configuration and execution phase
It is important to keep in mind that Gradle has a distinct configuration and execution phase (see Build Lifecycle).
val classesDir = file("build/classes")
classesDir.mkdirs()
tasks.register<Delete>("clean") {
delete("build")
}
tasks.register("compile") {
dependsOn("clean")
val classesDir = classesDir
doLast {
if (!classesDir.isDirectory) {
println("The class directory does not exist. I can not operate")
// do something
}
// do something
}
}def classesDir = file('build/classes')
classesDir.mkdirs()
tasks.register('clean', Delete) {
delete 'build'
}
tasks.register('compile') {
dependsOn 'clean'
def localClassesDir = classesDir
doLast {
if (!localClassesDir.isDirectory()) {
println 'The class directory does not exist. I can not operate'
// do something
}
// do something
}
}gradle -q compile> gradle -q compile The class directory does not exist. I can not operate
As the creation of the directory happens during the configuration phase, the clean task removes the directory during the execution phase.
Configuring the Build Environment
Gradle provides multiple mechanisms for configuring the behavior of Gradle itself and specific projects.
The following is a reference for using these mechanisms:
| Mechanism | Information | Example |
|---|---|---|
Flags that configure build behavior and Gradle features |
|
|
Properties specific to your Gradle project |
|
|
Properties that are passed to the Gradle runtime (JVM) |
|
|
Properties that configure Gradle settings |
|
|
Properties that configure build behavior based on the environment |
|
Priority for configurations
When configuring Gradle behavior, you can use these methods, but you must consider their priority. The following table lists these methods in order of highest to lowest precedence (the first one wins):
| Priority | Method | Location | Example | Details |
|---|---|---|---|---|
1 |
Command line |
|
These have precedence over properties and environment variables. |
|
2 |
Project Root Dir |
|
Stored in a |
|
3 |
|
|
Stored in a |
|
4 |
Environment |
|
Sourced by the environment that executes Gradle. |
Project properties
Project properties are specific to your Gradle project.
They are defined using blocks in your build script or directly in the project object.
For example, the project property myProperty is created in a build file:
ext {
myProperty = findProperty('myProperty') ?: 'Hello, world!'
}
println "My property value: ${project.ext.myProperty}"You have two options to add project properties, listed in order of priority:
-
Command Line: You can add properties directly to your Project object via the
-Pcommand line option.$ ./gradlew build -PmyProperty='Hi, world' -
System Properties or Environment Variables: You can set project properties with specially-named system properties or environment variables.
$ ./gradlew build -Dorg.gradle.project.myProperty='Hi, world'
If the environment variable name looks like ORG_GRADLE_PROJECT_prop=somevalue, then Gradle will set a prop property on your project object, with the value of somevalue.
Gradle also supports this for system properties, but with a different naming pattern, which looks like org.gradle.project.prop.
The following examples will set the foo property on your Project object to "bar".
Example 1: Setting a project property via the command line.
$ ./gradlew build -Pfoo=barExample 2: Setting a project property via a system property.
org.gradle.project.foo=barExample 3: Setting a project property via an environment variable.
$ export ORG_GRADLE_PROJECT_foo=barThis feature is very useful when you don’t have admin rights to a continuous integration server and need to set property values that are not easily visible. Since you cannot use the -P option in that scenario nor change the system-level configuration files, the correct strategy is to change the configuration of your continuous integration build job, adding an environment variable setting that matches an expected pattern. This won’t be visible to normal users on the system.
You can access a project property in your build script simply by using its name, as you would a variable.
Command-line flags
The command line interface and the available flags are described in its own section.
System properties
System properties are variables set at the JVM level and accessible to the Gradle build process.
System properties can be accessed using the System class in the build script.
Common system properties are listed below.
You have two options to add system properties listed in order of priority:
-
Command Line: Using the
-Dcommand-line option, you can pass a system property to the JVM, which runs Gradle. The-Doption of thegradlecommand has the same effect as the-Doption of thejavacommand.$ ./gradlew build -Dgradle.wrapperUser=myuser -
gradle.propertiesfile: You can also set system properties ingradle.propertiesfiles with the prefixsystemProp:gradle.propertiessystemProp.gradle.wrapperUser=myuser systemProp.gradle.wrapperPassword=mypassword
The following are common system properties:
gradle.wrapperUser=(myuser)-
Specify username to download Gradle distributions from servers using HTTP Basic Authentication.
gradle.wrapperPassword=(mypassword)-
Specify password for downloading a Gradle distribution using the Gradle wrapper.
gradle.user.home=(path to directory)-
Specify the
GRADLE_USER_HOMEdirectory. https.protocols-
Specify the supported TLS versions in a comma-separated format. e.g.,
TLSv1.2,TLSv1.3.
Additional Java system properties are listed here.
In a multi-project build, systemProp properties set in any project except the root will be ignored.
Only the root project’s gradle.properties file will be checked for properties that begin with systemProp.
The following examples demonstrate how to use system properties:
Example 1: Setting system properties with a gradle.properties file:
systemProp.system=gradlePropertiesValueExample 2: Reading system properties at configuration time:
// Using the Java API
println(System.getProperty("system"))// Using the Java API
println(System.getProperty("system"))
// Using the Gradle API, provides a lazy Provider<String>
println(providers.systemProperty("system").get())// Using the Java API
println(System.getProperty("system"))
// Using the Gradle API, provides a lazy Provider<String>
println(providers.systemProperty("system").get())// Using the Java API
println System.getProperty('system')// Using the Java API
println System.getProperty('system')
// Using the Gradle API, provides a lazy Provider<String>
println providers.systemProperty('system').get()// Using the Java API
println System.getProperty('system')
// Using the Gradle API, provides a lazy Provider<String>
println providers.systemProperty('system').get()Example 3: Reading system properties for consumption at execution time:
tasks.register<PrintValue>("printProperty") {
// Using the Gradle API, provides a lazy Provider<String> wired to a task input
inputValue = providers.systemProperty("system")
}tasks.register('printProperty', PrintValue) {
// Using the Gradle API, provides a lazy Provider<String> wired to a task input
inputValue = providers.systemProperty('system')
}Example 4: Setting system properties from the command line -D gradle.wrapperUser=username:
$ gradle -Dsystem=commandLineValue
Gradle properties
Gradle provides several options that make it easy to configure the Java process that will be used to execute your build.
While it’s possible to configure these in your local environment via GRADLE_OPTS or JAVA_OPTS, it is useful to be able to store certain settings like JVM memory configuration and JAVA_HOME location in version control so that an entire team can work with a consistent environment.
You have one option to add gradle properties:
-
gradle.propertiesfile: Place these settings into agradle.propertiesfile and commit it to your version control system.gradle.propertiesorg.gradle.caching.debug=false
The final configuration considered by Gradle is a combination of all Gradle properties set on the command line and your gradle.properties files.
If an option is configured in multiple locations, the first one found in any of these locations wins:
| Priority | Method | Location | Details |
|---|---|---|---|
1 |
Command line interface |
. |
In the command line using |
2 |
|
|
Stored in a |
3 |
|
Project Root Dir |
Stored in a |
4 |
|
|
Stored in a |
|
Note
|
The location of the GRADLE_USER_HOME may have been changed beforehand via the -Dgradle.user.home system property passed on the command line.
|
The following properties are common Gradle properties:
org.gradle.caching=(true,false)-
When set to
true, Gradle will reuse task outputs from any previous build when possible, resulting in much faster builds.Default is
false; the build cache is not enabled. org.gradle.caching.debug=(true,false)-
When set to
true, individual input property hashes and the build cache key for each task are logged on the console.Default is
false. org.gradle.configuration-cache=(true,false)-
Enables configuration caching. Gradle will try to reuse the build configuration from previous builds.
Default is
false. org.gradle.configureondemand=(true,false)-
Enables incubating configuration-on-demand, where Gradle will attempt to configure only necessary projects.
Default is
false. org.gradle.console=(auto,plain,rich,verbose)-
Customize console output coloring or verbosity.
Default depends on how Gradle is invoked.
org.gradle.continue=(true,false)-
If enabled, continue task execution after a task failure, else stop task execution after a task failure.
Default is
false. org.gradle.daemon=(true,false)-
When set to
truethe Gradle Daemon is used to run the build.Default is
true. org.gradle.daemon.idletimeout=(# of idle millis)-
Gradle Daemon will terminate itself after a specified number of idle milliseconds.
Default is
10800000(3 hours). org.gradle.debug=(true,false)-
When set to
true, Gradle will run the build with remote debugging enabled, listening on port 5005. Note that this is equivalent to adding-agentlib:jdwp=transport=dt_socket,server=y,suspend=y,address=5005to the JVM command line and will suspend the virtual machine until a debugger is attached.Default is
false. org.gradle.java.home=(path to JDK home)-
Specifies the Java home for the Gradle build process. The value can be set to either a
jdkorjrelocation; however, using a JDK is safer depending on what your build does. This does not affect the version of Java used to launch the Gradle client VM.Default is derived from your environment (
JAVA_HOMEor the path tojava) if the setting is unspecified. org.gradle.jvmargs=(JVM arguments)-
Specifies the JVM arguments used for the Gradle Daemon. The setting is particularly useful for configuring JVM memory settings for build performance. This does not affect the JVM settings for the Gradle client VM.
Default is
-Xmx512m "-XX:MaxMetaspaceSize=384m". org.gradle.logging.level=(quiet,warn,lifecycle,info,debug)-
When set to quiet, warn, info, or debug, Gradle will use this log level. The values are not case-sensitive.
Default is
lifecyclelevel. org.gradle.parallel=(true,false)-
When configured, Gradle will fork up to
org.gradle.workers.maxJVMs to execute projects in parallel.Default is
false. org.gradle.priority=(low,normal)-
Specifies the scheduling priority for the Gradle daemon and all processes launched by it.
Default is
normal. org.gradle.projectcachedir=(directory)-
Specify the project-specific cache directory. Defaults to
.gradlein the root project directory."Default is
.gradle. org.gradle.unsafe.isolated-projects=(true,false)-
Enables project isolation, which enables configuration caching.
Default is
false. org.gradle.vfs.verbose=(true,false)-
Configures verbose logging when watching the file system.
Default is
false. org.gradle.vfs.watch=(true,false)-
Toggles watching the file system. When enabled, Gradle reuses information it collects about the file system between builds.
Default is
trueon operating systems where Gradle supports this feature. org.gradle.warning.mode=(all,fail,summary,none)-
When set to
all,summary, ornone, Gradle will use different warning type display.Default is
summary. org.gradle.workers.max=(max # of worker processes)-
When configured, Gradle will use a maximum of the given number of workers.
Default is the number of CPU processors.
The following examples demonstrate how to use Gradle properties.
Example 1: Setting Gradle properties with a gradle.properties file:
gradlePropertiesProp=gradlePropertiesValue
gradleProperties.with.dots=gradlePropertiesDottedValueExample 2: Reading Gradle properties at configuration time:
// Using the API, provides a lazy Provider<String>
println(providers.gradleProperty("gradlePropertiesProp").get())
// Using Kotlin delegated properties on `settings`
val gradlePropertiesProp: String by settings
println(gradlePropertiesProp)// Using the API, provides a lazy Provider<String>
println(providers.gradleProperty("gradlePropertiesProp").get())
// Using Kotlin delegated properties on `project`
val gradlePropertiesProp: String by project
println(gradlePropertiesProp)// Using the API, provides a lazy Provider<String>
println providers.gradleProperty('gradlePropertiesProp').get()
// Using Groovy dynamic names
println gradlePropertiesProp
println settings.gradlePropertiesProp
// Using Groovy dynamic array notation on `settings`
println settings['gradlePropertiesProp']// Using the API, provides a lazy Provider<String>
println providers.gradleProperty('gradlePropertiesProp').get()
// Using Groovy dynamic names
println gradlePropertiesProp
println project.gradlePropertiesProp
// Using Groovy dynamic array notation on `project`
println project['gradlePropertiesProp']The Kotlin delegated properties are part of the Gradle Kotlin DSL.
You need to explicitly specify the type as String.
If you need to branch depending on the presence of the property, you can also use String? and check for null.
Note that using the dynamic Groovy names is impossible if a Gradle property has a dot in its name. You have to use the API or the dynamic array notation instead.
Example 3: Reading Gradle properties for consumption at execution time:
tasks.register<PrintValue>("printProperty") {
// Using the API, provides a lazy Provider<String> wired to a task input
inputValue = providers.gradleProperty("gradlePropertiesProp")
}tasks.register('printProperty', PrintValue) {
// Using the API, provides a lazy Provider<String> wired to a task input
inputValue = providers.gradleProperty('gradlePropertiesProp')
}Example 4: Setting Gradle properties from the command line:
$ gradle -DgradlePropertiesProp=commandLineValue
Note that initialization scripts can’t read Gradle properties directly.
The earliest Gradle properties can be read in initialization scripts is on settingsEvaluated {}:
Example 5: Reading Gradle properties from initialization scripts:
settingsEvaluated {
// Using the API, provides a lazy Provider<String>
println(providers.gradleProperty("gradlePropertiesProp").get())
// Using Kotlin delegated properties on `settings`
val gradlePropertiesProp: String by this
println(gradlePropertiesProp)
}settingsEvaluated { settings ->
// Using the API, provides a lazy Provider<String>
println settings.providers.gradleProperty('gradlePropertiesProp').get()
// Using Groovy dynamic names
println settings.gradlePropertiesProp
// Using Groovy dynamic array notation on `settings`
println settings['gradlePropertiesProp']
}Properties declared in a gradle.properties file present in a subproject directory are only available to that project and its children.
Environment variables
Gradle provides a number of environment variables, which are listed below.
You can access environment variables as properties in the build script using the System.getenv() method.
The following environment variables are available for the gradle command.
GRADLE_HOME-
Installation directory for Gradle.
Can be used to specify a local Gradle version instead of using the wrapper.
You can add
GRADLE_HOME/binto yourPATHfor specific applications and use cases (such as testing an early release for Gradle). JAVA_OPTS-
Used to pass JVM options and custom settings to the JVM.
GRADLE_OPTS-
Specifies JVM arguments to use when starting the Gradle client VM.
The client VM only handles command line input/output, so one would rarely need to change its VM options.
The actual build is run by the Gradle daemon, which is not affected by this environment variable.
GRADLE_USER_HOME-
Specifies the
GRADLE_USER_HOMEdirectory for Gradle to store its global configuration properties, initialization scripts, caches, log files and more.Defaults to
USER_HOME/.gradleif not set. JAVA_HOME-
Specifies the JDK installation directory to use for the client VM.
This VM is also used for the daemon unless a different one is specified in a Gradle properties file with
org.gradle.java.home. GRADLE_LIBS_REPO_OVERRIDE-
Overrides for the default Gradle library repository.
Can be used to specify a default Gradle repository URL in
org.gradle.plugins.ide.internal.resolver.Useful override to specify an internally hosted repository if your company uses a firewall/proxy.
The following examples demonstrate how to use environment variables.
Example 1: Reading environment variables at configuration time:
// Using the Java API
println(System.getenv("ENVIRONMENTAL"))// Using the Java API
println(System.getenv("ENVIRONMENTAL"))
// Using the Gradle API, provides a lazy Provider<String>
println(providers.environmentVariable("ENVIRONMENTAL").get())// Using the Java API
println(System.getenv("ENVIRONMENTAL"))
// Using the Gradle API, provides a lazy Provider<String>
println(providers.environmentVariable("ENVIRONMENTAL").get())// Using the Java API
println System.getenv('ENVIRONMENTAL')// Using the Java API
println System.getenv('ENVIRONMENTAL')
// Using the Gradle API, provides a lazy Provider<String>
println providers.environmentVariable('ENVIRONMENTAL').get()// Using the Java API
println System.getenv('ENVIRONMENTAL')
// Using the Gradle API, provides a lazy Provider<String>
println providers.environmentVariable('ENVIRONMENTAL').get()Example 2: Reading environment variables for consumption at execution time:
tasks.register<PrintValue>("printValue") {
// Using the Gradle API, provides a lazy Provider<String> wired to a task input
inputValue = providers.environmentVariable("ENVIRONMENTAL")
}tasks.register('printValue', PrintValue) {
// Using the Gradle API, provides a lazy Provider<String> wired to a task input
inputValue = providers.environmentVariable('ENVIRONMENTAL')
}Initialization Scripts
Gradle provides a powerful mechanism for customizing the build based on the current environment.
This mechanism also supports tools that wish to integrate with Gradle.
Basic usage
Initialization scripts (a.k.a. init scripts) are similar to other scripts in Gradle. These scripts, however, are run before the build starts.
Here are several possible uses:
-
Set up enterprise-wide configuration, such as where to find custom plugins.
-
Set up properties based on the current environment, such as a developer’s machine vs. a continuous integration server.
-
Supply personal information about the user required by the build, such as repository or database authentication credentials.
-
Define machine-specific details, such as where JDKs are installed.
-
Register build listeners. External tools that wish to listen to Gradle events might find this useful.
-
Register build loggers. You could customize how Gradle logs the events that it generates.
One main limitation of init scripts is that they cannot access classes in the buildSrc project.
Using an init script
There are several ways to use an init script:
-
Specify a file on the command line. The command line option is
-Ior--init-scriptfollowed by the path to the script.The command line option can appear more than once, each time adding another init script. The build will fail if any files specified on the command line do not exist.
-
Put a file called
init.gradle(orinit.gradle.ktsfor Kotlin) in the$GRADLE_USER_HOME/directory. -
Put a file that ends with
.gradle(or.init.gradle.ktsfor Kotlin) in the$GRADLE_USER_HOME/init.d/directory. -
Put a file that ends with
.gradle(or.init.gradle.ktsfor Kotlin) in the$GRADLE_HOME/init.d/directory, in the Gradle distribution.This lets you package a custom Gradle distribution containing custom build logic and plugins. You can combine this with the Gradle wrapper to make custom logic available to all builds in your enterprise.
If more than one init script is found, they will all be executed in the order specified above.
Scripts in a given directory are executed in alphabetical order. For example, a tool can specify an init script on the command line and another in the home directory for defining the environment. Both scripts will run when Gradle is executed.
Writing an init script
Like a Gradle build script, an init script is a Groovy or Kotlin script.
Each init script has a Gradle instance associated with it.
Any property reference and method call in the init script will delegate to this Gradle instance.
Each init script also implements the Script interface.
|
Note
|
When writing init scripts, pay attention to the scope of the reference you are trying to access.
For example, properties loaded from |
Configuring projects from an init script
You can use an init script to configure the projects in the build. This works similarly to configuring projects in a multi-project build.
The following sample shows how to perform extra configuration from an init script before the projects are evaluated:
repositories {
mavenCentral()
}
tasks.register("showRepos") {
val repositoryNames = repositories.map { it.name }
doLast {
println("All repos:")
println(repositoryNames)
}
}allprojects {
repositories {
mavenLocal()
}
}repositories {
mavenCentral()
}
tasks.register('showRepos') {
def repositoryNames = repositories.collect { it.name }
doLast {
println "All repos:"
println repositoryNames
}
}allprojects {
repositories {
mavenLocal()
}
}This sample uses this feature to configure an additional repository to be used only for specific environments.
Output when applying the init script
> gradle --init-script init.gradle.kts -q showRepos
All repos:
[MavenLocal, MavenRepo]> gradle --init-script init.gradle -q showRepos
All repos:
[MavenLocal, MavenRepo]External dependencies for the init script
Init scripts can also declare dependencies with the initscript() method, passing in a closure that declares the init script classpath.
Declaring external dependencies for an init script:
initscript {
repositories {
mavenCentral()
}
dependencies {
classpath("org.apache.commons:commons-math:2.0")
}
}initscript {
repositories {
mavenCentral()
}
dependencies {
classpath 'org.apache.commons:commons-math:2.0'
}
}The closure passed to the initscript() method configures a ScriptHandler instance.
You declare the init script classpath by adding dependencies to the classpath configuration.
This is the same way you declare, for example, the Java compilation classpath. You can use any of the dependency types described in Declaring Dependencies, except project dependencies.
Having declared the init script classpath, you can use the classes in your init script as you would any other classes on the classpath. The following example adds to the previous example and uses classes from the init script classpath.
An init script with external dependencies:
import org.apache.commons.math.fraction.Fraction
initscript {
repositories {
mavenCentral()
}
dependencies {
classpath("org.apache.commons:commons-math:2.0")
}
}
println(Fraction.ONE_FIFTH.multiply(2))tasks.register("doNothing")import org.apache.commons.math.fraction.Fraction
initscript {
repositories {
mavenCentral()
}
dependencies {
classpath 'org.apache.commons:commons-math:2.0'
}
}
println Fraction.ONE_FIFTH.multiply(2)tasks.register('doNothing')Output when applying the init script:
> gradle --init-script init.gradle.kts -q doNothing
2 / 5> gradle --init-script init.gradle -q doNothing
2 / 5Init script plugins
Like a Gradle build script or a Gradle settings file, plugins can be applied to init scripts.
Using plugins in init scripts:
apply<EnterpriseRepositoryPlugin>()
class EnterpriseRepositoryPlugin : Plugin<Gradle> {
companion object {
const val ENTERPRISE_REPOSITORY_URL = "https://repo.gradle.org/gradle/repo"
}
override fun apply(gradle: Gradle) {
// ONLY USE ENTERPRISE REPO FOR DEPENDENCIES
gradle.allprojects {
repositories {
// Remove all repositories not pointing to the enterprise repository url
all {
if (this !is MavenArtifactRepository || url.toString() != ENTERPRISE_REPOSITORY_URL) {
project.logger.lifecycle("Repository ${(this as? MavenArtifactRepository)?.url ?: name} removed. Only $ENTERPRISE_REPOSITORY_URL is allowed")
remove(this)
}
}
// add the enterprise repository
add(maven {
name = "STANDARD_ENTERPRISE_REPO"
url = uri(ENTERPRISE_REPOSITORY_URL)
})
}
}
}
}repositories{
mavenCentral()
}
data class RepositoryData(val name: String, val url: URI)
tasks.register("showRepositories") {
val repositoryData = repositories.withType<MavenArtifactRepository>().map { RepositoryData(it.name, it.url) }
doLast {
repositoryData.forEach {
println("repository: ${it.name} ('${it.url}')")
}
}
}apply plugin: EnterpriseRepositoryPlugin
class EnterpriseRepositoryPlugin implements Plugin<Gradle> {
private static String ENTERPRISE_REPOSITORY_URL = "https://repo.gradle.org/gradle/repo"
void apply(Gradle gradle) {
// ONLY USE ENTERPRISE REPO FOR DEPENDENCIES
gradle.allprojects { project ->
project.repositories {
// Remove all repositories not pointing to the enterprise repository url
all { ArtifactRepository repo ->
if (!(repo instanceof MavenArtifactRepository) ||
repo.url.toString() != ENTERPRISE_REPOSITORY_URL) {
project.logger.lifecycle "Repository ${repo.url} removed. Only $ENTERPRISE_REPOSITORY_URL is allowed"
remove repo
}
}
// add the enterprise repository
maven {
name "STANDARD_ENTERPRISE_REPO"
url ENTERPRISE_REPOSITORY_URL
}
}
}
}
}repositories{
mavenCentral()
}
@Immutable
class RepositoryData {
String name
URI url
}
tasks.register('showRepositories') {
def repositoryData = repositories.collect { new RepositoryData(it.name, it.url) }
doLast {
repositoryData.each {
println "repository: ${it.name} ('${it.url}')"
}
}
}Output when applying the init script:
> gradle --init-script init.gradle.kts -q showRepositories
repository: STANDARD_ENTERPRISE_REPO ('https://repo.gradle.org/gradle/repo')> gradle --init-script init.gradle -q showRepositories
repository: STANDARD_ENTERPRISE_REPO ('https://repo.gradle.org/gradle/repo')The plugin in the init script ensures that only a specified repository is used when running the build.
When applying plugins within the init script, Gradle instantiates the plugin and calls the plugin instance’s Plugin.apply(T) method.
The gradle object is passed as a parameter, which can be used to configure all aspects of a build. Of course, the applied plugin can be resolved as an external dependency as described in External dependencies for the init script
Developing Custom Gradle Types
There are several different kinds of "add-ons" to Gradle that you can develop, such as plugins, tasks, project extensions or artifact transforms, that are all implemented as classes and other types that can run on the JVM. This chapter discusses some of the features and concepts that are common to these types. You can use these features to help implement custom Gradle types and provide a consistent DSL for your users.
This chapter applies to the following types:
-
Plugin types.
-
Task types.
-
Artifact transform parameters types.
-
Worker API work action parameters types.
-
Extension objects created using
ExtensionContainer.create(), for example a project extension registered by a plugin. -
Objects created using
ObjectFactory.newInstance(). -
Objects created for a managed nested property.
-
Elements of a
NamedDomainObjectContainer.
Configuration using properties
The custom Gradle types that you implement often hold some configuration that you want to make available to build scripts and other plugins. For example, a download task may have configuration that specifies the URL to download from and the file system location to write the result to.
Managed properties
Gradle provides its own managed properties concept that allows you to declare each property as an abstract getter (Java, Groovy) or an abstract property (Kotlin).
Gradle then provides the implementation for such a property automatically.
It is called a managed property, as Gradle takes care of managing the state of the property.
A property may be mutable, meaning that it has both a get() method and set() method, or read-only, meaning that it has only a get() method.
Read-only properties are also called providers.
Mutable managed properties
To declare a mutable managed property, add an abstract getter method of type Property<T> - where T can be any serializable type or a fully Gradle managed type.
(See the list further down for more specific property types.)
The property must not have any setter methods.
Here is an example of a task type with an uri property of type URI:
public abstract class Download extends DefaultTask {
@Input
public abstract Property<URI> getUri(); // abstract getter of type Property<T>
@TaskAction
void run() {
System.out.println("Downloading " + getUri().get()); // Use the `uri` property
}
}Note that for a property to be considered a mutable managed property, the property’s getter methods must be abstract and have public or protected visibility.
The property type must be one of the following:
-
Property<T> -
RegularFileProperty -
DirectoryProperty -
ListProperty<T> -
SetProperty<T> -
MapProperty<K, V> -
ConfigurableFileCollection -
ConfigurableFileTree -
DomainObjectSet<T> -
NamedDomainObjectContainer<T> -
ExtensiblePolymorphicDomainObjectContainer<T> -
DependencyCollector
Gradle creates values for managed properties in the same way as ObjectFactory.
Read-only managed properties
To declare a read-only managed property, also called provider, add a getter method of type Provider<T>.
The method implementation then needs to derive the value, for example from other properties.
Here is an example of a task type with a uri provider that is derived from a location property:
public abstract class Download extends DefaultTask {
@Input
public abstract Property<String> getLocation();
@Internal
public Provider<URI> getUri() {
return getLocation().map(l -> URI.create("https://" + l));
}
@TaskAction
void run() {
System.out.println("Downloading " + getUri().get()); // Use the `uri` provider (read-only property)
}
}Read-only managed nested properties
To declare a read-only managed nested property, add an abstract getter method for the property to the type annotated with @Nested.
The property should not have any setter methods.
Gradle provides an implementation for the getter method, and also creates a value for the property.
The nested type is also treated as a custom type, and can use the features discussed in this chapter.
This pattern is useful when a custom type has a nested complex type which has the same lifecycle.
If the lifecycle is different, consider using Property<NestedType> instead.
Here is an example of a task type with a resource property. The Resource type is also a custom Gradle type and defines some managed properties:
public abstract class Download extends DefaultTask {
@Nested
public abstract Resource getResource(); // Use an abstract getter method annotated with @Nested
@TaskAction
void run() {
// Use the `resource` property
System.out.println("Downloading https://" + getResource().getHostName().get() + "/" + getResource().getPath().get());
}
}
public interface Resource {
@Input
Property<String> getHostName();
@Input
Property<String> getPath();
}Note that for a property to be considered a read-only managed nested property, the property’s getter methods must be abstract and have public or protected visibility.
The property must not have any setter methods.
In addition, the property getter must be annotated with @Nested.
Read-only managed "name" property
If the type contains an abstract property called "name" of type String, Gradle provides an implementation for the getter
method, and extends each constructor with a "name" parameter, which comes before all other constructor parameters. If the
type is an interface, Gradle will provide a constructor with a single "name" parameter and @Inject semantics.
You can have your type implement or extend the Named interface, which defines such a read-only "name" property.
Managed types
A managed type is an abstract class or interface with no fields and whose properties are all managed. That is, it is a type whose state is entirely managed by Gradle.
A named managed type is a managed type that additionally has an abstract property "name" of type String. Named
managed types are especially useful as the element type of NamedDomainObjectContainer (see below).
public interface Resource {
@Input
Property<String> getHostName();
@Input
Property<String> getPath();
}Java bean properties.
Sometimes you may see properties implemented in the Java bean property style.
That is, they do not use a Property<T> or Provider<T> types but are instead implemented with concrete setter and getter methods (or corresponding conveniences in Groovy or Kotlin).
This style of property definition is legacy in Gradle and is discouraged.
Properties in Gradle’s core plugins that are still of this style will be migrated to managed properties in future versions.
DSL support and extensibility
When Gradle creates an instance of a custom type, it decorates the instance to mix-in DSL and extensibility support.
Each decorated instance implements ExtensionAware, and so can have extension objects attached to it.
Note that plugins and the elements of containers created using Project.container() are currently not decorated, due to backwards compatibility issues.
Service injection
Gradle provides a number of useful services that can be used by custom Gradle types. For example, the WorkerExecutor service can be used by a task to run work in parallel, as seen in the worker API section. The services are made available through service injection.
Available services
The following services are available for injection:
-
ObjectFactory - Allows model objects to be created. See Creating objects explicitly for more details.
-
ProjectLayout - Provides access to key project locations. See lazy configuration for more details. This service is unavailable in Worker API actions.
-
BuildLayout - Provides access to important locations for a Gradle build. This service is only available for injection in settings plugins.
-
ProviderFactory - Creates
Providerinstances. See lazy configuration for more details. -
WorkerExecutor - Allows a task to run work in parallel. See the worker API for more details.
-
FileSystemOperations - Allows a task to run operations on the filesystem such as deleting files, copying files or syncing directories.
-
ArchiveOperations - Allows a task to run operations on archive files such as ZIP or TAR files.
-
ExecOperations - Allows a task to run external processes with dedicated support for running external
javaprograms. -
ToolingModelBuilderRegistry - Allows a plugin to registers a Gradle tooling API model.
Out of the above, ProjectLayout and WorkerExecutor services are only available for injection in project plugins.
Constructor injection
There are 2 ways that an object can receive the services that it needs. The first option is to add the service as a parameter of the class constructor.
The constructor must be annotated with the javax.inject.Inject annotation.
Gradle uses the declared type of each constructor parameter to determine the services that the object requires.
The order of the constructor parameters and their names are not significant and can be whatever you like.
Here is an example that shows a task type that receives an ObjectFactory via its constructor:
public class Download extends DefaultTask {
private final DirectoryProperty outputDirectory;
// Inject an ObjectFactory into the constructor
@Inject
public Download(ObjectFactory objectFactory) {
// Use the factory
outputDirectory = objectFactory.directoryProperty();
}
@OutputDirectory
public DirectoryProperty getOutputDirectory() {
return outputDirectory;
}
@TaskAction
void run() {
// ...
}
}Property injection
Alternatively, a service can be injected by adding a property getter method annotated with the javax.inject.Inject annotation to the class.
This can be useful, for example, when you cannot change the constructor of the class due to backwards compatibility constraints.
This pattern also allows Gradle to defer creation of the service until the getter method is called, rather than when the instance is created. This can help with performance.
Gradle uses the declared return type of the getter method to determine the service to make available. The name of the property is not significant and can be whatever you like.
The property getter method must be public or protected. The method can be abstract or, in cases where this isn’t possible, can have a dummy method body.
The method body is discarded.
Here is an example that shows a task type that receives a two services via property getter methods:
public abstract class Download extends DefaultTask {
// Use an abstract getter method
@Inject
protected abstract ObjectFactory getObjectFactory();
// Alternatively, use a getter method with a dummy implementation
@Inject
protected WorkerExecutor getWorkerExecutor() {
// Method body is ignored
throw new UnsupportedOperationException();
}
@TaskAction
void run() {
WorkerExecutor workerExecutor = getWorkerExecutor();
ObjectFactory objectFactory = getObjectFactory();
// Use the executor and factory ...
}
}Creating objects explicitly
|
Note
|
Prefer letting Gradle create objects automatically by using managed properties. |
A custom Gradle type can use the ObjectFactory service to create instances of Gradle types to use for its property values. These instances can make use of the features discussed in this chapter, allowing you to create objects and a nested DSL.
In the following example, a project extension receives an ObjectFactory instance through its constructor.
The constructor uses this to create a nested Resource object (also a custom Gradle type) and makes this object available through the resource property.
public class DownloadExtension {
// A nested instance
private final Resource resource;
@Inject
public DownloadExtension(ObjectFactory objectFactory) {
// Use an injected ObjectFactory to create a Resource object
resource = objectFactory.newInstance(Resource.class);
}
public Resource getResource() {
return resource;
}
}
public interface Resource {
Property<URI> getUri();
}Collection types
Gradle provides types for maintaining collections of objects, intended to work well to extends Gradle’s DSLs and provide useful features such as lazy configuration.
NamedDomainObjectContainer
A NamedDomainObjectContainer manages a set of objects, where each element has a name associated with it. The container takes care of creating and configuring the elements, and provides a DSL that build scripts can use to define and configure elements. It is intended to hold objects which are themselves configurable, for example a set of custom Gradle objects.
Gradle uses NamedDomainObjectContainer type extensively throughout the API.
For example, the project.tasks object used to manage the tasks of a project is a NamedDomainObjectContainer<Task>.
You can create a container instance using the ObjectFactory service, which provides the ObjectFactory.domainObjectContainer() method.
This is also available using the Project.container() method, however in a custom Gradle type it’s
generally better to use the injected ObjectFactory service instead of passing around a Project instance.
You can also create a container instance using a read-only managed property, described above.
In order to use a type with any of the domainObjectContainer() methods, it must either
-
be a named managed type; or
-
expose a property named “name” as the unique, and constant, name for the object. The
domainObjectContainer(Class)variant of the method creates new instances by calling the constructor of the class that takes a string argument, which is the desired name of the object.
Objects created this way are treated as custom Gradle types, and so can make use of the features discussed in this chapter, for example service injection or managed properties.
See the above link for domainObjectContainer() method variants that allow custom instantiation strategies.
public interface DownloadExtension {
NamedDomainObjectContainer<Resource> getResources();
}
public interface Resource {
// Type must have a read-only 'name' property
String getName();
Property<URI> getUri();
Property<String> getUserName();
}For each container property, Gradle automatically adds a block to the Groovy and Kotlin DSL that you can use to configure the contents of the container:
plugins {
id("org.gradle.sample.download")
}
download {
// Can use a block to configure the container contents
resources {
register("gradle") {
uri = uri("https://gradle.org")
}
}
}plugins {
id("org.gradle.sample.download")
}
download {
// Can use a block to configure the container contents
resources {
register('gradle') {
uri = uri('https://gradle.org')
}
}
}ExtensiblePolymorphicDomainObjectContainer
An ExtensiblePolymorphicDomainObjectContainer is a NamedDomainObjectContainer that allows you to
define instantiation strategies for different types of objects.
You can create an instance using the ObjectFactory.polymorphicDomainObjectContainer() method.
NamedDomainObjectSet
A NamedDomainObjectSet holds a set of configurable objects, where each element has a name associated with it.
This is similar to NamedDomainObjectContainer, however a NamedDomainObjectSet doesn’t manage the objects in the collection. They need to be created and added manually.
You can create an instance using the ObjectFactory.namedDomainObjectSet() method.
NamedDomainObjectList
A NamedDomainObjectList holds a list of configurable objects, where each element has a name associated with it.
This is similar to NamedDomainObjectContainer, however a NamedDomainObjectList doesn’t manage the objects in the collection. They need to be created and added manually.
You can create an instance using the ObjectFactory.namedDomainObjectList() method.
DomainObjectSet
A DomainObjectSet simply holds a set of configurable objects.
Compared to NamedDomainObjectContainer, a DomainObjectSet doesn’t manage the objects in the collection. They need to be created and added manually.
You can create an instance using the ObjectFactory.domainObjectSet() method.
Shared Build Services
Sometimes, it is useful for several tasks to share some state or resource. For example, tasks might share a cache of pre-computed values in order to do their work faster. Or tasks might do their work using a web service or database instance.
Gradle allows you to declare build services to represent this state. A build service is simply an object that holds the state for tasks to use. Gradle takes care of the service lifecycle, and will create the service instance only when it is required and clean it up once it is no longer required. Gradle can also optionally take care of coordinating access to the build service, so that no more than a specified number of tasks can use the service concurrently.
Implementing a build service
To implement a build service, create an abstract class that implements BuildService. Define methods on this type that you’d like tasks to use. A build service implementation is treated as a custom Gradle type and can use any of the features available to custom Gradle types.
A build service can optionally take parameters, which Gradle injects into the service instance when creating it.
To provide parameters, you define an abstract class (or interface) that
holds the parameters.
The parameters type must implement (or extend) BuildServiceParameters.
The service implementation can access the parameters using this.getParameters().
The parameters type is also a custom Gradle type.
When the build service does not require any parameters, you can use BuildServiceParameters.None as the parameters type.
A build service implementation can also optionally implement AutoCloseable, in which case Gradle will call the build service instance’s close() method when it discards the service instance.
This happens some time between completion of the last task that uses the build service and the end of the build.
Here is an example of a service that takes parameters and is closeable:
import org.gradle.api.file.DirectoryProperty;
import org.gradle.api.provider.Property;
import org.gradle.api.services.BuildService;
import org.gradle.api.services.BuildServiceParameters;
import java.net.URI;
import java.net.URISyntaxException;
public abstract class WebServer implements BuildService<WebServer.Params>, AutoCloseable {
// Some parameters for the web server
interface Params extends BuildServiceParameters {
Property<Integer> getPort();
DirectoryProperty getResources();
}
private final URI uri;
public WebServer() throws URISyntaxException {
// Use the parameters
int port = getParameters().getPort().get();
uri = new URI(String.format("https://localhost:%d/", port));
// Start the server ...
System.out.println(String.format("Server is running at %s", uri));
}
// A public method for tasks to use
public URI getUri() {
return uri;
}
@Override
public void close() {
// Stop the server ...
}
}Note that you should not implement the BuildService.getParameters() method, as Gradle will provide an implementation of this.
A build service implementation must be thread-safe, as it will potentially be used by multiple tasks concurrently.
Using a build service from a task
To use a build service from a task, you need to:
-
Add a property to the task of type
Property<MyServiceType>. -
Either annotate the property with
@Internalor@ServiceReference(since 8.0). -
Assign a shared build service provider to the property (optional, when using
@ServiceReference(<serviceName>)). -
Declare the association between the task and the service so Gradle can properly honor the build service lifecycle and its usage constraints (also optional, when using
@ServiceReference).
Note that using a service with any other annotation is currently not supported. For example, it is currently not possible to mark a service as an input to a task.
Annotating a shared build service property with @Internal
When you annotate a shared build service property with @Internal, you need to do two more things:
-
Explicitly assign a build service provider obtained when registering the service with BuildServiceRegistry.registerIfAbsent() to the property.
-
Explicitly declare the association between the task and the service via the Task.usesService.
Here is an example of a task that consumes the previous service via a property annotated with @Internal:
import org.gradle.api.DefaultTask;
import org.gradle.api.file.RegularFileProperty;
import org.gradle.api.provider.Property;
import org.gradle.api.tasks.Internal;
import org.gradle.api.tasks.OutputFile;
import org.gradle.api.tasks.TaskAction;
import java.net.URI;
public abstract class Download extends DefaultTask {
// This property provides access to the service instance
@Internal
abstract Property<WebServer> getServer();
@OutputFile
abstract RegularFileProperty getOutputFile();
@TaskAction
public void download() {
// Use the server to download a file
WebServer server = getServer().get();
URI uri = server.getUri().resolve("somefile.zip");
System.out.println(String.format("Downloading %s", uri));
}
}Annotating a shared build service property with @ServiceReference
|
Note
|
The @ServiceReference annotation is an incubating API and is subject to changing in a future release.
|
Otherwise, when you annotate a shared build service property with @ServiceReference,
there is no need to explicitly declare the association between the task and the service;
also, if you provide a service name to the annotation, and a shared build service is registered with that name,
it will be automatically assigned to the property when the task is created.
Here is an example of a task that consumes the previous service via a property annotated with @ServiceReference:
import org.gradle.api.DefaultTask;
import org.gradle.api.file.RegularFileProperty;
import org.gradle.api.provider.Property;
import org.gradle.api.services.ServiceReference;
import org.gradle.api.tasks.OutputFile;
import org.gradle.api.tasks.TaskAction;
import java.net.URI;
public abstract class Download extends DefaultTask {
// This property provides access to the service instance
@ServiceReference("web")
abstract Property<WebServer> getServer();
@OutputFile
abstract RegularFileProperty getOutputFile();
@TaskAction
public void download() {
// Use the server to download a file
WebServer server = getServer().get();
URI uri = server.getUri().resolve("somefile.zip");
System.out.println(String.format("Downloading %s", uri));
}
}Registering a build service and connecting it to tasks
To create a build service, you register the service instance using the BuildServiceRegistry.registerIfAbsent() method. Registering the service does not create the service instance. This happens on demand when a task first uses the service. If no task uses the service during a build, the service instance will not be created.
Currently, build services are scoped to a build, rather than to a project, and these services are available to be shared by the tasks of all projects.
You can access the registry of shared build services via Project.getGradle().getSharedServices().
Here is an example of a plugin that registers the previous service when the task property consuming the service is annotated with @Internal:
import org.gradle.api.Plugin;
import org.gradle.api.Project;
import org.gradle.api.provider.Provider;
public class DownloadPlugin implements Plugin<Project> {
public void apply(Project project) {
// Register the service
Provider<WebServer> serviceProvider = project.getGradle().getSharedServices().registerIfAbsent("web", WebServer.class, spec -> {
// Provide some parameters
spec.getParameters().getPort().set(5005);
});
project.getTasks().register("download", Download.class, task -> {
// Connect the service provider to the task
task.getServer().set(serviceProvider);
// Declare the association between the task and the service
task.usesService(serviceProvider);
task.getOutputFile().set(project.getLayout().getBuildDirectory().file("result.zip"));
});
}
}The plugin registers the service and receives a Provider<WebService> back. This provider can be connected to task properties to pass the service to the task.
Note that for a task property annotated with @Internal, the task property needs to (1) be explicitly assigned with the provider obtained during registation,
and (2) you must tell Gradle the task uses the service via Task.usesService.
Compare that to when the task property consuming the service is annotated with @ServiceReference:
import org.gradle.api.Plugin;
import org.gradle.api.Project;
import org.gradle.api.provider.Provider;
public class DownloadPlugin implements Plugin<Project> {
public void apply(Project project) {
// Register the service
project.getGradle().getSharedServices().registerIfAbsent("web", WebServer.class, spec -> {
// Provide some parameters
spec.getParameters().getPort().set(5005);
});
project.getTasks().register("download", Download.class, task -> {
task.getOutputFile().set(project.getLayout().getBuildDirectory().file("result.zip"));
});
}
}As you can see, there is no need to assign the build service provider to the task, nor to declare explicitly that the task uses the service.
Using shared build services from configuration actions
Generally, build services are intended to be used by tasks, as they usually represent some state that is potentially expensive to create, and you should avoid using
them at configuration time. However, sometimes it can make sense to use the service at configuration time. This is possible, simply call get() on the provider.
Other ways of using a build service
In addition to using a build service from a task, you can use a build service from a worker API action, an artifact transform or another build service.
To do this, pass the build service Provider as a parameter of the consuming action or service, in the same way you pass other parameters to the action or service.
For example, to pass a MyServiceType service to worker API action, you might add a property of type Property<MyServiceType> to the action’s parameters object and
then connect the Provider<MyServiceType> that you receive when registering the service to this property.
import org.gradle.api.DefaultTask;
import org.gradle.api.provider.Property;
import org.gradle.api.services.ServiceReference;
import org.gradle.api.tasks.TaskAction;
import org.gradle.workers.WorkAction;
import org.gradle.workers.WorkParameters;
import org.gradle.workers.WorkQueue;
import org.gradle.workers.WorkerExecutor;
import javax.inject.Inject;
import java.net.URI;
public abstract class Download extends DefaultTask {
public static abstract class DownloadWorkAction implements WorkAction<DownloadWorkAction.Parameters> {
interface Parameters extends WorkParameters {
// This property provides access to the service instance from the work action
abstract Property<WebServer> getServer();
}
@Override
public void execute() {
// Use the server to download a file
WebServer server = getParameters().getServer().get();
URI uri = server.getUri().resolve("somefile.zip");
System.out.println(String.format("Downloading %s", uri));
}
}
@Inject
abstract public WorkerExecutor getWorkerExecutor();
// This property provides access to the service instance from the task
@ServiceReference("web")
abstract Property<WebServer> getServer();
@TaskAction
public void download() {
WorkQueue workQueue = getWorkerExecutor().noIsolation();
workQueue.submit(DownloadWorkAction.class, parameter -> {
parameter.getServer().set(getServer());
});
}
}Currently, it is not possible to use a build service with a worker API action that uses ClassLoader or process isolation modes.
Concurrent access to the service
You can constrain concurrent execution when you register the service, by using the Property object returned from BuildServiceSpec.getMaxParallelUsages().
When this property has no value, which is the default, Gradle does not constrain access to the service. When this property has a value > 0, Gradle will allow no more than the specified number of tasks to use the service concurrently.
|
Important
|
When the consuming task property is annotated with @Internal, for the constraint to take effect, the build service must be registered with the consuming task via
Task.usesService(Provider<? extends BuildService<?>>).
This is not necessary if, instead, the consuming property is annotated with @ServiceReference.
|
Receiving information about task execution
A build service can be used to receive events as tasks are executed. To do this, create and register a build service that implements OperationCompletionListener:
import org.gradle.api.services.BuildService;
import org.gradle.api.services.BuildServiceParameters;
import org.gradle.tooling.events.FinishEvent;
import org.gradle.tooling.events.OperationCompletionListener;
import org.gradle.tooling.events.task.TaskFinishEvent;
public abstract class TaskEventsService implements BuildService<BuildServiceParameters.None>,
OperationCompletionListener { // (1)
@Override
public void onFinish(FinishEvent finishEvent) {
if (finishEvent instanceof TaskFinishEvent) { // (2)
// Handle task finish event...
}
}
}-
Implement the
OperationCompletionListenerinterface in addition to theBuildServiceinterface. -
Check if the finish event is a TaskFinishEvent.
Then, in the plugin you can use the methods on the BuildEventsListenerRegistry service to start receiving events:
import org.gradle.api.Plugin;
import org.gradle.api.Project;
import org.gradle.api.provider.Provider;
import org.gradle.build.event.BuildEventsListenerRegistry;
import javax.inject.Inject;
public abstract class TaskEventsPlugin implements Plugin<Project> {
@Inject
public abstract BuildEventsListenerRegistry getEventsListenerRegistry(); // (1)
@Override
public void apply(Project project) {
Provider<TaskEventsService> serviceProvider =
project.getGradle().getSharedServices().registerIfAbsent(
"taskEvents", TaskEventsService.class, spec -> {}); // (2)
getEventsListenerRegistry().onTaskCompletion(serviceProvider); // (3)
}
}-
Use service injection to obtain an instance of the
BuildEventsListenerRegistry. -
Register the build service as usual.
-
Use the service
Providerto subscribe the build service to build events.
Dataflow Actions
|
Note
|
The dataflow actions support is an incubating feature, and the details described here may change. |
A preferred way of executing work in a Gradle build is using a task. However, there are some kinds of work that do not fit tasks well, for example, custom handling of the build failure. What if you want to play a cheerful sound when the build succeeds and a sad one when it fails? This work piece has to process the task execution result, so it cannot be a task itself.
The dataflow actions API provides a way to schedule such kind of work. A dataflow action is a parameterized isolated piece of work that becomes eligible for execution as soon as all of its input parameters become available.
Implementing a dataflow action
The first step is to implement the action itself.
To do that you create a class implementing FlowAction interface.
The execute method must be implemented because this is where the work happens.
An action implementation is treated as a custom Gradle type and can use any of the features available to custom Gradle types.
In particular, some Gradle services can be injected into the implementation.
A dataflow action may accept parameters.
To provide parameters, you define an abstract class (or interface) to hold the parameters.
The parameters type must implement (or extend) FlowParameters.
The action implementation gets the parameters as an argument of the execute method.
The parameters type is also a custom Gradle type.
When the action requires no parameters, you can use FlowParameters.None as the parameters type.
Here is an example of a dataflow action that takes a shared build service and a file path as parameters.
package org.gradle.sample.sound;
import org.gradle.api.flow.FlowAction;
import org.gradle.api.flow.FlowParameters;
import org.gradle.api.provider.Property;
import org.gradle.api.services.ServiceReference;
import org.gradle.api.tasks.Input;
import java.io.File;
public abstract class SoundPlay implements FlowAction<SoundPlay.Parameters> {
interface Parameters extends FlowParameters {
@ServiceReference // (1)
Property<SoundService> getSoundService();
@Input // (2)
Property<File> getMediaFile();
}
@Override
public void execute(Parameters parameters) {
parameters.getSoundService().get().playSoundFile(parameters.getMediaFile().get());
}
}-
Parameters in the parameter type must be annotated. If a parameter is annotated with
@ServiceReferencethen a suitable shared build service implementation is automatically assigned to the parameter when the action is created, according to the usual rules. -
All other parameters must be annotated with
@Input.
Lifecycle event providers
Besides the usual value providers, Gradle provides dedicated providers for build lifecycle events, like build completion.
These providers are intended for dataflow actions and provide additional ordering guarantees when used as inputs.
The ordering also applies if you derive a provider from the event provider by, for example, calling map or flatMap.
You can obtain these providers from the FlowProviders class.
|
Warning
|
If you’re not using a lifecycle event provider as an input to the dataflow action, then the exact timing when the action is executed is not defined and may change in the next version of Gradle. |
Supplying the action for execution
You should not create FlowAction objects manually.
Instead, you request to execute them in the appropriate scope of FlowScope.
When doing that, you can configure the parameters for task to use.
package org.gradle.sample.sound;
import org.gradle.api.Plugin;
import org.gradle.api.flow.FlowProviders;
import org.gradle.api.flow.FlowScope;
import org.gradle.api.initialization.Settings;
import javax.inject.Inject;
import java.io.File;
public abstract class SoundFeedbackPlugin implements Plugin<Settings> {
@Inject
protected abstract FlowScope getFlowScope(); // (1)
@Inject
protected abstract FlowProviders getFlowProviders(); // (1)
@Override
public void apply(Settings settings) {
final File soundsDir = new File(settings.getSettingsDir(), "sounds");
getFlowScope().always( // (2)
SoundPlay.class, // (3)
spec -> // (4)
spec.getParameters().getMediaFile().set(
getFlowProviders().getBuildWorkResult().map(result -> // (5)
new File(
soundsDir,
result.getFailure().isPresent() ? "sad-trombone.mp3" : "tada.mp3"
)
)
)
);
}
}-
Use service injection to obtain
FlowScopeandFlowProvidersinstances. They are available for project and settings plugins. -
Use an appropriate scope to run your actions. As the name suggests, actions in the
alwaysscope are executed every time the build runs. -
Specify the class that implements the action.
-
Use the spec argument to configure the action parameters.
-
A lifecycle event provider can be mapped into something else while preserving the action ordering.
As a result, when you run the build, and it completes successfully, the action will play the "tada" sound. If the build fails at configuration or execution time, then you’ll hear "sad-trombone" — assuming, of course, that build configuration proceeds far enough for the action to be registered.
Testing Build Logic with TestKit
The Gradle TestKit (a.k.a. just TestKit) is a library that aids in testing Gradle plugins and build logic generally. At this time, it is focused on functional testing. That is, testing build logic by exercising it as part of a programmatically executed build. Over time, the TestKit will likely expand to facilitate other kinds of tests.
Usage
To use the TestKit, include the following in your plugin’s build:
dependencies {
testImplementation(gradleTestKit())
}dependencies {
testImplementation gradleTestKit()
}The gradleTestKit() encompasses the classes of the TestKit, as well as the Gradle Tooling API client. It does not include a version of JUnit, TestNG, or any other test execution framework. Such a dependency must be explicitly declared.
dependencies {
testImplementation("org.junit.jupiter:junit-jupiter:5.7.1")
testRuntimeOnly("org.junit.platform:junit-platform-launcher")
}
tasks.named<Test>("test") {
useJUnitPlatform()
}dependencies {
testImplementation("org.junit.jupiter:junit-jupiter:5.7.1")
testRuntimeOnly("org.junit.platform:junit-platform-launcher")
}
tasks.named('test', Test) {
useJUnitPlatform()
}Functional testing with the Gradle runner
The GradleRunner facilitates programmatically executing Gradle builds, and inspecting the result.
A contrived build can be created (e.g. programmatically, or from a template) that exercises the “logic under test”. The build can then be executed, potentially in a variety of ways (e.g. different combinations of tasks and arguments). The correctness of the logic can then be verified by asserting the following, potentially in combination:
-
The build’s output;
-
The build’s logging (i.e. console output);
-
The set of tasks executed by the build and their results (e.g. FAILED, UP-TO-DATE etc.).
After creating and configuring a runner instance, the build can be executed via the GradleRunner.build() or GradleRunner.buildAndFail() methods depending on the anticipated outcome.
The following demonstrates the usage of the Gradle runner in a Java JUnit test:
Example: Using GradleRunner with Java and JUnit
import org.gradle.testkit.runner.BuildResult;
import org.gradle.testkit.runner.GradleRunner;
import org.junit.jupiter.api.BeforeEach;
import org.junit.jupiter.api.Test;
import org.junit.jupiter.api.io.TempDir;
import java.io.BufferedWriter;
import java.io.File;
import java.io.FileWriter;
import java.io.IOException;
import static org.gradle.testkit.runner.TaskOutcome.SUCCESS;
import static org.junit.jupiter.api.Assertions.assertEquals;
import static org.junit.jupiter.api.Assertions.assertTrue;
public class BuildLogicFunctionalTest {
@TempDir File testProjectDir;
private File settingsFile;
private File buildFile;
@BeforeEach
public void setup() {
settingsFile = new File(testProjectDir, "settings.gradle");
buildFile = new File(testProjectDir, "build.gradle");
}
@Test
public void testHelloWorldTask() throws IOException {
writeFile(settingsFile, "rootProject.name = 'hello-world'");
String buildFileContent = "task helloWorld {" +
" doLast {" +
" println 'Hello world!'" +
" }" +
"}";
writeFile(buildFile, buildFileContent);
BuildResult result = GradleRunner.create()
.withProjectDir(testProjectDir)
.withArguments("helloWorld")
.build();
assertTrue(result.getOutput().contains("Hello world!"));
assertEquals(SUCCESS, result.task(":helloWorld").getOutcome());
}
private void writeFile(File destination, String content) throws IOException {
BufferedWriter output = null;
try {
output = new BufferedWriter(new FileWriter(destination));
output.write(content);
} finally {
if (output != null) {
output.close();
}
}
}
}Any test execution framework can be used.
As Gradle build scripts can also be written in the Groovy programming language, it is often a productive choice to write Gradle functional tests in Groovy. Furthermore, it is recommended to use the (Groovy based) Spock test execution framework as it offers many compelling features over the use of JUnit.
The following demonstrates the usage of the Gradle runner in a Groovy Spock test:
Example: Using GradleRunner with Groovy and Spock
import org.gradle.testkit.runner.GradleRunner
import static org.gradle.testkit.runner.TaskOutcome.*
import spock.lang.TempDir
import spock.lang.Specification
class BuildLogicFunctionalTest extends Specification {
@TempDir File testProjectDir
File settingsFile
File buildFile
def setup() {
settingsFile = new File(testProjectDir, 'settings.gradle')
buildFile = new File(testProjectDir, 'build.gradle')
}
def "hello world task prints hello world"() {
given:
settingsFile << "rootProject.name = 'hello-world'"
buildFile << """
task helloWorld {
doLast {
println 'Hello world!'
}
}
"""
when:
def result = GradleRunner.create()
.withProjectDir(testProjectDir)
.withArguments('helloWorld')
.build()
then:
result.output.contains('Hello world!')
result.task(":helloWorld").outcome == SUCCESS
}
}It is a common practice to implement any custom build logic (like plugins and task types) that is more complex in nature as external classes in a standalone project. The main driver behind this approach is bundle the compiled code into a JAR file, publish it to a binary repository and reuse it across various projects.
Getting the plugin-under-test into the test build
The GradleRunner uses the Tooling API to execute builds. An implication of this is that the builds are executed in a separate process (i.e. not the same process executing the tests). Therefore, the test build does not share the same classpath or classloaders as the test process and the code under test is not implicitly available to the test build.
|
Note
|
GradleRunner supports the same range of Gradle versions as the Tooling API. The supported versions are defined in the compatibility matrix. Builds with older Gradle versions may still work but there are no guarantees. |
Starting with version 2.13, Gradle provides a conventional mechanism to inject the code under test into the test build.
Automatic injection with the Java Gradle Plugin Development plugin
The Java Gradle Plugin development plugin can be used to assist in the development of Gradle plugins.
Starting with Gradle version 2.13, the plugin provides a direct integration with TestKit.
When applied to a project, the plugin automatically adds the gradleTestKit() dependency to the testApi configuration.
Furthermore, it automatically generates the classpath for the code under test and injects it via GradleRunner.withPluginClasspath() for any GradleRunner instance created by the user.
It’s important to note that the mechanism currently only works if the plugin under test is applied using the plugins DSL.
If the target Gradle version is prior to 2.8, automatic plugin classpath injection is not performed.
The plugin uses the following conventions for applying the TestKit dependency and injecting the classpath:
-
Source set containing code under test:
sourceSets.main -
Source set used for injecting the plugin classpath:
sourceSets.test
Any of these conventions can be reconfigured with the help of the class GradlePluginDevelopmentExtension.
The following Groovy-based sample demonstrates how to automatically inject the plugin classpath by using the standard conventions applied by the Java Gradle Plugin Development plugin.
plugins {
groovy
`java-gradle-plugin`
}
dependencies {
testImplementation("org.spockframework:spock-core:2.2-groovy-3.0") {
exclude(group = "org.codehaus.groovy")
}
testRuntimeOnly("org.junit.platform:junit-platform-launcher")
}plugins {
id 'groovy'
id 'java-gradle-plugin'
}
dependencies {
testImplementation('org.spockframework:spock-core:2.2-groovy-3.0') {
exclude group: 'org.codehaus.groovy'
}
testRuntimeOnly 'org.junit.platform:junit-platform-launcher'
}Example: Automatically injecting the code under test classes into test builds
def "hello world task prints hello world"() {
given:
settingsFile << "rootProject.name = 'hello-world'"
buildFile << """
plugins {
id 'org.gradle.sample.helloworld'
}
"""
when:
def result = GradleRunner.create()
.withProjectDir(testProjectDir)
.withArguments('helloWorld')
.withPluginClasspath()
.build()
then:
result.output.contains('Hello world!')
result.task(":helloWorld").outcome == SUCCESS
}The following build script demonstrates how to reconfigure the conventions provided by the Java Gradle Plugin Development plugin for a project that uses a custom Test source set.
|
Note
|
A new configuration DSL for modeling the below functionalTest suite is available via the incubating JVM Test Suite plugin.
|
plugins {
groovy
`java-gradle-plugin`
}
val functionalTest = sourceSets.create("functionalTest")
val functionalTestTask = tasks.register<Test>("functionalTest") {
group = "verification"
testClassesDirs = functionalTest.output.classesDirs
classpath = functionalTest.runtimeClasspath
useJUnitPlatform()
}
tasks.check {
dependsOn(functionalTestTask)
}
gradlePlugin {
testSourceSets(functionalTest)
}
dependencies {
"functionalTestImplementation"("org.spockframework:spock-core:2.2-groovy-3.0") {
exclude(group = "org.codehaus.groovy")
}
"functionalTestRuntimeOnly"("org.junit.platform:junit-platform-launcher")
}plugins {
id 'groovy'
id 'java-gradle-plugin'
}
def functionalTest = sourceSets.create('functionalTest')
def functionalTestTask = tasks.register('functionalTest', Test) {
group = 'verification'
testClassesDirs = sourceSets.functionalTest.output.classesDirs
classpath = sourceSets.functionalTest.runtimeClasspath
useJUnitPlatform()
}
tasks.named("check") {
dependsOn functionalTestTask
}
gradlePlugin {
testSourceSets sourceSets.functionalTest
}
dependencies {
functionalTestImplementation('org.spockframework:spock-core:2.2-groovy-3.0') {
exclude group: 'org.codehaus.groovy'
}
functionalTestRuntimeOnly 'org.junit.platform:junit-platform-launcher'
}Controlling the build environment
The runner executes the test builds in an isolated environment by specifying a dedicated "working directory" in a directory inside the JVM’s temp directory (i.e. the location specified by the java.io.tmpdir system property, typically /tmp). Any configuration in the default Gradle User Home (e.g. ~/.gradle/gradle.properties) is not used for test execution. The TestKit does not expose a mechanism for fine grained control of all aspects of the environment (e.g., JDK). Future versions of the TestKit will provide improved configuration options.
The TestKit uses dedicated daemon processes that are automatically shut down after test execution.
The dedicated working directory is not deleted by the runner after the build. The TestKit provides two ways to specify a location that is regularly cleaned, such as the project’s build folder:
-
The
org.gradle.testkit.dirsystem property; -
The GradleRunner.withTestKitDir(file testKitDir) method.
The Gradle version used to test
The Gradle runner requires a Gradle distribution in order to execute the build. The TestKit does not depend on all of Gradle’s implementation.
By default, the runner will attempt to find a Gradle distribution based on where the GradleRunner class was loaded from. That is, it is expected that the class was loaded from a Gradle distribution, as is the case when using the gradleTestKit() dependency declaration.
When using the runner as part of tests being executed by Gradle (e.g. executing the test task of a plugin project), the same distribution used to execute the tests will be used by the runner. When using the runner as part of tests being executed by an IDE, the same distribution of Gradle that was used when importing the project will be used. This means that the plugin will effectively be tested with the same version of Gradle that it is being built with.
Alternatively, a different and specific version of Gradle to use can be specified by the any of the following GradleRunner methods:
This can potentially be used to test build logic across Gradle versions. The following demonstrates a cross-version compatibility test written as Groovy Spock test:
Example: Specifying a Gradle version for test execution
import org.gradle.testkit.runner.GradleRunner
import static org.gradle.testkit.runner.TaskOutcome.*
import spock.lang.TempDir
import spock.lang.Specification
class BuildLogicFunctionalTest extends Specification {
@TempDir File testProjectDir
File settingsFile
File buildFile
def setup() {
settingsFile = new File(testProjectDir, 'settings.gradle')
buildFile = new File(testProjectDir, 'build.gradle')
}
def "can execute hello world task with Gradle version #gradleVersion"() {
given:
buildFile << """
task helloWorld {
doLast {
logger.quiet 'Hello world!'
}
}
"""
settingsFile << ""
when:
def result = GradleRunner.create()
.withGradleVersion(gradleVersion)
.withProjectDir(testProjectDir)
.withArguments('helloWorld')
.build()
then:
result.output.contains('Hello world!')
result.task(":helloWorld").outcome == SUCCESS
where:
gradleVersion << ['5.0', '6.0.1']
}
}Feature support when testing with different Gradle versions
It is possible to use the GradleRunner to execute builds with Gradle 1.0 and later. However, some runner features are not supported on earlier versions. In such cases, the runner will throw an exception when attempting to use the feature.
The following table lists the features that are sensitive to the Gradle version being used.
| Feature | Minimum Version | Description |
|---|---|---|
Inspecting executed tasks |
2.5 |
Inspecting the executed tasks, using BuildResult.getTasks() and similar methods. |
2.8 |
Injecting the code under test viaGradleRunner.withPluginClasspath(java.lang.Iterable). |
|
2.9 |
Inspecting the build’s text output when run in debug mode, using BuildResult.getOutput(). |
|
2.13 |
Injecting the code under test automatically via GradleRunner.withPluginClasspath() by applying the Java Gradle Plugin Development plugin. |
|
Setting environment variables to be used by the build. |
3.5 |
The Gradle Tooling API only supports setting environment variables in later versions. |
Debugging build logic
The runner uses the Tooling API to execute builds. An implication of this is that the builds are executed in a separate process (i.e. not the same process executing the tests). Therefore, executing your tests in debug mode does not allow you to debug your build logic as you may expect. Any breakpoints set in your IDE will be not be tripped by the code being exercised by the test build.
The TestKit provides two different ways to enable the debug mode:
-
Setting “
org.gradle.testkit.debug” system property totruefor the JVM using theGradleRunner(i.e. not the build being executed with the runner); -
Calling the GradleRunner.withDebug(boolean) method.
The system property approach can be used when it is desirable to enable debugging support without making an adhoc change to the runner configuration. Most IDEs offer the capability to set JVM system properties for test execution, and such a feature can be used to set this system property.
Testing with the Build Cache
To enable the Build Cache in your tests, you can pass the --build-cache argument to GradleRunner or use one of the other methods described in Enable the build cache. You can then check for the task outcome TaskOutcome.FROM_CACHE when your plugin’s custom task is cached. This outcome is only valid for Gradle 3.5 and newer.
Example: Testing cacheable tasks
def "cacheableTask is loaded from cache"() {
given:
buildFile << """
plugins {
id 'org.gradle.sample.helloworld'
}
"""
when:
def result = runner()
.withArguments( '--build-cache', 'cacheableTask')
.build()
then:
result.task(":cacheableTask").outcome == SUCCESS
when:
new File(testProjectDir, 'build').deleteDir()
result = runner()
.withArguments( '--build-cache', 'cacheableTask')
.build()
then:
result.task(":cacheableTask").outcome == FROM_CACHE
}Note that TestKit re-uses a Gradle User Home between tests (see GradleRunner.withTestKitDir(java.io.File)) which contains the default location for the local build cache. For testing with the build cache, the build cache directory should be cleaned between tests. The easiest way to accomplish this is to configure the local build cache to use a temporary directory.
Example: Clean build cache between tests
@TempDir File testProjectDir
File buildFile
File localBuildCacheDirectory
def setup() {
localBuildCacheDirectory = new File(testProjectDir, 'local-cache')
buildFile = new File(testProjectDir,'settings.gradle') << """
buildCache {
local {
directory '${localBuildCacheDirectory.toURI()}'
}
}
"""
buildFile = new File(testProjectDir,'build.gradle')
}Using Ant from Gradle
Gradle provides excellent integration with Ant. You can use individual Ant tasks or entire Ant builds in your Gradle builds. In fact, you will find that it’s far easier and more powerful using Ant tasks in a Gradle build script, than it is to use Ant’s XML format. You could even use Gradle simply as a powerful Ant task scripting tool.
Ant can be divided into two layers. The first layer is the Ant language. It provides the syntax for the build.xml file, the handling of the targets, special constructs like macrodefs, and so on. In other words, everything except the Ant tasks and types. Gradle understands this language, and allows you to import your Ant build.xml directly into a Gradle project. You can then use the targets of your Ant build as if they were Gradle tasks.
The second layer of Ant is its wealth of Ant tasks and types, like javac, copy or jar. For this layer Gradle provides integration simply by relying on Groovy, and the fantastic AntBuilder.
Finally, since build scripts are Groovy scripts, you can always execute an Ant build as an external process. Your build script may contain statements like: "ant clean compile".execute().[5]
You can use Gradle’s Ant integration as a path for migrating your build from Ant to Gradle. For example, you could start by importing your existing Ant build. Then you could move your dependency declarations from the Ant script to your build file. Finally, you could move your tasks across to your build file, or replace them with some of Gradle’s plugins. This process can be done in parts over time, and you can have a working Gradle build during the entire process.
|
Warning
|
Ant integration is not fully compatible with the configuration cache. Using Task.ant to run Ant task in the task action may work, but importing the Ant build is not supported. |
Using Ant tasks and types in your build
In your build script, a property called ant is provided by Gradle. This is a reference to an AntBuilder instance. This AntBuilder is used to access Ant tasks, types and properties from your build script. There is a very simple mapping from Ant’s build.xml format to Groovy, which is explained below.
You execute an Ant task by calling a method on the AntBuilder instance. You use the task name as the method name. For example, you execute the Ant echo task by calling the ant.echo() method. The attributes of the Ant task are passed as Map parameters to the method. Below is an example of the echo task. Notice that we can also mix Groovy code and the Ant task markup. This can be extremely powerful.
tasks.register("hello") {
doLast {
val greeting = "hello from Ant"
ant.withGroovyBuilder {
"echo"("message" to greeting)
}
}
}tasks.register('hello') {
doLast {
String greeting = 'hello from Ant'
ant.echo(message: greeting)
}
}gradle hello> gradle hello > Task :hello [ant:echo] hello from Ant BUILD SUCCESSFUL in 0s 1 actionable task: 1 executed
You pass nested text to an Ant task by passing it as a parameter of the task method call. In this example, we pass the message for the echo task as nested text:
tasks.register("hello") {
doLast {
ant.withGroovyBuilder {
"echo"("message" to "hello from Ant")
}
}
}tasks.register('hello') {
doLast {
ant.echo('hello from Ant')
}
}gradle hello> gradle hello > Task :hello [ant:echo] hello from Ant BUILD SUCCESSFUL in 0s 1 actionable task: 1 executed
You pass nested elements to an Ant task inside a closure. Nested elements are defined in the same way as tasks, by calling a method with the same name as the element we want to define.
tasks.register("zip") {
doLast {
ant.withGroovyBuilder {
"zip"("destfile" to "archive.zip") {
"fileset"("dir" to "src") {
"include"("name" to "**.xml")
"exclude"("name" to "**.java")
}
}
}
}
}tasks.register('zip') {
doLast {
ant.zip(destfile: 'archive.zip') {
fileset(dir: 'src') {
include(name: '**.xml')
exclude(name: '**.java')
}
}
}
}You can access Ant types in the same way that you access tasks, using the name of the type as the method name. The method call returns the Ant data type, which you can then use directly in your build script. In the following example, we create an Ant path object, then iterate over the contents of it.
import org.apache.tools.ant.types.Path
tasks.register("list") {
doLast {
val path = ant.withGroovyBuilder {
"path" {
"fileset"("dir" to "libs", "includes" to "*.jar")
}
} as Path
path.list().forEach {
println(it)
}
}
}tasks.register('list') {
doLast {
def path = ant.path {
fileset(dir: 'libs', includes: '*.jar')
}
path.list().each {
println it
}
}
}More information about AntBuilder can be found in 'Groovy in Action' 8.4 or at the Groovy Wiki.
Using custom Ant tasks in your build
To make custom tasks available in your build, you can use the taskdef (usually easier) or typedef Ant task, just as you would in a build.xml file. You can then refer to the custom Ant task as you would a built-in Ant task.
tasks.register("check") {
val checkstyleConfig = file("checkstyle.xml")
doLast {
ant.withGroovyBuilder {
"taskdef"("resource" to "com/puppycrawl/tools/checkstyle/ant/checkstyle-ant-task.properties") {
"classpath" {
"fileset"("dir" to "libs", "includes" to "*.jar")
}
}
"checkstyle"("config" to checkstyleConfig) {
"fileset"("dir" to "src")
}
}
}
}tasks.register('check') {
def checkstyleConfig = file('checkstyle.xml')
doLast {
ant.taskdef(resource: 'com/puppycrawl/tools/checkstyle/ant/checkstyle-ant-task.properties') {
classpath {
fileset(dir: 'libs', includes: '*.jar')
}
}
ant.checkstyle(config: checkstyleConfig) {
fileset(dir: 'src')
}
}
}You can use Gradle’s dependency management to assemble the classpath to use for the custom tasks. To do this, you need to define a custom configuration for the classpath, then add some dependencies to the configuration. This is described in more detail in Declaring Dependencies.
val pmd = configurations.create("pmd")
dependencies {
pmd(group = "pmd", name = "pmd", version = "4.2.5")
}configurations {
pmd
}
dependencies {
pmd group: 'pmd', name: 'pmd', version: '4.2.5'
}To use the classpath configuration, use the asPath property of the custom configuration.
tasks.register("check") {
doLast {
ant.withGroovyBuilder {
"taskdef"("name" to "pmd",
"classname" to "net.sourceforge.pmd.ant.PMDTask",
"classpath" to pmd.asPath)
"pmd"("shortFilenames" to true,
"failonruleviolation" to true,
"rulesetfiles" to file("pmd-rules.xml").toURI().toString()) {
"formatter"("type" to "text", "toConsole" to "true")
"fileset"("dir" to "src")
}
}
}
}tasks.register('check') {
doLast {
ant.taskdef(name: 'pmd',
classname: 'net.sourceforge.pmd.ant.PMDTask',
classpath: configurations.pmd.asPath)
ant.pmd(shortFilenames: 'true',
failonruleviolation: 'true',
rulesetfiles: file('pmd-rules.xml').toURI().toString()) {
formatter(type: 'text', toConsole: 'true')
fileset(dir: 'src')
}
}
}Importing an Ant build
You can use the ant.importBuild() method to import an Ant build into your Gradle project. When you import an Ant build, each Ant target is treated as a Gradle task. This means you can manipulate and execute the Ant targets in exactly the same way as Gradle tasks.
ant.importBuild("build.xml")ant.importBuild 'build.xml'<project>
<target name="hello">
<echo>Hello, from Ant</echo>
</target>
</project>gradle hello> gradle hello > Task :hello [ant:echo] Hello, from Ant BUILD SUCCESSFUL in 0s 1 actionable task: 1 executed
You can add a task which depends on an Ant target:
ant.importBuild("build.xml")
tasks.register("intro") {
dependsOn("hello")
doLast {
println("Hello, from Gradle")
}
}ant.importBuild 'build.xml'
tasks.register('intro') {
dependsOn("hello")
doLast {
println 'Hello, from Gradle'
}
}gradle intro> gradle intro > Task :hello [ant:echo] Hello, from Ant > Task :intro Hello, from Gradle BUILD SUCCESSFUL in 0s 2 actionable tasks: 2 executed
Or, you can add behaviour to an Ant target:
ant.importBuild("build.xml")
tasks.named("hello") {
doLast {
println("Hello, from Gradle")
}
}ant.importBuild 'build.xml'
hello {
doLast {
println 'Hello, from Gradle'
}
}gradle hello> gradle hello > Task :hello [ant:echo] Hello, from Ant Hello, from Gradle BUILD SUCCESSFUL in 0s 1 actionable task: 1 executed
It is also possible for an Ant target to depend on a Gradle task:
ant.importBuild("build.xml")
tasks.register("intro") {
doLast {
println("Hello, from Gradle")
}
}ant.importBuild 'build.xml'
tasks.register('intro') {
doLast {
println 'Hello, from Gradle'
}
}<project>
<target name="hello" depends="intro">
<echo>Hello, from Ant</echo>
</target>
</project>gradle hello> gradle hello > Task :intro Hello, from Gradle > Task :hello [ant:echo] Hello, from Ant BUILD SUCCESSFUL in 0s 2 actionable tasks: 2 executed
Sometimes it may be necessary to “rename” the task generated for an Ant target to avoid a naming collision with existing Gradle tasks. To do this, use the AntBuilder.importBuild(java.lang.Object, org.gradle.api.Transformer) method.
ant.importBuild("build.xml") { antTargetName ->
"a-" + antTargetName
}ant.importBuild('build.xml') { antTargetName ->
'a-' + antTargetName
}<project>
<target name="hello">
<echo>Hello, from Ant</echo>
</target>
</project>gradle a-hello> gradle a-hello > Task :a-hello [ant:echo] Hello, from Ant BUILD SUCCESSFUL in 0s 1 actionable task: 1 executed
Note that while the second argument to this method should be a Transformer, when programming in Groovy we can simply use a closure instead of an anonymous inner class (or similar) due to Groovy’s support for automatically coercing closures to single-abstract-method types.
Ant properties and references
There are several ways to set an Ant property, so that the property can be used by Ant tasks. You can set the property directly on the AntBuilder instance. The Ant properties are also available as a Map which you can change. You can also use the Ant property task. Below are some examples of how to do this.
ant.setProperty("buildDir", buildDir)
ant.properties.set("buildDir", buildDir)
ant.properties["buildDir"] = buildDir
ant.withGroovyBuilder {
"property"("name" to "buildDir", "location" to "buildDir")
}ant.buildDir = buildDir
ant.properties.buildDir = buildDir
ant.properties['buildDir'] = buildDir
ant.property(name: 'buildDir', location: buildDir)Many Ant tasks set properties when they execute. There are several ways to get the value of these properties. You can get the property directly from the AntBuilder instance. The Ant properties are also available as a Map. Below are some examples.
<property name="antProp" value="a property defined in an Ant build"/>println(ant.getProperty("antProp"))
println(ant.properties.get("antProp"))
println(ant.properties["antProp"])println ant.antProp
println ant.properties.antProp
println ant.properties['antProp']There are several ways to set an Ant reference:
ant.withGroovyBuilder { "path"("id" to "classpath", "location" to "libs") }
ant.references.set("classpath", ant.withGroovyBuilder { "path"("location" to "libs") })
ant.references["classpath"] = ant.withGroovyBuilder { "path"("location" to "libs") }ant.path(id: 'classpath', location: 'libs')
ant.references.classpath = ant.path(location: 'libs')
ant.references['classpath'] = ant.path(location: 'libs')<path refid="classpath"/>There are several ways to get an Ant reference:
<path id="antPath" location="libs"/>println(ant.references.get("antPath"))
println(ant.references["antPath"])println ant.references.antPath
println ant.references['antPath']Ant logging
Gradle maps Ant message priorities to Gradle log levels so that messages logged from Ant appear in the Gradle output. By default, these are mapped as follows:
| Ant Message Priority | Gradle Log Level |
|---|---|
VERBOSE |
|
DEBUG |
|
INFO |
|
WARN |
|
ERROR |
|
Fine tuning Ant logging
The default mapping of Ant message priority to Gradle log level can sometimes be problematic. For example, there is no message priority that maps directly to the LIFECYCLE log level, which is the default for Gradle. Many Ant tasks log messages at the INFO priority, which means to expose those messages from Gradle, a build would have to be run with the log level set to INFO, potentially logging much more output than is desired.
Conversely, if an Ant task logs messages at too high of a level, to suppress those messages would require the build to be run at a higher log level, such as QUIET. However, this could result in other, desirable output being suppressed.
To help with this, Gradle allows the user to fine tune the Ant logging and control the mapping of message priority to Gradle log level. This is done by setting the priority that should map to the default Gradle LIFECYCLE log level using the AntBuilder.setLifecycleLogLevel(java.lang.String) method. When this value is set, any Ant message logged at the configured priority or above will be logged at least at LIFECYCLE. Any Ant message logged below this priority will be logged at most at INFO.
For example, the following changes the mapping such that Ant INFO priority messages are exposed at the LIFECYCLE log level.
ant.lifecycleLogLevel = AntBuilder.AntMessagePriority.INFO
tasks.register("hello") {
doLast {
ant.withGroovyBuilder {
"echo"("level" to "info", "message" to "hello from info priority!")
}
}
}ant.lifecycleLogLevel = "INFO"
tasks.register('hello') {
doLast {
ant.echo(level: "info", message: "hello from info priority!")
}
}gradle hello> gradle hello > Task :hello [ant:echo] hello from info priority! BUILD SUCCESSFUL in 0s 1 actionable task: 1 executed
On the other hand, if the lifecycleLogLevel was set to ERROR, Ant messages logged at the WARN priority would no longer be logged at the WARN log level. They would now be logged at the INFO level and would be suppressed by default.
API
The Ant integration is provided by AntBuilder.
AUTHORING JVM BUILDS
Building Java & JVM projects
Gradle uses a convention-over-configuration approach to building JVM-based projects that borrows several conventions from Apache Maven. In particular, it uses the same default directory structure for source files and resources, and it works with Maven-compatible repositories.
We will look at Java projects in detail in this chapter, but most of the topics apply to other supported JVM languages as well, such as Kotlin, Groovy and Scala. If you don’t have much experience with building JVM-based projects with Gradle, take a look at the Java samples for step-by-step instructions on how to build various types of basic Java projects.
|
Note
|
The example in this section use the Java Library Plugin. However the described features are shared by all JVM plugins. Specifics of the different plugins are available in their dedicated documentation. |
Introduction
The simplest build script for a Java project applies the Java Library Plugin and optionally sets the project version and selects the Java toolchain to use:
plugins {
`java-library`
}
java {
toolchain {
languageVersion = JavaLanguageVersion.of(17)
}
}
version = "1.2.1"plugins {
id 'java-library'
}
java {
toolchain {
languageVersion = JavaLanguageVersion.of(17)
}
}
version = '1.2.1'By applying the Java Library Plugin, you get a whole host of features:
-
A
compileJavatask that compiles all the Java source files under src/main/java -
A
compileTestJavatask for source files under src/test/java -
A
testtask that runs the tests from src/test/java -
A
jartask that packages themaincompiled classes and resources from src/main/resources into a single JAR named <project>-<version>.jar -
A
javadoctask that generates Javadoc for themainclasses
This isn’t sufficient to build any non-trivial Java project — at the very least, you’ll probably have some file dependencies. But it means that your build script only needs the information that is specific to your project.
|
Note
|
Although the properties in the example are optional, we recommend that you specify them in your projects. Configuring the toolchain protects against problems with the project being built with different Java versions. The version string is important for tracking the progression of the project. The project version is also used in archive names by default. |
The Java Library Plugin also integrates the above tasks into the standard Base Plugin lifecycle tasks:
-
jaris attached toassemble -
testis attached tocheck
The rest of the chapter explains the different avenues for customizing the build to your requirements. You will also see later how to adjust the build for libraries, applications, web apps and enterprise apps.
Declaring your source files via source sets
Gradle’s Java support was the first to introduce a new concept for building source-based projects: source sets. The main idea is that source files and resources are often logically grouped by type, such as application code, unit tests and integration tests. Each logical group typically has its own sets of file dependencies, classpaths, and more. Significantly, the files that form a source set don’t have to be located in the same directory!
Source sets are a powerful concept that tie together several aspects of compilation:
-
the source files and where they’re located
-
the compilation classpath, including any required dependencies (via Gradle configurations)
-
where the compiled class files are placed
You can see how these relate to one another in this diagram:
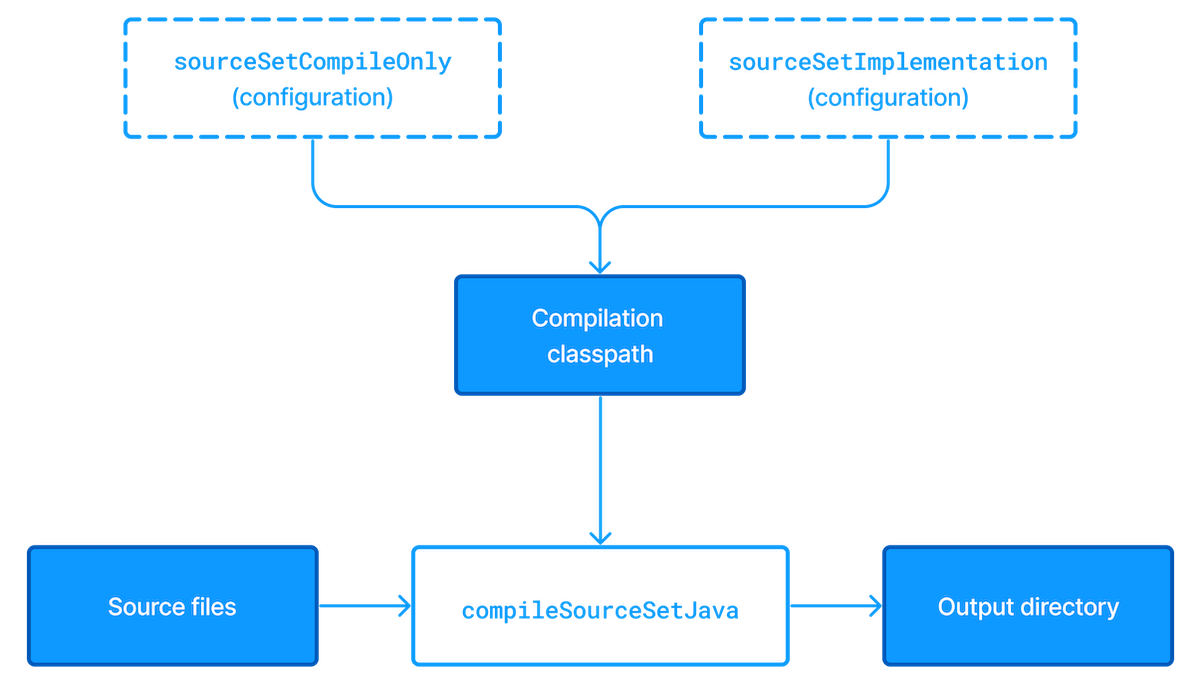
The shaded boxes represent properties of the source set itself.
On top of that, the Java Library Plugin automatically creates a compilation task for every source set you or a plugin defines — named compileSourceSetJava — and several dependency configurations.
main source setMost language plugins, Java included, automatically create a source set called main, which is used for the project’s production code. This source set is special in that its name is not included in the names of the configurations and tasks, hence why you have just a compileJava task and compileOnly and implementation configurations rather than compileMainJava, mainCompileOnly and mainImplementation respectively.
Java projects typically include resources other than source files, such as properties files, that may need processing — for example by replacing tokens within the files — and packaging within the final JAR.
The Java Library Plugin handles this by automatically creating a dedicated task for each defined source set called processSourceSetResources (or processResources for the main source set).
The following diagram shows how the source set fits in with this task:

As before, the shaded boxes represent properties of the source set, which in this case comprises the locations of the resource files and where they are copied to.
In addition to the main source set, the Java Library Plugin defines a test source set that represents the project’s tests.
This source set is used by the test task, which runs the tests.
You can learn more about this task and related topics in the Java testing chapter.
Projects typically use this source set for unit tests, but you can also use it for integration, acceptance and other types of test if you wish. The alternative approach is to define a new source set for each of your other test types, which is typically done for one or both of the following reasons:
-
You want to keep the tests separate from one another for aesthetics and manageability
-
The different test types require different compilation or runtime classpaths or some other difference in setup
You can see an example of this approach in the Java testing chapter, which shows you how to set up integration tests in a project.
You’ll learn more about source sets and the features they provide in:
Source set configurations
When a source set is created, it also creates a number of configurations as described above. Build logic should not attempt to create or access these configurations until they are first created by the source set.
When creating a source set, if one of these automatically created configurations already exists, Gradle will emit a deprecation warning. If the existing configuration’s role is different than the role that the source set would have assigned, its role will be mutated to the correct value and another deprecation warning will be emitted.
The build below demonstrates this unwanted behavior.
configurations {
val myCodeCompileClasspath: Configuration by creating
}
sourceSets {
val myCode: SourceSet by creating
}configurations {
myCodeCompileClasspath
}
sourceSets {
myCode
}In this case, the following deprecation warning is emitted:
When creating configurations during sourceSet custom setup, Gradle found that configuration customCompileClasspath already exists with permitted usage(s):
Consumable - this configuration can be selected by another project as a dependency
Resolvable - this configuration can be resolved by this project to a set of files
Declarable - this configuration can have dependencies added to it
Yet Gradle expected to create it with the usage(s):
Resolvable - this configuration can be resolved by this project to a set of filesFollowing two simple best practices will avoid this problem:
-
Don’t create configurations with names that will be used by source sets, such as names ending in
Api,Implementation,ApiElements,CompileOnly,CompileOnlyApi,RuntimeOnly,RuntimeClasspathorRuntimeElements. (This list is not exhaustive.) -
Create any custom source sets prior to any custom configurations.
Remember that any time you reference a configuration within the configurations container - with or without supplying an initialization action - Gradle will create the configuration.
Sometimes when using the Groovy DSL this creation is not obvious, as in the example below, where myCustomConfiguration is created prior to the call to extendsFrom.
configurations {
myCustomConfiguration.extendsFrom(implementation)
}For more information see Don’t anticipate configuration creation.
Managing your dependencies
The vast majority of Java projects rely on libraries, so managing a project’s dependencies is an important part of building a Java project. Dependency management is a big topic, so we will focus on the basics for Java projects here. If you’d like to dive into the detail, check out the introduction to dependency management.
Specifying the dependencies for your Java project requires just three pieces of information:
-
Which dependency you need, such as a name and version
-
What it’s needed for, e.g. compilation or running
-
Where to look for it
The first two are specified in a dependencies {} block and the third in a repositories {} block. For example, to tell Gradle that your project requires version 3.6.7 of Hibernate Core to compile and run your production code, and that you want to download the library from the Maven Central repository, you can use the following fragment:
repositories {
mavenCentral()
}
dependencies {
implementation("org.hibernate:hibernate-core:3.6.7.Final")
}repositories {
mavenCentral()
}
dependencies {
implementation 'org.hibernate:hibernate-core:3.6.7.Final'
}The Gradle terminology for the three elements is as follows:
-
Repository (ex:
mavenCentral()) — where to look for the modules you declare as dependencies -
Configuration (ex:
implementation) — a named collection of dependencies, grouped together for a specific goal such as compiling or running a module — a more flexible form of Maven scopes -
Module coordinate (ex:
org.hibernate:hibernate-core-3.6.7.Final) — the ID of the dependency, usually in the form '<group>:<module>:<version>' (or '<groupId>:<artifactId>:<version>' in Maven terminology)
You can find a more comprehensive glossary of dependency management terms here.
As far as configurations go, the main ones of interest are:
-
compileOnly— for dependencies that are necessary to compile your production code but shouldn’t be part of the runtime classpath -
implementation(supersedescompile) — used for compilation and runtime -
runtimeOnly(supersedesruntime) — only used at runtime, not for compilation -
testCompileOnly— same ascompileOnlyexcept it’s for the tests -
testImplementation— test equivalent ofimplementation -
testRuntimeOnly— test equivalent ofruntimeOnly
You can learn more about these and how they relate to one another in the plugin reference chapter.
Be aware that the Java Library Plugin offers two additional configurations — api and compileOnlyApi — for dependencies that are required for compiling both the module and any modules that depend on it.
compile configuration?The Java Library Plugin has historically used the compile configuration for dependencies that are required to both compile and run a project’s production code.
It is now deprecated, and will issue warnings when used, because it doesn’t distinguish between dependencies that impact the public API of a Java library project and those that don’t.
You can learn more about the importance of this distinction in Building Java libraries.
We have only scratched the surface here, so we recommend that you read the dedicated dependency management chapters once you’re comfortable with the basics of building Java projects with Gradle. Some common scenarios that require further reading include:
-
Defining a custom Maven- or Ivy-compatible repository
-
Using dependencies from a local filesystem directory
-
Declaring dependencies with changing (e.g. SNAPSHOT) and dynamic (range) versions
-
Declaring a sibling project as a dependency
-
Testing your fixes to a 3rd-party dependency via composite builds (a better alternative to publishing to and consuming from Maven Local)
You’ll discover that Gradle has a rich API for working with dependencies — one that takes time to master, but is straightforward to use for common scenarios.
Compiling your code
Compiling both your production and test code can be trivially easy if you follow the conventions:
-
Put your production source code under the src/main/java directory
-
Put your test source code under src/test/java
-
Declare your production compile dependencies in the
compileOnlyorimplementationconfigurations (see previous section) -
Declare your test compile dependencies in the
testCompileOnlyortestImplementationconfigurations -
Run the
compileJavatask for the production code andcompileTestJavafor the tests
Other JVM language plugins, such as the one for Groovy, follow the same pattern of conventions. We recommend that you follow these conventions wherever possible, but you don’t have to. There are several options for customization, as you’ll see next.
Customizing file and directory locations
Imagine you have a legacy project that uses an src directory for the production code and test for the test code. The conventional directory structure won’t work, so you need to tell Gradle where to find the source files. You do that via source set configuration.
Each source set defines where its source code resides, along with the resources and the output directory for the class files. You can override the convention values by using the following syntax:
sourceSets {
main {
java {
setSrcDirs(listOf("src"))
}
}
test {
java {
setSrcDirs(listOf("test"))
}
}
}sourceSets {
main {
java {
srcDirs = ['src']
}
}
test {
java {
srcDirs = ['test']
}
}
}Now Gradle will only search directly in src and test for the respective source code. What if you don’t want to override the convention, but simply want to add an extra source directory, perhaps one that contains some third-party source code you want to keep separate? The syntax is similar:
sourceSets {
main {
java {
srcDir("thirdParty/src/main/java")
}
}
}sourceSets {
main {
java {
srcDir 'thirdParty/src/main/java'
}
}
}Crucially, we’re using the method srcDir() here to append a directory path, whereas setting the srcDirs property replaces any existing values. This is a common convention in Gradle: setting a property replaces values, while the corresponding method appends values.
You can see all the properties and methods available on source sets in the DSL reference for SourceSet and SourceDirectorySet. Note that srcDirs and srcDir() are both on SourceDirectorySet.
Changing compiler options
Most of the compiler options are accessible through the corresponding task, such as compileJava and compileTestJava. These tasks are of type JavaCompile, so read the task reference for an up-to-date and comprehensive list of the options.
For example, if you want to use a separate JVM process for the compiler and prevent compilation failures from failing the build, you can use this configuration:
tasks.compileJava {
options.isIncremental = true
options.isFork = true
options.isFailOnError = false
}compileJava {
options.incremental = true
options.fork = true
options.failOnError = false
}That’s also how you can change the verbosity of the compiler, disable debug output in the byte code and configure where the compiler can find annotation processors.
Targeting a specific Java version
By default, Gradle will compile Java code to the language level of the JVM running Gradle. If you need to target a specific version of Java when compiling, Gradle provides multiple options:
-
Using Java toolchains is a preferred way to target a language version.
A toolchain uniformly handles compilation, execution and Javadoc generation, and it can be configured on the project level. -
Using
releaseproperty is possible starting from Java 10.
Selecting a Java release makes sure that compilation is done with the configured language level and against the JDK APIs from that Java version. -
Using
sourceCompatibilityandtargetCompatibilityproperties.
Although not generally advised, these options were historically used to configure the Java version during compilation.
Using toolchains
When Java code is compiled using a specific toolchain, the actual compilation is carried out by a compiler of the specified Java version. The compiler provides access to the language features and JDK APIs for the requested Java language version.
In the simplest case, the toolchain can be configured for a project using the java extension.
This way, not only compilation benefits from it, but also other tasks such as test and javadoc will also consistently use the same toolchain.
java {
toolchain {
languageVersion = JavaLanguageVersion.of(17)
}
}java {
toolchain {
languageVersion = JavaLanguageVersion.of(17)
}
}You can learn more about this in the Java toolchains guide.
Using Java release version
Setting the release flag ensures the specified language level is used regardless of which compiler actually performs the compilation. To use this feature, the compiler must support the requested release version. It is possible to specify an earlier release version while compiling with a more recent toolchain.
Gradle supports using the release flag from Java 10. It can be configured on the compilation task as follows.
tasks.compileJava {
options.release = 7
}compileJava {
options.release = 7
}The release flag provides guarantees similar to toolchains. It validates that the Java sources are not using language features introduced in later Java versions, and also that the code does not access APIs from more recent JDKs. The bytecode produced by the compiler also corresponds to the requested Java version, meaning that the compiled code cannot be executed on older JVMs.
The release option of the Java compiler was introduced in Java 9.
However, using this option with Gradle is only possible starting with Java 10, due to a bug in Java 9.
Using Java compatibility options
|
Warning
|
Using compatibility properties can lead to runtime failures when executing compiled code due to weaker guarantees they provide. Instead, consider using toolchains or the release flag. |
The sourceCompatibility and targetCompatibility options correspond to the Java compiler options -source and -target.
They are considered a legacy mechanism for targeting a specific Java version.
However, these options do not protect against the use of APIs introduced in later Java versions.
sourceCompatibility-
Defines the language version of Java used in your source files.
targetCompatibility-
Defines the minimum JVM version your code should run on, i.e. it determines the version of the bytecode generated by the compiler.
These options can be set per JavaCompile task, or on the java { } extension for all compile tasks, using properties with the same names.
Targeting Java 6 and Java 7
Gradle itself can only run on a JVM with Java version 8 or higher. However, Gradle still supports compiling, testing, generating Javadocs and executing applications for Java 6 and Java 7. Java 5 and below are not supported.
|
Note
|
If using Java 10+, leveraging the release flag might be an easier solution, see above.
|
To use Java 6 or Java 7, the following tasks need to be configured:
-
JavaCompiletask to fork and use the correct Java home -
Javadoctask to use the correctjavadocexecutable -
Testand theJavaExectask to use the correctjavaexecutable.
With the usage of Java toolchains, this can be done as follows:
java {
toolchain {
languageVersion = JavaLanguageVersion.of(7)
}
}java {
toolchain {
languageVersion = JavaLanguageVersion.of(7)
}
}The only requirement is that Java 7 is installed and has to be either in a location Gradle can detect automatically or explicitly configured.
Compiling independent sources separately
Most projects have at least two independent sets of sources: the production code and the test code. Gradle already makes this scenario part of its Java convention, but what if you have other sets of sources? One of the most common scenarios is when you have separate integration tests of some form or other. In that case, a custom source set may be just what you need.
You can see a complete example for setting up integration tests in the Java testing chapter. You can set up other source sets that fulfil different roles in the same way. The question then becomes: when should you define a custom source set?
To answer that question, consider whether the sources:
-
Need to be compiled with a unique classpath
-
Generate classes that are handled differently from the
mainandtestones -
Form a natural part of the project
If your answer to both 3 and either one of the others is yes, then a custom source set is probably the right approach. For example, integration tests are typically part of the project because they test the code in main. In addition, they often have either their own dependencies independent of the test source set or they need to be run with a custom Test task.
Other common scenarios are less clear cut and may have better solutions. For example:
-
Separate API and implementation JARs — it may make sense to have these as separate projects, particularly if you already have a multi-project build
-
Generated sources — if the resulting sources should be compiled with the production code, add their path(s) to the
mainsource set and make sure that thecompileJavatask depends on the task that generates the sources
If you’re unsure whether to create a custom source set or not, then go ahead and do so. It should be straightforward and if it’s not, then it’s probably not the right tool for the job.
Managing resources
Many Java projects make use of resources beyond source files, such as images, configuration files and localization data. Sometimes these files simply need to be packaged unchanged and sometimes they need to be processed as template files or in some other way. Either way, the Java Library Plugin adds a specific Copy task for each source set that handles the processing of its associated resources.
The task’s name follows the convention of processSourceSetResources — or processResources for the main source set — and it will automatically copy any files in src/[sourceSet]/resources to a directory that will be included in the production JAR. This target directory will also be included in the runtime classpath of the tests.
Since processResources is an instance of the ProcessResources task, you can perform any of the processing described in the Working With Files chapter.
Java properties files and reproducible builds
You can easily create Java properties files via the WriteProperties task, which fixes a well-known problem with Properties.store() that can reduce the usefulness of incremental builds.
The standard Java API for writing properties files produces a unique file every time, even when the same properties and values are used, because it includes a timestamp in the comments. Gradle’s WriteProperties task generates exactly the same output byte-for-byte if none of the properties have changed. This is achieved by a few tweaks to how a properties file is generated:
-
no timestamp comment is added to the output
-
the line separator is system independent, but can be configured explicitly (it defaults to
'\n') -
the properties are sorted alphabetically
Sometimes it can be desirable to recreate archives in a byte for byte way on different machines. You want to be sure that building an artifact from source code produces the same result, byte for byte, no matter when and where it is built. This is necessary for projects like reproducible-builds.org.
These tweaks not only lead to better incremental build integration, but they also help with reproducible builds. In essence, reproducible builds guarantee that you will see the same results from a build execution — including test results and production binaries — no matter when or on what system you run it.
Running tests
Alongside providing automatic compilation of unit tests in src/test/java, the Java Library Plugin has native support for running tests that use JUnit 3, 4 & 5 (JUnit 5 support came in Gradle 4.6) and TestNG. You get:
-
An automatic
testtask of type Test, using thetestsource set -
An HTML test report that includes the results from all
Testtasks that run -
Easy filtering of which tests to run
-
Fine-grained control over how the tests are run
-
The opportunity to create your own test execution and test reporting tasks
You do not get a Test task for every source set you declare, since not every source set represents tests! That’s why you typically need to create your own Test tasks for things like integration and acceptance tests if they can’t be included with the test source set.
As there is a lot to cover when it comes to testing, the topic has its own chapter in which we look at:
-
How tests are run
-
How to run a subset of tests via filtering
-
How Gradle discovers tests
-
How to configure test reporting and add your own reporting tasks
-
How to make use of specific JUnit and TestNG features
You can also learn more about configuring tests in the DSL reference for Test.
Packaging and publishing
How you package and potentially publish your Java project depends on what type of project it is. Libraries, applications, web applications and enterprise applications all have differing requirements. In this section, we will focus on the bare bones provided by the Java Library Plugin.
By default, the Java Library Plugin provides the jar task that packages all the compiled production classes and resources into a single JAR.
This JAR is also automatically built by the assemble task.
Furthermore, the plugin can be configured to provide the javadocJar and sourcesJar tasks to package Javadoc and source code if so desired.
If a publishing plugin is used, these tasks will automatically run during publishing or can be called directly.
java {
withJavadocJar()
withSourcesJar()
}java {
withJavadocJar()
withSourcesJar()
}If you want to create an 'uber' (AKA 'fat') JAR, then you can use a task definition like this:
plugins {
java
}
version = "1.0.0"
repositories {
mavenCentral()
}
dependencies {
implementation("commons-io:commons-io:2.6")
}
tasks.register<Jar>("uberJar") {
archiveClassifier = "uber"
from(sourceSets.main.get().output)
dependsOn(configurations.runtimeClasspath)
from({
configurations.runtimeClasspath.get().filter { it.name.endsWith("jar") }.map { zipTree(it) }
})
}plugins {
id 'java'
}
version = '1.0.0'
repositories {
mavenCentral()
}
dependencies {
implementation 'commons-io:commons-io:2.6'
}
tasks.register('uberJar', Jar) {
archiveClassifier = 'uber'
from sourceSets.main.output
dependsOn configurations.runtimeClasspath
from {
configurations.runtimeClasspath.findAll { it.name.endsWith('jar') }.collect { zipTree(it) }
}
}See Jar for more details on the configuration options available to you.
And note that you need to use archiveClassifier rather than archiveAppendix here for correct publication of the JAR.
You can use one of the publishing plugins to publish the JARs created by a Java project:
Modifying the JAR manifest
Each instance of the Jar, War and Ear tasks has a manifest property that allows you to customize the MANIFEST.MF file that goes into the corresponding archive. The following example demonstrates how to set attributes in the JAR’s manifest:
tasks.jar {
manifest {
attributes(
"Implementation-Title" to "Gradle",
"Implementation-Version" to archiveVersion
)
}
}jar {
manifest {
attributes("Implementation-Title": "Gradle",
"Implementation-Version": archiveVersion)
}
}See Manifest for the configuration options it provides.
You can also create standalone instances of Manifest. One reason for doing so is to share manifest information between JARs. The following example demonstrates how to share common attributes between JARs:
val sharedManifest = java.manifest {
attributes (
"Implementation-Title" to "Gradle",
"Implementation-Version" to version
)
}
tasks.register<Jar>("fooJar") {
manifest = java.manifest {
from(sharedManifest)
}
}def sharedManifest = java.manifest {
attributes("Implementation-Title": "Gradle",
"Implementation-Version": version)
}
tasks.register('fooJar', Jar) {
manifest = java.manifest {
from sharedManifest
}
}Another option available to you is to merge manifests into a single Manifest object. Those source manifests can take the form of a text for or another Manifest object. In the following example, the source manifests are all text files except for sharedManifest, which is the Manifest object from the previous example:
tasks.register<Jar>("barJar") {
manifest {
attributes("key1" to "value1")
from(sharedManifest, "src/config/basemanifest.txt")
from(listOf("src/config/javabasemanifest.txt", "src/config/libbasemanifest.txt")) {
eachEntry(Action<ManifestMergeDetails> {
if (baseValue != mergeValue) {
value = baseValue
}
if (key == "foo") {
exclude()
}
})
}
}
}tasks.register('barJar', Jar) {
manifest {
attributes key1: 'value1'
from sharedManifest, 'src/config/basemanifest.txt'
from(['src/config/javabasemanifest.txt', 'src/config/libbasemanifest.txt']) {
eachEntry { details ->
if (details.baseValue != details.mergeValue) {
details.value = baseValue
}
if (details.key == 'foo') {
details.exclude()
}
}
}
}
}Manifests are merged in the order they are declared in the from statement. If the base manifest and the merged manifest both define values for the same key, the merged manifest wins by default. You can fully customize the merge behavior by adding eachEntry actions in which you have access to a ManifestMergeDetails instance for each entry of the resulting manifest. Note that the merge is done lazily, either when generating the JAR or when Manifest.writeTo() or Manifest.getEffectiveManifest() are called.
Speaking of writeTo(), you can use that to easily write a manifest to disk at any time, like so:
tasks.jar { manifest.writeTo(layout.buildDirectory.file("mymanifest.mf")) }tasks.named('jar') { manifest.writeTo(layout.buildDirectory.file('mymanifest.mf')) }Generating API documentation
The Java Library Plugin provides a javadoc task of type Javadoc, that will generate standard Javadocs for all your production code, i.e. whatever source is in the main source set.
The task supports the core Javadoc and standard doclet options described in the Javadoc reference documentation.
See CoreJavadocOptions and StandardJavadocDocletOptions for a complete list of those options.
As an example of what you can do, imagine you want to use Asciidoc syntax in your Javadoc comments. To do this, you need to add Asciidoclet to Javadoc’s doclet path. Here’s an example that does just that:
val asciidoclet by configurations.creating
dependencies {
asciidoclet("org.asciidoctor:asciidoclet:1.+")
}
tasks.register("configureJavadoc") {
doLast {
tasks.javadoc {
options.doclet = "org.asciidoctor.Asciidoclet"
options.docletpath = asciidoclet.files.toList()
}
}
}
tasks.javadoc {
dependsOn("configureJavadoc")
}configurations {
asciidoclet
}
dependencies {
asciidoclet 'org.asciidoctor:asciidoclet:1.+'
}
tasks.register('configureJavadoc') {
doLast {
javadoc {
options.doclet = 'org.asciidoctor.Asciidoclet'
options.docletpath = configurations.asciidoclet.files.toList()
}
}
}
javadoc {
dependsOn configureJavadoc
}You don’t have to create a configuration for this, but it’s an elegant way to handle dependencies that are required for a unique purpose.
You might also want to create your own Javadoc tasks, for example to generate API docs for the tests:
tasks.register<Javadoc>("testJavadoc") {
source = sourceSets.test.get().allJava
}tasks.register('testJavadoc', Javadoc) {
source = sourceSets.test.allJava
}These are just two non-trivial but common customizations that you might come across.
Cleaning the build
The Java Library Plugin adds a clean task to your project by virtue of applying the Base Plugin.
This task simply deletes everything in the layout.buildDirectory directory, hence why you should always put files generated by the build in there.
The task is an instance of Delete and you can change what directory it deletes by setting its dir property.
Building JVM components
All of the specific JVM plugins are built on top of the Java Plugin. The examples above only illustrated concepts provided by this base plugin and shared with all JVM plugins.
Read on to understand which plugins fits which project type, as it is recommended to pick a specific plugin instead of applying the Java Plugin directly.
Building Java libraries
The unique aspect of library projects is that they are used (or "consumed") by other Java projects. That means the dependency metadata published with the JAR file — usually in the form of a Maven POM — is crucial. In particular, consumers of your library should be able to distinguish between two different types of dependencies: those that are only required to compile your library and those that are also required to compile the consumer.
Gradle manages this distinction via the Java Library Plugin, which introduces an api configuration in addition to the implementation one covered in this chapter. If the types from a dependency appear in public fields or methods of your library’s public classes, then that dependency is exposed via your library’s public API and should therefore be added to the api configuration. Otherwise, the dependency is an internal implementation detail and should be added to implementation.
If you’re unsure of the difference between an API and implementation dependency, the Java Library Plugin chapter has a detailed explanation. In addition, you can explore a basic, practical sample of building a Java library.
Building Java applications
Java applications packaged as a JAR aren’t set up for easy launching from the command line or a desktop environment. The Application Plugin solves the command line aspect by creating a distribution that includes the production JAR, its dependencies and launch scripts Unix-like and Windows systems.
See the plugin’s chapter for more details, but here’s a quick summary of what you get:
-
assemblecreates ZIP and TAR distributions of the application containing everything needed to run it -
A
runtask that starts the application from the build (for easy testing) -
Shell and Windows Batch scripts to start the application
You can see a basic example of building a Java application in the corresponding sample.
Building Java web applications
Java web applications can be packaged and deployed in a number of ways depending on the technology you use. For example, you might use Spring Boot with a fat JAR or a Reactive-based system running on Netty. Whatever technology you use, Gradle and its large community of plugins will satisfy your needs. Core Gradle, though, only directly supports traditional Servlet-based web applications deployed as WAR files.
That support comes via the War Plugin, which automatically applies the Java Plugin and adds an extra packaging step that does the following:
-
Copies static resources from src/main/webapp into the root of the WAR
-
Copies the compiled production classes into a WEB-INF/classes subdirectory of the WAR
-
Copies the library dependencies into a WEB-INF/lib subdirectory of the WAR
This is done by the war task, which effectively replaces the jar task — although that task remains — and is attached to the assemble lifecycle task. See the plugin’s chapter for more details and configuration options.
There is no core support for running your web application directly from the build, but we do recommend that you try the Gretty community plugin, which provides an embedded Servlet container.
Building Java EE applications
Java enterprise systems have changed a lot over the years, but if you’re still deploying to JEE application servers, you can make use of the Ear Plugin. This adds conventions and a task for building EAR files. The plugin’s chapter has more details.
Building Java Platforms
A Java platform represents a set of dependency declarations and constraints that form a cohesive unit to be applied on consuming projects. The platform has no source and no artifact of its own. It maps in the Maven world to a BOM.
The support comes via the Java Platform plugin, which sets up the different configurations and publication components.
|
Note
|
This plugin is the exception as it does not apply the Java Plugin. |
Enabling Java preview features
|
Warning
|
Using a Java preview feature is very likely to make your code incompatible with that compiled without a feature preview. As a consequence, we strongly recommend you not to publish libraries compiled with preview features and restrict the use of feature previews to toy projects. |
To enable Java preview features for compilation, test execution and runtime, you can use the following DSL snippet:
tasks.withType<JavaCompile>().configureEach {
options.compilerArgs.add("--enable-preview")
}
tasks.withType<Test>().configureEach {
jvmArgs("--enable-preview")
}
tasks.withType<JavaExec>().configureEach {
jvmArgs("--enable-preview")
}tasks.withType(JavaCompile).configureEach {
options.compilerArgs += "--enable-preview"
}
tasks.withType(Test).configureEach {
jvmArgs += "--enable-preview"
}
tasks.withType(JavaExec).configureEach {
jvmArgs += "--enable-preview"
}Building other JVM language projects
If you want to leverage the multi language aspect of the JVM, most of what was described here will still apply.
Gradle itself provides Groovy and Scala plugins.
The plugins automatically apply support for compiling Java code and can be further enhanced by combining them with the java-library plugin.
Compilation dependency between languages
These plugins create a dependency between Groovy/Scala compilation and Java compilation (of source code in the java folder of a source set).
You can change this default behavior by adjusting the classpath of the involved compile tasks as shown in the following example:
tasks.named<AbstractCompile>("compileGroovy") {
// Groovy only needs the declared dependencies
// (and not longer the output of compileJava)
classpath = sourceSets.main.get().compileClasspath
}
tasks.named<AbstractCompile>("compileJava") {
// Java also depends on the result of Groovy compilation
// (which automatically makes it depend of compileGroovy)
classpath += files(sourceSets.main.get().groovy.classesDirectory)
}tasks.named('compileGroovy') {
// Groovy only needs the declared dependencies
// (and not longer the output of compileJava)
classpath = sourceSets.main.compileClasspath
}
tasks.named('compileJava') {
// Java also depends on the result of Groovy compilation
// (which automatically makes it depend of compileGroovy)
classpath += files(sourceSets.main.groovy.classesDirectory)
}-
By setting the
compileGroovyclasspath to be onlysourceSets.main.compileClasspath, we effectively remove the previous dependency oncompileJavathat was declared by having the classpath also take into considerationsourceSets.main.java.classesDirectory -
By adding
sourceSets.main.groovy.classesDirectoryto thecompileJavaclasspath, we effectively declare a dependency on thecompileGroovytask
All of this is possible through the use of directory properties.
Extra language support
Beyond core Gradle, there are other great plugins for more JVM languages!
Testing in Java & JVM projects
Testing on the JVM is a rich subject matter. There are many different testing libraries and frameworks, as well as many different types of test. All need to be part of the build, whether they are executed frequently or infrequently. This chapter is dedicated to explaining how Gradle handles differing requirements between and within builds, with significant coverage of how it integrates with the two most common testing frameworks: JUnit and TestNG.
It explains:
-
Ways to control how the tests are run (Test execution)
-
How to select specific tests to run (Test filtering)
-
What test reports are generated and how to influence the process (Test reporting)
-
How Gradle finds tests to run (Test detection)
-
How to make use of the major frameworks' mechanisms for grouping tests together (Test grouping)
But first, let’s look at the basics of JVM testing in Gradle.
|
Note
|
A new configuration DSL for modeling test execution phases is available via the incubating JVM Test Suite plugin. |
The basics
All JVM testing revolves around a single task type: Test. This runs a collection of test cases using any supported test library — JUnit, JUnit Platform or TestNG — and collates the results. You can then turn those results into a report via an instance of the TestReport task type.
In order to operate, the Test task type requires just two pieces of information:
-
Where to find the compiled test classes (property: Test.getTestClassesDirs())
-
The execution classpath, which should include the classes under test as well as the test library that you’re using (property: Test.getClasspath())
When you’re using a JVM language plugin — such as the Java Plugin — you will automatically get the following:
-
A dedicated
testsource set for unit tests -
A
testtask of typeTestthat runs those unit tests
The JVM language plugins use the source set to configure the task with the appropriate execution classpath and the directory containing the compiled test classes. In addition, they attach the test task to the check lifecycle task.
It’s also worth bearing in mind that the test source set automatically creates corresponding dependency configurations — of which the most useful are testImplementation and testRuntimeOnly — that the plugins tie into the test task’s classpath.
All you need to do in most cases is configure the appropriate compilation and runtime dependencies and add any necessary configuration to the test task. The following example shows a simple setup that uses JUnit Platform and changes the maximum heap size for the tests' JVM to 1 gigabyte:
dependencies {
testImplementation("org.junit.jupiter:junit-jupiter:5.7.1")
testRuntimeOnly("org.junit.platform:junit-platform-launcher")
}
tasks.named<Test>("test") {
useJUnitPlatform()
maxHeapSize = "1G"
testLogging {
events("passed")
}
}dependencies {
testImplementation 'org.junit.jupiter:junit-jupiter:5.7.1'
testRuntimeOnly 'org.junit.platform:junit-platform-launcher'
}
tasks.named('test', Test) {
useJUnitPlatform()
maxHeapSize = '1G'
testLogging {
events "passed"
}
}The Test task has many generic configuration options as well as several framework-specific ones that you can find described in JUnitOptions, JUnitPlatformOptions and TestNGOptions. We cover a significant number of them in the rest of the chapter.
If you want to set up your own Test task with its own set of test classes, then the easiest approach is to create your own source set and Test task instance, as shown in Configuring integration tests.
Test execution
Gradle executes tests in a separate ('forked') JVM, isolated from the main build process. This prevents classpath pollution and excessive memory consumption for the build process. It also allows you to run the tests with different JVM arguments than the build is using.
You can control how the test process is launched via several properties on the Test task, including the following:
maxParallelForks— default: 1-
You can run your tests in parallel by setting this property to a value greater than 1. This may make your test suites complete faster, particularly if you run them on a multi-core CPU. When using parallel test execution, make sure your tests are properly isolated from one another. Tests that interact with the filesystem are particularly prone to conflict, causing intermittent test failures.
Your tests can distinguish between parallel test processes by using the value of the
org.gradle.test.workerproperty, which is unique for each process. You can use this for anything you want, but it’s particularly useful for filenames and other resource identifiers to prevent the kind of conflict we just mentioned. forkEvery— default: 0 (no maximum)-
This property specifies the maximum number of test classes that Gradle should run on a test process before its disposed of and a fresh one created. This is mainly used as a way to manage leaky tests or frameworks that have static state that can’t be cleared or reset between tests.
Warning: a low value (other than 0) can severely hurt the performance of the tests
ignoreFailures— default: false-
If this property is
true, Gradle will continue with the project’s build once the tests have completed, even if some of them have failed. Note that, by default, theTesttask always executes every test that it detects, irrespective of this setting. failFast— (since Gradle 4.6) default: false-
Set this to
trueif you want the build to fail and finish as soon as one of your tests fails. This can save a lot of time when you have a long-running test suite and is particularly useful when running the build on continuous integration servers. When a build fails before all tests have run, the test reports only include the results of the tests that have completed, successfully or not.You can also enable this behavior by using the
--fail-fastcommand line option, or disable it respectively with--no-fail-fast. testLogging— default: not set-
This property represents a set of options that control which test events are logged and at what level. You can also configure other logging behavior via this property. See TestLoggingContainer for more detail.
dryRun— default: false-
If this property is
true, Gradle will simulate the execution of the tests without actually running them. This will still generate reports, allowing for inspection of what tests were selected. This can be used to verify that your test filtering configuration is correct without actually running the tests.You can also enable this behavior by using the
--test-dry-runcommand-line option, or disable it respectively with--no-test-dry-run.
See Test for details on all the available configuration options.
The test process can exit unexpectedly if configured incorrectly. For instance, if the Java executable does not exist or an invalid JVM argument is provided, the test process will fail to start. Similarly, if a test makes programmatic changes to the test process, this can also cause unexpected failures.
For example, issues may occur if a SecurityManager is modified in a test because
Gradle’s internal messaging depends on reflection and socket communication, which may be disrupted if the permissions on the security manager change. In this particular case, you should restore the original SecurityManager after the test so that the
gradle test worker process can continue to function.
Test filtering
It’s a common requirement to run subsets of a test suite, such as when you’re fixing a bug or developing a new test case. Gradle provides two mechanisms to do this:
-
Filtering (the preferred option)
-
Test inclusion/exclusion
Filtering supersedes the inclusion/exclusion mechanism, but you may still come across the latter in the wild.
With Gradle’s test filtering you can select tests to run based on:
-
A fully-qualified class name or fully qualified method name, e.g.
org.gradle.SomeTest,org.gradle.SomeTest.someMethod -
A simple class name or method name if the pattern starts with an upper-case letter, e.g.
SomeTest,SomeTest.someMethod(since Gradle 4.7) -
'*' wildcard matching
You can enable filtering either in the build script or via the --tests command-line option. Here’s an example of some filters that are applied every time the build runs:
tasks.test {
filter {
//include specific method in any of the tests
includeTestsMatching("*UiCheck")
//include all tests from package
includeTestsMatching("org.gradle.internal.*")
//include all integration tests
includeTestsMatching("*IntegTest")
}
}test {
filter {
//include specific method in any of the tests
includeTestsMatching "*UiCheck"
//include all tests from package
includeTestsMatching "org.gradle.internal.*"
//include all integration tests
includeTestsMatching "*IntegTest"
}
}For more details and examples of declaring filters in the build script, please see the TestFilter reference.
The command-line option is especially useful to execute a single test method. When you use --tests, be aware that the inclusions declared in the build script are still honored. It is also possible to supply multiple --tests options, all of whose patterns will take effect. The following sections have several examples of using the command-line option.
|
Note
|
Not all test frameworks play well with filtering. Some advanced, synthetic tests may not be fully compatible. However, the vast majority of tests and use cases work perfectly well with Gradle’s filtering mechanism. |
The following two sections look at the specific cases of simple class/method names and fully-qualified names.
Simple name pattern
Since 4.7, Gradle has treated a pattern starting with an uppercase letter as a simple class name, or a class name + method name. For example, the following command lines run either all or exactly one of the tests in the SomeTestClass test case, regardless of what package it’s in:
# Executes all tests in SomeTestClass
gradle test --tests SomeTestClass
# Executes a single specified test in SomeTestClass
gradle test --tests SomeTestClass.someSpecificMethod
gradle test --tests SomeTestClass.*someMethod*Fully-qualified name pattern
Prior to 4.7 or if the pattern doesn’t start with an uppercase letter, Gradle treats the pattern as fully-qualified. So if you want to use the test class name irrespective of its package, you would use --tests *.SomeTestClass. Here are some more examples:
# specific class
gradle test --tests org.gradle.SomeTestClass
# specific class and method
gradle test --tests org.gradle.SomeTestClass.someSpecificMethod
# method name containing spaces
gradle test --tests "org.gradle.SomeTestClass.some method containing spaces"
# all classes at specific package (recursively)
gradle test --tests 'all.in.specific.package*'
# specific method at specific package (recursively)
gradle test --tests 'all.in.specific.package*.someSpecificMethod'
gradle test --tests '*IntegTest'
gradle test --tests '*IntegTest*ui*'
gradle test --tests '*ParameterizedTest.foo*'
# the second iteration of a parameterized test
gradle test --tests '*ParameterizedTest.*[2]'Note that the wildcard '*' has no special understanding of the '.' package separator. It’s purely text based. So --tests *.SomeTestClass will match any package, regardless of its 'depth'.
You can also combine filters defined at the command line with continuous build to re-execute a subset of tests immediately after every change to a production or test source file. The following executes all tests in the 'com.mypackage.foo' package or subpackages whenever a change triggers the tests to run:
gradle test --continuous --tests "com.mypackage.foo.*"Test reporting
The Test task generates the following results by default:
-
An HTML test report
-
XML test results in a format compatible with the Ant JUnit report task — one that is supported by many other tools, such as CI servers
-
An efficient binary format of the results used by the
Testtask to generate the other formats
In most cases, you’ll work with the standard HTML report, which automatically includes the results from all your Test tasks, even the ones you explicitly add to the build yourself. For example, if you add a Test task for integration tests, the report will include the results of both the unit tests and the integration tests if both tasks are run.
|
Note
|
To aggregate test results across multiple subprojects, see the Test Report Aggregation Plugin. |
Unlike with many of the testing configuration options, there are several project-level convention properties that affect the test reports. For example, you can change the destination of the test results and reports like so:
reporting.baseDir = file("my-reports")
java.testResultsDir = layout.buildDirectory.dir("my-test-results")
tasks.register("showDirs") {
val rootDir = project.rootDir
val reportsDir = project.reporting.baseDirectory
val testResultsDir = project.java.testResultsDir
doLast {
logger.quiet(rootDir.toPath().relativize(reportsDir.get().asFile.toPath()).toString())
logger.quiet(rootDir.toPath().relativize(testResultsDir.get().asFile.toPath()).toString())
}
}reporting.baseDir = "my-reports"
java.testResultsDir = layout.buildDirectory.dir("my-test-results")
tasks.register('showDirs') {
def rootDir = project.rootDir
def reportsDir = project.reporting.baseDirectory
def testResultsDir = project.java.testResultsDir
doLast {
logger.quiet(rootDir.toPath().relativize(reportsDir.get().asFile.toPath()).toString())
logger.quiet(rootDir.toPath().relativize(testResultsDir.get().asFile.toPath()).toString())
}
}gradle -q showDirs> gradle -q showDirs my-reports build/my-test-results
Follow the link to the convention properties for more details.
There is also a standalone TestReport task type that you can use to generate a custom HTML test report. All it requires are a value for destinationDir and the test results you want included in the report. Here is a sample which generates a combined report for the unit tests from all subprojects:
plugins {
id("java")
}
// Disable the test report for the individual test task
tasks.named<Test>("test") {
reports.html.required = false
}
// Share the test report data to be aggregated for the whole project
configurations.create("binaryTestResultsElements") {
isCanBeResolved = false
isCanBeConsumed = true
attributes {
attribute(Category.CATEGORY_ATTRIBUTE, objects.named(Category.DOCUMENTATION))
attribute(DocsType.DOCS_TYPE_ATTRIBUTE, objects.named("test-report-data"))
}
outgoing.artifact(tasks.test.map { task -> task.getBinaryResultsDirectory().get() })
}val testReportData by configurations.creating {
isCanBeConsumed = false
attributes {
attribute(Category.CATEGORY_ATTRIBUTE, objects.named(Category.DOCUMENTATION))
attribute(DocsType.DOCS_TYPE_ATTRIBUTE, objects.named("test-report-data"))
}
}
dependencies {
testReportData(project(":core"))
testReportData(project(":util"))
}
tasks.register<TestReport>("testReport") {
destinationDirectory = reporting.baseDirectory.dir("allTests")
// Use test results from testReportData configuration
testResults.from(testReportData)
}plugins {
id 'java'
}
// Disable the test report for the individual test task
test {
reports.html.required = false
}
// Share the test report data to be aggregated for the whole project
configurations {
binaryTestResultsElements {
canBeResolved = false
canBeConsumed = true
attributes {
attribute(Category.CATEGORY_ATTRIBUTE, objects.named(Category, Category.DOCUMENTATION))
attribute(DocsType.DOCS_TYPE_ATTRIBUTE, objects.named(DocsType, 'test-report-data'))
}
outgoing.artifact(test.binaryResultsDirectory)
}
}// A resolvable configuration to collect test reports data
configurations {
testReportData {
canBeConsumed = false
attributes {
attribute(Category.CATEGORY_ATTRIBUTE, objects.named(Category, Category.DOCUMENTATION))
attribute(DocsType.DOCS_TYPE_ATTRIBUTE, objects.named(DocsType, 'test-report-data'))
}
}
}
dependencies {
testReportData project(':core')
testReportData project(':util')
}
tasks.register('testReport', TestReport) {
destinationDirectory = reporting.baseDirectory.dir('allTests')
// Use test results from testReportData configuration
testResults.from(configurations.testReportData)
}In this example, we use a convention plugin myproject.java-conventions to expose the test results from a project to Gradle’s variant aware dependency management engine.
The plugin declares a consumable binaryTestResultsElements configuration that represents the binary test results of the test task.
In the aggregation project’s build file, we declare the testReportData configuration and depend on all of the projects that we want to aggregate the results from. Gradle will automatically select the binary test result variant from each of the subprojects instead of the project’s jar file.
Lastly, we add a testReport task that aggregates the test results from the testResultsDirs property, which contains all of the binary test results resolved from the testReportData configuration.
You should note that the TestReport type combines the results from multiple test tasks and needs to aggregate the results of individual test classes. This means that if a given test class is executed by multiple test tasks, then the test report will include executions of that class, but it can be hard to distinguish individual executions of that class and their output.
Communicating test results to CI servers and other tools via XML files
The Test tasks creates XML files describing the test results, in the “JUnit XML” pseudo standard. It is common for CI servers and other tooling to observe test results via these XML files.
By default, the files are written to layout.buildDirectory.dir("test-results/$testTaskName") with a file per test class.
The location can be changed for all test tasks of a project, or individually per test task.
java.testResultsDir = layout.buildDirectory.dir("junit-xml")java.testResultsDir = layout.buildDirectory.dir("junit-xml")With the above configuration, the XML files will be written to layout.buildDirectory.dir("junit-xml/$testTaskName").
tasks.test {
reports {
junitXml.outputLocation = layout.buildDirectory.dir("test-junit-xml")
}
}test {
reports {
junitXml.outputLocation = layout.buildDirectory.dir("test-junit-xml")
}
}With the above configuration, the XML files for the test task will be written to layout.buildDirectory.dir("test-results/test-junit-xml").
The location of the XML files for other test tasks will be unchanged.
Configuration options
The content of the XML files can also be configured to convey the results differently, by configuring the JUnitXmlReport options.
tasks.test {
reports {
junitXml.apply {
isOutputPerTestCase = true // defaults to false
mergeReruns = true // defaults to false
}
}
}test {
reports {
junitXml {
outputPerTestCase = true // defaults to false
mergeReruns = true // defaults to false
}
}
}The outputPerTestCase option, when enabled, associates any output logging generated during a test case to that test case in the results.
When disabled (the default) output is associated with the test class as whole and not the individual test cases (e.g. test methods) that produced the logging output.
Most modern tools that observe JUnit XML files support the “output per test case” format.
If you are using the XML files to communicate test results, it is recommended to enable this option as it provides more useful reporting.
When mergeReruns is enabled, if a test fails but is then retried and succeeds, its failures will be recorded as <flakyFailure> instead of <failure>, within one <testcase>.
This is effectively the reporting produced by the surefire plugin of Apache Maven™ when enabling reruns.
If your CI server understands this format, it will indicate that the test was flaky.
If it does not, it will indicate that the test succeeded as it will ignore the <flakyFailure> information.
If the test does not succeed (i.e. it fails for every retry), it will be indicated as having failed whether your tool understands this format or not.
When mergeReruns is disabled (the default), each execution of a test will be listed as a separate test case.
If you are using build scans or Develocity, flaky tests will be detected regardless of this setting.
Enabling this option is especially useful when using a CI tool that uses the XML test results to determine build failure instead of relying on Gradle’s determination of whether the build failed or not,
and you wish to not consider the build failed if all failed tests passed when retried.
This is the case for the Jenkins CI server and its JUnit plugin.
With mergeReruns enabled, tests that pass-on-retry will no longer cause this Jenkins plugin to consider the build to have failed.
However, failed test executions will be omitted from the Jenkins test result visualizations as it does not consider <flakyFailure> information.
The separate Flaky Test Handler Jenkins plugin can be used in addition to the JUnit Jenkins plugin to have such “flaky failures” also be visualized.
Tests are grouped and merged based on their reported name. When using any kind of test parameterization that affects the reported test name, or any other kind of mechanism that produces a potentially dynamic test name, care should be taken to ensure that the test name is stable and does not unnecessarily change.
Enabling the mergeReruns option does not add any retry/rerun functionality to test execution.
Rerunning can be enabled by the test execution framework (e.g. JUnit’s @RepeatedTest),
or via the separate Test Retry Gradle plugin.
Test detection
By default, Gradle will run all tests that it detects, which it does by inspecting the compiled test classes. This detection uses different criteria depending on the test framework used.
For JUnit, Gradle scans for both JUnit 3 and 4 test classes. A class is considered to be a JUnit test if it:
-
Ultimately inherits from
TestCaseorGroovyTestCase -
Is annotated with
@RunWith -
Contains a method annotated with
@Testor a super class does
For TestNG, Gradle scans for methods annotated with @Test.
Note that abstract classes are not executed. In addition, be aware that Gradle scans up the inheritance tree into jar files on the test classpath. So if those JARs contain test classes, they will also be run.
If you don’t want to use test class detection, you can disable it by setting the scanForTestClasses property on Test to false. When you do that, the test task uses only the includes and excludes properties to find test classes.
If scanForTestClasses is false and no include or exclude patterns are specified, Gradle defaults to running any class that matches the patterns **/*Tests.class and **/*Test.class, excluding those that match **/Abstract*.class.
|
Note
|
With JUnit Platform, only includes and excludes are used to filter test classes — scanForTestClasses has no effect.
|
Test logging
Gradle allows fine-tuned control over events that are logged to the console. Logging is configurable on a per-log-level basis and by default, the following events are logged:
When the log level is |
Events that are logged |
Additional configuration |
|
None |
None |
|
Exception format is SHORT |
|
|
Test failures, skipped tests, test standard output and test standard error |
Stacktraces are truncated. |
|
Full stacktraces are logged. |
Test logging can be modified on a per-log-level basis by adjusting the appropriate TestLogging instances in the testLogging property of the test task.
For example, to adjust the INFO level test logging configuration, modify the
TestLoggingContainer.getInfo() property.
Test grouping
JUnit, JUnit Platform and TestNG allow sophisticated groupings of test methods.
|
Note
|
This section applies to grouping individual test classes or methods within a collection of tests that serve the same testing purpose (unit tests, integration tests, acceptance tests, etc.). For dividing test classes based upon their purpose, see the incubating JVM Test Suite plugin. |
JUnit 4.8 introduced the concept of categories for grouping JUnit 4 tests classes and methods.[6] Test.useJUnit(org.gradle.api.Action) allows you to specify the JUnit categories you want to include and exclude. For example, the following configuration includes tests in CategoryA and excludes those in CategoryB for the test task:
tasks.test {
useJUnit {
includeCategories("org.gradle.junit.CategoryA")
excludeCategories("org.gradle.junit.CategoryB")
}
}test {
useJUnit {
includeCategories 'org.gradle.junit.CategoryA'
excludeCategories 'org.gradle.junit.CategoryB'
}
}JUnit Platform introduced tagging to replace categories. You can specify the included/excluded tags via Test.useJUnitPlatform(org.gradle.api.Action), as follows:
The TestNG framework uses the concept of test groups for a similar effect.[7] You can configure which test groups to include or exclude during the test execution via the Test.useTestNG(org.gradle.api.Action) setting, as seen here:
tasks.named<Test>("test") {
useTestNG {
val options = this as TestNGOptions
options.excludeGroups("integrationTests")
options.includeGroups("unitTests")
}
}test {
useTestNG {
excludeGroups 'integrationTests'
includeGroups 'unitTests'
}
}Using JUnit 5
JUnit 5 is the latest version of the well-known JUnit test framework. Unlike its predecessor, JUnit 5 is modularized and composed of several modules:
JUnit 5 = JUnit Platform + JUnit Jupiter + JUnit Vintage
The JUnit Platform serves as a foundation for launching testing frameworks on the JVM. JUnit Jupiter is the combination of the new programming model
and extension model for writing tests and extensions in JUnit 5. JUnit Vintage provides a TestEngine for running JUnit 3 and JUnit 4 based tests on the platform.
The following code enables JUnit Platform support in build.gradle:
tasks.named<Test>("test") {
useJUnitPlatform()
}tasks.named('test', Test) {
useJUnitPlatform()
}See Test.useJUnitPlatform() for more details.
Compiling and executing JUnit Jupiter tests
To enable JUnit Jupiter support in Gradle, all you need to do is add the following dependency:
dependencies {
testImplementation("org.junit.jupiter:junit-jupiter:5.7.1")
testRuntimeOnly("org.junit.platform:junit-platform-launcher")
}dependencies {
testImplementation 'org.junit.jupiter:junit-jupiter:5.7.1'
testRuntimeOnly 'org.junit.platform:junit-platform-launcher'
}You can then put your test cases into src/test/java as normal and execute them with gradle test.
Executing legacy tests with JUnit Vintage
If you want to run JUnit 3/4 tests on JUnit Platform, or even mix them with Jupiter tests, you should add extra JUnit Vintage Engine dependencies:
dependencies {
testImplementation("org.junit.jupiter:junit-jupiter:5.7.1")
testCompileOnly("junit:junit:4.13")
testRuntimeOnly("org.junit.vintage:junit-vintage-engine")
testRuntimeOnly("org.junit.platform:junit-platform-launcher")
}dependencies {
testImplementation 'org.junit.jupiter:junit-jupiter:5.7.1'
testCompileOnly 'junit:junit:4.13'
testRuntimeOnly 'org.junit.vintage:junit-vintage-engine'
testRuntimeOnly 'org.junit.platform:junit-platform-launcher'
}In this way, you can use gradle test to test JUnit 3/4 tests on JUnit Platform, without the need to rewrite them.
Filtering test engine
JUnit Platform allows you to use different test engines. JUnit currently provides two TestEngine implementations out of the box:
junit-jupiter-engine and junit-vintage-engine.
You can also write and plug in your own TestEngine implementation as documented here.
By default, all test engines on the test runtime classpath will be used. To control specific test engine implementations explicitly, you can add the following setting to your build script:
tasks.withType<Test>().configureEach {
useJUnitPlatform {
includeEngines("junit-vintage")
// excludeEngines("junit-jupiter")
}
}tasks.withType(Test).configureEach {
useJUnitPlatform {
includeEngines 'junit-vintage'
// excludeEngines 'junit-jupiter'
}
}Test execution order in TestNG
TestNG allows explicit control of the execution order of tests when you use a testng.xml file. Without such a file — or an equivalent one configured by TestNGOptions.getSuiteXmlBuilder() — you can’t specify the test execution order. However, what you can do is control whether all aspects of a test — including its associated @BeforeXXX and @AfterXXX methods, such as those annotated with @Before/AfterClass and @Before/AfterMethod — are executed before the next test starts. You do this by setting the TestNGOptions.getPreserveOrder() property to true. If you set it to false, you may encounter scenarios in which the execution order is something like: TestA.doBeforeClass() → TestB.doBeforeClass() → TestA tests.
While preserving the order of tests is the default behavior when directly working with testng.xml files, the TestNG API that is used by Gradle’s TestNG integration executes tests in unpredictable order by default.[8] The ability to preserve test execution order was introduced with TestNG version 5.14.5. Setting the preserveOrder property to true for an older TestNG version will cause the build to fail.
tasks.test {
useTestNG {
preserveOrder = true
}
}test {
useTestNG {
preserveOrder true
}
}The groupByInstance property controls whether tests should be grouped by instance rather than by class. The TestNG documentation explains the difference in more detail, but essentially, if you have a test method A() that depends on B(), grouping by instance ensures that each A-B pairing, e.g. B(1)-A(1), is executed before the next pairing. With group by class, all B() methods are run and then all A() ones.
Note that you typically only have more than one instance of a test if you’re using a data provider to parameterize it. Also, grouping tests by instances was introduced with TestNG version 6.1. Setting the groupByInstances property to true for an older TestNG version will cause the build to fail.
tasks.test {
useTestNG {
groupByInstances = true
}
}test {
useTestNG {
groupByInstances = true
}
}TestNG parameterized methods and reporting
TestNG supports parameterizing test methods, allowing a particular test method to be executed multiple times with different inputs. Gradle includes the parameter values in its reporting of the test method execution.
Given a parameterized test method named aTestMethod that takes two parameters, it will be reported with the name aTestMethod(toStringValueOfParam1, toStringValueOfParam2). This makes it easy to identify the parameter values for a particular iteration.
Configuring integration tests
A common requirement for projects is to incorporate integration tests in one form or another. Their aim is to verify that the various parts of the project are working together properly. This often means that they require special execution setup and dependencies compared to unit tests.
The simplest way to add integration tests to your build is by leveraging the incubating JVM Test Suite plugin. If an incubating solution is not something for you, here are the steps you need to take in your build:
-
Create a new source set for them
-
Add the dependencies you need to the appropriate configurations for that source set
-
Configure the compilation and runtime classpaths for that source set
-
Create a task to run the integration tests
You may also need to perform some additional configuration depending on what form the integration tests take. We will discuss those as we go.
Let’s start with a practical example that implements the first three steps in a build script, centered around a new source set intTest:
sourceSets {
create("intTest") {
compileClasspath += sourceSets.main.get().output
runtimeClasspath += sourceSets.main.get().output
}
}
val intTestImplementation by configurations.getting {
extendsFrom(configurations.implementation.get())
}
val intTestRuntimeOnly by configurations.getting
configurations["intTestRuntimeOnly"].extendsFrom(configurations.runtimeOnly.get())
dependencies {
intTestImplementation("org.junit.jupiter:junit-jupiter:5.7.1")
intTestRuntimeOnly("org.junit.platform:junit-platform-launcher")
}sourceSets {
intTest {
compileClasspath += sourceSets.main.output
runtimeClasspath += sourceSets.main.output
}
}
configurations {
intTestImplementation.extendsFrom implementation
intTestRuntimeOnly.extendsFrom runtimeOnly
}
dependencies {
intTestImplementation 'org.junit.jupiter:junit-jupiter:5.7.1'
intTestRuntimeOnly 'org.junit.platform:junit-platform-launcher'
}This will set up a new source set called intTest that automatically creates:
-
intTestImplementation,intTestCompileOnly,intTestRuntimeOnlyconfigurations (and a few others that are less commonly needed) -
A
compileIntTestJavatask that will compile all the source files under src/intTest/java
|
Note
|
If you are working with the IntelliJ IDE, you may wish to flag the directories in these additional source sets as containing test source rather than production source as explained in the Idea Plugin documentation. |
The example also does the following, not all of which you may need for your specific integration tests:
-
Adds the production classes from the
mainsource set to the compilation and runtime classpaths of the integration tests —sourceSets.main.outputis a file collection of all the directories containing compiled production classes and resources -
Makes the
intTestImplementationconfiguration extend fromimplementation, which means that all the declared dependencies of the production code also become dependencies of the integration tests -
Does the same for the
intTestRuntimeOnlyconfiguration
In most cases, you want your integration tests to have access to the classes under test, which is why we ensure that those are included on the compilation and runtime classpaths in this example. But some types of test interact with the production code in a different way. For example, you may have tests that run your application as an executable and verify the output. In the case of web applications, the tests may interact with your application via HTTP. Since the tests don’t need direct access to the classes under test in such cases, you don’t need to add the production classes to the test classpath.
Another common step is to attach all the unit test dependencies to the integration tests as well — via intTestImplementation.extendsFrom testImplementation — but that only makes sense if the integration tests require all or nearly all the same dependencies that the unit tests have.
There are a couple of other facets of the example you should take note of:
-
+=allows you to append paths and collections of paths tocompileClasspathandruntimeClasspathinstead of overwriting them -
If you want to use the convention-based configurations, such as
intTestImplementation, you must declare the dependencies after the new source set
Creating and configuring a source set automatically sets up the compilation stage, but it does nothing with respect to running the integration tests. So the last piece of the puzzle is a custom test task that uses the information from the new source set to configure its runtime classpath and the test classes:
val integrationTest = task<Test>("integrationTest") {
description = "Runs integration tests."
group = "verification"
testClassesDirs = sourceSets["intTest"].output.classesDirs
classpath = sourceSets["intTest"].runtimeClasspath
shouldRunAfter("test")
useJUnitPlatform()
testLogging {
events("passed")
}
}
tasks.check { dependsOn(integrationTest) }tasks.register('integrationTest', Test) {
description = 'Runs integration tests.'
group = 'verification'
testClassesDirs = sourceSets.intTest.output.classesDirs
classpath = sourceSets.intTest.runtimeClasspath
shouldRunAfter test
useJUnitPlatform()
testLogging {
events "passed"
}
}
check.dependsOn integrationTestAgain, we’re accessing a source set to get the relevant information, i.e. where the compiled test classes are — the testClassesDirs property — and what needs to be on the classpath when running them — classpath.
Users commonly want to run integration tests after the unit tests, because they are often slower to run and you want the build to fail early on the unit tests rather than later on the integration tests. That’s why the above example adds a shouldRunAfter() declaration. This is preferred over mustRunAfter() so that Gradle has more flexibility in executing the build in parallel.
For information on how to determine code coverage for tests in additional source sets, see the JaCoCo Plugin and the JaCoCo Report Aggregation Plugin chapters.
Testing Java Modules
If you are developing Java Modules, everything described in this chapter still applies and any of the supported test frameworks can be used. However, there are some things to consider depending on whether you need module information to be available, and module boundaries to be enforced, during test execution. In this context, the terms whitebox testing (module boundaries are deactivated or relaxed) and blackbox testing (module boundaries are in place) are often used. Whitebox testing is used/needed for unit testing and blackbox testing fits functional or integration test requirements.
Whitebox unit test execution on the classpath
The simplest setup to write unit tests for functions or classes in modules is to not use module specifics during test execution.
For this, you just need to write tests the same way you would write them for normal libraries.
If you don’t have a module-info.java file in your test source set (src/test/java) this source set will be considered as traditional Java library during compilation and test runtime.
This means, all dependencies, including Jars with module information, are put on the classpath.
The advantage is that all internal classes of your (or other) modules are then accessible directly in tests.
This may be a totally valid setup for unit testing, where we do not care about the larger module structure, but only about testing single functions.
|
Note
|
If you are using Eclipse: By default, Eclipse also runs unit tests as modules using module patching (see below). In an imported Gradle project, unit testing a module with the Eclipse test runner might fail. You then need to manually adjust the classpath/module path in the test run configuration or delegate test execution to Gradle. This only concerns the test execution. Unit test compilation and development works fine in Eclipse. |
Blackbox integration testing
For integration tests, you have the option to define the test set itself as additional module.
You do this similar to how you turn your main sources into a module:
by adding a module-info.java file to the corresponding source set (e.g. integrationTests/java/module-info.java).
You can find a full example that includes blackbox integration tests here.
|
Note
|
In Eclipse, compiling multiple modules in one project is currently not support. Therefore the integration test (blackbox) setup described here only works in Eclipse if the tests are moved to a separate subproject. |
Whitebox test execution with module patching
Another approach for whitebox testing is to stay in the module world by patching the tests into the module under test. This way, module boundaries stay in place, but the tests themselves become part of the module under test and can then access the module’s internals.
For which uses cases this is relevant and how this is best done is a topic of discussion. There is no general best approach at the moment. Thus, there is no special support for this in Gradle right now.
You can however, setup module patching for tests like this:
-
Add a
module-info.javato your test source set that is a copy of the mainmodule-info.javawith additional dependencies needed for testing (e.g.requires org.junit.jupiter.api). -
Configure both the
testCompileJavaandtesttasks with arguments to patch the main classes with the test classes as shown below.
val moduleName = "org.gradle.sample"
val patchArgs = listOf("--patch-module", "$moduleName=${tasks.compileJava.get().destinationDirectory.asFile.get().path}")
tasks.compileTestJava {
options.compilerArgs.addAll(patchArgs)
}
tasks.test {
jvmArgs(patchArgs)
}def moduleName = "org.gradle.sample"
def patchArgs = ["--patch-module", "$moduleName=${tasks.compileJava.destinationDirectory.asFile.get().path}"]
tasks.named('compileTestJava') {
options.compilerArgs += patchArgs
}
tasks.named('test') {
jvmArgs += patchArgs
}|
Note
|
If custom arguments are used for patching, these are not picked up by Eclipse and IDEA. You will most likely see invalid compilation errors in the IDE. |
Skipping the tests
If you want to skip the tests when running a build, you have a few options. You can either do it via command line arguments or in the build script. To do it on the command line, you can use the -x or --exclude-task option like so:
gradle build -x test
This excludes the test task and any other task that it exclusively depends on, i.e. no other task depends on the same task. Those tasks will not be marked "SKIPPED" by Gradle, but will simply not appear in the list of tasks executed.
Skipping a test via the build script can be done a few ways. One common approach is to make test execution conditional via the Task.onlyIf(String, org.gradle.api.specs.Spec) method. The following sample skips the test task if the project has a property called mySkipTests:
tasks.test {
val skipTestsProvider = providers.gradleProperty("mySkipTests")
onlyIf("mySkipTests property is not set") {
!skipTestsProvider.isPresent()
}
}def skipTestsProvider = providers.gradleProperty('mySkipTests')
test.onlyIf("mySkipTests property is not set") {
!skipTestsProvider.present
}In this case, Gradle will mark the skipped tests as "SKIPPED" rather than exclude them from the build.
Forcing tests to run
In well-defined builds, you can rely on Gradle to only run tests if the tests themselves or the production code change. However, you may encounter situations where the tests rely on a third-party service or something else that might change but can’t be modeled in the build.
You can always use the --rerun built-in task option to force a task to rerun.
gradle test --rerun
Alternatively, if build caching is not enabled, you can also force tests to run by cleaning the output of the relevant Test task — say test — and running the tests again, like so:
gradle cleanTest test
cleanTest is based on a task rule provided by the Base Plugin. You can use it for any task.
Debugging when running tests
On the few occasions that you want to debug your code while the tests are running, it can be helpful if you can attach a debugger at that point. You can either set the Test.getDebug() property to true or use the --debug-jvm command line option, or use --no-debug-jvm to set it to false.
When debugging for tests is enabled, Gradle will start the test process suspended and listening on port 5005.
You can also enable debugging in the DSL, where you can also configure other properties:
test {
debugOptions {
enabled = true
host = 'localhost'
port = 4455
server = true
suspend = true
}
}
With this configuration the test JVM will behave just like when passing the --debug-jvm argument but it will listen on port 4455.
To debug the test process remotely via network, the host needs to be set to the machine’s IP address or "*" (listen on all interfaces).
Using test fixtures
Producing and using test fixtures within a single project
Test fixtures are commonly used to setup the code under test, or provide utilities aimed at facilitating the tests of a component.
Java projects can enable test fixtures support by applying the java-test-fixtures plugin, in addition to the java or java-library plugins:
plugins {
// A Java Library
`java-library`
// which produces test fixtures
`java-test-fixtures`
// and is published
`maven-publish`
}plugins {
// A Java Library
id 'java-library'
// which produces test fixtures
id 'java-test-fixtures'
// and is published
id 'maven-publish'
}This will automatically create a testFixtures source set, in which you can write your test fixtures.
Test fixtures are configured so that:
-
they can see the main source set classes
-
test sources can see the test fixtures classes
For example for this main class:
public class Person {
private final String firstName;
private final String lastName;
public Person(String firstName, String lastName) {
this.firstName = firstName;
this.lastName = lastName;
}
public String getFirstName() {
return firstName;
}
public String getLastName() {
return lastName;
}
// ...A test fixture can be written in src/testFixtures/java:
public class Simpsons {
private static final Person HOMER = new Person("Homer", "Simpson");
private static final Person MARGE = new Person("Marjorie", "Simpson");
private static final Person BART = new Person("Bartholomew", "Simpson");
private static final Person LISA = new Person("Elisabeth Marie", "Simpson");
private static final Person MAGGIE = new Person("Margaret Eve", "Simpson");
private static final List<Person> FAMILY = new ArrayList<Person>() {{
add(HOMER);
add(MARGE);
add(BART);
add(LISA);
add(MAGGIE);
}};
public static Person homer() { return HOMER; }
public static Person marge() { return MARGE; }
public static Person bart() { return BART; }
public static Person lisa() { return LISA; }
public static Person maggie() { return MAGGIE; }
// ...Declaring dependencies of test fixtures
Similarly to the Java Library Plugin, test fixtures expose an API and an implementation configuration:
dependencies {
testImplementation("junit:junit:4.13")
// API dependencies are visible to consumers when building
testFixturesApi("org.apache.commons:commons-lang3:3.9")
// Implementation dependencies are not leaked to consumers when building
testFixturesImplementation("org.apache.commons:commons-text:1.6")
}dependencies {
testImplementation 'junit:junit:4.13'
// API dependencies are visible to consumers when building
testFixturesApi 'org.apache.commons:commons-lang3:3.9'
// Implementation dependencies are not leaked to consumers when building
testFixturesImplementation 'org.apache.commons:commons-text:1.6'
}It’s worth noticing that if a dependency is an implementation dependency of test fixtures, then when compiling tests that depend on those test fixtures, the implementation dependencies will not leak into the compile classpath. This results in improved separation of concerns and better compile avoidance.
Consuming test fixtures of another project
Test fixtures are not limited to a single project.
It is often the case that a dependent project tests also needs the test fixtures of the dependency.
This can be achieved very easily using the testFixtures keyword:
dependencies {
implementation(project(":lib"))
testImplementation("junit:junit:4.13")
testImplementation(testFixtures(project(":lib")))
}dependencies {
implementation(project(":lib"))
testImplementation 'junit:junit:4.13'
testImplementation(testFixtures(project(":lib")))
}Publishing test fixtures
One of the advantages of using the java-test-fixtures plugin is that test fixtures are published.
By convention, test fixtures will be published with an artifact having the test-fixtures classifier.
For both Maven and Ivy, an artifact with that classifier is simply published alongside the regular artifacts.
However, if you use the maven-publish or ivy-publish plugin, test fixtures are published as additional variants in Gradle Module Metadata and you can directly depend on test fixtures of external libraries in another Gradle project:
dependencies {
// Adds a dependency on the test fixtures of Gson, however this
// project doesn't publish such a thing
functionalTest(testFixtures("com.google.code.gson:gson:2.8.5"))
}dependencies {
// Adds a dependency on the test fixtures of Gson, however this
// project doesn't publish such a thing
functionalTest testFixtures("com.google.code.gson:gson:2.8.5")
}It’s worth noting that if the external project is not publishing Gradle Module Metadata, then resolution will fail with an error indicating that such a variant cannot be found:
gradle dependencyInsight --configuration functionalTestClasspath --dependency gson> gradle dependencyInsight --configuration functionalTestClasspath --dependency gson
> Task :dependencyInsight
com.google.code.gson:gson:2.8.5 FAILED
Failures:
- Could not resolve com.google.code.gson:gson:2.8.5.
- Unable to find a variant of com.google.code.gson:gson:2.8.5 providing the requested capability com.google.code.gson:gson-test-fixtures:
- Variant compile provides com.google.code.gson:gson:2.8.5
- Variant enforced-platform-compile provides com.google.code.gson:gson-derived-enforced-platform:2.8.5
- Variant enforced-platform-runtime provides com.google.code.gson:gson-derived-enforced-platform:2.8.5
- Variant javadoc provides com.google.code.gson:gson:2.8.5
- Variant platform-compile provides com.google.code.gson:gson-derived-platform:2.8.5
- Variant platform-runtime provides com.google.code.gson:gson-derived-platform:2.8.5
- Variant runtime provides com.google.code.gson:gson:2.8.5
- Variant sources provides com.google.code.gson:gson:2.8.5
com.google.code.gson:gson:2.8.5 FAILED
\--- functionalTestClasspath
A web-based, searchable dependency report is available by adding the --scan option.
BUILD SUCCESSFUL in 0s
1 actionable task: 1 executed
The error message mentions the missing com.google.code.gson:gson-test-fixtures capability, which is indeed not defined for this library.
That’s because by convention, for projects that use the java-test-fixtures plugin, Gradle automatically creates test fixtures variants with a capability whose name is the name of the main component, with the appendix -test-fixtures.
|
Note
|
If you publish your library and use test fixtures, but do not want to publish the fixtures, you can deactivate publishing of the test fixtures variants as shown below. |
val javaComponent = components["java"] as AdhocComponentWithVariants
javaComponent.withVariantsFromConfiguration(configurations["testFixturesApiElements"]) { skip() }
javaComponent.withVariantsFromConfiguration(configurations["testFixturesRuntimeElements"]) { skip() }components.java.withVariantsFromConfiguration(configurations.testFixturesApiElements) { skip() }
components.java.withVariantsFromConfiguration(configurations.testFixturesRuntimeElements) { skip() }Managing Dependencies of JVM Projects
This chapter explains how to apply basic dependency management concepts to JVM-based projects. For a detailed introduction to dependency management, see dependency management in Gradle.
Dissecting a typical build script
Let’s have a look at a very simple build script for a JVM-based project. It applies the Java Library plugin which automatically introduces a standard project layout, provides tasks for performing typical work and adequate support for dependency management.
plugins {
`java-library`
}
repositories {
mavenCentral()
}
dependencies {
implementation("org.hibernate:hibernate-core:3.6.7.Final")
api("com.google.guava:guava:23.0")
testImplementation("junit:junit:4.+")
}plugins {
id 'java-library'
}
repositories {
mavenCentral()
}
dependencies {
implementation 'org.hibernate:hibernate-core:3.6.7.Final'
api 'com.google.guava:guava:23.0'
testImplementation 'junit:junit:4.+'
}The Project.dependencies{} code block declares that Hibernate core 3.6.7.Final is required to compile the project’s production source code. It also states that junit >= 4.0 is required to compile the project’s tests. All dependencies are supposed to be looked up in the Maven Central repository as defined by Project.repositories{}. The following sections explain each aspect in more detail.
Declaring module dependencies
There are various types of dependencies that you can declare. One such type is a module dependency. A module dependency represents a dependency on a module with a specific version built outside the current build. Modules are usually stored in a repository, such as Maven Central, a corporate Maven or Ivy repository, or a directory in the local file system.
To define an module dependency, you add it to a dependency configuration:
dependencies {
implementation("org.hibernate:hibernate-core:3.6.7.Final")
}dependencies {
implementation 'org.hibernate:hibernate-core:3.6.7.Final'
}To find out more about defining dependencies, have a look at Declaring Dependencies.
Using dependency configurations
A Configuration is a named set of dependencies and artifacts. There are three main purposes for a configuration:
- Declaring dependencies
-
A plugin uses configurations to make it easy for build authors to declare what other subprojects or external artifacts are needed for various purposes during the execution of tasks defined by the plugin. For example a plugin may need the Spring web framework dependency to compile the source code.
- Resolving dependencies
-
A plugin uses configurations to find (and possibly download) inputs to the tasks it defines. For example Gradle needs to download Spring web framework JAR files from Maven Central.
- Exposing artifacts for consumption
-
A plugin uses configurations to define what artifacts it generates for other projects to consume. For example the project would like to publish its compiled source code packaged in the JAR file to an in-house Artifactory repository.
With those three purposes in mind, let’s take a look at a few of the standard configurations defined by the Java Library Plugin.
- implementation
-
The dependencies required to compile the production source of the project which are not part of the API exposed by the project. For example the project uses Hibernate for its internal persistence layer implementation.
- api
-
The dependencies required to compile the production source of the project which are part of the API exposed by the project. For example the project uses Guava and exposes public interfaces with Guava classes in their method signatures.
- testImplementation
-
The dependencies required to compile and run the test source of the project. For example the project decided to write test code with the test framework JUnit.
Various plugins add further standard configurations. You can also define your own custom configurations in your build via Project.configurations{}. See What are dependency configurations for the details of defining and customizing dependency configurations.
Declaring common Java repositories
How does Gradle know where to find the files for external dependencies? Gradle looks for them in a repository.
A repository is a collection of modules, organized by group, name and version.
Gradle understands different repository types, such as Maven and Ivy, and supports various ways of accessing the repository via HTTP or other protocols.
By default, Gradle does not define any repositories. You need to define at least one with the help of Project.repositories{} before you can use module dependencies. One option is use the Maven Central repository:
repositories {
mavenCentral()
}repositories {
mavenCentral()
}You can also have repositories on the local file system. This works for both Maven and Ivy repositories.
repositories {
ivy {
// URL can refer to a local directory
url = uri("../local-repo")
}
}repositories {
ivy {
// URL can refer to a local directory
url "../local-repo"
}
}A project can have multiple repositories. Gradle will look for a dependency in each repository in the order they are specified, stopping at the first repository that contains the requested module.
To find out more about defining repositories, have a look at Declaring Repositories.
Publishing artifacts
To learn more about publishing artifacts, have a look at publishing plugins.
JAVA TOOLCHAINS
Toolchains for JVM projects
Working on multiple projects can require interacting with multiple versions of the Java language. Even within a single project different parts of the codebase may be fixed to a particular language level due to backward compatibility requirements. This means different versions of the same tools (a toolchain) must be installed and managed on each machine that builds the project.
A Java toolchain is a set of tools to build and run Java projects, which is usually provided by the environment via local JRE or JDK installations.
Compile tasks may use javac as their compiler, test and exec tasks may use the java command while javadoc will be used to generate documentation.
By default, Gradle uses the same Java toolchain for running Gradle itself and building JVM projects. However, this may only sometimes be desirable. Building projects with different Java versions on different developer machines and CI servers may lead to unexpected issues. Additionally, you may want to build a project using a Java version that is not supported for running Gradle.
In order to improve reproducibility of the builds and make build requirements clearer, Gradle allows configuring toolchains on both project and task levels.
Toolchains for projects
You can define what toolchain to use for a project by stating the Java language version in the java extension block:
java {
toolchain {
languageVersion = JavaLanguageVersion.of(17)
}
}java {
toolchain {
languageVersion = JavaLanguageVersion.of(17)
}
}Executing the build (e.g. using gradle check) will now handle several things for you and others running your build:
-
Gradle configures all compile, test and javadoc tasks to use the defined toolchain.
-
Gradle detects locally installed toolchains.
-
Gradle chooses a toolchain matching the requirements (any Java 17 toolchain for the example above).
-
If no matching toolchain is found, Gradle can automatically download a matching one based on the configured toolchain download repositories.
|
Note
|
Toolchain support is available in the Java plugins and for the tasks they define. For the Groovy plugin, compilation is supported but not yet Groovydoc generation. For the Scala plugin, compilation and Scaladoc generation are supported. |
Selecting toolchains by vendor
In case your build has specific requirements from the used JRE/JDK, you may want to define the vendor for the toolchain as well.
JvmVendorSpec has a list of well-known JVM vendors recognized by Gradle.
The advantage is that Gradle can handle any inconsistencies across JDK versions in how exactly the JVM encodes the vendor information.
java {
toolchain {
languageVersion = JavaLanguageVersion.of(11)
vendor = JvmVendorSpec.ADOPTIUM
}
}java {
toolchain {
languageVersion = JavaLanguageVersion.of(11)
vendor = JvmVendorSpec.ADOPTIUM
}
}If the vendor you want to target is not a known vendor, you can still restrict the toolchain to those matching the java.vendor system property of the available toolchains.
The following snippet uses filtering to include a subset of available toolchains.
This example only includes toolchains whose java.vendor property contains the given match string.
The matching is done in a case-insensitive manner.
java {
toolchain {
languageVersion = JavaLanguageVersion.of(11)
vendor = JvmVendorSpec.matching("customString")
}
}java {
toolchain {
languageVersion = JavaLanguageVersion.of(11)
vendor = JvmVendorSpec.matching("customString")
}
}Selecting toolchains by virtual machine implementation
If your project requires a specific implementation, you can filter based on the implementation as well. Currently available implementations to choose from are:
VENDOR_SPECIFIC-
Acts as a placeholder and matches any implementation from any vendor (e.g. hotspot, zulu, …)
J9-
Matches only virtual machine implementations using the OpenJ9/IBM J9 runtime engine.
For example, to use an IBM JVM, distributed via AdoptOpenJDK, you can specify the filter as shown in the example below.
java {
toolchain {
languageVersion = JavaLanguageVersion.of(11)
vendor = JvmVendorSpec.IBM
implementation = JvmImplementation.J9
}
}java {
toolchain {
languageVersion = JavaLanguageVersion.of(11)
vendor = JvmVendorSpec.IBM
implementation = JvmImplementation.J9
}
}|
Note
|
The Java major version, the vendor (if specified) and implementation (if specified) will be tracked as an input for compilation and test execution. |
Configuring toolchain specifications
Gradle allows configuring multiple properties that affect the selection of a toolchain, such as language version or vendor. Even though these properties can be configured independently, the configuration must follow certain rules in order to form a valid specification.
A JavaToolchainSpec is considered valid in two cases:
-
when no properties have been set, i.e. the specification is empty;
-
when
languageVersionhas been set, optionally followed by setting any other property.
In other words, if a vendor or an implementation are specified, they must be accompanied by the language version. Gradle distinguishes between toolchain specifications that configure the language version and the ones that do not. A specification without a language version, in most cases, would be treated as a one that selects the toolchain of the current build.
Usage of invalid instances of JavaToolchainSpec results in a build error since Gradle 8.0.
Toolchains for tasks
In case you want to tweak which toolchain is used for a specific task, you can specify the exact tool a task is using.
For example, the Test task exposes a JavaLauncher property that defines which java executable to use for launching the tests.
In the example below, we configure all java compilation tasks to use Java 8.
Additionally, we introduce a new Test task that will run our unit tests using a JDK 17.
tasks.withType<JavaCompile>().configureEach {
javaCompiler = javaToolchains.compilerFor {
languageVersion = JavaLanguageVersion.of(8)
}
}
tasks.register<Test>("testsOn17") {
javaLauncher = javaToolchains.launcherFor {
languageVersion = JavaLanguageVersion.of(17)
}
}tasks.withType(JavaCompile).configureEach {
javaCompiler = javaToolchains.compilerFor {
languageVersion = JavaLanguageVersion.of(8)
}
}
task('testsOn17', type: Test) {
javaLauncher = javaToolchains.launcherFor {
languageVersion = JavaLanguageVersion.of(17)
}
}In addition, in the application subproject, we add another Java execution task to run our application with JDK 17.
tasks.register<JavaExec>("runOn17") {
javaLauncher = javaToolchains.launcherFor {
languageVersion = JavaLanguageVersion.of(17)
}
classpath = sourceSets["main"].runtimeClasspath
mainClass = application.mainClass
}task('runOn17', type: JavaExec) {
javaLauncher = javaToolchains.launcherFor {
languageVersion = JavaLanguageVersion.of(17)
}
classpath = sourceSets.main.runtimeClasspath
mainClass = application.mainClass
}Depending on the task, a JRE might be enough while for other tasks (e.g. compilation), a JDK is required. By default, Gradle prefers installed JDKs over JREs if they can satisfy the requirements.
Toolchains tool providers can be obtained from the javaToolchains extension.
Three tools are available:
-
A
JavaCompilerwhich is the tool used by the JavaCompile task -
A
JavaLauncherwhich is the tool used by the JavaExec or Test tasks -
A
JavadocToolwhich is the tool used by the Javadoc task
Integration with tasks relying on a Java executable or Java home
Any task that can be configured with a path to a Java executable, or a Java home location, can benefit from toolchains.
While you will not be able to wire a toolchain tool directly, they all have the metadata that gives access to their full path or to the path of the Java installation they belong to.
For example, you can configure the java executable for a task as follows:
val launcher = javaToolchains.launcherFor {
languageVersion = JavaLanguageVersion.of(11)
}
tasks.sampleTask {
javaExecutable = launcher.map { it.executablePath }
}def launcher = javaToolchains.launcherFor {
languageVersion = JavaLanguageVersion.of(11)
}
tasks.named('sampleTask') {
javaExecutable = launcher.map { it.executablePath }
}As another example, you can configure the Java Home for a task as follows:
val launcher = javaToolchains.launcherFor {
languageVersion = JavaLanguageVersion.of(11)
}
tasks.anotherSampleTask {
javaHome = launcher.map { it.metadata.installationPath }
}def launcher = javaToolchains.launcherFor {
languageVersion = JavaLanguageVersion.of(11)
}
tasks.named('anotherSampleTask') {
javaHome = launcher.map { it.metadata.installationPath }
}If you require a path to a specific tool such as Java compiler, you can obtain it as follows:
val compiler = javaToolchains.compilerFor {
languageVersion = JavaLanguageVersion.of(11)
}
tasks.yetAnotherSampleTask {
javaCompilerExecutable = compiler.map { it.executablePath }
}def compiler = javaToolchains.compilerFor {
languageVersion = JavaLanguageVersion.of(11)
}
tasks.named('yetAnotherSampleTask') {
javaCompilerExecutable = compiler.map { it.executablePath }
}|
Warning
|
The examples above use tasks with RegularFileProperty and DirectoryProperty properties which allow lazy configuration.
Doing respectively launcher.get().executablePath, launcher.get().metadata.installationPath or compiler.get().executablePath instead will give you the full path for the given toolchain but note that this may realize (and provision) a toolchain eagerly.
|
Auto detection of installed toolchains
By default, Gradle automatically detects local JRE/JDK installations so no further configuration is required by the user. The following is a list of common package managers, tools, and locations that are supported by the JVM auto-detection.
JVM auto-detection knows how to work with:
-
Operation-system specific locations: Linux, macOS, Windows
-
Maven Toolchain specifications
-
IntelliJ IDEA installations
Among the set of all detected JRE/JDK installations, one will be picked according to the Toolchain Precedence Rules.
|
Note
|
Whether you are using toolchain auto-detection or you are configuring Custom toolchain locations, installations that are non-existing or without a bin/java executable will be ignored with a warning, but they won’t generate an error.
|
How to disable auto-detection
In order to disable auto-detection, you can use the org.gradle.java.installations.auto-detect Gradle property:
-
Either start gradle using
-Porg.gradle.java.installations.auto-detect=false -
Or put
org.gradle.java.installations.auto-detect=falseinto yourgradle.propertiesfile.
Auto-provisioning
If Gradle can’t find a locally available toolchain that matches the requirements of the build, it can automatically download one (as long as a toolchain download repository has been configured; for detail, see relevant section). Gradle installs the downloaded JDKs in the Gradle User Home.
|
Note
|
Gradle only downloads JDK versions for GA releases. There is no support for downloading early access versions. |
Once installed in the Gradle User Home, a provisioned JDK becomes one of the JDKs visible to auto-detection and can be used by any subsequent builds, just like any other JDK installed on the system.
Since auto-provisioning only kicks in when auto-detection fails to find a matching JDK, auto-provisioning can only download new JDKs and is in no way involved in updating any of the already installed ones. None of the auto-provisioned JDKs will ever be revisited and automatically updated by auto-provisioning, even if there is a newer minor version available for them.
Toolchain Download Repositories
Toolchain download repository definitions are added to a build by applying specific settings plugins. For details on writing such plugins, consult the Toolchain Resolver Plugins page.
One example of a toolchain resolver plugin is the Disco Toolchains Plugin, based on the foojay Disco API. It even has a convention variant, which automatically takes care of all the needed configuration, just by being applied:
plugins {
id("org.gradle.toolchains.foojay-resolver-convention") version("0.8.0")
}plugins {
id 'org.gradle.toolchains.foojay-resolver-convention' version '0.8.0'
}In general, when applying toolchain resolver plugins, the toolchain download resolvers provided by them also need to be configured. Let’s illustrate with an example. Consider two toolchain resolver plugins applied by the build:
-
One is the Foojay plugin mentioned above, which downloads toolchains via the
FoojayToolchainResolverit provides. -
The other contains a FICTITIOUS resolver named
MadeUpResolver.
The following example uses these toolchain resolvers in a build via the toolchainManagement block in the settings file:
toolchainManagement {
jvm { // (1)
javaRepositories {
repository("foojay") { // (2)
resolverClass = org.gradle.toolchains.foojay.FoojayToolchainResolver::class.java
}
repository("made_up") { // (3)
resolverClass = MadeUpResolver::class.java
credentials {
username = "user"
password = "password"
}
authentication {
create<DigestAuthentication>("digest")
} // (4)
}
}
}
}toolchainManagement {
jvm { // (1)
javaRepositories {
repository('foojay') { // (2)
resolverClass = org.gradle.toolchains.foojay.FoojayToolchainResolver
}
repository('made_up') { // (3)
resolverClass = MadeUpResolver
credentials {
username "user"
password "password"
}
authentication {
digest(BasicAuthentication)
} // (4)
}
}
}
}-
In the
toolchainManagementblock, thejvmblock contains configuration for Java toolchains. -
The
javaRepositoriesblock defines named Java toolchain repository configurations. Use theresolverClassproperty to link these configurations to plugins. -
Toolchain declaration order matters. Gradle downloads from the first repository that provides a match, starting with the first repository in the list.
-
You can configure toolchain repositories with the same set of authentication and authorization options used for dependency management.
|
Warning
|
The jvm block in toolchainManagement only resolves after applying a toolchain resolver plugin.
|
Viewing and debugging toolchains
Gradle can display the list of all detected toolchains including their metadata.
For example, to show all toolchains of a project, run:
gradle -q javaToolchainsgradle -q javaToolchains> gradle -q javaToolchains
+ Options
| Auto-detection: Enabled
| Auto-download: Enabled
+ AdoptOpenJDK 1.8.0_242
| Location: /Users/username/myJavaInstalls/8.0.242.hs-adpt/jre
| Language Version: 8
| Vendor: AdoptOpenJDK
| Architecture: x86_64
| Is JDK: false
| Detected by: Gradle property 'org.gradle.java.installations.paths'
+ Microsoft JDK 16.0.2+7
| Location: /Users/username/.sdkman/candidates/java/16.0.2.7.1-ms
| Language Version: 16
| Vendor: Microsoft
| Architecture: aarch64
| Is JDK: true
| Detected by: SDKMAN!
+ OpenJDK 15-ea
| Location: /Users/user/customJdks/15.ea.21-open
| Language Version: 15
| Vendor: AdoptOpenJDK
| Architecture: x86_64
| Is JDK: true
| Detected by: environment variable 'JDK16'
+ Oracle JDK 1.7.0_80
| Location: /Library/Java/JavaVirtualMachines/jdk1.7.0_80.jdk/Contents/Home/jre
| Language Version: 7
| Vendor: Oracle
| Architecture: x86_64
| Is JDK: false
| Detected by: MacOS java_home
This can help to debug which toolchains are available to the build, how they are detected and what kind of metadata Gradle knows about those toolchains.
How to disable auto provisioning
In order to disable auto-provisioning, you can use the org.gradle.java.installations.auto-download Gradle property:
-
Either start gradle using
-Porg.gradle.java.installations.auto-download=false -
Or put
org.gradle.java.installations.auto-download=falseinto agradle.propertiesfile.
Custom toolchain locations
If auto-detecting local toolchains is not sufficient or disabled, there are additional ways you can let Gradle know about installed toolchains.
If your setup already provides environment variables pointing to installed JVMs, you can also let Gradle know about which environment variables to take into account.
Assuming the environment variables JDK8 and JRE17 point to valid java installations, the following instructs Gradle to resolve those environment variables and consider those installations when looking for a matching toolchain.
org.gradle.java.installations.fromEnv=JDK8,JRE17
Additionally, you can provide a comma-separated list of paths to specific installations using the org.gradle.java.installations.paths property.
For example, using the following in your gradle.properties will let Gradle know which directories to look at when detecting toolchains.
Gradle will treat these directories as possible installations but will not descend into any nested directories.
org.gradle.java.installations.paths=/custom/path/jdk1.8,/shared/jre11
|
Note
|
Gradle does not prioritize custom toolchains over auto-detected toolchains. If you enable auto-detection in your build, custom toolchains extend the set of toolchain locations. Gradle picks a toolchain according to the precedence rules. |
Toolchain installations precedence
Gradle will sort all the JDK/JRE installations matching the toolchain specification of the build and will pick the first one. Sorting is done based on the following rules:
-
the installation currently running Gradle is preferred over any other
-
JDK installations are preferred over JRE ones
-
certain vendors take precedence over others; their ordering (from the highest priority to lowest):
-
ADOPTIUM
-
ADOPTOPENJDK
-
AMAZON
-
APPLE
-
AZUL
-
BELLSOFT
-
GRAAL_VM
-
HEWLETT_PACKARD
-
IBM
-
JETBRAINS
-
MICROSOFT
-
ORACLE
-
SAP
-
TENCENT
-
everything else
-
-
higher major versions take precedence over lower ones
-
higher minor versions take precedence over lower ones
-
installation paths take precedence according to their lexicographic ordering (last resort criteria for deterministically deciding between installations of the same type, from the same vendor and with the same version)
All these rules are applied as multilevel sorting criteria, in the order shown. Let’s illustrate with an example. A toolchain specification requests Java version 17. Gradle detects the following matching installations:
-
Oracle JRE v17.0.1
-
Oracle JDK v17.0.0
-
Microsoft JDK 17.0.0
-
Microsoft JRE 17.0.1
-
Microsoft JDK 17.0.1
Assume that Gradle runs on a major Java version other than 17. Otherwise, that installation would have priority.
When we apply the above rules to sort this set we will end up with following ordering:
-
Microsoft JDK 17.0.1
-
Microsoft JDK 17.0.0
-
Oracle JDK v17.0.0
-
Microsoft JRE v17.0.1
-
Oracle JRE v17.0.1
Gradle prefers JDKs over JREs, so the JREs come last. Gradle prefers the Microsoft vendor over Oracle, so the Microsoft installations come first. Gradle prefers higher version numbers, so JDK 17.0.1 comes before JDK 17.0.0.
So Gradle picks the first match in this order: Microsoft JDK 17.0.1.
Toolchains for plugin authors
When creating a plugin or a task that uses toolchains, it is essential to provide sensible defaults and allow users to override them.
For JVM projects, it is usually safe to assume that the java plugin has been applied to the project.
The java plugin is automatically applied for the core Groovy and Scala plugins, as well as for the Kotlin plugin.
In such a case, using the toolchain defined via the java extension as a default value for the tool property is appropriate.
This way, the users will need to configure the toolchain only once on the project level.
The example below showcases how to use the default toolchain as convention while allowing users to individually configure the toolchain per task.
abstract class CustomTaskUsingToolchains : DefaultTask() {
@get:Nested
abstract val launcher: Property<JavaLauncher> // (1)
init {
val toolchain = project.extensions.getByType<JavaPluginExtension>().toolchain // (2)
val defaultLauncher = javaToolchainService.launcherFor(toolchain) // (3)
launcher.convention(defaultLauncher) // (4)
}
@TaskAction
fun showConfiguredToolchain() {
println(launcher.get().executablePath)
println(launcher.get().metadata.installationPath)
}
@get:Inject
protected abstract val javaToolchainService: JavaToolchainService
}abstract class CustomTaskUsingToolchains extends DefaultTask {
@Nested
abstract Property<JavaLauncher> getLauncher() // (1)
CustomTaskUsingToolchains() {
def toolchain = project.extensions.getByType(JavaPluginExtension.class).toolchain // (2)
Provider<JavaLauncher> defaultLauncher = getJavaToolchainService().launcherFor(toolchain) // (3)
launcher.convention(defaultLauncher) // (4)
}
@TaskAction
def showConfiguredToolchain() {
println launcher.get().executablePath
println launcher.get().metadata.installationPath
}
@Inject
protected abstract JavaToolchainService getJavaToolchainService()
}-
We declare a
JavaLauncherproperty on the task. The property must be marked as a@Nestedinput to make sure the task is responsive to toolchain changes. -
We obtain the toolchain spec from the
javaextension to use it as a default. -
Using the
JavaToolchainServicewe get a provider of theJavaLauncherthat matches the toolchain. -
Finally, we wire the launcher provider as a convention for our property.
In a project where the java plugin was applied, we can use the task as follows:
plugins {
java
}
java {
toolchain { // (1)
languageVersion = JavaLanguageVersion.of(8)
}
}
tasks.register<CustomTaskUsingToolchains>("showDefaultToolchain") // (2)
tasks.register<CustomTaskUsingToolchains>("showCustomToolchain") {
launcher = javaToolchains.launcherFor { // (3)
languageVersion = JavaLanguageVersion.of(17)
}
}plugins {
id 'java'
}
java {
toolchain { // (1)
languageVersion = JavaLanguageVersion.of(8)
}
}
tasks.register('showDefaultToolchain', CustomTaskUsingToolchains) // (2)
tasks.register('showCustomToolchain', CustomTaskUsingToolchains) {
launcher = javaToolchains.launcherFor { // (3)
languageVersion = JavaLanguageVersion.of(17)
}
}-
The toolchain defined on the
javaextension is used by default to resolve the launcher. -
The custom task without additional configuration will use the default Java 8 toolchain.
-
The other task overrides the value of the launcher by selecting a different toolchain using
javaToolchainsservice.
When a task needs access to toolchains without the java plugin being applied the toolchain service can be used directly.
If an unconfigured toolchain spec is provided to the service, it will always return a tool provider for the toolchain that is running Gradle.
This can be achieved by passing an empty lambda when requesting a tool: javaToolchainService.launcherFor({}).
You can find more details on defining custom tasks in the Authoring tasks documentation.
Toolchains limitations
Gradle may detect toolchains incorrectly when it’s running in a JVM compiled against musl, an alternative implementation of the C standard library.
JVMs compiled against musl can sometimes override the LD_LIBRARY_PATH environment variable to control dynamic library resolution.
This can influence forked java processes launched by Gradle, resulting in unexpected behavior.
As a consequence, using multiple java toolchains is discouraged in environments with the musl library.
This is the case in most Alpine distributions — consider using another distribution, like Ubuntu, instead.
If you are using a single toolchain, the JVM running Gradle, to build and run your application, you can safely ignore this limitation.
Toolchain Resolver Plugins
In Gradle version 7.6 and above, Gradle provides a way to define Java toolchain auto-provisioning logic in plugins. This page explains how to author a toolchain resolver plugin. For details on how toolchain auto-provisioning interacts with these plugins, see Toolchains.
Provide a download URI
Toolchain resolver plugins provide logic to map a toolchain request to a download response. At the moment the download response only contains a download URL, but may be extended in the future.
|
Warning
|
For the download URL only secure protocols like https are accepted.
This is required to make sure no one can tamper with the download in flight.
|
The plugins provide the mapping logic via an implementation of JavaToolchainResolver:
public abstract class JavaToolchainResolverImplementation
implements JavaToolchainResolver { // (1)
public Optional<JavaToolchainDownload> resolve(JavaToolchainRequest request) { // (2)
return Optional.empty(); // custom mapping logic goes here instead
}
}-
This class is
abstractbecauseJavaToolchainResolveris a build service. Gradle provides dynamic implementations for certain abstract methods at runtime. -
The mapping method returns a download response wrapped in an
Optional. If the resolver implementation can’t provide a matching toolchain, the enclosingOptionalcontains an empty value.
Register the resolver in a plugin
Use a settings plugin (Plugin<Settings>) to register the JavaToolchainResolver implementation:
public abstract class JavaToolchainResolverPlugin implements Plugin<Settings> { // (1)
@Inject
protected abstract JavaToolchainResolverRegistry getToolchainResolverRegistry(); // (2)
public void apply(Settings settings) {
settings.getPlugins().apply("jvm-toolchain-management"); // (3)
JavaToolchainResolverRegistry registry = getToolchainResolverRegistry();
registry.register(JavaToolchainResolverImplementation.class);
}
}-
The plugin uses property injection, so it must be
abstractand a settings plugin. -
To register the resolver implementation, use property injection to access the JavaToolchainResolverRegistry Gradle service.
-
Resolver plugins must apply the
jvm-toolchain-managementbase plugin. This dynamically adds thejvmblock totoolchainManagement, which makes registered toolchain repositories usable from the build.
JVM PLUGINS
The Java Library Plugin
The Java Library plugin expands the capabilities of the Java Plugin (java) by providing specific knowledge about Java libraries.
In particular, a Java library exposes an API to consumers (i.e., other projects using the Java or the Java Library plugin).
All the source sets, tasks and configurations exposed by the Java plugin are implicitly available when using this plugin.
Usage
To use the Java Library plugin, include the following in your build script:
plugins {
`java-library`
}plugins {
id 'java-library'
}API and implementation separation
The key difference between the standard Java plugin and the Java Library plugin is that the latter introduces the concept of an API exposed to consumers. A library is a Java component meant to be consumed by other components. It’s a very common use case in multi-project builds, but also as soon as you have external dependencies.
The plugin exposes two configurations that can be used to declare dependencies: api and implementation.
The api configuration should be used to declare dependencies which are exported by the library API, whereas the implementation configuration should be used to declare dependencies which are internal to the component.
dependencies {
api("org.apache.httpcomponents:httpclient:4.5.7")
implementation("org.apache.commons:commons-lang3:3.5")
}dependencies {
api 'org.apache.httpcomponents:httpclient:4.5.7'
implementation 'org.apache.commons:commons-lang3:3.5'
}Dependencies appearing in the api configurations will be transitively exposed to consumers of the library, and as such will appear on the compile classpath of consumers. Dependencies found in the implementation configuration will, on the other hand, not be exposed to consumers, and therefore not leak into the consumers' compile classpath. This comes with several benefits:
-
dependencies do not leak into the compile classpath of consumers anymore, so you will never accidentally depend on a transitive dependency
-
faster compilation thanks to reduced classpath size
-
less recompilations when implementation dependencies change: consumers would not need to be recompiled
-
cleaner publishing: when used in conjunction with the new
maven-publishplugin, Java libraries produce POM files that distinguish exactly between what is required to compile against the library and what is required to use the library at runtime (in other words, don’t mix what is needed to compile the library itself and what is needed to compile against the library).
|
Note
|
The compile and runtime configurations have been removed with Gradle 7.0.
Please refer to the upgrade guide how to migrate to implementation and api configurations`.
|
If your build consumes a published module with POM metadata, the Java and Java Library plugins both honor api and implementation separation through the scopes used in the POM.
Meaning that the compile classpath only includes Maven compile scoped dependencies, while the runtime classpath adds the Maven runtime scoped dependencies as well.
This often does not have an effect on modules published with Maven, where the POM that defines the project is directly published as metadata.
There, the compile scope includes both dependencies that were required to compile the project (i.e. implementation dependencies) and dependencies required to compile against the published library (i.e. API dependencies).
For most published libraries, this means that all dependencies belong to the compile scope.
If you encounter such an issue with an existing library, you can consider a component metadata rule to fix the incorrect metadata in your build.
However, as mentioned above, if the library is published with Gradle, the produced POM file only puts api dependencies into the compile scope and the remaining implementation dependencies into the runtime scope.
If your build consumes modules with Ivy metadata, you might be able to activate api and implementation separation as described here if all modules follow a certain structure.
|
Note
|
Separating compile and runtime scope of modules is active by default in Gradle 5.0+.
In Gradle 4.6+, you need to activate it by adding enableFeaturePreview('IMPROVED_POM_SUPPORT') in settings.gradle.
|
Recognizing API and implementation dependencies
This section will help you identify API and Implementation dependencies in your code using simple rules of thumb. The first of these is:
-
Prefer the
implementationconfiguration overapiwhen possible
This keeps the dependencies off of the consumer’s compilation classpath. In addition, the consumers will immediately fail to compile if any implementation types accidentally leak into the public API.
So when should you use the api configuration? An API dependency is one that contains at least one type that is exposed in the library binary interface, often referred to as its ABI (Application Binary Interface). This includes, but is not limited to:
-
types used in super classes or interfaces
-
types used in public method parameters, including generic parameter types (where public is something that is visible to compilers. I.e. , public, protected and package private members in the Java world)
-
types used in public fields
-
public annotation types
By contrast, any type that is used in the following list is irrelevant to the ABI, and therefore should be declared as an implementation dependency:
-
types exclusively used in method bodies
-
types exclusively used in private members
-
types exclusively found in internal classes (future versions of Gradle will let you declare which packages belong to the public API)
The following class makes use of a couple of third-party libraries, one of which is exposed in the class’s public API and the other is only used internally. The import statements don’t help us determine which is which, so we have to look at the fields, constructors and methods instead:
Example: Making the difference between API and implementation
// The following types can appear anywhere in the code
// but say nothing about API or implementation usage
import org.apache.commons.lang3.exception.ExceptionUtils;
import org.apache.http.HttpEntity;
import org.apache.http.HttpResponse;
import org.apache.http.HttpStatus;
import org.apache.http.client.HttpClient;
import org.apache.http.client.methods.HttpGet;
import java.io.ByteArrayOutputStream;
import java.io.IOException;
import java.io.UnsupportedEncodingException;
public class HttpClientWrapper {
private final HttpClient client; // private member: implementation details
// HttpClient is used as a parameter of a public method
// so "leaks" into the public API of this component
public HttpClientWrapper(HttpClient client) {
this.client = client;
}
// public methods belongs to your API
public byte[] doRawGet(String url) {
HttpGet request = new HttpGet(url);
try {
HttpEntity entity = doGet(request);
ByteArrayOutputStream baos = new ByteArrayOutputStream();
entity.writeTo(baos);
return baos.toByteArray();
} catch (Exception e) {
ExceptionUtils.rethrow(e); // this dependency is internal only
} finally {
request.releaseConnection();
}
return null;
}
// HttpGet and HttpEntity are used in a private method, so they don't belong to the API
private HttpEntity doGet(HttpGet get) throws Exception {
HttpResponse response = client.execute(get);
if (response.getStatusLine().getStatusCode() != HttpStatus.SC_OK) {
System.err.println("Method failed: " + response.getStatusLine());
}
return response.getEntity();
}
}The public constructor of HttpClientWrapper uses HttpClient as a parameter, so it is exposed to consumers and therefore belongs to the API. Note that HttpGet and HttpEntity are used in the signature of a private method, and so they don’t count towards making HttpClient an API dependency.
On the other hand, the ExceptionUtils type, coming from the commons-lang library, is only used in a method body (not in its signature), so it’s an implementation dependency.
Therefore, we can deduce that httpclient is an API dependency, whereas commons-lang is an implementation dependency. This conclusion translates into the following declaration in the build script:
dependencies {
api("org.apache.httpcomponents:httpclient:4.5.7")
implementation("org.apache.commons:commons-lang3:3.5")
}dependencies {
api 'org.apache.httpcomponents:httpclient:4.5.7'
implementation 'org.apache.commons:commons-lang3:3.5'
}The Java Library plugin configurations
The following graph describes how configurations are setup when the Java Library plugin is in use.
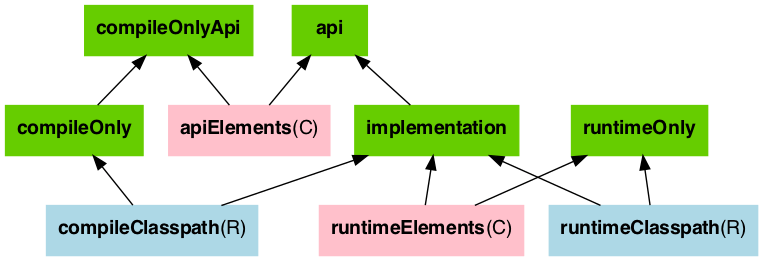
-
The configurations in green are the ones a user should use to declare dependencies
-
The configurations in pink are the ones used when a component compiles, or runs against the library
-
The configurations in blue are internal to the component, for its own use
And the next graph describes the test configurations setup:
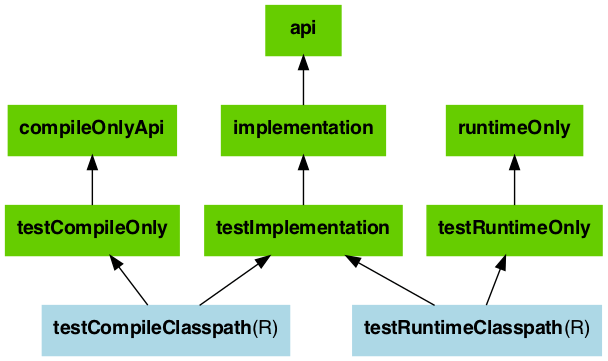
The role of each configuration is described in the following tables:
| Configuration name | Role | Consumable? | Resolvable? | Description |
|---|---|---|---|---|
|
Declaring API dependencies |
no |
no |
This is where you declare dependencies which are transitively exported to consumers, for compile time and runtime. |
|
Declaring implementation dependencies |
no |
no |
This is where you declare dependencies which are purely internal and not meant to be exposed to consumers (they are still exposed to consumers at runtime). |
|
Declaring compile only dependencies |
no |
no |
This is where you declare dependencies which are required at compile time, but not at runtime. This typically includes dependencies which are shaded when found at runtime. |
|
Declaring compile only API dependencies |
no |
no |
This is where you declare dependencies which are required at compile time by your module and consumers, but not at runtime. This typically includes dependencies which are shaded when found at runtime. |
|
Declaring runtime dependencies |
no |
no |
This is where you declare dependencies which are only required at runtime, and not at compile time. |
|
Test dependencies |
no |
no |
This is where you declare dependencies which are used to compile tests. |
|
Declaring test compile only dependencies |
no |
no |
This is where you declare dependencies which are only required at test compile time, but should not leak into the runtime. This typically includes dependencies which are shaded when found at runtime. |
|
Declaring test runtime dependencies |
no |
no |
This is where you declare dependencies which are only required at test runtime, and not at test compile time. |
| Configuration name | Role | Consumable? | Resolvable? | Description |
|---|---|---|---|---|
|
For compiling against this library |
yes |
no |
This configuration is meant to be used by consumers, to retrieve all the elements necessary to compile against this library. |
|
For executing this library |
yes |
no |
This configuration is meant to be used by consumers, to retrieve all the elements necessary to run against this library. |
| Configuration name | Role | Consumable? | Resolvable? | Description |
|---|---|---|---|---|
compileClasspath |
For compiling this library |
no |
yes |
This configuration contains the compile classpath of this library, and is therefore used when invoking the java compiler to compile it. |
runtimeClasspath |
For executing this library |
no |
yes |
This configuration contains the runtime classpath of this library |
testCompileClasspath |
For compiling the tests of this library |
no |
yes |
This configuration contains the test compile classpath of this library. |
testRuntimeClasspath |
For executing tests of this library |
no |
yes |
This configuration contains the test runtime classpath of this library |
Building Modules for the Java Module System
Since Java 9, Java itself offers a module system that allows for strict encapsulation during compile and runtime.
You can turn a Java library into a Java Module by creating a module-info.java file in the main/java source folder.
src
└── main
└── java
└── module-info.javaIn the module info file, you declare a module name, which packages of your module you want to export and which other modules you require.
module org.gradle.sample {
requires com.google.gson; // real module
requires org.apache.commons.lang3; // automatic module
// commons-cli-1.4.jar is not a module and cannot be required
}To tell the Java compiler that a Jar is a module, as opposed to a traditional Java library, Gradle needs to place it on the so called module path. It is an alternative to the classpath, which is the traditional way to tell the compiler about compiled dependencies. Gradle will automatically put a Jar of your dependencies on the module path, instead of the classpath, if these three things are true:
-
java.modularity.inferModulePathis not turned off -
We are actually building a module (as opposed to a traditional library) which we expressed by adding the
module-info.javafile. (Another option is to add theAutomatic-Module-NameJar manifest attribute as described further down.) -
The Jar our module depends on is itself a module, which Gradles decides based on the presence of a
module-info.class— the compiled version of the module descriptor — in the Jar. (Or, alternatively, the presence of anAutomatic-Module-Nameattribute the Jar manifest)
In the following, some more details about defining Java modules and how that interacts with Gradle’s dependency management are described. You can also look at a ready made example to try out the Java Module support directly.
Declaring module dependencies
There is a direct relationship to the dependencies you declare in the build file and the module dependencies you declare in the module-info.java file.
Ideally the declarations should be in sync as seen in the following table.
| Java Module Directive | Gradle Configuration | Purpose |
|---|---|---|
|
|
Declaring implementation dependencies |
|
|
Declaring API dependencies |
|
|
Declaring compile only dependencies |
|
|
Declaring compile only API dependencies |
Gradle currently does not automatically check if the dependency declarations are in sync. This may be added in future versions.
For more details on declaring module dependencies, please refer to documentation on the Java Module System.
Declaring package visibility and services
The Java module system supports additional more fine granular encapsulation concepts than Gradle itself currently does. For example, you explicitly need to declare which packages are part of your API and which are only visible inside your module. Some of these capabilities might be added to Gradle itself in future versions. For now, please refer to documentation on the Java Module System to learn how to use these features in Java Modules.
Declaring module versions
Java Modules also have a version that is encoded as part of the module identity in the module-info.class file.
This version can be inspected when a module is running.
version = "1.2"
tasks.compileJava {
// use the project's version or define one directly
options.javaModuleVersion = provider { version as String }
}version = '1.2'
tasks.named('compileJava') {
// use the project's version or define one directly
options.javaModuleVersion = provider { version }
}Using libraries that are not modules
You probably want to use external libraries, like OSS libraries from Maven Central, in your modular Java project.
Some libraries, in their newer versions, are already full modules with a module descriptor.
For example, com.google.code.gson:gson:2.8.9 that has the module name com.google.gson.
Others, like org.apache.commons:commons-lang3:3.10, may not offer a full module descriptor but will at least contain an Automatic-Module-Name entry in their manifest file to define the module’s name (org.apache.commons.lang3 in the example).
Such modules, that only have a name as module description, are called automatic module that export all their packages and can read all modules on the module path.
A third case are traditional libraries that provide no module information at all — for example commons-cli:commons-cli:1.4.
Gradle puts such libraries on the classpath instead of the module path.
The classpath is then treated as one module (the so called unnamed module) by Java.
dependencies {
implementation("com.google.code.gson:gson:2.8.9") // real module
implementation("org.apache.commons:commons-lang3:3.10") // automatic module
implementation("commons-cli:commons-cli:1.4") // plain library
}dependencies {
implementation 'com.google.code.gson:gson:2.8.9' // real module
implementation 'org.apache.commons:commons-lang3:3.10' // automatic module
implementation 'commons-cli:commons-cli:1.4' // plain library
}module org.gradle.sample.lib {
requires com.google.gson; // real module
requires org.apache.commons.lang3; // automatic module
// commons-cli-1.4.jar is not a module and cannot be required
}While a real module cannot directly depend on the unnamed module (only by adding command line flags), automatic modules can also see the unnamed module. Thus, if you cannot avoid to rely on a library without module information, you can wrap that library in an automatic module as part of your project. How you do that is described in the next section.
Another way to deal with non-modules is to enrich existing Jars with module descriptors yourself using artifact transforms. This sample contains a small buildSrc plugin registering such a transform which you may use and adjust to your needs. This can be interesting if you want to build a fully modular application and want the java runtime to treat everything as a real module.
Disabling Java Module support
In rare cases, you might want to disable the built-in Java Module support and define the module path by other means.
To achieve this, you can disable the functionality to automatically put any Jar on the module path.
Then Gradle puts Jars with module information on the classpath, even if you have a module-info.java in your source set.
This corresponds to the behaviour of Gradle versions <7.0.
To make this work, you need to set modularity.inferModulePath = false on the Java extension (for all tasks) or on individual tasks.
java {
modularity.inferModulePath = false
}
tasks.compileJava {
modularity.inferModulePath = false
}java {
modularity.inferModulePath = false
}
tasks.named('compileJava') {
modularity.inferModulePath = false
}Building an automatic module
If you can, you should always write complete module-info.java descriptors for your modules.
Still, there are a few cases where you might consider to (initally) only provide a module name for an automatic module:
-
You are working on a library that is not a module but you want to make it usable as such in the next release. Adding an
Automatic-Module-Nameis a good first step (most popular OSS libraries on Maven central have done it by now). -
As discussed in the previous section, an automatic module can be used as an adapter between your real modules and a traditional library on the classpath.
To turn a normal Java project into an automatic module, just add the manifest entry with the module name:
tasks.jar {
manifest {
attributes("Automatic-Module-Name" to "org.gradle.sample")
}
}tasks.named('jar') {
manifest {
attributes('Automatic-Module-Name': 'org.gradle.sample')
}
}|
Note
|
=== You can define an automatic module as part of a multi-project that otherwise defines real modules (e.g. as an adapter to another library). While this works fine in the Gradle build, such automatic module projects are not correctly recognized by IDEA/Eclipse at the moment. You can work around it by manually adding the Jar built for the automatic module to the dependencies of the project that does not find it in the IDE’s UI. === |
Using classes instead of jar for compilation
A feature of the java-library plugin is that projects which consume the library only require the classes folder for compilation, instead of the full JAR.
This enables lighter inter-project dependencies as resources processing (processResources task) and archive construction (jar task) are no longer executed when only Java code compilation is performed during development.
|
Note
|
The usage or not of the classes output instead of the JAR is a consumer decision. For example, Groovy consumers will request classes and processed resources as these may be needed for executing AST transformation as part of the compilation process. |
Increased memory usage for consumers
An indirect consequence is that up-to-date checking will require more memory, because Gradle will snapshot individual class files instead of a single jar.
This may lead to increased memory consumption for large projects, with the benefit of having the compileJava task up-to-date in more cases (e.g. changing resources no longer changes the input for compileJava tasks of upstream projects)
Significant build performance drop on Windows for huge multi-projects
Another side effect of the snapshotting of individual class files, only affecting Windows systems, is that the performance can significantly drop when processing a very large amount of class files on the compile classpath.
This only concerns very large multi-projects where a lot of classes are present on the classpath by using many api or (deprecated) compile dependencies.
To mitigate this, you can set the org.gradle.java.compile-classpath-packaging system property to true to change the behavior of the Java Library plugin to use jars instead of class folders for everything on the compile classpath.
Note, since this has other performance impacts and potentially side effects, by triggering all jar tasks at compile time, it is only recommended to activate this if you suffer from the described performance issue on Windows.
Distributing a library
Aside from publishing a library to a component repository, you may sometimes need to package a library and its dependencies in a distribution deliverable. The Java Library Distribution Plugin is there to help you do just that.
The Application Plugin
The Application plugin facilitates creating an executable JVM application. It makes it easy to start the application locally during development, and to package the application as a TAR and/or ZIP including operating system specific start scripts.
Applying the Application plugin also implicitly applies the Java plugin. The main source set is effectively the “application”.
Applying the Application plugin also implicitly applies the Distribution plugin. A main distribution is created that packages up the application, including code dependencies and generated start scripts.
Building JVM applications
To use the application plugin, include the following in your build script:
plugins {
application
}plugins {
id 'application'
}The only mandatory configuration for the plugin is the specification of the main class (i.e. entry point) of the application.
application {
mainClass = "org.gradle.sample.Main"
}application {
mainClass = 'org.gradle.sample.Main'
}You can run the application by executing the run task (type: JavaExec). This will compile the main source set, and launch a new JVM with its classes (along with all runtime dependencies) as the classpath and using the specified main class. You can launch the application in debug mode with gradle run --debug-jvm (see JavaExec.setDebug(boolean)).
Since Gradle 4.9, the command line arguments can be passed with --args. For example, if you want to launch the application with command line arguments foo --bar, you can use gradle run --args="foo --bar" (see JavaExec.setArgsString(java.lang.String).
If your application requires a specific set of JVM settings or system properties, you can configure the applicationDefaultJvmArgs property. These JVM arguments are applied to the run task and also considered in the generated start scripts of your distribution.
application {
applicationDefaultJvmArgs = listOf("-Dgreeting.language=en")
}application {
applicationDefaultJvmArgs = ['-Dgreeting.language=en']
}If your application’s start scripts should be in a different directory than bin, you can configure the executableDir property.
application {
executableDir = "custom_bin_dir"
}application {
executableDir = 'custom_bin_dir'
}Building applications using the Java Module System
Gradle supports the building of Java Modules as described in the corresponding section of the Java Library plugin documentation. Java modules can also be runnable and you can use the application plugin to run and package such a modular application. For this, you need to do two things in addition to what you do for a non-modular application.
First, you need to add a module-info.java file to describe your application module.
Please refer to the Java Library plugin documentation for more details on this topic.
Second, you need to tell Gradle the name of the module you want to run in addition to the main class name like this:
application {
mainModule = "org.gradle.sample.app" // name defined in module-info.java
mainClass = "org.gradle.sample.Main"
}application {
mainModule = 'org.gradle.sample.app' // name defined in module-info.java
mainClass = 'org.gradle.sample.Main'
}That’s all.
If you run your application, by executing the run task or through a generated start script, it will run as module and respect module boundaries at runtime.
For example, reflective access to an internal package from another module can fail.
The configured main class is also baked into the module-info.class file of your application Jar.
If you run the modular application directly using the java command, it is then sufficient to provide the module name.
You can also look at a ready made example that includes a modular application as part of a multi-project.
Building a distribution
A distribution of the application can be created, by way of the Distribution plugin (which is automatically applied). A main distribution is created with the following content:
| Location | Content |
|---|---|
(root dir) |
|
|
All runtime dependencies and main source set class files. |
|
Start scripts (generated by |
Static files to be added to the distribution can be simply added to src/dist. More advanced customization can be done by configuring the CopySpec exposed by the main distribution.
val createDocs by tasks.registering {
val docs = layout.buildDirectory.dir("docs")
outputs.dir(docs)
doLast {
docs.get().asFile.mkdirs()
docs.get().file("readme.txt").asFile.writeText("Read me!")
}
}
distributions {
main {
contents {
from(createDocs) {
into("docs")
}
}
}
}tasks.register('createDocs') {
def docs = layout.buildDirectory.dir('docs')
outputs.dir docs
doLast {
docs.get().asFile.mkdirs()
docs.get().file('readme.txt').asFile.write('Read me!')
}
}
distributions {
main {
contents {
from(createDocs) {
into 'docs'
}
}
}
}By specifying that the distribution should include the task’s output files (see incremental builds), Gradle knows that the task that produces the files must be invoked before the distribution can be assembled and will take care of this for you.
You can run gradle installDist to create an image of the application in build/install/projectName. You can run gradle distZip to create a ZIP containing the distribution, gradle distTar to create an application TAR or gradle assemble to build both.
Customizing start script generation
The application plugin can generate Unix (suitable for Linux, macOS etc.) and Windows start scripts out of the box.
The start scripts launch a JVM with the specified settings defined as part of the original build and runtime environment (e.g. JAVA_OPTS env var).
The default script templates are based on the same scripts used to launch Gradle itself, that ship as part of a Gradle distribution.
The start scripts are completely customizable. Please refer to the documentation of CreateStartScripts for more details and customization examples.
Tasks
The Application plugin adds the following tasks to the project.
run— JavaExec-
Depends on:
classesStarts the application.
startScripts— CreateStartScripts-
Depends on:
jarCreates OS specific scripts to run the project as a JVM application.
installDist— Sync-
Depends on:
jar,startScriptsInstalls the application into a specified directory.
distZip— Zip-
Depends on:
jar,startScriptsCreates a full distribution ZIP archive including runtime libraries and OS specific scripts.
distTar— Tar-
Depends on:
jar,startScriptsCreates a full distribution TAR archive including runtime libraries and OS specific scripts.
Application extension
The Application Plugin adds an extension to the project, which you can use to configure its behavior. See the JavaApplication DSL documentation for more information on the properties available on the extension.
You can configure the extension via the application {} block shown earlier, for example using the following in your build script:
application {
executableDir = "custom_bin_dir"
}application {
executableDir = 'custom_bin_dir'
}License of start scripts
The start scripts generated for the application are licensed under the Apache 2.0 Software License.
Convention properties (deprecated)
This plugin also adds some convention properties to the project, which you can use to configure its behavior. These are deprecated and superseded by the extension described above. See the Project DSL documentation for information on them.
Unlike the extension properties, these properties appear as top-level project properties in the build script. For example, to change the application name you can just add the following to your build script:
application.applicationName = "my-app"application.applicationName = 'my-app'The Java Platform Plugin
The Java Platform plugin brings the ability to declare platforms for the Java ecosystem. A platform can be used for different purposes:
-
a description of modules which are published together (and for example, share the same version)
-
a set of recommended versions for heterogeneous libraries. A typical example includes the Spring Boot BOM
-
sharing a set of dependency versions between subprojects
A platform is a special kind of software component which doesn’t contain any sources: it is only used to reference other libraries, so that they play well together during dependency resolution.
Platforms can be published as Gradle Module Metadata and Maven BOMs.
|
Note
|
The java-platform plugin cannot be used in combination with the java or java-library plugins in a given project.
Conceptually a project is either a platform, with no binaries, or produces binaries.
|
Usage
To use the Java Platform plugin, include the following in your build script:
plugins {
`java-platform`
}plugins {
id 'java-platform'
}API and runtime separation
A major difference between a Maven BOM and a Java platform is that in Gradle dependencies and constraints are declared and scoped to a configuration and the ones extending it. While many users will only care about declaring constraints for compile time dependencies, thus inherited by runtime and tests ones, it allows declaring dependencies or constraints that only apply to runtime or test.
For this purpose, the plugin exposes two configurations that can be used to declare dependencies: api and runtime.
The api configuration should be used to declare constraints and dependencies which should be used when compiling against the platform, whereas the runtime configuration should be used to declare constraints or dependencies which are visible at runtime.
dependencies {
constraints {
api("commons-httpclient:commons-httpclient:3.1")
runtime("org.postgresql:postgresql:42.2.5")
}
}dependencies {
constraints {
api 'commons-httpclient:commons-httpclient:3.1'
runtime 'org.postgresql:postgresql:42.2.5'
}
}Note that this example makes use of constraints and not dependencies. In general, this is what you would like to do: constraints will only apply if such a component is added to the dependency graph, either directly or transitively. This means that all constraints listed in a platform would not add a dependency unless another component brings it in: they can be seen as recommendations.
|
Note
|
For example, if a platform declares a constraint on |
By default, in order to avoid the common mistake of adding a dependency in a platform instead of a constraint, Gradle will fail if you try to do so. If, for some reason, you also want to add dependencies in addition to constraints, you need to enable it explicitly:
javaPlatform {
allowDependencies()
}javaPlatform {
allowDependencies()
}Local project constraints
If you have a multi-project build and want to publish a platform that links to subprojects, you can do it by declaring constraints on the subprojects which belong to the platform, as in the example below:
dependencies {
constraints {
api(project(":core"))
api(project(":lib"))
}
}dependencies {
constraints {
api project(":core")
api project(":lib")
}
}The project notation will become a classical group:name:version notation in the published metadata.
Sourcing constraints from another platform
Sometimes the platform you define is an extension of another existing platform.
In order to have your platform include the constraints from that third party platform, it needs to be imported as a platform dependency:
javaPlatform {
allowDependencies()
}
dependencies {
api(platform("com.fasterxml.jackson:jackson-bom:2.9.8"))
}javaPlatform {
allowDependencies()
}
dependencies {
api platform('com.fasterxml.jackson:jackson-bom:2.9.8')
}Publishing platforms
Publishing Java platforms is done by applying the maven-publish plugin and configuring a Maven publication that uses the javaPlatform component:
publishing {
publications {
create<MavenPublication>("myPlatform") {
from(components["javaPlatform"])
}
}
}publishing {
publications {
myPlatform(MavenPublication) {
from components.javaPlatform
}
}
}This will generate a BOM file for the platform, with a <dependencyManagement> block where its <dependencies> correspond to the constraints defined in the platform module.
Consuming platforms
Because a Java Platform is a special kind of component, a dependency on a Java platform has to be declared using the platform or enforcedPlatform keyword, as explained in the managing transitive dependencies section.
For example, if you want to share dependency versions between subprojects, you can define a platform module which would declare all versions:
dependencies {
constraints {
// Platform declares some versions of libraries used in subprojects
api("commons-httpclient:commons-httpclient:3.1")
api("org.apache.commons:commons-lang3:3.8.1")
}
}dependencies {
constraints {
// Platform declares some versions of libraries used in subprojects
api 'commons-httpclient:commons-httpclient:3.1'
api 'org.apache.commons:commons-lang3:3.8.1'
}
}And then have subprojects depend on the platform to get recommendations:
dependencies {
// get recommended versions from the platform project
api(platform(project(":platform")))
// no version required
api("commons-httpclient:commons-httpclient")
}dependencies {
// get recommended versions from the platform project
api platform(project(':platform'))
// no version required
api 'commons-httpclient:commons-httpclient'
}The Groovy Plugin
The Groovy plugin extends the Java plugin to add support for Groovy projects. It can deal with Groovy code, mixed Groovy and Java code, and even pure Java code (although we don’t necessarily recommend to use it for the latter). The plugin supports joint compilation, which allows you to freely mix and match Groovy and Java code, with dependencies in both directions. For example, a Groovy class can extend a Java class that in turn extends a Groovy class. This makes it possible to use the best language for the job, and to rewrite any class in the other language if needed.
Note that if you want to benefit from the API / implementation separation, you can also apply the java-library plugin to your Groovy project.
Usage
To use the Groovy plugin, include the following in your build script:
plugins {
groovy
}plugins {
id 'groovy'
}Tasks
The Groovy plugin adds the following tasks to the project. Information about altering the dependencies to Java compile tasks are found here.
compileGroovy— GroovyCompile-
Depends on:
compileJavaCompiles production Groovy source files.
compileTestGroovy— GroovyCompile-
Depends on:
compileTestJavaCompiles test Groovy source files.
compileSourceSetGroovy— GroovyCompile-
Depends on:
compileSourceSetJavaCompiles the given source set’s Groovy source files.
groovydoc— Groovydoc-
Generates API documentation for the production Groovy source files.
The Groovy plugin adds the following dependencies to tasks added by the Java plugin.
| Task name | Depends on |
|---|---|
|
|
|
|
|
|

Project layout
The Groovy plugin assumes the project layout shown in Groovy Layout. All the Groovy source directories can contain Groovy and Java code. The Java source directories may only contain Java source code.[9] None of these directories need to exist or have anything in them; the Groovy plugin will simply compile whatever it finds.
src/main/java-
Production Java source.
src/main/resources-
Production resources, such as XML and properties files.
src/main/groovy-
Production Groovy source. May also contain Java source files for joint compilation.
src/test/java-
Test Java source.
src/test/resources-
Test resources.
src/test/groovy-
Test Groovy source. May also contain Java source files for joint compilation.
src/sourceSet/java-
Java source for the source set named sourceSet.
src/sourceSet/resources-
Resources for the source set named sourceSet.
src/sourceSet/groovy-
Groovy source files for the given source set. May also contain Java source files for joint compilation.
Changing the project layout
Just like the Java plugin, the Groovy plugin allows you to configure custom locations for Groovy production and test source files.
sourceSets {
main {
groovy {
setSrcDirs(listOf("src/groovy"))
}
}
test {
groovy {
setSrcDirs(listOf("test/groovy"))
}
}
}sourceSets {
main {
groovy {
srcDirs = ['src/groovy']
}
}
test {
groovy {
srcDirs = ['test/groovy']
}
}
}Dependency management
Because Gradle’s build language is based on Groovy, and parts of Gradle are implemented in Groovy, Gradle already ships with a Groovy library. Nevertheless, Groovy projects need to explicitly declare a Groovy dependency. This dependency will then be used on compile and runtime class paths. It will also be used to get hold of the Groovy compiler and Groovydoc tool, respectively.
If Groovy is used for production code, the Groovy dependency should be added to the implementation configuration:
repositories {
mavenCentral()
}
dependencies {
implementation("org.codehaus.groovy:groovy-all:2.4.15")
}repositories {
mavenCentral()
}
dependencies {
implementation 'org.codehaus.groovy:groovy-all:2.4.15'
}If Groovy is only used for test code, the Groovy dependency should be added to the testImplementation configuration:
dependencies {
testImplementation("org.codehaus.groovy:groovy-all:2.4.15")
}dependencies {
testImplementation 'org.codehaus.groovy:groovy-all:2.4.15'
}To use the Groovy library that ships with Gradle, declare a localGroovy() dependency. Note that different Gradle versions ship with different Groovy versions; as such, using localGroovy() is less safe then declaring a regular Groovy dependency.
dependencies {
implementation(localGroovy())
}dependencies {
implementation localGroovy()
}Automatic configuration of groovyClasspath
The GroovyCompile and Groovydoc tasks consume Groovy code in two ways: on their classpath, and on their groovyClasspath. The former is used to locate classes referenced by the source code, and will typically contain the Groovy library along with other libraries. The latter is used to load and execute the Groovy compiler and Groovydoc tool, respectively, and should only contain the Groovy library and its dependencies.
Unless a task’s groovyClasspath is configured explicitly, the Groovy (base) plugin will try to infer it from the task’s classpath. This is done as follows:
-
If a
groovy-all(-indy)Jar is found onclasspath, that jar will be added togroovyClasspath. -
If a
groovy(-indy)jar is found onclasspath, and the project has at least one repository declared, a correspondinggroovy(-indy)repository dependency will be added togroovyClasspath. -
Otherwise, execution of the task will fail with a message saying that
groovyClasspathcould not be inferred.
Note that the “-indy” variation of each jar refers to the version with invokedynamic support.
Convention properties
The Groovy plugin does not add any convention properties to the project.
Source set properties
The Groovy plugin adds the following extensions to each source set in the project. You can use these properties in your build script as though they were properties of the source set object.
Groovy Plugin — source set properties
groovy— GroovySourceDirectorySet (read-only)-
Default value: Not null
The Groovy source files of this source set. Contains all
.groovyand.javafiles found in the Groovy source directories, and excludes all other types of files. groovy.srcDirs—Set<File>-
Default value:
[projectDir/src/name/groovy]The source directories containing the Groovy source files of this source set. May also contain Java source files for joint compilation. Can set using anything described in Specifying Multiple Files.
allGroovy— FileTree (read-only)-
Default value: Not null
All Groovy source files of this source set. Contains only the
.groovyfiles found in the Groovy source directories.
These properties are provided by a convention object of type GroovySourceSet.
The Groovy plugin also modifies some source set properties:
Groovy Plugin - modified source set properties
| Property name | Change |
|---|---|
|
Adds all |
|
Adds all source files found in the Groovy source directories. |
GroovyCompile
The Groovy plugin adds a GroovyCompile task for each source set in the project.
The task type shares much with the JavaCompile task by extending AbstractCompile (see the relevant Java Plugin section).
The GroovyCompile task supports most configuration options of the official Groovy compiler.
The task can also leverage the Java toolchain support.
| Task Property | Type | Default Value |
|---|---|---|
|
|
|
|
FileTree. Can set using anything described in Specifying Multiple Files. |
|
|
|
|
|
|
|
|
|
None but will be configured if a toolchain is defined on the |
Compilation avoidance
Caveat: Groovy compilation avoidance is an incubating feature since Gradle 5.6. There are known inaccuracies so please enable it at your own risk.
To enable the incubating support for Groovy compilation avoidance, add a enableFeaturePreview to your settings file:
enableFeaturePreview('GROOVY_COMPILATION_AVOIDANCE')enableFeaturePreview("GROOVY_COMPILATION_AVOIDANCE")If a dependent project has changed in an ABI-compatible way (only its private API has changed), then Groovy compilation tasks will be up-to-date.
This means that if project A depends on project B and a class in B is changed in an ABI-compatible way (typically, changing only the body of a method), then Gradle won’t recompile A.
See Java compile avoidance for a detailed list of the types of changes that do not affect the ABI and are ignored.
However, similar to Java’s annotation processing, there are various ways to customize the Groovy compilation process, for which implementation details matter.
Some well-known examples are Groovy AST transformations.
In these cases, these dependencies must be declared separately in a classpath called astTransformationClasspath:
val astTransformation by configurations.creating
dependencies {
astTransformation(project(":ast-transformation"))
}
tasks.withType<GroovyCompile>().configureEach {
astTransformationClasspath.from(astTransformation)
}configurations { astTransformation }
dependencies {
astTransformation(project(":ast-transformation"))
}
tasks.withType(GroovyCompile).configureEach {
astTransformationClasspath.from(configurations.astTransformation)
}Incremental Groovy compilation
Since 5.6, Gradle introduces an experimental incremental Groovy compiler. To enable incremental compilation for Groovy, you need:
-
Enable Groovy compilation avoidance.
-
Explicitly enable incremental Groovy compilation in the build script:
tasks.withType<GroovyCompile>().configureEach {
options.isIncremental = true
options.incrementalAfterFailure = true
}tasks.withType(GroovyCompile).configureEach {
options.incremental = true
options.incrementalAfterFailure = true
}This gives you the following benefits:
-
Incremental builds are much faster.
-
If only a small set of Groovy source files are changed, only the affected source files will be recompiled. Classes that don’t need to be recompiled remain unchanged in the output directory. For example, if you only change a few Groovy test classes, you don’t need to recompile all Groovy test source files — only the changed ones need to be recompiled.
To understand how incremental compilation works, see Incremental Java compilation for a detailed overview. Note that there’re several differences from Java incremental compilation:
The Groovy compiler doesn’t keep @Retention in generated annotation class bytecode (GROOVY-9185), thus all annotations are RUNTIME.
This means that changes to source-retention annotations won’t trigger a full recompilation.
Known issues
-
Changes to resources won’t trigger a recompilation, this might result in some incorrectness — for example Extension Modules.
Compiling and testing for Java 6 or Java 7
With toolchain support added to GroovyCompile, it is possible to compile Groovy code using a different Java version than the one running Gradle.
If you also have Java source files, this will also configure JavaCompile to use the right Java compiler is used, as can be seen in the Java plugin documentation.
Example: Configure Java 7 build for Groovy
java {
toolchain {
languageVersion = JavaLanguageVersion.of(7)
}
}java {
toolchain {
languageVersion = JavaLanguageVersion.of(7)
}
}The Scala Plugin
The Scala plugin extends the Java plugin to add support for Scala projects. The plugin also supports joint compilation, which allows you to freely mix and match Scala and Java code with dependencies in both directions. For example, a Scala class can extend a Java class that in turn extends a Scala class. This makes it possible to use the best language for the job, and to rewrite any class in the other language if needed.
Note that if you want to benefit from the API / implementation separation, you can also apply the java-library plugin to your Scala project.
Usage
To use the Scala plugin, include the following in your build script:
plugins {
scala
}plugins {
id 'scala'
}Tasks
The Scala plugin adds the following tasks to the project. Information about altering the dependencies to Java compile tasks are found here.
compileScala— ScalaCompile-
Depends on:
compileJavaCompiles production Scala source files.
compileTestScala— ScalaCompile-
Depends on:
compileTestJavaCompiles test Scala source files.
compileSourceSetScala— ScalaCompile-
Depends on:
compileSourceSetJavaCompiles the given source set’s Scala source files.
scaladoc— ScalaDoc-
Generates API documentation for the production Scala source files.
The ScalaCompile and ScalaDoc tasks support Java toolchains out of the box.
The Scala plugin adds the following dependencies to tasks added by the Java plugin.
| Task name | Depends on |
|---|---|
|
|
|
|
|
|
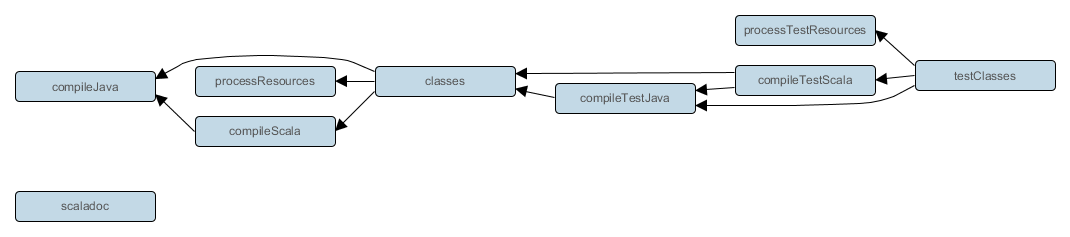
Project layout
The Scala plugin assumes the project layout shown below. All the Scala source directories can contain Scala and Java code. The Java source directories may only contain Java source code. None of these directories need to exist or have anything in them; the Scala plugin will simply compile whatever it finds.
src/main/java-
Production Java source.
src/main/resources-
Production resources, such as XML and properties files.
src/main/scala-
Production Scala source. May also contain Java source files for joint compilation.
src/test/java-
Test Java source.
src/test/resources-
Test resources.
src/test/scala-
Test Scala source. May also contain Java source files for joint compilation.
src/sourceSet/java-
Java source for the source set named sourceSet.
src/sourceSet/resources-
Resources for the source set named sourceSet.
src/sourceSet/scala-
Scala source files for the given source set. May also contain Java source files for joint compilation.
Changing the project layout
Just like the Java plugin, the Scala plugin allows you to configure custom locations for Scala production and test source files.
sourceSets {
main {
scala {
setSrcDirs(listOf("src/scala"))
}
}
test {
scala {
setSrcDirs(listOf("test/scala"))
}
}
}sourceSets {
main {
scala {
srcDirs = ['src/scala']
}
}
test {
scala {
srcDirs = ['test/scala']
}
}
}Dependency management
Scala projects need to declare a scala-library dependency. This dependency will then be used on compile and runtime class paths. It will also be used to get hold of the Scala compiler and Scaladoc tool, respectively.[10]
If Scala is used for production code, the scala-library dependency should be added to the implementation configuration:
repositories {
mavenCentral()
}
dependencies {
implementation("org.scala-lang:scala-library:2.13.12")
testImplementation("junit:junit:4.13")
}repositories {
mavenCentral()
}
dependencies {
implementation 'org.scala-lang:scala-library:2.13.12'
testImplementation 'junit:junit:4.13'
}If you want to use Scala 3 instead of the scala-library dependency you should add the scala3-library_3 dependency:
plugins {
scala
}
repositories {
mavenCentral()
}
dependencies {
implementation("org.scala-lang:scala3-library_3:3.0.1")
testImplementation("org.scalatest:scalatest_3:3.2.9")
testImplementation("junit:junit:4.13")
}
dependencies {
implementation("commons-collections:commons-collections:3.2.2")
}plugins {
id 'scala'
}
repositories {
mavenCentral()
}
dependencies {
implementation 'org.scala-lang:scala3-library_3:3.0.1'
implementation 'commons-collections:commons-collections:3.2.2'
testImplementation 'org.scalatest:scalatest_3:3.2.9'
testImplementation 'junit:junit:4.13'
}If Scala is only used for test code, the scala-library dependency should be added to the testImplementation configuration:
dependencies {
testImplementation("org.scala-lang:scala-library:2.13.12")
}dependencies {
testImplementation 'org.scala-lang:scala-library:2.13.12'
}Automatic configuration of scalaClasspath
The ScalaCompile and ScalaDoc tasks consume Scala code in two ways: on their classpath, and on their scalaClasspath. The former is used to locate classes referenced by the source code, and will typically contain scala-library along with other libraries. The latter is used to load and execute the Scala compiler and Scaladoc tool, respectively, and should only contain the scala-compiler library and its dependencies.
Unless a task’s scalaClasspath is configured explicitly, the Scala (base) plugin will try to infer it from the task’s classpath. This is done as follows:
-
If a
scala-libraryjar is found onclasspath, and the project has at least one repository declared, a correspondingscala-compilerrepository dependency will be added toscalaClasspath. -
Otherwise, execution of the task will fail with a message saying that
scalaClasspathcould not be inferred.
Configuring the Zinc compiler
The Scala plugin uses a configuration named zinc to resolve the Zinc compiler and its dependencies.
Gradle will provide a default version of Zinc, but if you need to use a particular Zinc version, you can change it.
Gradle supports version 1.6.0 of Zinc and above.
scala {
zincVersion = "1.9.3"
}scala {
zincVersion = "1.9.3"
}The Zinc compiler itself needs a compatible version of scala-library that may be different from the version required by your application.
Gradle takes care of specifying a compatible version of scala-library for you.
You can diagnose problems with the version of the Zinc compiler selected by running dependencyInsight for the zinc configuration.
| Gradle version | Supported Zinc versions | Zinc coordinates | Required Scala version | Supported Scala compilation version |
|---|---|---|---|---|
7.5 and newer |
SBT Zinc. Versions 1.6.0 and above. |
|
Scala |
Scala |
6.0 to 7.5 |
SBT Zinc. Versions 1.2.0 and above. |
|
Scala |
Scala |
1.x through 5.x |
Deprecated Typesafe Zinc compiler. Versions 0.3.0 and above, except for 0.3.2 through 0.3.5.2. |
|
Scala |
Scala |
Adding plugins to the Scala compiler
The Scala plugin adds a configuration named scalaCompilerPlugins which is used to declare and resolve optional compiler plugins.
dependencies {
implementation("org.scala-lang:scala-library:2.13.12")
scalaCompilerPlugins("org.typelevel:kind-projector_2.13.12:0.13.2")
}dependencies {
implementation "org.scala-lang:scala-library:2.13.12"
scalaCompilerPlugins "org.typelevel:kind-projector_2.13.12:0.13.2"
}Convention properties
The Scala plugin does not add any convention properties to the project.
Source set properties
The Scala plugin adds the following extensions to each source set in the project. You can use these in your build script as though they were properties of the source set object.
scala— SourceDirectorySet (read-only)-
The Scala source files of this source set. Contains all
.scalaand.javafiles found in the Scala source directories, and excludes all other types of files. Default value: non-null. scala.srcDirs—Set<File>-
The source directories containing the Scala source files of this source set. May also contain Java source files for joint compilation. Can set using anything described in Understanding implicit conversion to file collections. Default value:
[projectDir/src/name/scala]. allScala— FileTree (read-only)-
All Scala source files of this source set. Contains only the
.scalafiles found in the Scala source directories. Default value: non-null.
These extensions are backed by an object of type ScalaSourceSet.
The Scala plugin also modifies some source set properties:
| Property name | Change |
|---|---|
|
Adds all |
|
Adds all source files found in the Scala source directories. |
Target bytecode level and Java APIs version
When running the Scala compile task, Gradle will always add a parameter to configure the Java target for the Scala compiler that is derived from the Gradle configuration:
-
When using toolchains, the
-releaseoption, ortargetfor older Scala versions, is selected, with a version matching the Java language level of the toolchain configured. -
When not using toolchains, Gradle will always pass a
targetflag — with exact value dependent on the Scala version — to compile to Java 8 bytecode.
|
Note
|
This means that using toolchains with a recent Java version and an old Scala version can result in failures because Scala only supported Java 8 bytecode for some time. The solution is then to either use the right Java version in the toolchain or explicitly downgrade the target when needed. |
The following table explains the values computed by Gradle:
| Scala version | Toolchain in use | Parameter value |
|---|---|---|
version < |
yes |
|
no |
|
|
|
yes |
|
no |
|
|
|
yes |
|
no |
|
|
|
yes |
|
no |
|
Setting any of these flags explicitly, or using flags containing java-output-version, on ScalaCompile.scalaCompileOptions.additionalParameters disables that logic in favor of the explicit flag.
Compiling in external process
Scala compilation takes place in an external process.
Memory settings for the external process default to the defaults of the JVM. To adjust memory settings, configure the scalaCompileOptions.forkOptions property as needed:
tasks.withType<ScalaCompile>().configureEach {
scalaCompileOptions.forkOptions.apply {
memoryMaximumSize = "1g"
jvmArgs = listOf("-XX:MaxMetaspaceSize=512m")
}
}tasks.withType(ScalaCompile) {
scalaCompileOptions.forkOptions.with {
memoryMaximumSize = '1g'
jvmArgs = ['-XX:MaxMetaspaceSize=512m']
}
}Incremental compilation
By compiling only classes whose source code has changed since the previous compilation, and classes affected by these changes, incremental compilation can significantly reduce Scala compilation time. It is particularly effective when frequently compiling small code increments, as is often done at development time.
The Scala plugin defaults to incremental compilation by integrating with Zinc, a standalone version of sbt's incremental Scala compiler. If you want to disable the incremental compilation, set force = true in your build file:
tasks.withType<ScalaCompile>().configureEach {
scalaCompileOptions.apply {
isForce = true
}
}tasks.withType(ScalaCompile) {
scalaCompileOptions.with {
force = true
}
}Note: This will only cause all classes to be recompiled if at least one input source file has changed. If there are no changes to the source files, the compileScala task will still be considered UP-TO-DATE as usual.
The Zinc-based Scala Compiler supports joint compilation of Java and Scala code. By default, all Java and Scala code under src/main/scala will participate in joint compilation. Even Java code will be compiled incrementally.
Incremental compilation requires dependency analysis of the source code. The results of this analysis are stored in the file designated by scalaCompileOptions.incrementalOptions.analysisFile (which has a sensible default). In a multi-project build, analysis files are passed on to downstream ScalaCompile tasks to enable incremental compilation across project boundaries. For ScalaCompile tasks added by the Scala plugin, no configuration is necessary to make this work. For other ScalaCompile tasks that you might add, the property scalaCompileOptions.incrementalOptions.publishedCode needs to be configured to point to the classes folder or Jar archive by which the code is passed on to compile class paths of downstream ScalaCompile tasks. Note that if publishedCode is not set correctly, downstream tasks may not recompile code affected by upstream changes, leading to incorrect compilation results.
Note that Zinc’s Nailgun based daemon mode is not supported. Instead, we plan to enhance Gradle’s own compiler daemon to stay alive across Gradle invocations, reusing the same Scala compiler. This is expected to yield another significant speedup for Scala compilation.
Eclipse Integration
When the Eclipse plugin encounters a Scala project, it adds additional configuration to make the project work with Scala IDE out of the box. Specifically, the plugin adds a Scala nature and dependency container.
IntelliJ IDEA Integration
When the IDEA plugin encounters a Scala project, it adds additional configuration to make the project work with IDEA out of the box. Specifically, the plugin adds a Scala SDK (IntelliJ IDEA 14+) and a Scala compiler library that matches the Scala version on the project’s class path. The Scala plugin is backwards compatible with earlier versions of IntelliJ IDEA and it is possible to add a Scala facet instead of the default Scala SDK by configuring targetVersion on IdeaModel.
idea {
targetVersion = "13"
}idea {
targetVersion = '13'
}WORKING WITH DEPENDENCIES
Dependency Management Terminology
Dependency management comes with a wealth of terminology. Here you can find the most commonly-used terms including references to the user guide to learn about their practical application.
Artifact
A file or directory produced by a build, such as a JAR, a ZIP distribution, or a native executable.
Artifacts are typically designed to be used or consumed by users or other projects, or deployed to hosting systems. In such cases, the artifact is a single file. Directories are common in the case of inter-project dependencies to avoid the cost of producing the publishable artifact.
Capability
A capability identifies a feature offered by one or multiple components.
A capability is identified by coordinates similar to the coordinates used for module versions.
By default, each module version offers a capability that matches its coordinates, for example com.google:guava:18.0.
Capabilities can be used to express that a component provides multiple feature variants or that two different components implement the same feature (and thus cannot be used together).
For more details, see the section on capabilities.
Component
Any single version of a module.
For external libraries, the term component refers to one published version of the library.
In a build, components are defined by plugins (e.g. the Java Library plugin) and provide a simple way to define a publication for publishing.
They comprise artifacts as well as the appropriate metadata that describes a component’s variants in detail.
For example, the java component in its default setup consists of a JAR — produced by the jar task — and the dependency information of the Java api and runtime variants.
It may also define additional variants, for example sources and Javadoc, with the corresponding artifacts.
Configuration
A configuration is a named set of dependencies grouped together for a specific goal. Configurations provide access to the underlying, resolved modules and their artifacts. For more information, see the sections on dependency configurations as well as resolvable and consumable configurations.
|
Note
|
The word "configuration" is an overloaded term and has a different meaning outside of the context of dependency management. |
Dependency
A dependency is a pointer to another piece of software required to build, test or run a module. For more information, see the section on declaring dependencies.
Dependency constraint
A dependency constraint defines requirements that need to be met by a module to make it a valid resolution result for the dependency. For example, a dependency constraint can narrow down the set of supported module versions. Dependency constraints can be used to express such requirements for transitive dependencies. For more information, see the sections on upgrading and downgrading transitive dependencies.
Feature Variant
A feature variant is a variant representing a feature of a component that can be individually selected or not. A feature variant is identified by one or more capabilities. For more information, see the sections on modeling feature variants and optional dependencies.
Module
A piece of software that evolves over time e.g. Google Guava. Every module has a name. Each release of a module is optimally represented by a module version. For convenient consumption, modules can be hosted in a repository.
Module metadata
Releases of a module provide metadata.
Metadata is the data that describes the module in more detail e.g. information about the location of artifacts or required transitive dependencies.
Gradle offers its own metadata format called Gradle Module Metadata (.module file) but also supports Maven (.pom) and Ivy (ivy.xml) metadata.
See the section on understanding Gradle Module Metadata for more information on the supported metadata formats.
Component metadata rule
A component metadata rule is a rule that modifies a component’s metadata after it was fetched from a repository, e.g. to add missing information or to correct wrong information. In contrast to resolution rules, component metadata rules are applied before resolution starts. Component metadata rules are defined as part of the build logic and can be shared through plugins. For more information, see the section on fixing metadata with component metadata rules.
Module version
A module version represents a distinct set of changes of a released module.
For example 18.0 represents the version of the module with the coordinates com.google:guava:18.0.
In practice there’s no limitation to the scheme of the module version.
Timestamps, numbers, special suffixes like -GA are all allowed identifiers.
The most widely-used versioning strategy is semantic versioning.
Platform
A platform is a set of modules aimed to be used together. There are different categories of platforms, corresponding to different use cases:
-
module set: often a set of modules published together as a whole. Using one module of the set often means we want to use the same version for all modules of the set. For example, if using
groovy1.2, also usegroovy-json1.2. -
runtime environment: a set of libraries known to work well together. e.g., the Spring Platform, recommending versions for both Spring and components that work well with Spring.
-
deployment environment: Java runtime, application server, …
In addition Gradle defines virtual platforms.
|
Note
|
Maven’s BOM (bill-of-material) is a popular kind of platform that Gradle supports. |
Publication
A description of the files and metadata that should be published to a repository as a single entity for use by consumers.
A publication has a name and consists of one or more artifacts plus information about those artifacts (the metadata).
Repository
A repository hosts a set of modules, each of which may provide one or many releases (components) indicated by a module version. The repository can be based on a binary repository product (e.g. Artifactory or Nexus) or a directory structure in the filesystem. For more information, see Declaring Repositories.
Resolution rule
A resolution rule influences the behavior of how a dependency is resolved directly. Resolution rules are defined as part of the build logic. For more information, see the section on customizing resolution of a dependency directly.
Transitive dependency
A variant of a component can have dependencies on other modules to work properly, so-called transitive dependencies. Releases of a module hosted on a repository can provide metadata to declare those transitive dependencies. By default, Gradle resolves transitive dependencies automatically. The version selection for transitive dependencies can be influenced by declaring dependency constraints.
Variant (of a component)
Each component consists of one or more variants. A variant consists of a set of artifacts and defines a set of dependencies. It is identified by a set of attributes and capabilities.
Gradle’s dependency resolution is variant-aware and selects one or more variants of each component after a component (i.e. one version of a module) has been selected. It may also fail if the variant selection result is ambiguous, meaning that Gradle does not have enough information to select one of multiple mutual exclusive variants. In that case, more information can be provided through variant attributes. Examples of variants each Java components typically offers are api and runtime variants. Others examples are JDK8 and JDK11 variants. For more information, see the section on variant selection.
Variant Attribute
Attributes are used to identify and select variants.
A variant has one or more attributes defined, for example org.gradle.usage=java-api, org.gradle.jvm.version=11.
When dependencies are resolved, a set of attributes are requested and Gradle finds the best fitting variant(s) for each component in the dependency graph.
Compatibility and disambiguation rules can be implemented for an attribute to express compatibility between values (e.g. Java 8 is compatible with Java 11, but Java 11 should be preferred if the requested version is 11 or higher).
Such rules are typically provided by plugins.
For more information, see the sections on variant selection and declaring attributes.
THE BASICS
Dependency Management
Software projects rarely work in isolation. Projects often rely on reusable functionality from libraries. Some projects organize unrelated functionality into separate parts of a modular system.
Dependency management is an automated technique for declaring, resolving, and using functionality required by a project.
|
Tip
|
For an overview of dependency management terms, see Dependency Management Terminology. |
Dependency Management in Gradle
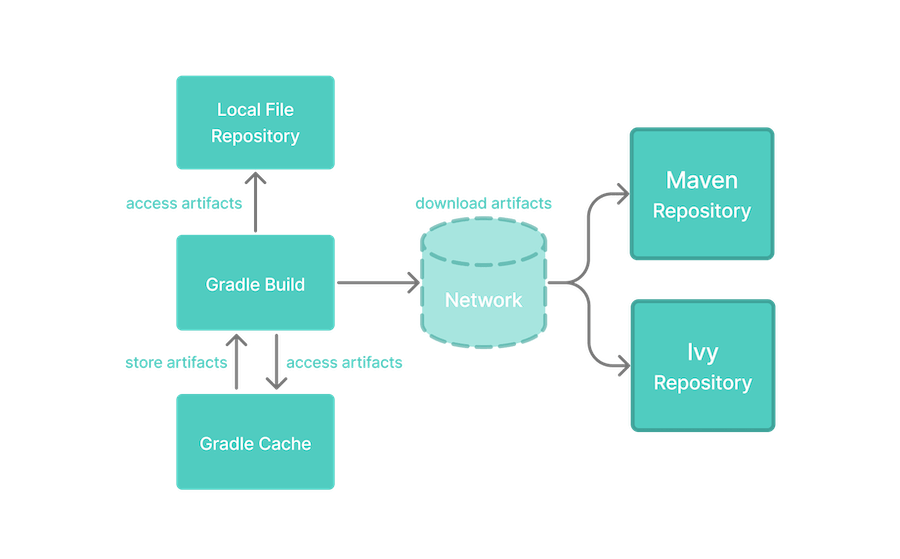
Gradle has built-in support for dependency management.
Let’s explore the main concepts with the help of a theoretical but common project:
-
This project builds Java source code.
-
Some Java source files import classes from the Google Guava library.
-
This project uses JUnit for testing.
The Gradle build file might look as follows:
plugins {
`java-library`
}
repositories { // (1)
google() // (2)
mavenCentral()
}
dependencies { // (3)
implementation("com.google.guava:guava:32.1.2-jre") // (4)
testImplementation("junit:junit:4.13.2")
}plugins {
id 'java-library'
}
repositories { // (1)
google() // (2)
mavenCentral()
}
dependencies { // (3)
implementation 'com.google.guava:guava:32.1.2-jre' // (4)
testImplementation 'junit:junit:4.13.2'
}-
Here we define repositories for the project.
-
Here we declare remote and local repositories for dependency locations.
You can declare repositories to tell Gradle where to fetch local or remote dependencies.
In this example, Gradle fetches dependencies from the Maven Central and Google repositories.
During a build, Gradle locates and downloads the dependencies, a process called dependency resolution. Gradle then stores resolved dependencies in a local cache called the dependency cache. Subsequent builds use this cache to avoid unnecessary network calls and speed up the build process. -
Here we define dependencies used by the project.
-
Here we declare the specific dependency name and version within a scope.
You can add code to your Java project from an external library such as
com.google.common.base(a Guava package) which becomes a dependency.
In this example, the theoretical project uses Guava version 32.1.2-jre and JUnit 4.13.2 as dependencies.
A build engineer can declare dependencies for different scopes. For example, you can declare dependencies that are only used at compile time. Gradle calls the scope of a dependency a configuration.
Repositories offer dependencies in multiple formats. For information about the formats supported by Gradle, see dependency types.
Metadata describes dependencies. Some examples of metadata include:
-
coordinates for finding the dependency in a repository
-
information about the project that created the dependency
-
the authors of the dependency
-
other dependencies required for a dependency to work properly, known as transitive dependencies
You can customize Gradle’s handling of transitive dependencies based on the requirements of a project.
Projects with hundreds of declared dependencies can be difficult to debug. Gradle provides tools to visualize and analyze a project’s dependency graph (i.e. dependency tree). You can use a Build Scan™ or built-in tasks.

Declaring repositories
Gradle can resolve dependencies from one or many repositories based on Maven, Ivy or flat directory formats. Check out the full reference on all types of repositories for more information.
Declaring a publicly-available repository
Organizations building software may want to leverage public binary repositories to download and consume open source dependencies. Popular public repositories include Maven Central and the Google Android repository. Gradle provides built-in shorthand notations for these widely-used repositories.
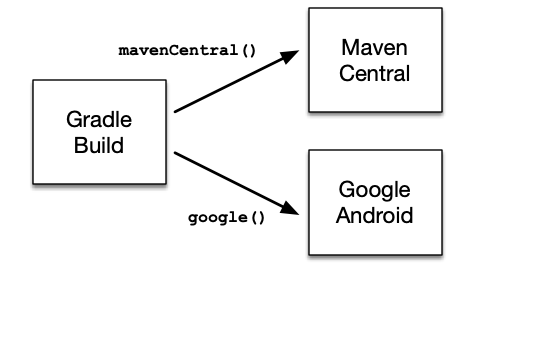
Under the covers Gradle resolves dependencies from the respective URL of the public repository defined by the shorthand notation. All shorthand notations are available via the RepositoryHandler API. Alternatively, you can spell out the URL of the repository for more fine-grained control.
Maven Central repository
Maven Central is a popular repository hosting open source libraries for consumption by Java projects.
To declare the Maven Central repository for your build add this to your script:
repositories {
mavenCentral()
}repositories {
mavenCentral()
}Google Maven repository
The Google repository hosts Android-specific artifacts including the Android SDK. For usage examples, see the relevant Android documentation.
To declare the Google Maven repository add this to your build script:
repositories {
google()
}repositories {
google()
}Declaring a custom repository by URL
Most enterprise projects set up a binary repository available only within an intranet. In-house repositories enable teams to publish internal binaries, setup user management and security measure and ensure uptime and availability. Specifying a custom URL is also helpful if you want to declare a less popular, but publicly-available repository.
Repositories with custom URLs can be specified as Maven or Ivy repositories by calling the corresponding methods available on the RepositoryHandler API.
Gradle supports other protocols than http or https as part of the custom URL e.g. file, sftp or s3.
For a full coverage see the section on supported repository types.
You can also define your own repository layout by using ivy { } repositories as they are very flexible in terms of how modules are organised in a repository.
Declaring multiple repositories
You can define more than one repository for resolving dependencies. Declaring multiple repositories is helpful if some dependencies are only available in one repository but not the other. You can mix any type of repository described in the reference section.
This example demonstrates how to declare various named and custom URL repositories for a project:
repositories {
mavenCentral()
maven {
url = uri("https://repo.spring.io/release")
}
maven {
url = uri("https://repository.jboss.org/maven2")
}
}repositories {
mavenCentral()
maven {
url "https://repo.spring.io/release"
}
maven {
url "https://repository.jboss.org/maven2"
}
}|
Note
|
The order of declaration determines how Gradle will check for dependencies at runtime. If Gradle finds a module descriptor in a particular repository, it will attempt to download all of the artifacts for that module from the same repository. You can learn more about the inner workings of dependency downloads. |
Strict limitation to declared repositories
Maven POM metadata can reference additional repositories. These will be ignored by Gradle, which will only use the repositories declared in the build itself.
|
Note
|
This is a reproducibility safe-guard but also a security protection. Without it, an updated version of a dependency could pull artifacts from anywhere into your build. |
Supported repository types
Gradle supports a wide range of sources for dependencies, both in terms of format and in terms of connectivity. You may resolve dependencies from:
-
Different formats
-
a Maven compatible artifact repository (e.g: Maven Central)
-
an Ivy compatible artifact repository (including custom layouts)
-
-
with different connectivity
-
a wide variety of remote protocols such as HTTPS, SFTP, AWS S3 and Google Cloud Storage
Flat directory repository
Some projects might prefer to store dependencies on a shared drive or as part of the project source code instead of a binary repository product. If you want to use a (flat) filesystem directory as a repository, simply type:
repositories {
flatDir {
dirs("lib")
}
flatDir {
dirs("lib1", "lib2")
}
}repositories {
flatDir {
dirs 'lib'
}
flatDir {
dirs 'lib1', 'lib2'
}
}This adds repositories which look into one or more directories for finding dependencies.
This type of repository does not support any meta-data formats like Ivy XML or Maven POM files. Instead, Gradle will dynamically generate a module descriptor (without any dependency information) based on the presence of artifacts.
|
Note
|
As Gradle prefers to use modules whose descriptor has been created from real meta-data rather than being generated, flat directory repositories cannot be used to override artifacts with real meta-data from other repositories declared in the build. For example, if Gradle finds only For the use case of overriding remote artifacts with local ones consider using an Ivy or Maven repository instead whose URL points to a local directory. |
If you only work with flat directory repositories you don’t need to set all attributes of a dependency.
Local repositories
The following sections describe repositories format, Maven or Ivy. These can be declared as local repositories, using a local filesystem path to access them.
The difference with the flat directory repository is that they do respect a format and contain metadata.
When such a repository is configured, Gradle totally bypasses its dependency cache for it as there can be no guarantee that content may not change between executions. Because of that limitation, they can have a performance impact.
They also make build reproducibility much harder to achieve and their use should be limited to tinkering or prototyping.
Maven repositories
Many organizations host dependencies in an in-house Maven repository only accessible within the company’s network. Gradle can declare Maven repositories by URL.
For adding a custom Maven repository you can do:
repositories {
maven {
url = uri("http://repo.mycompany.com/maven2")
}
}repositories {
maven {
url "http://repo.mycompany.com/maven2"
}
}Setting up composite Maven repositories
Sometimes a repository will have the POMs published to one location, and the JARs and other artifacts published at another location. To define such a repository, you can do:
repositories {
maven {
// Look for POMs and artifacts, such as JARs, here
url = uri("http://repo2.mycompany.com/maven2")
// Look for artifacts here if not found at the above location
artifactUrls("http://repo.mycompany.com/jars")
artifactUrls("http://repo.mycompany.com/jars2")
}
}repositories {
maven {
// Look for POMs and artifacts, such as JARs, here
url "http://repo2.mycompany.com/maven2"
// Look for artifacts here if not found at the above location
artifactUrls "http://repo.mycompany.com/jars"
artifactUrls "http://repo.mycompany.com/jars2"
}
}Gradle will look at the base url location for the POM and the JAR.
If the JAR can’t be found there, the extra artifactUrls are used to look for JARs.
Accessing authenticated Maven repositories
You can specify credentials for Maven repositories secured by different type of authentication.
See Supported repository transport protocols for authentication options.
Local Maven repository
Gradle can consume dependencies available in the local Maven repository. Declaring this repository is beneficial for teams that publish to the local Maven repository with one project and consume the artifacts by Gradle in another project.
|
Note
|
Gradle stores resolved dependencies in its own cache. A build does not need to declare the local Maven repository even if you resolve dependencies from a Maven-based, remote repository. |
|
Warning
|
Before adding Maven local as a repository, you should make sure this is really required. |
To declare the local Maven cache as a repository add this to your build script:
repositories {
mavenLocal()
}repositories {
mavenLocal()
}Gradle uses the same logic as Maven to identify the location of your local Maven cache.
If a local repository location is defined in a settings.xml, this location will be used.
The settings.xml in <home directory of the current user>/.m2 takes precedence over the settings.xml in M2_HOME/conf.
If no settings.xml is available, Gradle uses the default location <home directory of the current user>/.m2/repository.
The case for mavenLocal()
As a general advice, you should avoid adding mavenLocal() as a repository.
There are different issues with using mavenLocal() that you should be aware of:
-
Maven uses it as a cache, not a repository, meaning it can contain partial modules.
-
For example, if Maven never downloaded the source or javadoc files for a given module, Gradle will not find them either since it searches for files in a single repository once a module has been found.
-
-
As a local repository, Gradle does not trust its content, because:
-
Origin of artifacts cannot be tracked, which is a correctness and security problem
-
Artifacts can be easily overwritten, which is a security, correctness and reproducibility problem
-
-
To mitigate the fact that metadata and/or artifacts can be changed, Gradle does not perform any caching for local repositories
-
As a consequence, your builds are slower
-
Given that order of repositories is important, adding
mavenLocal()first means that all your builds are going to be slower
-
There are a few cases where you might have to use mavenLocal():
-
For interoperability with Maven
-
For example, project A is built with Maven, project B is built with Gradle, and you need to share the artifacts during development
-
It is always preferable to use an internal full featured repository instead
-
In case this is not possible, you should limit this to local builds only
-
-
For interoperability with Gradle itself
-
In a multi-repository world, you want to check that changes to project A work with project B
-
It is preferable to use composite builds for this use case
-
If for some reason neither composite builds nor full featured repository are possible, then
mavenLocal()is a last resort option
-
After all these warnings, if you end up using mavenLocal(), consider combining it with a repository filter.
This will make sure it only provides what is expected and nothing else.
Ivy repositories
Organizations might decide to host dependencies in an in-house Ivy repository. Gradle can declare Ivy repositories by URL.
Defining an Ivy repository with a standard layout
To declare an Ivy repository using the standard layout no additional customization is needed. You just declare the URL.
repositories {
ivy {
url = uri("http://repo.mycompany.com/repo")
}
}repositories {
ivy {
url "http://repo.mycompany.com/repo"
}
}Defining a named layout for an Ivy repository
You can specify that your repository conforms to the Ivy or Maven default layout by using a named layout.
repositories {
ivy {
url = uri("http://repo.mycompany.com/repo")
layout("maven")
}
}repositories {
ivy {
url "http://repo.mycompany.com/repo"
layout "maven"
}
}Valid named layout values are 'gradle' (the default), 'maven' and 'ivy'. See IvyArtifactRepository.layout(java.lang.String) in the API documentation for details of these named layouts.
Defining custom pattern layout for an Ivy repository
To define an Ivy repository with a non-standard layout, you can define a pattern layout for the repository:
repositories {
ivy {
url = uri("http://repo.mycompany.com/repo")
patternLayout {
artifact("[module]/[revision]/[type]/[artifact].[ext]")
}
}
}repositories {
ivy {
url "http://repo.mycompany.com/repo"
patternLayout {
artifact "[module]/[revision]/[type]/[artifact].[ext]"
}
}
}To define an Ivy repository which fetches Ivy files and artifacts from different locations, you can define separate patterns to use to locate the Ivy files and artifacts:
Each artifact or ivy specified for a repository adds an additional pattern to use. The patterns are used in the order that they are defined.
repositories {
ivy {
url = uri("http://repo.mycompany.com/repo")
patternLayout {
artifact("3rd-party-artifacts/[organisation]/[module]/[revision]/[artifact]-[revision].[ext]")
artifact("company-artifacts/[organisation]/[module]/[revision]/[artifact]-[revision].[ext]")
ivy("ivy-files/[organisation]/[module]/[revision]/ivy.xml")
}
}
}repositories {
ivy {
url "http://repo.mycompany.com/repo"
patternLayout {
artifact "3rd-party-artifacts/[organisation]/[module]/[revision]/[artifact]-[revision].[ext]"
artifact "company-artifacts/[organisation]/[module]/[revision]/[artifact]-[revision].[ext]"
ivy "ivy-files/[organisation]/[module]/[revision]/ivy.xml"
}
}
}Optionally, a repository with pattern layout can have its 'organisation' part laid out in Maven style, with forward slashes replacing dots as separators. For example, the organisation my.company would then be represented as my/company.
repositories {
ivy {
url = uri("http://repo.mycompany.com/repo")
patternLayout {
artifact("[organisation]/[module]/[revision]/[artifact]-[revision].[ext]")
setM2compatible(true)
}
}
}repositories {
ivy {
url "http://repo.mycompany.com/repo"
patternLayout {
artifact "[organisation]/[module]/[revision]/[artifact]-[revision].[ext]"
m2compatible = true
}
}
}Accessing authenticated Ivy repositories
You can specify credentials for Ivy repositories secured by basic authentication.
repositories {
ivy {
url = uri("http://repo.mycompany.com")
credentials {
username = "user"
password = "password"
}
}
}repositories {
ivy {
url "http://repo.mycompany.com"
credentials {
username "user"
password "password"
}
}
}See Supported repository transport protocols for authentication options.
Repository content filtering
Gradle exposes an API to declare what a repository may or may not contain. There are different use cases for it:
-
performance, when you know a dependency will never be found in a specific repository
-
security, by avoiding leaking what dependencies are used in a private project
-
reliability, when some repositories contain corrupted metadata or artifacts
It’s even more important when considering that the declared order of repositories matter.
Declaring a repository filter
repositories {
maven {
url = uri("https://repo.mycompany.com/maven2")
content {
// this repository *only* contains artifacts with group "my.company"
includeGroup("my.company")
}
}
mavenCentral {
content {
// this repository contains everything BUT artifacts with group starting with "my.company"
excludeGroupByRegex("my\\.company.*")
}
}
}repositories {
maven {
url "https://repo.mycompany.com/maven2"
content {
// this repository *only* contains artifacts with group "my.company"
includeGroup "my.company"
}
}
mavenCentral {
content {
// this repository contains everything BUT artifacts with group starting with "my.company"
excludeGroupByRegex "my\\.company.*"
}
}
}By default, repositories include everything and exclude nothing:
-
If you declare an include, then it excludes everything but what is included.
-
If you declare an exclude, then it includes everything but what is excluded.
-
If you declare both includes and excludes, then it includes only what is explicitly included and not excluded.
It is possible to filter either by explicit group, module or version, either strictly or using regular expressions. When using a strict version, it is possible to use a version range, using the format supported by Gradle. In addition, there are filtering options by resolution context: configuration name or even configuration attributes. See RepositoryContentDescriptor for details.
Declaring content exclusively found in one repository
Filters declared using the repository-level content filter are not exclusive. This means that declaring that a repository includes an artifact doesn’t mean that the other repositories can’t have it either: you must declare what every repository contains in extension.
Alternatively, Gradle provides an API which lets you declare that a repository exclusively includes an artifact. If you do so:
-
an artifact declared in a repository can’t be found in any other
-
exclusive repository content must be declared in extension (just like for repository-level content)
repositories {
// This repository will _not_ be searched for artifacts in my.company
// despite being declared first
mavenCentral()
exclusiveContent {
forRepository {
maven {
url = uri("https://repo.mycompany.com/maven2")
}
}
filter {
// this repository *only* contains artifacts with group "my.company"
includeGroup("my.company")
}
}
}repositories {
// This repository will _not_ be searched for artifacts in my.company
// despite being declared first
mavenCentral()
exclusiveContent {
forRepository {
maven {
url "https://repo.mycompany.com/maven2"
}
}
filter {
// this repository *only* contains artifacts with group "my.company"
includeGroup "my.company"
}
}
}It is possible to filter either by explicit group, module or version, either strictly or using regular expressions. See InclusiveRepositoryContentDescriptor for details.
|
Note
|
If you leverage exclusive content filtering in the Your options are either to declare all repositories in settings or to use non-exclusive content filtering. |
Maven repository filtering
For Maven repositories, it’s often the case that a repository would either contain releases or snapshots. Gradle lets you declare what kind of artifacts are found in a repository using this DSL:
repositories {
maven {
url = uri("https://repo.mycompany.com/releases")
mavenContent {
releasesOnly()
}
}
maven {
url = uri("https://repo.mycompany.com/snapshots")
mavenContent {
snapshotsOnly()
}
}
}repositories {
maven {
url "https://repo.mycompany.com/releases"
mavenContent {
releasesOnly()
}
}
maven {
url "https://repo.mycompany.com/snapshots"
mavenContent {
snapshotsOnly()
}
}
}Supported metadata sources
When searching for a module in a repository, Gradle, by default, checks for supported metadata file formats in that repository.
In a Maven repository, Gradle looks for a .pom file, in an ivy repository it looks for an ivy.xml file and in a flat directory repository it looks directly for .jar files as it does not expect any metadata.
Starting with 5.0, Gradle also looks for .module (Gradle module metadata) files.
However, if you define a customized repository you might want to configure this behavior.
For example, you can define a Maven repository without .pom files but only jars.
To do so, you can configure metadata sources for any repository.
repositories {
maven {
url = uri("http://repo.mycompany.com/repo")
metadataSources {
mavenPom()
artifact()
}
}
}repositories {
maven {
url "http://repo.mycompany.com/repo"
metadataSources {
mavenPom()
artifact()
}
}
}You can specify multiple sources to tell Gradle to keep looking if a file was not found. In that case, the order of checking for sources is predefined.
The following metadata sources are supported:
| Metadata source | Description | Order | Maven | Ivy / flat dir |
|---|---|---|---|---|
|
Look for Gradle |
1st |
yes |
yes |
|
Look for Maven |
2nd |
yes |
yes |
|
Look for |
2nd |
no |
yes |
|
Look directly for artifact |
3rd |
yes |
yes |
The defaults for Ivy and Maven repositories change with Gradle 6.0.
Before 6.0, artifact() was included in the defaults.
Leading to some inefficiency when modules are missing completely.
To restore this behavior, for example, for Maven central you can use:
mavenCentral { metadataSources { mavenPom(); artifact() } }In a similar way, you can opt into the new behavior in older Gradle versions using:
mavenCentral { metadataSources { mavenPom() } }Since Gradle 5.3, when parsing a metadata file, be it Ivy or Maven, Gradle will look for a marker indicating that a matching Gradle Module Metadata files exists. If it is found, it will be used instead of the Ivy or Maven file.
Starting with Gradle 5.6, you can disable this behavior by adding ignoreGradleMetadataRedirection() to the metadataSources declaration.
repositories {
maven {
url = uri("http://repo.mycompany.com/repo")
metadataSources {
mavenPom()
artifact()
ignoreGradleMetadataRedirection()
}
}
}repositories {
maven {
url "http://repo.mycompany.com/repo"
metadataSources {
mavenPom()
artifact()
ignoreGradleMetadataRedirection()
}
}
}Plugin repositories vs. build repositories
Gradle will use repositories at two different phases during your build.
The first phase is when configuring your build and loading the plugins it applied. To do that Gradle will use a special set of repositories.
The second phase is during dependency resolution. At this point Gradle will use the repositories declared in your project, as shown in the previous sections.
Plugin repositories
By default Gradle will use the Gradle plugin portal to look for plugins.
However, for different reasons, there are plugins available in other, public or not, repositories. When a build requires one of these plugins, additional repositories need to be specified so that Gradle knows where to search.
As the way to declare the repositories and what they are expected to contain depends on the way the plugin is applied, it is best to refer to Custom Plugin Repositories.
Centralizing repositories declaration
Instead of declaring repositories in every subproject of your build or via an allprojects block, Gradle offers a way to declare them in a central place for all projects.
|
Note
|
Central declaration of repositories is an incubating feature. |
Repositories used by convention in every subproject can be declared in the settings.gradle(.kts) file:
dependencyResolutionManagement {
repositories {
mavenCentral()
}
}dependencyResolutionManagement {
repositories {
mavenCentral()
}
}The dependencyResolutionManagement repositories block accepts the same notations as in a project. This includes Maven or Ivy repositories, with or without credentials, etc.
By default, repositories declared by a project in build.gradle(.kts) will override whatever is declared in settings.gradle(.kts):
dependencyResolutionManagement {
repositoriesMode = RepositoriesMode.PREFER_PROJECT
}dependencyResolutionManagement {
repositoriesMode = RepositoriesMode.PREFER_PROJECT
}There are three modes for dependency resolution management:
| Mode | Description | Default? | Use-Case |
|---|---|---|---|
|
Any repository declared on a project will cause the project to use the repositories declared by the project, ignoring those declared in settings. |
Yes |
Useful when teams need to use different repositories not common among subprojects. |
|
Any repository declared directly in a project, either directly or via a plugin, will be ignored. |
No |
Useful for enforcing large teams to use approved repositories only, but will not fail the build when a project or plugin declares a repository. |
|
Any repository declared directly in a project, either directly or via a plugin, will trigger a build error. |
No |
Useful for enforcing large teams to use approved repositories only. |
You can change the behavior to prefer the repositories in the settings.gradle(.kts) file by using repositoriesMode:
dependencyResolutionManagement {
repositoriesMode = RepositoriesMode.PREFER_SETTINGS
}dependencyResolutionManagement {
repositoriesMode = RepositoriesMode.PREFER_SETTINGS
}Gradle will warn you if a project or a plugin declares a repository in a project.
You can force Gradle to fail the build if you want to enforce that only settings repositories are used:
dependencyResolutionManagement {
repositoriesMode = RepositoriesMode.FAIL_ON_PROJECT_REPOS
}dependencyResolutionManagement {
repositoriesMode = RepositoriesMode.FAIL_ON_PROJECT_REPOS
}Supported repository transport protocols
Maven and Ivy repositories support the use of various transport protocols. At the moment the following protocols are supported:
| Type | Credential types | Link |
|---|---|---|
|
none |
|
|
username/password |
|
|
username/password |
|
|
username/password |
|
|
access key/secret key/session token or Environment variables |
|
|
default application credentials sourced from well known files, Environment variables etc. |
|
Note
|
Username and password should never be checked in plain text into version control as part of your build file.
You can store the credentials in a local gradle.properties file and use one of the open source Gradle plugins for encrypting and consuming credentials e.g. the credentials plugin.
|
The transport protocol is part of the URL definition for a repository. The following build script demonstrates how to create HTTP-based Maven and Ivy repositories:
repositories {
maven {
url = uri("http://repo.mycompany.com/maven2")
}
ivy {
url = uri("http://repo.mycompany.com/repo")
}
}repositories {
maven {
url "http://repo.mycompany.com/maven2"
}
ivy {
url "http://repo.mycompany.com/repo"
}
}The following example shows how to declare SFTP repositories:
repositories {
maven {
url = uri("sftp://repo.mycompany.com:22/maven2")
credentials {
username = "user"
password = "password"
}
}
ivy {
url = uri("sftp://repo.mycompany.com:22/repo")
credentials {
username = "user"
password = "password"
}
}
}repositories {
maven {
url "sftp://repo.mycompany.com:22/maven2"
credentials {
username "user"
password "password"
}
}
ivy {
url "sftp://repo.mycompany.com:22/repo"
credentials {
username "user"
password "password"
}
}
}For details on HTTP related authentication, see the section HTTP(S) authentication schemes configuration.
When using an AWS S3 backed repository you need to authenticate using AwsCredentials, providing access-key and a private-key. The following example shows how to declare a S3 backed repository and providing AWS credentials:
repositories {
maven {
url = uri("s3://myCompanyBucket/maven2")
credentials(AwsCredentials::class) {
accessKey = "someKey"
secretKey = "someSecret"
// optional
sessionToken = "someSTSToken"
}
}
ivy {
url = uri("s3://myCompanyBucket/ivyrepo")
credentials(AwsCredentials::class) {
accessKey = "someKey"
secretKey = "someSecret"
// optional
sessionToken = "someSTSToken"
}
}
}repositories {
maven {
url "s3://myCompanyBucket/maven2"
credentials(AwsCredentials) {
accessKey "someKey"
secretKey "someSecret"
// optional
sessionToken "someSTSToken"
}
}
ivy {
url "s3://myCompanyBucket/ivyrepo"
credentials(AwsCredentials) {
accessKey "someKey"
secretKey "someSecret"
// optional
sessionToken "someSTSToken"
}
}
}You can also delegate all credentials to the AWS sdk by using the AwsImAuthentication. The following example shows how:
repositories {
maven {
url = uri("s3://myCompanyBucket/maven2")
authentication {
create<AwsImAuthentication>("awsIm") // load from EC2 role or env var
}
}
ivy {
url = uri("s3://myCompanyBucket/ivyrepo")
authentication {
create<AwsImAuthentication>("awsIm")
}
}
}repositories {
maven {
url "s3://myCompanyBucket/maven2"
authentication {
awsIm(AwsImAuthentication) // load from EC2 role or env var
}
}
ivy {
url "s3://myCompanyBucket/ivyrepo"
authentication {
awsIm(AwsImAuthentication)
}
}
}For details on AWS S3 related authentication, see the section AWS S3 repositories configuration.
When using a Google Cloud Storage backed repository default application credentials will be used with no further configuration required:
repositories {
maven {
url = uri("gcs://myCompanyBucket/maven2")
}
ivy {
url = uri("gcs://myCompanyBucket/ivyrepo")
}
}repositories {
maven {
url "gcs://myCompanyBucket/maven2"
}
ivy {
url "gcs://myCompanyBucket/ivyrepo"
}
}For details on Google GCS related authentication, see the section Google Cloud Storage repositories configuration.
HTTP(S) authentication schemes configuration
When configuring a repository using HTTP or HTTPS transport protocols, multiple authentication schemes are available. By default, Gradle will attempt to use all schemes that are supported by the Apache HttpClient library, documented here. In some cases, it may be preferable to explicitly specify which authentication schemes should be used when exchanging credentials with a remote server. When explicitly declared, only those schemes are used when authenticating to a remote repository.
You can specify credentials for Maven repositories secured by basic authentication using PasswordCredentials.
repositories {
maven {
url = uri("http://repo.mycompany.com/maven2")
credentials {
username = "user"
password = "password"
}
}
}repositories {
maven {
url "http://repo.mycompany.com/maven2"
credentials {
username "user"
password "password"
}
}
}The following example show how to configure a repository to use only DigestAuthentication:
repositories {
maven {
url = uri("https://repo.mycompany.com/maven2")
credentials {
username = "user"
password = "password"
}
authentication {
create<DigestAuthentication>("digest")
}
}
}repositories {
maven {
url 'https://repo.mycompany.com/maven2'
credentials {
username "user"
password "password"
}
authentication {
digest(DigestAuthentication)
}
}
}Currently supported authentication schemes are:
- BasicAuthentication
-
Basic access authentication over HTTP. When using this scheme, credentials are sent preemptively.
- DigestAuthentication
-
Digest access authentication over HTTP.
- HttpHeaderAuthentication
-
Authentication based on any custom HTTP header, e.g. private tokens, OAuth tokens, etc.
Using preemptive authentication
Gradle’s default behavior is to only submit credentials when a server responds with an authentication challenge in the form of an HTTP 401 response. In some cases, the server will respond with a different code (ex. for repositories hosted on GitHub a 404 is returned) causing dependency resolution to fail. To get around this behavior, credentials may be sent to the server preemptively. To enable preemptive authentication simply configure your repository to explicitly use the BasicAuthentication scheme:
repositories {
maven {
url = uri("https://repo.mycompany.com/maven2")
credentials {
username = "user"
password = "password"
}
authentication {
create<BasicAuthentication>("basic")
}
}
}repositories {
maven {
url 'https://repo.mycompany.com/maven2'
credentials {
username "user"
password "password"
}
authentication {
basic(BasicAuthentication)
}
}
}Using HTTP header authentication
You can specify any HTTP header for secured Maven repositories requiring token, OAuth2 or other HTTP header based authentication using HttpHeaderCredentials with HttpHeaderAuthentication.
repositories {
maven {
url = uri("http://repo.mycompany.com/maven2")
credentials(HttpHeaderCredentials::class) {
name = "Private-Token"
value = "TOKEN"
}
authentication {
create<HttpHeaderAuthentication>("header")
}
}
}repositories {
maven {
url "http://repo.mycompany.com/maven2"
credentials(HttpHeaderCredentials) {
name = "Private-Token"
value = "TOKEN"
}
authentication {
header(HttpHeaderAuthentication)
}
}
}AWS S3 repositories configuration
S3 configuration properties
The following system properties can be used to configure the interactions with s3 repositories:
org.gradle.s3.endpoint-
Used to override the AWS S3 endpoint when using a non AWS, S3 API compatible, storage service.
org.gradle.s3.maxErrorRetry-
Specifies the maximum number of times to retry a request in the event that the S3 server responds with a HTTP 5xx status code. When not specified a default value of 3 is used.
S3 URL formats
S3 URL’s are 'virtual-hosted-style' and must be in the following format
s3://<bucketName>[.<regionSpecificEndpoint>]/<s3Key>
e.g. s3://myBucket.s3.eu-central-1.amazonaws.com/maven/release
-
myBucketis the AWS S3 bucket name. -
s3.eu-central-1.amazonaws.comis the optional region specific endpoint. -
/maven/releaseis the AWS S3 key (unique identifier for an object within a bucket)
S3 proxy settings
A proxy for S3 can be configured using the following system properties:
-
https.proxyHost -
https.proxyPort -
https.proxyUser -
https.proxyPassword -
http.nonProxyHosts(NOTE: this is not a typo.)
If the org.gradle.s3.endpoint property has been specified with a HTTP (not HTTPS) URI the following system proxy settings can be used:
-
http.proxyHost -
http.proxyPort -
http.proxyUser -
http.proxyPassword -
http.nonProxyHosts
AWS S3 V4 Signatures (AWS4-HMAC-SHA256)
Some of the AWS S3 regions (eu-central-1 - Frankfurt) require that all HTTP requests are signed in accordance with AWS’s signature version 4. It is recommended to specify S3 URL’s containing the region specific endpoint when using buckets that require V4 signatures. e.g.
s3://somebucket.s3.eu-central-1.amazonaws.com/maven/release
When a region-specific endpoint is not specified for buckets requiring V4 Signatures, Gradle will use the default AWS region (us-east-1) and the following warning will appear on the console:
Attempting to re-send the request to .... with AWS V4 authentication. To avoid this warning in the future, use region-specific endpoint to access buckets located in regions that require V4 signing.Failing to specify the region-specific endpoint for buckets requiring V4 signatures means:
-
3 round-trips to AWS, as opposed to one, for every file upload and download.
-
Depending on location - increased network latencies and slower builds.
-
Increased likelihood of transmission failures.
AWS S3 Cross Account Access
Some organizations may have multiple AWS accounts, e.g. one for each team. The AWS account of the bucket owner is often different from the artifact publisher and consumers. The bucket owner needs to be able to grant the consumers access otherwise the artifacts will only be usable by the publisher’s account. This is done by adding the bucket-owner-full-control Canned ACL to the uploaded objects. Gradle will do this in every upload. Make sure the publisher has the required IAM permission, PutObjectAcl (and PutObjectVersionAcl if bucket versioning is enabled), either directly or via an assumed IAM Role (depending on your case). You can read more at AWS S3 Access Permissions.
Google Cloud Storage repositories configuration
GCS configuration properties
The following system properties can be used to configure the interactions with Google Cloud Storage repositories:
org.gradle.gcs.endpoint-
Used to override the Google Cloud Storage endpoint when using a non-Google Cloud Platform, Google Cloud Storage API compatible, storage service.
org.gradle.gcs.servicePath-
Used to override the Google Cloud Storage root service path which the Google Cloud Storage client builds requests from, defaults to
/.
GCS URL formats
Google Cloud Storage URL’s are 'virtual-hosted-style' and must be in the following format gcs://<bucketName>/<objectKey>
e.g. gcs://myBucket/maven/release
-
myBucketis the Google Cloud Storage bucket name. -
/maven/releaseis the Google Cloud Storage key (unique identifier for an object within a bucket)
Handling credentials
Repository credentials should never be part of your build script but rather be kept external. Gradle provides an API in artifact repositories that allows you to declare only the type of required credentials. Credential values are looked up from the Gradle Properties during the build that requires them.
For example, given repository configuration:
repositories {
maven {
name = "mySecureRepository"
credentials(PasswordCredentials::class)
// url = uri(<<some repository url>>)
}
}repositories {
maven {
name = 'mySecureRepository'
credentials(PasswordCredentials)
// url = uri(<<some repository url>>)
}
}The username and password will be looked up from mySecureRepositoryUsername and mySecureRepositoryPassword properties.
Note that the configuration property prefix - the identity - is determined from the repository name.
Credentials can then be provided in any of supported ways for Gradle Properties -
gradle.properties file, command line arguments, environment variables or a combination of those options.
Also, note that credentials will only be required if the invoked build requires them. If for example a project is configured to publish artifacts to a secured repository, but the build does not invoke publishing task, Gradle will not require publishing credentials to be present. On the other hand, if the build needs to execute a task that requires credentials at some point, Gradle will check for credential presence first thing and will not start running any of the tasks if it knows that the build will fail at a later point because of missing credentials.
Here is a downloadable sample that demonstrates the concept in more detail.
Lookup is only supported for credentials listed in the Table 19.
| Type | Argument | Base property name | Required? |
|---|---|---|---|
|
|
required |
|
|
|
required |
|
|
|
required |
|
|
|
required |
|
|
|
optional |
|
|
|
required |
|
|
|
required |
Declaring dependencies
Before looking at dependency declarations themselves, the concept of dependency configuration needs to be defined.
What are dependency configurations
Every dependency declared for a Gradle project applies to a specific scope. For example some dependencies should be used for compiling source code whereas others only need to be available at runtime. Gradle represents the scope of a dependency with the help of a Configuration. Every configuration can be identified by a unique name.
Many Gradle plugins add pre-defined configurations to your project. The Java plugin, for example, adds configurations to represent the various classpaths it needs for source code compilation, executing tests and the like. See the Java plugin chapter for an example.
For more examples on the usage of configurations to navigate, inspect and post-process metadata and artifacts of assigned dependencies, have a look at the resolution result APIs.
Configuration inheritance and composition
A configuration can extend other configurations to form an inheritance hierarchy. Child configurations inherit the whole set of dependencies declared for any of its superconfigurations.
Configuration inheritance is heavily used by Gradle core plugins like the Java plugin.
For example the testImplementation configuration extends the implementation configuration.
The configuration hierarchy has a practical purpose: compiling tests requires the dependencies of the source code under test on top of the dependencies needed write the test class.
A Java project that uses JUnit to write and execute test code also needs Guava if its classes are imported in the production source code.
Under the covers the testImplementation and implementation configurations form an inheritance hierarchy by calling the method Configuration.extendsFrom(org.gradle.api.artifacts.Configuration[]).
A configuration can extend any other configuration irrespective of its definition in the build script or a plugin.
Let’s say you wanted to write a suite of smoke tests.
Each smoke test makes a HTTP call to verify a web service endpoint.
As the underlying test framework the project already uses JUnit.
You can define a new configuration named smokeTest that extends from the testImplementation configuration to reuse the existing test framework dependency.
val smokeTest by configurations.creating {
extendsFrom(configurations.testImplementation.get())
}
dependencies {
testImplementation("junit:junit:4.13")
smokeTest("org.apache.httpcomponents:httpclient:4.5.5")
}configurations {
smokeTest.extendsFrom testImplementation
}
dependencies {
testImplementation 'junit:junit:4.13'
smokeTest 'org.apache.httpcomponents:httpclient:4.5.5'
}Resolvable and consumable configurations
Configurations are a fundamental part of dependency resolution in Gradle. In the context of dependency resolution, it is useful to distinguish between a consumer and a producer. Along these lines, configurations have at least 3 different roles:
-
to declare dependencies
-
as a consumer, to resolve a set of dependencies to files
-
as a producer, to expose artifacts and their dependencies for consumption by other projects (such consumable configurations usually represent the variants the producer offers to its consumers)
For example, to express that an application app depends on library lib, at least one configuration is required:
// declare a "configuration" named "someConfiguration"
val someConfiguration by configurations.creating
dependencies {
// add a project dependency to the "someConfiguration" configuration
someConfiguration(project(":lib"))
}configurations {
// declare a "configuration" named "someConfiguration"
someConfiguration
}
dependencies {
// add a project dependency to the "someConfiguration" configuration
someConfiguration project(":lib")
}Configurations can inherit dependencies from other configurations by extending from them.
Now, notice that the code above doesn’t tell us anything about the intended consumer of this configuration.
In particular, it doesn’t tell us how the configuration is meant to be used.
Let’s say that lib is a Java library: it might expose different things, such as its API, implementation, or test fixtures.
It might be necessary to change how we resolve the dependencies of app depending upon the task we’re performing (compiling against the API of lib, executing the application, compiling tests, etc.).
To address this problem, you’ll often find companion configurations, which are meant to unambiguously declare the usage:
configurations {
// declare a configuration that is going to resolve the compile classpath of the application
compileClasspath {
extendsFrom(someConfiguration)
}
// declare a configuration that is going to resolve the runtime classpath of the application
runtimeClasspath {
extendsFrom(someConfiguration)
}
}configurations {
// declare a configuration that is going to resolve the compile classpath of the application
compileClasspath.extendsFrom(someConfiguration)
// declare a configuration that is going to resolve the runtime classpath of the application
runtimeClasspath.extendsFrom(someConfiguration)
}At this point, we have 3 different configurations with different roles:
-
someConfigurationdeclares the dependencies of my application. It is simply a collection of dependencies. -
compileClasspathandruntimeClasspathare configurations meant to be resolved: when resolved they should contain the compile classpath, and the runtime classpath of the application respectively.
This distinction is represented by the canBeResolved flag in the Configuration type.
A configuration that can be resolved is a configuration for which we can compute a dependency graph, because it contains all the necessary information for resolution to happen.
That is to say we’re going to compute a dependency graph, resolve the components in the graph, and eventually get artifacts.
A configuration which has canBeResolved set to false is not meant to be resolved.
Such a configuration is there only to declare dependencies.
The reason is that depending on the usage (compile classpath, runtime classpath), it can resolve to different graphs.
It is an error to try to resolve a configuration which has canBeResolved set to false.
To some extent, this is similar to an abstract class (canBeResolved=false) which is not supposed to be instantiated, and a concrete class extending the abstract class (canBeResolved=true).
A resolvable configuration will extend at least one non-resolvable configuration (and may extend more than one).
On the other end, at the library project side (the producer), we also use configurations to represent what can be consumed.
For example, the library may expose an API or a runtime, and we would attach artifacts to either one, the other, or both.
Typically, to compile against lib, we need the API of lib, but we don’t need its runtime dependencies.
So the lib project will expose an apiElements configuration, which is aimed at consumers looking for its API.
Such a configuration is consumable, but is not meant to be resolved.
This is expressed via the canBeConsumed flag of a Configuration:
configurations {
// A configuration meant for consumers that need the API of this component
create("exposedApi") {
// This configuration is an "outgoing" configuration, it's not meant to be resolved
isCanBeResolved = false
// As an outgoing configuration, explain that consumers may want to consume it
assert(isCanBeConsumed)
}
// A configuration meant for consumers that need the implementation of this component
create("exposedRuntime") {
isCanBeResolved = false
assert(isCanBeConsumed)
}
}configurations {
// A configuration meant for consumers that need the API of this component
exposedApi {
// This configuration is an "outgoing" configuration, it's not meant to be resolved
canBeResolved = false
// As an outgoing configuration, explain that consumers may want to consume it
assert canBeConsumed
}
// A configuration meant for consumers that need the implementation of this component
exposedRuntime {
canBeResolved = false
assert canBeConsumed
}
}In short, a configuration’s role is determined by the canBeResolved and canBeConsumed flag combinations:
Configuration role |
can be resolved |
can be consumed |
Dependency Scope |
false |
false |
Resolve for certain usage |
true |
false |
Exposed to consumers |
false |
true |
Legacy, don’t use |
true |
true |
For backwards compatibility, both flags have a default value of true, but as a plugin author, you should always determine the right values for those flags, or you might accidentally introduce resolution errors.
Choosing the right configuration for dependencies
The choice of the configuration where you declare a dependency is important. However there is no fixed rule into which configuration a dependency must go. It mostly depends on the way the configurations are organised, which is most often a property of the applied plugin(s).
For example, in the java plugin, the created configuration are documented and should serve as the basis for determining where to declare a dependency, based on its role for your code.
As a recommendation, plugins should clearly document the way their configurations are linked together and should strive as much as possible to isolate their roles.
Deprecated configurations
Configurations are intended to be used for a single role: declaring dependencies, performing resolution, or defining consumable variants. In the past, some configurations did not define which role they were intended to be used for. A deprecation warning is emitted when a configuration is used in a way that was not intended. To fix the deprecation, you will need to stop using the configuration in the deprecated role. The exact changes required depend on how the configuration is used and if there are alternative configurations that should be used instead.
Defining custom configurations
You can define configurations yourself, so-called custom configurations. A custom configuration is useful for separating the scope of dependencies needed for a dedicated purpose.
Let’s say you wanted to declare a dependency on the Jasper Ant task for the purpose of pre-compiling JSP files that should not end up in the classpath for compiling your source code. It’s fairly simple to achieve that goal by introducing a custom configuration and using it in a task.
val jasper by configurations.creating
repositories {
mavenCentral()
}
dependencies {
jasper("org.apache.tomcat.embed:tomcat-embed-jasper:9.0.2")
}
tasks.register("preCompileJsps") {
val jasperClasspath = jasper.asPath
val projectLayout = layout
doLast {
ant.withGroovyBuilder {
"taskdef"("classname" to "org.apache.jasper.JspC",
"name" to "jasper",
"classpath" to jasperClasspath)
"jasper"("validateXml" to false,
"uriroot" to projectLayout.projectDirectory.file("src/main/webapp").asFile,
"outputDir" to projectLayout.buildDirectory.file("compiled-jsps").get().asFile)
}
}
}configurations {
jasper
}
repositories {
mavenCentral()
}
dependencies {
jasper 'org.apache.tomcat.embed:tomcat-embed-jasper:9.0.2'
}
tasks.register('preCompileJsps') {
def jasperClasspath = configurations.jasper.asPath
def projectLayout = layout
doLast {
ant.taskdef(classname: 'org.apache.jasper.JspC',
name: 'jasper',
classpath: jasperClasspath)
ant.jasper(validateXml: false,
uriroot: projectLayout.projectDirectory.file('src/main/webapp').asFile,
outputDir: projectLayout.buildDirectory.file("compiled-jsps").get().asFile)
}
}You can manage project configurations with a configurations object.
Configurations have a name and can extend each other.
To learn more about this API have a look at ConfigurationContainer.
Different kinds of dependencies
Module dependencies
Module dependencies are the most common dependencies. They refer to a module in a repository.
dependencies {
runtimeOnly(group = "org.springframework", name = "spring-core", version = "2.5")
runtimeOnly("org.springframework:spring-aop:2.5")
runtimeOnly("org.hibernate:hibernate:3.0.5") {
isTransitive = true
}
runtimeOnly(group = "org.hibernate", name = "hibernate", version = "3.0.5") {
isTransitive = true
}
}dependencies {
runtimeOnly group: 'org.springframework', name: 'spring-core', version: '2.5'
runtimeOnly 'org.springframework:spring-core:2.5',
'org.springframework:spring-aop:2.5'
runtimeOnly(
[group: 'org.springframework', name: 'spring-core', version: '2.5'],
[group: 'org.springframework', name: 'spring-aop', version: '2.5']
)
runtimeOnly('org.hibernate:hibernate:3.0.5') {
transitive = true
}
runtimeOnly group: 'org.hibernate', name: 'hibernate', version: '3.0.5', transitive: true
runtimeOnly(group: 'org.hibernate', name: 'hibernate', version: '3.0.5') {
transitive = true
}
}See the DependencyHandler class in the API documentation for more examples and a complete reference.
Gradle provides different notations for module dependencies. There is a string notation and a map notation. A module dependency has an API which allows further configuration. Have a look at ExternalModuleDependency to learn all about the API. This API provides properties and configuration methods. Via the string notation you can define a subset of the properties. With the map notation you can define all properties. To have access to the complete API, either with the map or with the string notation, you can assign a single dependency to a configuration together with a closure.
|
Note
|
If you declare a module dependency, Gradle looks for a module metadata file ( |
|
Important
|
In Maven, a module can have one and only one artifact. In Gradle and Ivy, a module can have multiple artifacts. Each artifact can have a different set of dependencies. |
File dependencies
Projects sometimes do not rely on a binary repository product e.g. JFrog Artifactory or Sonatype Nexus for hosting and resolving external dependencies. It’s common practice to host those dependencies on a shared drive or check them into version control alongside the project source code. Those dependencies are referred to as file dependencies, the reason being that they represent a file without any metadata (like information about transitive dependencies, the origin or its author) attached to them.
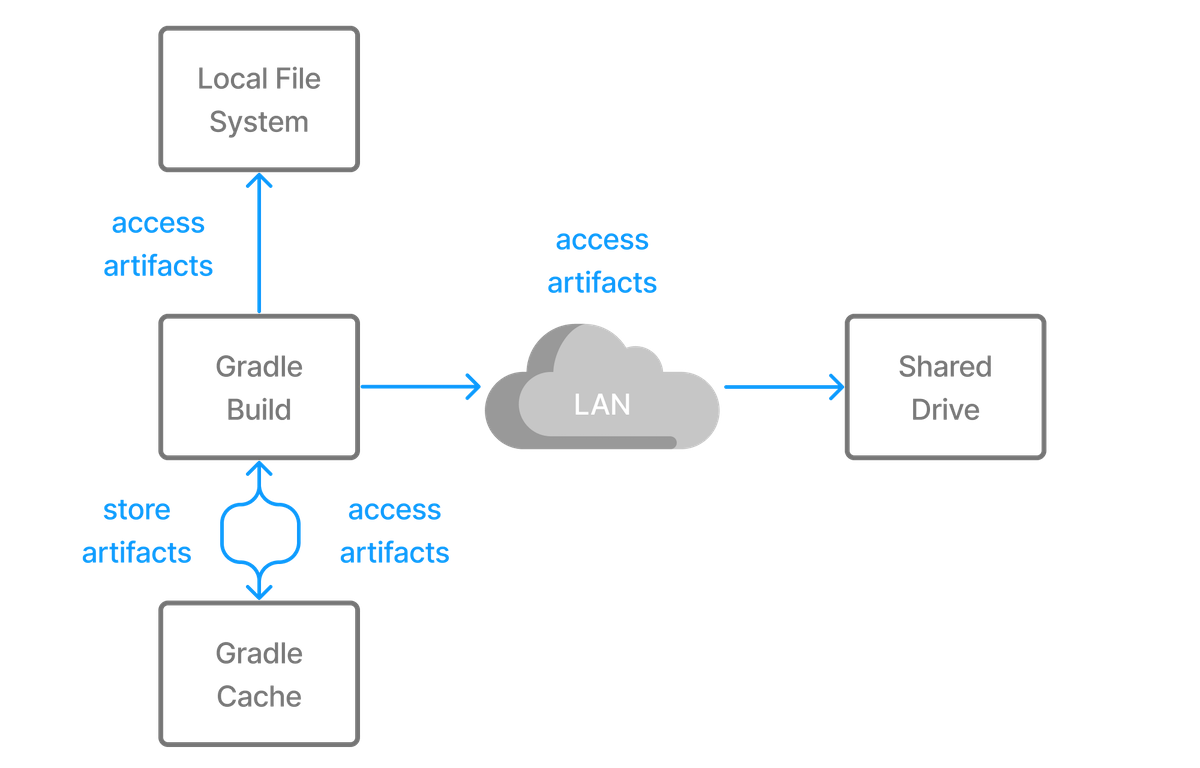
The following example resolves file dependencies from the directories ant, libs and tools.
configurations {
create("antContrib")
create("externalLibs")
create("deploymentTools")
}
dependencies {
"antContrib"(files("ant/antcontrib.jar"))
"externalLibs"(files("libs/commons-lang.jar", "libs/log4j.jar"))
"deploymentTools"(fileTree("tools") { include("*.exe") })
}configurations {
antContrib
externalLibs
deploymentTools
}
dependencies {
antContrib files('ant/antcontrib.jar')
externalLibs files('libs/commons-lang.jar', 'libs/log4j.jar')
deploymentTools(fileTree('tools') { include '*.exe' })
}As you can see in the code example, every dependency has to define its exact location in the file system. The most prominent methods for creating a file reference are Project.files(java.lang.Object…), ProjectLayout.files(java.lang.Object…) and Project.fileTree(java.lang.Object) Alternatively, you can also define the source directory of one or many file dependencies in the form of a flat directory repository.
|
Note
|
The order of the files in a |
File dependencies allow you to directly add a set of files to a configuration, without first adding them to a repository. This can be useful if you cannot, or do not want to, place certain files in a repository. Or if you do not want to use any repositories at all for storing your dependencies.
To add some files as a dependency for a configuration, you simply pass a file collection as a dependency:
dependencies {
runtimeOnly(files("libs/a.jar", "libs/b.jar"))
runtimeOnly(fileTree("libs") { include("*.jar") })
}dependencies {
runtimeOnly files('libs/a.jar', 'libs/b.jar')
runtimeOnly fileTree('libs') { include '*.jar' }
}File dependencies are not included in the published dependency descriptor for your project. However, file dependencies are included in transitive project dependencies within the same build. This means they cannot be used outside the current build, but they can be used within the same build.
You can declare which tasks produce the files for a file dependency. You might do this when, for example, the files are generated by the build.
dependencies {
implementation(files(layout.buildDirectory.dir("classes")) {
builtBy("compile")
})
}
tasks.register("compile") {
doLast {
println("compiling classes")
}
}
tasks.register("list") {
val compileClasspath: FileCollection = configurations["compileClasspath"]
dependsOn(compileClasspath)
doLast {
println("classpath = ${compileClasspath.map { file: File -> file.name }}")
}
}dependencies {
implementation files(layout.buildDirectory.dir('classes')) {
builtBy 'compile'
}
}
tasks.register('compile') {
doLast {
println 'compiling classes'
}
}
tasks.register('list') {
FileCollection compileClasspath = configurations.compileClasspath
dependsOn compileClasspath
doLast {
println "classpath = ${compileClasspath.collect { File file -> file.name }}"
}
}$ gradle -q list compiling classes classpath = [classes]
Versioning of file dependencies
It is recommended to clearly express the intention and a concrete version for file dependencies.
File dependencies are not considered by Gradle’s version conflict resolution.
Therefore, it is extremely important to assign a version to the file name to indicate the distinct set of changes shipped with it.
For example commons-beanutils-1.3.jar lets you track the changes of the library by the release notes.
As a result, the dependencies of the project are easier to maintain and organize. It is much easier to uncover potential API incompatibilities by the assigned version.
Project dependencies
Software projects often break up software components into modules to improve maintainability and prevent strong coupling. Modules can define dependencies between each other to reuse code within the same project.
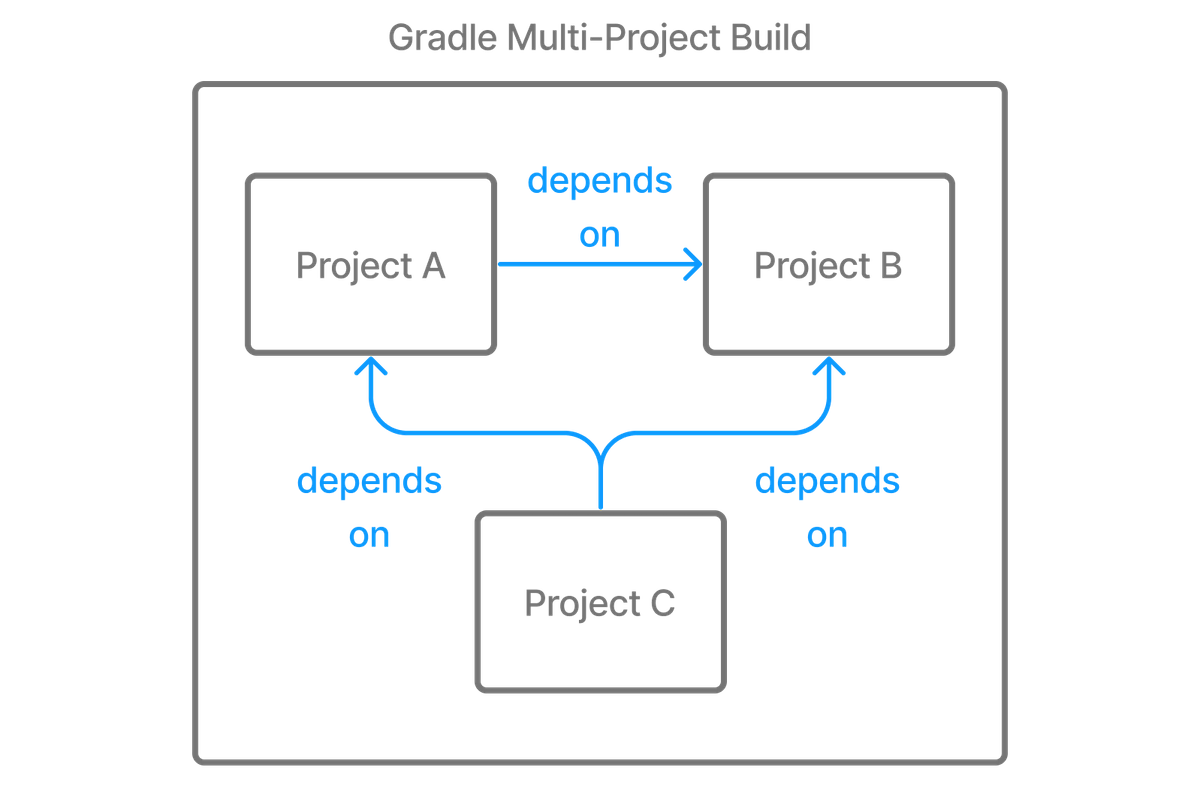
Gradle can model dependencies between modules. Those dependencies are called project dependencies because each module is represented by a Gradle project.
dependencies {
implementation(project(":shared"))
}dependencies {
implementation project(':shared')
}At runtime, the build automatically ensures that project dependencies are built in the correct order and added to the classpath for compilation. The chapter Authoring Multi-Project Builds discusses how to set up and configure multi-project builds in more detail.
For more information see the API documentation for ProjectDependency.
The following example declares the dependencies on the utils and api project from the web-service project. The method Project.project(java.lang.String) creates a reference to a specific subproject by path.
dependencies {
implementation(project(":utils"))
implementation(project(":api"))
}dependencies {
implementation project(':utils')
implementation project(':api')
}Type-safe project dependencies
Type-safe project accessors are an incubating feature which must be enabled explicitly. Implementation may change at any time.
To add support for type-safe project accessors, add this to your settings.gradle(.kts) file:
enableFeaturePreview("TYPESAFE_PROJECT_ACCESSORS")One issue with the project(":some:path") notation is that you have to remember the path to every project you want to depend on.
In addition, changing a project path requires you to change all places where the project dependency is used, but it is easy to miss one or more occurrences (because you have to rely on search and replace).
Since Gradle 7, Gradle offers an experimental type-safe API for project dependencies. The same example as above can now be rewritten as:
dependencies {
implementation(projects.utils)
implementation(projects.api)
}dependencies {
implementation projects.utils
implementation projects.api
}The type-safe API has the advantage of providing IDE completion so you don’t need to figure out the actual names of the projects.
If you add or remove a project that uses the Kotlin DSL, build script compilation fails if you forget to update a dependency.
The project accessors are mapped from the project path.
For example, if a project path is :commons:utils:some:lib then the project accessor will be projects.commons.utils.some.lib (which is the short-hand notation for projects.getCommons().getUtils().getSome().getLib()).
A project name with kebab case (some-lib) or snake case (some_lib) will be converted to camel case in accessors: projects.someLib.
Local forks of module dependencies
A module dependency can be substituted by a dependency to a local fork of the sources of that module, if the module itself is built with Gradle. This can be done by utilising composite builds. This allows you, for example, to fix an issue in a library you use in an application by using, and building, a locally patched version instead of the published binary version. The details of this are described in the section on composite builds.
Gradle distribution-specific dependencies
Gradle API dependency
You can declare a dependency on the API of the current version of Gradle by using the DependencyHandler.gradleApi() method. This is useful when you are developing custom Gradle tasks or plugins.
dependencies {
implementation(gradleApi())
}dependencies {
implementation gradleApi()
}Gradle TestKit dependency
You can declare a dependency on the TestKit API of the current version of Gradle by using the DependencyHandler.gradleTestKit() method. This is useful for writing and executing functional tests for Gradle plugins and build scripts.
dependencies {
testImplementation(gradleTestKit())
}dependencies {
testImplementation gradleTestKit()
}The TestKit chapter explains the use of TestKit by example.
Local Groovy dependency
You can declare a dependency on the Groovy that is distributed with Gradle by using the DependencyHandler.localGroovy() method. This is useful when you are developing custom Gradle tasks or plugins in Groovy.
dependencies {
implementation(localGroovy())
}dependencies {
implementation localGroovy()
}Documenting dependencies
When you declare a dependency or a dependency constraint, you can provide a custom reason for the declaration. This makes the dependency declarations in your build script and the dependency insight report easier to interpret.
plugins {
`java-library`
}
repositories {
mavenCentral()
}
dependencies {
implementation("org.ow2.asm:asm:7.1") {
because("we require a JDK 9 compatible bytecode generator")
}
}plugins {
id 'java-library'
}
repositories {
mavenCentral()
}
dependencies {
implementation('org.ow2.asm:asm:7.1') {
because 'we require a JDK 9 compatible bytecode generator'
}
}Example: Using the dependency insight report with custom reasons
gradle -q dependencyInsight --dependency asm> gradle -q dependencyInsight --dependency asm
org.ow2.asm:asm:7.1
Variant compile:
| Attribute Name | Provided | Requested |
|--------------------------------|----------|--------------|
| org.gradle.status | release | |
| org.gradle.category | library | library |
| org.gradle.libraryelements | jar | classes |
| org.gradle.usage | java-api | java-api |
| org.gradle.dependency.bundling | | external |
| org.gradle.jvm.environment | | standard-jvm |
| org.gradle.jvm.version | | 11 |
Selection reasons:
- Was requested: we require a JDK 9 compatible bytecode generator
org.ow2.asm:asm:7.1
\--- compileClasspath
A web-based, searchable dependency report is available by adding the --scan option.
Resolving specific artifacts from a module dependency
Whenever Gradle tries to resolve a module from a Maven or Ivy repository, it looks for a metadata file and the default artifact file, a JAR. The build fails if none of these artifact files can be resolved. Under certain conditions, you might want to tweak the way Gradle resolves artifacts for a dependency.
-
The dependency only provides a non-standard artifact without any metadata e.g. a ZIP file.
-
The module metadata declares more than one artifact e.g. as part of an Ivy dependency descriptor.
-
You only want to download a specific artifact without any of the transitive dependencies declared in the metadata.
Gradle is a polyglot build tool and not limited to just resolving Java libraries. Let’s assume you wanted to build a web application using JavaScript as the client technology. Most projects check in external JavaScript libraries into version control. An external JavaScript library is no different than a reusable Java library so why not download it from a repository instead?
Google Hosted Libraries is a distribution platform for popular, open-source JavaScript libraries. With the help of the artifact-only notation you can download a JavaScript library file e.g. JQuery. The @ character separates the dependency’s coordinates from the artifact’s file extension.
repositories {
ivy {
url = uri("https://ajax.googleapis.com/ajax/libs")
patternLayout {
artifact("[organization]/[revision]/[module].[ext]")
}
metadataSources {
artifact()
}
}
}
configurations {
create("js")
}
dependencies {
"js"("jquery:jquery:3.2.1@js")
}repositories {
ivy {
url 'https://ajax.googleapis.com/ajax/libs'
patternLayout {
artifact '[organization]/[revision]/[module].[ext]'
}
metadataSources {
artifact()
}
}
}
configurations {
js
}
dependencies {
js 'jquery:jquery:3.2.1@js'
}Some modules ship different "flavors" of the same artifact or they publish multiple artifacts that belong to a specific module version but have a different purpose. It’s common for a Java library to publish the artifact with the compiled class files, another one with just the source code in it and a third one containing the Javadocs.
In JavaScript, a library may exist as uncompressed or minified artifact. In Gradle, a specific artifact identifier is called classifier, a term generally used in Maven and Ivy dependency management.
Let’s say we wanted to download the minified artifact of the JQuery library instead of the uncompressed file. You can provide the classifier min as part of the dependency declaration.
repositories {
ivy {
url = uri("https://ajax.googleapis.com/ajax/libs")
patternLayout {
artifact("[organization]/[revision]/[module](.[classifier]).[ext]")
}
metadataSources {
artifact()
}
}
}
configurations {
create("js")
}
dependencies {
"js"("jquery:jquery:3.2.1:min@js")
}repositories {
ivy {
url 'https://ajax.googleapis.com/ajax/libs'
patternLayout {
artifact '[organization]/[revision]/[module](.[classifier]).[ext]'
}
metadataSources {
artifact()
}
}
}
configurations {
js
}
dependencies {
js 'jquery:jquery:3.2.1:min@js'
}Supported Metadata formats
External module dependencies require module metadata (so that, typically, Gradle can figure out the transitive dependencies of a module). To do so, Gradle supports different metadata formats.
You can also tweak which format will be looked up in the repository definition.
Gradle Module Metadata files
Gradle Module Metadata has been specifically designed to support all features of Gradle’s dependency management model and is hence the preferred format. You can find its specification here.
POM files
Gradle natively supports Maven POM files. It’s worth noting that by default Gradle will first look for a POM file, but if this file contains a special marker, Gradle will use Gradle Module Metadata instead.
Ivy files
Similarly, Gradle supports Apache Ivy metadata files.
Again, Gradle will first look for an ivy.xml file, but if this file contains a special marker, Gradle will use Gradle Module Metadata instead.
Understanding the difference between libraries and applications
Producers vs consumers
A key concept in dependency management with Gradle is the difference between consumers and producers.
When you build a library, you are effectively on the producer side: you are producing artifacts which are going to be consumed by someone else, the consumer.
A lot of problems with traditional build systems is that they don’t make the difference between a producer and a consumer.
A consumer needs to be understood in the large sense:
-
a project that depends on another project is a consumer
-
a task that depends on an artifact is a finer grained consumer
In dependency management, a lot of the decisions we make depend on the type of project we are building, that is to say, what kind of consumer we are.
Producer variants
A producer may want to generate different artifacts for different kinds of consumers: for the same source code, different binaries are produced. Or, a project may produce artifacts which are for consumption by other projects (same repository) but not for external use.
A typical example in the Java world is the Guava library which is published in different versions: one for Java projects, and one for Android projects.
However, it’s the consumer responsibility to tell what version to use, and it’s the dependency management engine responsibility to ensure consistency of the graph (for example making sure that you don’t end up with both Java and Android versions of Guava on your classpath). This is where the variant model of Gradle comes into play.
In Gradle, producer variants are exposed via consumable configurations.
Strong encapsulation
In order for a producer to compile a library, it needs all its implementation dependencies on the compile classpath. There are dependencies which are only required as an implementation detail of the library and there are libraries which are effectively part of the API.
However, a library depending on this produced library only needs to "see" the public API of your library and therefore the dependencies of this API. It’s a subset of the compile classpath of the producer: this is strong encapsulation of dependencies.
The consequence is that a dependency which is assigned to the implementation configuration of a library does not end up on the compile classpath of the consumer.
On the other hand, a dependency which is assigned to the api configuration of a library would end up on the compile classpath of the consumer.
At runtime, however, all dependencies are required.
Gradle makes the difference between different kinds of consumer even within a single project: the Java compile task, for example, is a different consumer than the Java exec task.
More details on the segregation of API and runtime dependencies in the Java world can be found here.
Being respectful of consumers
Whenever, as a developer, you decide to include a dependency, you must understand that there are consequences for your consumers. For example, if you add a dependency to your project, it becomes a transitive dependency of your consumers, and therefore may participate in conflict resolution if the consumer needs a different version.
A lot of the problems Gradle handles are about fixing the mismatch between the expectations of a consumer and a producer.
However, some projects are easier than others:
-
if you are at the end of the consumption chain, that is to say you build an application, then there are effectively no consumer of your project (apart from final customers): adding exclusions will have no other consequence than fixing your problem.
-
however if you are a library, adding exclusions may prevent consumers from working properly, because they would exercise a path of the code that you don’t
Always keep in mind that the solution you choose to fix a problem can "leak" to your consumers. This documentation aims at guiding you to find the right solution to the right problem, and more importantly, make decisions which help the resolution engine to take the right decisions in case of conflicts.
View and Debug Dependencies
Gradle provides tooling to navigate dependency graphs and mitigate dependency hell. Users can render the full graph of dependencies as well as identify the selection reason and origin for a dependency. Dependencies can originate through build script declared dependencies or transitive dependencies. You can visualize dependencies with:
-
the built-in Gradle CLI
dependenciestask -
the built-in Gradle CLI
dependencyInsighttask
List Project Dependencies
Gradle provides the built-in dependencies task to render a dependency tree from the command line.
By default, the dependency tree renders dependencies for all configurations within a single project.
The dependency tree indicates the selected version of each dependency.
It also displays information about dependency conflict resolution.
The dependencies task can be especially helpful for issues related to transitive dependencies.
Your build file lists direct dependencies, but the dependencies task can help you understand which transitive dependencies resolve during your build.
|
Note
|
Graph of dependencies declared in the buildscript classpath configuration can be rendered using task buildEnvironment.
|
Output Annotations
The dependencies task marks dependency trees with the following annotations:
-
(*): Indicates repeated occurrences of a transitive dependency subtree. Gradle expands transitive dependency subtrees only once per project; repeat occurrences only display the root of the subtree, followed by this annotation. -
(c): This element is a dependency constraint, not a dependency. Look for the matching dependency elsewhere in the tree. -
(n): A dependency or dependency configuration that cannot be resolved.
Specify a Dependency Configuration
To focus on the information about one dependency configuration, provide the optional parameter --configuration.
Just like project and task names, Gradle accepts abbreviated names to select a dependency configuration.
For example, you can specify tRC instead of testRuntimeClasspath if the pattern matches to a single dependency configuration.
Both of the following examples show dependencies in the testRuntimeClasspath dependency configuration of a Java project:
> gradle -q dependencies --configuration testRuntimeClasspath
> gradle -q dependencies --configuration tRC
To see a list of all the configurations available in a project, including those added by any plugins, you can run a resolvableConfigurations report.
For more info, see that plugin’s documentation (for instance, the Java Plugin is documented here).
Example
Consider a project that uses the JGit library to execute Source Control Management (SCM) operations for a release process. You can declare dependencies for external tooling with the help of a custom dependency configuration. This avoids polluting other contexts, such as the compilation classpath for your production source code.
The following example declares a custom dependency configuration named "scm" that contains the JGit dependency:
repositories {
mavenCentral()
}
configurations {
create("scm")
}
dependencies {
"scm"("org.eclipse.jgit:org.eclipse.jgit:4.9.2.201712150930-r")
}repositories {
mavenCentral()
}
configurations {
scm
}
dependencies {
scm 'org.eclipse.jgit:org.eclipse.jgit:4.9.2.201712150930-r'
}Use the following command to view a dependency tree for the scm dependency configuration:
> gradle -q dependencies --configuration scm
------------------------------------------------------------
Root project 'dependencies-report'
------------------------------------------------------------
scm
\--- org.eclipse.jgit:org.eclipse.jgit:4.9.2.201712150930-r
+--- com.jcraft:jsch:0.1.54
+--- com.googlecode.javaewah:JavaEWAH:1.1.6
+--- org.apache.httpcomponents:httpclient:4.3.6
| +--- org.apache.httpcomponents:httpcore:4.3.3
| +--- commons-logging:commons-logging:1.1.3
| \--- commons-codec:commons-codec:1.6
\--- org.slf4j:slf4j-api:1.7.2
A web-based, searchable dependency report is available by adding the --scan option.
Identify the Dependency Version Selected
A project may request two different versions of the same dependency either directly or transitively.
Gradle applies version conflict resolution to ensure that only one version of the dependency exists in the dependency graph.
The following example introduces a conflict with commons-codec:commons-codec, added both as a direct dependency and a transitive dependency of JGit:
repositories {
mavenCentral()
}
configurations {
create("scm")
}
dependencies {
"scm"("org.eclipse.jgit:org.eclipse.jgit:4.9.2.201712150930-r")
"scm"("commons-codec:commons-codec:1.7")
}repositories {
mavenCentral()
}
configurations {
scm
}
dependencies {
scm 'org.eclipse.jgit:org.eclipse.jgit:4.9.2.201712150930-r'
scm 'commons-codec:commons-codec:1.7'
}The dependency tree in a build scan shows information about conflicts. Click on a dependency and select the "Required By" tab to see the selection reason and origin of the dependency.
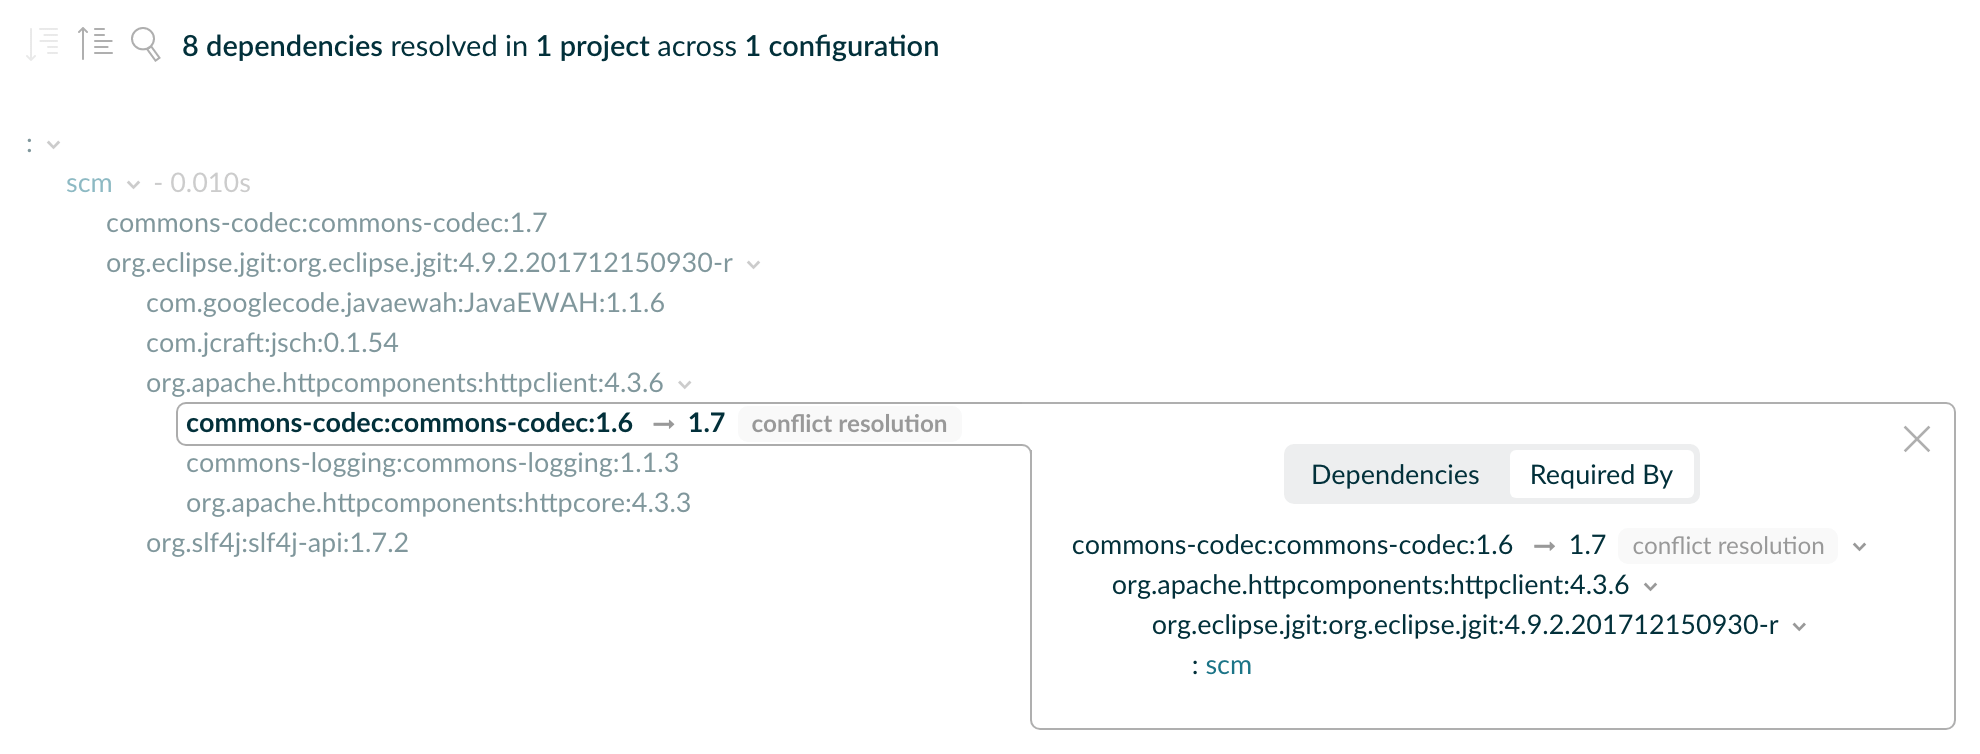
Dependency Insights
Gradle provides the built-in dependencyInsight task to render a dependency insight report from the command line.
Dependency insights provide information about a single dependency within a single configuration.
Given a dependency, you can identify the selection reason and origin.
dependencyInsight accepts the following parameters:
--dependency <dependency>(mandatory)-
The dependency to investigate. You can supply a complete
group:name, or part of it. If multiple dependencies match, Gradle generates a report covering all matching dependencies. --configuration <name>(mandatory)-
The dependency configuration which resolves the given dependency. This parameter is optional for projects that use the Java plugin, since the plugin provides a default value of
compileClasspath. --single-path(optional)-
Render only a single path to the dependency.
The following code snippet demonstrates how to run a dependency insight report for all paths to a dependency named "commons-codec" within the "scm" configuration:
> gradle -q dependencyInsight --dependency commons-codec --configuration scm
commons-codec:commons-codec:1.7
Variant default:
| Attribute Name | Provided | Requested |
|-------------------|----------|-----------|
| org.gradle.status | release | |
Selection reasons:
- By conflict resolution: between versions 1.7 and 1.6
commons-codec:commons-codec:1.7
\--- scm
commons-codec:commons-codec:1.6 -> 1.7
\--- org.apache.httpcomponents:httpclient:4.3.6
\--- org.eclipse.jgit:org.eclipse.jgit:4.9.2.201712150930-r
\--- scm
A web-based, searchable dependency report is available by adding the --scan option.
For more information about configurations, see the dependency configuration documentation.
Selection Reasons
The "Selection reasons" section of the dependency insight report lists the reasons why a dependency was selected. Have a look at the table below to understand the meaning of the different terms used:
| Reason | Meaning |
|---|---|
(Absent) |
No reason other than a reference, direct or transitive, was present. |
Was requested : <text> |
The dependency appears in the graph, and the inclusion came with a |
Was requested : didn’t match versions <versions> |
The dependency appears with a dynamic version which did not include the listed versions.
May be followed by a |
Was requested : reject version <versions> |
The dependency appears with a rich version containing one or more |
By conflict resolution : between versions <version> |
The dependency appeared multiple times, with different version requests. This resulted in conflict resolution to select the most appropriate version. |
By constraint |
A dependency constraint participated in the version selection.
May be followed by a |
By ancestor |
There is a rich version with a |
Selected by rule |
A dependency resolution rule overruled the default selection process.
May be followed by a |
Rejection : <version> by rule because <text> |
A |
Rejection: version <version>: <attributes information> |
The dependency has a dynamic version and some versions did not match the requested attributes. |
Forced |
The build enforces the version of the dependency through an enforced platform or resolution strategy. |
If multiple selection reasons exist, the insight report lists all of them.
Troubleshooting
Version Conflicts
If the selected version does not match your expectation, Gradle offers a series of tools to help you control transitive dependencies.
Variant Selection Errors
Sometimes a selection error happens at the variant selection level. Have a look at the dedicated section to understand these errors and how to resolve them.
Unsafe Configuration Resolution Errors
Resolving a configuration can have side effects on Gradle’s project model. As a result, Gradle must manage access to each project’s configurations. There are a number of ways a configuration might be resolved unsafely. For example:
-
A task from one project directly resolves a configuration in another project in the task’s action.
-
A task specifies a configuration from another project as an input file collection.
-
A build script for one project resolves a configuration in another project during evaluation.
-
Project configurations are resolved in the settings file.
Gradle produces a deprecation warning for each unsafe access. Unsafe access can cause indeterminate errors. You should fix unsafe access warnings in your build.
In most cases, you can resolve unsafe accesses by creating a cross-project dependency on the other project. See the documentation for sharing outputs between projects for more information.
If you find a use case that can’t be resolved using these techniques, please let us know by filing a GitHub Issue.
Understanding dependency resolution
This chapter covers the way dependency resolution works inside Gradle. After covering how you can declare repositories and dependencies, it makes sense to explain how these declarations come together during dependency resolution.
Dependency resolution is a process that consists of two phases, which are repeated until the dependency graph is complete:
-
When a new dependency is added to the graph, perform conflict resolution to determine which version should be added to the graph.
-
When a specific dependency, that is a module with a version, is identified as part of the graph, retrieve its metadata so that its dependencies can be added in turn.
The following section will describe what Gradle identifies as conflicts and how it can resolve them automatically. After that, the retrieval of metadata will be covered, explaining how Gradle can follow dependency links.
How Gradle handles conflicts?
When doing dependency resolution, Gradle handles two types of conflicts:
- Version conflicts
-
That is when two or more dependencies require a given dependency but with different versions.
- Implementation conflicts
-
That is when the dependency graph contains multiple modules that provide the same implementation, or capability in Gradle terminology.
The following sections will explain in detail how Gradle attempts to resolve these conflicts.
The dependency resolution process is highly customizable to meet enterprise requirements. For more information, see the chapter on Controlling transitive dependencies.
Version conflict resolution
A version conflict occurs when two components:
-
Depend on the same module, let’s say
com.google.guava:guava -
But on different versions, let’s say
20.0and25.1-android-
Our project itself depends on
com.google.guava:guava:20.0 -
Our project also depends on
com.google.inject:guice:4.2.2which itself depends oncom.google.guava:guava:25.1-android
-
Resolution strategy
Given the conflict above, there exist multiple ways to handle it, either by selecting a version or failing the resolution. Different tools that handle dependency management have different ways of handling these type of conflicts.
Apache Maven uses a nearest first strategy.
Maven will take the shortest path to a dependency and use that version. In case there are multiple paths of the same length, the first one wins.
This means that in the example above, the version of guava will be 20.0 because the direct dependency is closer than the guice dependency.
The main drawback of this method is that it is ordering dependent. Keeping order in a very large graph can be a challenge. For example, what if the new version of a dependency ends up having its own dependency declarations in a different order than the previous version?
With Maven, this could have unwanted impact on resolved versions.
|
Note
|
Apache Ivy is a very flexible dependency management tool. It offers the possibility to customize dependency resolution, including conflict resolution. This flexibility comes with the price of making it hard to reason about. |
Gradle will consider all requested versions, wherever they appear in the dependency graph. Out of these versions, it will select the highest one. More information on version ordering here.
As you have seen, Gradle supports a concept of rich version declaration, so what is the highest version depends on the way versions were declared:
-
If no ranges are involved, then the highest version that is not rejected will be selected.
-
If a version declared as
strictlyis lower than that version, selection will fail.
-
-
If ranges are involved:
-
If there is a non range version that falls within the specified ranges or is higher than their upper bound, it will be selected.
-
If there are only ranges, the selection will depend on the intersection of ranges:
-
If all the ranges intersect, then the highest existing version of the intersection will be selected.
-
If there is no clear intersection between all the ranges, the highest existing version will be selected from the highest range. If there is no version available for the highest range, the resolution will fail.
-
-
If a version declared as
strictlyis lower than that version, selection will fail.
-
Note that in the case where ranges come into play, Gradle requires metadata to determine which versions do exist for the considered range. This causes an intermediate lookup for metadata, as described in How Gradle retrieves dependency metadata?.
Qualifiers
There is a caveat to comparing versions when it comes to selecting the highest one. All the rules of version ordering still apply, but the conflict resolver has a bias towards versions without qualifiers.
The "qualifier" of a version, if it exists, is the tail end of the version string, starting at the first non-dot separator found in it. The other (first) part of the version string is called the "base form" of the version. Here are some examples to illustrate:
| Original version | Base version | Qualifier |
|---|---|---|
1.2.3 |
1.2.3 |
<none> |
1.2-3 |
1.2 |
3 |
1_alpha |
1 |
alpha |
abc |
abc |
<none> |
1.2b3 |
1.2 |
b3 |
abc.1+3 |
abc.1 |
3 |
b1-2-3.3 |
b |
1-2-3.3 |
As you can see separators are any of the ., -, _, + characters, plus the empty string when a numeric and a non-numeric part of the version are next to each-other.
When resolving the conflict between competing versions, the following logic applies:
-
first the versions with the highest base version are selected, the rest are discarded
-
if there are still multiple competing versions left, then one is picked with a preference for not having a qualifier or having release status.
Implementation conflict resolution
Gradle uses variants and capabilities to identify what a module provides.
This is a unique feature that deserves its own chapter to understand what it means and enables.
A conflict occurs the moment two modules either:
-
Attempt to select incompatible variants,
-
Declare the same capability
Learn more about handling these type of conflicts in Selecting between candidates.
How Gradle retrieves dependency metadata?
Gradle requires metadata about the modules included in your dependency graph. That information is required for two main points:
-
Determine the existing versions of a module when the declared version is dynamic.
-
Determine the dependencies of the module for a given version.
Discovering versions
Faced with a dynamic version, Gradle needs to identify the concrete matching versions:
-
Each repository is inspected, Gradle does not stop on the first one returning some metadata. When multiple are defined, they are inspected in the order they were added.
-
For Maven repositories, Gradle will use the
maven-metadata.xmlwhich provides information about the available versions. -
For Ivy repositories, Gradle will resort to directory listing.
This process results in a list of candidate versions that are then matched to the dynamic version expressed. At this point, version conflict resolution is resumed.
Note that Gradle caches the version information, more information can be found in the section Controlling dynamic version caching.
Obtaining module metadata
Given a required dependency, with a version, Gradle attempts to resolve the dependency by searching for the module the dependency points at.
-
Each repository is inspected in order.
-
Depending on the type of repository, Gradle looks for metadata files describing the module (
.module,.pomorivy.xmlfile) or directly for artifact files. -
Modules that have a module metadata file (
.module,.pomorivy.xmlfile) are preferred over modules that have an artifact file only. -
Once a repository returns a metadata result, following repositories are ignored.
-
-
Metadata for the dependency is retrieved and parsed, if found
-
If the module metadata is a POM file that has a parent POM declared, Gradle will recursively attempt to resolve each of the parent modules for the POM.
-
-
All of the artifacts for the module are then requested from the same repository that was chosen in the process above.
-
All of that data, including the repository source and potential misses are then stored in the The Dependency Cache.
|
Note
|
The penultimate point above is what can make the integration with Maven Local problematic. As it is a cache for Maven, it will sometimes miss some artifacts of a given module. If Gradle is sourcing such a module from Maven Local, it will consider the missing artifacts to be missing altogether. |
Repository disabling
When Gradle fails to retrieve information from a repository, it will disable it for the duration of the build and fail all dependency resolution.
That last point is important for reproducibility. If the build was allowed to continue, ignoring the faulty repository, subsequent builds could have a different result once the repository is back online.
HTTP Retries
Gradle will make several attempts to connect to a given repository before disabling it. If connection fails, Gradle will retry on certain errors which have a chance of being transient, increasing the amount of time waiting between each retry.
Blacklisting happens when the repository cannot be contacted, either because of a permanent error or because the maximum retries was reached.
The Dependency Cache
Gradle contains a highly sophisticated dependency caching mechanism, which seeks to minimise the number of remote requests made in dependency resolution, while striving to guarantee that the results of dependency resolution are correct and reproducible.
The Gradle dependency cache consists of two storage types located under $GRADLE_USER_HOME/caches:
-
A file-based store of downloaded artifacts, including binaries like jars as well as raw downloaded meta-data like POM files and Ivy files. The storage path for a downloaded artifact includes the SHA1 checksum, meaning that 2 artifacts with the same name but different content can easily be cached.
-
A binary store of resolved module metadata, including the results of resolving dynamic versions, module descriptors, and artifacts.
The Gradle cache does not allow the local cache to hide problems and create other mysterious and difficult to debug behavior. Gradle enables reliable and reproducible enterprise builds with a focus on bandwidth and storage efficiency.
Separate metadata cache
Gradle keeps a record of various aspects of dependency resolution in binary format in the metadata cache. The information stored in the metadata cache includes:
-
The result of resolving a dynamic version (e.g.
1.+) to a concrete version (e.g.1.2). -
The resolved module metadata for a particular module, including module artifacts and module dependencies.
-
The resolved artifact metadata for a particular artifact, including a pointer to the downloaded artifact file.
-
The absence of a particular module or artifact in a particular repository, eliminating repeated attempts to access a resource that does not exist.
Every entry in the metadata cache includes a record of the repository that provided the information as well as a timestamp that can be used for cache expiry.
Repository caches are independent
As described above, for each repository there is a separate metadata cache. A repository is identified by its URL, type and layout. If a module or artifact has not been previously resolved from this repository, Gradle will attempt to resolve the module against the repository. This will always involve a remote lookup on the repository, however in many cases no download will be required.
Dependency resolution will fail if the required artifacts are not available in any repository specified by the build, even if the local cache has a copy of this artifact which was retrieved from a different repository. Repository independence allows builds to be isolated from each other in an advanced way that no build tool has done before. This is a key feature to create builds that are reliable and reproducible in any environment.
Artifact reuse
Before downloading an artifact, Gradle tries to determine the checksum of the required artifact by downloading the sha file associated with that artifact. If the checksum can be retrieved, an artifact is not downloaded if an artifact already exists with the same id and checksum. If the checksum cannot be retrieved from the remote server, the artifact will be downloaded (and ignored if it matches an existing artifact).
As well as considering artifacts downloaded from a different repository, Gradle will also attempt to reuse artifacts found in the local Maven Repository. If a candidate artifact has been downloaded by Maven, Gradle will use this artifact if it can be verified to match the checksum declared by the remote server.
Checksum based storage
It is possible for different repositories to provide a different binary artifact in response to the same artifact identifier. This is often the case with Maven SNAPSHOT artifacts, but can also be true for any artifact which is republished without changing its identifier. By caching artifacts based on their SHA1 checksum, Gradle is able to maintain multiple versions of the same artifact. This means that when resolving against one repository Gradle will never overwrite the cached artifact file from a different repository. This is done without requiring a separate artifact file store per repository.
Cache Locking
The Gradle dependency cache uses file-based locking to ensure that it can safely be used by multiple Gradle processes concurrently. The lock is held whenever the binary metadata store is being read or written, but is released for slow operations such as downloading remote artifacts.
This concurrent access is only supported if the different Gradle processes can communicate together. This is usually not the case for containerized builds.
Cache Cleanup
Gradle keeps track of which artifacts in the dependency cache are accessed. Using this information, the cache is periodically (at most every 24 hours) scanned for artifacts that have not been used for more than 30 days. Obsolete artifacts are then deleted to ensure the cache does not grow indefinitely.
Dealing with ephemeral builds
It’s a common practice to run builds in ephemeral containers. A container is typically spawned to only execute a single build before it is destroyed. This can become a practical problem when a build depends on a lot of dependencies which each container has to re-download. To help with this scenario, Gradle provides a couple of options:
-
copying the dependency cache into each container
-
sharing a read-only dependency cache between multiple containers
Copying and reusing the cache
The dependency cache, both the file and metadata parts, are fully encoded using relative paths. This means that it is perfectly possible to copy a cache around and see Gradle benefit from it.
The path that can be copied is $GRADLE_USER_HOME/caches/modules-<version>.
The only constraint is placing it using the same structure at the destination, where the value of GRADLE_USER_HOME can be different.
Do not copy the *.lock or gc.properties files if they exist.
Note that creating the cache and consuming it should be done using compatible Gradle version, as shown in the table below. Otherwise, the build might still require some interactions with remote repositories to complete missing information, which might be available in a different version. If multiple incompatible Gradle versions are in play, all should be used when seeding the cache.
| Module cache version | File cache version | Metadata cache version | Gradle version(s) |
|---|---|---|---|
|
|
|
Gradle 6.1 to Gradle 6.3 |
|
|
|
Gradle 6.4 to Gradle 6.7 |
|
|
|
Gradle 6.8 to Gradle 7.4 |
|
|
|
Gradle 7.5 to Gradle 7.6.1 |
|
|
|
Gradle 7.6.2 |
|
|
|
Gradle 8.0 |
|
|
|
Gradle 8.1 |
|
|
|
Gradle 8.2 and above |
Sharing the dependency cache with other Gradle instances
Instead of copying the dependency cache into each container, it’s possible to mount a shared, read-only directory that will act as a dependency cache for all containers. This cache, unlike the classical dependency cache, is accessed without locking, making it possible for multiple builds to read from the cache concurrently. It’s important that the read-only cache is not written to when other builds may be reading from it.
When using the shared read-only cache, Gradle looks for dependencies (artifacts or metadata) in both the writable cache in the local Gradle User Home directory and the shared read-only cache. If a dependency is present in the read-only cache, it will not be downloaded. If a dependency is missing from the read-only cache, it will be downloaded and added to the writable cache. In practice, this means that the writable cache will only contain dependencies that are unavailable in the read-only cache.
The read-only cache should be sourced from a Gradle dependency cache that already contains some of the required dependencies. The cache can be incomplete; however, an empty shared cache will only add overhead.
|
Note
|
The shared read-only dependency cache is an incubating feature. |
The first step in using a shared dependency cache is to create one by copying of an existing local cache. For this you need to follow the instructions above.
Then set the GRADLE_RO_DEP_CACHE environment variable to point to the directory containing the cache:
$GRADLE_RO_DEP_CACHE
|-- modules-2 : the read-only dependency cache, should be mounted with read-only privileges
$GRADLE_HOME
|-- caches
|-- modules-2 : the container specific dependency cache, should be writable
|-- ...
|-- ...
In a CI environment, it’s a good idea to have one build which "seeds" a Gradle dependency cache, which is then copied to a different directory. This directory can then be used as the read-only cache for other builds. You shouldn’t use an existing Gradle installation cache as the read-only cache, because this directory may contain locks and may be modified by the seeding build.
Accessing the resolution result programmatically
While most users only need access to a "flat list" of files, there are cases where it can be interesting to reason on a graph and get more information about the resolution result:
-
for tooling integration, where a model of the dependency graph is required
-
for tasks generating a visual representation (image,
.dotfile, …) of a dependency graph -
for tasks providing diagnostics (similar to the
dependencyInsighttask) -
for tasks which need to perform dependency resolution at execution time (e.g, download files on demand)
For those use cases, Gradle provides lazy, thread-safe APIs, accessible by calling the Configuration.getIncoming() method:
-
the ResolutionResult API gives access to a resolved dependency graph, whether the resolution was successful or not.
-
the artifacts API provides a simple access to the resolved artifacts, untransformed, but with lazy download of artifacts (they would only be downloaded on demand).
-
the artifact view API provides an advanced, filtered view of artifacts, possibly transformed.
|
Note
|
See the documentation on using dependency resolution results for more details on how to consume the results in a task. |
Verifying dependencies
Working with external dependencies and plugins published on third-party repositories puts your build at risk. In particular, you need to be aware of what binaries are brought in transitively and if they are legit. To mitigate the security risks and avoid integrating compromised dependencies in your project, Gradle supports dependency verification.
Dependency verification is, by nature, an inconvenient feature to use. It means that whenever you’re going to update a dependency, builds are likely to fail. It means that merging branches are going to be harder because each branch can have different dependencies. It means that you will be tempted to switch it off.
So why should you bother?
Dependency verification is about trust in what you get and what you ship.
Without dependency verification it’s easy for an attacker to compromise your supply chain. There are many real world examples of tools compromised by adding a malicious dependency. Dependency verification is meant to protect yourself from those attacks, by forcing you to ensure that the artifacts you include in your build are the ones that you expect. It is not meant, however, to prevent you from including vulnerable dependencies.
Finding the right balance between security and convenience is hard but Gradle will try to let you choose the "right level" for you.
Dependency verification consists of two different and complementary operations:
-
checksum verification, which allows asserting the integrity of a dependency
-
signature verification, which allows asserting the provenance of a dependency
Gradle supports both checksum and signature verification out of the box but performs no dependency verification by default. This section will guide you into configuring dependency verification properly for your needs.
This feature can be used for:
-
detecting compromised dependencies
-
detecting compromised plugins
-
detecting tampered dependencies in the local dependency caches
Enabling dependency verification
The verification metadata file
|
Note
|
Currently the only source of dependency verification metadata is this XML configuration file. Future versions of Gradle may include other sources (for example via external services). |
Dependency verification is automatically enabled once the configuration file for dependency verification is discovered.
This configuration file is located at $PROJECT_ROOT/gradle/verification-metadata.xml.
This file minimally consists of the following:
<?xml version="1.0" encoding="UTF-8"?>
<verification-metadata xmlns="https://schema.gradle.org/dependency-verification"
xmlns:xsi="http://www.w3.org/2001/XMLSchema-instance"
xsi:schemaLocation="https://schema.gradle.org/dependency-verification https://schema.gradle.org/dependency-verification/dependency-verification-1.3.xsd">
<configuration>
<verify-metadata>true</verify-metadata>
<verify-signatures>false</verify-signatures>
</configuration>
</verification-metadata>Doing so, Gradle will verify all artifacts using checksums, but will not verify signatures. Gradle will verify any artifact downloaded using its dependency management engine, which includes, but is not limited to:
-
artifact files (e.g jar files, zips, …) used during a build
-
metadata artifacts (POM files, Ivy descriptors, Gradle Module Metadata)
-
plugins (both project and settings plugins)
-
artifacts resolved using the advanced dependency resolution APIs
Gradle will not verify changing dependencies (in particular SNAPSHOT dependencies) nor locally produced artifacts (typically jars produced during the build itself) as by nature their checksums and signatures would always change.
With such a minimal configuration file, a project using any external dependency or plugin would immediately start failing because it doesn’t contain any checksum to verify.
Scope of the dependency verification
A dependency verification configuration is global: a single file is used to configure verification of the whole build.
In particular, the same file is used for both the (sub)projects and buildSrc.
If an included build is used:
-
the configuration file of the current build is used for verification
-
so if the included build itself uses verification, its configuration is ignored in favor of the current one
-
which means that including a build works similarly to upgrading a dependency: it may require you to update your current verification metadata
An easy way to get started is therefore to generate the minimal configuration for an existing build.
Configuring the console output
By default, if dependency verification fails, Gradle will generate a small summary about the verification failure as well as an HTML report containing the full information about the failures.
If your environment prevents you from reading this HTML report file (for example if you run a build on CI and that it’s not easy to fetch the remote artifacts), Gradle provides a way to opt-in a verbose console report.
For this, you need to add this Gradle property to your gradle.properties file:
org.gradle.dependency.verification.console=verbose
Bootstrapping dependency verification
It’s worth mentioning that while Gradle can generate a dependency verification file for you, you should always check whatever Gradle generated for you because your build may already contain compromised dependencies without you knowing about it. Please refer to the appropriate checksum verification or signature verification section for more information.
If you plan on using signature verification, please also read the corresponding section of the docs.
Bootstrapping can either be used to create a file from the beginning, or also to update an existing file with new information. Therefore, it’s recommended to always use the same parameters once you started bootstrapping.
The dependency verification file can be generated with the following CLI instructions:
gradle --write-verification-metadata sha256 help
The write-verification-metadata flag requires the list of checksums that you want to generate or pgp for signatures.
Executing this command line will cause Gradle to:
-
resolve all resolvable configurations, which includes:
-
configurations from the root project
-
configurations from all subprojects
-
configurations from
buildSrc -
included builds configurations
-
configurations used by plugins
-
-
download all artifacts discovered during resolution
-
compute the requested checksums and possibly verify signatures depending on what you asked
-
At the end of the build, generate the configuration file which will contain the inferred verification metadata
As a consequence, the verification-metadata.xml file will be used in subsequent builds to verify dependencies.
There are dependencies that Gradle cannot discover this way.
In particular, you will notice that the CLI above uses the help task.
If you don’t specify any task, Gradle will automatically run the default task and generate a configuration file at the end of the build too.
The difference is that Gradle may discover more dependencies and artifacts depending on the tasks you execute. As a matter of fact, Gradle cannot automatically discover detached configurations, which are basically dependency graphs resolved as an internal implementation detail of the execution of a task: they are not, in particular, declared as an input of the task because they effectively depend on the configuration of the task at execution time.
A good way to start is just to use the simplest task, help, which will discover as much as possible, and if subsequent builds fail with a verification error, you can re-execute generation with the appropriate tasks to "discover" more dependencies.
Gradle won’t verify either checksums or signatures of plugins which use their own HTTP clients. Only plugins which use the infrastructure provided by Gradle for performing requests will see their requests verified.
Using generation for incremental updates
The verification file generated by Gradle has a strict ordering for all its content. It also uses the information from the existing state to limit changes to the strict minimum.
This means that generation is actually a convenient tool for updating a verification file:
-
Checksum entries generated by Gradle will have a clear
originthat starts with "Generated by Gradle", which is a good indicator that an entry needs to be reviewed, -
Entries added by hand will immediately be accounted for, and appear at the right location after writing the file,
-
The header comments of the file will be preserved, i.e. comments before the root XML node. This allows you to have a license header or instructions on which tasks and which parameters to use for generating that file.
With the above benefits, it is really easy to account for new dependencies or dependency versions by simply generating the file again and reviewing the changes.
Using dry mode
By default, bootstrapping is incremental, which means that if you run it multiple times, information is added to the file and in particular you can rely on your VCS to check the diffs. There are situations where you would just want to see what the generated verification metadata file would look like without actually changing the existing one or overwriting it.
For this purpose, you can just add --dry-run:
gradle --write-verification-metadata sha256 help --dry-run
Then instead of generating the verification-metadata.xml file, a new file will be generated, called verification-metadata.dryrun.xml.
|
Note
|
Because --dry-run doesn’t execute tasks, this would be much faster, but it will miss any resolution happening at task execution time.
|
Disabling metadata verification
By default, Gradle will not only verify artifacts (jars, …) but also the metadata associated with those artifacts (typically POM files).
Verifying this ensures the maximum level of security: metadata files typically tell what transitive dependencies will be included, so a compromised metadata file may cause the introduction of undesired dependencies in the graph.
However, because all artifacts are verified, such artifacts would in general easily be discovered by you, because they would cause a checksum verification failure (checksums would be missing from verification metadata).
Because metadata verification can significantly increase the size of your configuration file, you may therefore want to disable verification of metadata.
If you understand the risks of doing so, set the <verify-metadata> flag to false in the configuration file:
<?xml version="1.0" encoding="UTF-8"?>
<verification-metadata xmlns="https://schema.gradle.org/dependency-verification"
xmlns:xsi="http://www.w3.org/2001/XMLSchema-instance"
xsi:schemaLocation="https://schema.gradle.org/dependency-verification https://schema.gradle.org/dependency-verification/dependency-verification-1.3.xsd">
<configuration>
<verify-metadata>false</verify-metadata>
<verify-signatures>false</verify-signatures>
</configuration>
<!-- the rest of this file doesn't need to declare anything about metadata files -->
</verification-metadata>Verifying dependency checksums
Checksum verification allows you to ensure the integrity of an artifact. This is the simplest thing that Gradle can do for you to make sure that the artifacts you use are un-tampered.
Gradle supports MD5, SHA1, SHA-256 and SHA-512 checksums. However, only SHA-256 and SHA-512 checksums are considered secure nowadays.
Adding the checksum for an artifact
External components are identified by GAV coordinates, then each of the artifacts by their file names. To declare the checksums of an artifact, you need to add the corresponding section in the verification metadata file. For example, to declare the checksum for Apache PDFBox. The GAV coordinates are:
-
group
org.apache.pdfbox -
name
pdfbox -
version
2.0.17
Using this dependency will trigger the download of 2 different files:
-
pdfbox-2.0.17.jarwhich is the main artifact -
pdfbox-2.0.17.pomwhich is the metadata file associated with this artifact
As a consequence, you need to declare the checksums for both of them (unless you disabled metadata verification):
<?xml version="1.0" encoding="UTF-8"?>
<verification-metadata xmlns="https://schema.gradle.org/dependency-verification"
xmlns:xsi="http://www.w3.org/2001/XMLSchema-instance"
xsi:schemaLocation="https://schema.gradle.org/dependency-verification https://schema.gradle.org/dependency-verification/dependency-verification-1.3.xsd">
<configuration>
<verify-metadata>true</verify-metadata>
<verify-signatures>false</verify-signatures>
</configuration>
<components>
<component group="org.apache.pdfbox" name="pdfbox" version="2.0.17">
<artifact name="pdfbox-2.0.17.jar">
<sha512 value="7e11e54a21c395d461e59552e88b0de0ebaf1bf9d9bcacadf17b240d9bbc29bf6beb8e36896c186fe405d287f5d517b02c89381aa0fcc5e0aa5814e44f0ab331" origin="PDFBox Official site (https://pdfbox.apache.org/download.cgi)"/>
</artifact>
<artifact name="pdfbox-2.0.17.pom">
<sha512 value="82de436b38faf6121d8d2e71dda06e79296fc0f7bc7aba0766728c8d306fd1b0684b5379c18808ca724bf91707277eba81eb4fe19518e99e8f2a56459b79742f" origin="Generated by Gradle"/>
</artifact>
</component>
</components>
</verification-metadata>Where to get checksums from?
In general, checksums are published alongside artifacts on public repositories. However, if a dependency is compromised in a repository, it’s likely its checksum will be too, so it’s a good practice to get the checksum from a different place, usually the website of the library itself.
In fact, it’s a good security practice to publish the checksums of artifacts on a different server than the server where the artifacts themselves are hosted: it’s harder to compromise a library both on the repository and the official website.
In the example above, the checksum was published on the website for the JAR, but not the POM file. This is why it’s usually easier to let Gradle generate the checksums and verify by reviewing the generated file carefully.
In this example, not only could we check that the checksum was correct, but we could also find it on the official website, which is why we changed the value of the of origin attribute on the sha512 element from Generated by Gradle to PDFBox Official site.
Changing the origin gives users a sense of how trustworthy your build it.
Interestingly, using pdfbox will require much more than those 2 artifacts, because it will also bring in transitive dependencies.
If the dependency verification file only included the checksums for the main artifacts you used, the build would fail with an error like this one:
Execution failed for task ':compileJava'.
> Dependency verification failed for configuration ':compileClasspath':
- On artifact commons-logging-1.2.jar (commons-logging:commons-logging:1.2) in repository 'MavenRepo': checksum is missing from verification metadata.
- On artifact commons-logging-1.2.pom (commons-logging:commons-logging:1.2) in repository 'MavenRepo': checksum is missing from verification metadata.
What this indicates is that your build requires commons-logging when executing compileJava, however the verification file doesn’t contain enough information for Gradle to verify the integrity of the dependencies, meaning you need to add the required information to the verification metadata file.
See troubleshooting dependency verification for more insights on what to do in this situation.
What checksums are verified?
If a dependency verification metadata file declares more than one checksum for a dependency, Gradle will verify all of them and fail if any of them fails.
For example, the following configuration would check both the md5 and sha1 checksums:
<component group="org.apache.pdfbox" name="pdfbox" version="2.0.17">
<artifact name="pdfbox-2.0.17.jar">
<md5 value="c713a8e252d0add65e9282b151adf6b4" origin="official site"/>
<sha1 value="b5c8dff799bd967c70ccae75e6972327ae640d35" origin="official site" reason="Additional check for this artifact"/>
</artifact>
</component>There are multiple reasons why you’d like to do so:
-
an official site doesn’t publish secure checksums (SHA-256, SHA-512) but publishes multiple insecure ones (MD5, SHA1). While it’s easy to fake a MD5 checksum and hard but possible to fake a SHA1 checksum, it’s harder to fake both of them for the same artifact.
-
you might want to add generated checksums to the list above
-
when updating dependency verification file with more secure checksums, you don’t want to accidentally erase checksums
Verifying dependency signatures
In addition to checksums, Gradle supports verification of signatures. Signatures are used to assess the provenance of a dependency (it tells who signed the artifacts, which usually corresponds to who produced it).
As enabling signature verification usually means a higher level of security, you might want to replace checksum verification with signature verification.
|
Warning
|
Signatures can also be used to assess the integrity of a dependency similarly to checksums. Signatures are signatures of the hash of artifacts, not artifacts themselves. This means that if the signature is done on an unsafe hash (even SHA1), then you’re not correctly assessing the integrity of a file. For this reason, if you care about both, you need to add both signatures and checksums to your verification metadata. |
However:
-
Gradle only supports verification of signatures published on remote repositories as ASCII-armored PGP files
-
Not all artifacts are published with signatures
-
A good signature doesn’t mean that the signatory was legit
As a consequence, signature verification will often be used alongside checksum verification.
It’s very common to find artifacts which are signed with an expired key. This is not a problem for verification: key expiry is mostly used to avoid signing with a stolen key. If an artifact was signed before expiry, it’s still valid.
Enabling signature verification
Because verifying signatures is more expensive (both I/O and CPU wise) and harder to check manually, it’s not enabled by default.
Enabling it requires you to change the configuration option in the verification-metadata.xml file:
<?xml version="1.0" encoding="UTF-8"?>
<verification-metadata xmlns="https://schema.gradle.org/dependency-verification"
xmlns:xsi="http://www.w3.org/2001/XMLSchema-instance"
xsi:schemaLocation="https://schema.gradle.org/dependency-verification https://schema.gradle.org/dependency-verification/dependency-verification-1.3.xsd">
<configuration>
<verify-signatures>true</verify-signatures>
</configuration>
</verification-metadata>Understanding signature verification
Once signature verification is enabled, for each artifact, Gradle will:
-
try to download the corresponding
.ascfile -
if it’s present
-
automatically download the keys required to perform verification of the signature
-
verify the artifact using the downloaded public keys
-
if signature verification passes, perform additional requested checksum verification
-
-
if it’s absent, fallback to checksum verification
That is to say that Gradle’s verification mechanism is much stronger if signature verification is enabled than just with checksum verification. In particular:
-
if an artifact is signed with multiple keys, all of them must pass validation or the build will fail
-
if an artifact passes verification, any additional checksum configured for the artifact will also be checked
However, it’s not because an artifact passes signature verification that you can trust it: you need to trust the keys.
In practice, it means you need to list the keys that you trust for each artifact, which is done by adding a pgp entry instead of a sha1 for example:
<component group="com.github.javaparser" name="javaparser-core" version="3.6.11">
<artifact name="javaparser-core-3.6.11.jar">
<pgp value="8756c4f765c9ac3cb6b85d62379ce192d401ab61"/>
</artifact>
</component>|
Warning
|
For the At the time, V4 key fingerprints are of 160-bit (40 characters) length. We accept longer keys to be future-proof in case a longer key fingerprint is introduced. In |
This effectively means that you trust com.github.javaparser:javaparser-core:3.6.11 if it’s signed with the key 8756c4f765c9ac3cb6b85d62379ce192d401ab61.
Without this, the build would fail with this error:
> Dependency verification failed for configuration ':compileClasspath':
- On artifact javaparser-core-3.6.11.jar (com.github.javaparser:javaparser-core:3.6.11) in repository 'MavenRepo': Artifact was signed with key '8756c4f765c9ac3cb6b85d62379ce192d401ab61' (Bintray (by JFrog) <****>) and passed verification but the key isn't in your trusted keys list.
|
Note
|
The key IDs that Gradle shows in error messages are the key IDs found in the signature file it tries to verify. It doesn’t mean that it’s necessarily the keys that you should trust. In particular, if the signature is correct but done by a malicious entity, Gradle wouldn’t tell you. |
Trusting keys globally
Signature verification has the advantage that it can make the configuration of dependency verification easier by not having to explicitly list all artifacts like for checksum verification only. In fact, it’s common that the same key can be used to sign several artifacts. If this is the case, you can move the trusted key from the artifact level to the global configuration block:
<?xml version="1.0" encoding="UTF-8"?>
<verification-metadata xmlns="https://schema.gradle.org/dependency-verification"
xmlns:xsi="http://www.w3.org/2001/XMLSchema-instance"
xsi:schemaLocation="https://schema.gradle.org/dependency-verification https://schema.gradle.org/dependency-verification/dependency-verification-1.3.xsd">
<configuration>
<verify-metadata>true</verify-metadata>
<verify-signatures>true</verify-signatures>
<trusted-keys>
<trusted-key id="8756c4f765c9ac3cb6b85d62379ce192d401ab61" group="com.github.javaparser"/>
</trusted-keys>
</configuration>
<components/>
</verification-metadata>The configuration above means that for any artifact belonging to the group com.github.javaparser, we trust it if it’s signed with the 8756c4f765c9ac3cb6b85d62379ce192d401ab61 fingerprint.
The trusted-key element works similarly to the trusted-artifact element:
-
group, the group of the artifact to trust -
name, the name of the artifact to trust -
version, the version of the artifact to trust -
file, the name of the artifact file to trust -
regex, a boolean saying if thegroup,name,versionandfileattributes need to be interpreted as regular expressions (defaults tofalse)
You should be careful when trusting a key globally.
Try to limit it to the appropriate groups or artifacts:
-
a valid key may have been used to sign artifact
Awhich you trust -
later on, the key is stolen and used to sign artifact
B
It means you can trust the key A for the first artifact, probably only up to the released version before the key was stolen, but not for B.
Remember that anybody can put an arbitrary name when generating a PGP key, so never trust the key solely based on the key name. Verify if the key is listed at the official site. For example, Apache projects typically provide a KEYS.txt file that you can trust.
Specifying key servers and ignoring keys
Gradle will automatically download the public keys required to verify a signature. For this it uses a list of well known and trusted key servers (the list may change between Gradle versions, please refer to the implementation to figure out what servers are used by default).
You can explicitly set the list of key servers that you want to use by adding them to the configuration:
<?xml version="1.0" encoding="UTF-8"?>
<verification-metadata xmlns="https://schema.gradle.org/dependency-verification"
xmlns:xsi="http://www.w3.org/2001/XMLSchema-instance"
xsi:schemaLocation="https://schema.gradle.org/dependency-verification https://schema.gradle.org/dependency-verification/dependency-verification-1.3.xsd">
<configuration>
<verify-metadata>true</verify-metadata>
<verify-signatures>true</verify-signatures>
<key-servers>
<key-server uri="hkp://my-key-server.org"/>
<key-server uri="https://my-other-key-server.org"/>
</key-servers>
</configuration>
</verification-metadata>Despite this, it’s possible that a key is not available:
-
because it wasn’t published to a public key server
-
because it was lost
In this case, you can ignore a key in the configuration block:
<?xml version="1.0" encoding="UTF-8"?>
<verification-metadata xmlns="https://schema.gradle.org/dependency-verification"
xmlns:xsi="http://www.w3.org/2001/XMLSchema-instance"
xsi:schemaLocation="https://schema.gradle.org/dependency-verification https://schema.gradle.org/dependency-verification/dependency-verification-1.3.xsd">
<configuration>
<verify-metadata>true</verify-metadata>
<verify-signatures>true</verify-signatures>
<ignored-keys>
<ignored-key id="abcdef1234567890" reason="Key is not available in any key server"/>
</ignored-keys>
</configuration>
</verification-metadata>As soon as a key is ignored, it will not be used for verification, even if the signature file mentions it. However, if the signature cannot be verified with at least one other key, Gradle will mandate that you provide a checksum.
|
Note
|
If Gradle cannot download a key while bootstrapping, it will mark it as ignored. If you can find the key but Gradle does not, you can manually add it to the keyring file. |
Exporting keys for faster verification
Gradle automatically downloads the required keys but this operation can be quite slow and requires everyone to download the keys. To avoid this, Gradle offers the ability to use a local keyring file containing the required public keys. Note that only public key packets and a single userId per key are stored and used. All other information (user attributes, signatures, etc.) is stripped from downloaded or exported keys.
Gradle supports 2 different file formats for keyrings: a binary format (.gpg file) and a plain text format (.keys), also known as ASCII-armored format.
There are pros and cons for each of the formats: the binary format is more compact and can be updated directly via GPG commands, but is completely opaque (binary). On the opposite, the ASCII-armored format is human-readable, can be easily updated by hand and makes it easier to do code reviews thanks to readable diffs.
You can configure which file type would be used by adding the keyring-format configuration option:
<?xml version="1.0" encoding="UTF-8"?>
<verification-metadata xmlns="https://schema.gradle.org/dependency-verification"
xmlns:xsi="http://www.w3.org/2001/XMLSchema-instance"
xsi:schemaLocation="https://schema.gradle.org/dependency-verification https://schema.gradle.org/dependency-verification/dependency-verification-1.3.xsd">
<configuration>
<verify-metadata>true</verify-metadata>
<verify-signatures>true</verify-signatures>
<keyring-format>armored</keyring-format>
</configuration>
</verification-metadata>Available options for keyring format are armored and binary.
Without keyring-format, if the gradle/verification-keyring.gpg or gradle/verification-keyring.keys file is present, Gradle will search for keys there in priority.
The plain text file will be ignored if there’s already a .gpg file (the binary version takes precedence).
You can ask Gradle to export all keys it used for verification of this build to the keyring during bootstrapping:
./gradlew --write-verification-metadata pgp,sha256 --export-keys
Unless keyring-format is specified, this command will generate both the binary version and the ASCII-armored file.
Use this option to choose the preferred format.
You should only pick one for your project.
It’s a good idea to commit this file to VCS (as long as you trust your VCS).
If you use git and use the binary version, make sure to make it treat this file as binary, by adding this to your .gitattributes file:
*.gpg binary
You can also ask Gradle to export all trusted keys without updating the verification metadata file:
./gradlew --export-keys
|
Note
|
This command will not report verification errors, only export keys. |
Bootstrapping and signature verification
|
Warning
|
Signature verification bootstrapping takes an optimistic point of view that signature verification is enough. Therefore, if you also care about integrity, you must first bootstrap using checksum verification, then with signature verification. |
Similarly to bootstrapping for checksums, Gradle provides a convenience for bootstrapping a configuration file with signature verification enabled.
For this, just add the pgp option to the list of verifications to generate.
However, because there might be verification failures, missing keys or missing signature files, you must provide a fallback checksum verification algorithm:
./gradlew --write-verification-metadata pgp,sha256
this means that Gradle will verify the signatures and fallback to SHA-256 checksums when there’s a problem.
When bootstrapping, Gradle performs optimistic verification and therefore assumes a sane build environment. It will therefore:
-
automatically add the trusted keys as soon as verification passes
-
automatically add ignored keys for keys which couldn’t be downloaded from public key servers. See here how to manually add keys if needed
-
automatically generate checksums for artifacts without signatures or ignored keys
If, for some reason, verification fails during the generation, Gradle will automatically generate an ignored key entry but warn you that you must absolutely check what happens.
This situation is common as explained for this section: a typical case is when the POM file for a dependency differs from one repository to the other (often in a non-meaningful way).
In addition, Gradle will try to group keys automatically and generate the trusted-keys block which reduced the configuration file size as much as possible.
Forcing use of local keyrings only
The local keyring files (.gpg or .keys) can be used to avoid reaching out to key servers whenever a key is required to verify an artifact.
However, it may be that the local keyring doesn’t contain a key, in which case Gradle would use the key servers to fetch the missing key.
If the local keyring file isn’t regularly updated, using key export, then it may be that your CI builds, for example, would reach out to key servers too often (especially if you use disposable containers for builds).
To avoid this, Gradle offers the ability to disallow use of key servers altogether: only the local keyring file would be used, and if a key is missing from this file, the build will fail.
To enable this mode, you need to disable key servers in the configuration file:
<?xml version="1.0" encoding="UTF-8"?>
<verification-metadata xmlns="https://schema.gradle.org/dependency-verification"
xmlns:xsi="http://www.w3.org/2001/XMLSchema-instance"
xsi:schemaLocation="https://schema.gradle.org/dependency-verification https://schema.gradle.org/dependency-verification/dependency-verification-1.3.xsd">
<configuration>
<key-servers enabled="false"/>
...
</configuration>
...
</verification-metadata>|
Note
|
If you are asking Gradle to generate a verification metadata file and that an existing verification metadata file sets enabled to false, then this flag will be ignored, so that potentially missing keys are downloaded.
|
Disabling verification or making it lenient
Dependency verification can be expensive, or sometimes verification could get in the way of day to day development (because of frequent dependency upgrades, for example).
Alternatively, you might want to enable verification on CI servers but not on local machines.
Gradle actually provides 3 different verification modes:
-
strict, which is the default. Verification fails as early as possible, in order to avoid the use of compromised dependencies during the build. -
lenient, which will run the build even if there are verification failures. The verification errors will be displayed during the build without causing a build failure. -
offwhen verification is totally ignored.
All those modes can be activated on the CLI using the --dependency-verification flag, for example:
./gradlew --dependency-verification lenient build
Alternatively, you can set the org.gradle.dependency.verification system property, either on the CLI:
./gradlew -Dorg.gradle.dependency.verification=lenient build
or in a gradle.properties file:
org.gradle.dependency.verification=lenient
Disabling dependency verification for some configurations only
In order to provide the strongest security level possible, dependency verification is enabled globally. This will ensure, for example, that you trust all the plugins you use. However, the plugins themselves may need to resolve additional dependencies that it doesn’t make sense to ask the user to accept. For this purpose, Gradle provides an API which allows disabling dependency verification on some specific configurations.
|
Warning
|
Disabling dependency verification, if you care about security, is not a good idea. This API mostly exist for cases where it doesn’t make sense to check dependencies. However, in order to be on the safe side, Gradle will systematically print a warning whenever verification has been disabled for a specific configuration. |
As an example, a plugin may want to check if there are newer versions of a library available and list those versions. It doesn’t make sense, in this context, to ask the user to put the checksums of the POM files of the newer releases because by definition, they don’t know about them. So the plugin might need to run its code independently of the dependency verification configuration.
To do this, you need to call the ResolutionStrategy#disableDependencyVerification method:
configurations {
"myPluginClasspath" {
resolutionStrategy {
disableDependencyVerification()
}
}
}configurations {
myPluginClasspath {
resolutionStrategy {
disableDependencyVerification()
}
}
}It’s also possible to disable verification on detached configurations like in the following example:
tasks.register("checkDetachedDependencies") {
val detachedConf: FileCollection = configurations.detachedConfiguration(dependencies.create("org.apache.commons:commons-lang3:3.3.1")).apply {
resolutionStrategy.disableDependencyVerification()
}
doLast {
println(detachedConf.files)
}
}tasks.register("checkDetachedDependencies") {
def detachedConf = configurations.detachedConfiguration(dependencies.create("org.apache.commons:commons-lang3:3.3.1"))
detachedConf.resolutionStrategy.disableDependencyVerification()
doLast {
println(detachedConf.files)
}
}Trusting some particular artifacts
You might want to trust some artifacts more than others. For example, it’s legitimate to think that artifacts produced in your company and found in your internal repository only are safe, but you want to check every external component.
|
Note
|
This is a typical company policy. In practice, nothing prevents your internal repository from being compromised, so it’s a good idea to check your internal artifacts too! |
For this purpose, Gradle offers a way to automatically trust some artifacts. You can trust all artifacts in a group by adding this to your configuration:
<?xml version="1.0" encoding="UTF-8"?>
<verification-metadata xmlns="https://schema.gradle.org/dependency-verification"
xmlns:xsi="http://www.w3.org/2001/XMLSchema-instance"
xsi:schemaLocation="https://schema.gradle.org/dependency-verification https://schema.gradle.org/dependency-verification/dependency-verification-1.3.xsd">
<configuration>
<trusted-artifacts>
<trust group="com.mycompany" reason="We trust mycompany artifacts"/>
</trusted-artifacts>
</configuration>
</verification-metadata>This means that all components which group is com.mycompany will automatically be trusted.
Trusted means that Gradle will not perform any verification whatsoever.
The trust element accepts those attributes:
-
group, the group of the artifact to trust -
name, the name of the artifact to trust -
version, the version of the artifact to trust -
file, the name of the artifact file to trust -
regex, a boolean saying if thegroup,name,versionandfileattributes need to be interpreted as regular expressions (defaults tofalse) -
reason, an optional reason, why matched artifacts are trusted
In the example above it means that the trusted artifacts would be artifacts in com.mycompany but not com.mycompany.other.
To trust all artifacts in com.mycompany and all subgroups, you can use:
<?xml version="1.0" encoding="UTF-8"?>
<verification-metadata xmlns="https://schema.gradle.org/dependency-verification"
xmlns:xsi="http://www.w3.org/2001/XMLSchema-instance"
xsi:schemaLocation="https://schema.gradle.org/dependency-verification https://schema.gradle.org/dependency-verification/dependency-verification-1.3.xsd">
<configuration>
<trusted-artifacts>
<trust group="^com[.]mycompany($|([.].*))" regex="true" reason="We trust all mycompany artifacts"/>
</trusted-artifacts>
</configuration>
</verification-metadata>Trusting multiple checksums for an artifact
It’s quite common to have different checksums for the same artifact in the wild. How is that possible? Despite progress, it’s often the case that developers publish, for example, to Maven Central and another repository separately, using different builds. In general, this is not a problem but sometimes it means that the metadata files would be different (different timestamps, additional whitespaces, …). Add to this that your build may use several repositories or repository mirrors and it makes it quite likely that a single build can "see" different metadata files for the same component! In general, it’s not malicious (but you must verify that the artifact is actually correct), so Gradle lets you declare the additional artifact checksums. For example:
<component group="org.apache" name="apache" version="13">
<artifact name="apache-13.pom">
<sha256 value="2fafa38abefe1b40283016f506ba9e844bfcf18713497284264166a5dbf4b95e">
<also-trust value="ff513db0361fd41237bef4784968bc15aae478d4ec0a9496f811072ccaf3841d"/>
</sha256>
</artifact>
</component>You can have as many also-trust entries as needed, but in general you shouldn’t have more than 2.
Skipping Javadocs and sources
By default Gradle will verify all downloaded artifacts, which includes Javadocs and sources. In general this is not a problem but you might face an issue with IDEs which automatically try to download them during import: if you didn’t set the checksums for those too, importing would fail.
To avoid this, you can configure Gradle to trust automatically all javadocs/sources:
<trusted-artifacts>
<trust file=".*-javadoc[.]jar" regex="true"/>
<trust file=".*-sources[.]jar" regex="true"/>
</trusted-artifacts>Adding keys manually to the keyring
Adding keys to the ASCII-armored keyring
The added key must be ASCII-armored formatted and can be simply added at the end of the file. If you already downloaded the key in the right format, you can simply append it to the file.
Or you can amend an existing KEYS file by issuing the following commands:
$ gpg --no-default-keyring --keyring /tmp/keyring.gpg --recv-keys 8756c4f765c9ac3cb6b85d62379ce192d401ab61
gpg: keybox '/tmp/keyring.gpg' created
gpg: key 379CE192D401AB61: public key "Bintray (by JFrog) <****>" imported
gpg: Total number processed: 1
gpg: imported: 1
# Write its ASCII-armored version
$ gpg --keyring /tmp/keyring.gpg --export --armor 8756c4f765c9ac3cb6b85d62379ce192d401ab61 > gradle/verification-keyring.keysOnce done, make sure to run the generation command again so that the key is processed by Gradle. This will do the following:
-
Add a standard header to the key
-
Rewrite the key using Gradle’s own format, which trims the key to the bare minimum
-
Move the key to its sorted location, keeping the file reproducible
Adding keys to the binary keyring
You can add keys to the binary version using GPG, for example issuing the following commands (syntax may depend on the tool you use):
$ gpg --no-default-keyring --keyring gradle/verification-keyring.gpg --recv-keys 8756c4f765c9ac3cb6b85d62379ce192d401ab61
gpg: keybox 'gradle/verification-keyring.gpg' created
gpg: key 379CE192D401AB61: public key "Bintray (by JFrog) <****>" imported
gpg: Total number processed: 1
gpg: imported: 1
$ gpg --no-default-keyring --keyring gradle/verification-keyring.gpg --recv-keys 6f538074ccebf35f28af9b066a0975f8b1127b83
gpg: key 0729A0AFF8999A87: public key "Kotlin Release <****>" imported
gpg: Total number processed: 1
gpg: imported: 1Dealing with a verification failure
Dependency verification can fail in different ways, this section explains how you should deal with the various cases.
Missing verification metadata
The simplest failure you can have is when verification metadata is missing from the dependency verification file. This is the case for example if you use checksum verification, then you update a dependency and new versions of the dependency (and potentially its transitive dependencies) are brought in.
Gradle will tell you what metadata is missing:
Execution failed for task ':compileJava'.
> Dependency verification failed for configuration ':compileClasspath':
- On artifact commons-logging-1.2.jar (commons-logging:commons-logging:1.2) in repository 'MavenRepo': checksum is missing from verification metadata.
-
the missing module group is
commons-logging, it’s artifact name iscommons-loggingand its version is1.2. The corresponding artifact iscommons-logging-1.2.jarso you need to add the following entry to the verification file:
<component group="commons-logging" name="commons-logging" version="1.2">
<artifact name="commons-logging-1.2.jar">
<sha256 value="daddea1ea0be0f56978ab3006b8ac92834afeefbd9b7e4e6316fca57df0fa636" origin="official distribution"/>
</artifact>
</component>Alternatively, you can ask Gradle to generate the missing information by using the bootstrapping mechanism: existing information in the metadata file will be preserved, Gradle will only add the missing verification metadata.
Incorrect checksums
A more problematic issue is when the actual checksum verification fails:
Execution failed for task ':compileJava'.
> Dependency verification failed for configuration ':compileClasspath':
- On artifact commons-logging-1.2.jar (commons-logging:commons-logging:1.2) in repository 'MavenRepo': expected a 'sha256' checksum of '91f7a33096ea69bac2cbaf6d01feb934cac002c48d8c8cfa9c240b40f1ec21df' but was 'daddea1ea0be0f56978ab3006b8ac92834afeefbd9b7e4e6316fca57df0fa636'
This time, Gradle tells you what dependency is at fault, what was the expected checksum (the one you declared in the verification metadata file) and the one which was actually computed during verification.
Such a failure indicates that a dependency may have been compromised. At this stage, you must perform manual verification and check what happens. Several things can happen:
-
a dependency was tampered in the local dependency cache of Gradle. This is usually harmless: erase the file from the cache and Gradle would redownload the dependency.
-
a dependency is available in multiple sources with slightly different binaries (additional whitespace, …)
-
please inform the maintainers of the library that they have such an issue
-
you can use
also-trustto accept the additional checksums
-
-
the dependency was compromised
-
immediately inform the maintainers of the library
-
notify the repository maintainers of the compromised library
-
Note that a variation of a compromised library is often name squatting, when a hacker would use GAV coordinates which look legit but are actually different by one character, or repository shadowing, when a dependency with the official GAV coordinates is published in a malicious repository which comes first in your build.
Untrusted signatures
If you have signature verification enabled, Gradle will perform verification of the signatures but will not trust them automatically:
> Dependency verification failed for configuration ':compileClasspath':
- On artifact javaparser-core-3.6.11.jar (com.github.javaparser:javaparser-core:3.6.11) in repository 'MavenRepo': Artifact was signed with key '379ce192d401ab61' (Bintray (by JFrog) <****>) and passed verification but the key isn't in your trusted keys list.
In this case it means you need to check yourself if the key that was used for verification (and therefore the signature) can be trusted, in which case refer to this section of the documentation to figure out how to declare trusted keys.
Failed signature verification
If Gradle fails to verify a signature, you will need to take action and verify artifacts manually because this may indicate a compromised dependency.
If such a thing happens, Gradle will fail with:
> Dependency verification failed for configuration ':compileClasspath':
- On artifact javaparser-core-3.6.11.jar (com.github.javaparser:javaparser-core:3.6.11) in repository 'MavenRepo': Artifact was signed with key '379ce192d401ab61' (Bintray (by JFrog) <****>) but signature didn't match
There are several options:
-
signature was wrong in the first place, which happens frequently with dependencies published on different repositories.
-
the signature is correct but the artifact has been compromised (either in the local dependency cache or remotely)
The right approach here is to go to the official site of the dependency and see if they publish signatures for their artifacts. If they do, verify that the signature that Gradle downloaded matches the one published.
If you have checked that the dependency is not compromised and that it’s "only" the signature which is wrong, you should declare an artifact level key exclusion:
<components>
<component group="com.github.javaparser" name="javaparser-core" version="3.6.11">
<artifact name="javaparser-core-3.6.11.pom">
<ignored-keys>
<ignored-key id="379ce192d401ab61" reason="internal repo has corrupted POM"/>
</ignored-keys>
</artifact>
</component>
</components>However, if you only do so, Gradle will still fail because all keys for this artifact will be ignored and you didn’t provide a checksum:
<components>
<component group="com.github.javaparser" name="javaparser-core" version="3.6.11">
<artifact name="javaparser-core-3.6.11.pom">
<ignored-keys>
<ignored-key id="379ce192d401ab61" reason="internal repo has corrupted POM"/>
</ignored-keys>
<sha256 value="a2023504cfd611332177f96358b6f6db26e43d96e8ef4cff59b0f5a2bee3c1e1"/>
</artifact>
</component>
</components>Manual verification of a dependency
You will likely face a dependency verification failure (either checksum verification or signature verification) and will need to figure out if the dependency has been compromised or not.
In this section we give an example how you can manually check if a dependency was compromised.
For this we will take this example failure:
> Dependency verification failed for configuration ':compileClasspath': - On artifact j2objc-annotations-1.1.jar (com.google.j2objc:j2objc-annotations:1.1) in repository 'MyCompany Mirror': Artifact was signed with key '29579f18fa8fd93b' but signature didn't match
This error message gives us the GAV coordinates of the problematic dependency, as well as an indication of where the dependency was fetched from.
Here, the dependency comes from MyCompany Mirror, which is a repository declared in our build.
The first thing to do is therefore to download the artifact and its signature manually from the mirror:
$ curl https://my-company-mirror.com/repo/com/google/j2objc/j2objc-annotations/1.1/j2objc-annotations-1.1.jar --output j2objc-annotations-1.1.jar $ curl https://my-company-mirror.com/repo/com/google/j2objc/j2objc-annotations/1.1/j2objc-annotations-1.1.jar.asc --output j2objc-annotations-1.1.jar.asc
Then we can use the key information provided in the error message to import the key locally:
$ gpg --recv-keys B801E2F8EF035068EC1139CC29579F18FA8FD93B
And perform verification:
$ gpg --verify j2objc-annotations-1.1.jar.asc gpg: assuming signed data in 'j2objc-annotations-1.1.jar' gpg: Signature made Thu 19 Jan 2017 12:06:51 AM CET gpg: using RSA key 29579F18FA8FD93B gpg: BAD signature from "Tom Ball <****>" [unknown]
What this tells us is that the problem is not on the local machine: the repository already contains a bad signature.
The next step is to do the same by downloading what is actually on Maven Central:
$ curl https://my-company-mirror.com/repo/com/google/j2objc/j2objc-annotations/1.1/j2objc-annotations-1.1.jar --output central-j2objc-annotations-1.1.jar $ curl https://my-company-mirror.com/repo/com/google/j2objc/j2objc-annotations/1/1/j2objc-annotations-1.1.jar.asc --output central-j2objc-annotations-1.1.jar.asc
And we can now check the signature again:
$ gpg --verify central-j2objc-annotations-1.1.jar.asc gpg: assuming signed data in 'central-j2objc-annotations-1.1.jar' gpg: Signature made Thu 19 Jan 2017 12:06:51 AM CET gpg: using RSA key 29579F18FA8FD93B gpg: Good signature from "Tom Ball <****>" [unknown] gpg: WARNING: This key is not certified with a trusted signature! gpg: There is no indication that the signature belongs to the owner. Primary key fingerprint: B801 E2F8 EF03 5068 EC11 39CC 2957 9F18 FA8F D93B
This indicates that the dependency is valid on Maven Central. At this stage, we already know that the problem lives in the mirror, it may have been compromised, but we need to verify.
A good idea is to compare the 2 artifacts, which you can do with a tool like diffoscope.
We then figure out that the intent wasn’t malicious but that somehow a build has been overwritten with a newer version (the version in Central is newer than the one in our repository).
In this case, you can decide to:
-
ignore the signature for this artifact and trust the different possible checksums (both for the old artifact and the new version)
-
or cleanup your mirror so that it contains the same version as in Maven Central
It’s worth noting that if you choose to delete the version from your repository, you will also need to remove it from the local Gradle cache.
This is facilitated by the fact the error message tells you were the file is located:
> Dependency verification failed for configuration ':compileClasspath':
- On artifact j2objc-annotations-1.1.jar (com.google.j2objc:j2objc-annotations:1.1) in repository 'MyCompany Mirror': Artifact was signed with key '29579f18fa8fd93b' but signature didn't match
This can indicate that a dependency has been compromised. Please carefully verify the signatures and checksums.
For your information here are the path to the files which failed verification:
- $<<directory_layout.adoc#dir:gradle_user_home,GRADLE_USER_HOME>>/caches/modules-2/files-2.1/com.google.j2objc/j2objc-annotations/1.1/976d8d30bebc251db406f2bdb3eb01962b5685b3/j2objc-annotations-1.1.jar (signature: GRADLE_USER_HOME/caches/modules-2/files-2.1/com.google.j2objc/j2objc-annotations/1.1/82e922e14f57d522de465fd144ec26eb7da44501/j2objc-annotations-1.1.jar.asc)
GRADLE_USER_HOME = /home/jiraya/.gradle
You can safely delete the artifact file as Gradle would automatically re-download it:
rm -rf ~/.gradle/caches/modules-2/files-2.1/com.google.j2objc/j2objc-annotations/1.1
Cleaning up the verification file
If you do nothing, the dependency verification metadata will grow over time as you add new dependencies or change versions: Gradle will not automatically remove unused entries from this file. The reason is that there’s no way for Gradle to know upfront if a dependency will effectively be used during the build or not.
As a consequence, adding dependencies or changing dependency version can easily lead to more entries in the file, while leaving unnecessary entries out there.
One option to cleanup the file is to move the existing verification-metadata.xml file to a different location and call Gradle with the --dry-run mode: while not perfect (it will not notice dependencies only resolved at configuration time), it generates a new file that you can compare with the existing one.
We need to move the existing file because both the bootstrapping mode and the dry-run mode are incremental: they copy information from the existing metadata verification file (in particular, trusted keys).
Refreshing missing keys
Gradle caches missing keys for 24 hours, meaning it will not attempt to re-download the missing keys for 24 hours after failing.
If you want to retry immediately, you can run with the --refresh-keys CLI flag:
./gradlew build --refresh-keys
See here how to manually add keys if Gradle keeps failing to download them.
DECLARING VERSIONS
Declaring Versions and Ranges
The simplest version declaration is a simple string representing the version to use. Gradle supports different ways of declaring a version string:
-
An exact version: e.g.
1.3,1.3.0-beta3,1.0-20150201.131010-1 -
A Maven-style version range: e.g.
[1.0,),[1.1, 2.0),(1.2, 1.5]-
The
[and]symbols indicate an inclusive bound;(and)indicate an exclusive bound. -
When the upper or lower bound is missing, the range has no upper or lower bound.
-
The symbol
]can be used instead of(for an exclusive lower bound, and[instead of)for exclusive upper bound. e.g]1.0, 2.0[ -
An upper bound exclude acts as a prefix exclude. This means that
[1.0, 2.0[will also exclude all versions starting with2.0that are smaller than2.0. For example versions like2.0-dev1or2.0-SNAPSHOTare no longer included in the range.
-
-
A prefix version range: e.g.
1.`, `1.3.-
Only versions exactly matching the portion before the
+are included. -
The range
+on its own will include any version.
-
-
A
latest-statusversion: e.g.latest.integration,latest.release-
Will match the highest versioned module with the specified status. See ComponentMetadata.getStatus().
-
-
A Maven
SNAPSHOTversion identifier: e.g.1.0-SNAPSHOT,1.4.9-beta1-SNAPSHOT
Version ordering
Versions have an implicit ordering. Version ordering is used to:
-
Determine if a particular version is included in a range.
-
Determine which version is 'newest' when performing conflict resolution (watch out though, conflict resolution uses "base versions").
Versions are ordered based on the following rules:
-
Each version is split into it’s constituent "parts":
-
The characters
[. - _ +]are used to separate the different "parts" of a version. -
Any part that contains both digits and letters is split into separate parts for each:
1a1 == 1.a.1 -
Only the parts of a version are compared. The actual separator characters are not significant:
1.a.1 == 1-a+1 == 1.a-1 == 1a1(watch out though, in the context of conflict resolution there are exceptions to this rule).
-
-
The equivalent parts of 2 versions are compared using the following rules:
-
If both parts are numeric, the highest numeric value is higher:
1.1<1.2 -
If one part is numeric, it is considered higher than the non-numeric part:
1.a<1.1 -
If both are non-numeric, the parts are compared alphabetically, in a case-sensitive manner:
1.A<1.B<1.a<1.b -
A version with an extra numeric part is considered higher than a version without (even when it’s zero):
1.1<1.1.0 -
A version with an extra non-numeric part is considered lower than a version without:
1.1.a<1.1
-
-
Certain non-numeric parts have special meaning for the purposes of ordering:
-
devis consider lower than any other non-numeric part:1.0-dev<1.0-ALPHA<1.0-alpha<1.0-rc. -
The strings
rc,snapshot,final,ga,releaseandspare considered higher than any other string part (sorted in this order):1.0-zeta<1.0-rc<1.0-snapshot<1.0-final<1.0-ga<1.0-release<1.0-sp<1.0. -
These special values are NOT case sensitive, as opposed to regular string parts and they do not depend on the separator used around them:
1.0-RC-1==1.0.rc.1
-
Simple version declaration semantics
When you declare a version using the short-hand notation, for example:
dependencies {
implementation("org.slf4j:slf4j-api:1.7.15")
}dependencies {
implementation('org.slf4j:slf4j-api:1.7.15')
}Then the version is considered a required version which means that it should minimally be 1.7.15 but can be upgraded by the engine (optimistic upgrade).
There is, however, a shorthand notation for strict versions, using the !! notation:
dependencies {
// short-hand notation with !!
implementation("org.slf4j:slf4j-api:1.7.15!!")
// is equivalent to
implementation("org.slf4j:slf4j-api") {
version {
strictly("1.7.15")
}
}
// or...
implementation("org.slf4j:slf4j-api:[1.7, 1.8[!!1.7.25")
// is equivalent to
implementation("org.slf4j:slf4j-api") {
version {
strictly("[1.7, 1.8[")
prefer("1.7.25")
}
}
}dependencies {
// short-hand notation with !!
implementation('org.slf4j:slf4j-api:1.7.15!!')
// is equivalent to
implementation("org.slf4j:slf4j-api") {
version {
strictly '1.7.15'
}
}
// or...
implementation('org.slf4j:slf4j-api:[1.7, 1.8[!!1.7.25')
// is equivalent to
implementation('org.slf4j:slf4j-api') {
version {
strictly '[1.7, 1.8['
prefer '1.7.25'
}
}
}A strict version cannot be upgraded and overrides whatever transitive dependencies originating from this dependency provide. It is recommended to use ranges for strict versions.
The notation [1.7, 1.8[!!1.7.25 above is equivalent to:
-
strictly
[1.7, 1.8[ -
prefer
1.7.25
which means that the engine must select a version between 1.7 (included) and 1.8 (excluded), and that if no other component in the graph needs a different version, it should prefer 1.7.25.
Declaring a dependency without version
A recommended practice for larger projects is to declare dependencies without versions and use dependency constraints for version declaration. The advantage is that dependency constraints allow you to manage versions of all dependencies, including transitive ones, in one place.
dependencies {
implementation("org.springframework:spring-web")
}
dependencies {
constraints {
implementation("org.springframework:spring-web:5.0.2.RELEASE")
}
}dependencies {
implementation 'org.springframework:spring-web'
}
dependencies {
constraints {
implementation 'org.springframework:spring-web:5.0.2.RELEASE'
}
}Declaring Rich Versions
Gradle supports a rich model for declaring versions, which allows to combine different level of version information. The terms and their meaning are explained below, from the strongest to the weakest:
strictly-
Any version not matched by this version notation will be excluded. This is the strongest version declaration. On a declared dependency, a
strictlycan downgrade a version. When on a transitive dependency, it will cause dependency resolution to fail if no version acceptable by this clause can be selected. See overriding dependency version for details. This term supports dynamic versions.When defined, this overrides any previous
requiredeclaration and clears previousreject.
require-
Implies that the selected version cannot be lower than what
requireaccepts but could be higher through conflict resolution, even if higher has an exclusive higher bound. This is what a direct dependency translates to. This term supports dynamic versions.When defined, this overrides any previous
strictlydeclaration and clears previousreject.
prefer-
This is a very soft version declaration. It applies only if there is no stronger non dynamic opinion on a version for the module. This term does not support dynamic versions.
Definition can complement
strictlyorrequire.When defined, this overrides any previous
preferdeclaration and clears previousreject.
There is also an additional term outside of the level hierarchy:
reject-
Declares that specific version(s) are not accepted for the module. This will cause dependency resolution to fail if the only versions selectable are also rejected. This term supports dynamic versions.
The following table illustrates a number of use cases and how to combine the different terms for rich version declaration:
| Which version(s) of this dependency are acceptable? | strictly |
require |
prefer |
rejects |
Selection result |
|---|---|---|---|---|---|
Tested with version |
1.5 |
Any version starting from |
|||
Tested with |
[1.0, 2.0[ |
1.5 |
Any version between |
||
Tested with |
[1.0, 2.0[ |
1.5 |
Any version between |
||
Same as above, with |
[1.0, 2.0[ |
1.5 |
1.4 |
Any version between |
|
No opinion, works with |
1.5 |
|
|||
No opinion, prefer latest release. |
|
The latest release at build time. |
|||
On the edge, latest release, no downgrade. |
|
The latest release at build time. |
|||
No other version than 1.5. |
1.5 |
1.5, or failure if another |
|||
|
[1.5,1.6[ |
Latest |
Lines annotated with a lock (🔒) indicate that leveraging dependency locking makes sense in this context. Another concept that relates with rich version declaration is the ability to publish resolved versions instead of declared ones.
Using strictly, especially for a library, must be a well thought process as it has an impact on downstream consumers.
At the same time, used correctly, it will help consumers understand what combination of libraries do not work together in their context.
See overriding dependency version for more information.
|
Note
|
Rich version information will be preserved in the Gradle Module Metadata format.
However conversion to Ivy or Maven metadata formats will be lossy.
The highest level will be published, that is |
Rich version declaration is accessed through the version DSL method on a dependency or constraint declaration which gives access to MutableVersionConstraint.
dependencies {
implementation("org.slf4j:slf4j-api") {
version {
strictly("[1.7, 1.8[")
prefer("1.7.25")
}
}
constraints {
add("implementation", "org.springframework:spring-core") {
version {
require("4.2.9.RELEASE")
reject("4.3.16.RELEASE")
}
}
}
}dependencies {
implementation('org.slf4j:slf4j-api') {
version {
strictly '[1.7, 1.8['
prefer '1.7.25'
}
}
constraints {
implementation('org.springframework:spring-core') {
version {
require '4.2.9.RELEASE'
reject '4.3.16.RELEASE'
}
}
}
}Handling versions which change over time
There are many situations when you want to use the latest version of a particular module dependency, or the latest in a range of versions.
This can be a requirement during development, or you may be developing a library that is designed to work with a range of dependency versions.
You can easily depend on these constantly changing dependencies by using a dynamic version.
A dynamic version can be either a version range (e.g. 2.+) or it can be a placeholder for the latest version available e.g. latest.integration.
Alternatively, the module you request can change over time even for the same version, a so-called changing version.
An example of this type of changing module is a Maven SNAPSHOT module, which always points at the latest artifact published.
In other words, a standard Maven snapshot is a module that is continually evolving, it is a "changing module".
|
Caution
|
Using dynamic versions and changing modules can lead to unreproducible builds. As new versions of a particular module are published, its API may become incompatible with your source code. Use this feature with caution! |
Declaring a dynamic version
Projects might adopt a more aggressive approach for consuming dependencies to modules. For example you might want to always integrate the latest version of a dependency to consume cutting edge features at any given time. A dynamic version allows for resolving the latest version or the latest version of a version range for a given module.
|
Caution
|
Using dynamic versions in a build bears the risk of potentially breaking it. As soon as a new version of the dependency is released that contains an incompatible API change your source code might stop compiling. |
plugins {
`java-library`
}
repositories {
mavenCentral()
}
dependencies {
implementation("org.springframework:spring-web:5.+")
}plugins {
id 'java-library'
}
repositories {
mavenCentral()
}
dependencies {
implementation 'org.springframework:spring-web:5.+'
}A build scan can effectively visualize dynamic dependency versions and their respective, selected versions.
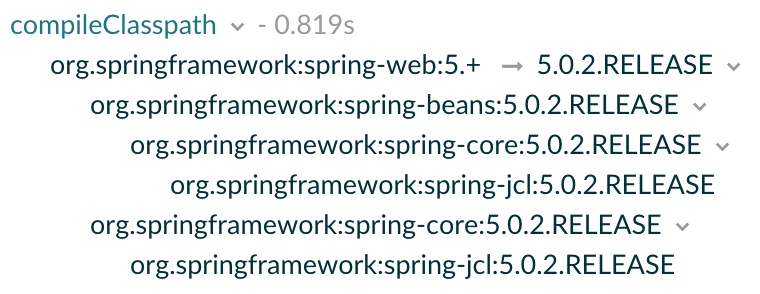
By default, Gradle caches dynamic versions of dependencies for 24 hours. Within this time frame, Gradle does not try to resolve newer versions from the declared repositories. The threshold can be configured as needed for example if you want to resolve new versions earlier.
Declaring a changing version
A team might decide to implement a series of features before releasing a new version of the application or library. A common strategy to allow consumers to integrate an unfinished version of their artifacts early and often is to release a module with a so-called changing version. A changing version indicates that the feature set is still under active development and hasn’t released a stable version for general availability yet.
In Maven repositories, changing versions are commonly referred to as snapshot versions.
Snapshot versions contain the suffix -SNAPSHOT.
The following example demonstrates how to declare a snapshot version on the Spring dependency.
plugins {
`java-library`
}
repositories {
mavenCentral()
maven {
url = uri("https://repo.spring.io/snapshot/")
}
}
dependencies {
implementation("org.springframework:spring-web:5.0.3.BUILD-SNAPSHOT")
}plugins {
id 'java-library'
}
repositories {
mavenCentral()
maven {
url 'https://repo.spring.io/snapshot/'
}
}
dependencies {
implementation 'org.springframework:spring-web:5.0.3.BUILD-SNAPSHOT'
}By default, Gradle caches changing versions of dependencies for 24 hours. Within this time frame, Gradle does not try to resolve newer versions from the declared repositories. The threshold can be configured as needed for example if you want to resolve new snapshot versions earlier.
Gradle is flexible enough to treat any version as changing version e.g. if you wanted to model snapshot behavior for an Ivy module.
All you need to do is to set the property ExternalModuleDependency.setChanging(boolean) to true.
Controlling dynamic version caching
By default, Gradle caches dynamic versions and changing modules for 24 hours. During that time frame Gradle does not contact any of the declared, remote repositories for new versions. If you want Gradle to check the remote repository more frequently or with every execution of your build, then you will need to change the time to live (TTL) threshold.
|
Note
|
Using a short TTL threshold for dynamic or changing versions may result in longer build times due to the increased number of HTTP(s) calls. |
You can override the default cache modes using command line options. You can also change the cache expiry times in your build programmatically using the resolution strategy.
Controlling dependency caching programmatically
You can fine-tune certain aspects of caching programmatically using the ResolutionStrategy for a configuration. The programmatic approach is useful if you would like to change the settings permanently.
By default, Gradle caches dynamic versions for 24 hours. To change how long Gradle will cache the resolved version for a dynamic version, use:
configurations.all {
resolutionStrategy.cacheDynamicVersionsFor(10, "minutes")
}configurations.all {
resolutionStrategy.cacheDynamicVersionsFor 10, 'minutes'
}By default, Gradle caches changing modules for 24 hours. To change how long Gradle will cache the meta-data and artifacts for a changing module, use:
configurations.all {
resolutionStrategy.cacheChangingModulesFor(4, "hours")
}configurations.all {
resolutionStrategy.cacheChangingModulesFor 4, 'hours'
}Controlling dependency caching from the command line
Avoiding network access with offline mode
The --offline command line switch tells Gradle to always use dependency modules from the cache, regardless if they are due to be checked again. When running with offline, Gradle will never attempt to access the network to perform dependency resolution. If required modules are not present in the dependency cache, build execution will fail.
Refreshing dependencies
You can control the behavior of dependency caching for a distinct build invocation from the command line. Command line options are helpful for making a selective, ad-hoc choice for a single execution of the build.
At times, the Gradle Dependency Cache can become out of sync with the actual state of the configured repositories.
Perhaps a repository was initially misconfigured, or perhaps a "non-changing" module was published incorrectly.
To refresh all dependencies in the dependency cache, use the --refresh-dependencies option on the command line.
The --refresh-dependencies option tells Gradle to ignore all cached entries for resolved modules and artifacts.
A fresh resolve will be performed against all configured repositories, with dynamic versions recalculated, modules refreshed, and artifacts downloaded.
However, where possible Gradle will check if the previously downloaded artifacts are valid before downloading again.
This is done by comparing published SHA1 values in the repository with the SHA1 values for existing downloaded artifacts.
-
new versions of dynamic dependencies
-
new versions of changing modules (modules which use the same version string but can have different contents)
Refreshing dependencies will cause Gradle to invalidate its listing caches. However:
-
it will perform HTTP HEAD requests on metadata files but will not re-download them if they are identical
-
it will perform HTTP HEAD requests on artifact files but will not re-download them if they are identical
In other words, refreshing dependencies only has an impact if you actually use dynamic dependencies or that you have changing dependencies that you were not aware of (in which case it is your responsibility to declare them correctly to Gradle as changing dependencies).
It’s a common misconception to think that using --refresh-dependencies will force download of dependencies.
This is not the case: Gradle will only perform what is strictly required to refresh the dynamic dependencies.
This may involve downloading new listing or metadata files, or even artifacts, but if nothing changed, the impact is minimal.
Using component selection rules
Component selection rules may influence which component instance should be selected when multiple versions are available that match a version selector. Rules are applied against every available version and allow the version to be explicitly rejected by rule. This allows Gradle to ignore any component instance that does not satisfy conditions set by the rule. Examples include:
-
For a dynamic version like
1.+certain versions may be explicitly rejected from selection. -
For a static version like
1.4an instance may be rejected based on extra component metadata such as the Ivy branch attribute, allowing an instance from a subsequent repository to be used.
Rules are configured via the ComponentSelectionRules object. Each rule configured will be called with a ComponentSelection object as an argument which contains information about the candidate version being considered. Calling ComponentSelection.reject(java.lang.String) causes the given candidate version to be explicitly rejected, in which case the candidate will not be considered for the selector.
The following example shows a rule that disallows a particular version of a module but allows the dynamic version to choose the next best candidate.
configurations {
create("rejectConfig") {
resolutionStrategy {
componentSelection {
// Accept the highest version matching the requested version that isn't '1.5'
all {
if (candidate.group == "org.sample" && candidate.module == "api" && candidate.version == "1.5") {
reject("version 1.5 is broken for 'org.sample:api'")
}
}
}
}
}
}
dependencies {
"rejectConfig"("org.sample:api:1.+")
}configurations {
rejectConfig {
resolutionStrategy {
componentSelection {
// Accept the highest version matching the requested version that isn't '1.5'
all { ComponentSelection selection ->
if (selection.candidate.group == 'org.sample' && selection.candidate.module == 'api' && selection.candidate.version == '1.5') {
selection.reject("version 1.5 is broken for 'org.sample:api'")
}
}
}
}
}
}
dependencies {
rejectConfig "org.sample:api:1.+"
}Note that version selection is applied starting with the highest version first. The version selected will be the first version found that all component selection rules accept. A version is considered accepted if no rule explicitly rejects it.
Similarly, rules can be targeted at specific modules.
Modules must be specified in the form of group:module.
configurations {
create("targetConfig") {
resolutionStrategy {
componentSelection {
withModule("org.sample:api") {
if (candidate.version == "1.5") {
reject("version 1.5 is broken for 'org.sample:api'")
}
}
}
}
}
}configurations {
targetConfig {
resolutionStrategy {
componentSelection {
withModule("org.sample:api") { ComponentSelection selection ->
if (selection.candidate.version == "1.5") {
selection.reject("version 1.5 is broken for 'org.sample:api'")
}
}
}
}
}
}Component selection rules can also consider component metadata when selecting a version.
Possible additional metadata that can be considered are ComponentMetadata and IvyModuleDescriptor.
Note that this extra information may not always be available and thus should be checked for null values.
configurations {
create("metadataRulesConfig") {
resolutionStrategy {
componentSelection {
// Reject any versions with a status of 'experimental'
all {
if (candidate.group == "org.sample" && metadata?.status == "experimental") {
reject("don't use experimental candidates from 'org.sample'")
}
}
// Accept the highest version with either a "release" branch or a status of 'milestone'
withModule("org.sample:api") {
if (getDescriptor(IvyModuleDescriptor::class)?.branch != "release" && metadata?.status != "milestone") {
reject("'org.sample:api' must have testing branch or milestone status")
}
}
}
}
}
}configurations {
metadataRulesConfig {
resolutionStrategy {
componentSelection {
// Reject any versions with a status of 'experimental'
all { ComponentSelection selection ->
if (selection.candidate.group == 'org.sample' && selection.metadata?.status == 'experimental') {
selection.reject("don't use experimental candidates from 'org.sample'")
}
}
// Accept the highest version with either a "release" branch or a status of 'milestone'
withModule('org.sample:api') { ComponentSelection selection ->
if (selection.getDescriptor(IvyModuleDescriptor)?.branch != "release" && selection.metadata?.status != 'milestone') {
selection.reject("'org.sample:api' must be a release branch or have milestone status")
}
}
}
}
}
}Note that a ComponentSelection argument is always required as parameter when declaring a component selection rule.
Locking dependency versions
Use of dynamic dependency versions (e.g. 1.+ or [1.0,2.0)) makes builds non-deterministic.
This causes builds to break without any obvious change, and worse, can be caused by a transitive dependency that the build author has no control over.
To achieve reproducible builds, it is necessary to lock versions of dependencies and transitive dependencies such that a build with the same inputs will always resolve the same module versions. This is called dependency locking.
It enables, amongst others, the following scenarios:
-
Companies dealing with multi repositories no longer need to rely on
-SNAPSHOTor changing dependencies, which sometimes result in cascading failures when a dependency introduces a bug or incompatibility. Now dependencies can be declared against major or minor version range, enabling to test with the latest versions on CI while leveraging locking for stable developer builds. -
Teams that want to always use the latest of their dependencies can use dynamic versions, locking their dependencies only for releases. The release tag will contain the lock states, allowing that build to be fully reproducible when bug fixes need to be developed.
Combined with publishing resolved versions, you can also replace the declared dynamic version part at publication time. Consumers will instead see the versions that your release resolved.
Locking is enabled per dependency configuration. Once enabled, you must create an initial lock state. It will cause Gradle to verify that resolution results do not change, resulting in the same selected dependencies even if newer versions are produced. Modifications to your build that would impact the resolved set of dependencies will cause it to fail. This makes sure that changes, either in published dependencies or build definitions, do not alter resolution without adapting the lock state.
|
Note
|
Dependency locking makes sense only with dynamic versions.
It will have no impact on changing versions (like |
Enabling locking on configurations
Locking of a configuration happens through the ResolutionStrategy:
configurations {
compileClasspath {
resolutionStrategy.activateDependencyLocking()
}
}configurations {
compileClasspath {
resolutionStrategy.activateDependencyLocking()
}
}|
Note
|
Only configurations that can be resolved will have lock state attached to them. Applying locking on non resolvable-configurations is simply a no-op. |
Or the following, as a way to lock all configurations:
dependencyLocking {
lockAllConfigurations()
}dependencyLocking {
lockAllConfigurations()
}|
Note
|
The above will lock all project configurations, but not the buildscript ones. |
You can also disable locking on a specific configuration. This can be useful if a plugin configured locking on all configurations but you happen to add one that should not be locked.
configurations.compileClasspath {
resolutionStrategy.deactivateDependencyLocking()
}configurations {
compileClasspath {
resolutionStrategy.deactivateDependencyLocking()
}
}Locking buildscript classpath configuration
If you apply plugins to your build, you may want to leverage dependency locking there as well.
In order to lock the classpath configuration used for script plugins, do the following:
buildscript {
configurations.classpath {
resolutionStrategy.activateDependencyLocking()
}
}buildscript {
configurations.classpath {
resolutionStrategy.activateDependencyLocking()
}
}Generating and updating dependency locks
In order to generate or update lock state, you specify the --write-locks command line argument in addition to the normal tasks that would trigger configurations to be resolved.
This will cause the creation of lock state for each resolved configuration in that build execution.
Note that if lock state existed previously, it is overwritten.
|
Note
|
Gradle will not write lock state to disk if the build fails. This prevents persisting possibly invalid state. |
Lock all configurations in one build execution
When locking multiple configurations, you may want to lock them all at once, during a single build execution.
For this, you have two options:
-
Run
gradle dependencies --write-locks. This will effectively lock all resolvable configurations that have locking enabled. Note that in a multi project setup,dependenciesonly is executed on one project, the root one in this case. -
Declare a custom task that resolves all configurations. This does not work for Android projects.
tasks.register("resolveAndLockAll") {
notCompatibleWithConfigurationCache("Filters configurations at execution time")
doFirst {
require(gradle.startParameter.isWriteDependencyLocks) { "$path must be run from the command line with the `--write-locks` flag" }
}
doLast {
configurations.filter {
// Add any custom filtering on the configurations to be resolved
it.isCanBeResolved
}.forEach { it.resolve() }
}
}tasks.register('resolveAndLockAll') {
notCompatibleWithConfigurationCache("Filters configurations at execution time")
doFirst {
assert gradle.startParameter.writeDependencyLocks : "$path must be run from the command line with the `--write-locks` flag"
}
doLast {
configurations.findAll {
// Add any custom filtering on the configurations to be resolved
it.canBeResolved
}.each { it.resolve() }
}
}That second option, with proper selection of configurations, can be the only option in the native world, where not all configurations can be resolved on a single platform.
Lock state location and format
Lock state will be preserved in a file located at the root of the project or subproject directory.
Each file is named gradle.lockfile.
The one exception to this rule is for the lock file for the buildscript itself.
In that case the file will be named buildscript-gradle.lockfile.
The lockfile will have the following content:
# This is a Gradle generated file for dependency locking. # Manual edits can break the build and are not advised. # This file is expected to be part of source control. org.springframework:spring-beans:5.0.5.RELEASE=compileClasspath, runtimeClasspath org.springframework:spring-core:5.0.5.RELEASE=compileClasspath, runtimeClasspath org.springframework:spring-jcl:5.0.5.RELEASE=compileClasspath, runtimeClasspath empty=annotationProcessor
-
Each line still represents a single dependency in the
group:artifact:versionnotation -
It then lists all configurations that contain the given dependency
-
Module and configurations are ordered alphabetically, to ease diffs
-
The last line of the file lists all empty configurations, that is configurations known to have no dependencies
which matches the following dependency declaration:
configurations {
compileClasspath {
resolutionStrategy.activateDependencyLocking()
}
runtimeClasspath {
resolutionStrategy.activateDependencyLocking()
}
annotationProcessor {
resolutionStrategy.activateDependencyLocking()
}
}
dependencies {
implementation("org.springframework:spring-beans:[5.0,6.0)")
}configurations {
compileClasspath {
resolutionStrategy.activateDependencyLocking()
}
runtimeClasspath {
resolutionStrategy.activateDependencyLocking()
}
annotationProcessor {
resolutionStrategy.activateDependencyLocking()
}
}
dependencies {
implementation 'org.springframework:spring-beans:[5.0,6.0)'
}Migrating from the lockfile per configuration format
If your project uses the legacy lock file format of a file per locked configuration, follow these instructions to migrate to the new format:
|
Note
|
Migration can be done one configuration at a time. Gradle will keep sourcing the lock state from the per configuration files as long as there is no information for that configuration in the single lock file. |
Configuring the per project lock file name and location
When using the single lock file per project, you can configure its name and location. The main reason for providing this is to enable having a file name that is determined by some project properties, effectively allowing a single project to store different lock state for different execution contexts. One trivial example in the JVM ecosystem is the Scala version that is often found in artifact coordinates.
val scalaVersion = "2.12"
dependencyLocking {
lockFile = file("$projectDir/locking/gradle-${scalaVersion}.lockfile")
}def scalaVersion = "2.12"
dependencyLocking {
lockFile = file("$projectDir/locking/gradle-${scalaVersion}.lockfile")
}Running a build with lock state present
The moment a build needs to resolve a configuration that has locking enabled and it finds a matching lock state, it will use it to verify that the given configuration still resolves the same versions.
A successful build indicates that the same dependencies are used as stored in the lock state, regardless if new versions matching the dynamic selector have been produced.
The complete validation is as follows:
-
Existing entries in the lock state must be matched in the build
-
A version mismatch or missing resolved module causes a build failure
-
-
Resolution result must not contain extra dependencies compared to the lock state
Fine tuning dependency locking behaviour with lock mode
While the default lock mode behaves as described above, two other modes are available:
- Strict mode
-
In this mode, in addition to the validations above, dependency locking will fail if a configuration marked as locked does not have lock state associated with it.
- Lenient mode
-
In this mode, dependency locking will still pin dynamic versions but otherwise changes to the dependency resolution are no longer errors.
The lock mode can be controlled from the dependencyLocking block as shown below:
dependencyLocking {
lockMode = LockMode.STRICT
}dependencyLocking {
lockMode = LockMode.STRICT
}Selectively updating lock state entries
In order to update only specific modules of a configuration, you can use the --update-locks command line flag.
It takes a comma (,) separated list of module notations.
In this mode, the existing lock state is still used as input to resolution, filtering out the modules targeted by the update.
❯ gradle classes --update-locks org.apache.commons:commons-lang3,org.slf4j:slf4j-api
Wildcards, indicated with *, can be used in the group or module name. They can be the only character or appear at the end of the group or module respectively.
The following wildcard notation examples are valid:
-
org.apache.commons:*: will let all modules belonging to grouporg.apache.commonsupdate -
*:guava: will let all modules namedguava, whatever their group, update -
org.springframework.spring*:spring*: will let all modules having their group starting withorg.springframework.springand name starting withspringupdate
|
Note
|
The resolution may cause other module versions to update, as dictated by the Gradle resolution rules. |
Disabling dependency locking
-
Make sure that the configuration for which you no longer want locking is not configured with locking.
-
Next time you update the save lock state, Gradle will automatically clean up all stale lock state from it.
Gradle needs to resolve a configuration, no longer marked as locked, to detect that associated lock state can be dropped.
Ignoring specific dependencies from the lock state
Dependency locking can be used in cases where reproducibility is not the main goal. As a build author, you may want to have different frequency of dependency version updates, based on their origin for example. In that case, it might be convenient to ignore some dependencies because you always want to use the latest version for those. An example is the internal dependencies in an organization which should always use the latest version as opposed to third party dependencies which have a different upgrade cycle.
|
Warning
|
This feature can break reproducibility and should be used with caution. There are scenarios that are better served with leveraging different lock modes or using different names for lock files. |
You can configure ignored dependencies in the dependencyLocking project extension:
dependencyLocking {
ignoredDependencies.add("com.example:*")
}dependencyLocking {
ignoredDependencies.add('com.example:*')
}The notation is a <group>:<name> dependency notation, where * can be used as a trailing wildcard.
See the description on updating lock files for more details.
Note that the value *:* is not accepted as it is equivalent to disabling locking.
Ignoring dependencies will have the following effects:
-
An ignored dependency applies to all locked configurations. The setting is project scoped.
-
Ignoring a dependency does not mean lock state ignores its transitive dependencies.
-
There is no validation that an ignored dependency is present in any configuration resolution.
-
If the dependency is present in lock state, loading it will filter out the dependency.
-
If the dependency is present in the resolution result, it will be ignored when validating that resolution matches the lock state.
-
Finally, if the dependency is present in the resolution result and the lock state is persisted, it will be absent from the written lock state.
Locking limitations
-
Locking cannot yet be applied to source dependencies.
Nebula locking plugin
This feature is inspired by the Nebula Gradle dependency lock plugin.
CONTROLLING TRANSITIVES
Upgrading versions of transitive dependencies
Direct dependencies vs dependency constraints
A component may have two different kinds of dependencies:
-
direct dependencies are directly required by the component. A direct dependency is also referred to as a first level dependency. For example, if your project source code requires Guava, Guava should be declared as direct dependency.
-
transitive dependencies are dependencies that your component needs, but only because another dependency needs them.
It’s quite common that issues with dependency management are about transitive dependencies. Often developers incorrectly fix transitive dependency issues by adding direct dependencies. To avoid this, Gradle provides the concept of dependency constraints.
Adding constraints on transitive dependencies
Dependency constraints allow you to define the version or the version range of both dependencies declared in the build script and transitive dependencies. It is the preferred method to express constraints that should be applied to all dependencies of a configuration. When Gradle attempts to resolve a dependency to a module version, all dependency declarations with version, all transitive dependencies and all dependency constraints for that module are taken into consideration. The highest version that matches all conditions is selected. If no such version is found, Gradle fails with an error showing the conflicting declarations. If this happens you can adjust your dependencies or dependency constraints declarations, or make other adjustments to the transitive dependencies if needed. Similar to dependency declarations, dependency constraint declarations are scoped by configurations and can therefore be selectively defined for parts of a build. If a dependency constraint influenced the resolution result, any type of dependency resolve rules may still be applied afterwards.
dependencies {
implementation("org.apache.httpcomponents:httpclient")
constraints {
implementation("org.apache.httpcomponents:httpclient:4.5.3") {
because("previous versions have a bug impacting this application")
}
implementation("commons-codec:commons-codec:1.11") {
because("version 1.9 pulled from httpclient has bugs affecting this application")
}
}
}dependencies {
implementation 'org.apache.httpcomponents:httpclient'
constraints {
implementation('org.apache.httpcomponents:httpclient:4.5.3') {
because 'previous versions have a bug impacting this application'
}
implementation('commons-codec:commons-codec:1.11') {
because 'version 1.9 pulled from httpclient has bugs affecting this application'
}
}
}In the example, all versions are omitted from the dependency declaration.
Instead, the versions are defined in the constraints block.
The version definition for commons-codec:1.11 is only taken into account if commons-codec is brought in as transitive dependency, since commons-codec is not defined as dependency in the project.
Otherwise, the constraint has no effect.
Dependency constraints can also define a rich version constraint and support strict versions to enforce a version even if it contradicts with the version defined by a transitive dependency (e.g. if the version needs to be downgraded).
|
Note
|
Dependency constraints are only published when using Gradle Module Metadata. This means that currently they are only fully supported if Gradle is used for publishing and consuming (i.e. they are 'lost' when consuming modules with Maven or Ivy). |
Dependency constraints themselves can also be added transitively.
Downgrading versions and excluding dependencies
Overriding transitive dependency versions
Gradle resolves any dependency version conflicts by selecting the latest version found in the dependency graph. Some projects might need to divert from the default behavior and enforce an earlier version of a dependency e.g. if the source code of the project depends on an older API of a dependency than some of the external libraries.
|
Warning
|
Forcing a version of a dependency requires a conscious decision. Changing the version of a transitive dependency might lead to runtime errors if external libraries do not properly function without them. Consider upgrading your source code to use a newer version of the library as an alternative approach. |
In general, forcing dependencies is done to downgrade a dependency. There might be different use cases for downgrading:
-
a bug was discovered in the latest release
-
your code depends on a lower version which is not binary compatible
-
your code doesn’t depend on the code paths which need a higher version of a dependency
In all situations, this is best expressed saying that your code strictly depends on a version of a transitive. Using strict versions, you will effectively depend on the version you declare, even if a transitive dependency says otherwise.
|
Note
|
Strict dependencies are to some extent similar to Maven’s nearest first strategy, but there are subtle differences:
|
Let’s say a project uses the HttpClient library for performing HTTP calls. HttpClient pulls in Commons Codec as transitive dependency with version 1.10. However, the production source code of the project requires an API from Commons Codec 1.9 which is not available in 1.10 anymore. A dependency version can be enforced by declaring it as strict it in the build script:
dependencies {
implementation("org.apache.httpcomponents:httpclient:4.5.4")
implementation("commons-codec:commons-codec") {
version {
strictly("1.9")
}
}
}dependencies {
implementation 'org.apache.httpcomponents:httpclient:4.5.4'
implementation('commons-codec:commons-codec') {
version {
strictly '1.9'
}
}
}Consequences of using strict versions
Using a strict version must be carefully considered, in particular by library authors. As the producer, a strict version will effectively behave like a force: the version declaration takes precedence over whatever is found in the transitive dependency graph. In particular, a strict version will override any other strict version on the same module found transitively.
However, for consumers, strict versions are still considered globally during graph resolution and may trigger an error if the consumer disagrees.
For example, imagine that your project B strictly depends on C:1.0.
Now, a consumer, A, depends on both B and C:1.1.
Then this would trigger a resolution error because A says it needs C:1.1 but B, within its subgraph, strictly needs 1.0.
This means that if you choose a single version in a strict constraint, then the version can no longer be upgraded, unless the consumer also sets a strict version constraint on the same module.
In the example above, A would have to say it strictly depends on 1.1.
For this reason, a good practice is that if you use strict versions, you should express them in terms of ranges and a preferred version within this range.
For example, B might say, instead of strictly 1.0, that it strictly depends on the [1.0, 2.0[ range, but prefers 1.0.
Then if a consumer chooses 1.1 (or any other version in the range), the build will no longer fail (constraints are resolved).
Forced dependencies vs strict dependencies
If the project requires a specific version of a dependency at the configuration-level this can be achieved by calling the method ResolutionStrategy.force(java.lang.Object[]).
configurations {
"compileClasspath" {
resolutionStrategy.force("commons-codec:commons-codec:1.9")
}
}
dependencies {
implementation("org.apache.httpcomponents:httpclient:4.5.4")
}configurations {
compileClasspath {
resolutionStrategy.force 'commons-codec:commons-codec:1.9'
}
}
dependencies {
implementation 'org.apache.httpcomponents:httpclient:4.5.4'
}Excluding transitive dependencies
While the previous section showed how you can enforce a certain version of a transitive dependency, this section covers excludes as a way to remove a transitive dependency completely.
|
Warning
|
Similar to forcing a version of a dependency, excluding a dependency completely requires a conscious decision. Excluding a transitive dependency might lead to runtime errors if external libraries do not properly function without them. If you use excludes, make sure that you do not utilise any code path requiring the excluded dependency by sufficient test coverage. |
Transitive dependencies can be excluded on the level of a declared dependency.
Exclusions are spelled out as a key/value pair via the attributes group and/or module as shown in the example below.
For more information, refer to ModuleDependency.exclude(java.util.Map).
dependencies {
implementation("commons-beanutils:commons-beanutils:1.9.4") {
exclude(group = "commons-collections", module = "commons-collections")
}
}dependencies {
implementation('commons-beanutils:commons-beanutils:1.9.4') {
exclude group: 'commons-collections', module: 'commons-collections'
}
}In this example, we add a dependency to commons-beanutils but exclude the transitive dependency commons-collections.
In our code, shown below, we only use one method from the beanutils library, PropertyUtils.setSimpleProperty().
Using this method for existing setters does not require any functionality from commons-collections as we verified through test coverage.
import org.apache.commons.beanutils.PropertyUtils;
public class Main {
public static void main(String[] args) throws Exception {
Object person = new Person();
PropertyUtils.setSimpleProperty(person, "name", "Bart Simpson");
PropertyUtils.setSimpleProperty(person, "age", 38);
}
}Effectively, we are expressing that we only use a subset of the library, which does not require the commons-collection library.
This can be seen as implicitly defining a feature variant that has not been explicitly declared by commons-beanutils itself.
However, the risk of breaking an untested code path increased by doing this.
For example, here we use the setSimpleProperty() method to modify properties defined by setters in the Person class, which works fine.
If we would attempt to set a property not existing on the class, we should get an error like Unknown property on class Person.
However, because the error handling path uses a class from commons-collections, the error we now get is NoClassDefFoundError: org/apache/commons/collections/FastHashMap.
So if our code would be more dynamic, and we would forget to cover the error case sufficiently, consumers of our library might be confronted with unexpected errors.
This is only an example to illustrate potential pitfalls. In practice, larger libraries or frameworks can bring in a huge set of dependencies. If those libraries fail to declare features separately and can only be consumed in a "all or nothing" fashion, excludes can be a valid method to reduce the library to the feature set actually required.
On the upside, Gradle’s exclude handling is, in contrast to Maven, taking the whole dependency graph into account.
So if there are multiple dependencies on a library, excludes are only exercised if all dependencies agree on them.
For example, if we add opencsv as another dependency to our project above, which also depends on commons-beanutils, commons-collection is no longer excluded as opencsv itself does not exclude it.
dependencies {
implementation("commons-beanutils:commons-beanutils:1.9.4") {
exclude(group = "commons-collections", module = "commons-collections")
}
implementation("com.opencsv:opencsv:4.6") // depends on 'commons-beanutils' without exclude and brings back 'commons-collections'
}dependencies {
implementation('commons-beanutils:commons-beanutils:1.9.4') {
exclude group: 'commons-collections', module: 'commons-collections'
}
implementation 'com.opencsv:opencsv:4.6' // depends on 'commons-beanutils' without exclude and brings back 'commons-collections'
}If we still want to have commons-collections excluded, because our combined usage of commons-beanutils and opencsv does not need it, we need to exclude it from the transitive dependencies of opencsv as well.
dependencies {
implementation("commons-beanutils:commons-beanutils:1.9.4") {
exclude(group = "commons-collections", module = "commons-collections")
}
implementation("com.opencsv:opencsv:4.6") {
exclude(group = "commons-collections", module = "commons-collections")
}
}dependencies {
implementation('commons-beanutils:commons-beanutils:1.9.4') {
exclude group: 'commons-collections', module: 'commons-collections'
}
implementation('com.opencsv:opencsv:4.6') {
exclude group: 'commons-collections', module: 'commons-collections'
}
}Historically, excludes were also used as a band aid to fix other issues not supported by some dependency management systems. Gradle however, offers a variety of features that might be better suited to solve a certain use case. You may consider to look into the following features:
-
Update or downgrade dependency versions: If versions of dependencies clash, it is usually better to adjust the version through a dependency constraint, instead of attempting to exclude the dependency with the undesired version.
-
Component Metadata Rules: If a library’s metadata is clearly wrong, for example if it includes a compile time dependency which is never needed at compile time, a possible solution is to remove the dependency in a component metadata rule. By this, you tell Gradle that a dependency between two modules is never needed — i.e. the metadata was wrong — and therefore should never be considered. If you are developing a library, you have to be aware that this information is not published, and so sometimes an exclude can be the better alternative.
-
Resolving mutually exclusive dependency conflicts: Another situation that you often see solved by excludes is that two dependencies cannot be used together because they represent two implementations of the same thing (the same capability). Some popular examples are clashing logging API implementations (like
log4jandlog4j-over-slf4j) or modules that have different coordinates in different versions (likecom.google.collectionsandguava). In these cases, if this information is not known to Gradle, it is recommended to add the missing capability information via component metadata rules as described in the declaring component capabilities section. Even if you are developing a library, and your consumers will have to deal with resolving the conflict again, it is often the right solution to leave the decision to the final consumers of libraries. I.e. you as a library author should not have to decide which logging implementation your consumers use in the end.
Sharing dependency versions between projects
Central declaration of dependencies
Using a version catalog
A version catalog is a list of dependencies, represented as dependency coordinates, that a user can pick from when declaring dependencies in a build script.
For example, instead of declaring a dependency using a string notation, the dependency coordinates can be picked from a version catalog:
dependencies {
implementation(libs.groovy.core)
}dependencies {
implementation(libs.groovy.core)
}In this context, libs is a catalog and groovy represents a dependency available in this catalog. A version catalog provides a number of advantages over declaring the dependencies directly in build scripts:
-
For each catalog, Gradle generates type-safe accessors so that you can easily add dependencies with autocompletion in the IDE.
-
Each catalog is visible to all projects of a build. It is a central place to declare a version of a dependency and to make sure that a change to that version applies to every subproject.
-
Catalogs can declare dependency bundles, which are "groups of dependencies" that are commonly used together.
-
Catalogs can separate the group and name of a dependency from its actual version and use version references instead, making it possible to share a version declaration between multiple dependencies.
Adding a dependency using the libs.someLib notation works exactly like if you had hardcoded the group, artifact and version directly in the build script.
|
Warning
|
A dependency catalog doesn’t enforce the version of a dependency: like a regular dependency notation, it declares the requested version or a rich version. That version is not necessarily the version that is selected during conflict resolution. |
Declaring a version catalog
Version catalogs can be declared in the settings.gradle(.kts) file.
In the example above, in order to make groovy available via the libs catalog, we need to associate an alias with GAV (group, artifact, version) coordinates:
dependencyResolutionManagement {
versionCatalogs {
create("libs") {
library("groovy-core", "org.codehaus.groovy:groovy:3.0.5")
library("groovy-json", "org.codehaus.groovy:groovy-json:3.0.5")
library("groovy-nio", "org.codehaus.groovy:groovy-nio:3.0.5")
library("commons-lang3", "org.apache.commons", "commons-lang3").version {
strictly("[3.8, 4.0[")
prefer("3.9")
}
}
}
}dependencyResolutionManagement {
versionCatalogs {
libs {
library('groovy-core', 'org.codehaus.groovy:groovy:3.0.5')
library('groovy-json', 'org.codehaus.groovy:groovy-json:3.0.5')
library('groovy-nio', 'org.codehaus.groovy:groovy-nio:3.0.5')
library('commons-lang3', 'org.apache.commons', 'commons-lang3').version {
strictly '[3.8, 4.0['
prefer '3.9'
}
}
}
}Aliases and their mapping to type safe accessors
Aliases must consist of a series of identifiers separated by a dash (-, recommended), an underscore (_) or a dot (.).
Identifiers themselves must consist of ascii characters, preferably lowercase, eventually followed by numbers.
For example:
-
guavais a valid alias -
groovy-coreis a valid alias -
commons-lang3is a valid alias -
androidx.awesome.libis also a valid alias -
but
this.#is.not!
Then type safe accessors are generated for each subgroup.
For example, given the following aliases in a version catalog named libs:
guava, groovy-core, groovy-xml, groovy-json, androidx.awesome.lib
We would generate the following type-safe accessors:
-
libs.guava -
libs.groovy.core -
libs.groovy.xml -
libs.groovy.json -
libs.androidx.awesome.lib
Where the libs prefix comes from the version catalog name.
In case you want to avoid the generation of a subgroup accessor, we recommend relying on case to differentiate.
For example the aliases groovyCore, groovyJson and groovyXml would be mapped to the libs.groovyCore, libs.groovyJson and libs.groovyXml accessors respectively.
When declaring aliases, it’s worth noting that any of the -, _ and . characters can be used as separators, but the generated catalog will have all normalized to .:
for example foo-bar as an alias is converted to foo.bar automatically.
Some keywords are reserved, so they cannot be used as an alias. Next words cannot be used as an alias:
-
extensions
-
class
-
convention
Additional to that next words cannot be used as a first subgroup of an alias for dependencies (for bundles, versions and plugins this restriction doesn’t apply):
-
bundles
-
versions
-
plugins
So for example for dependencies an alias versions-dependency is not valid, but versionsDependency or dependency-versions are valid.
Dependencies with same version numbers
In the first example in declaring a version catalog, we can see that we declare 3 aliases for various components of the groovy library and that all of them share the same version number.
Instead of repeating the same version number, we can declare a version and reference it:
dependencyResolutionManagement {
versionCatalogs {
create("libs") {
version("groovy", "3.0.5")
version("checkstyle", "8.37")
library("groovy-core", "org.codehaus.groovy", "groovy").versionRef("groovy")
library("groovy-json", "org.codehaus.groovy", "groovy-json").versionRef("groovy")
library("groovy-nio", "org.codehaus.groovy", "groovy-nio").versionRef("groovy")
library("commons-lang3", "org.apache.commons", "commons-lang3").version {
strictly("[3.8, 4.0[")
prefer("3.9")
}
}
}
}dependencyResolutionManagement {
versionCatalogs {
libs {
version('groovy', '3.0.5')
version('checkstyle', '8.37')
library('groovy-core', 'org.codehaus.groovy', 'groovy').versionRef('groovy')
library('groovy-json', 'org.codehaus.groovy', 'groovy-json').versionRef('groovy')
library('groovy-nio', 'org.codehaus.groovy', 'groovy-nio').versionRef('groovy')
library('commons-lang3', 'org.apache.commons', 'commons-lang3').version {
strictly '[3.8, 4.0['
prefer '3.9'
}
}
}
}Versions declared separately are also available via type-safe accessors, making them usable for more use cases than dependency versions, in particular for tooling:
checkstyle {
// will use the version declared in the catalog
toolVersion = libs.versions.checkstyle.get()
}checkstyle {
// will use the version declared in the catalog
toolVersion = libs.versions.checkstyle.get()
}If the alias of a declared version is also a prefix of some more specific alias, as in libs.versions.zinc and libs.versions.zinc.apiinfo, then
the value of the more generic version is available via asProvider() on the type-safe accessor:
scala {
zincVersion = libs.versions.zinc.asProvider().get()
}scala {
zincVersion = libs.versions.zinc.asProvider().get()
}Dependencies declared in a catalog are exposed to build scripts via an extension corresponding to their name.
In the example above, because the catalog declared in settings is named libs, the extension is available via the name libs in all build scripts of the current build.
Declaring dependencies using the following notation…
dependencies {
implementation(libs.groovy.core)
implementation(libs.groovy.json)
implementation(libs.groovy.nio)
}dependencies {
implementation libs.groovy.core
implementation libs.groovy.json
implementation libs.groovy.nio
}…has exactly the same effect as writing:
dependencies {
implementation("org.codehaus.groovy:groovy:3.0.5")
implementation("org.codehaus.groovy:groovy-json:3.0.5")
implementation("org.codehaus.groovy:groovy-nio:3.0.5")
}dependencies {
implementation 'org.codehaus.groovy:groovy:3.0.5'
implementation 'org.codehaus.groovy:groovy-json:3.0.5'
implementation 'org.codehaus.groovy:groovy-nio:3.0.5'
}Versions declared in the catalog are rich versions. Please refer to the version catalog builder API for the full version declaration support documentation.
Dependency bundles
Because it’s frequent that some dependencies are systematically used together in different projects, a version catalog offers the concept of a "dependency bundle". A bundle is basically an alias for several dependencies. For example, instead of declaring 3 individual dependencies like above, you could write:
dependencies {
implementation(libs.bundles.groovy)
}dependencies {
implementation libs.bundles.groovy
}The bundle named groovy needs to be declared in the catalog:
dependencyResolutionManagement {
versionCatalogs {
create("libs") {
version("groovy", "3.0.5")
version("checkstyle", "8.37")
library("groovy-core", "org.codehaus.groovy", "groovy").versionRef("groovy")
library("groovy-json", "org.codehaus.groovy", "groovy-json").versionRef("groovy")
library("groovy-nio", "org.codehaus.groovy", "groovy-nio").versionRef("groovy")
library("commons-lang3", "org.apache.commons", "commons-lang3").version {
strictly("[3.8, 4.0[")
prefer("3.9")
}
bundle("groovy", listOf("groovy-core", "groovy-json", "groovy-nio"))
}
}
}dependencyResolutionManagement {
versionCatalogs {
libs {
version('groovy', '3.0.5')
version('checkstyle', '8.37')
library('groovy-core', 'org.codehaus.groovy', 'groovy').versionRef('groovy')
library('groovy-json', 'org.codehaus.groovy', 'groovy-json').versionRef('groovy')
library('groovy-nio', 'org.codehaus.groovy', 'groovy-nio').versionRef('groovy')
library('commons-lang3', 'org.apache.commons', 'commons-lang3').version {
strictly '[3.8, 4.0['
prefer '3.9'
}
bundle('groovy', ['groovy-core', 'groovy-json', 'groovy-nio'])
}
}
}The semantics are again equivalent: adding a single bundle is equivalent to adding all dependencies which are part of the bundle individually.
Plugins
In addition to libraries, version catalog supports declaring plugin versions. While libraries are represented by their group, artifact and version coordinates, Gradle plugins are identified by their id and version only. Therefore, they need to be declared separately:
|
Warning
|
You cannot use a plugin declared in a version catalog in your settings file or settings plugin (because catalogs are defined in settings themselves, it would be a chicken and egg problem). |
dependencyResolutionManagement {
versionCatalogs {
create("libs") {
plugin("versions", "com.github.ben-manes.versions").version("0.45.0")
}
}
}dependencyResolutionManagement {
versionCatalogs {
libs {
plugin('versions', 'com.github.ben-manes.versions').version('0.45.0')
}
}
}Then the plugin is accessible in the plugins block and can be consumed in any project of the build using:
plugins {
`java-library`
checkstyle
alias(libs.plugins.versions)
}plugins {
id 'java-library'
id 'checkstyle'
// Use the plugin `versions` as declared in the `libs` version catalog
alias(libs.plugins.versions)
}Using multiple catalogs
Aside from the conventional libs catalog, you can declare any number of catalogs through the Settings API.
This allows you to separate dependency declarations in multiple sources in a way that makes sense for your projects.
dependencyResolutionManagement {
versionCatalogs {
create("testLibs") {
val junit5 = version("junit5", "5.7.1")
library("junit-api", "org.junit.jupiter", "junit-jupiter-api").versionRef(junit5)
library("junit-engine", "org.junit.jupiter", "junit-jupiter-engine").versionRef(junit5)
}
}
}dependencyResolutionManagement {
versionCatalogs {
testLibs {
def junit5 = version('junit5', '5.7.1')
library('junit-api', 'org.junit.jupiter', 'junit-jupiter-api').versionRef(junit5)
library('junit-engine', 'org.junit.jupiter', 'junit-jupiter-engine').versionRef(junit5)
}
}
}|
Note
|
Each catalog will generate an extension applied to all projects for accessing its content.
As such it makes sense to reduce the chance of collisions by picking a name that reduces the potential conflicts.
As an example, one option is to pick a name that ends with |
The libs.versions.toml file
In addition to the settings API above, Gradle offers a conventional file to declare a catalog.
If a libs.versions.toml file is found in the gradle subdirectory of the root build, then a catalog will be automatically declared with the contents of this file.
Declaring a libs.versions.toml file doesn’t make it the single source of truth for dependencies: it’s a conventional location where dependencies can be declared.
As soon as you start using catalogs, it’s strongly recommended to declare all your dependencies in a catalog and not hardcode group/artifact/version strings in build scripts.
Be aware that it may happen that plugins add dependencies, which are dependencies defined outside of this file.
Just like src/main/java is a convention to find the Java sources, which doesn’t prevent additional source directories to be declared (either in a build script or a plugin), the presence of the libs.versions.toml file doesn’t prevent the declaration of dependencies elsewhere.
The presence of this file does, however, suggest that most dependencies, if not all, will be declared in this file. Therefore, updating a dependency version, for most users, should only consists of changing a line in this file.
By default, the libs.versions.toml file will be an input to the libs catalog.
It is possible to change the name of the default catalog, for example if you already have an extension with the same name:
dependencyResolutionManagement {
defaultLibrariesExtensionName = "projectLibs"
}dependencyResolutionManagement {
defaultLibrariesExtensionName = 'projectLibs'
}The version catalog TOML file format
The TOML file consists of 4 major sections:
-
the
[versions]section is used to declare versions which can be referenced by dependencies -
the
[libraries]section is used to declare the aliases to coordinates -
the
[bundles]section is used to declare dependency bundles -
the
[plugins]section is used to declare plugins
For example:
[versions]
groovy = "3.0.5"
checkstyle = "8.37"
[libraries]
groovy-core = { module = "org.codehaus.groovy:groovy", version.ref = "groovy" }
groovy-json = { module = "org.codehaus.groovy:groovy-json", version.ref = "groovy" }
groovy-nio = { module = "org.codehaus.groovy:groovy-nio", version.ref = "groovy" }
commons-lang3 = { group = "org.apache.commons", name = "commons-lang3", version = { strictly = "[3.8, 4.0[", prefer="3.9" } }
[bundles]
groovy = ["groovy-core", "groovy-json", "groovy-nio"]
[plugins]
versions = { id = "com.github.ben-manes.versions", version = "0.45.0" }
Versions can be declared either as a single string, in which case they are interpreted as a required version, or as a rich versions:
[versions]
my-lib = { strictly = "[1.0, 2.0[", prefer = "1.2" }Supported members of a version declaration are:
-
require: the required version -
strictly: the strict version -
prefer: the preferred version -
reject: the list of rejected versions -
rejectAll: a boolean to reject all versions
Dependency declaration can either be declared as a simple string, in which case they are interpreted as group:artifact:version coordinates, or separating the version declaration from the group and name:
|
Note
|
For aliases, the rules described in the section aliases and their mapping to type safe accessors apply as well. |
[versions]
common = "1.4"
[libraries]
my-lib = "com.mycompany:mylib:1.4"
my-other-lib = { module = "com.mycompany:other", version = "1.4" }
my-other-lib2 = { group = "com.mycompany", name = "alternate", version = "1.4" }
mylib-full-format = { group = "com.mycompany", name = "alternate", version = { require = "1.4" } }
[plugins]
short-notation = "some.plugin.id:1.4"
long-notation = { id = "some.plugin.id", version = "1.4" }
reference-notation = { id = "some.plugin.id", version.ref = "common" }
In case you want to reference a version declared in the [versions] section, you should use the version.ref property:
[versions]
some = "1.4"
[libraries]
my-lib = { group = "com.mycompany", name="mylib", version.ref="some" }The TOML file format is very lenient and lets you write "dotted" properties as shortcuts to full object declarations. For example, this:
a.b.c="d"is equivalent to:
a.b = { c = "d" }or
a = { b = { c = "d" } }See the TOML specification for details.
Type unsafe API
Version catalogs can be accessed through a type unsafe API. This API is available in situations where generated accessors are not. It is accessed through the version catalog extension:
val versionCatalog = extensions.getByType<VersionCatalogsExtension>().named("libs")
println("Library aliases: ${versionCatalog.libraryAliases}")
dependencies {
versionCatalog.findLibrary("groovy-json").ifPresent {
implementation(it)
}
}def versionCatalog = extensions.getByType(VersionCatalogsExtension).named("libs")
println "Library aliases: ${versionCatalog.libraryAliases}"
dependencies {
versionCatalog.findLibrary("groovy-json").ifPresent {
implementation(it)
}
}Check the version catalog API for all supported methods.
Sharing catalogs
Version catalogs are used in a single build (possibly multi-project build) but may also be shared between builds. For example, an organization may want to create a catalog of dependencies that different projects, from different teams, may use.
Importing a catalog from a TOML file
The version catalog builder API supports including a model from an external file.
This makes it possible to reuse the catalog of the main build for buildSrc, if needed.
For example, the buildSrc/settings.gradle(.kts) file can include this file using:
dependencyResolutionManagement {
versionCatalogs {
create("libs") {
from(files("../gradle/libs.versions.toml"))
}
}
}dependencyResolutionManagement {
versionCatalogs {
libs {
from(files("../gradle/libs.versions.toml"))
}
}
}|
Warning
|
Only a single file will be accepted when using the VersionCatalogBuilder.from(Object dependencyNotation) method. This means that notations like Project.files(java.lang.Object…) must refer to a single file, otherwise the build will fail. If a more complicated structure is required (version catalogs imported from multiple files), it’s advisable to use a code-based approach, instead of TOML file. |
This technique can therefore be used to declare multiple catalogs from different files:
dependencyResolutionManagement {
versionCatalogs {
// declares an additional catalog, named 'testLibs', from the 'test-libs.versions.toml' file
create("testLibs") {
from(files("gradle/test-libs.versions.toml"))
}
}
}dependencyResolutionManagement {
versionCatalogs {
// declares an additional catalog, named 'testLibs', from the 'test-libs.versions.toml' file
testLibs {
from(files('gradle/test-libs.versions.toml'))
}
}
}The version catalog plugin
While importing catalogs from local files is convenient, it doesn’t solve the problem of sharing a catalog in an organization or for external consumers. One option to share a catalog is to write a settings plugin, publish it on the Gradle plugin portal or an internal repository, and let the consumers apply the plugin on their settings file.
Alternatively, Gradle offers a version catalog plugin, which offers the ability to declare, then publish a catalog.
To do this, you need to apply the version-catalog plugin:
plugins {
`version-catalog`
`maven-publish`
}plugins {
id 'version-catalog'
id 'maven-publish'
}This plugin will then expose the catalog extension that you can use to declare a catalog:
catalog {
// declare the aliases, bundles and versions in this block
versionCatalog {
library("my-lib", "com.mycompany:mylib:1.2")
}
}catalog {
// declare the aliases, bundles and versions in this block
versionCatalog {
library('my-lib', 'com.mycompany:mylib:1.2')
}
}Such a catalog can then be published by applying either the maven-publish or ivy-publish plugin and configuring the publication to use the versionCatalog component:
publishing {
publications {
create<MavenPublication>("maven") {
from(components["versionCatalog"])
}
}
}publishing {
publications {
maven(MavenPublication) {
from components.versionCatalog
}
}
}When publishing such a project, a libs.versions.toml file will automatically be generated (and uploaded), which can then be consumed from other Gradle builds.
Importing a published catalog
A catalog produced by the version catalog plugin can be imported via the settings API:
dependencyResolutionManagement {
versionCatalogs {
create("libs") {
from("com.mycompany:catalog:1.0")
}
}
}dependencyResolutionManagement {
versionCatalogs {
libs {
from("com.mycompany:catalog:1.0")
}
}
}Overwriting catalog versions
In case a catalog declares a version, you can overwrite the version when importing the catalog:
dependencyResolutionManagement {
versionCatalogs {
create("amendedLibs") {
from("com.mycompany:catalog:1.0")
// overwrite the "groovy" version declared in the imported catalog
version("groovy", "3.0.6")
}
}
}dependencyResolutionManagement {
versionCatalogs {
amendedLibs {
from("com.mycompany:catalog:1.0")
// overwrite the "groovy" version declared in the imported catalog
version("groovy", "3.0.6")
}
}
}In the example above, any dependency which was using the groovy version as reference will be automatically updated to use 3.0.6.
|
Note
|
Again, overwriting a version doesn’t mean that the actual resolved dependency version will be the same: this only changes what is imported, that is to say what is used when declaring a dependency. The actual version will be subject to traditional conflict resolution, if any. |
Using a platform to control transitive versions
A platform is a special software component which can be used to control transitive dependency versions. In most cases it’s exclusively composed of dependency constraints which will either suggest dependency versions or enforce some versions. As such, this is a perfect tool whenever you need to share dependency versions between projects. In this case, a project will typically be organized this way:
-
a
platformproject which defines constraints for the various dependencies found in the different sub-projects -
a number of sub-projects which depend on the platform and declare dependencies without version
In the Java ecosystem, Gradle provides a plugin for this purpose.
It’s also common to find platforms published as Maven BOMs which Gradle supports natively.
A dependency on a platform is created using the platform keyword:
dependencies {
// get recommended versions from the platform project
api(platform(project(":platform")))
// no version required
api("commons-httpclient:commons-httpclient")
}dependencies {
// get recommended versions from the platform project
api platform(project(':platform'))
// no version required
api 'commons-httpclient:commons-httpclient'
}This platform notation is a short-hand notation which actually performs several operations under the hood:
-
it sets the org.gradle.category attribute to
platform, which means that Gradle will select the platform component of the dependency. -
it sets the endorseStrictVersions behavior by default, meaning that if the platform declares strict dependencies, they will be enforced.
This means that by default, a dependency to a platform triggers the inheritance of all strict versions defined in that platform, which can be useful for platform authors to make sure that all consumers respect their decisions in terms of versions of dependencies.
This can be turned off by explicitly calling the doNotEndorseStrictVersions method.
Importing Maven BOMs
Gradle provides support for importing bill of materials (BOM) files, which are effectively .pom files that use <dependencyManagement> to control the dependency versions of direct and transitive dependencies.
The BOM support in Gradle works similar to using <scope>import</scope> when depending on a BOM in Maven.
In Gradle however, it is done via a regular dependency declaration on the BOM:
dependencies {
// import a BOM
implementation(platform("org.springframework.boot:spring-boot-dependencies:1.5.8.RELEASE"))
// define dependencies without versions
implementation("com.google.code.gson:gson")
implementation("dom4j:dom4j")
}dependencies {
// import a BOM
implementation platform('org.springframework.boot:spring-boot-dependencies:1.5.8.RELEASE')
// define dependencies without versions
implementation 'com.google.code.gson:gson'
implementation 'dom4j:dom4j'
}In the example, the versions of gson and dom4j are provided by the Spring Boot BOM.
This way, if you are developing for a platform like Spring Boot, you do not have to declare any versions yourself but can rely on the versions the platform provides.
Gradle treats all entries in the <dependencyManagement> block of a BOM similar to Gradle’s dependency constraints.
This means that any version defined in the <dependencyManagement> block can impact the dependency resolution result.
In order to qualify as a BOM, a .pom file needs to have <packaging>pom</packaging> set.
However often BOMs are not only providing versions as recommendations, but also a way to override any other version found in the graph.
You can enable this behavior by using the enforcedPlatform keyword, instead of platform, when importing the BOM:
dependencies {
// import a BOM. The versions used in this file will override any other version found in the graph
implementation(enforcedPlatform("org.springframework.boot:spring-boot-dependencies:1.5.8.RELEASE"))
// define dependencies without versions
implementation("com.google.code.gson:gson")
implementation("dom4j:dom4j")
// this version will be overridden by the one found in the BOM
implementation("org.codehaus.groovy:groovy:1.8.6")
}dependencies {
// import a BOM. The versions used in this file will override any other version found in the graph
implementation enforcedPlatform('org.springframework.boot:spring-boot-dependencies:1.5.8.RELEASE')
// define dependencies without versions
implementation 'com.google.code.gson:gson'
implementation 'dom4j:dom4j'
// this version will be overridden by the one found in the BOM
implementation 'org.codehaus.groovy:groovy:1.8.6'
}|
Warning
|
Using |
Should I use a platform or a catalog?
Because platforms and catalogs both talk about dependency versions and can both be used to share dependency versions in a project, there might be a confusion regarding what to use and if one is preferable to the other.
In short, you should:
-
use catalogs to only define dependencies and their versions for projects and to generate type-safe accessors
-
use platform to apply versions to dependency graph and to affect dependency resolution
A catalog helps with centralizing the dependency versions and is only, as it name implies, a catalog of dependencies you can pick from. We recommend using it to declare the coordinates of your dependencies, in all cases. It will be used by Gradle to generate type-safe accessors, present short-hand notations for external dependencies and it allows sharing those coordinates between different projects easily. Using a catalog will not have any kind of consequence on downstream consumers: it’s transparent to them.
A platform is a more heavyweight construct: it’s a component of a dependency graph, like any other library. If you depend on a platform, that platform is itself a component in the graph. It means, in particular, that:
-
Constraints defined in a platform can influence transitive dependencies, not only the direct dependencies of your project.
-
A platform is versioned, and a transitive dependency in the graph can depend on a different version of the platform, causing various dependency upgrades.
-
A platform can tie components together, and in particular can be used as a construct for aligning versions.
-
A dependency on a platform is "inherited" by the consumers of your dependency: it means that a dependency on a platform can influence what versions of libraries would be used by your consumers even if you don’t directly, or transitively, depend on components the platform references.
In summary, using a catalog is always a good engineering practice as it centralizes common definitions, allows sharing of dependency versions or plugin versions, but it is an "implementation detail" of the build: it will not be visible to consumers and unused elements of a catalog are just ignored.
A platform is meant to influence the dependency resolution graph, for example by adding constraints on transitive dependencies: it’s a solution for structuring a dependency graph and influencing the resolution result.
In practice, your project can both use a catalog and declare a platform which itself uses the catalog:
plugins {
`java-platform`
}
dependencies {
constraints {
api(libs.mylib)
}
}plugins {
id 'java-platform'
}
dependencies {
constraints {
api(libs.mylib)
}
}Aligning dependency versions
Dependency version alignment allows different modules belonging to the same logical group (a platform) to have identical versions in a dependency graph.
Handling inconsistent module versions
Gradle supports aligning versions of modules which belong to the same "platform".
It is often preferable, for example, that the API and implementation modules of a component are using the same version.
However, because of the game of transitive dependency resolution, it is possible that different modules belonging to the same platform end up using different versions.
For example, your project may depend on the jackson-databind and vert.x libraries, as illustrated below:
dependencies {
// a dependency on Jackson Databind
implementation("com.fasterxml.jackson.core:jackson-databind:2.8.9")
// and a dependency on vert.x
implementation("io.vertx:vertx-core:3.5.3")
}dependencies {
// a dependency on Jackson Databind
implementation 'com.fasterxml.jackson.core:jackson-databind:2.8.9'
// and a dependency on vert.x
implementation 'io.vertx:vertx-core:3.5.3'
}Because vert.x depends on jackson-core, we would actually resolve the following dependency versions:
-
jackson-coreversion2.9.5(brought byvertx-core) -
jackson-databindversion2.9.5(by conflict resolution) -
jackson-annotationversion2.9.0(dependency ofjackson-databind:2.9.5)
It’s easy to end up with a set of versions which do not work well together. To fix this, Gradle supports dependency version alignment, which is supported by the concept of platforms. A platform represents a set of modules which "work well together". Either because they are actually published as a whole (when one of the members of the platform is published, all other modules are also published with the same version), or because someone tested the modules and indicates that they work well together (typically, the Spring Platform).
Aligning versions natively with Gradle
Gradle natively supports alignment of modules produced by Gradle. This is a direct consequence of the transitivity of dependency constraints. So if you have a multi-project build, and you wish that consumers get the same version of all your modules, Gradle provides a simple way to do this using the Java Platform Plugin.
For example, if you have a project that consists of 3 modules:
-
lib -
utils -
core, depending onlibandutils
And a consumer that declares the following dependencies:
-
coreversion 1.0 -
libversion 1.1
Then by default resolution would select core:1.0 and lib:1.1, because lib has no dependency on core.
We can fix this by adding a new module in our project, a platform, that will add constraints on all the modules of your project:
plugins {
`java-platform`
}
dependencies {
// The platform declares constraints on all components that
// require alignment
constraints {
api(project(":core"))
api(project(":lib"))
api(project(":utils"))
}
}plugins {
id 'java-platform'
}
dependencies {
// The platform declares constraints on all components that
// require alignment
constraints {
api(project(":core"))
api(project(":lib"))
api(project(":utils"))
}
}Once this is done, we need to make sure that all modules now depend on the platform, like this:
dependencies {
// Each project has a dependency on the platform
api(platform(project(":platform")))
// And any additional dependency required
implementation(project(":lib"))
implementation(project(":utils"))
}dependencies {
// Each project has a dependency on the platform
api(platform(project(":platform")))
// And any additional dependency required
implementation(project(":lib"))
implementation(project(":utils"))
}It is important that the platform contains a constraint on all the components, but also that each component has a dependency on the platform. By doing this, whenever Gradle will add a dependency to a module of the platform on the graph, it will also include constraints on the other modules of the platform. This means that if we see another module belonging to the same platform, we will automatically upgrade to the same version.
In our example, it means that we first see core:1.0, which brings a platform 1.0 with constraints on lib:1.0 and lib:1.0.
Then we add lib:1.1 which has a dependency on platform:1.1.
By conflict resolution, we select the 1.1 platform, which has a constraint on core:1.1.
Then we conflict resolve between core:1.0 and core:1.1, which means that core and lib are now aligned properly.
|
Note
|
This behavior is enforced for published components only if you use Gradle Module Metadata. |
Aligning versions of modules not published with Gradle
Whenever the publisher doesn’t use Gradle, like in our Jackson example, we can explain to Gradle that all Jackson modules "belong to" the same platform and benefit from the same behavior as with native alignment. There are two options to express that a set of modules belong to a platform:
-
A platform is published as a BOM and can be used: For example,
com.fasterxml.jackson:jackson-bomcan be used as platform. The information missing to Gradle in that case is that the platform should be added to the dependencies if one of its members is used. -
No existing platform can be used. Instead, a virtual platform should be created by Gradle: In this case, Gradle builds up the platform itself based on all the members that are used.
To provide the missing information to Gradle, you can define component metadata rules as explained in the following.
Align versions of modules using a published BOM
abstract class JacksonBomAlignmentRule: ComponentMetadataRule {
override fun execute(ctx: ComponentMetadataContext) {
ctx.details.run {
if (id.group.startsWith("com.fasterxml.jackson")) {
// declare that Jackson modules belong to the platform defined by the Jackson BOM
belongsTo("com.fasterxml.jackson:jackson-bom:${id.version}", false)
}
}
}
}abstract class JacksonBomAlignmentRule implements ComponentMetadataRule {
void execute(ComponentMetadataContext ctx) {
ctx.details.with {
if (id.group.startsWith("com.fasterxml.jackson")) {
// declare that Jackson modules belong to the platform defined by the Jackson BOM
belongsTo("com.fasterxml.jackson:jackson-bom:${id.version}", false)
}
}
}
}By using the belongsTo with false (not virtual), we declare that all modules belong to the same published platform.
In this case, the platform is com.fasterxml.jackson:jackson-bom and Gradle will look for it, as for any other module, in the declared repositories.
dependencies {
components.all<JacksonBomAlignmentRule>()
}dependencies {
components.all(JacksonBomAlignmentRule)
}Using the rule, the versions in the example above align to whatever the selected version of com.fasterxml.jackson:jackson-bom defines.
In this case, com.fasterxml.jackson:jackson-bom:2.9.5 will be selected as 2.9.5 is the highest version of a module selected.
In that BOM, the following versions are defined and will be used:
jackson-core:2.9.5,
jackson-databind:2.9.5 and
jackson-annotation:2.9.0.
The lower versions of jackson-annotation here might be the desired result as it is what the BOM recommends.
|
Note
|
This behavior is working reliable since Gradle 6.1. Effectively, it is similar to a component metadata rule that adds a platform dependency to all members of the platform using withDependencies.
|
Align versions of modules without a published platform
abstract class JacksonAlignmentRule: ComponentMetadataRule {
override fun execute(ctx: ComponentMetadataContext) {
ctx.details.run {
if (id.group.startsWith("com.fasterxml.jackson")) {
// declare that Jackson modules all belong to the Jackson virtual platform
belongsTo("com.fasterxml.jackson:jackson-virtual-platform:${id.version}")
}
}
}
}abstract class JacksonAlignmentRule implements ComponentMetadataRule {
void execute(ComponentMetadataContext ctx) {
ctx.details.with {
if (id.group.startsWith("com.fasterxml.jackson")) {
// declare that Jackson modules all belong to the Jackson virtual platform
belongsTo("com.fasterxml.jackson:jackson-virtual-platform:${id.version}")
}
}
}
}By using the belongsTo keyword without further parameter (platform is virtual), we declare that all modules belong to the same virtual platform, which is treated specially by the engine.
A virtual platform will not be retrieved from a repository.
The identifier, in this case com.fasterxml.jackson:jackson-virtual-platform, is something you as the build author define yourself.
The "content" of the platform is then created by Gradle on the fly by collecting all belongsTo statements pointing at the same virtual platform.
dependencies {
components.all<JacksonAlignmentRule>()
}dependencies {
components.all(JacksonAlignmentRule)
}Using the rule, all versions in the example above would align to 2.9.5.
In this case, also jackson-annotation:2.9.5 will be taken, as that is how we defined our local virtual platform.
For both published and virtual platforms, Gradle lets you override the version choice of the platform itself by specifying an enforced dependency on the platform:
dependencies {
// Forcefully downgrade the virtual Jackson platform to 2.8.9
implementation(enforcedPlatform("com.fasterxml.jackson:jackson-virtual-platform:2.8.9"))
}dependencies {
// Forcefully downgrade the virtual Jackson platform to 2.8.9
implementation enforcedPlatform('com.fasterxml.jackson:jackson-virtual-platform:2.8.9')
}Handling mutually exclusive dependencies
Introduction to component capabilities
Often a dependency graph would accidentally contain multiple implementations of the same API. This is particularly common with logging frameworks, where multiple bindings are available, and that one library chooses a binding when another transitive dependency chooses another. Because those implementations live at different GAV coordinates, the build tool has usually no way to find out that there’s a conflict between those libraries. To solve this, Gradle provides the concept of capability.
It’s illegal to find two components providing the same capability in a single dependency graph. Intuitively, it means that if Gradle finds two components that provide the same thing on classpath, it’s going to fail with an error indicating what modules are in conflict. In our example, it means that different bindings of a logging framework provide the same capability.
Capability coordinates
A capability is defined by a (group, module, version) triplet.
Each component defines an implicit capability corresponding to its GAV coordinates (group, artifact, version).
For example, the org.apache.commons:commons-lang3:3.8 module has an implicit capability with group org.apache.commons, name commons-lang3 and version 3.8.
It is important to realize that capabilities are versioned.
Declaring component capabilities
By default, Gradle will fail if two components in the dependency graph provide the same capability. Because most modules are currently published without Gradle Module Metadata, capabilities are not always automatically discovered by Gradle. It is however interesting to use rules to declare component capabilities in order to discover conflicts as soon as possible, during the build instead of runtime.
A typical example is whenever a component is relocated at different coordinates in a new release.
For example, the ASM library lived at asm:asm coordinates until version 3.3.1, then changed to org.ow2.asm:asm since 4.0.
It is illegal to have both ASM <= 3.3.1 and 4.0+ on the classpath, because they provide the same feature, it’s just that the component has been relocated.
Because each component has an implicit capability corresponding to its GAV coordinates, we can "fix" this by having a rule that will declare that the asm:asm module provides the org.ow2.asm:asm capability:
class AsmCapability : ComponentMetadataRule {
override
fun execute(context: ComponentMetadataContext) = context.details.run {
if (id.group == "asm" && id.name == "asm") {
allVariants {
withCapabilities {
// Declare that ASM provides the org.ow2.asm:asm capability, but with an older version
addCapability("org.ow2.asm", "asm", id.version)
}
}
}
}
}@CompileStatic
class AsmCapability implements ComponentMetadataRule {
void execute(ComponentMetadataContext context) {
context.details.with {
if (id.group == "asm" && id.name == "asm") {
allVariants {
it.withCapabilities {
// Declare that ASM provides the org.ow2.asm:asm capability, but with an older version
it.addCapability("org.ow2.asm", "asm", id.version)
}
}
}
}
}
}Now the build is going to fail whenever the two components are found in the same dependency graph.
|
Note
|
At this stage, Gradle will only make more builds fail. It will not automatically fix the problem for you, but it helps you realize that you have a problem. It is recommended to write such rules in plugins which are then applied to your builds. Then, users have to express their preferences, if possible, or fix the problem of having incompatible things on the classpath, as explained in the following section. |
Selecting between candidates
At some point, a dependency graph is going to include either incompatible modules, or modules which are mutually exclusive. For example, you may have different logger implementations and you need to choose one binding. Capabilities help realizing that you have a conflict, but Gradle also provides tools to express how to solve the conflicts.
Selecting between different capability candidates
In the relocation example above, Gradle was able to tell you that you have two versions of the same API on classpath: an "old" module and a "relocated" one. Now we can solve the conflict by automatically choosing the component which has the highest capability version:
configurations.all {
resolutionStrategy.capabilitiesResolution.withCapability("org.ow2.asm:asm") {
selectHighestVersion()
}
}configurations.all {
resolutionStrategy.capabilitiesResolution.withCapability('org.ow2.asm:asm') {
selectHighestVersion()
}
}However, fixing by choosing the highest capability version conflict resolution is not always suitable. For a logging framework, for example, it doesn’t matter what version of the logging frameworks we use, we should always select Slf4j.
In this case, we can fix it by explicitly selecting slf4j as the winner:
configurations.all {
resolutionStrategy.capabilitiesResolution.withCapability("log4j:log4j") {
val toBeSelected = candidates.firstOrNull { it.id.let { id -> id is ModuleComponentIdentifier && id.module == "log4j-over-slf4j" } }
if (toBeSelected != null) {
select(toBeSelected)
}
because("use slf4j in place of log4j")
}
}configurations.all {
resolutionStrategy.capabilitiesResolution.withCapability("log4j:log4j") {
def toBeSelected = candidates.find { it.id instanceof ModuleComponentIdentifier && it.id.module == 'log4j-over-slf4j' }
if (toBeSelected != null) {
select(toBeSelected)
}
because 'use slf4j in place of log4j'
}
}Note that this approach works also well if you have multiple Slf4j bindings on the classpath:
bindings are basically different logger implementations and you need only one.
However, the selected implementation may depend on the configuration being resolved.
For example, for tests, slf4j-simple may be enough but for production, slf4-over-log4j may be better.
Resolution can only be made in favor of a module found in the graph.
The select method only accepts a module found in the current candidates.
If the module you want to select is not part of the conflict, you can abstain from performing a selection, effectively not resolving this conflict.
It might be that another conflict exists in the graph for the same capability and will have the module you want to select.
If no resolution is given for all conflicts on a given capability, the build will fail given the module chosen for resolution was not part of the graph at all.
In addition select(null) will result in an error and so should be avoided.
For more information, check out the the capabilities resolution API.
Fixing metadata with component metadata rules
Each module that is pulled from a repository has metadata associated with it, such as its group, name, version as well as the different variants it provides with their artifacts and dependencies. Sometimes, this metadata is incomplete or incorrect. To manipulate such incomplete metadata from within the build script, Gradle offers an API to write component metadata rules. These rules take effect after a module’s metadata has been downloaded, but before it is used in dependency resolution.
Basics of writing a component metadata rule
Component metadata rules are applied in the components (ComponentMetadataHandler) section of the dependencies block (DependencyHandler) of a build script or in the settings script. The rules can be defined in two different ways:
-
As an action directly when they are applied in the components section
-
As an isolated class implementing the ComponentMetadataRule interface
While defining rules inline as action can be convenient for experimentation, it is generally recommended to define rules as separate classes.
Rules that are written as isolated classes can be annotated with @CacheableRule to cache the results of their application such that they do not need to be re-executed each time dependencies are resolved.
@CacheableRule
abstract class TargetJvmVersionRule @Inject constructor(val jvmVersion: Int) : ComponentMetadataRule {
@get:Inject abstract val objects: ObjectFactory
override fun execute(context: ComponentMetadataContext) {
context.details.withVariant("compile") {
attributes {
attribute(TargetJvmVersion.TARGET_JVM_VERSION_ATTRIBUTE, jvmVersion)
attribute(Usage.USAGE_ATTRIBUTE, objects.named(Usage.JAVA_API))
}
}
}
}
dependencies {
components {
withModule<TargetJvmVersionRule>("commons-io:commons-io") {
params(7)
}
withModule<TargetJvmVersionRule>("commons-collections:commons-collections") {
params(8)
}
}
implementation("commons-io:commons-io:2.6")
implementation("commons-collections:commons-collections:3.2.2")
}@CacheableRule
abstract class TargetJvmVersionRule implements ComponentMetadataRule {
final Integer jvmVersion
@Inject TargetJvmVersionRule(Integer jvmVersion) {
this.jvmVersion = jvmVersion
}
@Inject abstract ObjectFactory getObjects()
void execute(ComponentMetadataContext context) {
context.details.withVariant("compile") {
attributes {
attribute(TargetJvmVersion.TARGET_JVM_VERSION_ATTRIBUTE, jvmVersion)
attribute(Usage.USAGE_ATTRIBUTE, objects.named(Usage, Usage.JAVA_API))
}
}
}
}
dependencies {
components {
withModule("commons-io:commons-io", TargetJvmVersionRule) {
params(7)
}
withModule("commons-collections:commons-collections", TargetJvmVersionRule) {
params(8)
}
}
implementation("commons-io:commons-io:2.6")
implementation("commons-collections:commons-collections:3.2.2")
}As can be seen in the examples above, component metadata rules are defined by implementing ComponentMetadataRule which has a single execute method receiving an instance of ComponentMetadataContext as parameter.
In this example, the rule is also further configured through an ActionConfiguration.
This is supported by having a constructor in your implementation of ComponentMetadataRule accepting the parameters that were configured and the services that need injecting.
Gradle enforces isolation of instances of ComponentMetadataRule.
This means that all parameters must be Serializable or known Gradle types that can be isolated.
In addition, Gradle services can be injected into your ComponentMetadataRule.
Because of this, the moment you have a constructor, it must be annotated with @javax.inject.Inject.
A commonly required service is ObjectFactory to create instances of strongly typed value objects like a value for setting an Attribute.
A service which is helpful for advanced usage of component metadata rules with custom metadata is the RepositoryResourceAccessor.
A component metadata rule can be applied to all modules — all(rule) — or to a selected module — withModule(groupAndName, rule).
Usually, a rule is specifically written to enrich metadata of one specific module and hence the withModule API should be preferred.
Declaring rules in a central place
|
Note
|
Declaring component metadata rules in settings is an incubating feature |
Instead of declaring rules for each subproject individually, it is possible to declare rules in the settings.gradle(.kts) file for the whole build.
Rules declared in settings are the conventional rules applied to each project: if the project doesn’t declare any rules, the rules from the settings script will be used.
dependencyResolutionManagement {
components {
withModule<GuavaRule>("com.google.guava:guava")
}
}dependencyResolutionManagement {
components {
withModule("com.google.guava:guava", GuavaRule)
}
}By default, rules declared in a project will override whatever is declared in settings. It is possible to change this default, for example to always prefer the settings rules:
dependencyResolutionManagement {
rulesMode = RulesMode.PREFER_SETTINGS
}dependencyResolutionManagement {
rulesMode = RulesMode.PREFER_SETTINGS
}If this method is called and that a project or plugin declares rules, a warning will be issued. You can make this a failure instead by using this alternative:
dependencyResolutionManagement {
rulesMode = RulesMode.FAIL_ON_PROJECT_RULES
}dependencyResolutionManagement {
rulesMode = RulesMode.FAIL_ON_PROJECT_RULES
}The default behavior is equivalent to calling this method:
dependencyResolutionManagement {
rulesMode = RulesMode.PREFER_PROJECT
}dependencyResolutionManagement {
rulesMode = RulesMode.PREFER_PROJECT
}Which parts of metadata can be modified?
The component metadata rules API is oriented at the features supported by Gradle Module Metadata and the dependencies API in build scripts. The main difference between writing rules and defining dependencies and artifacts in the build script is that component metadata rules, following the structure of Gradle Module Metadata, operate on variants directly. On the contrary, in build scripts you often influence the shape of multiple variants at once (e.g. an api dependency is added to the api and runtime variant of a Java library, the artifact produced by the jar task is also added to these two variants).
Variants can be addressed for modification through the following methods:
-
allVariants: modify all variants of a component -
withVariant(name): modify a single variant identified by its name -
addVariant(name)oraddVariant(name, base): add a new variant to the component either from scratch or by copying the details of an existing variant (base)
The following details of each variant can be adjusted:
-
The attributes that identify the variant —
attributes {}block -
The capabilities the variant provides —
withCapabilities { }block -
The dependencies of the variant, including rich versions —
withDependencies {}block -
The dependency constraints of the variant, including rich versions —
withDependencyConstraints {}block -
The location of the published files that make up the actual content of the variant —
withFiles { }block
There are also a few properties of the whole component that can be changed:
-
The component level attributes, currently the only meaningful attribute there is
org.gradle.status -
The status scheme to influence interpretation of the
org.gradle.statusattribute during version selection -
The belongsTo property for version alignment through virtual platforms
Depending on the format of the metadata of a module, it is mapped differently to the variant-centric representation of the metadata:
-
If the module has Gradle Module Metadata, the data structure the rule operates on is very similar to what you find in the module’s
.modulefile. -
If the module was published only with
.pommetadata, a number of fixed variants is derived as explained in the mapping of POM files to variants section. -
If the module was published only with an
ivy.xmlfile, the Ivy configurations defined in the file can be accessed instead of variants. Their dependencies, dependency constraints and files can be modified. Additionally, theaddVariant(name, baseVariantOrConfiguration) { }API can be used to derive variants from Ivy configurations if desired (for example, compile and runtime variants for the Java library plugin can be defined with this).
When to use Component Metadata Rules?
In general, if you consider using component metadata rules to adjust the metadata of a certain module, you should check first if that module was published with Gradle Module Metadata (.module file) or traditional metadata only (.pom or ivy.xml).
If a module was published with Gradle Module Metadata, the metadata is likely complete although there can still be cases where something is just plainly wrong. For these modules you should only use component metadata rules if you have clearly identified a problem with the metadata itself. If you have an issue with the dependency resolution result, you should first check if you can solve the issue by declaring dependency constraints with rich versions. In particular, if you are developing a library that you publish, you should remember that dependency constraints, in contrast to component metadata rules, are published as part of the metadata of your own library. So with dependency constraints, you automatically share the solution of dependency resolution issues with your consumers, while component metadata rules are only applied to your own build.
If a module was published with traditional metadata (.pom or ivy.xml only, no .module file) it is more likely that the metadata is incomplete as features such as variants or dependency constraints are not supported in these formats.
Still, conceptually such modules can contain different variants or might have dependency constraints they just omitted (or wrongly defined as dependencies).
In the next sections, we explore a number existing oss modules with such incomplete metadata and the rules for adding the missing metadata information.
As a rule of thumb, you should contemplate if the rule you are writing also works out of context of your build. That is, does the rule still produce a correct and useful result if applied in any other build that uses the module(s) it affects?
Fixing wrong dependency details
Let’s consider as an example the publication of the Jaxen XPath Engine on Maven central. The pom of version 1.1.3 declares a number of dependencies in the compile scope which are not actually needed for compilation. These have been removed in the 1.1.4 pom. Assuming that we need to work with 1.1.3 for some reason, we can fix the metadata with the following rule:
@CacheableRule
abstract class JaxenDependenciesRule: ComponentMetadataRule {
override fun execute(context: ComponentMetadataContext) {
context.details.allVariants {
withDependencies {
removeAll { it.group in listOf("dom4j", "jdom", "xerces", "maven-plugins", "xml-apis", "xom") }
}
}
}
}@CacheableRule
abstract class JaxenDependenciesRule implements ComponentMetadataRule {
void execute(ComponentMetadataContext context) {
context.details.allVariants {
withDependencies {
removeAll { it.group in ["dom4j", "jdom", "xerces", "maven-plugins", "xml-apis", "xom"] }
}
}
}
}Within the withDependencies block you have access to the full list of dependencies and can use all methods available on the Java collection interface to inspect and modify that list.
In addition, there are add(notation, configureAction) methods accepting the usual notations similar to declaring dependencies in the build script.
Dependency constraints can be inspected and modified the same way in the withDependencyConstraints block.
If we take a closer look at the Jaxen 1.1.4 pom, we observe that the dom4j, jdom and xerces dependencies are still there but marked as optional. Optional dependencies in poms are not automatically processed by Gradle nor Maven. The reason is that they indicate that there are optional feature variants provided by the Jaxen library which require one or more of these dependencies, but the information what these features are and which dependency belongs to which is missing. Such information cannot be represented in pom files, but in Gradle Module Metadata through variants and capabilities. Hence, we can add this information in a rule as well.
@CacheableRule
abstract class JaxenCapabilitiesRule: ComponentMetadataRule {
override fun execute(context: ComponentMetadataContext) {
context.details.addVariant("runtime-dom4j", "runtime") {
withCapabilities {
removeCapability("jaxen", "jaxen")
addCapability("jaxen", "jaxen-dom4j", context.details.id.version)
}
withDependencies {
add("dom4j:dom4j:1.6.1")
}
}
}
}@CacheableRule
abstract class JaxenCapabilitiesRule implements ComponentMetadataRule {
void execute(ComponentMetadataContext context) {
context.details.addVariant("runtime-dom4j", "runtime") {
withCapabilities {
removeCapability("jaxen", "jaxen")
addCapability("jaxen", "jaxen-dom4j", context.details.id.version)
}
withDependencies {
add("dom4j:dom4j:1.6.1")
}
}
}
}Here, we first use the addVariant(name, baseVariant) method to create an additional variant, which we identify as feature variant by defining a new capability jaxen-dom4j to represent the optional dom4j integration feature of Jaxen.
This works similar to defining optional feature variants in build scripts.
We then use one of the add methods for adding dependencies to define which dependencies this optional feature needs.
In the build script, we can then add a dependency to the optional feature and Gradle will use the enriched metadata to discover the correct transitive dependencies.
dependencies {
components {
withModule<JaxenDependenciesRule>("jaxen:jaxen")
withModule<JaxenCapabilitiesRule>("jaxen:jaxen")
}
implementation("jaxen:jaxen:1.1.3")
runtimeOnly("jaxen:jaxen:1.1.3") {
capabilities { requireCapability("jaxen:jaxen-dom4j") }
}
}dependencies {
components {
withModule("jaxen:jaxen", JaxenDependenciesRule)
withModule("jaxen:jaxen", JaxenCapabilitiesRule)
}
implementation("jaxen:jaxen:1.1.3")
runtimeOnly("jaxen:jaxen:1.1.3") {
capabilities { requireCapability("jaxen:jaxen-dom4j") }
}
}Making variants published as classified jars explicit
While in the previous example, all variants, "main variants" and optional features, were packaged in one jar file, it is common to publish certain variants as separate files. In particular, when the variants are mutual exclusive — i.e. they are not feature variants, but different variants offering alternative choices. One example all pom-based libraries already have are the runtime and compile variants, where Gradle can choose only one depending on the task at hand. Another of such alternatives discovered often in the Java ecosystems are jars targeting different Java versions.
As example, we look at version 0.7.9 of the asynchronous programming library Quasar published on Maven central.
If we inspect the directory listing, we discover that a quasar-core-0.7.9-jdk8.jar was published, in addition to quasar-core-0.7.9.jar.
Publishing additional jars with a classifier (here jdk8) is common practice in maven repositories.
And while both Maven and Gradle allow you to reference such jars by classifier, they are not mentioned at all in the metadata.
Thus, there is no information that these jars exist and if there are any other differences, like different dependencies, between the variants represented by such jars.
In Gradle Module Metadata, this variant information would be present and for the already published Quasar library, we can add it using the following rule:
@CacheableRule
abstract class QuasarRule: ComponentMetadataRule {
override fun execute(context: ComponentMetadataContext) {
listOf("compile", "runtime").forEach { base ->
context.details.addVariant("jdk8${base.capitalize()}", base) {
attributes {
attribute(TargetJvmVersion.TARGET_JVM_VERSION_ATTRIBUTE, 8)
}
withFiles {
removeAllFiles()
addFile("${context.details.id.name}-${context.details.id.version}-jdk8.jar")
}
}
context.details.withVariant(base) {
attributes {
attribute(TargetJvmVersion.TARGET_JVM_VERSION_ATTRIBUTE, 7)
}
}
}
}
}@CacheableRule
abstract class QuasarRule implements ComponentMetadataRule {
void execute(ComponentMetadataContext context) {
["compile", "runtime"].each { base ->
context.details.addVariant("jdk8${base.capitalize()}", base) {
attributes {
attribute(TargetJvmVersion.TARGET_JVM_VERSION_ATTRIBUTE, 8)
}
withFiles {
removeAllFiles()
addFile("${context.details.id.name}-${context.details.id.version}-jdk8.jar")
}
}
context.details.withVariant(base) {
attributes {
attribute(TargetJvmVersion.TARGET_JVM_VERSION_ATTRIBUTE, 7)
}
}
}
}
}In this case, it is pretty clear that the classifier stands for a target Java version, which is a known Java ecosystem attribute.
Because we also need both a compile and runtime for Java 8, we create two new variants but use the existing compile and runtime variants as base.
This way, all other Java ecosystem attributes are already set correctly and all dependencies are carried over.
Then we set the TARGET_JVM_VERSION_ATTRIBUTE to 8 for both variants, remove any existing file from the new variants with removeAllFiles(), and add the jdk8 jar file with addFile().
The removeAllFiles() is needed, because the reference to the main jar quasar-core-0.7.5.jar is copied from the corresponding base variant.
We also enrich the existing compile and runtime variants with the information that they target Java 7 — attribute(TARGET_JVM_VERSION_ATTRIBUTE, 7).
Now, we can request a Java 8 versions for all of our dependencies on the compile classpath in the build script and Gradle will automatically select the best fitting variant for each library.
In the case of Quasar this will now be the jdk8Compile variant exposing the quasar-core-0.7.9-jdk8.jar.
configurations["compileClasspath"].attributes {
attribute(TargetJvmVersion.TARGET_JVM_VERSION_ATTRIBUTE, 8)
}
dependencies {
components {
withModule<QuasarRule>("co.paralleluniverse:quasar-core")
}
implementation("co.paralleluniverse:quasar-core:0.7.9")
}configurations.compileClasspath.attributes {
attribute(TargetJvmVersion.TARGET_JVM_VERSION_ATTRIBUTE, 8)
}
dependencies {
components {
withModule("co.paralleluniverse:quasar-core", QuasarRule)
}
implementation("co.paralleluniverse:quasar-core:0.7.9")
}Making variants encoded in versions explicit
Another solution to publish multiple alternatives for the same library is the usage of a versioning pattern as done by the popular Guava library. Here, each new version is published twice by appending the classifier to the version instead of the jar artifact. In the case of Guava 28 for example, we can find a 28.0-jre (Java 8) and 28.0-android (Java 6) version on Maven central. The advantage of using this pattern when working only with pom metadata is that both variants are discoverable through the version. The disadvantage is that there is no information what the different version suffixes mean semantically. So in the case of conflict, Gradle would just pick the highest version when comparing the version strings.
Turning this into proper variants is a bit more tricky, as Gradle first selects a version of a module and then selects the best fitting variant. So the concept that variants are encoded as versions is not supported directly. However, since both variants are always published together we can assume that the files are physically located in the same repository. And since they are published with Maven repository conventions, we know the location of each file if we know module name and version. We can write the following rule:
@CacheableRule
abstract class GuavaRule: ComponentMetadataRule {
override fun execute(context: ComponentMetadataContext) {
val variantVersion = context.details.id.version
val version = variantVersion.substring(0, variantVersion.indexOf("-"))
listOf("compile", "runtime").forEach { base ->
mapOf(6 to "android", 8 to "jre").forEach { (targetJvmVersion, jarName) ->
context.details.addVariant("jdk$targetJvmVersion${base.capitalize()}", base) {
attributes {
attributes.attribute(TargetJvmVersion.TARGET_JVM_VERSION_ATTRIBUTE, targetJvmVersion)
}
withFiles {
removeAllFiles()
addFile("guava-$version-$jarName.jar", "../$version-$jarName/guava-$version-$jarName.jar")
}
}
}
}
}
}@CacheableRule
abstract class GuavaRule implements ComponentMetadataRule {
void execute(ComponentMetadataContext context) {
def variantVersion = context.details.id.version
def version = variantVersion.substring(0, variantVersion.indexOf("-"))
["compile", "runtime"].each { base ->
[6: "android", 8: "jre"].each { targetJvmVersion, jarName ->
context.details.addVariant("jdk$targetJvmVersion${base.capitalize()}", base) {
attributes {
attributes.attribute(TargetJvmVersion.TARGET_JVM_VERSION_ATTRIBUTE, targetJvmVersion)
}
withFiles {
removeAllFiles()
addFile("guava-$version-${jarName}.jar", "../$version-$jarName/guava-$version-${jarName}.jar")
}
}
}
}
}
}Similar to the previous example, we add runtime and compile variants for both Java versions.
In the withFiles block however, we now also specify a relative path for the corresponding jar file which allows Gradle to find the file no matter if it has selected a -jre or -android version.
The path is always relative to the location of the metadata (in this case pom) file of the selection module version.
So with this rules, both Guava 28 "versions" carry both the jdk6 and jdk8 variants.
So it does not matter to which one Gradle resolves.
The variant, and with it the correct jar file, is determined based on the requested TARGET_JVM_VERSION_ATTRIBUTE value.
configurations["compileClasspath"].attributes {
attribute(TargetJvmVersion.TARGET_JVM_VERSION_ATTRIBUTE, 6)
}
dependencies {
components {
withModule<GuavaRule>("com.google.guava:guava")
}
// '23.3-android' and '23.3-jre' are now the same as both offer both variants
implementation("com.google.guava:guava:23.3+")
}configurations.compileClasspath.attributes {
attribute(TargetJvmVersion.TARGET_JVM_VERSION_ATTRIBUTE, 6)
}
dependencies {
components {
withModule("com.google.guava:guava", GuavaRule)
}
// '23.3-android' and '23.3-jre' are now the same as both offer both variants
implementation("com.google.guava:guava:23.3+")
}Adding variants for native jars
Jars with classifiers are also used to separate parts of a library for which multiple alternatives exists, for example native code, from the main artifact. This is for example done by the Lightweight Java Game Library (LWGJ), which publishes several platform specific jars to Maven central from which always one is needed, in addition to the main jar, at runtime. It is not possible to convey this information in pom metadata as there is no concept of putting multiple artifacts in relation through the metadata. In Gradle Module Metadata, each variant can have arbitrary many files and we can leverage that by writing the following rule:
@CacheableRule
abstract class LwjglRule: ComponentMetadataRule {
data class NativeVariant(val os: String, val arch: String, val classifier: String)
private val nativeVariants = listOf(
NativeVariant(OperatingSystemFamily.LINUX, "arm32", "natives-linux-arm32"),
NativeVariant(OperatingSystemFamily.LINUX, "arm64", "natives-linux-arm64"),
NativeVariant(OperatingSystemFamily.WINDOWS, "x86", "natives-windows-x86"),
NativeVariant(OperatingSystemFamily.WINDOWS, "x86-64", "natives-windows"),
NativeVariant(OperatingSystemFamily.MACOS, "x86-64", "natives-macos")
)
@get:Inject abstract val objects: ObjectFactory
override fun execute(context: ComponentMetadataContext) {
context.details.withVariant("runtime") {
attributes {
attributes.attribute(OperatingSystemFamily.OPERATING_SYSTEM_ATTRIBUTE, objects.named("none"))
attributes.attribute(MachineArchitecture.ARCHITECTURE_ATTRIBUTE, objects.named("none"))
}
}
nativeVariants.forEach { variantDefinition ->
context.details.addVariant("${variantDefinition.classifier}-runtime", "runtime") {
attributes {
attributes.attribute(OperatingSystemFamily.OPERATING_SYSTEM_ATTRIBUTE, objects.named(variantDefinition.os))
attributes.attribute(MachineArchitecture.ARCHITECTURE_ATTRIBUTE, objects.named(variantDefinition.arch))
}
withFiles {
addFile("${context.details.id.name}-${context.details.id.version}-${variantDefinition.classifier}.jar")
}
}
}
}
}@CacheableRule
abstract class LwjglRule implements ComponentMetadataRule { //val os: String, val arch: String, val classifier: String)
private def nativeVariants = [
[os: OperatingSystemFamily.LINUX, arch: "arm32", classifier: "natives-linux-arm32"],
[os: OperatingSystemFamily.LINUX, arch: "arm64", classifier: "natives-linux-arm64"],
[os: OperatingSystemFamily.WINDOWS, arch: "x86", classifier: "natives-windows-x86"],
[os: OperatingSystemFamily.WINDOWS, arch: "x86-64", classifier: "natives-windows"],
[os: OperatingSystemFamily.MACOS, arch: "x86-64", classifier: "natives-macos"]
]
@Inject abstract ObjectFactory getObjects()
void execute(ComponentMetadataContext context) {
context.details.withVariant("runtime") {
attributes {
attributes.attribute(OperatingSystemFamily.OPERATING_SYSTEM_ATTRIBUTE, objects.named(OperatingSystemFamily, "none"))
attributes.attribute(MachineArchitecture.ARCHITECTURE_ATTRIBUTE, objects.named(MachineArchitecture, "none"))
}
}
nativeVariants.each { variantDefinition ->
context.details.addVariant("${variantDefinition.classifier}-runtime", "runtime") {
attributes {
attributes.attribute(OperatingSystemFamily.OPERATING_SYSTEM_ATTRIBUTE, objects.named(OperatingSystemFamily, variantDefinition.os))
attributes.attribute(MachineArchitecture.ARCHITECTURE_ATTRIBUTE, objects.named(MachineArchitecture, variantDefinition.arch))
}
withFiles {
addFile("${context.details.id.name}-${context.details.id.version}-${variantDefinition.classifier}.jar")
}
}
}
}
}This rule is quite similar to the Quasar library example above.
Only this time we have five different runtime variants we add and nothing we need to change for the compile variant.
The runtime variants are all based on the existing runtime variant and we do not change any existing information.
All Java ecosystem attributes, the dependencies and the main jar file stay part of each of the runtime variants.
We only set the additional attributes OPERATING_SYSTEM_ATTRIBUTE and ARCHITECTURE_ATTRIBUTE which are defined as part of Gradle’s native support.
And we add the corresponding native jar file so that each runtime variant now carries two files: the main jar and the native jar.
In the build script, we can now request a specific variant and Gradle will fail with a selection error if more information is needed to make a decision.
configurations["runtimeClasspath"].attributes {
attribute(OperatingSystemFamily.OPERATING_SYSTEM_ATTRIBUTE, objects.named("windows"))
}
dependencies {
components {
withModule<LwjglRule>("org.lwjgl:lwjgl")
}
implementation("org.lwjgl:lwjgl:3.2.3")
}configurations["runtimeClasspath"].attributes {
attribute(OperatingSystemFamily.OPERATING_SYSTEM_ATTRIBUTE, objects.named(OperatingSystemFamily, "windows"))
}
dependencies {
components {
withModule("org.lwjgl:lwjgl", LwjglRule)
}
implementation("org.lwjgl:lwjgl:3.2.3")
}> Could not resolve all files for configuration ':runtimeClasspath'.
> Could not resolve org.lwjgl:lwjgl:3.2.3.
Required by:
project :
> Cannot choose between the following variants of org.lwjgl:lwjgl:3.2.3:
- natives-windows-runtime
- natives-windows-x86-runtime
Making different flavors of a library available through capabilities
Because it is difficult to model optional feature variants as separate jars with pom metadata, libraries sometimes compose different jars with a different feature set.
That is, instead of composing your flavor of the library from different feature variants, you select one of the pre-composed variants (offering everything in one jar).
One such library is the well-known dependency injection framework Guice, published on Maven central, which offers a complete flavor (the main jar) and a reduced variant without aspect-oriented programming support (guice-4.2.2-no_aop.jar).
That second variant with a classifier is not mentioned in the pom metadata.
With the following rule, we create compile and runtime variants based on that file and make it selectable through a capability named com.google.inject:guice-no_aop.
@CacheableRule
abstract class GuiceRule: ComponentMetadataRule {
override fun execute(context: ComponentMetadataContext) {
listOf("compile", "runtime").forEach { base ->
context.details.addVariant("noAop${base.capitalize()}", base) {
withCapabilities {
addCapability("com.google.inject", "guice-no_aop", context.details.id.version)
}
withFiles {
removeAllFiles()
addFile("guice-${context.details.id.version}-no_aop.jar")
}
withDependencies {
removeAll { it.group == "aopalliance" }
}
}
}
}
}@CacheableRule
abstract class GuiceRule implements ComponentMetadataRule {
void execute(ComponentMetadataContext context) {
["compile", "runtime"].each { base ->
context.details.addVariant("noAop${base.capitalize()}", base) {
withCapabilities {
addCapability("com.google.inject", "guice-no_aop", context.details.id.version)
}
withFiles {
removeAllFiles()
addFile("guice-${context.details.id.version}-no_aop.jar")
}
withDependencies {
removeAll { it.group == "aopalliance" }
}
}
}
}
}The new variants also have the dependency on the standardized aop interfaces library aopalliance:aopalliance removed, as this is clearly not needed by these variants.
Again, this is information that cannot be expressed in pom metadata.
We can now select a guice-no_aop variant and will get the correct jar file and the correct dependencies.
dependencies {
components {
withModule<GuiceRule>("com.google.inject:guice")
}
implementation("com.google.inject:guice:4.2.2") {
capabilities { requireCapability("com.google.inject:guice-no_aop") }
}
}dependencies {
components {
withModule("com.google.inject:guice", GuiceRule)
}
implementation("com.google.inject:guice:4.2.2") {
capabilities { requireCapability("com.google.inject:guice-no_aop") }
}
}Adding missing capabilities to detect conflicts
Another usage of capabilities is to express that two different modules, for example log4j and log4j-over-slf4j, provide alternative implementations of the same thing.
By declaring that both provide the same capability, Gradle only accepts one of them in a dependency graph.
This example, and how it can be tackled with a component metadata rule, is described in detail in the feature modelling section.
Making Ivy modules variant-aware
Modules with Ivy metadata, do not have variants by default.
However, Ivy configurations can be mapped to variants as the addVariant(name, baseVariantOrConfiguration) accepts any Ivy configuration that was published as base.
This can be used, for example, to define runtime and compile variants.
An example of a corresponding rule can be found here.
Ivy details of Ivy configurations (e.g. dependencies and files) can also be modified using the withVariant(configurationName) API.
However, modifying attributes or capabilities on Ivy configurations has no effect.
For very Ivy specific use cases, the component metadata rules API also offers access to other details only found in Ivy metadata.
These are available through the IvyModuleDescriptor interface and can be accessed using getDescriptor(IvyModuleDescriptor) on the ComponentMetadataContext.
@CacheableRule
abstract class IvyComponentRule : ComponentMetadataRule {
override fun execute(context: ComponentMetadataContext) {
val descriptor = context.getDescriptor(IvyModuleDescriptor::class)
if (descriptor != null && descriptor.branch == "testing") {
context.details.status = "rc"
}
}
}@CacheableRule
abstract class IvyComponentRule implements ComponentMetadataRule {
void execute(ComponentMetadataContext context) {
def descriptor = context.getDescriptor(IvyModuleDescriptor)
if (descriptor != null && descriptor.branch == "testing") {
context.details.status = "rc"
}
}
}Filter using Maven metadata
For Maven specific use cases, the component metadata rules API also offers access to other details only found in POM metadata.
These are available through the PomModuleDescriptor interface and can be accessed using getDescriptor(PomModuleDescriptor) on the ComponentMetadataContext.
@CacheableRule
abstract class MavenComponentRule : ComponentMetadataRule {
override fun execute(context: ComponentMetadataContext) {
val descriptor = context.getDescriptor(PomModuleDescriptor::class)
if (descriptor != null && descriptor.packaging == "war") {
// ...
}
}
}@CacheableRule
abstract class MavenComponentRule implements ComponentMetadataRule {
void execute(ComponentMetadataContext context) {
def descriptor = context.getDescriptor(PomModuleDescriptor)
if (descriptor != null && descriptor.packaging == "war") {
// ...
}
}
}Modifying metadata on the component level for alignment
While all the examples above made modifications to variants of a component, there is also a limited set of modifications that can be done to the metadata of the component itself. This information can influence the version selection process for a module during dependency resolution, which is performed before one or multiple variants of a component are selected.
The first API available on the component is belongsTo() to create virtual platforms for aligning versions of multiple modules without Gradle Module Metadata.
It is explained in detail in the section on aligning versions of modules not published with Gradle.
Modifying metadata on the component level for version selection based on status
Gradle and Gradle Module Metadata also allow attributes to be set on the whole component instead of a single variant.
Each of these attributes carries special semantics as they influence version selection which is done before variant selection.
While variant selection can handle any custom attribute, version selection only considers attributes for which specific semantics are implemented.
At the moment, the only attribute with meaning here is org.gradle.status.
It is therefore recommended to only modify this attribute, if any, on the component level.
A dedicated API setStatus(value) is available for this.
To modify another attribute for all variants of a component withAllVariants { attributes {} } should be utilised instead.
A module’s status is taken into consideration when a latest version selector is resolved.
Specifically, latest.someStatus will resolve to the highest module version that has status someStatus or a more mature status.
For example, latest.integration will select the highest module version regardless of its status (because integration is the least mature status as explained below), whereas latest.release will select the highest module version with status release.
The interpretation of the status can be influenced by changing a module’s status scheme through the setStatusScheme(valueList) API.
This concept models the different levels of maturity that a module transitions through over time with different publications.
The default status scheme, ordered from least to most mature status, is integration, milestone, release.
The org.gradle.status attribute must be set, to one of the values in the components status scheme.
Thus each component always has a status which is determined from the metadata as follows:
-
Gradle Module Metadata: the value that was published for the
org.gradle.statusattribute on the component -
Ivy metadata:
statusdefined in the ivy.xml, defaults tointegrationif missing -
Pom metadata:
integrationfor modules with a SNAPSHOT version,releasefor all others
The following example demonstrates latest selectors based on a custom status scheme declared in a component metadata rule that applies to all modules:
@CacheableRule
abstract class CustomStatusRule : ComponentMetadataRule {
override fun execute(context: ComponentMetadataContext) {
context.details.statusScheme = listOf("nightly", "milestone", "rc", "release")
if (context.details.status == "integration") {
context.details.status = "nightly"
}
}
}
dependencies {
components {
all<CustomStatusRule>()
}
implementation("org.apache.commons:commons-lang3:latest.rc")
}@CacheableRule
abstract class CustomStatusRule implements ComponentMetadataRule {
void execute(ComponentMetadataContext context) {
context.details.statusScheme = ["nightly", "milestone", "rc", "release"]
if (context.details.status == "integration") {
context.details.status = "nightly"
}
}
}
dependencies {
components {
all(CustomStatusRule)
}
implementation("org.apache.commons:commons-lang3:latest.rc")
}Compared to the default scheme, the rule inserts a new status rc and replaces integration with nightly.
Existing modules with the state integration are mapped to nightly.
Customizing resolution of a dependency directly
This section covers mechanisms Gradle offers to directly influence the behavior of the dependency resolution engine. In contrast to the other concepts covered in this chapter, like dependency constraints or component metadata rules, which are all inputs to resolution, the following mechanisms allow you to write rules which are directly injected into the resolution engine. Because of this, they can be seen as brute force solutions, that may hide future problems (e.g. if new dependencies are added). Therefore, the general advice is to only use the following mechanisms if other means are not sufficient. If you are authoring a library, you should always prefer dependency constraints as they are published for your consumers.
Using dependency resolve rules
A dependency resolve rule is executed for each resolved dependency, and offers a powerful api for manipulating a requested dependency prior to that dependency being resolved. The feature currently offers the ability to change the group, name and/or version of a requested dependency, allowing a dependency to be substituted with a completely different module during resolution.
Dependency resolve rules provide a very powerful way to control the dependency resolution process, and can be used to implement all sorts of advanced patterns in dependency management. Some of these patterns are outlined below. For more information and code samples see the ResolutionStrategy class in the API documentation.
Implementing a custom versioning scheme
In some corporate environments, the list of module versions that can be declared in Gradle builds is maintained and audited externally. Dependency resolve rules provide a neat implementation of this pattern:
-
In the build script, the developer declares dependencies with the module group and name, but uses a placeholder version, for example:
default. -
The
defaultversion is resolved to a specific version via a dependency resolve rule, which looks up the version in a corporate catalog of approved modules.
This rule implementation can be neatly encapsulated in a corporate plugin, and shared across all builds within the organisation.
configurations.all {
resolutionStrategy.eachDependency {
if (requested.version == "default") {
val version = findDefaultVersionInCatalog(requested.group, requested.name)
useVersion(version.version)
because(version.because)
}
}
}
data class DefaultVersion(val version: String, val because: String)
fun findDefaultVersionInCatalog(group: String, name: String): DefaultVersion {
//some custom logic that resolves the default version into a specific version
return DefaultVersion(version = "1.0", because = "tested by QA")
}configurations.all {
resolutionStrategy.eachDependency { DependencyResolveDetails details ->
if (details.requested.version == 'default') {
def version = findDefaultVersionInCatalog(details.requested.group, details.requested.name)
details.useVersion version.version
details.because version.because
}
}
}
def findDefaultVersionInCatalog(String group, String name) {
//some custom logic that resolves the default version into a specific version
[version: "1.0", because: 'tested by QA']
}Denying a particular version with a replacement
Dependency resolve rules provide a mechanism for denying a particular version of a dependency and providing a replacement version. This can be useful if a certain dependency version is broken and should not be used, where a dependency resolve rule causes this version to be replaced with a known good version. One example of a broken module is one that declares a dependency on a library that cannot be found in any of the public repositories, but there are many other reasons why a particular module version is unwanted and a different version is preferred.
In example below, imagine that version 1.2.1 contains important fixes and should always be used in preference to 1.2.
The rule provided will enforce just this: any time version 1.2 is encountered it will be replaced with 1.2.1.
Note that this is different from a forced version as described above, in that any other versions of this module would not be affected.
This means that the 'newest' conflict resolution strategy would still select version 1.3 if this version was also pulled transitively.
configurations.all {
resolutionStrategy.eachDependency {
if (requested.group == "org.software" && requested.name == "some-library" && requested.version == "1.2") {
useVersion("1.2.1")
because("fixes critical bug in 1.2")
}
}
}configurations.all {
resolutionStrategy.eachDependency { DependencyResolveDetails details ->
if (details.requested.group == 'org.software' && details.requested.name == 'some-library' && details.requested.version == '1.2') {
details.useVersion '1.2.1'
details.because 'fixes critical bug in 1.2'
}
}
}|
Note
|
There’s a difference with using the reject directive of rich version constraints: rich versions will cause the build to fail if a rejected version is found in the graph, or select a non rejected version when using dynamic dependencies. Here, we manipulate the requested versions in order to select a different version when we find a rejected one. In other words, this is a solution to rejected versions, while rich version constraints allow declaring the intent (you should not use this version). |
Using module replacement rules
It is preferable to express module conflicts in terms of capabilities conflicts. However, if there’s no such rule declared or that you are working on versions of Gradle which do not support capabilities, Gradle provides tooling to work around those issues.
Module replacement rules allow a build to declare that a legacy library has been replaced by a new one.
A good example when a new library replaced a legacy one is the google-collections -> guava migration.
The team that created google-collections decided to change the module name from com.google.collections:google-collections into com.google.guava:guava.
This is a legal scenario in the industry: teams need to be able to change the names of products they maintain, including the module coordinates. Renaming of the module coordinates has impact on conflict resolution.
To explain the impact on conflict resolution, let’s consider the google-collections -> guava scenario.
It may happen that both libraries are pulled into the same dependency graph.
For example, our project depends on guava but some of our dependencies pull in a legacy version of google-collections.
This can cause runtime errors, for example during test or application execution.
Gradle does not automatically resolve the google-collections -> guava conflict because it is not considered as a version conflict.
It’s because the module coordinates for both libraries are completely different and conflict resolution is activated when group and module coordinates are the same but there are different versions available in the dependency graph (for more info, refer to the section on conflict resolution).
Traditional remedies to this problem are:
-
Declare exclusion rule to avoid pulling in
google-collectionsto graph. It is probably the most popular approach. -
Avoid dependencies that pull in legacy libraries.
-
Upgrade the dependency version if the new version no longer pulls in a legacy library.
-
Downgrade to
google-collections. It’s not recommended, just mentioned for completeness.
Traditional approaches work but they are not general enough.
For example, an organisation wants to resolve the google-collections -> guava conflict resolution problem in all projects.
It is possible to declare that certain module was replaced by other.
This enables organisations to include the information about module replacement in the corporate plugin suite and resolve the problem holistically for all Gradle-powered projects in the enterprise.
dependencies {
modules {
module("com.google.collections:google-collections") {
replacedBy("com.google.guava:guava", "google-collections is now part of Guava")
}
}
}dependencies {
modules {
module("com.google.collections:google-collections") {
replacedBy("com.google.guava:guava", "google-collections is now part of Guava")
}
}
}For more examples and detailed API, refer to the DSL reference for ComponentMetadataHandler.
What happens when we declare that google-collections is replaced by guava?
Gradle can use this information for conflict resolution. Gradle will consider every version of guava newer/better than any version of google-collections.
Also, Gradle will ensure that only guava jar is present in the classpath / resolved file list.
Note that if only google-collections appears in the dependency graph (e.g. no guava) Gradle will not eagerly replace it with guava.
Module replacement is an information that Gradle uses for resolving conflicts.
If there is no conflict (e.g. only google-collections or only guava in the graph) the replacement information is not used.
Currently it is not possible to declare that a given module is replaced by a set of modules. However, it is possible to declare that multiple modules are replaced by a single module.
Using dependency substitution rules
Dependency substitution rules work similarly to dependency resolve rules. In fact, many capabilities of dependency resolve rules can be implemented with dependency substitution rules. They allow project and module dependencies to be transparently substituted with specified replacements. Unlike dependency resolve rules, dependency substitution rules allow project and module dependencies to be substituted interchangeably.
Adding a dependency substitution rule to a configuration changes the timing of when that configuration is resolved. Instead of being resolved on first use, the configuration is instead resolved when the task graph is being constructed. This can have unexpected consequences if the configuration is being further modified during task execution, or if the configuration relies on modules that are published during execution of another task.
To explain:
-
A
Configurationcan be declared as an input to any Task, and that configuration can include project dependencies when it is resolved. -
If a project dependency is an input to a Task (via a configuration), then tasks to build the project artifacts must be added to the task dependencies.
-
In order to determine the project dependencies that are inputs to a task, Gradle needs to resolve the
Configurationinputs. -
Because the Gradle task graph is fixed once task execution has commenced, Gradle needs to perform this resolution prior to executing any tasks.
In the absence of dependency substitution rules, Gradle knows that an external module dependency will never transitively reference a project dependency. This makes it easy to determine the full set of project dependencies for a configuration through simple graph traversal. With this functionality, Gradle can no longer make this assumption, and must perform a full resolve in order to determine the project dependencies.
Substituting an external module dependency with a project dependency
One use case for dependency substitution is to use a locally developed version of a module in place of one that is downloaded from an external repository. This could be useful for testing a local, patched version of a dependency.
The module to be replaced can be declared with or without a version specified.
configurations.all {
resolutionStrategy.dependencySubstitution {
substitute(module("org.utils:api"))
.using(project(":api")).because("we work with the unreleased development version")
substitute(module("org.utils:util:2.5")).using(project(":util"))
}
}configurations.all {
resolutionStrategy.dependencySubstitution {
substitute module("org.utils:api") using project(":api") because "we work with the unreleased development version"
substitute module("org.utils:util:2.5") using project(":util")
}
}Note that a project that is substituted must be included in the multi-project build (via settings.gradle).
Dependency substitution rules take care of replacing the module dependency with the project dependency and wiring up any task dependencies, but do not implicitly include the project in the build.
Substituting a project dependency with a module replacement
Another way to use substitution rules is to replace a project dependency with a module in a multi-project build. This can be useful to speed up development with a large multi-project build, by allowing a subset of the project dependencies to be downloaded from a repository rather than being built.
The module to be used as a replacement must be declared with a version specified.
configurations.all {
resolutionStrategy.dependencySubstitution {
substitute(project(":api"))
.using(module("org.utils:api:1.3")).because("we use a stable version of org.utils:api")
}
}configurations.all {
resolutionStrategy.dependencySubstitution {
substitute project(":api") using module("org.utils:api:1.3") because "we use a stable version of org.utils:api"
}
}When a project dependency has been replaced with a module dependency, that project is still included in the overall multi-project build.
However, tasks to build the replaced dependency will not be executed in order to resolve the depending Configuration.
Conditionally substituting a dependency
A common use case for dependency substitution is to allow more flexible assembly of sub-projects within a multi-project build. This can be useful for developing a local, patched version of an external dependency or for building a subset of the modules within a large multi-project build.
The following example uses a dependency substitution rule to replace any module dependency with the group org.example, but only if a local project matching the dependency name can be located.
configurations.all {
resolutionStrategy.dependencySubstitution.all {
requested.let {
if (it is ModuleComponentSelector && it.group == "org.example") {
val targetProject = findProject(":${it.module}")
if (targetProject != null) {
useTarget(targetProject)
}
}
}
}
}configurations.all {
resolutionStrategy.dependencySubstitution.all { DependencySubstitution dependency ->
if (dependency.requested instanceof ModuleComponentSelector && dependency.requested.group == "org.example") {
def targetProject = findProject(":${dependency.requested.module}")
if (targetProject != null) {
dependency.useTarget targetProject
}
}
}
}Note that a project that is substituted must be included in the multi-project build (via settings.gradle).
Dependency substitution rules take care of replacing the module dependency with the project dependency, but do not implicitly include the project in the build.
Substituting a dependency with another variant
Gradle’s dependency management engine is variant-aware meaning that for a single component, the engine may select different artifacts and transitive dependencies.
What to select is determined by the attributes of the consumer configuration and the attributes of the variants found on the producer side.
It is, however, possible that some specific dependencies override attributes from the configuration itself.
This is typically the case when using the Java Platform plugin: this plugin builds a special kind of component which is called a "platform" and can be addressed by setting the component category attribute to platform, in opposition to typical dependencies which are targetting libraries.
Therefore, you may face situations where you want to substitute a platform dependency with a regular dependency, or the other way around.
Substituting a dependency with attributes
Let’s imagine that you want to substitute a platform dependency with a regular dependency. This means that the library you are consuming declared something like this:
dependencies {
// This is a platform dependency but you want the library
implementation(platform("com.google.guava:guava:28.2-jre"))
}dependencies {
// This is a platform dependency but you want the library
implementation platform('com.google.guava:guava:28.2-jre')
}The platform keyword is actually a short-hand notation for a dependency with attributes.
If we want to substitute this dependency with a regular dependency, then we need to select precisely the dependencies which have the platform attribute.
This can be done by using a substitution rule:
configurations.all {
resolutionStrategy.dependencySubstitution {
substitute(platform(module("com.google.guava:guava:28.2-jre")))
.using(module("com.google.guava:guava:28.2-jre"))
}
}configurations.all {
resolutionStrategy.dependencySubstitution {
substitute(platform(module('com.google.guava:guava:28.2-jre'))).
using module('com.google.guava:guava:28.2-jre')
}
}The same rule without the platform keyword would try to substitute regular dependencies with a regular dependency, which is not what you want, so it’s important to understand that the substitution rules apply on a dependency specification: it matches the requested dependency (substitute XXX) with a substitute (using YYY).
You can have attributes on both the requested dependency or the substitute and the substitution is not limited to platform: you can actually specify the whole set of dependency attributes using the variant notation.
The following rule is strictly equivalent to the rule above:
configurations.all {
resolutionStrategy.dependencySubstitution {
substitute(variant(module("com.google.guava:guava:28.2-jre")) {
attributes {
attribute(Category.CATEGORY_ATTRIBUTE, objects.named(Category.REGULAR_PLATFORM))
}
}).using(module("com.google.guava:guava:28.2-jre"))
}
}configurations.all {
resolutionStrategy.dependencySubstitution {
substitute variant(module('com.google.guava:guava:28.2-jre')) {
attributes {
attribute(Category.CATEGORY_ATTRIBUTE, objects.named(Category, Category.REGULAR_PLATFORM))
}
} using module('com.google.guava:guava:28.2-jre')
}
}Please refer to the Substitution DSL API docs for a complete reference of the variant substitution API.
|
Warning
|
In composite builds, the rule that you have to match the exact requested dependency attributes is not applied: when using composites, Gradle will automatically match the requested attributes. In other words, it is implicit that if you include another build, you are substituting all variants of the substituted module with an equivalent variant in the included build. |
Substituting a dependency with a dependency with capabilities
Similarly to attributes substitution, Gradle lets you substitute a dependency with or without capabilities with another dependency with or without capabilities.
For example, let’s imagine that you need to substitute a regular dependency with its test fixtures instead. You can achieve this by using the following dependency substitution rule:
configurations.testCompileClasspath {
resolutionStrategy.dependencySubstitution {
substitute(module("com.acme:lib:1.0")).using(variant(module("com.acme:lib:1.0")) {
capabilities {
requireCapability("com.acme:lib-test-fixtures")
}
})
}
}configurations.testCompileClasspath {
resolutionStrategy.dependencySubstitution {
substitute(module('com.acme:lib:1.0'))
.using variant(module('com.acme:lib:1.0')) {
capabilities {
requireCapability('com.acme:lib-test-fixtures')
}
}
}
}Capabilities which are declared in a substitution rule on the requested dependency constitute part of the dependency match specification, and therefore dependencies which do not require the capabilities will not be matched.
Please refer to the Substitution DSL API docs for a complete reference of the variant substitution API.
Substituting a dependency with a classifier or artifact
While external modules are in general addressed via their group/artifact/version coordinates, it is common that such modules are published with additional artifacts that you may want to use in place of the main artifact. This is typically the case for classified artifacts, but you may also need to select an artifact with a different file type or extension. Gradle discourages use of classifiers in dependencies and prefers to model such artifacts as additional variants of a module. There are lots of advantages of using variants instead of classified artifacts, including, but not only, a different set of dependencies for those artifacts.
However, in order to help bridging the two models, Gradle provides means to change or remove a classifier in a substitution rule.
dependencies {
implementation("com.google.guava:guava:28.2-jre")
implementation("co.paralleluniverse:quasar-core:0.8.0")
implementation(project(":lib"))
}dependencies {
implementation 'com.google.guava:guava:28.2-jre'
implementation 'co.paralleluniverse:quasar-core:0.8.0'
implementation project(':lib')
}In the example above, the first level dependency on quasar makes us think that Gradle would resolve quasar-core-0.8.0.jar but it’s not the case: the build would fail with this message:
Execution failed for task ':resolve'.
> Could not resolve all files for configuration ':runtimeClasspath'.
> Could not find quasar-core-0.8.0-jdk8.jar (co.paralleluniverse:quasar-core:0.8.0).
Searched in the following locations:
https://repo1.maven.org/maven2/co/paralleluniverse/quasar-core/0.8.0/quasar-core-0.8.0-jdk8.jarThat’s because there’s a dependency on another project, lib, which itself depends on a different version of quasar-core:
dependencies {
implementation("co.paralleluniverse:quasar-core:0.7.10:jdk8")
}dependencies {
implementation "co.paralleluniverse:quasar-core:0.7.10:jdk8"
}What happens is that Gradle would perform conflict resolution between quasar-core 0.8.0 and quasar-core 0.7.10.
Because 0.8.0 is higher, we select this version, but the dependency in lib has a classifier, jdk8 and this classifier doesn’t exist anymore in release 0.8.0.
To fix this problem, you can ask Gradle to resolve both dependencies without classifier:
configurations.all {
resolutionStrategy.dependencySubstitution {
substitute(module("co.paralleluniverse:quasar-core"))
.using(module("co.paralleluniverse:quasar-core:0.8.0"))
.withoutClassifier()
}
}configurations.all {
resolutionStrategy.dependencySubstitution {
substitute module('co.paralleluniverse:quasar-core') using module('co.paralleluniverse:quasar-core:0.8.0') withoutClassifier()
}
}This rule effectively replaces any dependency on quasar-core found in the graph with a dependency without classifier.
Alternatively, it’s possible to select a dependency with a specific classifier or, for more specific use cases, substitute with a very specific artifact (type, extension and classifier).
For more information, please refer to the following API documentation:
-
artifact selection via the Substitution DSL
-
artifact selection via the DependencySubstitution API
-
artifact selection via the ResolutionStrategy API
Disabling transitive resolution
By default Gradle resolves all transitive dependencies specified by the dependency metadata.
Sometimes this behavior may not be desirable e.g. if the metadata is incorrect or defines a large graph of transitive dependencies.
You can tell Gradle to disable transitive dependency management for a dependency by setting ModuleDependency.setTransitive(boolean) to false.
As a result only the main artifact will be resolved for the declared dependency.
dependencies {
implementation("com.google.guava:guava:23.0") {
isTransitive = false
}
}dependencies {
implementation('com.google.guava:guava:23.0') {
transitive = false
}
}|
Note
|
Disabling transitive dependency resolution will likely require you to declare the necessary runtime dependencies in your build script which otherwise would have been resolved automatically. Not doing so might lead to runtime classpath issues. |
A project can decide to disable transitive dependency resolution completely. You either don’t want to rely on the metadata published to the consumed repositories or you want to gain full control over the dependencies in your graph. For more information, see Configuration.setTransitive(boolean).
configurations.all {
isTransitive = false
}
dependencies {
implementation("com.google.guava:guava:23.0")
}configurations.all {
transitive = false
}
dependencies {
implementation 'com.google.guava:guava:23.0'
}Changing configuration dependencies prior to resolution
At times, a plugin may want to modify the dependencies of a configuration before it is resolved.
The withDependencies method permits dependencies to be added, removed or modified programmatically.
configurations {
create("implementation") {
withDependencies {
val dep = this.find { it.name == "to-modify" } as ExternalModuleDependency
dep.version {
strictly("1.2")
}
}
}
}configurations {
implementation {
withDependencies { DependencySet dependencies ->
ExternalModuleDependency dep = dependencies.find { it.name == 'to-modify' } as ExternalModuleDependency
dep.version {
strictly "1.2"
}
}
}
}Setting default configuration dependencies
A configuration can be configured with default dependencies to be used if no dependencies are explicitly set for the configuration. A primary use case of this functionality is for developing plugins that make use of versioned tools that the user might override. By specifying default dependencies, the plugin can use a default version of the tool only if the user has not specified a particular version to use.
configurations {
create("pluginTool") {
defaultDependencies {
add(project.dependencies.create("org.gradle:my-util:1.0"))
}
}
}configurations {
pluginTool {
defaultDependencies { dependencies ->
dependencies.add(project.dependencies.create("org.gradle:my-util:1.0"))
}
}
}Excluding a dependency from a configuration completely
Similar to excluding a dependency in a dependency declaration, you can exclude a transitive dependency for a particular configuration completely by using Configuration.exclude(java.util.Map). This will automatically exclude the transitive dependency for all dependencies declared on the configuration.
configurations {
"implementation" {
exclude(group = "commons-collections", module = "commons-collections")
}
}
dependencies {
implementation("commons-beanutils:commons-beanutils:1.9.4")
implementation("com.opencsv:opencsv:4.6")
}configurations {
implementation {
exclude group: 'commons-collections', module: 'commons-collections'
}
}
dependencies {
implementation 'commons-beanutils:commons-beanutils:1.9.4'
implementation 'com.opencsv:opencsv:4.6'
}Matching dependencies to repositories
Gradle exposes an API to declare what a repository may or may not contain. This feature offers a fine grained control on which repository serve which artifacts, which can be one way of controlling the source of dependencies.
Head over to the section on repository content filtering to know more about this feature.
Enabling Ivy dynamic resolve mode
Gradle’s Ivy repository implementations support the equivalent to Ivy’s dynamic resolve mode.
Normally, Gradle will use the rev attribute for each dependency definition included in an ivy.xml file.
In dynamic resolve mode, Gradle will instead prefer the revConstraint attribute over the rev attribute for a given dependency definition.
If the revConstraint attribute is not present, the rev attribute is used instead.
To enable dynamic resolve mode, you need to set the appropriate option on the repository definition.
A couple of examples are shown below.
Note that dynamic resolve mode is only available for Gradle’s Ivy repositories.
It is not available for Maven repositories, or custom Ivy DependencyResolver implementations.
// Can enable dynamic resolve mode when you define the repository
repositories {
ivy {
url = uri("http://repo.mycompany.com/repo")
resolve.isDynamicMode = true
}
}
// Can use a rule instead to enable (or disable) dynamic resolve mode for all repositories
repositories.withType<IvyArtifactRepository> {
resolve.isDynamicMode = true
}// Can enable dynamic resolve mode when you define the repository
repositories {
ivy {
url "http://repo.mycompany.com/repo"
resolve.dynamicMode = true
}
}
// Can use a rule instead to enable (or disable) dynamic resolve mode for all repositories
repositories.withType(IvyArtifactRepository) {
resolve.dynamicMode = true
}Preventing accidental dependency upgrades
In some situations, you might want to be in total control of the dependency graph. In particular, you may want to make sure that:
-
the versions declared in a build script actually correspond to the ones being resolved
-
or make sure that dependency resolution is reproducible over time
Gradle provides ways to perform this by configuring the resolution strategy.
Failing on version conflict
There’s a version conflict whenever Gradle finds the same module in two different versions in a dependency graph.
By default, Gradle performs optimistic upgrades, meaning that if version 1.1 and 1.3 are found in the graph, we resolve to the highest version, 1.3.
However, it is easy to miss that some dependencies are upgraded because of a transitive dependency.
In the example above, if 1.1 was a version used in your build script and 1.3 a version brought transitively, you could use 1.3 without actually noticing.
To make sure that you are aware of such upgrades, Gradle provides a mode that can be activated in the resolution strategy of a configuration. Imagine the following dependencies declaration:
dependencies {
implementation("org.apache.commons:commons-lang3:3.0")
// the following dependency brings lang3 3.8.1 transitively
implementation("com.opencsv:opencsv:4.6")
}dependencies {
implementation 'org.apache.commons:commons-lang3:3.0'
// the following dependency brings lang3 3.8.1 transitively
implementation 'com.opencsv:opencsv:4.6'
}Then by default Gradle would upgrade commons-lang3, but it is possible to fail the build:
configurations.all {
resolutionStrategy {
failOnVersionConflict()
}
}configurations.all {
resolutionStrategy {
failOnVersionConflict()
}
}Making sure resolution is reproducible
There are cases where dependency resolution can be unstable over time. That is to say that if you build at date D, building at date D+x may give a different resolution result.
This is possible in the following cases:
-
dynamic dependency versions are used (version ranges,
latest.release,1.+, …) -
or changing versions are used (SNAPSHOTs, fixed version with changing contents, …)
The recommended way to deal with dynamic versions is to use dependency locking. However, it is possible to prevent the use of dynamic versions altogether, which is an alternate strategy:
configurations.all {
resolutionStrategy {
failOnDynamicVersions()
}
}configurations.all {
resolutionStrategy {
failOnDynamicVersions()
}
}Likewise, it’s possible to prevent the use of changing versions by activating this flag:
configurations.all {
resolutionStrategy {
failOnChangingVersions()
}
}configurations.all {
resolutionStrategy {
failOnChangingVersions()
}
}It’s a good practice to fail on changing versions at release time.
Eventually, it’s possible to combine both failing on dynamic versions and changing versions using a single call:
configurations.all {
resolutionStrategy {
failOnNonReproducibleResolution()
}
}configurations.all {
resolutionStrategy {
failOnNonReproducibleResolution()
}
}Getting consistent dependency resolution results
|
Note
|
Dependency resolution consistency is an incubating feature |
It’s a common misconception that there’s a single dependency graph for an application. In fact Gradle will, during a build, resolve a number of distinct dependency graphs, even within a single project. For example, the graph of dependencies to use at compile time is different from the graph of dependencies to use at runtime. In general, the graph of dependencies at runtime is a superset of the compile dependencies (there are exceptions to the rule, for example in case some dependencies are repackaged within the runtime binary).
Gradle resolves those dependency graphs independently. This means, in the Java ecosystem for example, that the resolution of the "compile classpath" doesn’t influence the resolution of the "runtime classpath". Similarly, test dependencies could end up bumping the version of production dependencies, causing some surprising results when executing tests.
These surprising behaviors can be mitigated by enabling dependency resolution consistency.
Enabling project-local dependency resolution consistency
For example, imagine that your Java library depends on the following libraries:
dependencies {
implementation("org.codehaus.groovy:groovy:3.0.1")
runtimeOnly("io.vertx:vertx-lang-groovy:3.9.4")
}dependencies {
implementation 'org.codehaus.groovy:groovy:3.0.1'
runtimeOnly 'io.vertx:vertx-lang-groovy:3.9.4'
}Then resolving the compileClasspath configuration would resolve the groovy library to version 3.0.1 as expected.
However, resolving the runtimeClasspath configuration would instead return groovy 3.0.2.
The reason for this is that a transitive dependency of vertx, which is a runtimeOnly dependency, brings a higher version of groovy.
In general, this isn’t a problem, but it also means that the version of the Groovy library that you are going to use at runtime is going to be different from the one that you used for compilation.
In order to avoid this situation, Gradle offers an API to explain that configurations should be resolved consistently.
Declaring resolution consistency between configurations
In the example above, we can declare that we want, at runtime, the same versions of the common dependencies as compile time, by declaring that the "runtime classpath" should be consistent with the "compile classpath":
configurations {
runtimeClasspath.get().shouldResolveConsistentlyWith(compileClasspath.get())
}configurations {
runtimeClasspath.shouldResolveConsistentlyWith(compileClasspath)
}As a result, both the runtimeClasspath and compileClasspath will resolve Groovy 3.0.1.
The relationship is directed, which means that if the runtimeClasspath configuration has to be resolved, Gradle will first resolve the compileClasspath and then "inject" the result of resolution as strict constraints into the runtimeClasspath.
If, for some reason, the versions of the two graphs cannot be "aligned", then resolution will fail with a call to action.
Declaring consistent resolution in the Java ecosystem
The runtimeClasspath and compileClasspath example above are common in the Java ecosystem.
However, it’s often not enough to declare consistency between those two configurations only.
For example, you most likely want the test runtime classpath to be consistent with the
runtime classpath.
To make this easier, Gradle provides a way to configure consistent resolution for the Java ecosystem using the java extension:
java {
consistentResolution {
useCompileClasspathVersions()
}
}java {
consistentResolution {
useCompileClasspathVersions()
}
}Please refer to the Java Plugin Extension docs for more configuration options.
PRODUCING AND CONSUMING VARIANTS OF LIBRARIES
Declaring Capabilities of a Library
Capabilities as first-level concept
Components provide a number of features which are often orthogonal to the software architecture used to provide those features. For example, a library may include several features in a single artifact. However, such a library would be published at single GAV (group, artifact and version) coordinates. This means that, at single coordinates, potentially co-exist different "features" of a component.
With Gradle it becomes interesting to explicitly declare what features a component provides. For this, Gradle provides the concept of capability.
A feature is often built by combining different capabilities.
In an ideal world, components shouldn’t declare dependencies on explicit GAVs, but rather express their requirements in terms of capabilities:
-
"give me a component which provides logging"
-
"give me a scripting engine"
-
"give me a scripting engine that supports Groovy"
By modeling capabilities, the dependency management engine can be smarter and tell you whenever you have incompatible capabilities in a dependency graph, or ask you to choose whenever different modules in a graph provide the same capability.
Declaring capabilities for external modules
It’s worth noting that Gradle supports declaring capabilities for components you build, but also for external components in case they didn’t.
For example, if your build file contains the following dependencies:
dependencies {
// This dependency will bring log4:log4j transitively
implementation("org.apache.zookeeper:zookeeper:3.4.9")
// We use log4j over slf4j
implementation("org.slf4j:log4j-over-slf4j:1.7.10")
}dependencies {
// This dependency will bring log4:log4j transitively
implementation 'org.apache.zookeeper:zookeeper:3.4.9'
// We use log4j over slf4j
implementation 'org.slf4j:log4j-over-slf4j:1.7.10'
}As is, it’s pretty hard to figure out that you will end up with two logging frameworks on the classpath.
In fact, zookeeper will bring in log4j, where what we want to use is log4j-over-slf4j.
We can preemptively detect the conflict by adding a rule which will declare that both logging frameworks provide the same capability:
dependencies {
// Activate the "LoggingCapability" rule
components.all(LoggingCapability::class.java)
}
class LoggingCapability : ComponentMetadataRule {
val loggingModules = setOf("log4j", "log4j-over-slf4j")
override
fun execute(context: ComponentMetadataContext) = context.details.run {
if (loggingModules.contains(id.name)) {
allVariants {
withCapabilities {
// Declare that both log4j and log4j-over-slf4j provide the same capability
addCapability("log4j", "log4j", id.version)
}
}
}
}
}dependencies {
// Activate the "LoggingCapability" rule
components.all(LoggingCapability)
}
@CompileStatic
class LoggingCapability implements ComponentMetadataRule {
final static Set<String> LOGGING_MODULES = ["log4j", "log4j-over-slf4j"] as Set<String>
void execute(ComponentMetadataContext context) {
context.details.with {
if (LOGGING_MODULES.contains(id.name)) {
allVariants {
it.withCapabilities {
// Declare that both log4j and log4j-over-slf4j provide the same capability
it.addCapability("log4j", "log4j", id.version)
}
}
}
}
}
}By adding this rule, we will make sure that Gradle will detect conflicts and properly fail:
> Could not resolve all files for configuration ':compileClasspath'.
> Could not resolve org.slf4j:log4j-over-slf4j:1.7.10.
Required by:
project :
> Module 'org.slf4j:log4j-over-slf4j' has been rejected:
Cannot select module with conflict on capability 'log4j:log4j:1.7.10' also provided by [log4j:log4j:1.2.16(compile)]
> Could not resolve log4j:log4j:1.2.16.
Required by:
project : > org.apache.zookeeper:zookeeper:3.4.9
> Module 'log4j:log4j' has been rejected:
Cannot select module with conflict on capability 'log4j:log4j:1.2.16' also provided by [org.slf4j:log4j-over-slf4j:1.7.10(compile)]
See the capabilities section of the documentation to figure out how to fix capability conflicts.
Declaring additional capabilities for a local component
All components have an implicit capability corresponding to the same GAV coordinates as the component. However, it is also possible to declare additional explicit capabilities for a component. This is convenient whenever a library published at different GAV coordinates is an alternate implementation of the same API:
configurations {
apiElements {
outgoing {
capability("com.acme:my-library:1.0")
capability("com.other:module:1.1")
}
}
runtimeElements {
outgoing {
capability("com.acme:my-library:1.0")
capability("com.other:module:1.1")
}
}
}configurations {
apiElements {
outgoing {
capability("com.acme:my-library:1.0")
capability("com.other:module:1.1")
}
}
runtimeElements {
outgoing {
capability("com.acme:my-library:1.0")
capability("com.other:module:1.1")
}
}
}Capabilities must be attached to outgoing configurations, which are consumable configurations of a component.
This example shows that we declare two capabilities:
-
com.acme:my-library:1.0, which corresponds to the implicit capability of the library -
com.other:module:1.1, which corresponds to another capability of this library
It’s worth noting we need to do 1. because as soon as you start declaring explicit capabilities, then all capabilities need to be declared, including the implicit one.
The second capability can be specific to this library, or it can correspond to a capability provided by an external component.
In that case, if com.other:module appears in the same dependency graph, the build will fail and consumers will have to choose what module to use.
Capabilities are published to Gradle Module Metadata. However, they have no equivalent in POM or Ivy metadata files. As a consequence, when publishing such a component, Gradle will warn you that this feature is only for Gradle consumers:
Maven publication 'maven' contains dependencies that cannot be represented in a published pom file. - Declares capability com.acme:my-library:1.0 - Declares capability com.other:module:1.1
Modeling library features
Gradle supports the concept of features: it’s often the case that a single library can be split up into multiple related yet distinct libraries, where each feature can be used alongside the main library.
Features allow a component to expose multiple related libraries, each of which can declare its own dependencies. These libraries are exposed as variants, similar to how the main library exposes variants for its API and runtime.
This allows for a number of different scenarios (list is non-exhaustive):
-
a (better) substitute for Maven optional dependencies
-
a main library is built with support for different mutually-exclusive implementations of runtime features; the user must choose one, and only one, implementation of each such feature
-
a main library is built with support for optional runtime features, each of which requires a different set of dependencies
-
a main library comes with supplementary features like test fixtures
-
a main library comes with a main artifact, and enabling an additional feature requires additional artifacts
Selection of features via capabilities
Declaring a dependency on a component is usually done by providing a set of coordinates (group, artifact, version also known as GAV coordinates). This allows the engine to determine the component we’re looking for, but such a component may provide different variants. A variant is typically chosen based on the usage. For example, we might choose a different variant for compiling against a component (in which case we need the API of the component) or when executing code (in which case we need the runtime of the component). All variants of a component provide a number of capabilities, which are denoted similarly using GAV coordinates.
A capability is denoted by GAV coordinates, but you must think of it as feature description:
-
"I provide an SLF4J binding"
-
"I provide runtime support for MySQL"
-
"I provide a Groovy runtime"
And in general, having two components that provide the same thing in the graph is a problem (they conflict).
This is an important concept because:
-
By default, a variant provides a capability corresponding to the GAV coordinates of its component
-
No two variants in a dependency graph can provide the same capability
-
Multiple variants of a single component may be selected as long as they provide different capabilities
A typical component will only provide variants with the default capability. A Java library, for example, exposes two variants (API and runtime) which provide the same capability. As a consequence, it is an error to have both the API and runtime of a single component in a dependency graph.
However, imagine that you need the runtime and the test fixtures runtime of a component. Then it is allowed as long as the runtime and test fixtures runtime variant of the library declare different capabilities.
If we do so, a consumer would then have to declare two dependencies:
-
one on the "main" feature, the library
-
one on the "test fixtures" feature, by requiring its capability
|
Note
|
While the resolution engine supports multi-variant components independently of the ecosystem, features are currently only available using the Java plugins. |
Registering features
Features can be declared by applying the java-library plugin.
The following code illustrates how to declare a feature named mongodbSupport:
sourceSets {
create("mongodbSupport") {
java {
srcDir("src/mongodb/java")
}
}
}
java {
registerFeature("mongodbSupport") {
usingSourceSet(sourceSets["mongodbSupport"])
}
}sourceSets {
mongodbSupport {
java {
srcDir 'src/mongodb/java'
}
}
}
java {
registerFeature('mongodbSupport') {
usingSourceSet(sourceSets.mongodbSupport)
}
}Gradle will automatically set up a number of things for you, in a very similar way to how the Java Library Plugin sets up configurations.
Dependency scope configurations are created in the same manner as for the main feature:
-
the configuration
mongodbSupportApi, used to declare API dependencies for this feature -
the configuration
mongodbSupportImplementation, used to declare implementation dependencies for this feature -
the configuration
mongodbSupportRuntimeOnly, used to declare runtime-only dependencies for this feature -
the configuration
mongodbSupportCompileOnly, used to declare compile-only dependencies for this feature -
the configuration
mongodbSupportCompileOnlyApi, used to declare compile-only API dependencies for this feature
Furthermore, consumable configurations are created in the same manner as for the main feature:
-
the configuration
mongodbSupportApiElements, used by consumers to fetch the artifacts and API dependencies of this feature -
the configuration
mongodbSupportRuntimeElements, used by consumers to fetch the artifacts and runtime dependencies of this feature
A feature should have a source set with the same name.
Gradle will create a Jar task to bundle the classes built from the feature source set, using a classifier corresponding to the kebab-case name of the feature.
|
Warning
|
Do not use the main source set when registering a feature. This behavior will be deprecated in a future version of Gradle. |
Most users will only need to care about the dependency scope configurations, to declare the specific dependencies of this feature:
dependencies {
"mongodbSupportImplementation"("org.mongodb:mongodb-driver-sync:3.9.1")
}dependencies {
mongodbSupportImplementation 'org.mongodb:mongodb-driver-sync:3.9.1'
}By convention, Gradle maps the feature name to a capability whose group and version are the same as the group and version of the main component, respectively, but whose name is the main component name followed by a - followed by the kebab-cased feature name.
For example, if the component’s group is org.gradle.demo, its name is provider, its version is 1.0, and the feature is named mongodbSupport, the feature’s variants will have the org.gradle.demo:provider-mongodb-support:1.0 capability.
If you choose the capability name yourself or add more capabilities to a variant, it is recommended to follow the same convention.
Publishing features
Depending on the metadata file format, publishing features may be lossy:
-
using Gradle Module Metadata, everything is published and consumers will get the full benefit of features
-
using POM metadata (Maven), features are published as optional dependencies and artifacts of features are published with different classifiers
-
using Ivy metadata, features are published as extra configurations, which are not extended by the
defaultconfiguration
Publishing features is supported using the maven-publish and ivy-publish plugins only.
The Java Library Plugin will take care of registering the additional variants for you, so there’s no additional configuration required, only the regular publications:
plugins {
`java-library`
`maven-publish`
}
// ...
publishing {
publications {
create("myLibrary", MavenPublication::class.java) {
from(components["java"])
}
}
}plugins {
id 'java-library'
id 'maven-publish'
}
// ...
publishing {
publications {
myLibrary(MavenPublication) {
from components.java
}
}
}Adding javadoc and sources JARs
Similar to the main Javadoc and sources JARs, you can configure the added feature so that it produces JARs for the Javadoc and sources.
java {
registerFeature("mongodbSupport") {
usingSourceSet(sourceSets["mongodbSupport"])
withJavadocJar()
withSourcesJar()
}
}java {
registerFeature('mongodbSupport') {
usingSourceSet(sourceSets.mongodbSupport)
withJavadocJar()
withSourcesJar()
}
}Dependencies on features
As mentioned earlier, features can be lossy when published. As a consequence, a consumer can depend on a feature only in these cases:
-
with a project dependency (in a multi-project build)
-
with Gradle Module Metadata available, that is the publisher MUST have published it
-
within the Ivy world, by declaring a dependency on the configuration matching the feature
A consumer can specify that it needs a specific feature of a producer by declaring required capabilities. For example, if a producer declares a "MySQL support" feature like this:
group = "org.gradle.demo"
sourceSets {
create("mysqlSupport") {
java {
srcDir("src/mysql/java")
}
}
}
java {
registerFeature("mysqlSupport") {
usingSourceSet(sourceSets["mysqlSupport"])
}
}
dependencies {
"mysqlSupportImplementation"("mysql:mysql-connector-java:8.0.14")
}group = 'org.gradle.demo'
sourceSets {
mysqlSupport {
java {
srcDir 'src/mysql/java'
}
}
}
java {
registerFeature('mysqlSupport') {
usingSourceSet(sourceSets.mysqlSupport)
}
}
dependencies {
mysqlSupportImplementation 'mysql:mysql-connector-java:8.0.14'
}Then the consumer can declare a dependency on the MySQL support feature by doing this:
dependencies {
// This project requires the main producer component
implementation(project(":producer"))
// But we also want to use its MySQL support
runtimeOnly(project(":producer")) {
capabilities {
requireCapability("org.gradle.demo:producer-mysql-support")
}
}
}dependencies {
// This project requires the main producer component
implementation(project(":producer"))
// But we also want to use its MySQL support
runtimeOnly(project(":producer")) {
capabilities {
requireCapability("org.gradle.demo:producer-mysql-support")
}
}
}This will automatically bring the mysql-connector-java dependency on the runtime classpath.
If there were more than one dependency, all of them would be brought, meaning that a feature can be used to group dependencies which contribute to a feature together.
Similarly, if an external library with features was published with Gradle Module Metadata, it is possible to depend on a feature provided by that library:
dependencies {
// This project requires the main producer component
implementation("org.gradle.demo:producer:1.0")
// But we also want to use its MongoDB support
runtimeOnly("org.gradle.demo:producer:1.0") {
capabilities {
requireCapability("org.gradle.demo:producer-mongodb-support")
}
}
}dependencies {
// This project requires the main producer component
implementation('org.gradle.demo:producer:1.0')
// But we also want to use its MongoDB support
runtimeOnly('org.gradle.demo:producer:1.0') {
capabilities {
requireCapability("org.gradle.demo:producer-mongodb-support")
}
}
}Handling mutually exclusive variants
The main advantage of using capabilities as a way to handle features is that you can precisely handle compatibility of variants. The rule is simple:
No two variants in a dependency graph can provide the same capability
We can leverage this to ensure that Gradle fails whenever the user mis-configures dependencies. Consider a situation where your library supports MySQL, Postgres and MongoDB, but that it’s only allowed to choose one of those at the same time. We can model this restriction by ensuring each feature also provides the same capability, thus making it impossible for these features to be used together in the same graph.
java {
registerFeature("mysqlSupport") {
usingSourceSet(sourceSets["mysqlSupport"])
capability("org.gradle.demo", "producer-db-support", "1.0")
capability("org.gradle.demo", "producer-mysql-support", "1.0")
}
registerFeature("postgresSupport") {
usingSourceSet(sourceSets["postgresSupport"])
capability("org.gradle.demo", "producer-db-support", "1.0")
capability("org.gradle.demo", "producer-postgres-support", "1.0")
}
registerFeature("mongoSupport") {
usingSourceSet(sourceSets["mongoSupport"])
capability("org.gradle.demo", "producer-db-support", "1.0")
capability("org.gradle.demo", "producer-mongo-support", "1.0")
}
}
dependencies {
"mysqlSupportImplementation"("mysql:mysql-connector-java:8.0.14")
"postgresSupportImplementation"("org.postgresql:postgresql:42.2.5")
"mongoSupportImplementation"("org.mongodb:mongodb-driver-sync:3.9.1")
}java {
registerFeature('mysqlSupport') {
usingSourceSet(sourceSets.mysqlSupport)
capability('org.gradle.demo', 'producer-db-support', '1.0')
capability('org.gradle.demo', 'producer-mysql-support', '1.0')
}
registerFeature('postgresSupport') {
usingSourceSet(sourceSets.postgresSupport)
capability('org.gradle.demo', 'producer-db-support', '1.0')
capability('org.gradle.demo', 'producer-postgres-support', '1.0')
}
registerFeature('mongoSupport') {
usingSourceSet(sourceSets.mongoSupport)
capability('org.gradle.demo', 'producer-db-support', '1.0')
capability('org.gradle.demo', 'producer-mongo-support', '1.0')
}
}
dependencies {
mysqlSupportImplementation 'mysql:mysql-connector-java:8.0.14'
postgresSupportImplementation 'org.postgresql:postgresql:42.2.5'
mongoSupportImplementation 'org.mongodb:mongodb-driver-sync:3.9.1'
}Here, the producer declares 3 features, one for each database runtime support:
-
mysql-supportprovides both thedb-supportandmysql-supportcapabilities -
postgres-supportprovides both thedb-supportandpostgres-supportcapabilities -
mongo-supportprovides both thedb-supportandmongo-supportcapabilities
Then if the consumer tries to get both the postgres-support and mysql-support features (this also works transitively):
dependencies {
// This project requires the main producer component
implementation(project(":producer"))
// Let's try to ask for both MySQL and Postgres support
runtimeOnly(project(":producer")) {
capabilities {
requireCapability("org.gradle.demo:producer-mysql-support")
}
}
runtimeOnly(project(":producer")) {
capabilities {
requireCapability("org.gradle.demo:producer-postgres-support")
}
}
}dependencies {
implementation(project(":producer"))
// Let's try to ask for both MySQL and Postgres support
runtimeOnly(project(":producer")) {
capabilities {
requireCapability("org.gradle.demo:producer-mysql-support")
}
}
runtimeOnly(project(":producer")) {
capabilities {
requireCapability("org.gradle.demo:producer-postgres-support")
}
}
}Dependency resolution would fail with the following error:
Cannot choose between org.gradle.demo:producer:1.0 variant mysqlSupportRuntimeElements and org.gradle.demo:producer:1.0 variant postgresSupportRuntimeElements because they provide the same capability: org.gradle.demo:producer-db-support:1.0
Understanding variant selection
In other dependency management engines, like Apache Maven™, dependencies and artifacts are bound to a component that is published at a particular GAV (group-artifact-version) coordinates. The set of dependencies for this component are always the same, regardless of which artifact may be used from the component.
If the component does have multiple artifacts, each one is identified by a cumbersome classifier.
There are no common semantics associated with classifiers and that makes it difficult to guarantee a globally consistent dependency graph.
This means that nothing prevents multiple artifacts for a single component (e.g., jdk7 and jdk8 classifiers) from appearing in a classpath and causing hard to diagnose problems.
Maven component model
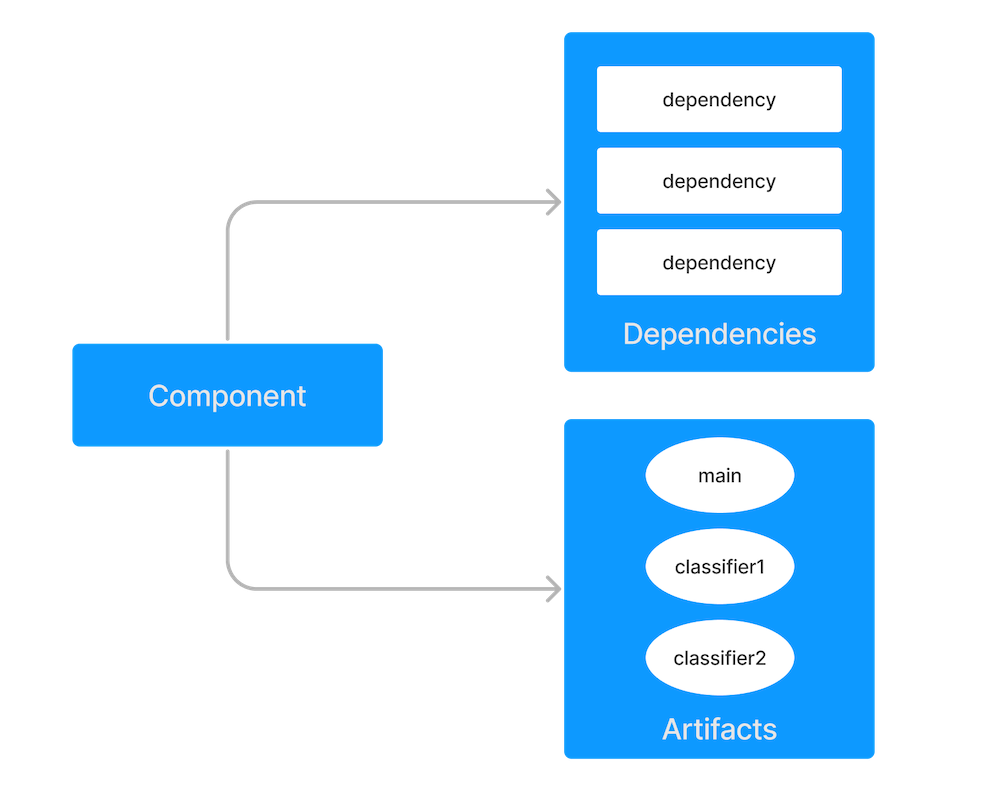
Gradle component model
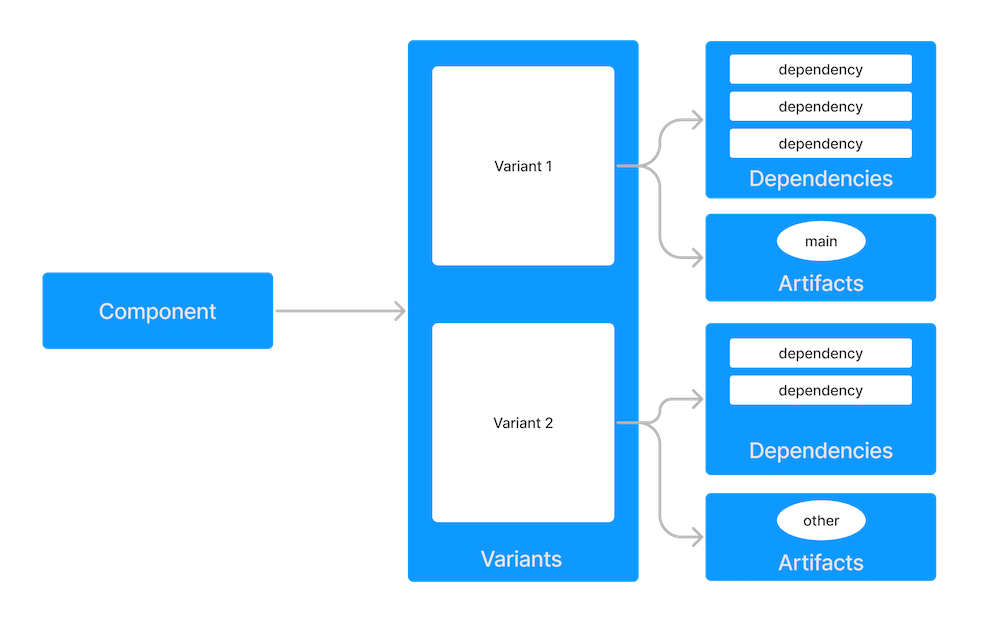
Gradle’s dependency management engine is variant aware.
In addition to a component, Gradle has the concept of variants of a component. Variants correspond to the different ways a component can be used, such as for Java compilation or native linking or documentation. Artifacts are attached to a variant and each variant can have a different set of dependencies.
How does Gradle know which variant to choose when there’s more than one? Variants are matched by use of attributes, which provide semantics to the variants and help the engine to produce a consistent resolution result.
Gradle differentiates between two kind of components:
-
local components (like projects), built from sources
-
external components, published to repositories
For local components, variants are mapped to consumable configurations. For external components, variants are defined by published Gradle Module Metadata or are derived from Ivy/Maven metadata.
Variants and configurations are sometimes used interchangeably in the documentation, DSL or API for historical reasons.
All components provide variants and those variants may be backed by a consumable configuration. Not all configurations are variants because they may be used for declaring or resolving dependencies.
Variant attributes
Attributes are type-safe key-value pairs that are defined by the consumer (for a resolvable configuration) and the producer (for each variant).
The consumer can define any number of attributes. Each attribute helps narrow the possible variants that can be selected. Attribute values do not need to be exact matches.
The variant can also define any number of attributes.
The attributes should describe how the variant is intended to be used.
For example, Gradle uses an attribute named org.gradle.usage to describe with how a component is used by the consumer (for compilation, for runtime execution, etc).
It is not unusual for a variant to have more attributes than the consumer needs to provide to select it.
Variant attribute matching
The variant name is mostly for debugging purposes and error messages. The name does not participate variant matching—only its attributes do.
There are no restrictions on the number of variants a component can define. Usually, a component has at least an implementation variant, but it could also expose test fixtures, documentation or source code. A component may also expose different variants for different consumers for the same usage. For example, when compiling, a component could have different headers for Linux vs Windows vs macOS.
Gradle performs variant aware selection by matching the attributes requested by the consumer against attributes defined by the producer. The selection algorithm is detailed in another section.
|
Note
|
There are two exceptions to this rule that bypass variant aware resolution:
|
A simple example
Let’s consider an example where a consumer is trying to use a library for compilation.
First, the consumer needs to explain how it’s going to use the result of dependency resolution. This is done by setting attributes on the resolvable configuration of the consumer.
The consumer wants to resolve a variant that matches: org.gradle.usage=java-api
Second, the producer needs to expose the different variants of the component.
The producer component exposes 2 variants:
-
its API (named
apiElements) with attributeorg.gradle.usage=java-api -
its runtime (named
runtimeElements) with attributeorg.gradle.usage=java-runtime
Finally, Gradle selects the appropriate variant by looking at the variant attributes:
-
the consumer wants a variant with attributes
org.gradle.usage=java-api -
the producer has a matching variant (
apiElements) -
the producer has a non-matching variant (
runtimeElements)
Gradle provides the artifacts and dependencies from the apiElements variant to the consumer.
A more complicated example
In the real world, consumers and producers have more than one attribute.
A Java Library project in Gradle will involve several different attributes:
-
org.gradle.usagethat describes how the variant is used -
org.gradle.dependency.bundlingthat describes how the variant handles dependencies (shadow jar vs fat jar vs regular jar) -
org.gradle.libraryelements, that describes the packaging of the variant (classes or jar) -
org.gradle.jvm.versionthat describes the minimal version of Java this variant targets -
org.gradle.jvm.environmentthat describes the type of JVM this variant targets
Let’s consider an example where the consumer wants to run tests with a library on Java 8 and the producer supports two different Java versions (Java 8 and Java 11).
First, the consumer needs to explain which version of the Java it needs.
The consumer wants to resolve a variant that:
-
can be used at runtime (has
org.gradle.usage=java-runtime) -
can be run on at least Java 8 (
org.gradle.jvm.version=8)
Second, the producer needs to expose the different variants of the component.
Like in the simple example, there is both a API (compilation) and runtime variant. These exist for both the Java 8 and Java 11 version of the component.
-
its API for Java 8 consumers (named
apiJava8Elements) with attributeorg.gradle.usage=java-apiandorg.gradle.jvm.version=8 -
its runtime for Java 8 consumers (named
runtime8Elements) with attributeorg.gradle.usage=java-runtimeandorg.gradle.jvm.version=8 -
its API for Java 11 consumers (named
apiJava11Elements) with attributeorg.gradle.usage=java-apiandorg.gradle.jvm.version=11 -
its runtime for Java 11 consumers (named
runtime11Elements) with attributeorg.gradle.usage=java-runtimeandorg.gradle.jvm.version=11
Finally, Gradle selects the best matching variant by looking at all of the attributes:
-
the consumer wants a variant with compatible attributes to
org.gradle.usage=java-runtimeandorg.gradle.jvm.version=8 -
the variants
runtime8Elementsandruntime11Elementshave `org.gradle.usage=java-runtime -
the variants
apiJava8ElementsandapiJava11Elementsare incompatible -
the variant
runtime8Elementsis compatible because it can run on Java 8 -
the variant
runtime11Elementsis incompatible because it cannot run on Java 8
Gradle provides the artifacts and dependencies from the runtime8Elements variant to the consumer.
What if the consumer sets org.gradle.jvm.version to 7?
Dependency resolution would fail with an error message explaining that there’s no suitable variant. Gradle recognizes that the consumer wants a Java 7 compatible library and the minimal version of Java available on the producer is 8.
If the consumer requested org.gradle.jvm.version=15, then Gradle knows either the Java 8 or Java 11 variants could work. Gradle select the highest compatible Java version (11).
Variant selection errors
When selecting the most compatible variant of a component, resolution may fail:
-
when more than one variant from the producer matches the consumer attributes (ambiguity error)
-
when no variants from the producer match the consumer attributes (incompatibility error)
Dealing with ambiguity errors
An ambiguous variant selection looks like the following:
> Could not resolve all files for configuration ':compileClasspath'.
> Could not resolve project :lib.
Required by:
project :ui
> Cannot choose between the following variants of project :lib:
- feature1ApiElements
- feature2ApiElements
All of them match the consumer attributes:
- Variant 'feature1ApiElements' capability org.test:test-capability:1.0:
- Unmatched attribute:
- Found org.gradle.category 'library' but wasn't required.
- Compatible attributes:
- Provides org.gradle.dependency.bundling 'external'
- Provides org.gradle.jvm.version '11'
- Required org.gradle.libraryelements 'classes' and found value 'jar'.
- Provides org.gradle.usage 'java-api'
- Variant 'feature2ApiElements' capability org.test:test-capability:1.0:
- Unmatched attribute:
- Found org.gradle.category 'library' but wasn't required.
- Compatible attributes:
- Provides org.gradle.dependency.bundling 'external'
- Provides org.gradle.jvm.version '11'
- Required org.gradle.libraryelements 'classes' and found value 'jar'.
- Provides org.gradle.usage 'java-api'
All compatible candidate variants are displayed with their attributes.
-
Unmatched attributes are presented first, as they might be the missing piece in selecting the proper variant.
-
Compatible attributes are presented second as they indicate what the consumer wanted and how these variants do match that request.
-
There will not be any incompatible attributes as the variant would not be considered a candidate.
In the example above, the fix does not lie in attribute matching but in capability matching, which are shown next to the variant name.
Because these two variants effectively provide the same attributes and capabilities, they cannot be disambiguated.
So in this case, the fix is most likely to provide different capabilities on the producer side (project :lib) and express a capability choice on the consumer side (project :ui).
Dealing with no matching variant errors
A no matching variant error looks like the following:
> No variants of project :lib match the consumer attributes:
- Configuration ':lib:compile':
- Incompatible attribute:
- Required artifactType 'dll' and found incompatible value 'jar'.
- Other compatible attribute:
- Provides usage 'api'
- Configuration ':lib:compile' variant debug:
- Incompatible attribute:
- Required artifactType 'dll' and found incompatible value 'jar'.
- Other compatible attributes:
- Found buildType 'debug' but wasn't required.
- Provides usage 'api'
- Configuration ':lib:compile' variant release:
- Incompatible attribute:
- Required artifactType 'dll' and found incompatible value 'jar'.
- Other compatible attributes:
- Found buildType 'release' but wasn't required.
- Provides usage 'api'
or like:
> No variants of project : match the consumer attributes:
- Configuration ':myElements' declares attribute 'color' with value 'blue':
- Incompatible because this component declares attribute 'artifactType' with value 'jar' and the consumer needed attribute 'artifactType' with value 'dll'
- Configuration ':myElements' variant secondary declares attribute 'color' with value 'blue':
- Incompatible because this component declares attribute 'artifactType' with value 'jar' and the consumer needed attribute 'artifactType' with value 'dll'
depending upon the stage in the variant selection algorithm where the error occurs.
All potentially compatible candidate variants are displayed with their attributes.
-
Incompatible attributes are presented first, as they usually are the key in understanding why a variant could not be selected.
-
Other attributes are presented second, this includes requested and compatible ones as well as all extra producer attributes that are not requested by the consumer.
Similar to the ambiguous variant error, the goal is to understand which variant should be selected. In some cases, there may not be any compatible variants from the producer (e.g., trying to run on Java 8 with a library built for Java 11).
Dealing with incompatible variant errors
An incompatible variant error looks like the following example, where a consumer wants to select a variant with color=green, but the only variant available has color=blue:
> Could not resolve all task dependencies for configuration ':resolveMe'.
> Could not resolve project :.
Required by:
project :
> Configuration 'mismatch' in project : does not match the consumer attributes
Configuration 'mismatch':
- Incompatible because this component declares attribute 'color' with value 'blue' and the consumer needed attribute 'color' with value 'green'
It occurs when Gradle cannot select a single variant of a dependency because an explicitly requested attribute value does not match (and is not compatible with) the value of that attribute on any of the variants of the dependency.
A sub-type of this failure occurs when Gradle successfully selects multiple variants of the same component, but the selected variants are incompatible with each other.
This looks like the following, where a consumer wants to select two different variants of a component, each supplying different capabilities, which is acceptable.
Unfortunately one variant has color=blue and the other has color=green:
> Could not resolve all task dependencies for configuration ':resolveMe'.
> Could not resolve project :.
Required by:
project :
> Multiple incompatible variants of org.example:nyvu:1.0 were selected:
- Variant org.example:nyvu:1.0 variant blueElementsCapability1 has attributes {color=blue}
- Variant org.example:nyvu:1.0 variant greenElementsCapability2 has attributes {color=green}
> Could not resolve project :.
Required by:
project :
> Multiple incompatible variants of org.example:pi2e5:1.0 were selected:
- Variant org.example:pi2e5:1.0 variant blueElementsCapability1 has attributes {color=blue}
- Variant org.example:pi2e5:1.0 variant greenElementsCapability2 has attributes {color=green}
Dealing with ambiguous transformation errors
ArtifactTransforms can be used to transform artifacts from one type to another, changing their attributes. Variant selection can use the attributes available as the result of an artifact transform as a candidate variant.
If a project registers multiple artifact transforms, needs to use an artifact transform to produce a matching variant for a consumer’s request, and multiple artifact transforms could each be used to accomplish this, then Gradle will fail with an ambiguous transformation error like the following:
> Could not resolve all task dependencies for configuration ':resolveMe'.
> Found multiple transforms that can produce a variant of project : with requested attributes:
- color 'red'
- shape 'round'
Found the following transforms:
- From 'configuration ':roundBlueLiquidElements'':
- With source attributes:
- color 'blue'
- shape 'round'
- state 'liquid'
- Candidate transform(s):
- Transform 'BrokenTransform' producing attributes:
- color 'red'
- shape 'round'
- state 'gas'
- Transform 'BrokenTransform' producing attributes:
- color 'red'
- shape 'round'
- state 'solid'
Visualizing variant information
Outgoing variants report
The report task outgoingVariants shows the list of variants available for selection by consumers of the project. It displays the capabilities, attributes and artifacts for each variant.
This task is similar to the dependencyInsight reporting task.
By default, outgoingVariants prints information about all variants.
It offers the optional parameter --variant <variantName> to select a single variant to display.
It also accepts the --all flag to include information about legacy and deprecated configurations, or --no-all to exclude this information.
Here is the output of the outgoingVariants task on a freshly generated java-library project:
> Task :outgoingVariants
--------------------------------------------------
Variant apiElements
--------------------------------------------------
API elements for the 'main' feature.
Capabilities
- new-java-library:lib:unspecified (default capability)
Attributes
- org.gradle.category = library
- org.gradle.dependency.bundling = external
- org.gradle.jvm.version = 11
- org.gradle.libraryelements = jar
- org.gradle.usage = java-api
Artifacts
- build/libs/lib.jar (artifactType = jar)
Secondary Variants (*)
--------------------------------------------------
Secondary Variant classes
--------------------------------------------------
Description = Directories containing compiled class files for main.
Attributes
- org.gradle.category = library
- org.gradle.dependency.bundling = external
- org.gradle.jvm.version = 11
- org.gradle.libraryelements = classes
- org.gradle.usage = java-api
Artifacts
- build/classes/java/main (artifactType = java-classes-directory)
--------------------------------------------------
Variant mainSourceElements (i)
--------------------------------------------------
Description = List of source directories contained in the Main SourceSet.
Capabilities
- new-java-library:lib:unspecified (default capability)
Attributes
- org.gradle.category = verification
- org.gradle.dependency.bundling = external
- org.gradle.verificationtype = main-sources
Artifacts
- src/main/java (artifactType = directory)
- src/main/resources (artifactType = directory)
--------------------------------------------------
Variant runtimeElements
--------------------------------------------------
Runtime elements for the 'main' feature.
Capabilities
- new-java-library:lib:unspecified (default capability)
Attributes
- org.gradle.category = library
- org.gradle.dependency.bundling = external
- org.gradle.jvm.version = 11
- org.gradle.libraryelements = jar
- org.gradle.usage = java-runtime
Artifacts
- build/libs/lib.jar (artifactType = jar)
Secondary Variants (*)
--------------------------------------------------
Secondary Variant classes
--------------------------------------------------
Description = Directories containing compiled class files for main.
Attributes
- org.gradle.category = library
- org.gradle.dependency.bundling = external
- org.gradle.jvm.version = 11
- org.gradle.libraryelements = classes
- org.gradle.usage = java-runtime
Artifacts
- build/classes/java/main (artifactType = java-classes-directory)
--------------------------------------------------
Secondary Variant resources
--------------------------------------------------
Description = Directories containing the project's assembled resource files for use at runtime.
Attributes
- org.gradle.category = library
- org.gradle.dependency.bundling = external
- org.gradle.jvm.version = 11
- org.gradle.libraryelements = resources
- org.gradle.usage = java-runtime
Artifacts
- build/resources/main (artifactType = java-resources-directory)
--------------------------------------------------
Variant testResultsElementsForTest (i)
--------------------------------------------------
Description = Directory containing binary results of running tests for the test Test Suite's test target.
Capabilities
- new-java-library:lib:unspecified (default capability)
Attributes
- org.gradle.category = verification
- org.gradle.testsuite.name = test
- org.gradle.testsuite.target.name = test
- org.gradle.testsuite.type = unit-test
- org.gradle.verificationtype = test-results
Artifacts
- build/test-results/test/binary (artifactType = directory)
(i) Configuration uses incubating attributes such as Category.VERIFICATION.
(*) Secondary variants are variants created via the Configuration#getOutgoing(): ConfigurationPublications API which also participate in selection, in addition to the configuration itself.
From this you can see the two main variants that are exposed by a java library, apiElements and runtimeElements.
Notice that the main difference is on the org.gradle.usage attribute, with values java-api and java-runtime.
As they indicate, this is where the difference is made between what needs to be on the compile classpath of consumers, versus what’s needed on the runtime classpath.
It also shows secondary variants, which are exclusive to Gradle projects and not published.
For example, the secondary variant classes from apiElements is what allows Gradle to skip the JAR creation when compiling against a java-library project.
Information about invalid consumable configurations
A project cannot have multiple configurations with the same attributes and capabilities. In that case, the project will fail to build.
In order to be able to visualize such issues, the outgoing variant reports handle those errors in a lenient fashion. This allows the report to display information about the issue.
Resolvable configurations report
Gradle also offers a complimentary report task called resolvableConfigurations that displays the resolvable configurations of a project, which are those which can have dependencies added and be resolved. The report will list their attributes and any configurations that they extend. It will also list a summary of any attributes which will be affected by Compatibility Rules or Disambiguation Rules during resolution.
By default, resolvableConfigurations prints information about all purely resolvable configurations.
These are configurations that are marked resolvable but not marked consumable.
Though some resolvable configurations are also marked consumable, these are legacy configurations that should not have dependencies added in build scripts.
This report offers the optional parameter --configuration <configurationName> to select a single configuration to display.
It also accepts the --all flag to include information about legacy and deprecated configurations, or --no-all to exclude this information.
Finally, it accepts the --recursive flag to list in the extended configurations section those configurations which are extended transitively rather than directly.
Alternatively, --no-recursive can be used to exclude this information.
Here is the output of the resolvableConfigurations task on a freshly generated java-library project:
> Task :resolvableConfigurations
--------------------------------------------------
Configuration annotationProcessor
--------------------------------------------------
Description = Annotation processors and their dependencies for source set 'main'.
Attributes
- org.gradle.category = library
- org.gradle.dependency.bundling = external
- org.gradle.jvm.environment = standard-jvm
- org.gradle.libraryelements = jar
- org.gradle.usage = java-runtime
--------------------------------------------------
Configuration compileClasspath
--------------------------------------------------
Description = Compile classpath for source set 'main'.
Attributes
- org.gradle.category = library
- org.gradle.dependency.bundling = external
- org.gradle.jvm.environment = standard-jvm
- org.gradle.jvm.version = 11
- org.gradle.libraryelements = classes
- org.gradle.usage = java-api
Extended Configurations
- compileOnly
- implementation
--------------------------------------------------
Configuration runtimeClasspath
--------------------------------------------------
Description = Runtime classpath of source set 'main'.
Attributes
- org.gradle.category = library
- org.gradle.dependency.bundling = external
- org.gradle.jvm.environment = standard-jvm
- org.gradle.jvm.version = 11
- org.gradle.libraryelements = jar
- org.gradle.usage = java-runtime
Extended Configurations
- implementation
- runtimeOnly
--------------------------------------------------
Configuration testAnnotationProcessor
--------------------------------------------------
Description = Annotation processors and their dependencies for source set 'test'.
Attributes
- org.gradle.category = library
- org.gradle.dependency.bundling = external
- org.gradle.jvm.environment = standard-jvm
- org.gradle.libraryelements = jar
- org.gradle.usage = java-runtime
--------------------------------------------------
Configuration testCompileClasspath
--------------------------------------------------
Description = Compile classpath for source set 'test'.
Attributes
- org.gradle.category = library
- org.gradle.dependency.bundling = external
- org.gradle.jvm.environment = standard-jvm
- org.gradle.jvm.version = 11
- org.gradle.libraryelements = classes
- org.gradle.usage = java-api
Extended Configurations
- testCompileOnly
- testImplementation
--------------------------------------------------
Configuration testRuntimeClasspath
--------------------------------------------------
Description = Runtime classpath of source set 'test'.
Attributes
- org.gradle.category = library
- org.gradle.dependency.bundling = external
- org.gradle.jvm.environment = standard-jvm
- org.gradle.jvm.version = 11
- org.gradle.libraryelements = jar
- org.gradle.usage = java-runtime
Extended Configurations
- testImplementation
- testRuntimeOnly
--------------------------------------------------
Compatibility Rules
--------------------------------------------------
Description = The following Attributes have compatibility rules defined.
- org.gradle.dependency.bundling
- org.gradle.jvm.environment
- org.gradle.jvm.version
- org.gradle.libraryelements
- org.gradle.plugin.api-version
- org.gradle.usage
--------------------------------------------------
Disambiguation Rules
--------------------------------------------------
Description = The following Attributes have disambiguation rules defined.
- org.gradle.category
- org.gradle.dependency.bundling
- org.gradle.jvm.environment
- org.gradle.jvm.version
- org.gradle.libraryelements
- org.gradle.plugin.api-version
- org.gradle.usage
From this you can see the two main configurations used to resolve dependencies, compileClasspath and runtimeClasspath, as well as their corresponding test configurations.
Mapping from Maven/Ivy to Gradle variants
Neither Maven nor Ivy have the concept of variants, which are only natively supported by Gradle Module Metadata. Gradle can still work with Maven and Ivy by using different variant derivation strategies.
Gradle Module Metadata is a metadata format for modules published on Maven, Ivy and other kinds of repositories.
It is similar to the pom.xml or ivy.xml metadata file, but this format contains details about variants.
See the Gradle Module Metadata specification for more information.
Mapping of Maven POM metadata to variants
Modules published on a Maven repository are automatically converted into variant-aware modules.
There is no way for Gradle to know which kind of component was published:
-
a BOM that represents a Gradle platform
-
a BOM used as a super-POM
-
a POM that is both a platform and a library
The default strategy used by Java projects in Gradle is to derive 8 different variants:
-
two "library" variants (attribute
org.gradle.category=library)-
the
compilevariant maps the<scope>compile</scope>dependencies. This variant is equivalent to theapiElementsvariant of the Java Library plugin. All dependencies of this scope are considered API dependencies. -
the
runtimevariant maps both the<scope>compile</scope>and<scope>runtime</scope>dependencies. This variant is equivalent to theruntimeElementsvariant of the Java Library plugin. All dependencies of those scopes are considered runtime dependencies.-
in both cases, the
<dependencyManagement>dependencies are not converted to constraints
-
-
-
a "sources" variant that represents the sources jar for the component
-
a "javadoc" variant that represents the javadoc jar for the component
-
four "platform" variants derived from the
<dependencyManagement>block (attributeorg.gradle.category=platform):-
the
platform-compilevariant maps the<scope>compile</scope>dependency management dependencies as dependency constraints. -
the
platform-runtimevariant maps both the<scope>compile</scope>and<scope>runtime</scope>dependency management dependencies as dependency constraints. -
the
enforced-platform-compileis similar toplatform-compilebut all the constraints are forced -
the
enforced-platform-runtimeis similar toplatform-runtimebut all the constraints are forced
-
You can understand more about the use of platform and enforced platforms variants by looking at the importing BOMs section of the manual.
By default, whenever you declare a dependency on a Maven module, Gradle is going to look for the library variants.
However, using the platform or enforcedPlatform keyword, Gradle is now looking for one of the "platform" variants, which allows you to import the constraints from the POM files, instead of the dependencies.
Mapping of Ivy files to variants
Gradle has no built-in derivation strategy implemented for Ivy files. Ivy is a flexible format that allows you to publish arbitrary files and can be heavily customized.
If you want to implement a derivation strategy for compile and runtime variants for Ivy, you can do so with component metadata rule.
The component metadata rules API allows you to access Ivy configurations and create variants based on them.
If you know that all the Ivy modules your are consuming have been published with Gradle without further customizations of the ivy.xml file, you can add the following rule to your build:
abstract class IvyVariantDerivationRule @Inject internal constructor(objectFactory: ObjectFactory) : ComponentMetadataRule {
private val jarLibraryElements: LibraryElements
private val libraryCategory: Category
private val javaRuntimeUsage: Usage
private val javaApiUsage: Usage
init {
jarLibraryElements = objectFactory.named(LibraryElements.JAR)
libraryCategory = objectFactory.named(Category.LIBRARY)
javaRuntimeUsage = objectFactory.named(Usage.JAVA_RUNTIME)
javaApiUsage = objectFactory.named(Usage.JAVA_API)
}
override fun execute(context: ComponentMetadataContext) {
// This filters out any non Ivy module
if(context.getDescriptor(IvyModuleDescriptor::class) == null) {
return
}
context.details.addVariant("runtimeElements", "default") {
attributes {
attribute(LibraryElements.LIBRARY_ELEMENTS_ATTRIBUTE, jarLibraryElements)
attribute(Category.CATEGORY_ATTRIBUTE, libraryCategory)
attribute(Usage.USAGE_ATTRIBUTE, javaRuntimeUsage)
}
}
context.details.addVariant("apiElements", "compile") {
attributes {
attribute(LibraryElements.LIBRARY_ELEMENTS_ATTRIBUTE, jarLibraryElements)
attribute(Category.CATEGORY_ATTRIBUTE, libraryCategory)
attribute(Usage.USAGE_ATTRIBUTE, javaApiUsage)
}
}
}
}
dependencies {
components { all<IvyVariantDerivationRule>() }
}abstract class IvyVariantDerivationRule implements ComponentMetadataRule {
final LibraryElements jarLibraryElements
final Category libraryCategory
final Usage javaRuntimeUsage
final Usage javaApiUsage
@Inject
IvyVariantDerivationRule(ObjectFactory objectFactory) {
jarLibraryElements = objectFactory.named(LibraryElements, LibraryElements.JAR)
libraryCategory = objectFactory.named(Category, Category.LIBRARY)
javaRuntimeUsage = objectFactory.named(Usage, Usage.JAVA_RUNTIME)
javaApiUsage = objectFactory.named(Usage, Usage.JAVA_API)
}
void execute(ComponentMetadataContext context) {
// This filters out any non Ivy module
if(context.getDescriptor(IvyModuleDescriptor) == null) {
return
}
context.details.addVariant("runtimeElements", "default") {
attributes {
attribute(LibraryElements.LIBRARY_ELEMENTS_ATTRIBUTE, jarLibraryElements)
attribute(Category.CATEGORY_ATTRIBUTE, libraryCategory)
attribute(Usage.USAGE_ATTRIBUTE, javaRuntimeUsage)
}
}
context.details.addVariant("apiElements", "compile") {
attributes {
attribute(LibraryElements.LIBRARY_ELEMENTS_ATTRIBUTE, jarLibraryElements)
attribute(Category.CATEGORY_ATTRIBUTE, libraryCategory)
attribute(Usage.USAGE_ATTRIBUTE, javaApiUsage)
}
}
}
}
dependencies {
components { all(IvyVariantDerivationRule) }
}The rule creates an apiElements variant based on the compile configuration and a runtimeElements variant based on the default configuration of each ivy module.
For each variant, it sets the corresponding Java ecosystem attributes.
Dependencies and artifacts of the variants are taken from the underlying configurations.
If not all consumed Ivy modules follow this pattern, the rule can be adjusted or only applied to a selected set of modules.
For all Ivy modules without variants, Gradle has a fallback selection method. Gradle does not perform variant aware resolution and instead selects either the default configuration or an explicitly named configuration.
Working with Variant Attributes
As explained in the section on variant aware matching, attributes give semantics to variants and are used by Gradle’s dependency management engine to select the best matching variant.
As a user of Gradle, attributes are often hidden as implementation details. But it might be useful to understand the standard attributes defined by Gradle and its core plugins.
As a plugin author, these attributes, and the way they are defined, can serve as a basis for building your own set of attributes in your eco system plugin.
Standard attributes defined by Gradle
Gradle defines a list of standard attributes used by Gradle’s core plugins.
Ecosystem-independent standard attributes
| Attribute name | Description | Values | compatibility and disambiguation rules |
|---|---|---|---|
Indicates main purpose of variant |
|
Following ecosystem semantics (e.g. |
|
Indicates the category of this software component |
|
Following ecosystem semantics (e.g. |
|
Indicates the contents of a |
|
Following ecosystem semantics(e.g. in the JVM world, |
|
Indicates the contents of a |
|
No default, no compatibility |
|
Indicates how dependencies of a variant are accessed. |
|
Following ecosystem semantics (e.g. in the JVM world, |
|
Indicates what kind of verification task produced this output. |
|
No default, no compatibility |
|
Warning
|
When the These variants are meant to contain only the results of running verification tasks, such as test results or code coverage reports. They are not publishable, and will produce an error if added to a component which is published. |
| Attribute name | Description | Values | compatibility and disambiguation rules |
|---|---|---|---|
|
Component level attribute, derived |
Based on a status scheme, with a default one existing based on the source repository. |
Based on the scheme in use |
JVM ecosystem specific attributes
In addition to the ecosystem independent attributes defined above, the JVM ecosystem adds the following attribute:
| Attribute name | Description | Values | compatibility and disambiguation rules |
|---|---|---|---|
Indicates the JVM version compatibility. |
Integer using the version after the |
Defaults to the JVM version used by Gradle, lower is compatible with higher, prefers highest compatible. |
|
Indicates that a variant is optimized for a certain JVM environment. |
Common values are |
The attribute is used to prefer one variant over another if multiple are available, but in general all values are compatible. The default is |
|
Indicates the name of the TestSuite that produced this output. |
Value is the name of the Suite. |
No default, no compatibility |
|
Indicates the name of the TestSuiteTarget that produced this output. |
Value is the name of the Target. |
No default, no compatibility |
|
Indicates the type of test suite (unit test, integration test, performance test, etc.) |
|
No default, no compatibility |
The JVM ecosystem also contains a number of compatibility and disambiguation rules over the different attributes.
The reader willing to know more can take a look at the code for org.gradle.api.internal.artifacts.JavaEcosystemSupport.
Native ecosystem specific attributes
In addition to the ecosystem independent attributes defined above, the native ecosystem adds the following attributes:
| Attribute name | Description | Values | compatibility and disambiguation rules |
|---|---|---|---|
Indicates if the binary was built with debugging symbols |
Boolean |
N/A |
|
Indicates if the binary was built with optimization flags |
Boolean |
N/A |
|
Indicates the target architecture of the binary |
|
None |
|
Indicates the target operating system of the binary |
|
None |
Gradle plugin ecosystem specific attributes
For Gradle plugin development, the following attribute is supported since Gradle 7.0. A Gradle plugin variant can specify compatibility with a Gradle API version through this attribute.
| Attribute name | Description | Values | compatibility and disambiguation rules |
|---|---|---|---|
Indicates the Gradle API version compatibility. |
Valid Gradle version strings. |
Defaults to the currently running Gradle, lower is compatible with higher, prefers highest compatible. |
Declaring custom attributes
If you are extending Gradle, e.g. by writing a plugin for another ecosystem, declaring custom attributes could be an option if you want to support variant-aware dependency management features in your plugin. However, you should be cautious if you also attempt to publish libraries. Semantics of new attributes are usually defined through a plugin, which can carry compatibility and disambiguation rules. Consequently, builds that consume libraries published for a certain ecosystem, also need to apply the corresponding plugin to interpret attributes correctly. If your plugin is intended for a larger audience, i.e. if it is openly available and libraries are published to public repositories, defining new attributes effectively extends the semantics of Gradle Module Metadata and comes with responsibilities. E.g., support for attributes that are already published should not be removed again, or should be handled in some kind of compatibility layer in future versions of the plugin.
Creating attributes in a build script or plugin
Attributes are typed. An attribute can be created via the Attribute<T>.of method:
// An attribute of type `String`
val myAttribute = Attribute.of("my.attribute.name", String::class.java)
// An attribute of type `Usage`
val myUsage = Attribute.of("my.usage.attribute", Usage::class.java)// An attribute of type `String`
def myAttribute = Attribute.of("my.attribute.name", String)
// An attribute of type `Usage`
def myUsage = Attribute.of("my.usage.attribute", Usage)Attribute types support most Java primitive classes; such as String and Integer; Or anything extending org.gradle.api.Named.
Attributes must be declared in the attribute schema found on the dependencies handler:
dependencies.attributesSchema {
// registers this attribute to the attributes schema
attribute(myAttribute)
attribute(myUsage)
}dependencies.attributesSchema {
// registers this attribute to the attributes schema
attribute(myAttribute)
attribute(myUsage)
}Then configurations can be configured to set values for attributes:
configurations {
create("myConfiguration") {
attributes {
attribute(myAttribute, "my-value")
}
}
}configurations {
myConfiguration {
attributes {
attribute(myAttribute, 'my-value')
}
}
}For attributes which type extends Named, the value of the attribute must be created via the object factory:
configurations {
"myConfiguration" {
attributes {
attribute(myUsage, project.objects.named(Usage::class.java, "my-value"))
}
}
}configurations {
myConfiguration {
attributes {
attribute(myUsage, project.objects.named(Usage, 'my-value'))
}
}
}Attribute matching
Attribute compatibility rules
Attributes let the engine select compatible variants. There are cases where a producer may not have exactly what the consumer requests but has a variant that can be used.
For example, if the consumer is asking for the API of a library and the producer doesn’t have an exactly matching variant, the runtime variant could be considered compatible. This is typical of libraries published to external repositories. In this case, we know that even if we don’t have an exact match (API), we can still compile against the runtime variant (it contains more than what we need to compile but it’s still ok to use).
Gradle provides attribute compatibility rules that can be defined for each attribute. The role of a compatibility rule is to explain which attribute values are compatible based on what the consumer asked for.
Attribute compatibility rules have to be registered via the attribute matching strategy that you can obtain from the attributes schema.
Attribute disambiguation rules
Since multiple values for an attribute can be compatible, Gradle needs to choose the "best" candidate between all compatible candidates. This is called "disambiguation".
This is done by implementing an attribute disambiguation rule.
Attribute disambiguation rules have to be registered via the attribute matching strategy that you can obtain from the attributes schema, which is a member of DependencyHandler.
Variant attribute matching algorithm
Finding the best variant can get complicated when there are many different variants available for a component and many different attributes. Gradle’s dependency resolution engine performs the following algorithm when finding the best result (or failing):
-
Each candidate’s attribute value is compared to the consumer’s requested attribute value. A candidate is considered compatible if its value matches the consumer’s value exactly, passes the attribute’s compatibility rule or is not provided.
-
If only one candidate is considered compatible, that candidate wins.
-
If several candidates are compatible, but one of the candidates matches all of the same attributes as the other candidates, Gradle chooses that candidate. This is the candidate with the "longest" match.
-
If several candidates are compatible and are compatible with an equal number of attributes, Gradle needs to disambiguate the candidates.
-
For each requested attribute, if a candidate does not have a value matching the disambiguation rule, it’s eliminated from consideration.
-
If the attribute has a known precedence, Gradle will stop as soon as there is a single candidate remaining.
-
If the attribute does not have a known precedence, Gradle must consider all attributes.
-
-
If several candidates still remain, Gradle will start to consider "extra" attributes to disambiguate between multiple candidates. Extra attributes are attributes that were not requested by the consumer but are present on at least one candidate. These extra attributes are considered in precedence order.
-
If the attribute has a known precedence, Gradle will stop as soon as there is a single candidate remaining.
-
After all extra attributes with precedence are considered, the remaining candidates can be chosen if they are compatible with all of the non-ordered disambiguation rules.
-
-
If several candidates still remain, Gradle will consider extra attributes again. A candidate can be chosen if it has the fewest number of extra attributes.
If at any step no candidates remain compatible, resolution fails. Additionally, Gradle outputs a list of all compatible candidates from step 1 to help with debugging variant matching failures.
Plugins and ecosystems can influence the selection algorithm by implementing compatibility rules, disambiguation rules and telling Gradle the precedence of attributes. Attributes with a higher precedence are used to eliminate compatible matches in order.
For example, in the Java ecosystem, the org.gradle.usage attribute has a higher precedence than org.gradle.libraryelements. This means that if two candidates were available with compatible values for both org.gradle.usage and org.gradle.libraryelements, Gradle will choose the candidate that passes the disambiguation rule for org.gradle.usage.
Sharing outputs between projects
A common pattern, in multi-project builds, is that one project consumes the artifacts of another project.
In general, the simplest consumption form in the Java ecosystem is that when A depends on B, then A would depend on the jar produced by project B.
As previously described in this chapter, this is modeled by A depending on a variant of B, where the variant is selected based on the needs of A.
For compilation, we need the API dependencies of B, provided by the apiElements variant.
For runtime, we need the runtime dependencies of B, provided by the runtimeElements variant.
However, what if you need a different artifact than the main one? Gradle provides, for example, built-in support for depending on the test fixtures of another project, but sometimes the artifact you need to depend on simply isn’t exposed as a variant.
In order to be safe to share between projects and allow maximum performance (parallelism), such artifacts must be exposed via outgoing configurations.
A frequent anti-pattern to declare cross-project dependencies is:
dependencies {
// this is unsafe!
implementation project(":other").tasks.someOtherJar
}This publication model is unsafe and can lead to non-reproducible and hard to parallelize builds. This section explains how to properly create cross-project boundaries by defining "exchanges" between projects by using variants.
There are two, complementary, options to share artifacts between projects. The simplified version is only suitable if what you need to share is a simple artifact that doesn’t depend on the consumer. The simple solution is also limited to cases where this artifact is not published to a repository. This also implies that the consumer does not publish a dependency to this artifact. In cases where the consumer resolves to different artifacts in different contexts (e.g., different target platforms) or that publication is required, you need to use the advanced version.
Simple sharing of artifacts between projects
First, a producer needs to declare a configuration which is going to be exposed to consumers. As explained in the configurations chapter, this corresponds to a consumable configuration.
Let’s imagine that the consumer requires instrumented classes from the producer, but that this artifact is not the main one. The producer can expose its instrumented classes by creating a configuration that will "carry" this artifact:
val instrumentedJars by configurations.creating {
isCanBeConsumed = true
isCanBeResolved = false
// If you want this configuration to share the same dependencies, otherwise omit this line
extendsFrom(configurations["implementation"], configurations["runtimeOnly"])
}configurations {
instrumentedJars {
canBeConsumed = true
canBeResolved = false
// If you want this configuration to share the same dependencies, otherwise omit this line
extendsFrom implementation, runtimeOnly
}
}This configuration is consumable, which means it’s an "exchange" meant for consumers. We’re now going to add artifacts to this configuration, that consumers would get when they consume it:
artifacts {
add("instrumentedJars", instrumentedJar)
}artifacts {
instrumentedJars(instrumentedJar)
}Here the "artifact" we’re attaching is a task that actually generates a Jar.
Doing so, Gradle can automatically track dependencies of this task and build them as needed.
This is possible because the Jar task extends AbstractArchiveTask.
If it’s not the case, you will need to explicitly declare how the artifact is generated.
artifacts {
add("instrumentedJars", someTask.outputFile) {
builtBy(someTask)
}
}artifacts {
instrumentedJars(someTask.outputFile) {
builtBy(someTask)
}
}Now the consumer needs to depend on this configuration in order to get the right artifact:
dependencies {
instrumentedClasspath(project(mapOf(
"path" to ":producer",
"configuration" to "instrumentedJars")))
}dependencies {
instrumentedClasspath(project(path: ":producer", configuration: 'instrumentedJars'))
}|
Warning
|
Declaring a dependency on an explicit target configuration is not recommended. If you plan to publish the component which has this dependency, this will likely lead to broken metadata. If you need to publish the component on a remote repository, follow the instructions of the variant-aware cross publication documentation. |
In this case, we’re adding the dependency to the instrumentedClasspath configuration, which is a consumer specific configuration. In Gradle terminology, this is called a resolvable configuration, which is defined this way:
val instrumentedClasspath by configurations.creating {
isCanBeConsumed = false
}configurations {
instrumentedClasspath {
canBeConsumed = false
}
}Variant-aware sharing of artifacts between projects
In the simple sharing solution, we defined a configuration on the producer side which serves as an exchange of artifacts between the producer and the consumer.
However, the consumer has to explicitly tell which configuration it depends on, which is something we want to avoid in variant aware resolution.
In fact, we also have explained that it is possible for a consumer to express requirements using attributes and that the producer should provide the appropriate outgoing variants using attributes too.
This allows for smarter selection, because using a single dependency declaration, without any explicit target configuration, the consumer may resolve different things.
The typical example is that using a single dependency declaration project(":myLib"), we would either choose the arm64 or i386 version of myLib depending on the architecture.
To do this, we will add attributes to both the consumer and the producer.
It is important to understand that once configurations have attributes, they participate in variant aware resolution, which means that they are candidates considered whenever any notation like project(":myLib") is used.
In other words, the attributes set on the producer must be consistent with the other variants produced on the same project.
They must not, in particular, introduce ambiguity for the existing selection.
In practice, it means that the attribute set used on the configuration you create are likely to be dependent on the ecosystem in use (Java, C++, …) because the relevant plugins for those ecosystems often use different attributes.
Let’s enhance our previous example which happens to be a Java Library project.
Java libraries expose a couple of variants to their consumers, apiElements and runtimeElements. Now, we’re adding a 3rd one, instrumentedJars.
Therefore, we need to understand what our new variant is used for in order to set the proper attributes on it.
Let’s look at the attributes we find on the runtimeElements configuration on the producer:
Attributes
- org.gradle.category = library
- org.gradle.dependency.bundling = external
- org.gradle.jvm.version = 11
- org.gradle.libraryelements = jar
- org.gradle.usage = java-runtime
What it tells us is that the Java Library plugin produces variants with 5 attributes:
-
org.gradle.categorytells us that this variant represents a library -
org.gradle.dependency.bundlingtells us that the dependencies of this variant are found as jars (they are not, for example, repackaged inside the jar) -
org.gradle.jvm.versiontells us that the minimum Java version this library supports is Java 11 -
org.gradle.libraryelementstells us this variant contains all elements found in a jar (classes and resources) -
org.gradle.usagesays that this variant is a Java runtime, therefore suitable for a Java compiler but also at runtime
As a consequence, if we want our instrumented classes to be used in place of this variant when executing tests, we need to attach similar attributes to our variant.
In fact, the attribute we care about is org.gradle.libraryelements which explains what the variant contains, so we can setup the variant this way:
val instrumentedJars by configurations.creating {
isCanBeConsumed = true
isCanBeResolved = false
attributes {
attribute(Category.CATEGORY_ATTRIBUTE, objects.named(Category.LIBRARY))
attribute(Usage.USAGE_ATTRIBUTE, objects.named(Usage.JAVA_RUNTIME))
attribute(Bundling.BUNDLING_ATTRIBUTE, objects.named(Bundling.EXTERNAL))
attribute(TargetJvmVersion.TARGET_JVM_VERSION_ATTRIBUTE, JavaVersion.current().majorVersion.toInt())
attribute(LibraryElements.LIBRARY_ELEMENTS_ATTRIBUTE, objects.named("instrumented-jar"))
}
}configurations {
instrumentedJars {
canBeConsumed = true
canBeResolved = false
attributes {
attribute(Category.CATEGORY_ATTRIBUTE, objects.named(Category, Category.LIBRARY))
attribute(Usage.USAGE_ATTRIBUTE, objects.named(Usage, Usage.JAVA_RUNTIME))
attribute(Bundling.BUNDLING_ATTRIBUTE, objects.named(Bundling, Bundling.EXTERNAL))
attribute(TargetJvmVersion.TARGET_JVM_VERSION_ATTRIBUTE, JavaVersion.current().majorVersion.toInteger())
attribute(LibraryElements.LIBRARY_ELEMENTS_ATTRIBUTE, objects.named(LibraryElements, 'instrumented-jar'))
}
}
}|
Note
|
Choosing the right attributes to set is the hardest thing in this process, because they carry the semantics of the variant. Therefore, before adding new attributes, you should always ask yourself if there isn’t an attribute which carries the semantics you need. If there isn’t, then you may add a new attribute. When adding new attributes, you must also be careful because it’s possible that it creates ambiguity during selection. Often adding an attribute means adding it to all existing variants. |
What we have done here is that we have added a new variant, which can be used at runtime, but contains instrumented classes instead of the normal classes. However, it now means that for runtime, the consumer has to choose between two variants:
-
runtimeElements, the regular variant offered by thejava-libraryplugin -
instrumentedJars, the variant we have created
In particular, say we want the instrumented classes on the test runtime classpath. We can now, on the consumer, declare our dependency as a regular project dependency:
dependencies {
testImplementation("junit:junit:4.13")
testImplementation(project(":producer"))
}dependencies {
testImplementation 'junit:junit:4.13'
testImplementation project(':producer')
}If we stop here, Gradle will still select the runtimeElements variant in place of our instrumentedJars variant.
This is because the testRuntimeClasspath configuration asks for a configuration which libraryelements attribute is jar, and our new instrumented-jars value is not compatible.
So we need to change the requested attributes so that we now look for instrumented jars:
configurations {
testRuntimeClasspath {
attributes {
attribute(LibraryElements.LIBRARY_ELEMENTS_ATTRIBUTE, objects.named(LibraryElements::class.java, "instrumented-jar"))
}
}
}configurations {
testRuntimeClasspath {
attributes {
attribute(LibraryElements.LIBRARY_ELEMENTS_ATTRIBUTE, objects.named(LibraryElements, 'instrumented-jar'))
}
}
}We can look at another report on the consumer side to view exactly what attributes of each dependency will be requested:
Attributes
- org.gradle.category = library
- org.gradle.dependency.bundling = external
- org.gradle.jvm.version = 11
- org.gradle.libraryelements = instrumented-jar
- org.gradle.usage = java-runtime
The resolvableConfigurations report is the complement of the outgoingVariants report.
By running both of these reports on the consumer and producer sides of a relationship, respectively, you can see exactly what attributes are involved in matching during dependency resolution and better predict the outcome when configurations are resolved.
Now, we’re saying that whenever we’re going to resolve the test runtime classpath, what we are looking for is instrumented classes. There is a problem though: in our dependencies list, we have JUnit, which, obviously, is not instrumented. So if we stop here, Gradle is going to fail, explaining that there’s no variant of JUnit which provide instrumented classes. This is because we didn’t explain that it’s fine to use the regular jar, if no instrumented version is available. To do this, we need to write a compatibility rule:
abstract class InstrumentedJarsRule: AttributeCompatibilityRule<LibraryElements> {
override fun execute(details: CompatibilityCheckDetails<LibraryElements>) = details.run {
if (consumerValue?.name == "instrumented-jar" && producerValue?.name == "jar") {
compatible()
}
}
}abstract class InstrumentedJarsRule implements AttributeCompatibilityRule<LibraryElements> {
@Override
void execute(CompatibilityCheckDetails<LibraryElements> details) {
if (details.consumerValue.name == 'instrumented-jar' && details.producerValue.name == 'jar') {
details.compatible()
}
}
}which we need to declare on the attributes schema:
dependencies {
attributesSchema {
attribute(LibraryElements.LIBRARY_ELEMENTS_ATTRIBUTE) {
compatibilityRules.add(InstrumentedJarsRule::class.java)
}
}
}dependencies {
attributesSchema {
attribute(LibraryElements.LIBRARY_ELEMENTS_ATTRIBUTE) {
compatibilityRules.add(InstrumentedJarsRule)
}
}
}And that’s it! Now we have:
-
added a variant which provides instrumented jars
-
explained that this variant is a substitute for the runtime
-
explained that the consumer needs this variant only for test runtime
Gradle therefore offers a powerful mechanism to select the right variants based on preferences and compatibility. More details can be found in the variant aware plugins section of the documentation.
|
Warning
|
By adding a value to an existing attribute like we have done, or by defining new attributes, we are extending the model. This means that all consumers have to know about this extended model. For local consumers, this is usually not a problem because all projects understand and share the same schema, but if you had to publish this new variant to an external repository, it means that external consumers would have to add the same rules to their builds for them to pass. This is in general not a problem for ecosystem plugins (e.g: the Kotlin plugin) where consumption is in any case not possible without applying the plugin, but it is a problem if you add custom values or attributes. So, avoid publishing custom variants if they are for internal use only. |
Targeting different platforms
It is common for a library to target different platforms. In the Java ecosystem, we often see different artifacts for the same library, distinguished by a different classifier. A typical example is Guava, which is published as this:
-
guava-jrefor JDK 8 and above -
guava-androidfor JDK 7
The problem with this approach is that there’s no semantics associated with the classifier.
The dependency resolution engine, in particular, cannot determine automatically which version to use based on the consumer requirements.
For example, it would be better to express that you have a dependency on Guava, and let the engine choose between jre and android based on what is compatible.
Gradle provides an improved model for this, which doesn’t have the weakness of classifiers: attributes.
In particular, in the Java ecosystem, Gradle provides a built-in attribute that library authors can use to express compatibility with the Java ecosystem: org.gradle.jvm.version.
This attribute expresses the minimal version that a consumer must have in order to work properly.
When you apply the java or java-library plugins, Gradle will automatically associate this attribute to the outgoing variants.
This means that all libraries published with Gradle automatically tell which target platform they use.
By default, the org.gradle.jvm.version is set to the value of the release property (or as fallback to the targetCompatibility value) of the main compilation task of the source set.
While this attribute is automatically set, Gradle will not, by default, let you build a project for different JVMs. If you need to do this, then you will need to create additional variants following the instructions on variant-aware matching.
|
Note
|
Future versions of Gradle will provide ways to automatically build for different Java platforms. |
Transforming dependency artifacts on resolution
As described in different kinds of configurations, there may be different variants for the same dependency.
For example, an external Maven dependency has a variant which should be used when compiling against the dependency (java-api), and a variant for running an application which uses the dependency (java-runtime).
A project dependency has even more variants, for example the classes of the project which are used for compilation are available as classes directories (org.gradle.usage=java-api, org.gradle.libraryelements=classes) or as JARs (org.gradle.usage=java-api, org.gradle.libraryelements=jar).
The variants of a dependency may differ in its transitive dependencies or in the artifact itself.
For example, the java-api and java-runtime variants of a Maven dependency only differ in the transitive dependencies and both use the same artifact — the JAR file.
For a project dependency, the java-api,classes and the java-api,jars variants have the same transitive dependencies and different artifacts — the classes directories and the JAR files respectively.
Gradle identifies a variant of a dependency uniquely by its set of attributes.
The java-api variant of a dependency is the variant identified by the org.gradle.usage attribute with value java-api.
When Gradle resolves a configuration, the attributes on the resolved configuration determine the requested attributes.
For all dependencies in the configuration, the variant with the requested attributes is selected when resolving the configuration.
For example, when the configuration requests org.gradle.usage=java-api, org.gradle.libraryelements=classes on a project dependency, then the classes directory is selected as the artifact.
When the dependency does not have a variant with the requested attributes, resolving the configuration fails.
Sometimes it is possible to transform the artifact of the dependency into the requested variant without changing the transitive dependencies.
For example, unzipping a JAR transforms the artifact of the java-api,jars variant into the java-api,classes variant.
Such a transformation is called Artifact Transform.
Gradle allows registering artifact transforms, and when the dependency does not have the requested variant, then Gradle will try to find a chain of artifact transforms for creating the variant.
Artifact transform selection and execution
As described above, when Gradle resolves a configuration and a dependency in the configuration does not have a variant with the requested attributes, Gradle tries to find a chain of artifact transforms to create the variant.
The process of finding a matching chain of artifact transforms is called artifact transform selection.
Each registered transform converts from a set of attributes to a set of attributes.
For example, the unzip transform can convert from org.gradle.usage=java-api, org.gradle.libraryelements=jars to org.gradle.usage=java-api, org.gradle.libraryelements=classes.
In order to find a chain, Gradle starts with the requested attributes and then considers all transforms which modify some of the requested attributes as possible paths leading there. Going backwards, Gradle tries to obtain a path to some existing variant using transforms.
For example, consider a minified attribute with two values: true and false.
The minified attribute represents a variant of a dependency with unnecessary class files removed.
There is an artifact transform registered, which can transform minified from false to true.
When minified=true is requested for a dependency, and there are only variants with minified=false, then Gradle selects the registered minify transform.
The minify transform is able to transform the artifact of the dependency with minified=false to the artifact with minified=true.
Of all the found transform chains, Gradle tries to select the best one:
-
If there is only one transform chain, it is selected.
-
If there are two transform chains, and one is a suffix of the other one, it is selected.
-
If there is a shortest transform chain, then it is selected.
-
In all other cases, the selection fails and an error is reported.
|
Important
|
Gradle does not try to select artifact transforms when there is already a variant of the dependency matching the requested attributes. |
|
Note
|
The |
After selecting the required artifact transforms, Gradle resolves the variants of the dependencies which are necessary for the initial transform in the chain. As soon as Gradle finishes resolving the artifacts for the variant, either by downloading an external dependency or executing a task producing the artifact, Gradle starts transforming the artifacts of the variant with the selected chain of artifact transforms. Gradle executes the transform chains in parallel when possible.
Picking up the minify example above, consider a configuration with two dependencies, the external guava dependency and a project dependency on the producer project.
The configuration has the attributes org.gradle.usage=java-runtime,org.gradle.libraryelements=jar,minified=true.
The external guava dependency has two variants:
-
org.gradle.usage=java-runtime,org.gradle.libraryelements=jar,minified=falseand -
org.gradle.usage=java-api,org.gradle.libraryelements=jar,minified=false.
Using the minify transform, Gradle can convert the variant org.gradle.usage=java-runtime,org.gradle.libraryelements=jar,minified=false of guava to org.gradle.usage=java-runtime,org.gradle.libraryelements=jar,minified=true, which are the requested attributes.
The project dependency also has variants:
-
org.gradle.usage=java-runtime,org.gradle.libraryelements=jar,minified=false, -
org.gradle.usage=java-runtime,org.gradle.libraryelements=classes,minified=false, -
org.gradle.usage=java-api,org.gradle.libraryelements=jar,minified=false, -
org.gradle.usage=java-api,org.gradle.libraryelements=classes,minified=false -
and a few more.
Again, using the minify transform, Gradle can convert the variant org.gradle.usage=java-runtime,org.gradle.libraryelements=jar,minified=false of the project producer to org.gradle.usage=java-runtime,org.gradle.libraryelements=jar,minified=true, which are the requested attributes.
When the configuration is resolved, Gradle needs to download the guava JAR and minify it.
Gradle also needs to execute the producer:jar task to generate the JAR artifact of the project and then minify it.
The downloading and the minification of the guava.jar happens in parallel to the execution of the producer:jar task and the minification of the resulting JAR.
Here is how to setup the minified attribute so that the above works.
You need to register the new attribute in the schema, add it to all JAR artifacts and request it on all resolvable configurations.
val artifactType = Attribute.of("artifactType", String::class.java)
val minified = Attribute.of("minified", Boolean::class.javaObjectType)
dependencies {
attributesSchema {
attribute(minified) // (1)
}
artifactTypes.getByName("jar") {
attributes.attribute(minified, false) // (2)
}
}
configurations.all {
afterEvaluate {
if (isCanBeResolved) {
attributes.attribute(minified, true) // (3)
}
}
}
dependencies {
registerTransform(Minify::class) {
from.attribute(minified, false).attribute(artifactType, "jar")
to.attribute(minified, true).attribute(artifactType, "jar")
}
}
dependencies { // (4)
implementation("com.google.guava:guava:27.1-jre")
implementation(project(":producer"))
}
tasks.register<Copy>("resolveRuntimeClasspath") { // (5)
from(configurations.runtimeClasspath)
into(layout.buildDirectory.dir("runtimeClasspath"))
}def artifactType = Attribute.of('artifactType', String)
def minified = Attribute.of('minified', Boolean)
dependencies {
attributesSchema {
attribute(minified) // (1)
}
artifactTypes.getByName("jar") {
attributes.attribute(minified, false) // (2)
}
}
configurations.all {
afterEvaluate {
if (canBeResolved) {
attributes.attribute(minified, true) // (3)
}
}
}
dependencies {
registerTransform(Minify) {
from.attribute(minified, false).attribute(artifactType, "jar")
to.attribute(minified, true).attribute(artifactType, "jar")
}
}
dependencies { // (4)
implementation('com.google.guava:guava:27.1-jre')
implementation(project(':producer'))
}
tasks.register("resolveRuntimeClasspath", Copy) {// (5)
from(configurations.runtimeClasspath)
into(layout.buildDirectory.dir("runtimeClasspath"))
}-
Add the attribute to the schema
-
All JAR files are not minified
-
Request
minified=trueon all resolvable configurations -
Add the dependencies which will be transformed
-
Add task that requires the transformed artifacts
You can now see what happens when we run the resolveRuntimeClasspath task which resolves the runtimeClasspath configuration.
Observe that Gradle transforms the project dependency before the resolveRuntimeClasspath task starts.
Gradle transforms the binary dependencies when it executes the resolveRuntimeClasspath task.
> gradle resolveRuntimeClasspath > Task :producer:compileJava > Task :producer:processResources NO-SOURCE > Task :producer:classes > Task :producer:jar > Transform producer.jar (project :producer) with Minify Nothing to minify - using producer.jar unchanged > Task :resolveRuntimeClasspath Minifying guava-27.1-jre.jar Nothing to minify - using listenablefuture-9999.0-empty-to-avoid-conflict-with-guava.jar unchanged Nothing to minify - using jsr305-3.0.2.jar unchanged Nothing to minify - using checker-qual-2.5.2.jar unchanged Nothing to minify - using error_prone_annotations-2.2.0.jar unchanged Nothing to minify - using j2objc-annotations-1.1.jar unchanged Nothing to minify - using animal-sniffer-annotations-1.17.jar unchanged Nothing to minify - using failureaccess-1.0.1.jar unchanged BUILD SUCCESSFUL in 0s 3 actionable tasks: 3 executed
Implementing artifact transforms
Similar to task types, an artifact transform consists of an action and some parameters. The major difference to custom task types is that the action and the parameters are implemented as two separate classes.
The implementation of the artifact transform action is a class implementing TransformAction.
You need to implement the transform() method on the action, which converts an input artifact into zero, one or multiple of output artifacts.
Most artifact transforms will be one-to-one, so the transform method will transform the input artifact to exactly one output artifact.
The implementation of the artifact transform action needs to register each output artifact by calling TransformOutputs.dir() or TransformOutputs.file().
You can only supply two types of paths to the dir or file methods:
-
An absolute path to the input artifact or in the input artifact (for an input directory).
-
A relative path.
Gradle uses the absolute path as the location of the output artifact.
For example, if the input artifact is an exploded WAR, then the transform action can call TransformOutputs.file() for all jar files in the WEB-INF/lib directory.
The output of the transform would then be the library JARs of the web application.
For a relative path, the dir() or file() method returns a workspace to the transform action.
The implementation of the transform action needs to create the transformed artifact at the location of the provided workspace.
The output artifacts replace the input artifact in the transformed variant in the order they were registered.
For example, if the configuration consists of the artifacts lib1.jar, lib2.jar, lib3.jar, and the transform action registers a minified output artifact <artifact-name>-min.jar for the input artifact, then the transformed configuration consists of the artifacts lib1-min.jar, lib2-min.jar and lib3-min.jar.
Here is the implementation of an Unzip transform which transforms a JAR file into a classes directory by unzipping it.
The Unzip transform does not require any parameters.
Note how the implementation uses @InputArtifact to inject the artifact to transform into the action.
It requests a directory for the unzipped classes by using TransformOutputs.dir() and then unzips the JAR file into this directory.
abstract class Unzip : TransformAction<TransformParameters.None> { // (1)
@get:InputArtifact // (2)
abstract val inputArtifact: Provider<FileSystemLocation>
override
fun transform(outputs: TransformOutputs) {
val input = inputArtifact.get().asFile
val unzipDir = outputs.dir(input.name) // (3)
unzipTo(input, unzipDir) // (4)
}
private fun unzipTo(zipFile: File, unzipDir: File) {
// implementation...
}
}abstract class Unzip implements TransformAction<TransformParameters.None> { // (1)
@InputArtifact // (2)
abstract Provider<FileSystemLocation> getInputArtifact()
@Override
void transform(TransformOutputs outputs) {
def input = inputArtifact.get().asFile
def unzipDir = outputs.dir(input.name) // (3)
unzipTo(input, unzipDir) // (4)
}
private static void unzipTo(File zipFile, File unzipDir) {
// implementation...
}
}-
Use
TransformParameters.Noneif the transform does not use parameters -
Inject the input artifact
-
Request an output location for the unzipped files
-
Do the actual work of the transform
An artifact transform may require parameters, like a String determining some filter, or some file collection which is used for supporting the transformation of the input artifact.
In order to pass those parameters to the transform action, you need to define a new type with the desired parameters.
The type needs to implement the marker interface TransformParameters.
The parameters must be represented using managed properties and the parameters type must be a managed type.
You can use an interface or abstract class declaring the getters and Gradle will generate the implementation.
All getters need to have proper input annotations, see incremental build annotations table.
You can find out more about implementing artifact transform parameters in Developing Custom Gradle Types.
Here is the implementation of a Minify transform that makes JARs smaller by only keeping certain classes in them.
The Minify transform requires the classes to keep as parameters.
Observe how you can obtain the parameters by TransformAction.getParameters() in the transform() method.
The implementation of the transform() method requests a location for the minified JAR by using TransformOutputs.file() and then creates the minified JAR at this location.
abstract class Minify : TransformAction<Minify.Parameters> { // (1)
interface Parameters : TransformParameters { // (2)
@get:Input
var keepClassesByArtifact: Map<String, Set<String>>
}
@get:PathSensitive(PathSensitivity.NAME_ONLY)
@get:InputArtifact
abstract val inputArtifact: Provider<FileSystemLocation>
override
fun transform(outputs: TransformOutputs) {
val fileName = inputArtifact.get().asFile.name
for (entry in parameters.keepClassesByArtifact) { // (3)
if (fileName.startsWith(entry.key)) {
val nameWithoutExtension = fileName.substring(0, fileName.length - 4)
minify(inputArtifact.get().asFile, entry.value, outputs.file("${nameWithoutExtension}-min.jar"))
return
}
}
println("Nothing to minify - using ${fileName} unchanged")
outputs.file(inputArtifact) // (4)
}
private fun minify(artifact: File, keepClasses: Set<String>, jarFile: File) {
println("Minifying ${artifact.name}")
// Implementation ...
}
}abstract class Minify implements TransformAction<Parameters> { // (1)
interface Parameters extends TransformParameters { // (2)
@Input
Map<String, Set<String>> getKeepClassesByArtifact()
void setKeepClassesByArtifact(Map<String, Set<String>> keepClasses)
}
@PathSensitive(PathSensitivity.NAME_ONLY)
@InputArtifact
abstract Provider<FileSystemLocation> getInputArtifact()
@Override
void transform(TransformOutputs outputs) {
def fileName = inputArtifact.get().asFile.name
for (entry in parameters.keepClassesByArtifact) { // (3)
if (fileName.startsWith(entry.key)) {
def nameWithoutExtension = fileName.substring(0, fileName.length() - 4)
minify(inputArtifact.get().asFile, entry.value, outputs.file("${nameWithoutExtension}-min.jar"))
return
}
}
println "Nothing to minify - using ${fileName} unchanged"
outputs.file(inputArtifact) // (4)
}
private void minify(File artifact, Set<String> keepClasses, File jarFile) {
println "Minifying ${artifact.name}"
// Implementation ...
}
}-
Declare the parameter type
-
Interface for the transform parameters
-
Use the parameters
-
Use the unchanged input artifact when no minification is required
Remember that the input artifact is a dependency, which may have its own dependencies.
If your artifact transform needs access to those transitive dependencies, it can declare an abstract getter returning a FileCollection and annotate it with @InputArtifactDependencies.
When your transform runs, Gradle will inject the transitive dependencies into that FileCollection property by implementing the getter.
Note that using input artifact dependencies in a transform has performance implications, only inject them when you really need them.
Moreover, artifact transforms can make use of the build cache for their outputs.
To enable the build cache for an artifact transform, add the @CacheableTransform annotation on the action class.
For cacheable transforms, you must annotate its @InputArtifact property — and any property marked with @InputArtifactDependencies — with normalization annotations such as @PathSensitive.
The following example shows a more complicated transform. It moves some selected classes of a JAR to a different package, rewriting the byte code of the moved classes and all classes using the moved classes (class relocation). In order to determine the classes to relocate, it looks at the packages of the input artifact and the dependencies of the input artifact. It also does not relocate packages contained in JAR files in an external classpath.
@CacheableTransform // (1)
abstract class ClassRelocator : TransformAction<ClassRelocator.Parameters> {
interface Parameters : TransformParameters { // (2)
@get:CompileClasspath // (3)
val externalClasspath: ConfigurableFileCollection
@get:Input
val excludedPackage: Property<String>
}
@get:Classpath // (4)
@get:InputArtifact
abstract val primaryInput: Provider<FileSystemLocation>
@get:CompileClasspath
@get:InputArtifactDependencies // (5)
abstract val dependencies: FileCollection
override
fun transform(outputs: TransformOutputs) {
val primaryInputFile = primaryInput.get().asFile
if (parameters.externalClasspath.contains(primaryInputFile)) { // (6)
outputs.file(primaryInput)
} else {
val baseName = primaryInputFile.name.substring(0, primaryInputFile.name.length - 4)
relocateJar(outputs.file("$baseName-relocated.jar"))
}
}
private fun relocateJar(output: File) {
// implementation...
val relocatedPackages = (dependencies.flatMap { it.readPackages() } + primaryInput.get().asFile.readPackages()).toSet()
val nonRelocatedPackages = parameters.externalClasspath.flatMap { it.readPackages() }
val relocations = (relocatedPackages - nonRelocatedPackages).map { packageName ->
val toPackage = "relocated.$packageName"
println("$packageName -> $toPackage")
Relocation(packageName, toPackage)
}
JarRelocator(primaryInput.get().asFile, output, relocations).run()
}
}@CacheableTransform // (1)
abstract class ClassRelocator implements TransformAction<Parameters> {
interface Parameters extends TransformParameters { // (2)
@CompileClasspath // (3)
ConfigurableFileCollection getExternalClasspath()
@Input
Property<String> getExcludedPackage()
}
@Classpath // (4)
@InputArtifact
abstract Provider<FileSystemLocation> getPrimaryInput()
@CompileClasspath
@InputArtifactDependencies // (5)
abstract FileCollection getDependencies()
@Override
void transform(TransformOutputs outputs) {
def primaryInputFile = primaryInput.get().asFile
if (parameters.externalClasspath.contains(primaryInput)) { // (6)
outputs.file(primaryInput)
} else {
def baseName = primaryInputFile.name.substring(0, primaryInputFile.name.length - 4)
relocateJar(outputs.file("$baseName-relocated.jar"))
}
}
private relocateJar(File output) {
// implementation...
def relocatedPackages = (dependencies.collectMany { readPackages(it) } + readPackages(primaryInput.get().asFile)) as Set
def nonRelocatedPackages = parameters.externalClasspath.collectMany { readPackages(it) }
def relocations = (relocatedPackages - nonRelocatedPackages).collect { packageName ->
def toPackage = "relocated.$packageName"
println("$packageName -> $toPackage")
new Relocation(packageName, toPackage)
}
new JarRelocator(primaryInput.get().asFile, output, relocations).run()
}
}-
Declare the transform cacheable
-
Interface for the transform parameters
-
Declare input type for each parameter
-
Declare a normalization for the input artifact
-
Inject the input artifact dependencies
-
Use the parameters
Registering artifact transforms
You need to register the artifact transform actions, providing parameters if necessary, so that they can be selected when resolving dependencies.
In order to register an artifact transform, you must use registerTransform() within the dependencies {} block.
There are a few points to consider when using registerTransform():
-
The
fromandtoattributes are required. -
The transform action itself can have configuration options. You can configure them with the
parameters {}block. -
You must register the transform on the project that has the configuration that will be resolved.
-
You can supply any type implementing TransformAction to the
registerTransform()method.
For example, imagine you want to unpack some dependencies and put the unpacked directories and files on the classpath.
You can do so by registering an artifact transform action of type Unzip, as shown here:
val artifactType = Attribute.of("artifactType", String::class.java)
dependencies {
registerTransform(Unzip::class) {
from.attribute(artifactType, "jar")
to.attribute(artifactType, "java-classes-directory")
}
}def artifactType = Attribute.of('artifactType', String)
dependencies {
registerTransform(Unzip) {
from.attribute(artifactType, 'jar')
to.attribute(artifactType, 'java-classes-directory')
}
}Another example is that you want to minify JARs by only keeping some class files from them.
Note the use of the parameters {} block to provide the classes to keep in the minified JARs to the Minify transform.
val artifactType = Attribute.of("artifactType", String::class.java)
val minified = Attribute.of("minified", Boolean::class.javaObjectType)
val keepPatterns = mapOf(
"guava" to setOf(
"com.google.common.base.Optional",
"com.google.common.base.AbstractIterator"
)
)
dependencies {
registerTransform(Minify::class) {
from.attribute(minified, false).attribute(artifactType, "jar")
to.attribute(minified, true).attribute(artifactType, "jar")
parameters {
keepClassesByArtifact = keepPatterns
}
}
}def artifactType = Attribute.of('artifactType', String)
def minified = Attribute.of('minified', Boolean)
def keepPatterns = [
"guava": [
"com.google.common.base.Optional",
"com.google.common.base.AbstractIterator"
] as Set
]
dependencies {
registerTransform(Minify) {
from.attribute(minified, false).attribute(artifactType, "jar")
to.attribute(minified, true).attribute(artifactType, "jar")
parameters {
keepClassesByArtifact = keepPatterns
}
}
}Implementing incremental artifact transforms
Similar to incremental tasks, artifact transforms can avoid work by only processing changed files from the last execution. This is done by using the InputChanges interface. For artifact transforms, only the input artifact is an incremental input, and therefore the transform can only query for changes there. In order to use InputChanges in the transform action, inject it into the action. For more information on how to use InputChanges, see the corresponding documentation for incremental tasks.
Here is an example of an incremental transform that counts the lines of code in Java source files:
abstract class CountLoc : TransformAction<TransformParameters.None> {
@get:Inject // (1)
abstract val inputChanges: InputChanges
@get:PathSensitive(PathSensitivity.RELATIVE)
@get:InputArtifact
abstract val input: Provider<FileSystemLocation>
override
fun transform(outputs: TransformOutputs) {
val outputDir = outputs.dir("${input.get().asFile.name}.loc")
println("Running transform on ${input.get().asFile.name}, incremental: ${inputChanges.isIncremental}")
inputChanges.getFileChanges(input).forEach { change -> // (2)
val changedFile = change.file
if (change.fileType != FileType.FILE) {
return@forEach
}
val outputLocation = outputDir.resolve("${change.normalizedPath}.loc")
when (change.changeType) {
ChangeType.ADDED, ChangeType.MODIFIED -> {
println("Processing file ${changedFile.name}")
outputLocation.parentFile.mkdirs()
outputLocation.writeText(changedFile.readLines().size.toString())
}
ChangeType.REMOVED -> {
println("Removing leftover output file ${outputLocation.name}")
outputLocation.delete()
}
}
}
}
}abstract class CountLoc implements TransformAction<TransformParameters.None> {
@Inject // (1)
abstract InputChanges getInputChanges()
@PathSensitive(PathSensitivity.RELATIVE)
@InputArtifact
abstract Provider<FileSystemLocation> getInput()
@Override
void transform(TransformOutputs outputs) {
def outputDir = outputs.dir("${input.get().asFile.name}.loc")
println("Running transform on ${input.get().asFile.name}, incremental: ${inputChanges.incremental}")
inputChanges.getFileChanges(input).forEach { change -> // (2)
def changedFile = change.file
if (change.fileType != FileType.FILE) {
return
}
def outputLocation = new File(outputDir, "${change.normalizedPath}.loc")
switch (change.changeType) {
case ADDED:
case MODIFIED:
println("Processing file ${changedFile.name}")
outputLocation.parentFile.mkdirs()
outputLocation.text = changedFile.readLines().size()
case REMOVED:
println("Removing leftover output file ${outputLocation.name}")
outputLocation.delete()
}
}
}
}-
Inject
InputChanges -
Query for changes in the input artifact
PUBLISHING LIBRARIES
Publishing a project as module
The vast majority of software projects build something that aims to be consumed in some way. It could be a library that other software projects use or it could be an application for end users. Publishing is the process by which the thing being built is made available to consumers.
In Gradle, that process looks like this:
Each of the these steps is dependent on the type of repository to which you want to publish artifacts. The two most common types are Maven-compatible and Ivy-compatible repositories, or Maven and Ivy repositories for short.
As of Gradle 6.0, the Gradle Module Metadata will always be published alongside the Ivy XML or Maven POM metadata file.
Gradle makes it easy to publish to these types of repository by providing some prepackaged infrastructure in the form of the Maven Publish Plugin and the Ivy Publish Plugin. These plugins allow you to configure what to publish and perform the publishing with a minimum of effort.

Let’s take a look at those steps in more detail:
- What to publish
-
Gradle needs to know what files and information to publish so that consumers can use your project. This is typically a combination of artifacts and metadata that Gradle calls a publication. Exactly what a publication contains depends on the type of repository it’s being published to.
For example, a publication destined for a Maven repository includes:
-
One or more artifacts — typically built by the project,
-
The Gradle Module Metadata file which will describe the variants of the published component,
-
The Maven POM file will identify the primary artifact and its dependencies. The primary artifact is typically the project’s production JAR and secondary artifacts might consist of "-sources" and "-javadoc" JARs.
In addition, Gradle will publish checksums for all of the above, and signatures when configured to do so. From Gradle 6.0 onwards, this includes
SHA256andSHA512checksums. -
- Where to publish
-
Gradle needs to know where to publish artifacts so that consumers can get hold of them. This is done via repositories, which store and make available all sorts of artifact. Gradle also needs to interact with the repository, which is why you must provide the type of the repository and its location.
- How to publish
-
Gradle automatically generates publishing tasks for all possible combinations of publication and repository, allowing you to publish any artifact to any repository. If you’re publishing to a Maven repository, the tasks are of type PublishToMavenRepository, while for Ivy repositories the tasks are of type PublishToIvyRepository.
What follows is a practical example that demonstrates the entire publishing process.
Setting up basic publishing
The first step in publishing, irrespective of your project type, is to apply the appropriate publishing plugin. As mentioned in the introduction, Gradle supports both Maven and Ivy repositories via the following plugins:
These provide the specific publication and repository classes needed to configure publishing for the corresponding repository type. Since Maven repositories are the most commonly used ones, they will be the basis for this example and for the other samples in the chapter. Don’t worry, we will explain how to adjust individual samples for Ivy repositories.
Let’s assume we’re working with a simple Java library project, so only the following plugins are applied:
plugins {
`java-library`
`maven-publish`
}plugins {
id 'java-library'
id 'maven-publish'
}Once the appropriate plugin has been applied, you can configure the publications and repositories. For this example, we want to publish the project’s production JAR file — the one produced by the jar task — to a custom Maven repository. We do that with the following publishing {} block, which is backed by PublishingExtension:
group = "org.example"
version = "1.0"
publishing {
publications {
create<MavenPublication>("myLibrary") {
from(components["java"])
}
}
repositories {
maven {
name = "myRepo"
url = uri(layout.buildDirectory.dir("repo"))
}
}
}group = 'org.example'
version = '1.0'
publishing {
publications {
myLibrary(MavenPublication) {
from components.java
}
}
repositories {
maven {
name = 'myRepo'
url = layout.buildDirectory.dir("repo")
}
}
}This defines a publication called "myLibrary" that can be published to a Maven repository by virtue of its type: MavenPublication.
This publication consists of just the production JAR artifact and its metadata, which combined are represented by the java component of the project.
|
Note
|
Components are the standard way of defining a publication. They are provided by plugins, usually of the language or platform variety. For example, the Java Plugin defines the components.java SoftwareComponent, while the War Plugin defines components.web.
|
The example also defines a file-based Maven repository with the name "myRepo". Such a file-based repository is convenient for a sample, but real-world builds typically work with HTTPS-based repository servers, such as Maven Central or an internal company server.
|
Note
|
You may define one, and only one, repository without a name. This translates to an implicit name of "Maven" for Maven repositories and "Ivy" for Ivy repositories. All other repository definitions must be given an explicit name. |
In combination with the project’s group and version, the publication and repository definitions provide everything that Gradle needs to publish the project’s production JAR. Gradle will then create a dedicated publishMyLibraryPublicationToMyRepoRepository task that does just that. Its name is based on the template publishPubNamePublicationToRepoNameRepository. See the appropriate publishing plugin’s documentation for more details on the nature of this task and any other tasks that may be available to you.
You can either execute the individual publishing tasks directly, or you can execute publish, which will run all the available publishing tasks. In this example, publish will just run publishMyLibraryPublicationToMavenRepository.
|
Note
|
Basic publishing to an Ivy repository is very similar: you simply use the Ivy Publish Plugin, replace There are differences between the two types of repository, particularly around the extra metadata that each support — for example, Maven repositories require a POM file while Ivy ones have their own metadata format — so see the plugin chapters for comprehensive information on how to configure both publications and repositories for whichever repository type you’re working with. |
That’s everything for the basic use case. However, many projects need more control over what gets published, so we look at several common scenarios in the following sections.
Suppressing validation errors
Gradle performs validation of generated module metadata.
In some cases, validation can fail, indicating that you most likely have an error to fix, but you may have done something intentionally.
If this is the case, Gradle will indicate the name of the validation error you can disable on the GenerateModuleMetadata tasks:
tasks.withType<GenerateModuleMetadata> {
// The value 'enforced-platform' is provided in the validation
// error message you got
suppressedValidationErrors.add("enforced-platform")
}tasks.withType(GenerateModuleMetadata).configureEach {
// The value 'enforced-platform' is provided in the validation
// error message you got
suppressedValidationErrors.add('enforced-platform')
}Understanding Gradle Module Metadata
Gradle Module Metadata is a format used to serialize the Gradle component model. It is similar to Apache Maven™'s POM file or Apache Ivy™ ivy.xml files. The goal of metadata files is to provide to consumers a reasonable model of what is published on a repository.
Gradle Module Metadata is a unique format aimed at improving dependency resolution by making it multi-platform and variant-aware.
In particular, Gradle Module Metadata supports:
Publication of Gradle Module Metadata will enable better dependency management for your consumers:
-
early discovery of problems by detecting incompatible modules
-
consistent selection of platform-specific dependencies
-
native dependency version alignment
-
automatically getting dependencies for specific features of your library
Gradle Module Metadata is automatically published when using the Maven Publish plugin or the Ivy Publish plugin.
The specification for Gradle Module Metadata can be found here.
Mapping with other formats
Gradle Module Metadata is automatically published on Maven or Ivy repositories. However, it doesn’t replace the pom.xml or ivy.xml files: it is published alongside those files. This is done to maximize compatibility with third-party build tools.
Gradle does its best to map Gradle-specific concepts to Maven or Ivy. When a build file uses features that can only be represented in Gradle Module Metadata, Gradle will warn you at publication time. The table below summarizes how some Gradle specific features are mapped to Maven and Ivy:
| Gradle | Maven | Ivy | Description |
|---|---|---|---|
|
Not published |
Gradle dependency constraints are transitive, while Maven’s dependency management block isn’t |
|
Publishes the requires version |
Published the requires version |
||
Not published |
Not published |
Component capabilities are unique to Gradle |
|
Variant artifacts are uploaded, dependencies are published as optional dependencies |
Variant artifacts are uploaded, dependencies are not published |
Feature variants are a good replacement for optional dependencies |
|
Artifacts are uploaded, dependencies are those described by the mapping |
Artifacts are uploaded, dependencies are ignored |
Custom component types are probably not consumable from Maven or Ivy in any case. They usually exist in the context of a custom ecosystem. |
Disabling metadata compatibility publication warnings
If you want to suppress warnings, you can use the following APIs to do so:
-
For Maven, see the
suppress*methods in MavenPublication -
For Ivy, see the
suppress*methods in IvyPublication
publications {
register<MavenPublication>("maven") {
from(components["java"])
suppressPomMetadataWarningsFor("runtimeElements")
}
}publications {
maven(MavenPublication) {
from components.java
suppressPomMetadataWarningsFor('runtimeElements')
}
}Interactions with other build tools
Because Gradle Module Metadata is not widely spread and because it aims at maximizing compatibility with other tools, Gradle does a couple of things:
-
Gradle Module Metadata is systematically published alongside the normal descriptor for a given repository (Maven or Ivy)
-
the
pom.xmlorivy.xmlfile will contain a marker comment which tells Gradle that Gradle Module Metadata exists for this module
The goal of the marker is not for other tools to parse module metadata: it’s for Gradle users only. It explains to Gradle that a better module metadata file exists and that it should use it instead. It doesn’t mean that consumption from Maven or Ivy would be broken either, only that it works in degraded mode.
|
Note
|
This must be seen as a performance optimization: instead of having to do 2 network requests, one to get Gradle Module Metadata, then one to get the POM/Ivy file in case of a miss, Gradle will first look at the file which is most likely to be present, then only perform a 2nd request if the module was actually published with Gradle Module Metadata. |
If you know that the modules you depend on are always published with Gradle Module Metadata, you can optimize the network calls by configuring the metadata sources for a repository:
repositories {
maven {
setUrl("http://repo.mycompany.com/repo")
metadataSources {
gradleMetadata()
}
}
}repositories {
maven {
url "http://repo.mycompany.com/repo"
metadataSources {
gradleMetadata()
}
}
}Gradle Module Metadata validation
Gradle Module Metadata is validated before being published.
The following rules are enforced:
-
Variant names must be unique,
-
Each variant must have at least one attribute,
-
Two variants cannot have the exact same attributes and capabilities,
-
If there are dependencies, at least one, across all variants, must carry version information.
These rules ensure the quality of the metadata produced, and help confirm that consumption will not be problematic.
Gradle Module Metadata reproducibility
The task generating the module metadata files is currently never marked UP-TO-DATE by Gradle due to the way it is implemented.
However, if neither build inputs nor build scripts changed, the task result is effectively up-to-date: it always produces the same output.
If users desire to have a unique module file per build invocation, it is possible to link an identifier in the produced metadata to the build that created it.
Users can choose to enable this unique identifier in their publication:
publishing {
publications {
create<MavenPublication>("myLibrary") {
from(components["java"])
withBuildIdentifier()
}
}
}publishing {
publications {
myLibrary(MavenPublication) {
from components.java
withBuildIdentifier()
}
}
}With the changes above, the generated Gradle Module Metadata file will always be different, forcing downstream tasks to consider it out-of-date.
Disabling Gradle Module Metadata publication
There are situations where you might want to disable publication of Gradle Module Metadata:
-
the repository you are uploading to rejects the metadata file (unknown format)
-
you are using Maven or Ivy specific concepts which are not properly mapped to Gradle Module Metadata
In this case, disabling the publication of Gradle Module Metadata is done simply by disabling the task which generates the metadata file:
tasks.withType<GenerateModuleMetadata> {
enabled = false
}tasks.withType(GenerateModuleMetadata) {
enabled = false
}Signing artifacts
The Signing Plugin can be used to sign all artifacts and metadata files that make up a publication, including Maven POM files and Ivy module descriptors. In order to use it:
-
Apply the Signing Plugin
-
Configure the signatory credentials — follow the link to see how
-
Specify the publications you want signed
Here’s an example that configures the plugin to sign the mavenJava publication:
signing {
sign(publishing.publications["mavenJava"])
}signing {
sign publishing.publications.mavenJava
}This will create a Sign task for each publication you specify and wire all publishPubNamePublicationToRepoNameRepository tasks to depend on it. Thus, publishing any publication will automatically create and publish the signatures for its artifacts and metadata, as you can see from this output:
Example: Sign and publish a project
gradle publish> gradle publish > Task :compileJava > Task :processResources > Task :classes > Task :jar > Task :javadoc > Task :javadocJar > Task :sourcesJar > Task :generateMetadataFileForMavenJavaPublication > Task :generatePomFileForMavenJavaPublication > Task :signMavenJavaPublication > Task :publishMavenJavaPublicationToMavenRepository > Task :publish BUILD SUCCESSFUL in 0s 10 actionable tasks: 10 executed
Customizing publishing
Modifying and adding variants to existing components for publishing
Gradle’s publication model is based on the notion of components, which are defined by plugins.
For example, the Java Library plugin defines a java component which corresponds to a library, but the Java Platform plugin defines another kind of component, named javaPlatform, which is effectively a different kind of software component (a platform).
Sometimes we want to add more variants to or modify existing variants of an existing component.
For example, if you added a variant of a Java library for a different platform, you may just want to declare this additional variant on the java component itself.
In general, declaring additional variants is often the best solution to publish additional artifacts.
To perform such additions or modifications, the AdhocComponentWithVariants interface declares two methods called addVariantsFromConfiguration and withVariantsFromConfiguration which accept two parameters:
-
the outgoing configuration that is used as a variant source
-
a customization action which allows you to filter which variants are going to be published
To utilise these methods, you must make sure that the SoftwareComponent you work with is itself an AdhocComponentWithVariants, which is the case for the components created by the Java plugins (Java, Java Library, Java Platform).
Adding a variant is then very simple:
val javaComponent = components.findByName("java") as AdhocComponentWithVariants
javaComponent.addVariantsFromConfiguration(outgoing) {
// dependencies for this variant are considered runtime dependencies
mapToMavenScope("runtime")
// and also optional dependencies, because we don't want them to leak
mapToOptional()
}AdhocComponentWithVariants javaComponent = (AdhocComponentWithVariants) project.components.findByName("java")
javaComponent.addVariantsFromConfiguration(outgoing) {
// dependencies for this variant are considered runtime dependencies
it.mapToMavenScope("runtime")
// and also optional dependencies, because we don't want them to leak
it.mapToOptional()
}In other cases, you might want to modify a variant that was added by one of the Java plugins already.
For example, if you activate publishing of Javadoc and sources, these become additional variants of the java component.
If you only want to publish one of them, e.g. only Javadoc but no sources, you can modify the sources variant to not being published:
java {
withJavadocJar()
withSourcesJar()
}
val javaComponent = components["java"] as AdhocComponentWithVariants
javaComponent.withVariantsFromConfiguration(configurations["sourcesElements"]) {
skip()
}
publishing {
publications {
create<MavenPublication>("mavenJava") {
from(components["java"])
}
}
}java {
withJavadocJar()
withSourcesJar()
}
components.java.withVariantsFromConfiguration(configurations.sourcesElements) {
skip()
}
publishing {
publications {
mavenJava(MavenPublication) {
from components.java
}
}
}Creating and publishing custom components
In the previous example, we have demonstrated how to extend or modify an existing component, like the components provided by the Java plugins. But Gradle also allows you to build a custom component (not a Java Library, not a Java Platform, not something supported natively by Gradle).
To create a custom component, you first need to create an empty adhoc component. At the moment, this is only possible via a plugin because you need to get a handle on the SoftwareComponentFactory :
class InstrumentedJarsPlugin @Inject constructor(
private val softwareComponentFactory: SoftwareComponentFactory) : Plugin<Project> {private final SoftwareComponentFactory softwareComponentFactory
@Inject
InstrumentedJarsPlugin(SoftwareComponentFactory softwareComponentFactory) {
this.softwareComponentFactory = softwareComponentFactory
}Declaring what a custom component publishes is still done via the AdhocComponentWithVariants API. For a custom component, the first step is to create custom outgoing variants, following the instructions in this chapter. At this stage, what you should have is variants which can be used in cross-project dependencies, but that we are now going to publish to external repositories.
// create an adhoc component
val adhocComponent = softwareComponentFactory.adhoc("myAdhocComponent")
// add it to the list of components that this project declares
components.add(adhocComponent)
// and register a variant for publication
adhocComponent.addVariantsFromConfiguration(outgoing) {
mapToMavenScope("runtime")
}// create an adhoc component
def adhocComponent = softwareComponentFactory.adhoc("myAdhocComponent")
// add it to the list of components that this project declares
project.components.add(adhocComponent)
// and register a variant for publication
adhocComponent.addVariantsFromConfiguration(outgoing) {
it.mapToMavenScope("runtime")
}First we use the factory to create a new adhoc component.
Then we add a variant through the addVariantsFromConfiguration method, which is described in more detail in the previous section.
In simple cases, there’s a one-to-one mapping between a Configuration and a variant, in which case you can publish all variants issued from a single Configuration because they are effectively the same thing.
However, there are cases where a Configuration is associated with additional configuration publications that we also call secondary variants.
Such configurations make sense in the cross-project publications use case, but not when publishing externally.
This is for example the case when between projects you share a directory of files, but there’s no way you can publish a directory directly on a Maven repository (only packaged things like jars or zips).
Look at the ConfigurationVariantDetails class for details about how to skip publication of a particular variant.
If addVariantsFromConfiguration has already been called for a configuration, further modification of the resulting variants can be performed using withVariantsFromConfiguration.
When publishing an adhoc component like this:
-
Gradle Module Metadata will exactly represent the published variants. In particular, all outgoing variants will inherit dependencies, artifacts and attributes of the published configuration.
-
Maven and Ivy metadata files will be generated, but you need to declare how the dependencies are mapped to Maven scopes via the ConfigurationVariantDetails class.
In practice, it means that components created this way can be consumed by Gradle the same way as if they were "local components".
Adding custom artifacts to a publication
Instead of thinking in terms of artifacts, you should embrace the variant aware model of Gradle. It is expected that a single module may need multiple artifacts. However this rarely stops there, if the additional artifacts represent an optional feature, they might also have different dependencies and more.
Gradle, via Gradle Module Metadata, supports the publication of additional variants which make those artifacts known to the dependency resolution engine. Please refer to the variant-aware sharing section of the documentation to see how to declare such variants and check out how to publish custom components.
If you attach extra artifacts to a publication directly, they are published "out of context". That means, they are not referenced in the metadata at all and can then only be addressed directly through a classifier on a dependency. In contrast to Gradle Module Metadata, Maven pom metadata will not contain information on additional artifacts regardless of whether they are added through a variant or directly, as variants cannot be represented in the pom format.
The following section describes how you publish artifacts directly if you are sure that metadata, for example Gradle or POM metadata, is irrelevant for your use case. For example, if your project doesn’t need to be consumed by other projects and the only thing required as result of the publishing are the artifacts themselves.
In general, there are two options:
-
Create a publication only with artifacts
-
Add artifacts to a publication based on a component with metadata (not recommended, instead adjust a component or use a adhoc component publication which will both also produce metadata fitting your artifacts)
To create a publication based on artifacts, start by defining a custom artifact and attaching it to a Gradle configuration of your choice.
The following sample defines an RPM artifact that is produced by an rpm task (not shown) and attaches that artifact to the conf configuration:
configurations {
create("conf")
}
val rpmFile = layout.buildDirectory.file("rpms/my-package.rpm")
val rpmArtifact = artifacts.add("conf", rpmFile.get().asFile) {
type = "rpm"
builtBy("rpm")
}configurations {
conf
}
def rpmFile = layout.buildDirectory.file('rpms/my-package.rpm')
def rpmArtifact = artifacts.add('conf', rpmFile.get().asFile) {
type 'rpm'
builtBy 'rpm'
}The artifacts.add() method — from ArtifactHandler — returns an artifact object of type PublishArtifact that can then be used in defining a publication, as shown in the following sample:
publishing {
publications {
create<MavenPublication>("maven") {
artifact(rpmArtifact)
}
}
}publishing {
publications {
maven(MavenPublication) {
artifact rpmArtifact
}
}
}-
The
artifact()method accepts publish artifacts as argument — likerpmArtifactin the sample — as well as any type of argument accepted by Project.file(java.lang.Object), such as aFileinstance, a string file path or a archive task. -
Publishing plugins support different artifact configuration properties, so always check the plugin documentation for more details. The
classifierandextensionproperties are supported by both the Maven Publish Plugin and the Ivy Publish Plugin. -
Custom artifacts need to be distinct within a publication, typically via a unique combination of
classifierandextension. See the documentation for the plugin you’re using for the precise requirements. -
If you use
artifact()with an archive task, Gradle automatically populates the artifact’s metadata with theclassifierandextensionproperties from that task.
Now you can publish the RPM.
If you really want to add an artifact to a publication based on a component, instead of adjusting the component itself, you can combine the from components.someComponent and artifact someArtifact notations.
Restricting publications to specific repositories
When you have defined multiple publications or repositories, you often want to control which publications are published to which repositories. For instance, consider the following sample that defines two publications — one that consists of just a binary and another that contains the binary and associated sources — and two repositories — one for internal use and one for external consumers:
publishing {
publications {
create<MavenPublication>("binary") {
from(components["java"])
}
create<MavenPublication>("binaryAndSources") {
from(components["java"])
artifact(tasks["sourcesJar"])
}
}
repositories {
// change URLs to point to your repos, e.g. http://my.org/repo
maven {
name = "external"
url = uri(layout.buildDirectory.dir("repos/external"))
}
maven {
name = "internal"
url = uri(layout.buildDirectory.dir("repos/internal"))
}
}
}publishing {
publications {
binary(MavenPublication) {
from components.java
}
binaryAndSources(MavenPublication) {
from components.java
artifact sourcesJar
}
}
repositories {
// change URLs to point to your repos, e.g. http://my.org/repo
maven {
name = 'external'
url = layout.buildDirectory.dir('repos/external')
}
maven {
name = 'internal'
url = layout.buildDirectory.dir('repos/internal')
}
}
}The publishing plugins will create tasks that allow you to publish either of the publications to either repository. They also attach those tasks to the publish aggregate task. But let’s say you want to restrict the binary-only publication to the external repository and the binary-with-sources publication to the internal one. To do that, you need to make the publishing conditional.
Gradle allows you to skip any task you want based on a condition via the Task.onlyIf(String, org.gradle.api.specs.Spec) method. The following sample demonstrates how to implement the constraints we just mentioned:
tasks.withType<PublishToMavenRepository>().configureEach {
val predicate = provider {
(repository == publishing.repositories["external"] &&
publication == publishing.publications["binary"]) ||
(repository == publishing.repositories["internal"] &&
publication == publishing.publications["binaryAndSources"])
}
onlyIf("publishing binary to the external repository, or binary and sources to the internal one") {
predicate.get()
}
}
tasks.withType<PublishToMavenLocal>().configureEach {
val predicate = provider {
publication == publishing.publications["binaryAndSources"]
}
onlyIf("publishing binary and sources") {
predicate.get()
}
}tasks.withType(PublishToMavenRepository) {
def predicate = provider {
(repository == publishing.repositories.external &&
publication == publishing.publications.binary) ||
(repository == publishing.repositories.internal &&
publication == publishing.publications.binaryAndSources)
}
onlyIf("publishing binary to the external repository, or binary and sources to the internal one") {
predicate.get()
}
}
tasks.withType(PublishToMavenLocal) {
def predicate = provider {
publication == publishing.publications.binaryAndSources
}
onlyIf("publishing binary and sources") {
predicate.get()
}
}gradle publish> gradle publish > Task :compileJava > Task :processResources > Task :classes > Task :jar > Task :generateMetadataFileForBinaryAndSourcesPublication > Task :generatePomFileForBinaryAndSourcesPublication > Task :sourcesJar > Task :publishBinaryAndSourcesPublicationToExternalRepository SKIPPED > Task :publishBinaryAndSourcesPublicationToInternalRepository > Task :generateMetadataFileForBinaryPublication > Task :generatePomFileForBinaryPublication > Task :publishBinaryPublicationToExternalRepository > Task :publishBinaryPublicationToInternalRepository SKIPPED > Task :publish BUILD SUCCESSFUL in 0s 10 actionable tasks: 10 executed
You may also want to define your own aggregate tasks to help with your workflow. For example, imagine that you have several publications that should be published to the external repository. It could be very useful to publish all of them in one go without publishing the internal ones.
The following sample demonstrates how you can do this by defining an aggregate task — publishToExternalRepository — that depends on all the relevant publish tasks:
tasks.register("publishToExternalRepository") {
group = "publishing"
description = "Publishes all Maven publications to the external Maven repository."
dependsOn(tasks.withType<PublishToMavenRepository>().matching {
it.repository == publishing.repositories["external"]
})
}tasks.register('publishToExternalRepository') {
group = 'publishing'
description = 'Publishes all Maven publications to the external Maven repository.'
dependsOn tasks.withType(PublishToMavenRepository).matching {
it.repository == publishing.repositories.external
}
}This particular sample automatically handles the introduction or removal of the relevant publishing tasks by using TaskCollection.withType(java.lang.Class) with the PublishToMavenRepository task type. You can do the same with PublishToIvyRepository if you’re publishing to Ivy-compatible repositories.
Configuring publishing tasks
The publishing plugins create their non-aggregate tasks after the project has been evaluated, which means you cannot directly reference them from your build script. If you would like to configure any of these tasks, you should use deferred task configuration. This can be done in a number of ways via the project’s tasks collection.
For example, imagine you want to change where the generatePomFileForPubNamePublication tasks write their POM files. You can do this by using the TaskCollection.withType(java.lang.Class) method, as demonstrated by this sample:
tasks.withType<GenerateMavenPom>().configureEach {
val matcher = Regex("""generatePomFileFor(\w+)Publication""").matchEntire(name)
val publicationName = matcher?.let { it.groupValues[1] }
destination = layout.buildDirectory.file("poms/${publicationName}-pom.xml").get().asFile
}tasks.withType(GenerateMavenPom).all {
def matcher = name =~ /generatePomFileFor(\w+)Publication/
def publicationName = matcher[0][1]
destination = layout.buildDirectory.file("poms/${publicationName}-pom.xml").get().asFile
}The above sample uses a regular expression to extract the name of the publication from the name of the task. This is so that there is no conflict between the file paths of all the POM files that might be generated. If you only have one publication, then you don’t have to worry about such conflicts since there will only be one POM file.
The Maven Publish Plugin
The Maven Publish Plugin provides the ability to publish build artifacts to an Apache Maven repository. A module published to a Maven repository can be consumed by Maven, Gradle (see Declaring Dependencies) and other tools that understand the Maven repository format. You can learn about the fundamentals of publishing in Publishing Overview.
Usage
To use the Maven Publish Plugin, include the following in your build script:
plugins {
`maven-publish`
}plugins {
id 'maven-publish'
}The Maven Publish Plugin uses an extension on the project named publishing of type PublishingExtension. This extension provides a container of named publications and a container of named repositories. The Maven Publish Plugin works with MavenPublication publications and MavenArtifactRepository repositories.
Tasks
generatePomFileForPubNamePublication— GenerateMavenPom-
Creates a POM file for the publication named PubName, populating the known metadata such as project name, project version, and the dependencies. The default location for the POM file is build/publications/$pubName/pom-default.xml.
publishPubNamePublicationToRepoNameRepository— PublishToMavenRepository-
Publishes the PubName publication to the repository named RepoName. If you have a repository definition without an explicit name, RepoName will be "Maven".
publishPubNamePublicationToMavenLocal— PublishToMavenLocal-
Copies the PubName publication to the local Maven cache — typically <home directory of the current user>/.m2/repository — along with the publication’s POM file and other metadata.
publish-
Depends on: All
publishPubNamePublicationToRepoNameRepositorytasksAn aggregate task that publishes all defined publications to all defined repositories. It does not include copying publications to the local Maven cache.
publishToMavenLocal-
Depends on: All
publishPubNamePublicationToMavenLocaltasksCopies all defined publications to the local Maven cache, including their metadata (POM files, etc.).
Publications
This plugin provides publications of type MavenPublication. To learn how to define and use publications, see the section on basic publishing.
There are four main things you can configure in a Maven publication:
-
A component — via MavenPublication.from(org.gradle.api.component.SoftwareComponent).
-
Custom artifacts — via the MavenPublication.artifact(java.lang.Object) method. See MavenArtifact for the available configuration options for custom Maven artifacts.
-
Standard metadata like
artifactId,groupIdandversion. -
Other contents of the POM file — via MavenPublication.pom(org.gradle.api.Action).
You can see all of these in action in the complete publishing example. The API documentation for MavenPublication has additional code samples.
Identity values in the generated POM
The attributes of the generated POM file will contain identity values derived from the following project properties:
-
groupId- Project.getGroup() -
artifactId- Project.getName() -
version- Project.getVersion()
Overriding the default identity values is easy: simply specify the groupId, artifactId or version attributes when configuring the MavenPublication.
publishing {
publications {
create<MavenPublication>("maven") {
groupId = "org.gradle.sample"
artifactId = "library"
version = "1.1"
from(components["java"])
}
}
}publishing {
publications {
maven(MavenPublication) {
groupId = 'org.gradle.sample'
artifactId = 'library'
version = '1.1'
from components.java
}
}
}|
Tip
|
Certain repositories will not be able to handle all supported characters. For example, the : character cannot be used as an identifier when publishing to a filesystem-backed repository on Windows.
|
Maven restricts groupId and artifactId to a limited character set ([A-Za-z0-9_\\-.]+) and Gradle enforces this restriction. For version (as well as the artifact extension and classifier properties), Gradle will handle any valid Unicode character.
The only Unicode values that are explicitly prohibited are \, / and any ISO control character. Supplied values are validated early in publication.
Customizing the generated POM
The generated POM file can be customized before publishing. For example, when publishing a library to Maven Central you will need to set certain metadata. The Maven Publish Plugin provides a DSL for that purpose. Please see MavenPom in the DSL Reference for the complete documentation of available properties and methods. The following sample shows how to use the most common ones:
publishing {
publications {
create<MavenPublication>("mavenJava") {
pom {
name = "My Library"
description = "A concise description of my library"
url = "http://www.example.com/library"
properties = mapOf(
"myProp" to "value",
"prop.with.dots" to "anotherValue"
)
licenses {
license {
name = "The Apache License, Version 2.0"
url = "http://www.apache.org/licenses/LICENSE-2.0.txt"
}
}
developers {
developer {
id = "johnd"
name = "John Doe"
email = "john.doe@example.com"
}
}
scm {
connection = "scm:git:git://example.com/my-library.git"
developerConnection = "scm:git:ssh://example.com/my-library.git"
url = "http://example.com/my-library/"
}
}
}
}
}publishing {
publications {
mavenJava(MavenPublication) {
pom {
name = 'My Library'
description = 'A concise description of my library'
url = 'http://www.example.com/library'
properties = [
myProp: "value",
"prop.with.dots": "anotherValue"
]
licenses {
license {
name = 'The Apache License, Version 2.0'
url = 'http://www.apache.org/licenses/LICENSE-2.0.txt'
}
}
developers {
developer {
id = 'johnd'
name = 'John Doe'
email = 'john.doe@example.com'
}
}
scm {
connection = 'scm:git:git://example.com/my-library.git'
developerConnection = 'scm:git:ssh://example.com/my-library.git'
url = 'http://example.com/my-library/'
}
}
}
}
}Customizing dependencies versions
Two strategies are supported for publishing dependencies:
- Declared versions (default)
-
This strategy publishes the versions that are defined by the build script author with the dependency declarations in the
dependenciesblock. Any other kind of processing, for example through a rule changing the resolved version, will not be taken into account for the publication. - Resolved versions
-
This strategy publishes the versions that were resolved during the build, possibly by applying resolution rules and automatic conflict resolution. This has the advantage that the published versions correspond to the ones the published artifact was tested against.
Example use cases for resolved versions:
-
A project uses dynamic versions for dependencies but prefers exposing the resolved version for a given release to its consumers.
-
In combination with dependency locking, you want to publish the locked versions.
-
A project leverages the rich versions constraints of Gradle, which have a lossy conversion to Maven. Instead of relying on the conversion, it publishes the resolved versions.
This is done by using the versionMapping DSL method which allows to configure the VersionMappingStrategy:
publishing {
publications {
create<MavenPublication>("mavenJava") {
versionMapping {
usage("java-api") {
fromResolutionOf("runtimeClasspath")
}
usage("java-runtime") {
fromResolutionResult()
}
}
}
}
}publishing {
publications {
mavenJava(MavenPublication) {
versionMapping {
usage('java-api') {
fromResolutionOf('runtimeClasspath')
}
usage('java-runtime') {
fromResolutionResult()
}
}
}
}
}In the example above, Gradle will use the versions resolved on the runtimeClasspath for dependencies declared in api, which are mapped to the compile scope of Maven.
Gradle will also use the versions resolved on the runtimeClasspath for dependencies declared in implementation, which are mapped to the runtime scope of Maven.
fromResolutionResult() indicates that Gradle should use the default classpath of a variant and runtimeClasspath is the default classpath of java-runtime.
Repositories
This plugin provides repositories of type MavenArtifactRepository. To learn how to define and use repositories for publishing, see the section on basic publishing.
Here’s a simple example of defining a publishing repository:
publishing {
repositories {
maven {
// change to point to your repo, e.g. http://my.org/repo
url = uri(layout.buildDirectory.dir("repo"))
}
}
}publishing {
repositories {
maven {
// change to point to your repo, e.g. http://my.org/repo
url = layout.buildDirectory.dir('repo')
}
}
}The two main things you will want to configure are the repository’s:
-
URL (required)
-
Name (optional)
You can define multiple repositories as long as they have unique names within the build script. You may also declare one (and only one) repository without a name. That repository will take on an implicit name of "Maven".
You can also configure any authentication details that are required to connect to the repository. See MavenArtifactRepository for more details.
Snapshot and release repositories
It is a common practice to publish snapshots and releases to different Maven repositories. A simple way to accomplish this is to configure the repository URL based on the project version. The following sample uses one URL for versions that end with "SNAPSHOT" and a different URL for the rest:
publishing {
repositories {
maven {
val releasesRepoUrl = layout.buildDirectory.dir("repos/releases")
val snapshotsRepoUrl = layout.buildDirectory.dir("repos/snapshots")
url = uri(if (version.toString().endsWith("SNAPSHOT")) snapshotsRepoUrl else releasesRepoUrl)
}
}
}publishing {
repositories {
maven {
def releasesRepoUrl = layout.buildDirectory.dir('repos/releases')
def snapshotsRepoUrl = layout.buildDirectory.dir('repos/snapshots')
url = version.endsWith('SNAPSHOT') ? snapshotsRepoUrl : releasesRepoUrl
}
}
}Similarly, you can use a project or system property to decide which repository to publish to. The following example uses the release repository if the project property release is set, such as when a user runs gradle -Prelease publish:
publishing {
repositories {
maven {
val releasesRepoUrl = layout.buildDirectory.dir("repos/releases")
val snapshotsRepoUrl = layout.buildDirectory.dir("repos/snapshots")
url = uri(if (project.hasProperty("release")) releasesRepoUrl else snapshotsRepoUrl)
}
}
}publishing {
repositories {
maven {
def releasesRepoUrl = layout.buildDirectory.dir('repos/releases')
def snapshotsRepoUrl = layout.buildDirectory.dir('repos/snapshots')
url = project.hasProperty('release') ? releasesRepoUrl : snapshotsRepoUrl
}
}
}Publishing to Maven Local
For integration with a local Maven installation, it is sometimes useful to publish the module into the Maven local repository (typically at <home directory of the current user>/.m2/repository), along with its POM file and other metadata. In Maven parlance, this is referred to as 'installing' the module.
The Maven Publish Plugin makes this easy to do by automatically creating a PublishToMavenLocal task for each MavenPublication in the publishing.publications container. The task name follows the pattern of publishPubNamePublicationToMavenLocal. Each of these tasks is wired into the publishToMavenLocal aggregate task. You do not need to have mavenLocal() in your publishing.repositories section.
Publishing Maven relocation information
When a project changes the groupId or artifactId (the coordinates) of an artifact it publishes, it is important to let users know where the new artifact can be found. Maven can help with that through the relocation feature. The way this works is that a project publishes an additional artifact under the old coordinates consisting only of a minimal relocation POM; that POM file specifies where the new artifact can be found. Maven repository browsers and build tools can then inform the user that the coordinates of an artifact have changed.
For this, a project adds an additional MavenPublication specifying a MavenPomRelocation:
publishing {
publications {
// ... artifact publications
// Specify relocation POM
create<MavenPublication>("relocation") {
pom {
// Old artifact coordinates
groupId = "com.example"
artifactId = "lib"
version = "2.0.0"
distributionManagement {
relocation {
// New artifact coordinates
groupId = "com.new-example"
artifactId = "lib"
version = "2.0.0"
message = "groupId has been changed"
}
}
}
}
}
}publishing {
publications {
// ... artifact publications
// Specify relocation POM
relocation(MavenPublication) {
pom {
// Old artifact coordinates
groupId = "com.example"
artifactId = "lib"
version = "2.0.0"
distributionManagement {
relocation {
// New artifact coordinates
groupId = "com.new-example"
artifactId = "lib"
version = "2.0.0"
message = "groupId has been changed"
}
}
}
}
}
}Only the property which has changed needs to be specified under relocation, that is artifactId and / or groupId. All other properties are optional.
|
Tip
|
Specifying the A custom |
The relocation POM should be created for what would be the next version of the old artifact. For example when the artifact coordinates of com.example:lib:1.0.0 are changed and the artifact with the new coordinates continues version numbering and is published as com.new-example:lib:2.0.0, then the relocation POM should specify a relocation from com.example:lib:2.0.0 to com.new-example:lib:2.0.0.
A relocation POM only has to be published once, the build file configuration for it should be removed again once it has been published.
Note that a relocation POM is not suitable for all situations; when an artifact has been split into two or more separate artifacts then a relocation POM might not be helpful.
Retroactively publishing relocation information
It is possible to publish relocation information retroactively after the coordinates of an artifact have changed in the past, and no relocation information was published back then.
The same recommendations as described above apply. To ease migration for users, it is important to pay attention to the version specified in the relocation POM. The relocation POM should allow the user to move to the new artifact in one step, and then allow them to update to the latest version in a separate step. For example when for the coordinates of com.new-example:lib:5.0.0 were changed in version 2.0.0, then ideally the relocation POM should be published for the old coordinates com.example:lib:2.0.0 relocating to com.new-example:lib:2.0.0. The user can then switch from com.example:lib to com.new-example and then separately update from version 2.0.0 to 5.0.0, handling breaking changes (if any) step by step.
When relocation information is published retroactively, it is not necessary to wait for next regular release of the project, it can be published in the meantime. As mentioned above, the relocation information should then be removed again from the build file once the relocation POM has been published.
Avoiding duplicate dependencies
When only the coordinates of the artifact have changed, but package names of the classes inside the artifact have remained the same, dependency conflicts can occur. A project might (transitively) depend on the old artifact but at the same time also have a dependency on the new artifact which both contain the same classes, potentially with incompatible changes.
To detect such conflicting duplicate dependencies, capabilities can be published as part of the Gradle Module Metadata. For an example using a Java Library project, see declaring additional capabilities for a local component.
Performing a dry run
To verify that relocation information works as expected before publishing it to a remote repository, it can first be published to the local Maven repository. Then a local test Gradle or Maven project can be created which has the relocation artifact as dependency.
Complete example
The following example demonstrates how to sign and publish a Java library including sources, Javadoc, and a customized POM:
plugins {
`java-library`
`maven-publish`
signing
}
group = "com.example"
version = "1.0"
java {
withJavadocJar()
withSourcesJar()
}
publishing {
publications {
create<MavenPublication>("mavenJava") {
artifactId = "my-library"
from(components["java"])
versionMapping {
usage("java-api") {
fromResolutionOf("runtimeClasspath")
}
usage("java-runtime") {
fromResolutionResult()
}
}
pom {
name = "My Library"
description = "A concise description of my library"
url = "http://www.example.com/library"
properties = mapOf(
"myProp" to "value",
"prop.with.dots" to "anotherValue"
)
licenses {
license {
name = "The Apache License, Version 2.0"
url = "http://www.apache.org/licenses/LICENSE-2.0.txt"
}
}
developers {
developer {
id = "johnd"
name = "John Doe"
email = "john.doe@example.com"
}
}
scm {
connection = "scm:git:git://example.com/my-library.git"
developerConnection = "scm:git:ssh://example.com/my-library.git"
url = "http://example.com/my-library/"
}
}
}
}
repositories {
maven {
// change URLs to point to your repos, e.g. http://my.org/repo
val releasesRepoUrl = uri(layout.buildDirectory.dir("repos/releases"))
val snapshotsRepoUrl = uri(layout.buildDirectory.dir("repos/snapshots"))
url = if (version.toString().endsWith("SNAPSHOT")) snapshotsRepoUrl else releasesRepoUrl
}
}
}
signing {
sign(publishing.publications["mavenJava"])
}
tasks.javadoc {
if (JavaVersion.current().isJava9Compatible) {
(options as StandardJavadocDocletOptions).addBooleanOption("html5", true)
}
}plugins {
id 'java-library'
id 'maven-publish'
id 'signing'
}
group = 'com.example'
version = '1.0'
java {
withJavadocJar()
withSourcesJar()
}
publishing {
publications {
mavenJava(MavenPublication) {
artifactId = 'my-library'
from components.java
versionMapping {
usage('java-api') {
fromResolutionOf('runtimeClasspath')
}
usage('java-runtime') {
fromResolutionResult()
}
}
pom {
name = 'My Library'
description = 'A concise description of my library'
url = 'http://www.example.com/library'
properties = [
myProp: "value",
"prop.with.dots": "anotherValue"
]
licenses {
license {
name = 'The Apache License, Version 2.0'
url = 'http://www.apache.org/licenses/LICENSE-2.0.txt'
}
}
developers {
developer {
id = 'johnd'
name = 'John Doe'
email = 'john.doe@example.com'
}
}
scm {
connection = 'scm:git:git://example.com/my-library.git'
developerConnection = 'scm:git:ssh://example.com/my-library.git'
url = 'http://example.com/my-library/'
}
}
}
}
repositories {
maven {
// change URLs to point to your repos, e.g. http://my.org/repo
def releasesRepoUrl = layout.buildDirectory.dir('repos/releases')
def snapshotsRepoUrl = layout.buildDirectory.dir('repos/snapshots')
url = version.endsWith('SNAPSHOT') ? snapshotsRepoUrl : releasesRepoUrl
}
}
}
signing {
sign publishing.publications.mavenJava
}
javadoc {
if(JavaVersion.current().isJava9Compatible()) {
options.addBooleanOption('html5', true)
}
}The result is that the following artifacts will be published:
-
The POM:
my-library-1.0.pom -
The primary JAR artifact for the Java component:
my-library-1.0.jar -
The sources JAR artifact that has been explicitly configured:
my-library-1.0-sources.jar -
The Javadoc JAR artifact that has been explicitly configured:
my-library-1.0-javadoc.jar
The Signing Plugin is used to generate a signature file for each artifact. In addition, checksum files will be generated for all artifacts and signature files.
|
Tip
|
publishToMavenLocal` does not create checksum files in $USER_HOME/.m2/repository.
If you want to verify that the checksum files are created correctly, or use them for later publishing, consider configuring a custom Maven repository with a file:// URL and using that as the publishing target instead.
|
Removal of deferred configuration behavior
Prior to Gradle 5.0, the publishing {} block was (by default) implicitly treated as if all the logic inside it was executed after the project is evaluated.
This behavior caused quite a bit of confusion and was deprecated in Gradle 4.8, because it was the only block that behaved that way.
You may have some logic inside your publishing block or in a plugin that is depending on the deferred configuration behavior. For instance, the following logic assumes that the subprojects will be evaluated when the artifactId is set:
subprojects {
publishing {
publications {
create<MavenPublication>("mavenJava") {
from(components["java"])
artifactId = tasks.jar.get().archiveBaseName.get()
}
}
}
}subprojects {
publishing {
publications {
mavenJava(MavenPublication) {
from components.java
artifactId = jar.archiveBaseName
}
}
}
}This kind of logic must now be wrapped in an afterEvaluate {} block.
subprojects {
publishing {
publications {
create<MavenPublication>("mavenJava") {
from(components["java"])
afterEvaluate {
artifactId = tasks.jar.get().archiveBaseName.get()
}
}
}
}
}subprojects {
publishing {
publications {
mavenJava(MavenPublication) {
from components.java
afterEvaluate {
artifactId = jar.archiveBaseName
}
}
}
}
}The Ivy Publish Plugin
The Ivy Publish Plugin provides the ability to publish build artifacts in the Apache Ivy format, usually to a repository for consumption by other builds or projects. What is published is one or more artifacts created by the build, and an Ivy module descriptor (normally ivy.xml) that describes the artifacts and the dependencies of the artifacts, if any.
A published Ivy module can be consumed by Gradle (see Declaring Dependencies) and other tools that understand the Ivy format. You can learn about the fundamentals of publishing in Publishing Overview.
Usage
To use the Ivy Publish Plugin, include the following in your build script:
plugins {
`ivy-publish`
}plugins {
id 'ivy-publish'
}The Ivy Publish Plugin uses an extension on the project named publishing of type PublishingExtension. This extension provides a container of named publications and a container of named repositories. The Ivy Publish Plugin works with IvyPublication publications and IvyArtifactRepository repositories.
Tasks
generateDescriptorFileForPubNamePublication— GenerateIvyDescriptor-
Creates an Ivy descriptor file for the publication named PubName, populating the known metadata such as project name, project version, and the dependencies. The default location for the descriptor file is build/publications/$pubName/ivy.xml.
publishPubNamePublicationToRepoNameRepository— PublishToIvyRepository-
Publishes the PubName publication to the repository named RepoName. If you have a repository definition without an explicit name, RepoName will be "Ivy".
publish-
Depends on: All
publishPubNamePublicationToRepoNameRepositorytasksAn aggregate task that publishes all defined publications to all defined repositories.
Publications
This plugin provides publications of type IvyPublication. To learn how to define and use publications, see the section on basic publishing.
There are four main things you can configure in an Ivy publication:
-
A component — via IvyPublication.from(org.gradle.api.component.SoftwareComponent).
-
Custom artifacts — via the IvyPublication.artifact(java.lang.Object) method. See IvyArtifact for the available configuration options for custom Ivy artifacts.
-
Standard metadata like
module,organisationandrevision. -
Other contents of the module descriptor — via IvyPublication.descriptor(org.gradle.api.Action).
You can see all of these in action in the complete publishing example. The API documentation for IvyPublication has additional code samples.
Identity values for the published project
The generated Ivy module descriptor file contains an <info> element that identifies the module. The default identity values are derived from the following:
-
organisation- Project.getGroup() -
module- Project.getName() -
revision- Project.getVersion() -
status- Project.getStatus() -
branch- (not set)
Overriding the default identity values is easy: simply specify the organisation, module or revision properties when configuring the IvyPublication. status and branch can be set via the descriptor property — see IvyModuleDescriptorSpec.
The descriptor property can also be used to add additional custom elements as children of the <info> element, like so:
publishing {
publications {
create<IvyPublication>("ivy") {
organisation = "org.gradle.sample"
module = "project1-sample"
revision = "1.1"
descriptor.status = "milestone"
descriptor.branch = "testing"
descriptor.extraInfo("http://my.namespace", "myElement", "Some value")
from(components["java"])
}
}
}publishing {
publications {
ivy(IvyPublication) {
organisation = 'org.gradle.sample'
module = 'project1-sample'
revision = '1.1'
descriptor.status = 'milestone'
descriptor.branch = 'testing'
descriptor.extraInfo 'http://my.namespace', 'myElement', 'Some value'
from components.java
}
}
}|
Tip
|
Certain repositories are not able to handle all supported characters. For example, the : character cannot be used as an identifier when publishing to a filesystem-backed repository on Windows.
|
Gradle will handle any valid Unicode character for organisation, module and revision (as well as the artifact’s name, extension and classifier). The only values that are explicitly prohibited are \, / and any ISO control character. The supplied values are validated early during publication.
Customizing the generated module descriptor
At times, the module descriptor file generated from the project information will need to be tweaked before publishing. The Ivy Publish Plugin provides a DSL for that purpose. Please see IvyModuleDescriptorSpec in the DSL Reference for the complete documentation of available properties and methods.
The following sample shows how to use the most common aspects of the DSL:
publications {
create<IvyPublication>("ivyCustom") {
descriptor {
license {
name = "The Apache License, Version 2.0"
url = "http://www.apache.org/licenses/LICENSE-2.0.txt"
}
author {
name = "Jane Doe"
url = "http://example.com/users/jane"
}
description {
text = "A concise description of my library"
homepage = "http://www.example.com/library"
}
}
versionMapping {
usage("java-api") {
fromResolutionOf("runtimeClasspath")
}
usage("java-runtime") {
fromResolutionResult()
}
}
}
}publications {
ivyCustom(IvyPublication) {
descriptor {
license {
name = 'The Apache License, Version 2.0'
url = 'http://www.apache.org/licenses/LICENSE-2.0.txt'
}
author {
name = 'Jane Doe'
url = 'http://example.com/users/jane'
}
description {
text = 'A concise description of my library'
homepage = 'http://www.example.com/library'
}
}
versionMapping {
usage('java-api') {
fromResolutionOf('runtimeClasspath')
}
usage('java-runtime') {
fromResolutionResult()
}
}
}
}In this example we are simply adding a 'description' element to the generated Ivy dependency descriptor, but this hook allows you to modify any aspect of the generated descriptor. For example, you could replace the version range for a dependency with the actual version used to produce the build.
You can also add arbitrary XML to the descriptor file via IvyModuleDescriptorSpec.withXml(org.gradle.api.Action), but you cannot use it to modify any part of the module identifier (organisation, module, revision).
|
Caution
|
It is possible to modify the descriptor in such a way that it is no longer a valid Ivy module descriptor, so care must be taken when using this feature. |
Customizing dependencies versions
Two strategies are supported for publishing dependencies:
- Declared versions (default)
-
This strategy publishes the versions that are defined by the build script author with the dependency declarations in the
dependenciesblock. Any other kind of processing, for example through a rule changing the resolved version, will not be taken into account for the publication. - Resolved versions
-
This strategy publishes the versions that were resolved during the build, possibly by applying resolution rules and automatic conflict resolution. This has the advantage that the published versions correspond to the ones the published artifact was tested against.
Example use cases for resolved versions:
-
A project uses dynamic versions for dependencies but prefers exposing the resolved version for a given release to its consumers.
-
In combination with dependency locking, you want to publish the locked versions.
-
A project leverages the rich versions constraints of Gradle, which have a lossy conversion to Ivy. Instead of relying on the conversion, it publishes the resolved versions.
This is done by using the versionMapping DSL method which allows to configure the VersionMappingStrategy:
publications {
create<IvyPublication>("ivyCustom") {
versionMapping {
usage("java-api") {
fromResolutionOf("runtimeClasspath")
}
usage("java-runtime") {
fromResolutionResult()
}
}
}
}publications {
ivyCustom(IvyPublication) {
versionMapping {
usage('java-api') {
fromResolutionOf('runtimeClasspath')
}
usage('java-runtime') {
fromResolutionResult()
}
}
}
}In the example above, Gradle will use the versions resolved on the runtimeClasspath for dependencies declared in api, which are mapped to the compile configuration of Ivy.
Gradle will also use the versions resolved on the runtimeClasspath for dependencies declared in implementation, which are mapped to the runtime configuration of Ivy.
fromResolutionResult() indicates that Gradle should use the default classpath of a variant and runtimeClasspath is the default classpath of java-runtime.
Repositories
This plugin provides repositories of type IvyArtifactRepository. To learn how to define and use repositories for publishing, see the section on basic publishing.
Here’s a simple example of defining a publishing repository:
publishing {
repositories {
ivy {
// change to point to your repo, e.g. http://my.org/repo
url = uri(layout.buildDirectory.dir("repo"))
}
}
}publishing {
repositories {
ivy {
// change to point to your repo, e.g. http://my.org/repo
url = layout.buildDirectory.dir("repo")
}
}
}The two main things you will want to configure are the repository’s:
-
URL (required)
-
Name (optional)
You can define multiple repositories as long as they have unique names within the build script. You may also declare one (and only one) repository without a name. That repository will take on an implicit name of "Ivy".
You can also configure any authentication details that are required to connect to the repository. See IvyArtifactRepository for more details.
Complete example
The following example demonstrates publishing with a multi-project build. Each project publishes a Java component configured to also build and publish Javadoc and source code artifacts. The descriptor file is customized to include the project description for each project.
rootProject.name = "ivy-publish-java"
include("project1", "project2")plugins {
`kotlin-dsl`
}
repositories {
gradlePluginPortal()
}plugins {
id("java-library")
id("ivy-publish")
}
version = "1.0"
group = "org.gradle.sample"
repositories {
mavenCentral()
}
java {
withJavadocJar()
withSourcesJar()
}
publishing {
repositories {
ivy {
// change to point to your repo, e.g. http://my.org/repo
url = uri("${rootProject.buildDir}/repo")
}
}
publications {
create<IvyPublication>("ivy") {
from(components["java"])
descriptor.description {
text = providers.provider({ description })
}
}
}
}plugins {
id("myproject.publishing-conventions")
}
description = "The first project"
dependencies {
implementation("junit:junit:4.13")
implementation(project(":project2"))
}plugins {
id("myproject.publishing-conventions")
}
description = "The second project"
dependencies {
implementation("commons-collections:commons-collections:3.2.2")
}rootProject.name = 'ivy-publish-java'
include 'project1', 'project2'plugins {
id 'groovy-gradle-plugin'
}plugins {
id 'java-library'
id 'ivy-publish'
}
version = '1.0'
group = 'org.gradle.sample'
repositories {
mavenCentral()
}
java {
withJavadocJar()
withSourcesJar()
}
publishing {
repositories {
ivy {
// change to point to your repo, e.g. http://my.org/repo
url = "${rootProject.buildDir}/repo"
}
}
publications {
ivy(IvyPublication) {
from components.java
descriptor.description {
text = providers.provider({ description })
}
}
}
}plugins {
id 'myproject.publishing-conventions'
}
description = 'The first project'
dependencies {
implementation 'junit:junit:4.13'
implementation project(':project2')
}plugins {
id 'myproject.publishing-conventions'
}
description = 'The second project'
dependencies {
implementation 'commons-collections:commons-collections:3.2.2'
}The result is that the following artifacts will be published for each project:
-
The Gradle Module Metadata file:
project1-1.0.module. -
The Ivy module metadata file:
ivy-1.0.xml. -
The primary JAR artifact for the Java component:
project1-1.0.jar. -
The Javadoc and sources JAR artifacts of the Java component (because we configured
withJavadocJar()andwithSourcesJar()):project1-1.0-javadoc.jar,project1-1.0-source.jar.
OPTIMIZING BUILD PERFORMANCE
Improve the Performance of Gradle Builds
Build performance is critical to productivity. The longer builds take to complete, the more likely they’ll disrupt your development flow. Builds run many times a day, so even small waiting periods add up. The same is true for Continuous Integration (CI) builds: the less time they take, the faster you can react to new issues and the more often you can experiment.
All this means that it’s worth investing some time and effort into making your build as fast as possible. This section offers several ways to make a build faster. Additionally, you’ll find details about what leads to build performance degradation, and how you can avoid it.
|
Tip
|
Want faster Gradle Builds? Register here for our Build Cache training session to learn how Develocity can speed up builds by up to 90%. |
Inspect your build
Before you make any changes, inspect your build with a build scan or profile report. A proper build inspection helps you understand:
-
how long it takes to build your project
-
which parts of your build are slow
Inspecting provides a comparison point to better understand the impact of the changes recommended on this page.
To best make use of this page:
-
Inspect your build.
-
Make a change.
-
Inspect your build again.
If the change improved build times, make it permanent. If you don’t see an improvement, remove the change and try another.
Update versions
Gradle
The Gradle team continuously improves the performance of Gradle builds. If you’re using an old version of Gradle, you’re missing out on the benefits of that work. Keeping up with Gradle version upgrades is low risk because the Gradle team ensures backwards compatibility between minor versions of Gradle. Staying up-to-date also makes transitioning to the next major version easier, since you’ll get early deprecation warnings.
Java
Gradle runs on the Java Virtual Machine (JVM). Java performance improvements often benefit Gradle. For the best Gradle performance, use the latest version of Java.
Plugins
Plugin writers continuously improve the performance of their plugins. If you’re using an old version of a plugin, you’re missing out on the benefits of that work. The Android, Java, and Kotlin plugins in particular can significantly impact build performance. Update to the latest version of these plugins for performance improvements.
Enable parallel execution
Most projects consist of more than one subproject. Usually, some of those subprojects are independent of one another;
that is, they do not share state. Yet by default, Gradle only runs one task at a time.
To execute tasks belonging to different subprojects in parallel, use the parallel flag:
$ gradle <task> --parallel
To execute project tasks in parallel by default, add the following setting to the gradle.properties file in the project root or your Gradle home:
org.gradle.parallel=trueParallel builds can significantly improve build times; how much depends on your project structure and how many dependencies you have between subprojects. A build whose execution time is dominated by a single subproject won’t benefit much at all. Neither will a project with lots of inter-subproject dependencies. But most multi-subproject builds see a reduction in build times.
Visualize parallelism with build scans
Build scans give you a visual timeline of task execution. In the following example build, you can see long-running tasks at the beginning and end of the build:
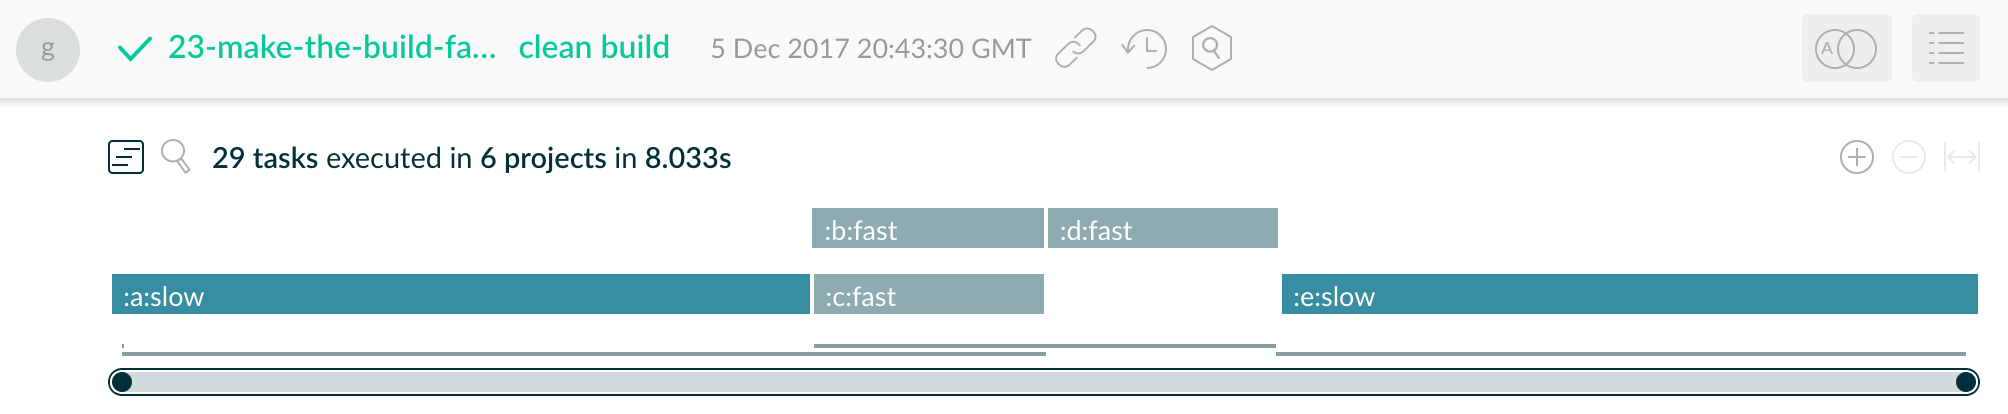
Tweaking the build configuration to run the two slow tasks early on and in parallel reduces the overall build time from 8 seconds to 5 seconds:
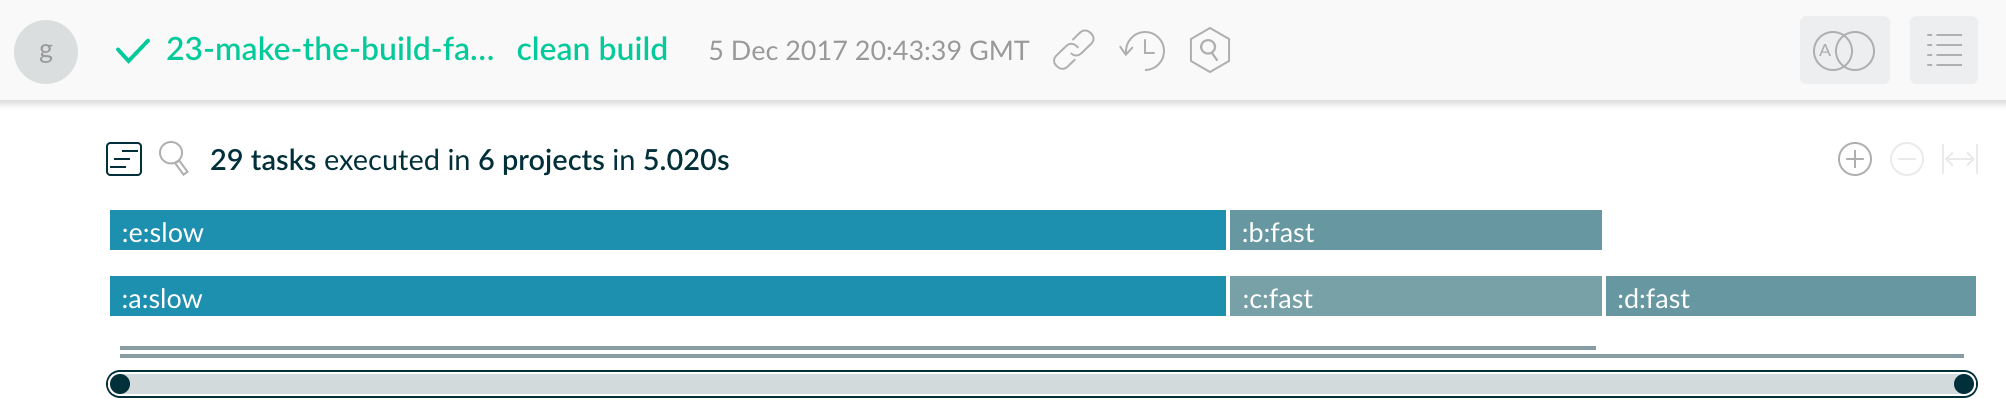
Re-enable the Gradle Daemon
The Gradle Daemon reduces build times by:
-
caching project information across builds
-
running in the background so every Gradle build doesn’t have to wait for JVM startup
-
benefiting from continuous runtime optimization in the JVM
-
watching the file system to calculate exactly what needs to be rebuilt before you run a build
Gradle enables the Daemon by default, but some builds override this preference. If your build disables the Daemon, you could see a significant performance improvement from enabling the daemon.
You can enable the Daemon at build time with the daemon flag:
$ gradle <task> --daemon
To enable the Daemon by default in older Gradle versions, add the following setting to the
gradle.properties file in the project root or your Gradle home:
org.gradle.daemon=trueOn developer machines, you should see a significant performance improvement. On CI machines, long-lived agents benefit from the Daemon. But short-lived machines don’t benefit much. Daemons automatically shut down on memory pressure in Gradle 3.0 and above, so it’s always safe to leave the Daemon enabled.
Enable the configuration cache
|
Important
|
This feature has the following limitations:
|
You can cache the result of the configuration phase by enabling the configuration cache. When build configuration inputs remain the same across builds, the configuration cache allows Gradle to skip the configuration phase entirely.
Build configuration inputs include:
-
Init scripts
-
Settings scripts
-
Build scripts
-
System properties used during the configuration phase
-
Gradle properties used during the configuration phase
-
Environment variables used during the configuration phase
-
Configuration files accessed using value suppliers such as providers
-
buildSrcinputs, including build configuration inputs and source files
By default, Gradle does not use the configuration cache.
To enable the configuration cache at build time, use the configuration-cache flag:
$ gradle <task> --configuration-cache
To enable the configuration cache by default, add the following setting to the gradle.properties file in the project root or your Gradle home:
org.gradle.configuration-cache=trueFor more information about the configuration cache, check out the configuration cache documentation.
Additional configuration cache benefits
The configuration cache enables additional benefits as well. When enabled, Gradle:
-
Executes all tasks in parallel, even those in the same subproject.
-
Caches dependency resolution results.
Enable incremental build for custom tasks
Incremental build is a Gradle optimization that skips running tasks that have previously executed with the same inputs. If a task’s inputs and its outputs have not changed since the last execution, Gradle skips that task.
Most built-in tasks provided by Gradle work with incremental build. To make a custom task compatible with incremental build, specify the inputs and outputs:
tasks.register("processTemplatesAdHoc") {
inputs.property("engine", TemplateEngineType.FREEMARKER)
inputs.files(fileTree("src/templates"))
.withPropertyName("sourceFiles")
.withPathSensitivity(PathSensitivity.RELATIVE)
inputs.property("templateData.name", "docs")
inputs.property("templateData.variables", mapOf("year" to "2013"))
outputs.dir(layout.buildDirectory.dir("genOutput2"))
.withPropertyName("outputDir")
doLast {
// Process the templates here
}
}tasks.register('processTemplatesAdHoc') {
inputs.property('engine', TemplateEngineType.FREEMARKER)
inputs.files(fileTree('src/templates'))
.withPropertyName('sourceFiles')
.withPathSensitivity(PathSensitivity.RELATIVE)
inputs.property('templateData.name', 'docs')
inputs.property('templateData.variables', [year: '2013'])
outputs.dir(layout.buildDirectory.dir('genOutput2'))
.withPropertyName('outputDir')
doLast {
// Process the templates here
}
}For more information about incremental builds, check out the incremental build documentation.
Visualize incremental builds with build scan timelines
Look at the build scan timeline view to identify tasks that could benefit from incremental builds. This can also help you understand why tasks execute when you expect Gradle to skip them.
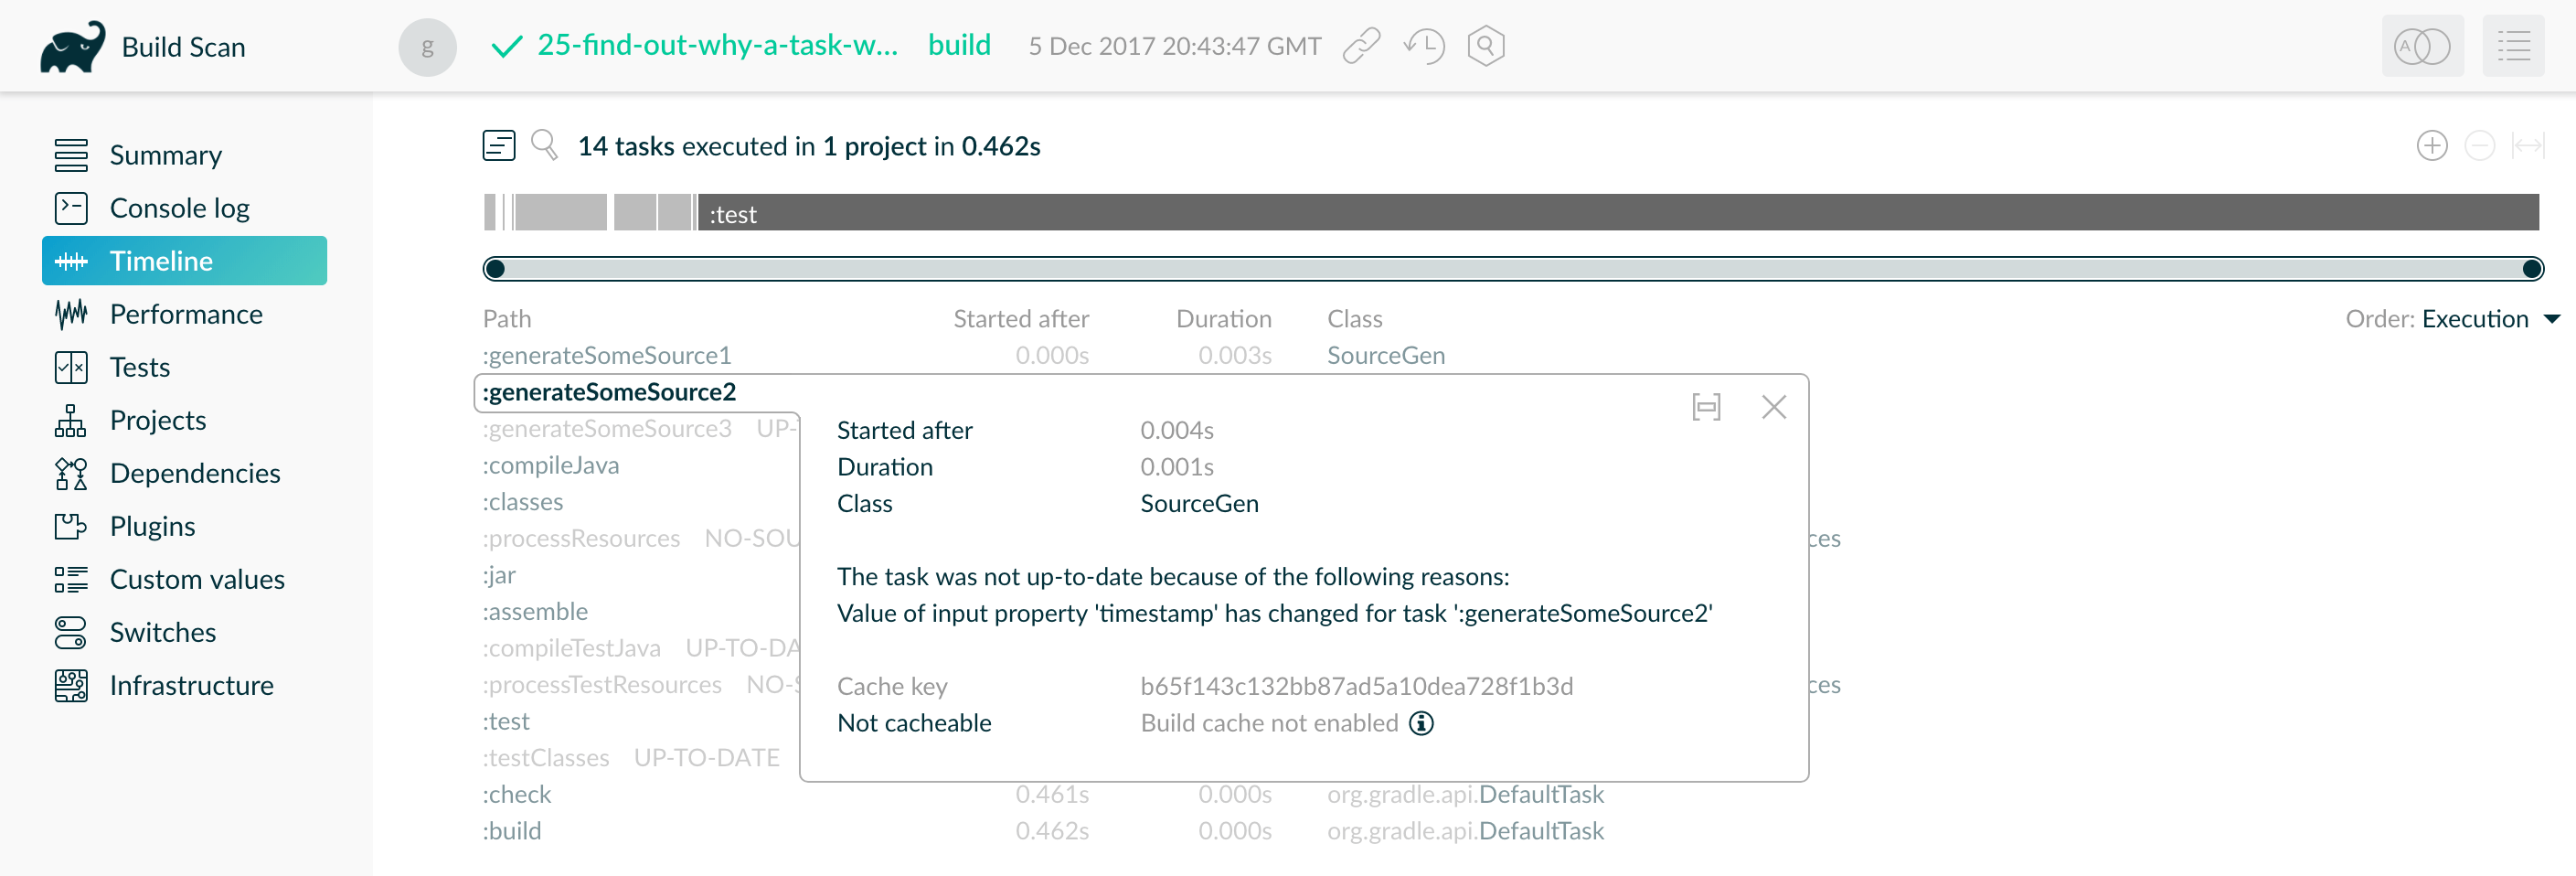
As you can see in the build scan above, the task was not up-to-date because one of its inputs ("timestamp") changed, forcing the task to re-run.
Sort tasks by duration to find the slowest tasks in your project.
Enable the build cache
The build cache is a Gradle optimization that stores task outputs for specific input.
When you later run that same task with the same input, Gradle retrieves the output from the build cache instead of running the task again.
By default, Gradle does not use the build cache.
To enable the build cache at build time, use the build-cache flag:
$ gradle <task> --build-cache
To enable the build cache by default, add the following setting to the gradle.properties file in the project root or your Gradle home:
org.gradle.caching=trueYou can use a local build cache to speed up repeated builds on a single machine. You can also use a shared build cache to speed up repeated builds across multiple machines. Develocity provides one. Shared build caches can decrease build times for both CI and developer builds.
For more information about the build cache, check out the build cache documentation.
Visualize the build cache with build scans
Build scans can help you investigate build cache effectiveness. In the performance screen, the "Build cache" tab shows you statistics about:
-
how many tasks interacted with a cache
-
which cache was used
-
transfer and pack/unpack rates for these cache entries
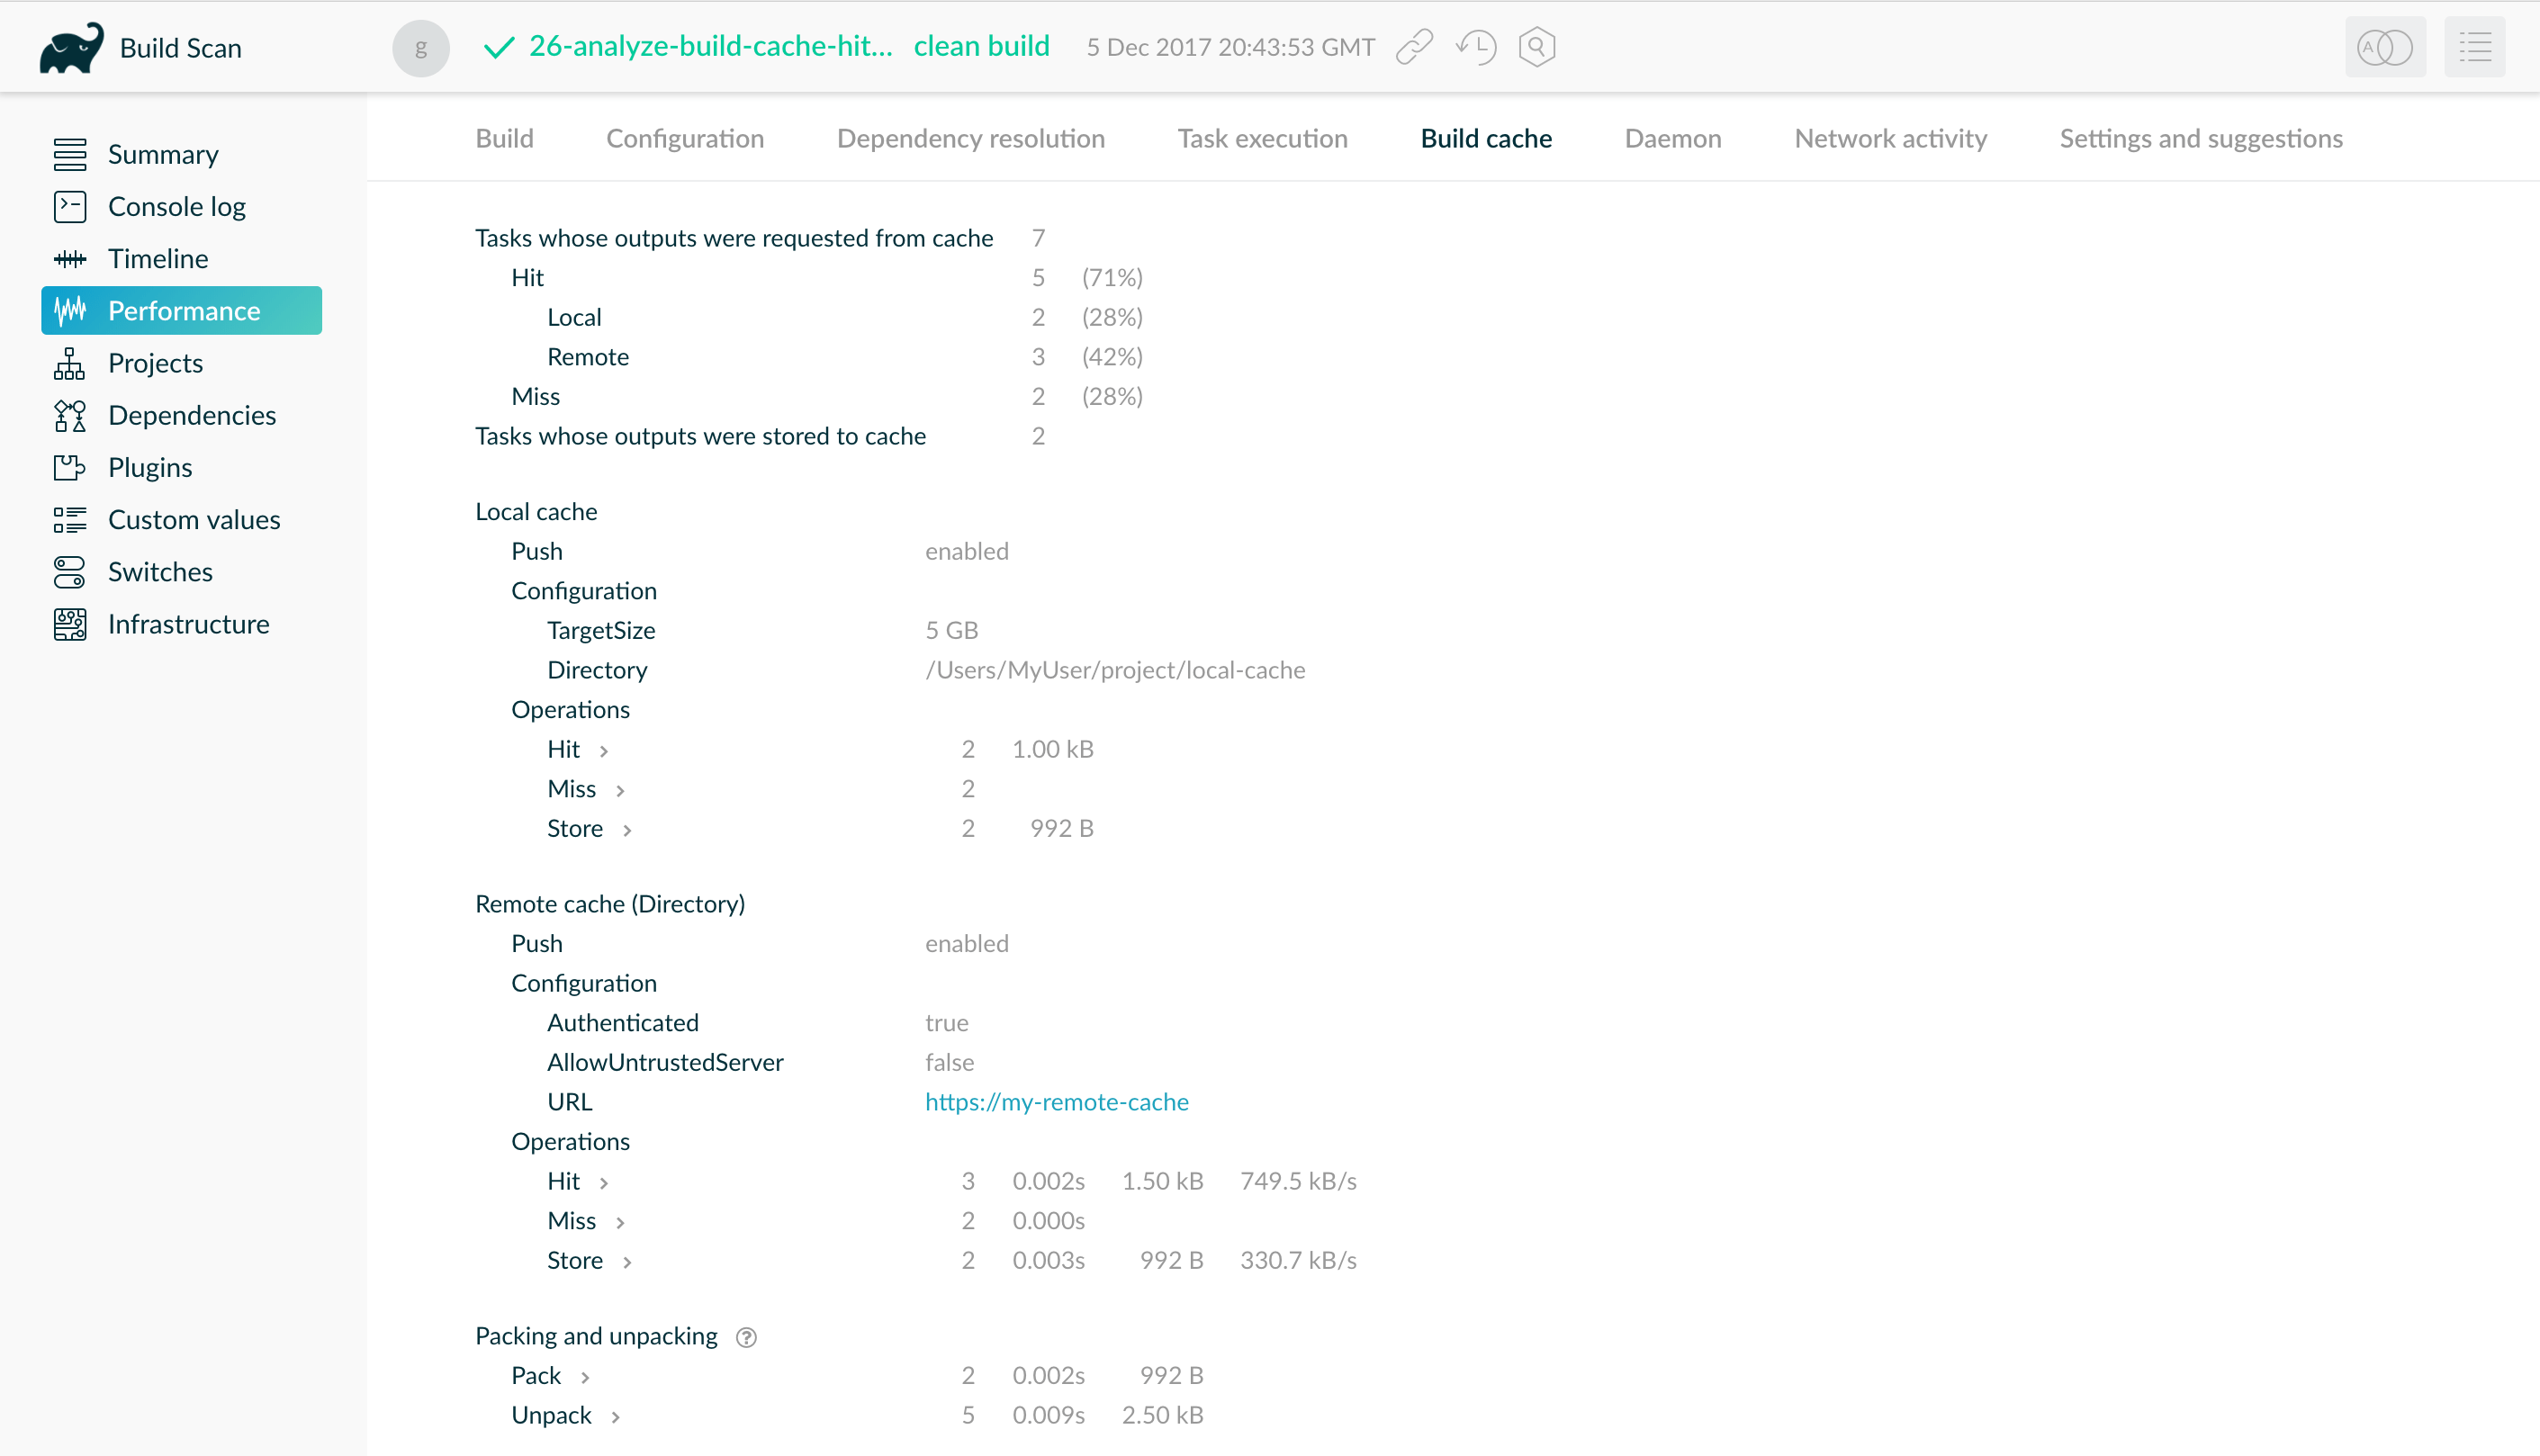
The "Task execution" tab shows details about task cacheability. Click on a category to see a timeline screen that highlights tasks of that category.
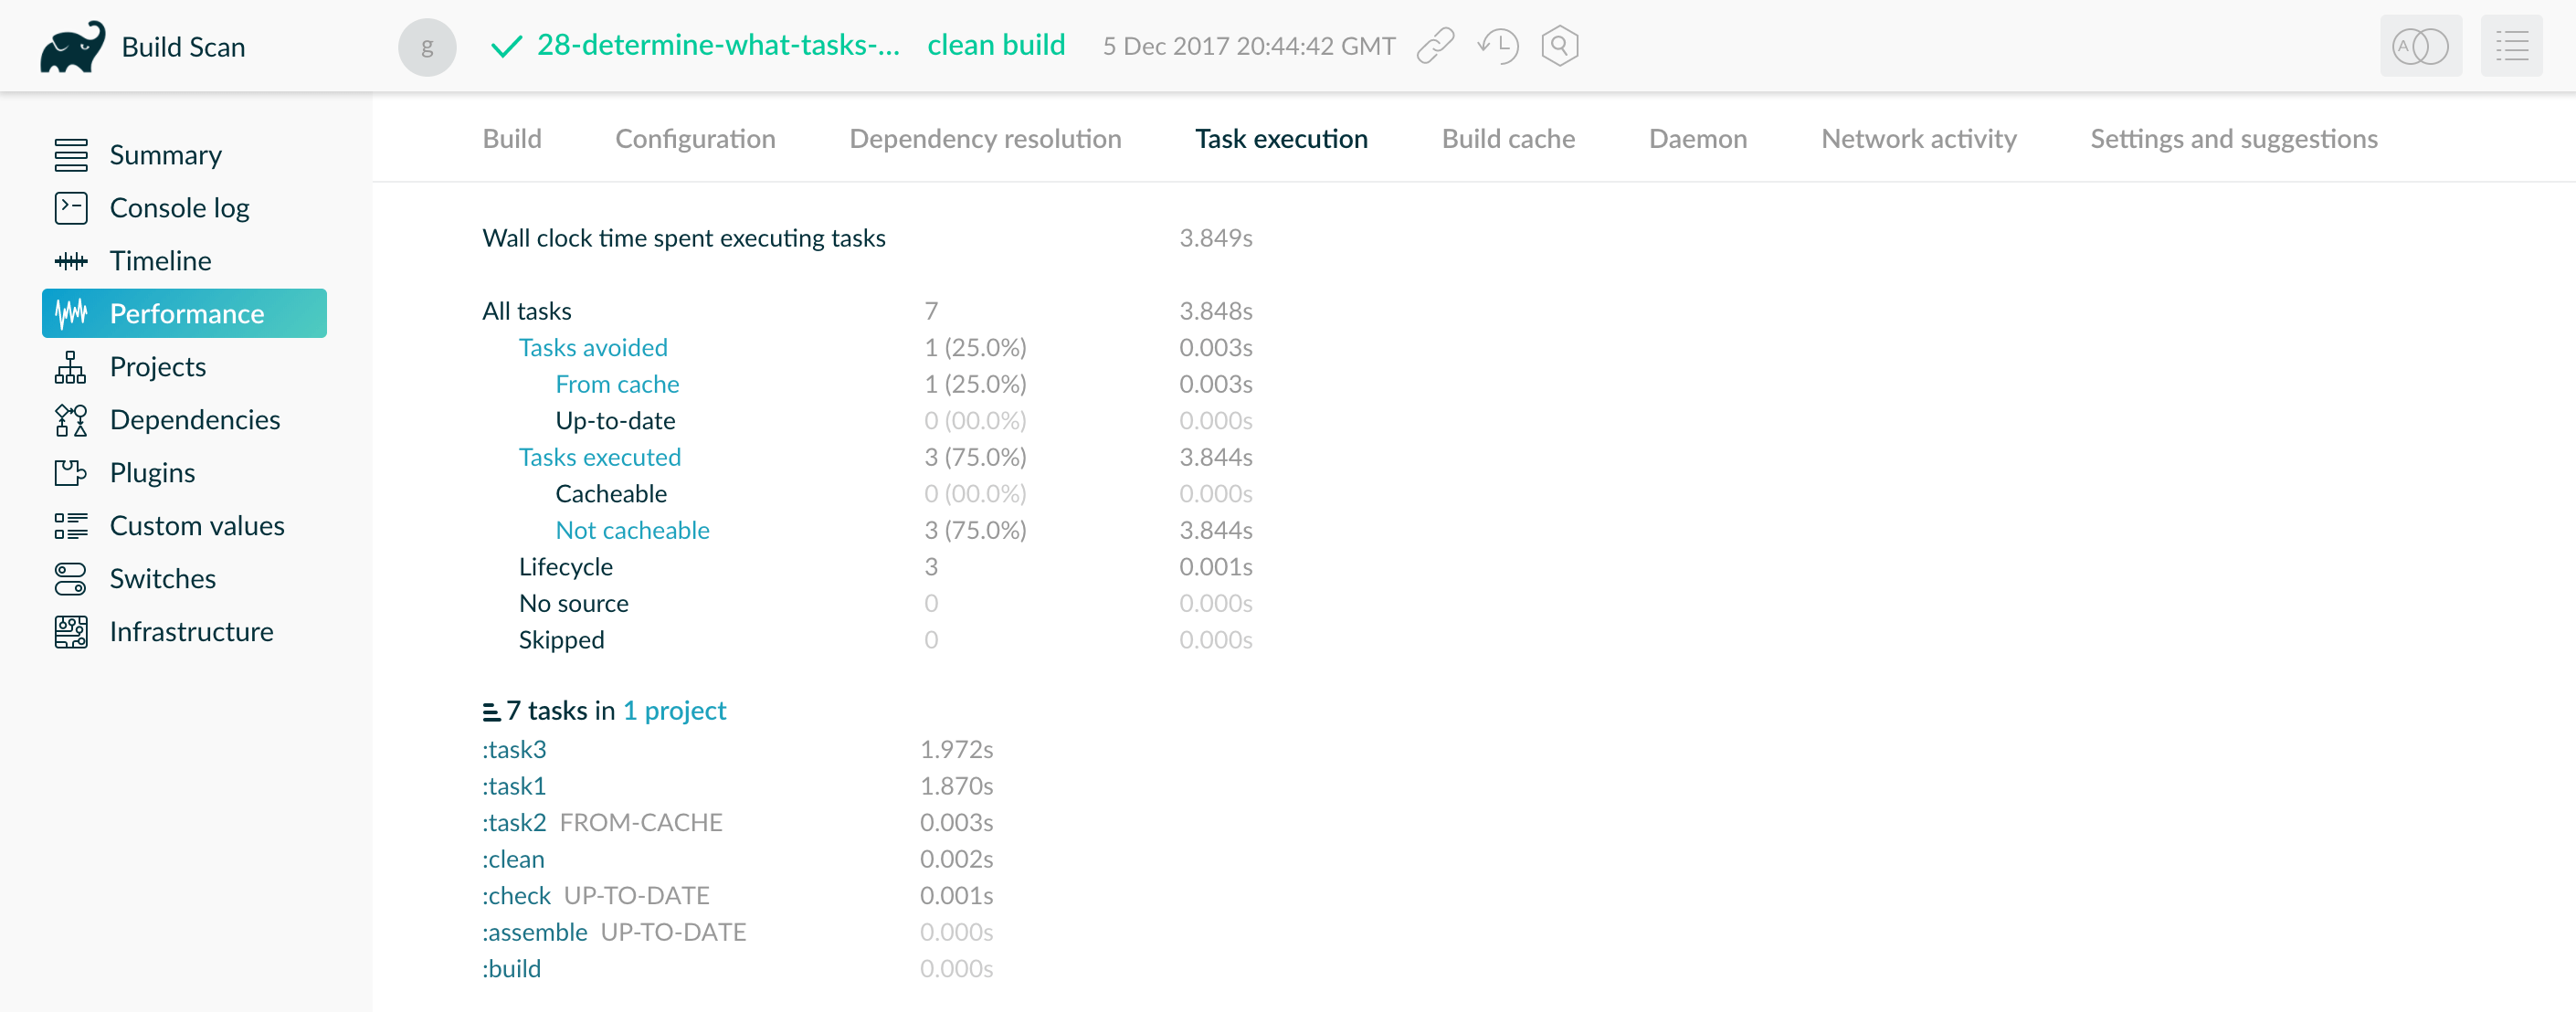

Sort by task duration on the timeline screen to highlight tasks with great time saving potential.
The build scan above shows that :task1 and :task3 could be improved and made cacheable
and shows why Gradle didn’t cache them.
Create builds for specific developer workflows
The fastest task is one that doesn’t execute. If you can find ways to skip tasks you don’t need to run, you’ll end up with a faster build overall.
If your build includes multiple subprojects, create tasks to build those subprojects independently. This helps you get the most out of caching, since a change to one subproject won’t force a rebuild for unrelated subprojects. And this helps reduce build times for teams that work on unrelated subprojects: there’s no need for front-end developers to build the back-end subprojects every time they change the front-end. Documentation writers don’t need to build front-end or back-end code even if the documentation lives in the same project as that code.
Instead, create tasks that match the needs of developers. You’ll still have a single task graph for the whole project. Each group of users suggests a restricted view of the task graph: turn that view into a Gradle workflow that excludes unnecessary tasks.
Gradle provides several features to create these workflows:
-
Assign tasks to appropriate groups
-
Create aggregate tasks: tasks with no action that only depend on other tasks, such as
assemble -
Defer configuration via
gradle.taskGraph.whenReady()and others, so you can perform verification only when it’s necessary
Increase the heap size
By default, Gradle reserves 512MB of heap space for your build. This is plenty for most projects.
However, some very large builds might need more memory to hold Gradle’s model and caches.
If this is the case for you, you can specify a larger memory requirement.
Specify the following property in the gradle.properties file in your project root or your Gradle home:
org.gradle.jvmargs=-Xmx2048MTo learn more, check out the JVM memory configuration documentation.
Optimize Configuration
As described in the build lifecycle chapter, a
Gradle build goes through 3 phases: initialization, configuration, and execution.
Configuration code always executes regardless of the tasks that run.
As a result, any expensive work performed during configuration slows down every invocation.
Even simple commands like gradle help and gradle tasks.
The next few subsections introduce techniques that can reduce time spent in the configuration phase.
|
Note
|
You can also enable the configuration cache to reduce the impact of a slow configuration phase. But even machines that use the cache still occasionally execute your configuration phase. As a result, you should make the configuration phase as fast as possible with these techniques. |
Avoid expensive or blocking work
You should avoid time-intensive work in the configuration phase.
But sometimes it can sneak into your build in non-obvious places.
It’s usually clear when you’re encrypting data or calling remote services during configuration if that code is in a build file.
But logic like this is more often found in plugins and occasionally custom task classes.
Any expensive work in a plugin’s apply() method or a tasks’s constructor is a red flag.
Only apply plugins where they’re needed
Every plugin and script that you apply to a project adds to the overall configuration time.
Some plugins have a greater impact than others.
That doesn’t mean you should avoid using plugins, but you should take care to only apply them where they’re needed.
For example, it’s easy to apply plugins to all subprojects via allprojects {} or subprojects {} even if not every project needs them.
In the above build scan example, you can see that the root build script applies the script-a.gradle
script to 3 subprojects inside the build:
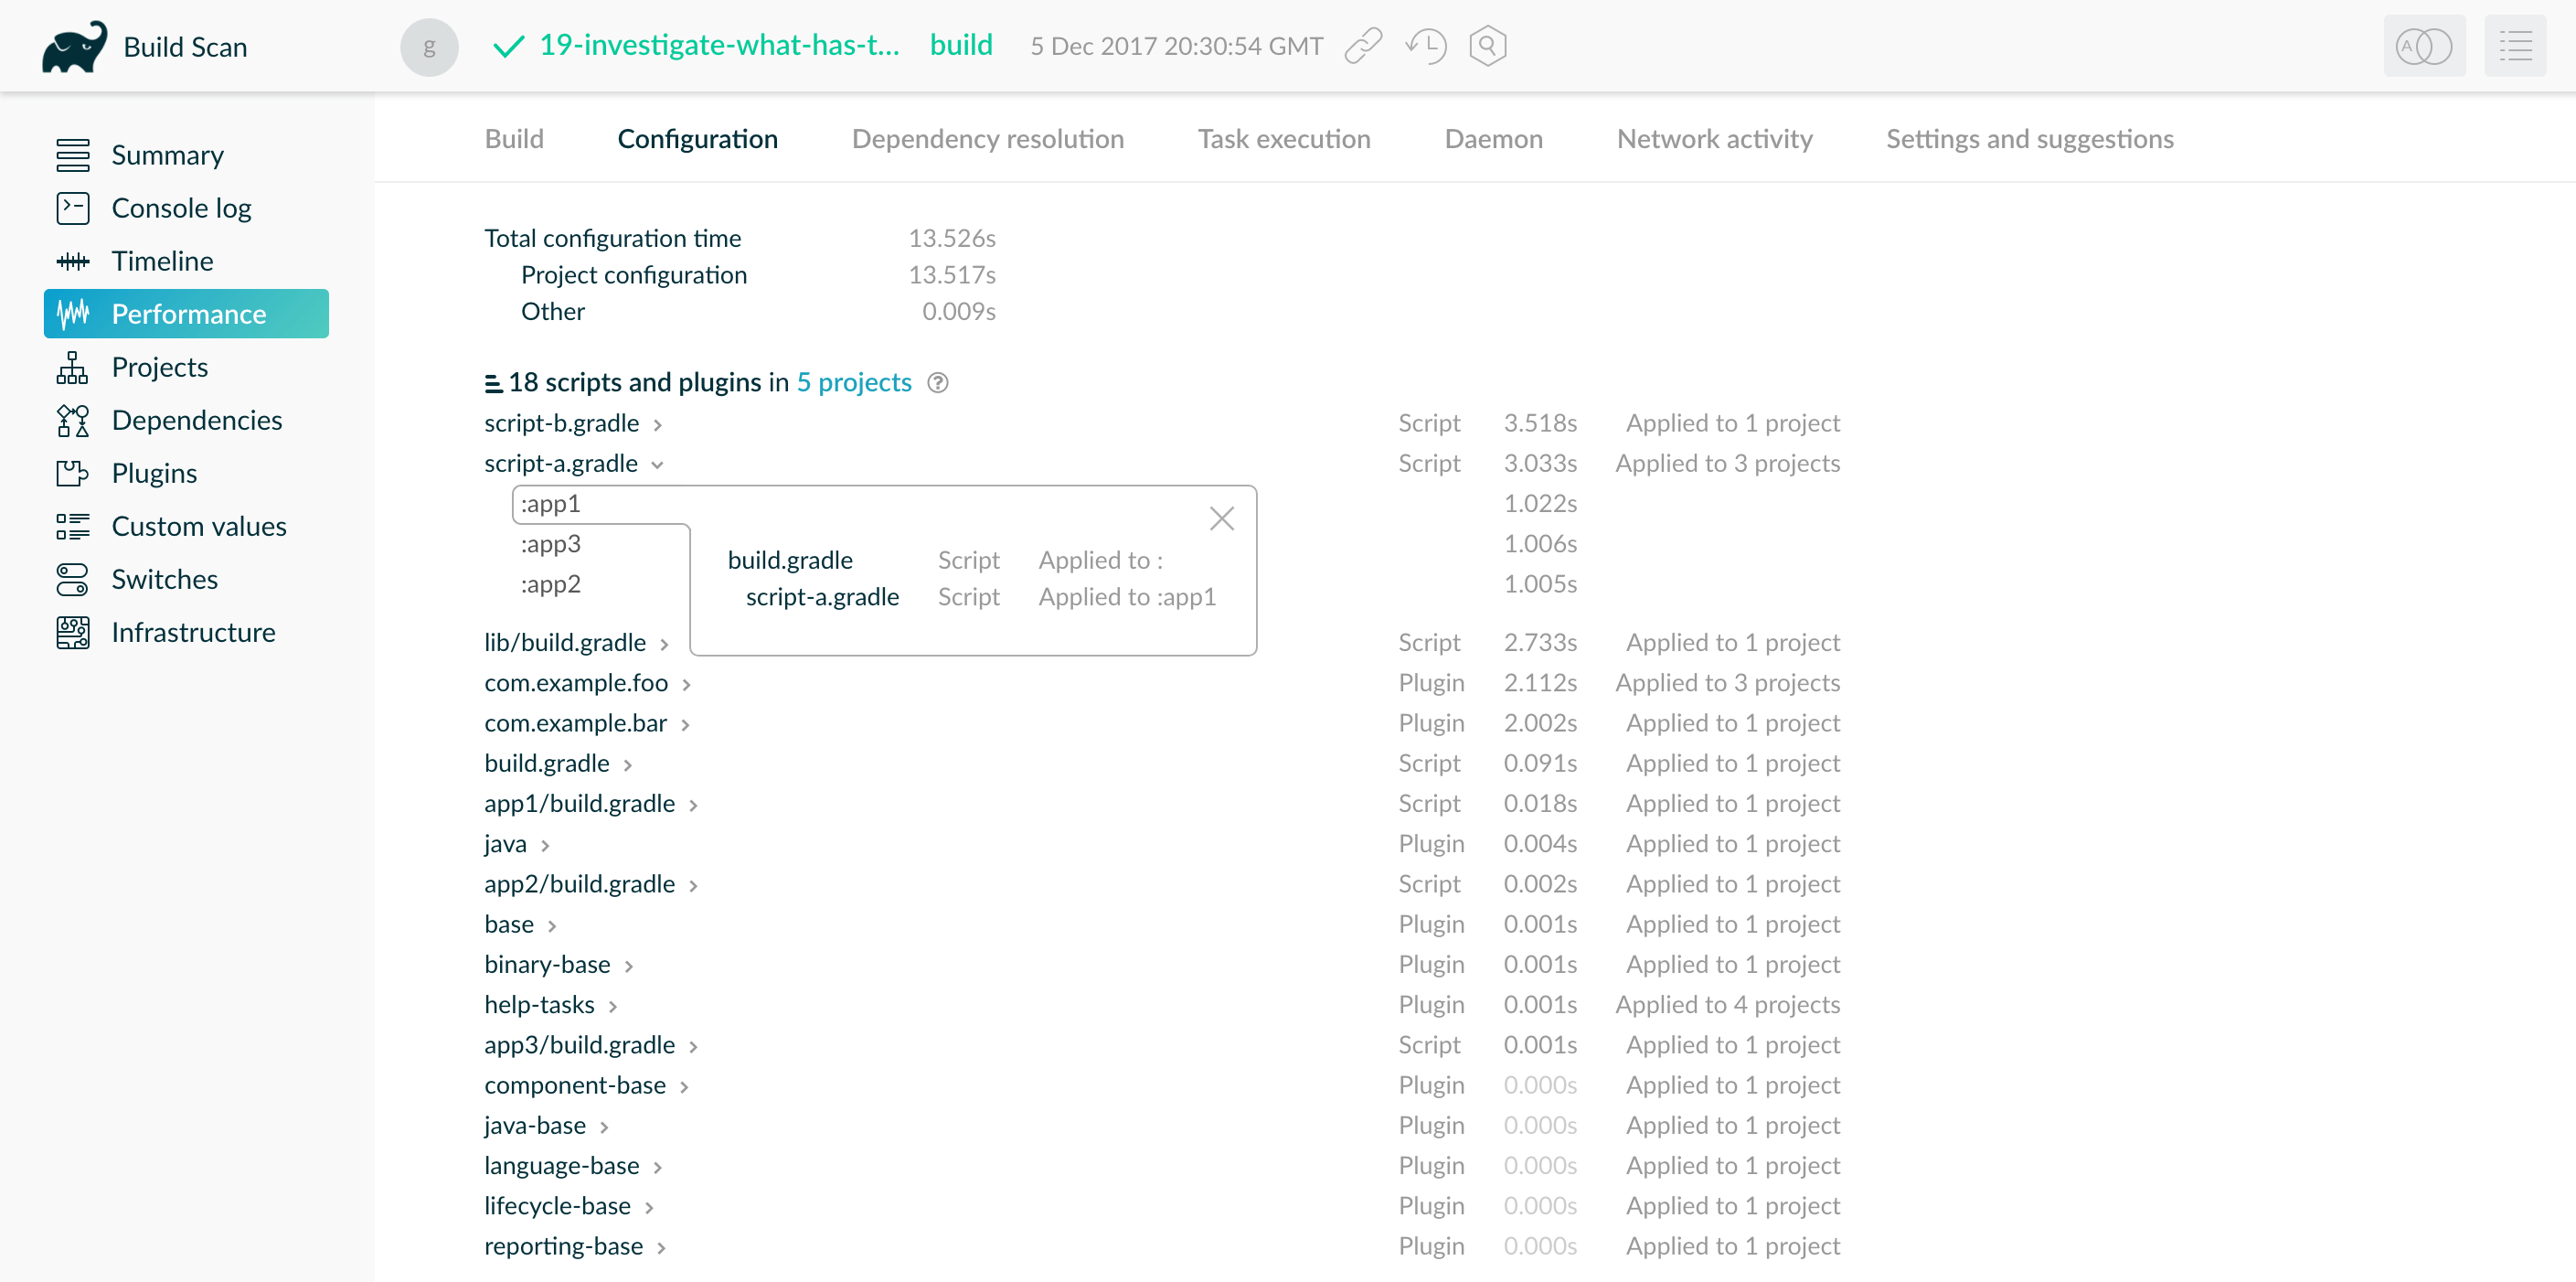
This script takes 1 second to run. Since it applies to 3 subprojects, this script cumulatively delays the configuration phase by 3 seconds. In this situation, there are several ways to reduce the delay:
-
If only one subproject uses the script, you could remove the script application from the other subprojects. This reduces the configuration delay by two seconds in each Gradle invocation.
-
If multiple subprojects, but not all, use the script, you could refactor the script and all surrounding logic into a custom plugin located in
buildSrc. Apply the custom plugin to only the relevant subprojects, reducing configuration delay and avoiding code duplication.
Statically compile tasks and plugins
Plugin and task authors often write Groovy for its concise syntax, API extensions to the JDK, and functional methods using closures. But Groovy syntax comes with the cost of dynamic interpretation. As a result, method calls in Groovy take more time and use more CPU than method calls in Java or Kotlin.
You can reduce this cost with static Groovy compilation: add the @CompileStatic annotation to your Groovy classes when you don’t
explicitly require dynamic features. If you need dynamic Groovy in a method, add the @CompileDynamic annotation to that method.
Alternatively, you can write plugins and tasks in a statically compiled language such as Java or Kotlin.
Warning: Gradle’s Groovy DSL relies heavily on Groovy’s dynamic features. To use static compilation in your plugins, switch to Java-like syntax.
The following example defines a task that copies files without dynamic features:
project.tasks.register('copyFiles', Copy) { Task t ->
t.into(project.layout.buildDirectory.dir('output'))
t.from(project.configurations.getByName('compile'))
}This example uses the register() and getByName() methods available on all Gradle “domain object containers”.
Domain object containers include tasks, configurations, dependencies, extensions, and more.
Some collections, such as TaskContainer, have dedicated types with extra methods like create,
which accepts a task type.
When you use static compilation, an IDE can:
-
quickly show errors related to unrecognised types, properties, and methods
-
auto-complete method names
Optimize Dependency resolution
Dependency resolution simplifies integrating third-party libraries and other dependencies into your projects. Gradle contacts remote servers to discover and download dependencies. You can optimize the way you reference dependencies to cut down on these remote server calls.
Avoid unnecessary and unused dependencies
Managing third-party libraries and their transitive dependencies adds a significant cost to project maintenance and build times.
Watch out for unused dependencies: when a third-party library stops being used by isn’t removed from the dependency list. This happens frequently during refactors. You can use the Gradle Lint plugin to identify unused dependencies.
If you only use a small number of methods or classes in a third-party library, consider:
-
implementing the required code yourself in your project
-
copying the required code from the library (with attribution!) if it is open source
Optimize repository order
When Gradle resolves dependencies, it searches through each repository in the declared order. To reduce the time spent searching for dependencies, declare the repository hosting the largest number of your dependencies first. This minimizes the number of network requests required to resolve all dependencies.
Minimize repository count
Limit the number of declared repositories to the minimum possible for your build to work.
If you’re using a custom repository server, create a virtual repository that aggregates several repositories together. Then, add only that repository to your build file.
Minimize dynamic and snapshot versions
Dynamic versions (e.g. “2.+”), and changing versions (snapshots) force Gradle to contact remote repositories to find new releases. By default, Gradle only checks once every 24 hours. But you can change this programmatically with the following settings:
-
cacheDynamicVersionsFor -
cacheChangingModulesFor
If a build file or initialization script lowers these values, Gradle queries repositories more often. When you don’t need the absolute latest release of a dependency every time you build, consider removing the custom values for these settings.
Find dynamic and changing versions with build scans
You can find all dependencies with dynamic versions via build scans:
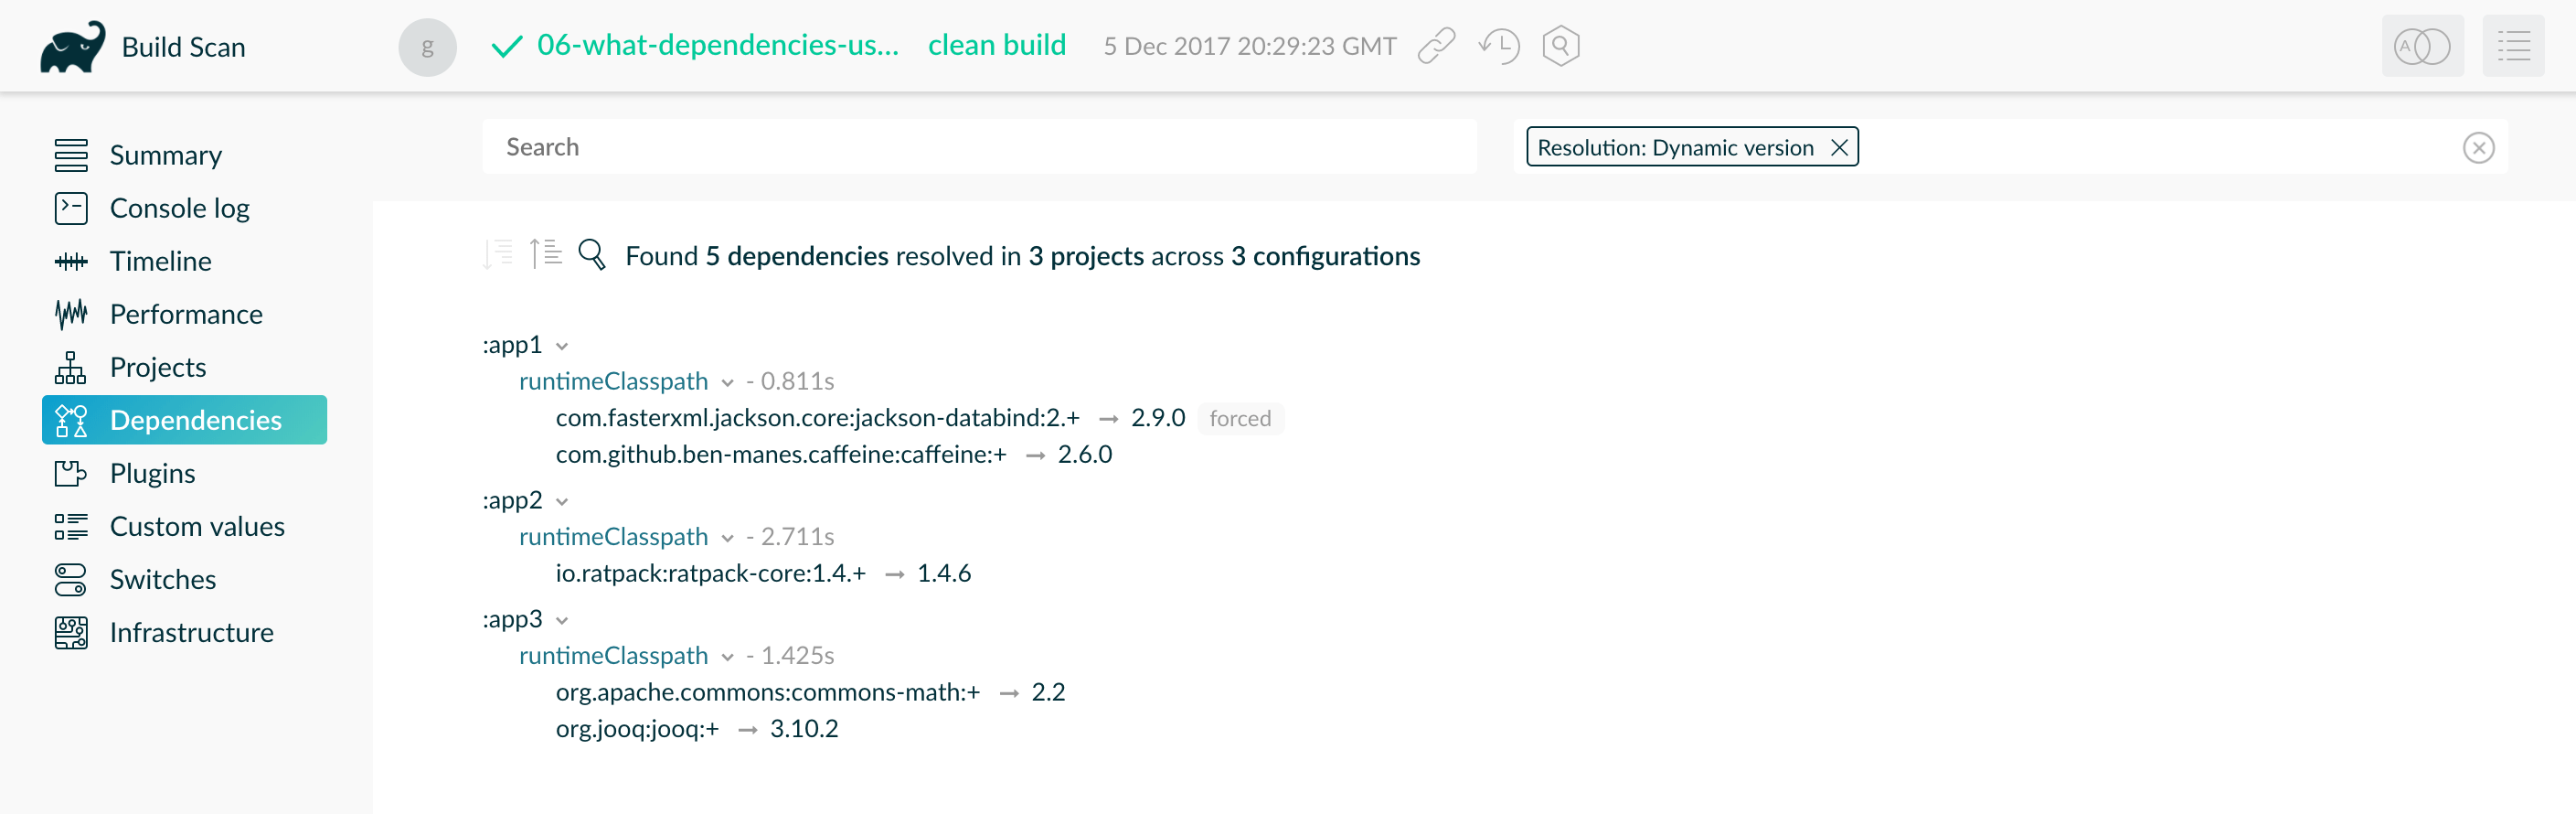
You may be able to use fixed versions like "1.2" and "3.0.3.GA" that allow Gradle to cache versions. If you must use dynamic and changing versions, tune the cache settings to best meet your needs.
Avoid dependency resolution during configuration
Dependency resolution is an expensive process, both in terms of I/O and computation. Gradle reduces the required network traffic through caching. But there is still a cost. Gradle runs the configuration phase on every build. If you trigger dependency resolution during the configuration phase, every build pays that cost.
Switch to declarative syntax
If you evaluate a configuration file, your project pays the cost of dependency resolution during configuration. Normally tasks evaluate these files, since you don’t need the files until you’re ready to do something with them in a task action. Imagine you’re doing some debugging and want to display the files that make up a configuration. To implement this, you might inject a print statement:
tasks.register<Copy>("copyFiles") {
println(">> Compilation deps: ${configurations.compileClasspath.get().files.map { it.name }}")
into(layout.buildDirectory.dir("output"))
from(configurations.compileClasspath)
}tasks.register('copyFiles', Copy) {
println ">> Compilation deps: ${configurations.compileClasspath.files.name}"
into(layout.buildDirectory.dir('output'))
from(configurations.compileClasspath)
}The files property forces Gradle to resolve the dependencies. In this example, that happens during the configuration phase.
Because the configuration phase runs on every build, all builds now pay the performance cost of dependency resolution.
You can avoid this cost with a doFirst() action:
tasks.register<Copy>("copyFiles") {
into(layout.buildDirectory.dir("output"))
// Store the configuration into a variable because referencing the project from the task action
// is not compatible with the configuration cache.
val compileClasspath: FileCollection = configurations.compileClasspath.get()
from(compileClasspath)
doFirst {
println(">> Compilation deps: ${compileClasspath.files.map { it.name }}")
}
}tasks.register('copyFiles', Copy) {
into(layout.buildDirectory.dir('output'))
// Store the configuration into a variable because referencing the project from the task action
// is not compatible with the configuration cache.
FileCollection compileClasspath = configurations.compileClasspath
from(compileClasspath)
doFirst {
println ">> Compilation deps: ${compileClasspath.files.name}"
}
}Note that the from() declaration doesn’t resolve the dependencies because you’re using the dependency configuration itself as an argument, not the files.
The Copy task resolves the configuration itself during task execution.
Visualize dependency resolution with build scans
The "Dependency resolution" tab on the performance page of a build scan shows dependency resolution time during the configuration and execution phases:
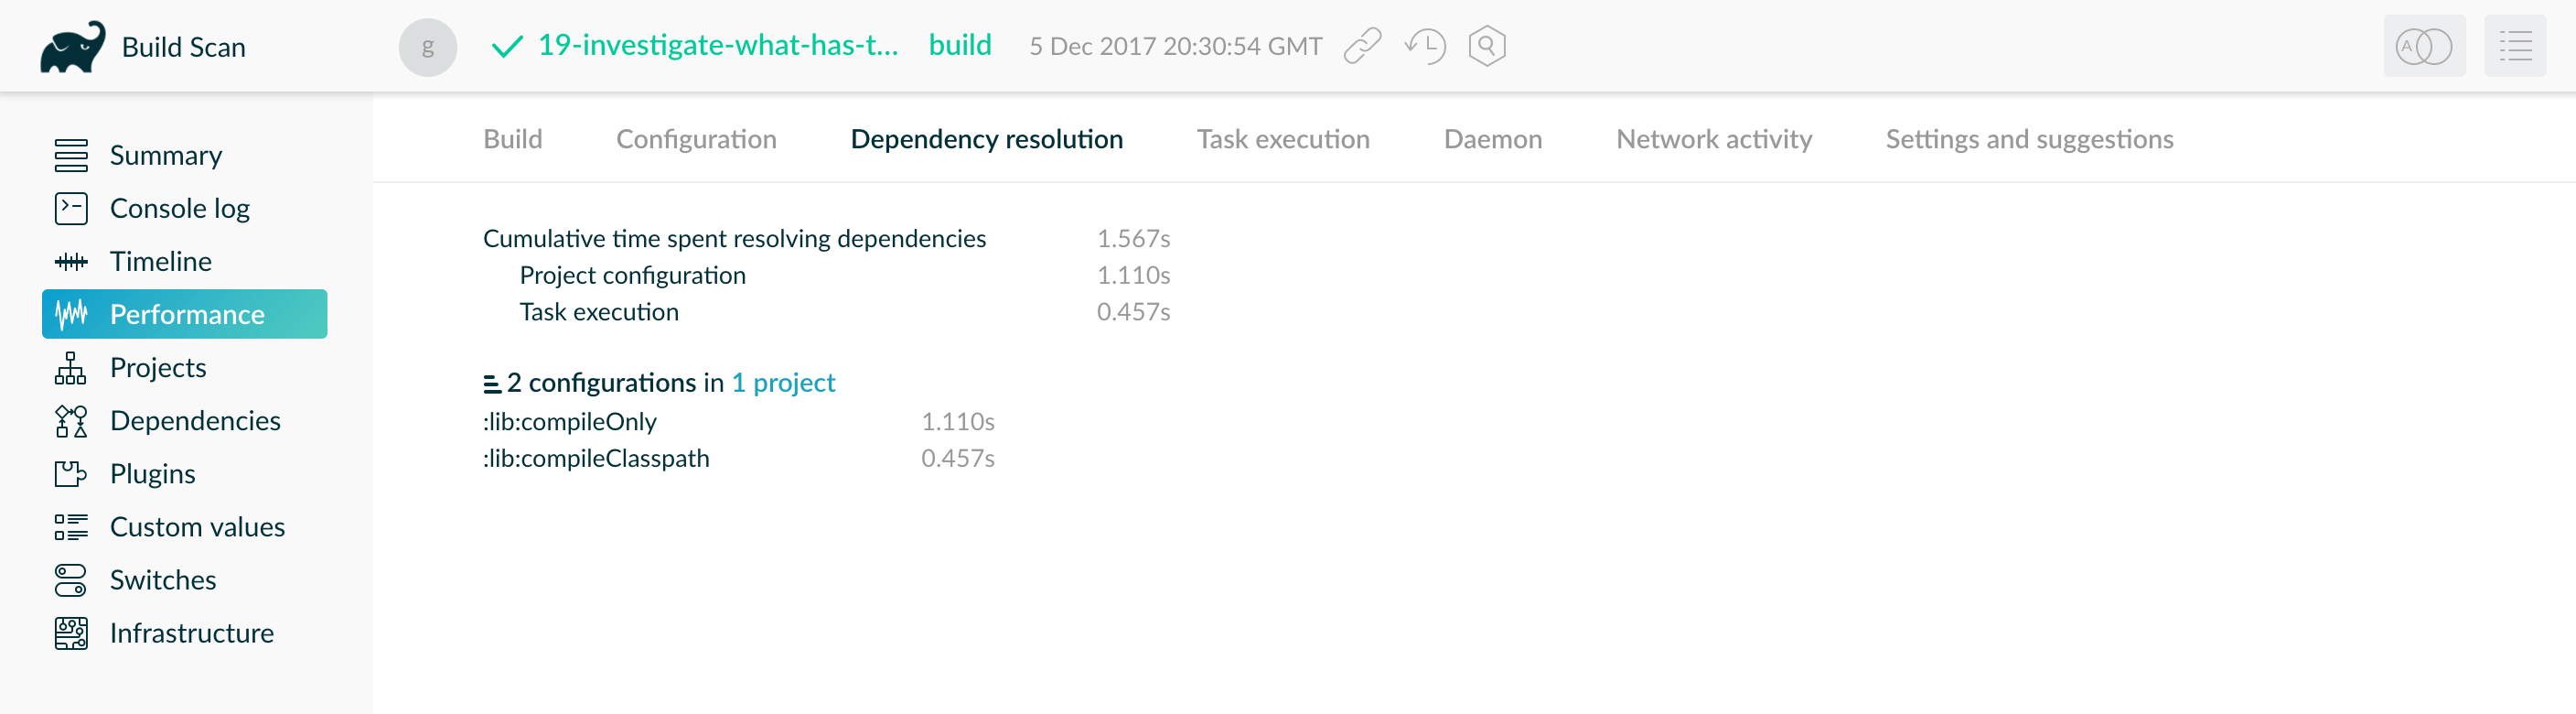
Build scans provide another means of identifying this issue. Your build should spend 0 seconds resolving dependencies during "project configuration". This example shows the build resolves dependencies too early in the lifecycle. You can also find a "Settings and suggestions" tab on the "Performance" page. This shows dependencies resolved during the configuration phase.
Remove or improve custom dependency resolution logic
Gradle allows users to model dependency resolution in the way that best suits them. Simple customizations, such as forcing specific versions of a dependency or substituting one dependency for another, don’t have a big impact on dependency resolution times. More complex customizations, such as custom logic that downloads and parses POMs, can slow down dependency resolution signficantly.
Use build scans or profile reports to check that custom dependency resolution logic doesn’t adversely affect dependency resolution times. This could be custom logic you have written yourself, or it could be part of a plugin.
Remove slow or unexpected dependency downloads
Slow dependency downloads can impact your overall build performance. Several things could cause this, including a slow internet connection or an overloaded repository server. On the "Performance" page of a build scan, you’ll find a "Network Activity" tab. This tab lists information including:
-
the time spent downloading dependencies
-
the transfer rate of dependency downloads
-
a list of downloads sorted by download time
In the following example, two slow dependency downloads took 20 and 40 seconds and slowed down the overall performance of a build:
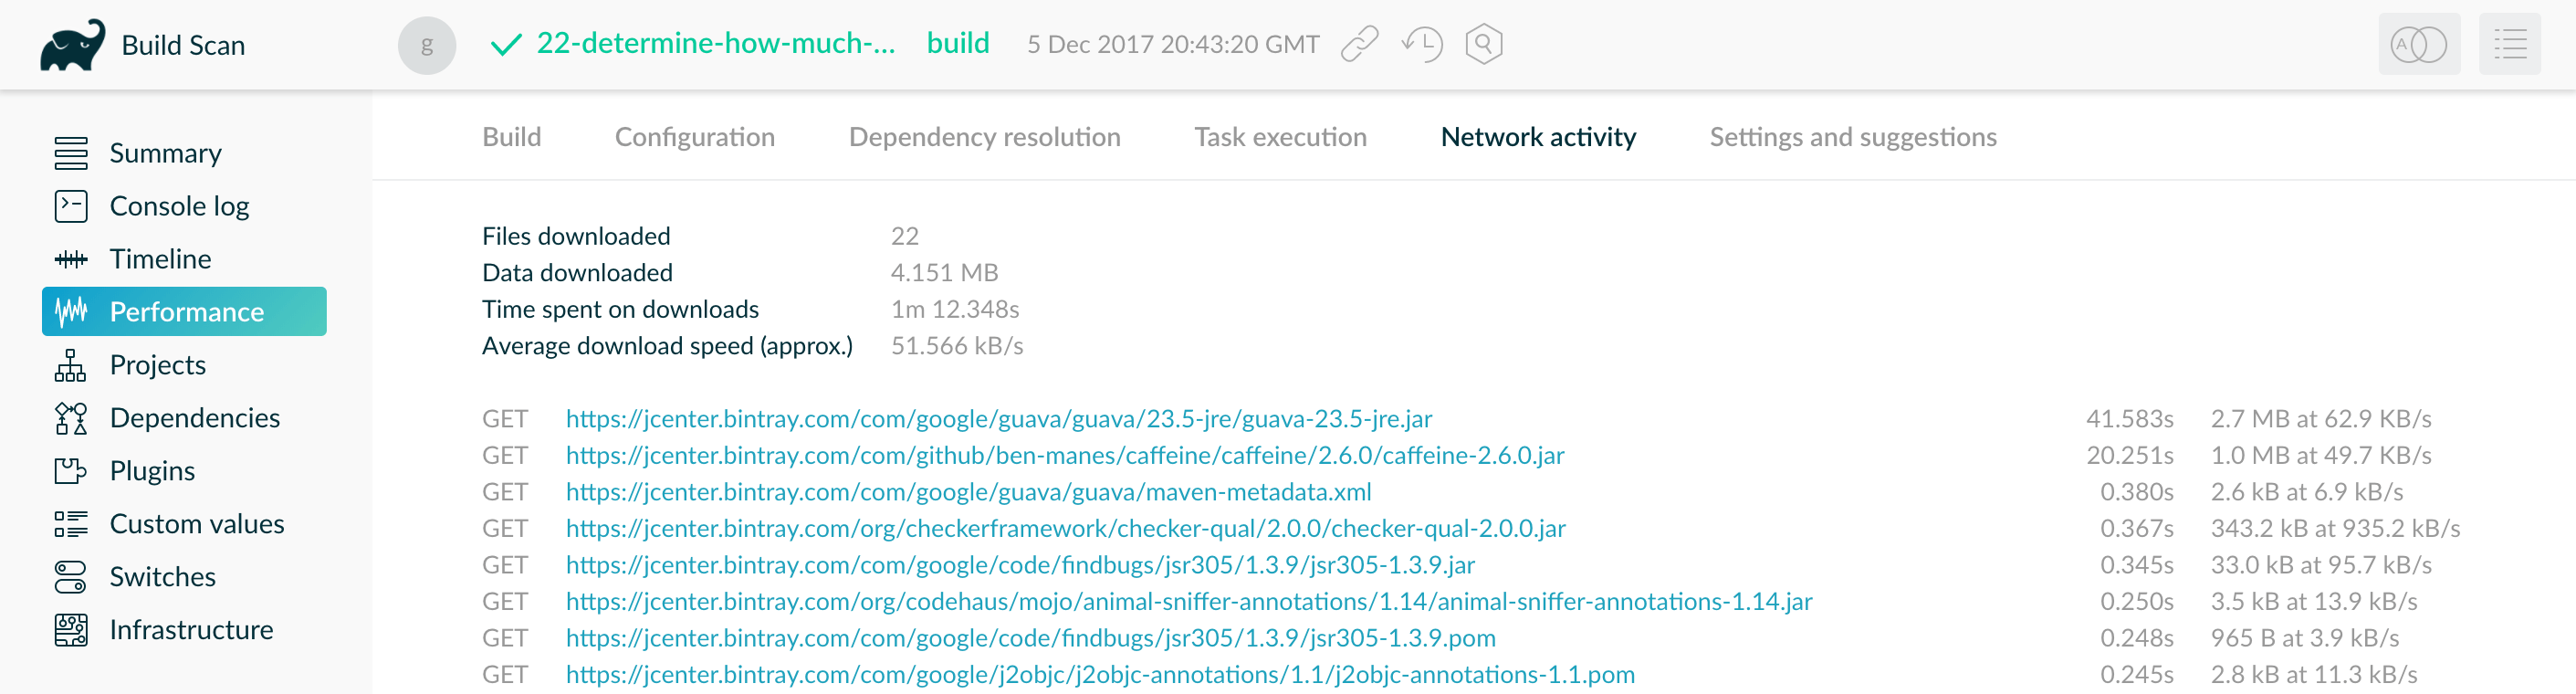
Check the download list for unexpected dependency downloads. For example, you might see a download caused by a dependency using a dynamic version.
Eliminate these slow or unexpected downloads by switching to a different repository or dependency.
Optimize Java projects
The following sections apply only to projects that use the java plugin or another JVM language.
Optimize tests
Projects often spend much of their build time testing. These could be a mixture of unit and integration tests. Integration tests usually take longer. Build scans can help you identify the slowest tests. You can then focus on speeding up those tests.
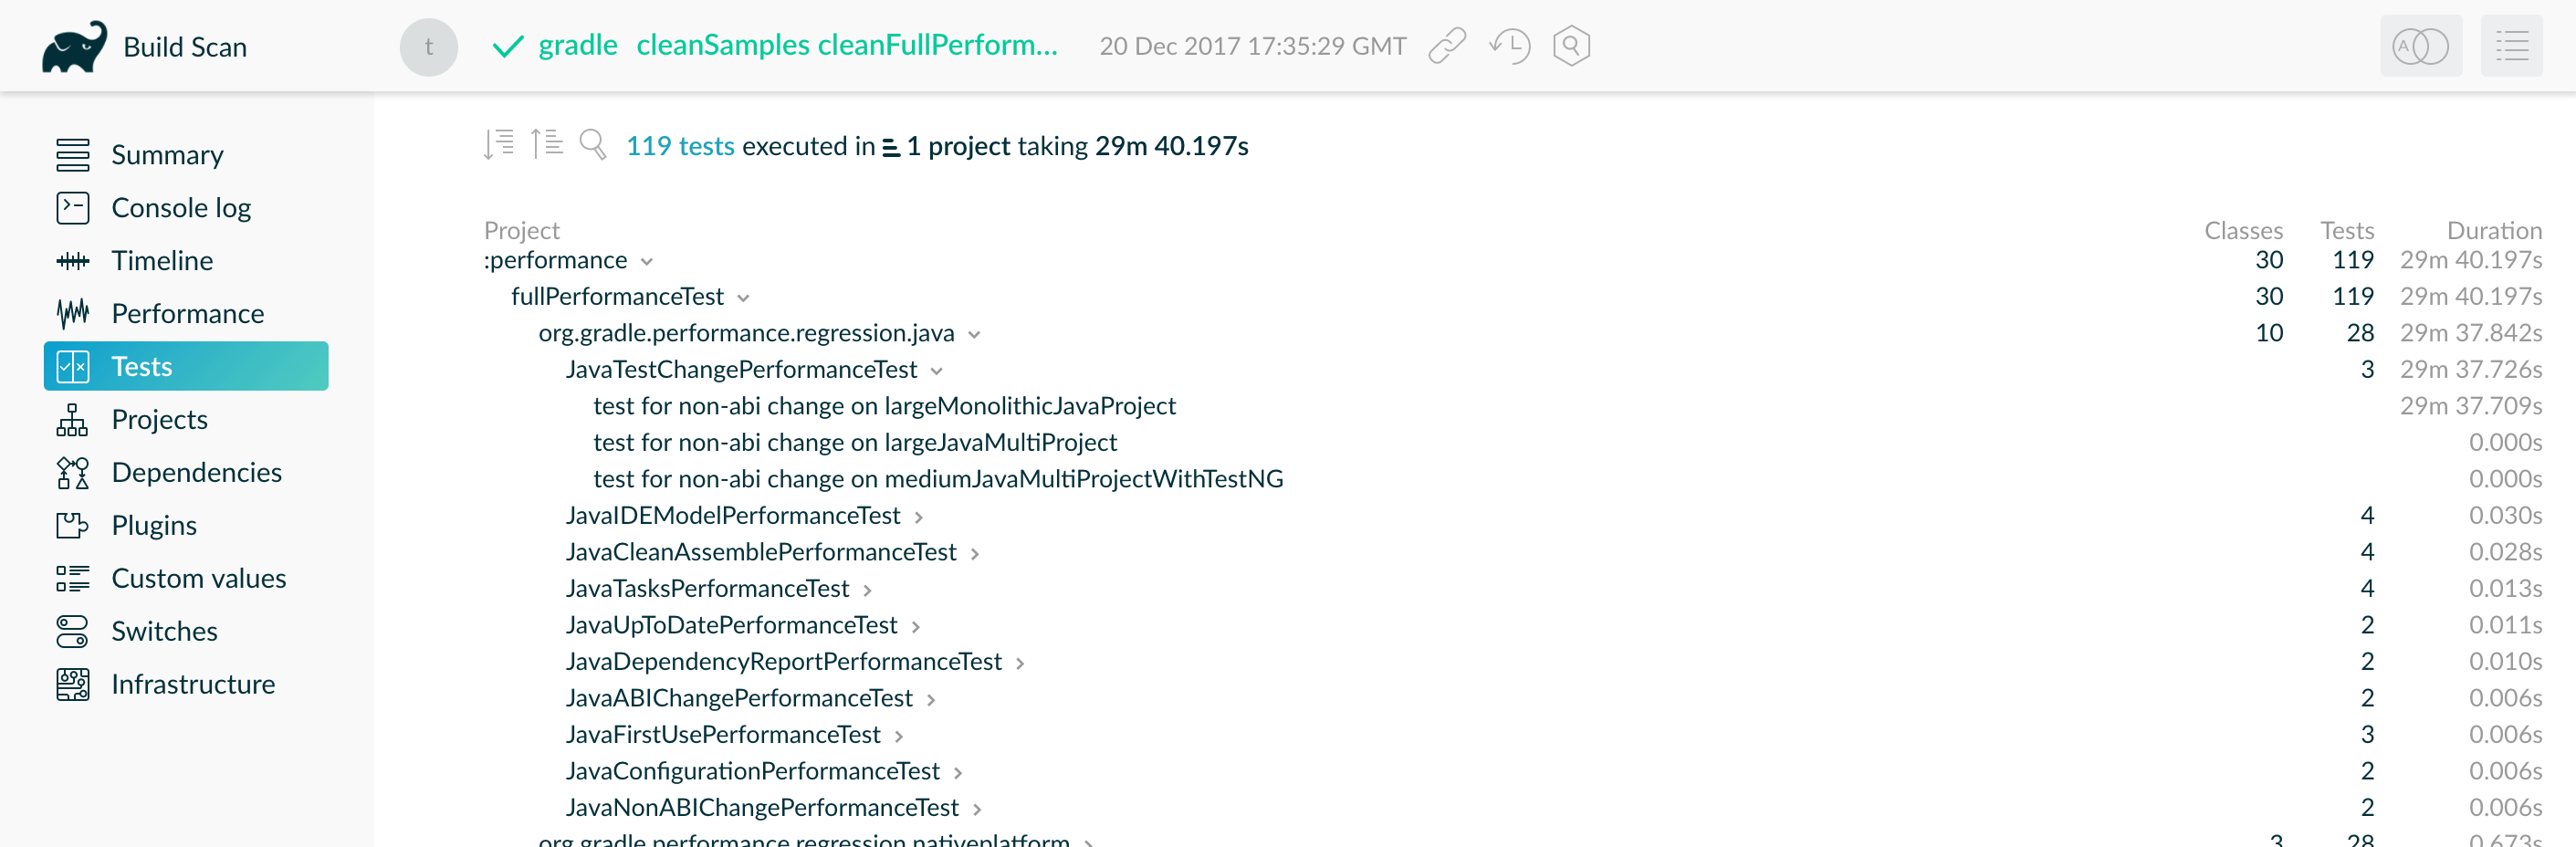
The above build scan shows an interactive test report for all projects in which tests ran.
Gradle has several ways to speed up tests:
-
Execute tests in parallel
-
Fork tests into multiple processes
-
Disable reports
Let’s look at each of these in turn.
Execute tests in parallel
Gradle can run multiple test cases in parallel.
To enable this feature, override the value of maxParallelForks on the relevant Test task.
For the best performance, use some number less than or equal to the number of available CPU cores:
tasks.withType<Test>().configureEach {
maxParallelForks = (Runtime.getRuntime().availableProcessors() / 2).coerceAtLeast(1)
}tasks.withType(Test).configureEach {
maxParallelForks = Runtime.runtime.availableProcessors().intdiv(2) ?: 1
}Tests in parallel must be independent. They should not share resources such as files or databases. If your tests do share resources, they could interfere with each other in random and unpredictable ways.
Fork tests into multiple processes
By default, Gradle runs all tests in a single forked VM. If there are a lot of tests, or some tests that consume lots of memory, your tests may take longer than you expect to run. You can increase the heap size, but garbage collection may slow down your tests.
Alternatively, you can fork a new test VM after a certain number of tests have run with the forkEvery setting:
tasks.withType<Test>().configureEach {
forkEvery = 100
}tasks.withType(Test).configureEach {
forkEvery = 100
}|
Warning
|
Forking a VM is an expensive operation. Setting too small a value here slows down testing. |
Disable reports
Gradle automatically creates test reports regardless of whether you want to look at them. That report generation slows down the overall build. You may not need reports if:
-
you only care if the tests succeeded (rather than why)
-
you use build scans, which provide more information than a local report
To disable test reports, set reports.html.required and reports.junitXml.required to false in the Test task:
tasks.withType<Test>().configureEach {
reports.html.required = false
reports.junitXml.required = false
}tasks.withType(Test).configureEach {
reports.html.required = false
reports.junitXml.required = false
}You might want to conditionally enable reports so you don’t have to edit the build file to see them. To enable the reports based on a project property, check for the presence of a property before disabling reports:
tasks.withType<Test>().configureEach {
if (!project.hasProperty("createReports")) {
reports.html.required = false
reports.junitXml.required = false
}
}tasks.withType(Test).configureEach {
if (!project.hasProperty("createReports")) {
reports.html.required = false
reports.junitXml.required = false
}
}Then, pass the property with -PcreateReports on the command line to generate the reports.
$ gradle <task> -PcreateReports
Or configure the property in the gradle.properties file in the project root or your Gradle home:
createReports=trueOptimize the compiler
The Java compiler is fast. But if you’re compiling hundreds of Java classes, even a short compilation time adds up. Gradle offers a several optimizations for Java compilation:
-
Run the compiler as a separate process
-
Switch internal-only dependencies to implementation visibility
Run the compiler as a separate process
You can run the compiler as a separate process with the following configuration for any JavaCompile task:
<task>.options.isFork = true<task>.options.fork = trueTo apply the configuration to all Java compilation tasks, you can configureEach java compilation task:
tasks.withType<JavaCompile>().configureEach {
options.isFork = true
}tasks.withType(JavaCompile).configureEach {
options.fork = true
}Gradle reuses this process within the duration the build, so the forking overhead is minimal. By forking memory-intensive compilation into a separate process, we minimize garbage collection in the main Gradle process. Less garbage collection means that Gradle’s infrastructure can run faster, especially when you also use parallel builds.
Forking compilation rarely impacts the performance of small projects. But you should consider it if a single task compiles more than a thousand source files together.
Switch internal-only dependencies to implementation visibility
|
Note
|
Only libraries can define api dependencies. Use the
java-library plugin to define API dependencies in your libraries. Projects that use the java plugin cannot declare api dependencies.
|
Before Gradle 3.4, projects declared dependencies using the compile configuration.
This exposed all of those dependencies to downstream projects. In Gradle 3.4 and above,
you can separate downstream-facing api dependencies from internal-only implementation details.
Implementation dependencies don’t leak into the compile classpath of downstream projects.
When implementation details change, Gradle only recompiles api dependencies.
dependencies {
api(project("my-utils"))
implementation("com.google.guava:guava:21.0")
}dependencies {
api project('my-utils')
implementation 'com.google.guava:guava:21.0'
}This can significantly reduce the "ripple" of recompilations caused by a single change in large multi-project builds.
Improve the performance of older Gradle releases
Some projects cannot easily upgrade to a current Gradle version. While you should always upgrade Gradle to a recent version when possible, we recognize that it isn’t always feasible for certain niche situations. In those select cases, check out these recommendations to optimize older versions of Gradle.
Enable the Daemon
Gradle 3.0 and above enable the Daemon by default. If you are using an older version, you should update to the latest version of Gradle. If you cannot update your Gradle version, you can enable the Daemon manually.
Use incremental compilation
Gradle can analyze dependencies down to the individual class level
to recompile only the classes affected by a change.
Gradle 4.10 and above enable incremental compilation by default.
To enable incremental compilation by default in older Gradle versions, add the following setting to your
build.gradle file:
tasks.withType<JavaCompile>().configureEach {
options.isIncremental = true
}tasks.withType(JavaCompile).configureEach {
options.incremental = true
}Use compile avoidance
Often, updates only change internal implementation details of your code, like the body of a method. These updates are known as ABI-compatible changes: they have no impact on the binary interface of your project. In Gradle 3.4 and above, ABI-compatible changes no longer trigger recompiles of downstream projects. This especially improves build times in large multi-project builds with deep dependency chains.
Upgrade to a Gradle version above 3.4 to benefit from compile avoidance.
|
Note
|
If you use annotation processors, you need to explicitly declare them in order for compilation avoidance to work. To learn more, check out the compile avoidance documentation. |
Optimize Android projects
Everything on this page applies to Android builds, since Android builds use Gradle. Yet Android introduces unique opportunities for optimization. For more information, check out the Android team performance guide. You can also watch the accompanying talk from Google IO 2017.
Gradle Daemon
A daemon is a computer program that runs as a background process rather than being under the direct control of an interactive user.
Gradle runs on the Java Virtual Machine (JVM) and uses several supporting libraries with non-trivial initialization time. Startups can be slow. The Gradle Daemon solves this problem.
The Gradle Daemon is a long-lived background process that reduces the time it takes to run a build.
The Gradle Daemon reduces build times by:
-
Caching project information across builds
-
Running in the background so every Gradle build doesn’t have to wait for JVM startup
-
Benefiting from continuous runtime optimization in the JVM
-
Watching the file system to calculate exactly what needs to be rebuilt before you run a build
Understanding the Daemon
The Gradle JVM client sends the Daemon build information such as command line arguments, project directories, and environment variables so that it can run the build. The Wrapper is responsible for resolving dependencies, executing build scripts, creating and running tasks; when it is done, it sends the client the output. Communication between the client and the Daemon happens via a local socket connection.
Daemons use the JVM’s default minimum heap size.
If the requested build environment does not specify a maximum heap size, the Daemon uses up to 512MB of heap. 512MB is adequate for most builds. Larger builds with hundreds of subprojects, configuration, and source code may benefit from a larger heap size.
Check Daemon status
To get a list of running Daemons and their statuses, use the --status command:
$ gradle --status
PID STATUS INFO 28486 IDLE 7.5 34247 BUSY 7.5
Currently, a given Gradle version can only connect to Daemons of the same version. This means the status output only shows Daemons spawned running the same version of Gradle as the current project.
Find Daemons
If you have installed the Java Development Kit (JDK), you can view live daemons with the jps command.
$ jps
33920 Jps 27171 GradleDaemon 22792
Live Daemons appear under the name GradleDaemon.
Because this command uses the JDK, you can view Daemons running any version of Gradle.
Enable Daemon
Gradle enables the Daemon by default since Gradle 3.0.
If your project doesn’t use the Daemon, you can enable it for a single build with the --daemon flag when you run a build:
$ gradle <task> --daemon
This flag overrides any settings that disable the Daemon in your project or user gradle.properties files.
To enable the Daemon by default in older Gradle versions, add the following setting to the gradle.properties file in the project root or your Gradle User Home (GRADLE_USER_HOME:
org.gradle.daemon=trueDisable Daemon
You can disable the Daemon in multiple ways but there are important considerations:
- Single-use Daemon
-
If the JVM args of the client process don’t match what the build requires, a single-used Daemon (disposable JVM) is created. This means the Daemon is required for the build, so it is created, used, and then stopped at the end of the build.
- No Daemon
-
If the
JAVA_OPTSandGRADLE_OPTSmatchorg.gradle.jvmargs, the Daemon will not be used at all since the build happens in the client JVM.
Disable for a build
To disable the Daemon for a single build, pass the --no-daemon flag when you run a build:
$ gradle <task> --no-daemon
This flag overrides any settings that enable the Daemon in your project including the gradle.properties files.
Disable for a project
To disable the Daemon for all builds of a project, add org.gradle.daemon=false to the gradle.properties file in the project root.
Disable for a user
On Windows, this command disables the Daemon for the current user:
(if not exist "%USERPROFILE%/.gradle" mkdir "%USERPROFILE%/.gradle") && (echo. >> "%USERPROFILE%/.gradle/gradle.properties" && echo org.gradle.daemon=false >> "%USERPROFILE%/.gradle/gradle.properties")On UNIX-like operating systems, the following Bash shell command disables the Daemon for the current user:
mkdir -p ~/.gradle && echo "org.gradle.daemon=false" >> ~/.gradle/gradle.propertiesDisable globally
There are two recommended ways to disable the Daemon globally across an environment:
-
add
org.gradle.daemon=falseto the$GRADLE_USER_HOME/gradle.properties` file -
add the flag
-Dorg.gradle.daemon=falseto theGRADLE_OPTSenvironment variable
Don’t forget to make sure your JVM arguments and GRADLE_OPTS / JAVA_OPTS match if you want to completely disable the Daemon and not simply invoke a single-use one.
Stop Daemon
It can be helpful to stop the Daemon when troubleshooting or debugging a failure.
Daemons automatically stop given any of the following conditions:
-
Available system memory is low
-
Daemon has been idle for 3 hours
To stop running Daemon processes, use the following command:
$ gradle --stop
This terminates all Daemon processes started with the same version of Gradle used to execute the command.
You can also kill Daemons manually with your operating system. To find the PIDs for all Daemons regardless of Gradle version, see Find Daemons.
Tools & IDEs
The Gradle Tooling API used by IDEs and other tools to integrate with Gradle always uses the Gradle Daemon to execute builds. If you execute Gradle builds from within your IDE, you already use the Gradle Daemon. There is no need to enable it for your environment.
Continuous Integration
We recommend using the Daemon for developer machines and Continuous Integration (CI) servers.
Compatibility
Gradle starts a new Daemon if no idle or compatible Daemons exist.
The following values determine compatibility:
-
Requested build environment, including the following:
-
Java version
-
JVM attributes
-
JVM properties
-
-
Gradle version
Compatibility is based on exact matches of these values. For example:
-
If a Daemon is available with a Java 8 runtime, but the requested build environment calls for Java 10, then the Daemon is not compatible.
-
If a Daemon is available running Gradle 7.0, but the current build uses Gradle 7.4, then the Daemon is not compatible.
Certain properties of a Java runtime are immutable: they cannot be changed once the JVM has started. The following JVM system properties are immutable:
-
file.encoding -
user.language -
user.country -
user.variant -
java.io.tmpdir -
javax.net.ssl.keyStore -
javax.net.ssl.keyStorePassword -
javax.net.ssl.keyStoreType -
javax.net.ssl.trustStore -
javax.net.ssl.trustStorePassword -
javax.net.ssl.trustStoreType -
com.sun.management.jmxremote
The following JVM attributes controlled by startup arguments are also immutable:
-
The maximum heap size (the
-XmxJVM argument) -
The minimum heap size (the
-XmsJVM argument) -
The boot classpath (the
-Xbootclasspathargument) -
The "assertion" status (the
-eaargument)
If the requested build environment requirements for any of these properties and attributes differ from the Daemon’s JVM requirements, the Daemon is not compatible.
|
Note
|
For more information about build environments, see the build environment documentation. |
Performance Impact
The Daemon can reduce build times by 15-75% when you build the same project repeatedly.
|
Tip
|
To understand the Daemon’s impact on your builds, you can profile your build with --profile.
|
In between builds, the Daemon waits idly for the next build. As a result, your machine only loads Gradle into memory once for multiple builds instead of once per build. This is a significant performance optimization.
Runtime Code Optimizations
The JVM gains significant performance from runtime code optimization: optimizations applied to code while it runs.
JVM implementations like OpenJDK’s Hotspot progressively optimize code during execution. Consequently, subsequent builds can be faster purely due to this optimization process.
With the Daemon, perceived build times can drop dramatically between a project’s 1st and 10th builds.
Memory Caching
The Daemon enables in-memory caching across builds. This includes classes for plugins and build scripts.
Similarly, the Daemon maintains in-memory caches of build data, such as the hashes of task inputs and outputs for incremental builds.
Performance Monitoring
Gradle actively monitors heap usage to detect memory leaks in the Daemon.
When a memory leak exhausts available heap space, the Daemon:
-
Finishes the currently running build.
-
Restarts before running the next build.
Gradle enables this monitoring by default.
To disable this monitoring, set the org.gradle.daemon.performance.enable-monitoring Daemon option to false.
You can do this on the command line with the following command:
$ gradle <task> -Dorg.gradle.daemon.performance.enable-monitoring=false
Or you can configure the property in the gradle.properties file in the project root or your GRADLE_USER_HOME (Gradle User Home):
org.gradle.daemon.performance.enable-monitoring=falseFile System Watching
Gradle maintains a Virtual File System (VFS) to calculate what needs to be rebuilt on repeat builds of a project. By watching the file system, Gradle keeps the VFS current between builds.
Enable
Gradle enables file system watching by default for supported operating systems since Gradle 7.
Run the build with the '--watch-fs' flag to force file system watching for a build.
To force file system watching for all builds (unless disabled with --no-watch-fs), add the following value to gradle.properties:
org.gradle.vfs.watch=trueDisable
To disable file system watching:
-
use the
--no-watch-fsflag -
set
org.gradle.vfs.watch=falseingradle.properties
Supported Operating Systems
Gradle uses native operating system features to watch the file system. Gradle supports file system watching on the following operating systems:
-
Windows 10, version 1709 and later
-
Linux, tested on the following distributions:
-
Ubuntu 16.04 or later
-
CentOS Stream 8 or later
-
Red Hat Enterprise Linux (RHEL) 8 or later
-
Amazon Linux 2 or later
-
-
macOS 10.14 (Mojave) or later on Intel and ARM architectures
Supported File Systems
File system watching supports the following file system types:
-
APFS
-
btrfs
-
ext3
-
ext4
-
XFS
-
HFS+
-
NTFS
Gradle also supports VirtualBox’s shared folders.
Network file systems like Samba and NFS are not supported.
File system watching is not compatible with symlinks. If your project files include symlinks, symlinked files do not benefit from file system-watching optimizations.
Unsupported File Systems
When enabled by default, file system watching acts conservatively when it encounters content on unsupported file systems. This can happen if you mount a project directory or subdirectory from a network drive. Gradle doesn’t retain information about unsupported file systems between builds when enabled by default. If you explicitly enable file system watching, Gradle retains information about unsupported file systems between builds.
Logging
To view information about Virtual File System (VFS) changes at the beginning and end of a build, enable verbose VFS logging.
Set the org.gradle.vfs.verbose Daemon option to true to enable verbose logging.
You can do this on the command line with the following command:
$ gradle <task> -Dorg.gradle.vfs.verbose=true
Or configure the property in the gradle.properties file in the project root or your Gradle User Home:
org.gradle.vfs.verbose=trueThis produces the following output at the start and end of the build:
$ gradle assemble --watch-fs -Dorg.gradle.vfs.verbose=true
Received 3 file system events since last build while watching 1 locations Virtual file system retained information about 2 files, 2 directories and 0 missing files since last build > Task :compileJava NO-SOURCE > Task :processResources NO-SOURCE > Task :classes UP-TO-DATE > Task :jar UP-TO-DATE > Task :assemble UP-TO-DATE BUILD SUCCESSFUL in 58ms 1 actionable task: 1 up-to-date Received 5 file system events during the current build while watching 1 locations Virtual file system retains information about 3 files, 2 directories and 2 missing files until next build
On Windows and macOS, Gradle might report changes received since the last build, even if you haven’t changed anything. These are harmless notifications about changes to Gradle’s caches and can be safely ignored.
Troubleshooting
- Gradle does not detect some changes
-
Please let us know on the Gradle community Slack. If a build declares its inputs and outputs correctly, this should not happen. So it’s either a bug we must fix or your build lacks declaration for some inputs or outputs.
- VFS state dropped due to lost state
-
Did you receive a message that reads
Dropped VFS state due to lost stateduring a build? Please let us know on the Gradle community Slack. This means that your build cannot benefit from file system watching for one of the following reasons:-
the Daemon received an unknown file system event
-
too many changes happened, and the watching API couldn’t handle it
-
- Too many open files on macOS
-
If you receive the
java.io.IOException: Too many open fileserror on macOS, raise your open files limit. See this post for more details.
Adjust inotify Limits on Linux
File system watching uses inotify on Linux. Depending on the size of your build, it may be necessary to increase inotify limits. If you are using an IDE, then you probably already had to increase the limits in the past.
File system watching uses one inotify watch per watched directory. You can see the current limit of inotify watches per user by running:
cat /proc/sys/fs/inotify/max_user_watchesTo increase the limit to e.g. 512K watches run the following:
echo fs.inotify.max_user_watches=524288 | sudo tee -a /etc/sysctl.confsudo sysctl -p --systemEach used inotify watch takes up to 1KB of memory. Assuming inotify uses all the 512K watches then file system watching could use up to 500MB. In a memory-constrained environment, you may want to disable file system watching.
Incremental build
An important part of any build tool is the ability to avoid doing work that has already been done. Consider the process of compilation. Once your source files have been compiled, there should be no need to recompile them unless something has changed that affects the output, such as the modification of a source file or the removal of an output file. And compilation can take a significant amount of time, so skipping the step when it’s not needed saves a lot of time.
Gradle supports this behavior out of the box through a feature called incremental build.
You have almost certainly already seen it in action.
When you run a task and the task is marked with UP-TO-DATE in the console output, this means incremental build is at work.
How does an incremental build work? How can you make sure your tasks support running incrementally? Let’s take a look.
Task inputs and outputs
In the most common case, a task takes some inputs and generates some outputs. We can consider the process of Java compilation as an example of a task. The Java source files act as inputs of the task, while the generated class files, i.e. the result of the compilation, are the outputs of the task.
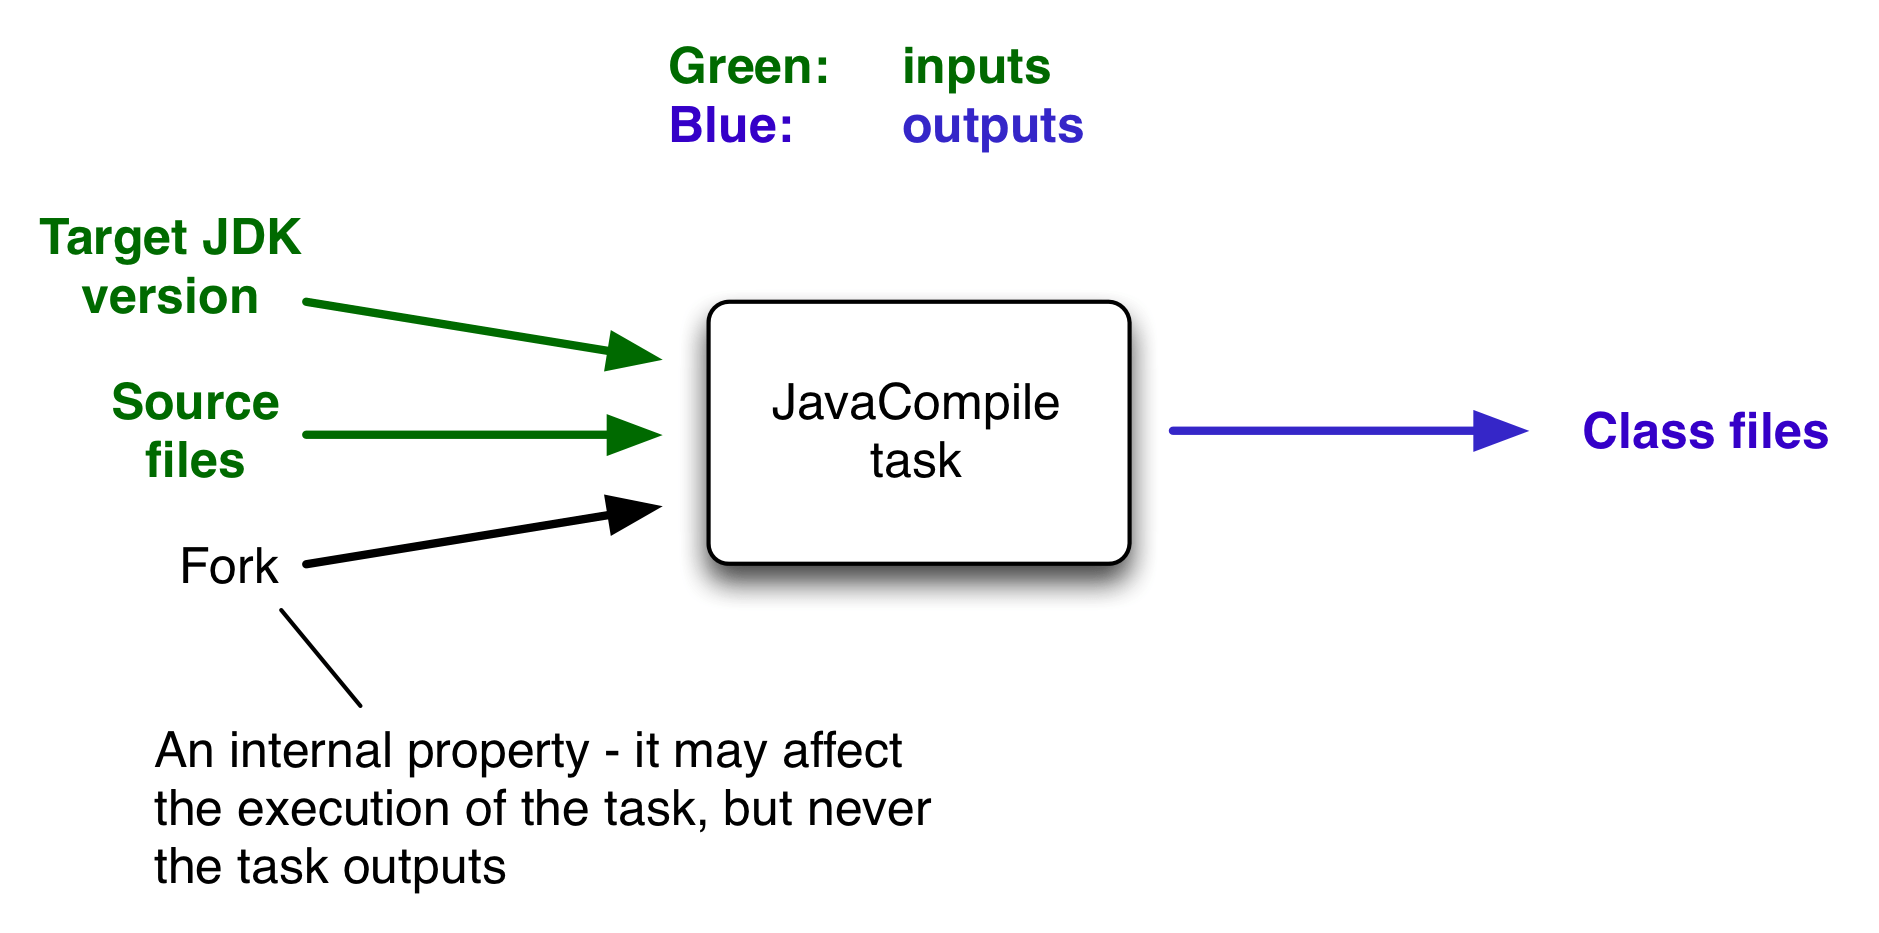
An important characteristic of an input is that it affects one or more outputs, as you can see from the previous figure. Different bytecode is generated depending on the content of the source files and the minimum version of the Java runtime you want to run the code on. That makes them task inputs. But whether compilation has 500MB or 600MB of maximum memory available, determined by the memoryMaximumSize property, has no impact on what bytecode gets generated. In Gradle terminology, memoryMaximumSize is just an internal task property.
As part of incremental build, Gradle tests whether any of the task inputs or outputs has changed since the last build. If they haven’t, Gradle can consider the task up to date and therefore skip executing its actions. Also note that incremental build won’t work unless a task has at least one task output, although tasks usually have at least one input as well.
What this means for build authors is simple: you need to tell Gradle which task properties are inputs and which are outputs. If a task property affects the output, be sure to register it as an input, otherwise the task will be considered up to date when it’s not. Conversely, don’t register properties as inputs if they don’t affect the output, otherwise the task will potentially execute when it doesn’t need to. Also be careful of non-deterministic tasks that may generate different output for exactly the same inputs: these should not be configured for incremental build as the up-to-date checks won’t work.
Let’s now look at how you can register task properties as inputs and outputs.
Declaring inputs and outputs via annotations
If you’re implementing a custom task as a class, then it takes just two steps to make it work with incremental build:
-
Create typed properties (via getter methods) for each of your task inputs and outputs
-
Add the appropriate annotation to each of those properties
|
Note
|
Annotations must be placed on getters or on Groovy properties. Annotations placed on setters, or on a Java field without a corresponding annotated getter, are ignored. |
Gradle supports four main categories of inputs and outputs:
-
Simple values
Things like strings and numbers. More generally, a simple value can have any type that implements
Serializable. -
Filesystem types
These consist of
RegularFile,Directoryand the standardFileclass but also derivatives of Gradle’s FileCollection type and anything else that can be passed to either the Project.file(java.lang.Object) method — for single file/directory properties — or the Project.files(java.lang.Object...) method. -
Dependency resolution results
This includes the ResolvedArtifactResult type for artifact metadata and the ResolvedComponentResult type for dependency graphs. Note that they are only supported wrapped in a
Provider. -
Nested values
Custom types that don’t conform to the other two categories but have their own properties that are inputs or outputs. In effect, the task inputs or outputs are nested inside these custom types.
As an example, imagine you have a task that processes templates of varying types, such as FreeMarker, Velocity, Moustache, etc. It takes template source files and combines them with some model data to generate populated versions of the template files.
This task will have three inputs and one output:
-
Template source files
-
Model data
-
Template engine
-
Where the output files are written
When you’re writing a custom task class, it’s easy to register properties as inputs or outputs via annotations. To demonstrate, here is a skeleton task implementation with some suitable inputs and outputs, along with their annotations:
package org.example;
import java.util.HashMap;
import org.gradle.api.DefaultTask;
import org.gradle.api.file.ConfigurableFileCollection;
import org.gradle.api.file.DirectoryProperty;
import org.gradle.api.file.FileSystemOperations;
import org.gradle.api.provider.Property;
import org.gradle.api.tasks.*;
import javax.inject.Inject;
public abstract class ProcessTemplates extends DefaultTask {
@Input
public abstract Property<TemplateEngineType> getTemplateEngine();
@InputFiles
public abstract ConfigurableFileCollection getSourceFiles();
@Nested
public abstract TemplateData getTemplateData();
@OutputDirectory
public abstract DirectoryProperty getOutputDir();
@Inject
public abstract FileSystemOperations getFs();
@TaskAction
public void processTemplates() {
// ...
}
}package org.example;
import org.gradle.api.provider.MapProperty;
import org.gradle.api.provider.Property;
import org.gradle.api.tasks.Input;
public abstract class TemplateData {
@Input
public abstract Property<String> getName();
@Input
public abstract MapProperty<String, String> getVariables();
}gradle processTemplates> gradle processTemplates > Task :processTemplates BUILD SUCCESSFUL in 0s 3 actionable tasks: 3 up-to-date
gradle processTemplates (run again)> gradle processTemplates > Task :processTemplates UP-TO-DATE BUILD SUCCESSFUL in 0s 3 actionable tasks: 3 up-to-date
There’s plenty to talk about in this example, so let’s work through each of the input and output properties in turn:
-
templateEngineRepresents which engine to use when processing the source templates, e.g. FreeMarker, Velocity, etc. You could implement this as a string, but in this case we have gone for a custom enum as it provides greater type information and safety. Since enums implement
Serializableautomatically, we can treat this as a simple value and use the@Inputannotation, just as we would with aStringproperty. -
sourceFilesThe source templates that the task will be processing. Single files and collections of files need their own special annotations. In this case, we’re dealing with a collection of input files and so we use the
@InputFilesannotation. You’ll see more file-oriented annotations in a table later. -
templateDataFor this example, we’re using a custom class to represent the model data. However, it does not implement
Serializable, so we can’t use the@Inputannotation. That’s not a problem as the properties withinTemplateData— a string and a hash map with serializable type parameters — are serializable and can be annotated with@Input. We use@NestedontemplateDatato let Gradle know that this is a value with nested input properties. -
outputDirThe directory where the generated files go. As with input files, there are several annotations for output files and directories. A property representing a single directory requires
@OutputDirectory. You’ll learn about the others soon.
These annotated properties mean that Gradle will skip the task if none of the source files, template engine, model data or generated files has changed since the previous time Gradle executed the task. This will often save a significant amount of time. You can learn how Gradle detects changes later.
This example is particularly interesting because it works with collections of source files. What happens if only one source file changes? Does the task process all the source files again or just the modified one? That depends on the task implementation. If the latter, then the task itself is incremental, but that’s a different feature to the one we’re discussing here. Gradle does help task implementers with this via its incremental task inputs feature.
Now that you have seen some of the input and output annotations in practice, let’s take a look at all the annotations available to you and when you should use them. The table below lists the available annotations and the corresponding property type you can use with each one.
| Annotation | Expected property type | Description |
|---|---|---|
Any |
A simple input value or dependency resolution results |
|
|
A single input file (not directory) |
|
|
A single input directory (not file) |
|
|
An iterable of input files and directories |
|
|
An iterable of input files and directories that represent a Java classpath. This allows the task to ignore irrelevant changes to the property, such as different names for the same files. It is similar to annotating the property Note: The |
|
|
An iterable of input files and directories that represent a Java compile classpath. This allows the task to ignore irrelevant changes that do not affect the API of the classes in classpath. See also Using the classpath annotations. The following kinds of changes to the classpath will be ignored:
NOTE - The |
|
|
A single output file (not directory) |
|
|
A single output directory (not file) |
|
|
An iterable or map of output files. Using a file tree turns caching off for the task. |
|
|
An iterable of output directories. Using a file tree turns caching off for the task. |
|
|
Specifies one or more files that are removed by this task. Note that a task can define either inputs/outputs or destroyables, but not both. |
|
|
Specifies one or more files that represent the local state of the task. These files are removed when the task is loaded from cache. |
|
Any custom type |
A custom type that may not implement |
|
Any type |
Indicates that the property is neither an input nor an output. It simply affects the console output of the task in some way, such as increasing or decreasing the verbosity of the task. |
|
Any type |
Indicates that the property is used internally but is neither an input nor an output. |
|
Any type |
Indicates that the property has been replaced by another and should be ignored as an input or output. |
|
|
Used with Implies |
|
|
Used with |
|
Any type |
Used with any of the property type annotations listed in the Optional API documentation. This annotation disables validation checks on the corresponding property. See the section on validation for more details. |
|
|
||
|
Used with |
|
|
Used with |
|
Note
|
Similar to the above, |
Annotations are inherited from all parent types including implemented interfaces. Property type annotations override any other property type annotation declared in a parent type. This way an @InputFile property can be turned into an @InputDirectory property in a child task type.
Annotations on a property declared in a type override similar annotations declared by the superclass and in any implemented interfaces. Superclass annotations take precedence over annotations declared in implemented interfaces.
The Console and Internal annotations in the table are special cases as they don’t declare either task inputs or task outputs. So why use them? It’s so that you can take advantage of the Java Gradle Plugin Development plugin to help you develop and publish your own plugins. This plugin checks whether any properties of your custom task classes lack an incremental build annotation. This protects you from forgetting to add an appropriate annotation during development.
Using dependency resolution results
Dependency resolution results can be consumed as task inputs in two ways. First by consuming the graph of the resolved metadata using ResolvedComponentResult. Second by consuming the flat set of the resolved artifacts using ResolvedArtifactResult.
A resolved graph can be obtained lazily from the incoming resolution result of a Configuration and wired to an @Input property:
link:https://docs.gradle.org/8.7/samples/writing-tasks/tasks-with-dependency-resolution-result-inputs/common/dependency-reports/src/main/java/com/example/GraphResolvedComponents.java[role=include]link:https://docs.gradle.org/8.7/samples/writing-tasks/tasks-with-dependency-resolution-result-inputs/common/dependency-reports/src/main/java/com/example/DependencyReportsPlugin.java[role=include]The resolved set of artifacts can be obtained lazily from the incoming artifacts of a Configuration.
Given the ResolvedArtifactResult type contains both metadata and file information, instances need to be transformed to metadata only before being wired to an @Input property:
link:https://docs.gradle.org/8.7/samples/writing-tasks/tasks-with-dependency-resolution-result-inputs/common/dependency-reports/src/main/java/com/example/ListResolvedArtifacts.java[role=include]link:https://docs.gradle.org/8.7/samples/writing-tasks/tasks-with-dependency-resolution-result-inputs/common/dependency-reports/src/main/java/com/example/DependencyReportsPlugin.java[role=include]Both graph and flat results can be combined and augmented with resolved file information. This is all demonstrated in the Tasks with dependency resolution result inputs sample.
Using the classpath annotations
Besides @InputFiles, for JVM-related tasks Gradle understands the concept of classpath inputs. Both runtime and compile classpaths are treated differently when Gradle is looking for changes.
As opposed to input properties annotated with @InputFiles, for classpath properties the order of the entries in the file collection matter.
On the other hand, the names and paths of the directories and jar files on the classpath itself are ignored.
Timestamps and the order of class files and resources inside jar files on a classpath are ignored, too, thus recreating a jar file with different file dates will not make the task out of date.
Runtime classpaths are marked with @Classpath, and they offer further customization via classpath normalization.
Input properties annotated with @CompileClasspath are considered Java compile classpaths.
Additionally to the aforementioned general classpath rules, compile classpaths ignore changes to everything but class files. Gradle uses the same class analysis described in Java compile avoidance to further filter changes that don’t affect the class' ABIs.
This means that changes which only touch the implementation of classes do not make the task out of date.
Nested inputs
When analyzing @Nested task properties for declared input and output sub-properties Gradle uses the type of the actual value.
Hence it can discover all sub-properties declared by a runtime sub-type.
When adding @Nested to an iterable, each element is treated as a separate nested input.
Each nested input in the iterable is assigned a name, which by default is the dollar sign followed by the index in the iterable, e.g. $2.
If an element of the iterable implements Named, then the name is used as property name.
The ordering of the elements in the iterable is crucial for reliable up-to-date checks and caching if not all of the elements implement Named.
Multiple elements which have the same name are not allowed.
When adding @Nested to a map, then for each value a nested input is added, using the key as name.
The type and classpath of nested inputs is tracked, too.
This ensures that changes to the implementation of a nested input causes the build to be out of date.
By this it is also possible to add user provided code as an input, e.g. by annotating an @Action property with @Nested.
Note that any inputs to such actions should be tracked, either by annotated properties on the action or by manually registering them with the task.
Using nested inputs allows richer modeling and extensibility for tasks, as e.g. shown by Test.getJvmArgumentProviders().
This allows us to model the JaCoCo Java agent, thus declaring the necessary JVM arguments and providing the inputs and outputs to Gradle:
class JacocoAgent implements CommandLineArgumentProvider {
private final JacocoTaskExtension jacoco;
public JacocoAgent(JacocoTaskExtension jacoco) {
this.jacoco = jacoco;
}
@Nested
@Optional
public JacocoTaskExtension getJacoco() {
return jacoco.isEnabled() ? jacoco : null;
}
@Override
public Iterable<String> asArguments() {
return jacoco.isEnabled() ? ImmutableList.of(jacoco.getAsJvmArg()) : Collections.<String>emptyList();
}
}
test.getJvmArgumentProviders().add(new JacocoAgent(extension));For this to work, JacocoTaskExtension needs to have the correct input and output annotations.
The approach works for Test JVM arguments, since Test.getJvmArgumentProviders() is an Iterable annotated with @Nested.
There are other task types where this kind of nested inputs are available:
-
JavaExec.getArgumentProviders() - model e.g. custom tools
-
JavaExec.getJvmArgumentProviders() - used for Jacoco Java agent
-
CompileOptions.getCompilerArgumentProviders() - model e.g. annotation processors
-
Exec.getArgumentProviders() - model e.g. custom tools
-
JavaCompile.getOptions().getForkOptions().getJvmArgumentProviders() - model Java compiler daemon command line arguments
-
GroovyCompile.getGroovyOptions().getForkOptions().getJvmArgumentProviders() - model Groovy compiler daemon command line arguments
-
ScalaCompile.getScalaOptions().getForkOptions().getJvmArgumentProviders() - model Scala compiler daemon command line arguments
In the same way, this kind of modelling is available to custom tasks.
Validation at runtime
When executing the build Gradle checks if task types are declared with the proper annotations. It tries to identify problems where e.g. annotations are used on incompatible types, or on setters etc. Any getter not annotated with an input/output annotation is also flagged. These problems then fail the build or are turned into deprecation warnings when the task is executed.
Tasks that have a validation warning are executed without any optimizations. Specifically, they never can be:
-
up-to-date,
-
loaded from or stored in the build cache,
-
executed in parallel with other tasks, even if parallel execution is enabled,
-
executed incrementally.
The in-memory representation of the file system state (Virtual File System) is also invalidated before an invalid task is executed.
Declaring inputs and outputs via the runtime API
Custom task classes are an easy way to bring your own build logic into the arena of incremental build, but you don’t always have that option. That’s why Gradle also provides an alternative API that can be used with any tasks, which we look at next.
When you don’t have access to the source for a custom task class, there is no way to add any of the annotations we covered in the previous section. Fortunately, Gradle provides a runtime API for scenarios just like that. It can also be used for ad-hoc tasks, as you’ll see next.
Declaring inputs and outputs of ad-hoc tasks
This runtime API is provided through a couple of aptly named properties that are available on every Gradle task:
-
Task.getInputs() of type TaskInputs
-
Task.getOutputs() of type TaskOutputs
These objects have methods that allow you to specify files, directories and values which constitute the task’s inputs and outputs. In fact, the runtime API has almost feature parity with the annotations.
It lacks equivalents for
Let’s take the template processing example from before and see how it would look as an ad-hoc task that uses the runtime API:
tasks.register("processTemplatesAdHoc") {
inputs.property("engine", TemplateEngineType.FREEMARKER)
inputs.files(fileTree("src/templates"))
.withPropertyName("sourceFiles")
.withPathSensitivity(PathSensitivity.RELATIVE)
inputs.property("templateData.name", "docs")
inputs.property("templateData.variables", mapOf("year" to "2013"))
outputs.dir(layout.buildDirectory.dir("genOutput2"))
.withPropertyName("outputDir")
doLast {
// Process the templates here
}
}tasks.register('processTemplatesAdHoc') {
inputs.property('engine', TemplateEngineType.FREEMARKER)
inputs.files(fileTree('src/templates'))
.withPropertyName('sourceFiles')
.withPathSensitivity(PathSensitivity.RELATIVE)
inputs.property('templateData.name', 'docs')
inputs.property('templateData.variables', [year: '2013'])
outputs.dir(layout.buildDirectory.dir('genOutput2'))
.withPropertyName('outputDir')
doLast {
// Process the templates here
}
}gradle processTemplatesAdHoc> gradle processTemplatesAdHoc > Task :processTemplatesAdHoc BUILD SUCCESSFUL in 0s 3 actionable tasks: 3 executed
As before, there’s much to talk about. To begin with, you should really write a custom task class for this as it’s a non-trivial implementation that has several configuration options. In this case, there are no task properties to store the root source folder, the location of the output directory or any of the other settings. That’s deliberate to highlight the fact that the runtime API doesn’t require the task to have any state. In terms of incremental build, the above ad-hoc task will behave the same as the custom task class.
All the input and output definitions are done through the methods on inputs and outputs, such as property(), files(), and dir().
Gradle performs up-to-date checks on the argument values to determine whether the task needs to run again or not.
Each method corresponds to one of the incremental build annotations, for example inputs.property() maps to @Input and outputs.dir() maps to @OutputDirectory.
The files that a task removes can be specified through destroyables.register().
tasks.register("removeTempDir") {
val tmpDir = layout.projectDirectory.dir("tmpDir")
destroyables.register(tmpDir)
doLast {
tmpDir.asFile.deleteRecursively()
}
}tasks.register('removeTempDir') {
def tempDir = layout.projectDirectory.dir('tmpDir')
destroyables.register(tempDir)
doLast {
tempDir.asFile.deleteDir()
}
}One notable difference between the runtime API and the annotations is the lack of a method that corresponds directly to @Nested. That’s why the example uses two property() declarations for the template data, one for each TemplateData property. You should utilize the same technique when using the runtime API with nested values. Any given task can either declare destroyables or inputs/outputs, but cannot declare both.
Fine-grained configuration
The runtime API methods only allow you to declare your inputs and outputs in themselves. However, the file-oriented ones return a builder — of type TaskInputFilePropertyBuilder — that lets you provide additional information about those inputs and outputs.
You can learn about all the options provided by the builder in its API documentation, but we’ll show you a simple example here to give you an idea of what you can do.
Let’s say we don’t want to run the processTemplates task if there are no source files, regardless of whether it’s a clean build or not. After all, if there are no source files, there’s nothing for the task to do. The builder allows us to configure this like so:
tasks.register("processTemplatesAdHocSkipWhenEmpty") {
// ...
inputs.files(fileTree("src/templates") {
include("**/*.fm")
})
.skipWhenEmpty()
.withPropertyName("sourceFiles")
.withPathSensitivity(PathSensitivity.RELATIVE)
.ignoreEmptyDirectories()
// ...
}tasks.register('processTemplatesAdHocSkipWhenEmpty') {
// ...
inputs.files(fileTree('src/templates') {
include '**/*.fm'
})
.skipWhenEmpty()
.withPropertyName('sourceFiles')
.withPathSensitivity(PathSensitivity.RELATIVE)
.ignoreEmptyDirectories()
// ...
}gradle clean processTemplatesAdHocSkipWhenEmpty> gradle clean processTemplatesAdHocSkipWhenEmpty > Task :processTemplatesAdHocSkipWhenEmpty NO-SOURCE BUILD SUCCESSFUL in 0s 3 actionable tasks: 2 executed, 1 up-to-date
The TaskInputs.files() method returns a builder that has a skipWhenEmpty() method. Invoking this method is equivalent to annotating to the property with @SkipWhenEmpty.
Now that you have seen both the annotations and the runtime API, you may be wondering which API you should be using. Our recommendation is to use the annotations wherever possible, and it’s sometimes worth creating a custom task class just so that you can make use of them. The runtime API is more for situations in which you can’t use the annotations.
Declaring inputs and outputs for custom task types
Another type of example involves registering additional inputs and outputs for instances of a custom task class.
For example, imagine that the ProcessTemplates task also needs to read src/headers/headers.txt (e.g. because it is included from one of the sources).
You’d want Gradle to know about this input file, so that it can re-execute the task whenever the contents of this file change.
With the runtime API you can do just that:
tasks.register<ProcessTemplates>("processTemplatesWithExtraInputs") {
// ...
inputs.file("src/headers/headers.txt")
.withPropertyName("headers")
.withPathSensitivity(PathSensitivity.NONE)
}tasks.register('processTemplatesWithExtraInputs', ProcessTemplates) {
// ...
inputs.file('src/headers/headers.txt')
.withPropertyName('headers')
.withPathSensitivity(PathSensitivity.NONE)
}Using the runtime API like this is a little like using doLast() and doFirst() to attach extra actions to a task, except in this case we’re attaching information about inputs and outputs.
|
Warning
|
If the task type is already using the incremental build annotations, registering inputs or outputs with the same property names will result in an error. |
Benefits of declaring task inputs and outputs
Once you declare a task’s formal inputs and outputs, Gradle can then infer things about those properties. For example, if an input of one task is set to the output of another, that means the first task depends on the second, right? Gradle knows this and can act upon it.
We’ll look at this feature next and also some other features that come from Gradle knowing things about inputs and outputs.
Inferred task dependencies
Consider an archive task that packages the output of the processTemplates task. A build author will see that the archive task obviously requires processTemplates to run first and so may add an explicit dependsOn. However, if you define the archive task like so:
tasks.register<Zip>("packageFiles") {
from(processTemplates.map { it.outputDir })
}tasks.register('packageFiles', Zip) {
from processTemplates.map { it.outputDir }
}gradle clean packageFiles> gradle clean packageFiles > Task :processTemplates > Task :packageFiles BUILD SUCCESSFUL in 0s 5 actionable tasks: 4 executed, 1 up-to-date
Gradle will automatically make packageFiles depend on processTemplates. It can do this because it’s aware that one of the inputs of packageFiles requires the output of the processTemplates task. We call this an inferred task dependency.
The above example can also be written as
tasks.register<Zip>("packageFiles2") {
from(processTemplates)
}tasks.register('packageFiles2', Zip) {
from processTemplates
}gradle clean packageFiles2> gradle clean packageFiles2 > Task :processTemplates > Task :packageFiles2 BUILD SUCCESSFUL in 0s 5 actionable tasks: 4 executed, 1 up-to-date
This is because the from() method can accept a task object as an argument. Behind the scenes, from() uses the project.files() method to wrap the argument, which in turn exposes the task’s formal outputs as a file collection. In other words, it’s a special case!
Input and output validation
The incremental build annotations provide enough information for Gradle to perform some basic validation on the annotated properties. In particular, it does the following for each property before the task executes:
-
@InputFile- verifies that the property has a value and that the path corresponds to a file (not a directory) that exists. -
@InputDirectory- same as for@InputFile, except the path must correspond to a directory. -
@OutputDirectory- verifies that the path doesn’t match a file and also creates the directory if it doesn’t already exist.
If one task produces an output in a location and another task consumes that location by referring to it as an input, then Gradle checks that the consumer task depends on the producer task. When the producer and the consumer tasks are executing at the same time, the build fails to avoid capturing an incorrect state.
Such validation improves the robustness of the build, allowing you to identify issues related to inputs and outputs quickly.
You will occasionally want to disable some of this validation, specifically when an input file may validly not exist. That’s why Gradle provides the @Optional annotation: you use it to tell Gradle that a particular input is optional and therefore the build should not fail if the corresponding file or directory doesn’t exist.
Continuous build
Another benefit of defining task inputs and outputs is continuous build. Since Gradle knows what files a task depends on, it can automatically run a task again if any of its inputs change. By activating continuous build when you run Gradle — through the --continuous or -t options — you will put Gradle into a state in which it continually checks for changes and executes the requested tasks when it encounters such changes.
You can find out more about this feature in Continuous build.
Task parallelism
One last benefit of defining task inputs and outputs is that Gradle can use this information to make decisions about how to run tasks when the "--parallel" option is used. For instance, Gradle will inspect the outputs of tasks when selecting the next task to run and will avoid concurrent execution of tasks that write to the same output directory. Similarly, Gradle will use the information about what files a task destroys (e.g. specified by the Destroys annotation) and avoid running a task that removes a set of files while another task is running that consumes or creates those same files (and vice versa). It can also determine that a task that creates a set of files has already run and that a task that consumes those files has yet to run and will avoid running a task that removes those files in between. By providing task input and output information in this way, Gradle can infer creation/consumption/destruction relationships between tasks and can ensure that task execution does not violate those relationships.
How does it work?
Before a task is executed for the first time, Gradle takes a fingerprint of the inputs. This fingerprint contains the paths of input files and a hash of the contents of each file. Gradle then executes the task. If the task completes successfully, Gradle takes a fingerprint of the outputs. This fingerprint contains the set of output files and a hash of the contents of each file. Gradle persists both fingerprints for the next time the task is executed.
Each time after that, before the task is executed, Gradle takes a new fingerprint of the inputs and outputs. If the new fingerprints are the same as the previous fingerprints, Gradle assumes that the outputs are up to date and skips the task. If they are not the same, Gradle executes the task. Gradle persists both fingerprints for the next time the task is executed.
If the stats of a file (i.e. lastModified and size) did not change, Gradle will reuse the file’s fingerprint from the previous run.
That means that Gradle does not detect changes when the stats of a file did not change.
Gradle also considers the code of the task as part of the inputs to the task. When a task, its actions, or its dependencies change between executions, Gradle considers the task as out-of-date.
Gradle understands if a file property (e.g. one holding a Java classpath) is order-sensitive. When comparing the fingerprint of such a property, even a change in the order of the files will result in the task becoming out-of-date.
Note that if a task has an output directory specified, any files added to that directory since the last time it was executed are ignored and will NOT cause the task to be out of date. This is so unrelated tasks may share an output directory without interfering with each other. If this is not the behaviour you want for some reason, consider using TaskOutputs.upToDateWhen(groovy.lang.Closure)
Note also that changing the availability of an unavailable file (e.g. modifying the target of a broken symlink to a valid file, or vice versa), will be detected and handled by up-to-date check.
The inputs for the task are also used to calculate the build cache key used to load task outputs when enabled. For more details see Task output caching.
For tracking the implementation of tasks, task actions and nested inputs, Gradle uses the class name and an identifier for the classpath which contains the implementation. There are some situations when Gradle is not able to track the implementation precisely:
- Unknown classloader
-
When the classloader which loaded the implementation has not been created by Gradle, the classpath cannot be determined.
- Java lambda
-
Java lambda classes are created at runtime with a non-deterministic classname. Therefore, the class name does not identify the implementation of the lambda and changes between different Gradle runs.
When the implementation of a task, task action or a nested input cannot be tracked precisely, Gradle disables any caching for the task. That means that the task will never be up-to-date or loaded from the build cache.
Advanced techniques
Everything you’ve seen so far in this section will cover most of the use cases you’ll encounter, but there are some scenarios that need special treatment. We’ll present a few of those next with the appropriate solutions.
Adding your own cached input/output methods
Have you ever wondered how the from() method of the Copy task works? It’s not annotated with @InputFiles and yet any files passed to it are treated as formal inputs of the task. What’s happening?
The implementation is quite simple and you can use the same technique for your own tasks to improve their APIs. Write your methods so that they add files directly to the appropriate annotated property. As an example, here’s how to add a sources() method to the custom ProcessTemplates class we introduced earlier:
tasks.register<ProcessTemplates>("processTemplates") {
templateEngine = TemplateEngineType.FREEMARKER
templateData.name = "test"
templateData.variables = mapOf("year" to "2012")
outputDir = layout.buildDirectory.dir("genOutput")
sources(fileTree("src/templates"))
}tasks.register('processTemplates', ProcessTemplates) {
templateEngine = TemplateEngineType.FREEMARKER
templateData.name = 'test'
templateData.variables = [year: '2012']
outputDir = file(layout.buildDirectory.dir('genOutput'))
sources fileTree('src/templates')
}public abstract class ProcessTemplates extends DefaultTask {
// ...
@SkipWhenEmpty
@InputFiles
@PathSensitive(PathSensitivity.NONE)
public abstract ConfigurableFileCollection getSourceFiles();
public void sources(FileCollection sourceFiles) {
getSourceFiles().from(sourceFiles);
}
// ...
}gradle processTemplates> gradle processTemplates > Task :processTemplates BUILD SUCCESSFUL in 0s 3 actionable tasks: 3 executed
In other words, as long as you add values and files to formal task inputs and outputs during the configuration phase, they will be treated as such regardless from where in the build you add them.
If we want to support tasks as arguments as well and treat their outputs as the inputs, we can use the TaskProvider directly like so:
val copyTemplates by tasks.registering(Copy::class) {
into(file(layout.buildDirectory.dir("tmp")))
from("src/templates")
}
tasks.register<ProcessTemplates>("processTemplates2") {
// ...
sources(copyTemplates)
}def copyTemplates = tasks.register('copyTemplates', Copy) {
into file(layout.buildDirectory.dir('tmp'))
from 'src/templates'
}
tasks.register('processTemplates2', ProcessTemplates) {
// ...
sources copyTemplates
} // ...
public void sources(TaskProvider<?> inputTask) {
getSourceFiles().from(inputTask);
}
// ...gradle processTemplates2> gradle processTemplates2 > Task :copyTemplates > Task :processTemplates2 BUILD SUCCESSFUL in 0s 4 actionable tasks: 4 executed
This technique can make your custom task easier to use and result in cleaner build files.
As an added benefit, our use of TaskProvider means that our custom method can set up an inferred task dependency.
One last thing to note: if you are developing a task that takes collections of source files as inputs, like this example, consider using the built-in SourceTask. It will save you having to implement some of the plumbing that we put into ProcessTemplates.
Linking an @OutputDirectory to an @InputFiles
When you want to link the output of one task to the input of another, the types often match and a simple property assignment will provide that link. For example, a File output property can be assigned to a File input.
Unfortunately, this approach breaks down when you want the files in a task’s @OutputDirectory (of type File) to become the source for another task’s @InputFiles property (of type FileCollection). Since the two have different types, property assignment won’t work.
As an example, imagine you want to use the output of a Java compilation task — via the destinationDir property — as the input of a custom task that instruments a set of files containing Java bytecode. This custom task, which we’ll call Instrument, has a classFiles property annotated with @InputFiles. You might initially try to configure the task like so:
plugins {
id("java-library")
}
tasks.register<Instrument>("badInstrumentClasses") {
classFiles.from(fileTree(tasks.compileJava.flatMap { it.destinationDirectory }))
destinationDir = layout.buildDirectory.dir("instrumented")
}plugins {
id 'java-library'
}
tasks.register('badInstrumentClasses', Instrument) {
classFiles.from fileTree(tasks.named('compileJava').flatMap { it.destinationDirectory }) {}
destinationDir = file(layout.buildDirectory.dir('instrumented'))
}gradle clean badInstrumentClasses> gradle clean badInstrumentClasses > Task :clean UP-TO-DATE > Task :badInstrumentClasses NO-SOURCE BUILD SUCCESSFUL in 0s 3 actionable tasks: 2 executed, 1 up-to-date
There’s nothing obviously wrong with this code, but you can see from the console output that the compilation task is missing. In this case you would need to add an explicit task dependency between instrumentClasses and compileJava via dependsOn. The use of fileTree() means that Gradle can’t infer the task dependency itself.
One solution is to use the TaskOutputs.files property, as demonstrated by the following example:
tasks.register<Instrument>("instrumentClasses") {
classFiles.from(tasks.compileJava.map { it.outputs.files })
destinationDir = layout.buildDirectory.dir("instrumented")
}tasks.register('instrumentClasses', Instrument) {
classFiles.from tasks.named('compileJava').map { it.outputs.files }
destinationDir = file(layout.buildDirectory.dir('instrumented'))
}gradle clean instrumentClasses> gradle clean instrumentClasses > Task :clean UP-TO-DATE > Task :compileJava > Task :instrumentClasses BUILD SUCCESSFUL in 0s 5 actionable tasks: 4 executed, 1 up-to-date
Alternatively, you can get Gradle to access the appropriate property itself by using one of project.files(), project.layout.files() or project.objects.fileCollection() in place of project.fileTree():
tasks.register<Instrument>("instrumentClasses2") {
classFiles.from(layout.files(tasks.compileJava))
destinationDir = layout.buildDirectory.dir("instrumented")
}tasks.register('instrumentClasses2', Instrument) {
classFiles.from layout.files(tasks.named('compileJava'))
destinationDir = file(layout.buildDirectory.dir('instrumented'))
}gradle clean instrumentClasses2> gradle clean instrumentClasses2 > Task :clean UP-TO-DATE > Task :compileJava > Task :instrumentClasses2 BUILD SUCCESSFUL in 0s 5 actionable tasks: 4 executed, 1 up-to-date
Remember that files(), layout.files() and objects.fileCollection() can take tasks as arguments, whereas fileTree() cannot.
The downside of this approach is that all file outputs of the source task become the input files of the target — instrumentClasses in this case. That’s fine as long as the source task only has a single file-based output, like the JavaCompile task. But if you have to link just one output property among several, then you need to explicitly tell Gradle which task generates the input files using the builtBy method:
tasks.register<Instrument>("instrumentClassesBuiltBy") {
classFiles.from(fileTree(tasks.compileJava.flatMap { it.destinationDirectory }) {
builtBy(tasks.compileJava)
})
destinationDir = layout.buildDirectory.dir("instrumented")
}tasks.register('instrumentClassesBuiltBy', Instrument) {
classFiles.from fileTree(tasks.named('compileJava').flatMap { it.destinationDirectory }) {
builtBy tasks.named('compileJava')
}
destinationDir = file(layout.buildDirectory.dir('instrumented'))
}gradle clean instrumentClassesBuiltBy> gradle clean instrumentClassesBuiltBy > Task :clean UP-TO-DATE > Task :compileJava > Task :instrumentClassesBuiltBy BUILD SUCCESSFUL in 0s 5 actionable tasks: 4 executed, 1 up-to-date
You can of course just add an explicit task dependency via dependsOn, but the above approach provides more semantic meaning, explaining why compileJava has to run beforehand.
Disabling up-to-date checks
Gradle automatically handles up-to-date checks for output files and directories, but what if the task output is something else entirely? Perhaps it’s an update to a web service or a database table. Or sometimes you have a task which should always run.
That’s where the doNotTrackState() method on Task comes in.
One can use this to disable up-to-date checks completely for a task, like so:
tasks.register<Instrument>("alwaysInstrumentClasses") {
classFiles.from(layout.files(tasks.compileJava))
destinationDir = layout.buildDirectory.dir("instrumented")
doNotTrackState("Instrumentation needs to re-run every time")
}tasks.register('alwaysInstrumentClasses', Instrument) {
classFiles.from layout.files(tasks.named('compileJava'))
destinationDir = file(layout.buildDirectory.dir('instrumented'))
doNotTrackState("Instrumentation needs to re-run every time")
}gradle clean alwaysInstrumentClasses> gradle clean alwaysInstrumentClasses > Task :compileJava > Task :alwaysInstrumentClasses BUILD SUCCESSFUL in 0s 4 actionable tasks: 1 executed, 3 up-to-date
gradle alwaysInstrumentClasses> gradle alwaysInstrumentClasses > Task :compileJava UP-TO-DATE > Task :alwaysInstrumentClasses BUILD SUCCESSFUL in 0s 4 actionable tasks: 1 executed, 3 up-to-date
If you are writing your own task that always should run, then you can also use the @UntrackedTask annotation on the task class instead of calling Task.doNotTrackState().
Integrate an external tool which does its own up-to-date checking
Sometimes you want to integrate an external tool like Git or Npm, both of which do their own up-to-date checking.
In that case it doesn’t make much sense for Gradle to also do up-to-date checks.
You can disable Gradle’s up-to-date checks by using the @UntrackedTask annotation on the task wrapping the tool.
Alternatively, you can use the runtime API method Task.doNotTrackState().
For example, let’s say you want to implement a task which clones a Git repository.
@UntrackedTask(because = "Git tracks the state") // (1)
public abstract class GitClone extends DefaultTask {
@Input
public abstract Property<String> getRemoteUri();
@Input
public abstract Property<String> getCommitId();
@OutputDirectory
public abstract DirectoryProperty getDestinationDir();
@TaskAction
public void gitClone() throws IOException {
File destinationDir = getDestinationDir().get().getAsFile().getAbsoluteFile(); // (2)
String remoteUri = getRemoteUri().get();
// Fetch origin or clone and checkout
// ...
}
}tasks.register<GitClone>("cloneGradleProfiler") {
destinationDir = layout.buildDirectory.dir("gradle-profiler") // <3
remoteUri = "https://github.com/gradle/gradle-profiler.git"
commitId = "d6c18a21ca6c45fd8a9db321de4478948bdf801b"
}tasks.register("cloneGradleProfiler", GitClone) {
destinationDir = layout.buildDirectory.dir("gradle-profiler") // (3)
remoteUri = "https://github.com/gradle/gradle-profiler.git"
commitId = "d6c18a21ca6c45fd8a9db321de4478948bdf801b"
}-
Declare the task as untracked.
-
Use the output directory to run the external tool.
-
Add the task and configure the output directory in your build.
Configure input normalization
For up to date checks and the build cache Gradle needs to determine if two task input properties have the same value. In order to do so, Gradle first normalizes both inputs and then compares the result. For example, for a compile classpath, Gradle extracts the ABI signature from the classes on the classpath and then compares signatures between the last Gradle run and the current Gradle run as described in Java compile avoidance.
Normalization applies to all zip files on the classpath (e.g. jars, wars, aars, apks, etc). This allows Gradle to recognize when two zip files are functionally the same, even though the zip files themselves might be slightly different due to metadata (such as timestamps or file order). Normalization applies not only to zip files directly on the classpath, but also to zip files nested inside directories or inside other zip files on the classpath.
It is possible to customize Gradle’s built-in strategy for runtime classpath normalization.
All inputs annotated with @Classpath are considered to be runtime classpaths.
Let’s say you want to add a file build-info.properties to all your produced jar files which contains information about the build, e.g. the timestamp when the build started or some ID to identify the CI job that published the artifact.
This file is only for auditing purposes, and has no effect on the outcome of running tests.
Nonetheless, this file is part of the runtime classpath for the test task and changes on every build invocation.
Therefore, the test would be never up-to-date or pulled from the build cache.
In order to benefit from incremental builds again, you are able tell Gradle to ignore this file on the runtime classpath at the project level by using Project.normalization(org.gradle.api.Action) (in the consuming project):
normalization {
runtimeClasspath {
ignore("build-info.properties")
}
}normalization {
runtimeClasspath {
ignore 'build-info.properties'
}
}If adding such a file to your jar files is something you do for all of the projects in your build, and you want to filter this file for all consumers, you should consider configuring such normalization in a convention plugin to share it between subprojects.
The effect of this configuration would be that changes to build-info.properties would be ignored for up-to-date checks and build cache key calculations.
Note that this will not change the runtime behavior of the test task — i.e. any test is still able to load build-info.properties and the runtime classpath is still the same as before.
Properties file normalization
By default, properties files (i.e. files that end in a .properties extension) will be normalized to ignore differences in comments, whitespace and the order of properties.
Gradle does this by loading the properties files and only considering the individual properties during up-to-date checks or build cache key calculations.
It is sometimes the case, though, that certain properties have a runtime impact, while others do not. If a property is changing that does not have an impact on the runtime classpath, it may be desirable to exclude it from up-to-date checks and build cache key calculations. However, excluding the entire file would also exclude the properties that do have a runtime impact. In this case, properties can be excluded selectively from any or all properties files on the runtime classpath.
A rule for ignoring properties can be applied to a specific set of files using the patterns described in RuntimeClasspathNormalization. In the event that a file matches a rule, but cannot be loaded as a properties file (e.g. because it is not formatted properly or uses a non-standard encoding), it will be incorporated into the up-to-date or build cache key calculation as a normal file. In other words, if the file cannot be loaded as a properties file, any changes to whitespace, property order, or comments may cause the task to become out-of-date or cause a cache miss.
normalization {
runtimeClasspath {
properties("**/build-info.properties") {
ignoreProperty("timestamp")
}
}
}normalization {
runtimeClasspath {
properties('**/build-info.properties') {
ignoreProperty 'timestamp'
}
}
}normalization {
runtimeClasspath {
properties {
ignoreProperty("timestamp")
}
}
}normalization {
runtimeClasspath {
properties {
ignoreProperty 'timestamp'
}
}
}Java META-INF normalization
For files in the META-INF directory of jar archives it’s not always possible to ignore files completely due to their runtime impact.
Manifest files within META-INF are normalized to ignore comments, whitespace and order differences.
Manifest attribute names are compared case-and-order insensitively.
Manifest properties files are normalized according to Properties File Normalization.
META-INF manifest attributesnormalization {
runtimeClasspath {
metaInf {
ignoreAttribute("Implementation-Version")
}
}
}normalization {
runtimeClasspath {
metaInf {
ignoreAttribute("Implementation-Version")
}
}
}META-INF property keysnormalization {
runtimeClasspath {
metaInf {
ignoreProperty("app.version")
}
}
}normalization {
runtimeClasspath {
metaInf {
ignoreProperty("app.version")
}
}
}META-INF/MANIFEST.MFnormalization {
runtimeClasspath {
metaInf {
ignoreManifest()
}
}
}normalization {
runtimeClasspath {
metaInf {
ignoreManifest()
}
}
}META-INFnormalization {
runtimeClasspath {
metaInf {
ignoreCompletely()
}
}
}normalization {
runtimeClasspath {
metaInf {
ignoreCompletely()
}
}
}Providing custom up-to-date logic
Gradle automatically handles up-to-date checks for output files and directories, but what if the task output is something else entirely? Perhaps it’s an update to a web service or a database table. Gradle has no way of knowing how to check whether the task is up to date in such cases.
That’s where the upToDateWhen() method on TaskOutputs comes in.
This takes a predicate function that is used to determine whether a task is up to date or not.
For example, you could read the version number of your database schema from the database.
Or, you could check whether a particular record in a database table exists or has changed for example.
Just be aware that up-to-date checks should save you time. Don’t add checks that cost as much or more time than the standard execution of the task. In fact, if a task ends up running frequently anyway, because it’s rarely up to date, then it may not be worth having no up-to-date checks at all as described in Disabling up-to-date checks. Remember that your checks will always run if the task is in the execution task graph.
One common mistake is to use upToDateWhen() instead of Task.onlyIf().
If you want to skip a task on the basis of some condition unrelated to the task inputs and outputs, then you should use onlyIf().
For example, in cases where you want to skip a task when a particular property is set or not set.
Stale task outputs
When the Gradle version changes, Gradle detects that outputs from tasks that ran with older versions of Gradle need to be removed to ensure that the newest version of the tasks are starting from a known clean state.
|
Note
|
Automatic clean-up of stale output directories has only been implemented for the output of source sets (Java/Groovy/Scala compilation). |
Configuration cache
Introduction
The configuration cache is a feature that significantly improves build performance by caching the result of the configuration phase and reusing this for subsequent builds. Using the configuration cache, Gradle can skip the configuration phase entirely when nothing that affects the build configuration, such as build scripts, has changed. Gradle also applies performance improvements to task execution as well.
The configuration cache is conceptually similar to the build cache, but caches different information. The build cache takes care of caching the outputs and intermediate files of the build, such as task outputs or artifact transform outputs. The configuration cache takes care of caching the build configuration for a particular set of tasks. In other words, the configuration cache saves the output of the configuration phase, and the build cache saves the outputs of the execution phase.
|
Important
|
This feature is currently not enabled by default. This feature has the following limitations:
|
How does it work?
When the configuration cache is enabled and you run Gradle for a particular set of tasks, for example by running gradlew check, Gradle checks whether a configuration cache entry is available for the requested set of tasks.
If available, Gradle uses this entry instead of running the configuration phase.
The cache entry contains information about the set of tasks to run, along with their configuration and dependency information.
The first time you run a particular set of tasks, there will be no entry in the configuration cache for these tasks and so Gradle will run the configuration phase as normal:
-
Run init scripts.
-
Run the settings script for the build, applying any requested settings plugins.
-
Configure and build the
buildSrcproject, if present. -
Run the builds scripts for the build, applying any requested project plugins.
-
Calculate the task graph for the requested tasks, running any deferred configuration actions.
Following the configuration phase, Gradle writes a snapshot of the task graph to a new configuration cache entry, for later Gradle invocations. Gradle then loads the task graph from the configuration cache, so that it can apply optimizations to the tasks, and then runs the execution phase as normal. Configuration time will still be spent the first time you run a particular set of tasks. However, you should see build performance improvement immediately because tasks will run in parallel.
When you subsequently run Gradle with this same set of tasks, for example by running gradlew check again, Gradle will load the tasks and their configuration directly from the configuration cache and skip the configuration phase entirely.
Before using a configuration cache entry, Gradle checks that none of the "build configuration inputs", such as build scripts, for the entry have changed.
If a build configuration input has changed, Gradle will not use the entry and will run the configuration phase again as above, saving the result for later reuse.
Build configuration inputs include:
-
Init scripts
-
Settings scripts
-
Build scripts
-
System properties used during the configuration phase
-
Gradle properties used during the configuration phase
-
Environment variables used during the configuration phase
-
Configuration files accessed using value suppliers such as providers
-
buildSrcand plugin included build inputs, including build configuration inputs and source files.
Gradle uses its own optimized serialization mechanism and format to store the configuration cache entries. It automatically serializes the state of arbitrary object graphs. If your tasks hold references to objects with simple state or of supported types you don’t have anything to do to support the serialization.
As a fallback and to provide some aid in migrating existing tasks, some semantics of Java Serialization are supported. But it is not recommended relying on it, mostly for performance reasons.
Performance improvements
Apart from skipping the configuration phase, the configuration cache provides some additional performance improvements:
-
All tasks run in parallel by default, subject to dependency constraints.
-
Dependency resolution is cached.
-
Configuration state and dependency resolution state is discarded from heap after writing the task graph. This reduces the peak heap usage required for a given set of tasks.
Using the configuration cache
It is recommended to get started with the simplest task invocation possible.
Running help with the configuration cache enabled is a good first step:
❯ gradle --configuration-cache help Calculating task graph as no cached configuration is available for tasks: help ... BUILD SUCCESSFUL in 4s 1 actionable task: 1 executed Configuration cache entry stored.
Running this for the first time, the configuration phase executes, calculating the task graph.
Then, run the same command again. This reuses the cached configuration:
❯ gradle --configuration-cache help Reusing configuration cache. ... BUILD SUCCESSFUL in 500ms 1 actionable task: 1 executed Configuration cache entry reused.
If it succeeds on your build, congratulations, you can now try with more useful tasks. You should target your development loop. A good example is running tests after making incremental changes.
If any problem is found caching or reusing the configuration, an HTML report is generated to help you diagnose and fix the issues. The report also shows detected build configuration inputs like system properties, environment variables and value suppliers read during the configuration phase. See the Troubleshooting section below for more information.
Keep reading to learn how to tweak the configuration cache, manually invalidate the state if something goes wrong and use the configuration cache from an IDE.
Enabling the configuration cache
By default, Gradle does not use the configuration cache.
To enable the cache at build time, use the configuration-cache flag:
❯ gradle --configuration-cache
You can also enable the cache persistently in a gradle.properties file using the org.gradle.configuration-cache property:
org.gradle.configuration-cache=trueIf enabled in a gradle.properties file, you can override that setting and disable the cache at build time with the no-configuration-cache flag:
❯ gradle --no-configuration-cache
Ignoring problems
By default, Gradle will fail the build if any configuration cache problems are encountered. When gradually improving your plugin or build logic to support the configuration cache it can be useful to temporarily turn problems into warnings, with no guarantee that the build will work.
This can be done from the command line:
❯ gradle --configuration-cache-problems=warn
or in a gradle.properties file:
org.gradle.configuration-cache.problems=warnAllowing a maximum number of problems
When configuration cache problems are turned into warnings, Gradle will fail the build if 512 problems are found by default.
This can be adjusted by specifying an allowed maximum number of problems on the command line:
❯ gradle -Dorg.gradle.configuration-cache.max-problems=5
or in a gradle.properties file:
org.gradle.configuration-cache.max-problems=5Invalidating the cache
The configuration cache is automatically invalidated when inputs to the configuration phase change. However, certain inputs are not tracked yet, so you may have to manually invalidate the configuration cache when untracked inputs to the configuration phase change. This can happen if you ignored problems. See the Requirements and Not yet implemented sections below for more information.
The configuration cache state is stored on disk in a directory named .gradle/configuration-cache in the root directory of the Gradle build in use.
If you need to invalidate the cache, simply delete that directory:
❯ rm -rf .gradle/configuration-cache
Configuration cache entries are checked periodically (at most every 24 hours) for whether they are still in use. They are deleted if they haven’t been used for 7 days.
Stable configuration cache
Working towards the stabilization of configuration caching we implemented some strictness behind a feature flag when it was considered too disruptive for early adopters.
You can enable that feature flag as follows:
enableFeaturePreview("STABLE_CONFIGURATION_CACHE")enableFeaturePreview "STABLE_CONFIGURATION_CACHE"The STABLE_CONFIGURATION_CACHE feature flag enables the following:
- Undeclared shared build service usage
-
When enabled, tasks using a shared build service without declaring the requirement via the
Task.usesServicemethod will emit a deprecation warning.
In addition, when the configuration cache is not enabled but the feature flag is present, deprecations for the following configuration cache requirements are also enabled:
It is recommended to enable it as soon as possible in order to be ready for when we remove the flag and make the linked features the default.
IDE support
If you enable and configure the configuration cache from your gradle.properties file, then the configuration cache will be enabled when your IDE delegates to Gradle.
There’s nothing more to do.
gradle.properties is usually checked in to source control.
If you don’t want to enable the configuration cache for your whole team yet you can also enable the configuration cache from your IDE only as explained below.
Note that syncing a build from an IDE doesn’t benefit from the configuration cache, only running tasks does.
IntelliJ based IDEs
In IntelliJ IDEA or Android Studio this can be done in two ways, either globally or per run configuration.
To enable it for the whole build, go to Run > Edit configurations….
This will open the IntelliJ IDEA or Android Studio dialog to configure Run/Debug configurations.
Select Templates > Gradle and add the necessary system properties to the VM options field.
For example to enable the configuration cache, turning problems into warnings, add the following:
-Dorg.gradle.configuration-cache=true -Dorg.gradle.configuration-cache.problems=warn
You can also choose to only enable it for a given run configuration.
In this case, leave the Templates > Gradle configuration untouched and edit each run configuration as you see fit.
Combining these two ways you can enable globally and disable for certain run configurations, or the opposite.
|
Tip
|
You can use the gradle-idea-ext-plugin to configure IntelliJ run configurations from your build. This is a good way to enable the configuration cache only for the IDE. |
Eclipse IDEs
In Eclipse IDEs you can enable and configure the configuration cache through Buildship in two ways, either globally or per run configuration.
To enable it globally, go to Preferences > Gradle.
You can use the properties described above as system properties.
For example to enable the configuration cache, turning problems into warnings, add the following JVM arguments:
-
-Dorg.gradle.configuration-cache=true -
-Dorg.gradle.configuration-cache.problems=warn
To enable it for a given run configuration, go to Run configurations…, find the one you want to change, go to Project Settings, tick the Override project settings checkbox and add the same system properties as a JVM argument.
Combining these two ways you can enable globally and disable for certain run configurations, or the opposite.
Supported plugins
The configuration cache is brand new and introduces new requirements for plugin implementations. As a result, both core Gradle plugins, and community plugins need to be adjusted. This section provides information about the current support in core Gradle plugins and community plugins.
Core Gradle plugins
Not all core Gradle plugins support configuration caching yet.
JVM languages and frameworks |
Native languages |
Packaging and distribution |
|---|---|---|
Code analysis |
IDE project files generation |
Utility |
| ✓ |
Supported plugin |
| ⚠ |
Partially supported plugin |
| ✖ |
Unsupported plugin |
Community plugins
Please refer to issue gradle/gradle#13490 to learn about the status of community plugins.
Troubleshooting
The following sections will go through some general guidelines on dealing with problems with the configuration cache. This applies to both your build logic and to your Gradle plugins.
Upon failure to serialize the state required to run the tasks, an HTML report of detected problems is generated. The Gradle failure output includes a clickable link to the report. This report is useful and allows you to drill down into problems, understand what is causing them.
Let’s look at a simple example build script that contains a couple problems:
tasks.register("someTask") {
val destination = System.getProperty("someDestination") // (1)
inputs.dir("source")
outputs.dir(destination)
doLast {
project.copy { // (2)
from("source")
into(destination)
}
}
}tasks.register('someTask') {
def destination = System.getProperty('someDestination') // (1)
inputs.dir('source')
outputs.dir(destination)
doLast {
project.copy { // (2)
from 'source'
into destination
}
}
}Running that task fails and print the following in the console:
❯ gradle --configuration-cache someTask -DsomeDestination=dest ... * What went wrong: Configuration cache problems found in this build. 1 problem was found storing the configuration cache. - Build file 'build.gradle': line 6: invocation of 'Task.project' at execution time is unsupported. See https://docs.gradle.org/0.0.0/userguide/configuration_cache.html#config_cache:requirements:use_project_during_execution See the complete report at file:///home/user/gradle/samples/build/reports/configuration-cache/<hash>/configuration-cache-report.html > Invocation of 'Task.project' by task ':someTask' at execution time is unsupported. * Try: > Run with --stacktrace option to get the stack trace. > Run with --info or --debug option to get more log output. > Run with --scan to get full insights. > Get more help at https://help.gradle.org. BUILD FAILED in 0s 1 actionable task: 1 executed Configuration cache entry discarded with 1 problem.
The configuration cache entry was discarded because of the found problem failing the build.
Details can be found in the linked HTML report:
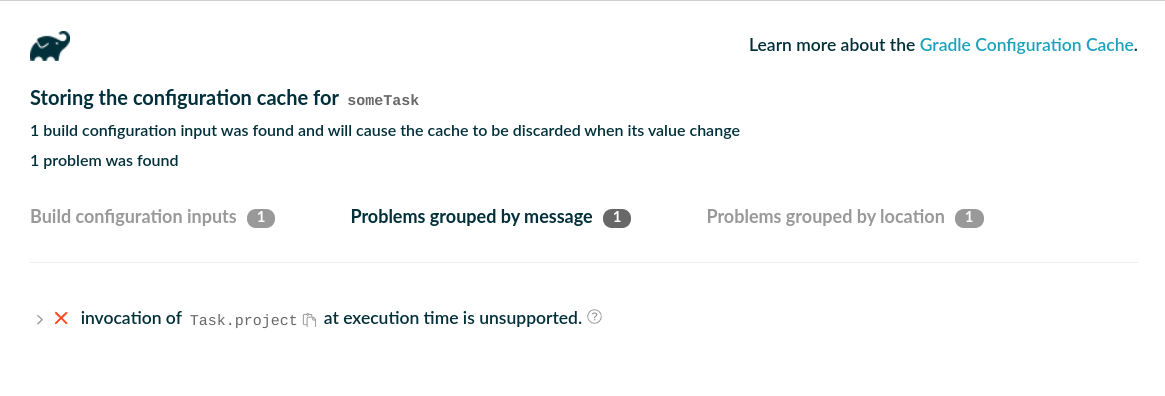
The report displays the set of problems twice. First grouped by problem message, then grouped by task. The former allows you to quickly see what classes of problems your build is facing. The latter allows you to quickly see which tasks are problematic. In both cases you can expand the tree in order to discover where the culprit is in the object graph.
The report also includes a list of detected build configuration inputs, such as environment variables, system properties and value suppliers that were read at configuration phase:
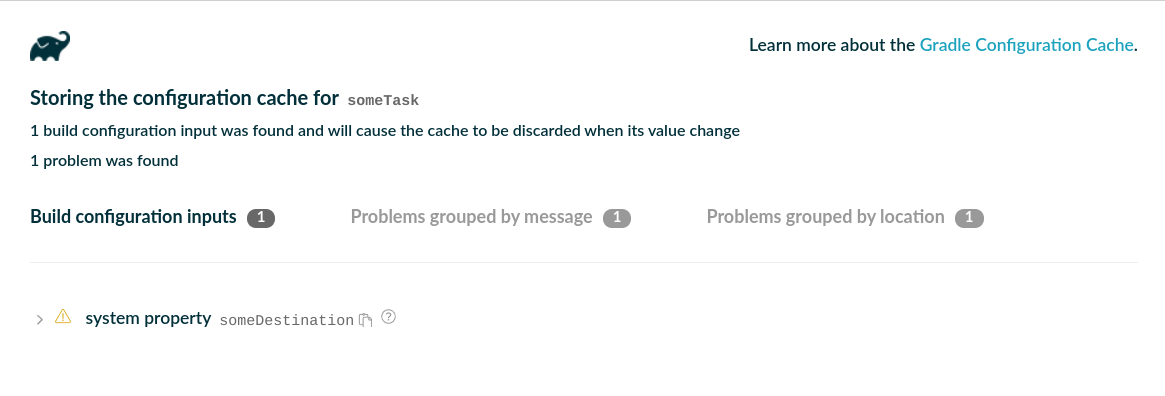
|
Tip
|
Problems displayed in the report have links to the corresponding requirement where you can find guidance on how to fix the problem or to the corresponding not yet implemented feature. When changing your build or plugin to fix the problems you should consider testing your build logic with TestKit. |
At this stage, you can decide to either turn the problems into warnings and continue exploring how your build reacts to the configuration cache, or fix the problems at hand.
Let’s ignore the reported problem, and run the same build again twice to see what happens when reusing the cached problematic configuration:
❯ gradle --configuration-cache --configuration-cache-problems=warn someTask -DsomeDestination=dest Calculating task graph as no cached configuration is available for tasks: someTask > Task :someTask 1 problem was found storing the configuration cache. - Build file 'build.gradle': line 6: invocation of 'Task.project' at execution time is unsupported. See https://docs.gradle.org/0.0.0/userguide/configuration_cache.html#config_cache:requirements:use_project_during_execution See the complete report at file:///home/user/gradle/samples/build/reports/configuration-cache/<hash>/configuration-cache-report.html BUILD SUCCESSFUL in 0s 1 actionable task: 1 executed Configuration cache entry stored with 1 problem. ❯ gradle --configuration-cache --configuration-cache-problems=warn someTask -DsomeDestination=dest Reusing configuration cache. > Task :someTask 1 problem was found reusing the configuration cache. - Build file 'build.gradle': line 6: invocation of 'Task.project' at execution time is unsupported. See https://docs.gradle.org/0.0.0/userguide/configuration_cache.html#config_cache:requirements:use_project_during_execution See the complete report at file:///home/user/gradle/samples/build/reports/configuration-cache/<hash>/configuration-cache-report.html BUILD SUCCESSFUL in 0s 1 actionable task: 1 executed Configuration cache entry reused with 1 problem.
The two builds succeed reporting the observed problem, storing then reusing the configuration cache.
With the help of the links present in the console problem summary and in the HTML report we can fix our problems. Here’s a fixed version of the build script:
abstract class MyCopyTask : DefaultTask() { // (1)
@get:InputDirectory abstract val source: DirectoryProperty // (2)
@get:OutputDirectory abstract val destination: DirectoryProperty // (2)
@get:Inject abstract val fs: FileSystemOperations // (3)
@TaskAction
fun action() {
fs.copy { // (3)
from(source)
into(destination)
}
}
}
tasks.register<MyCopyTask>("someTask") {
val projectDir = layout.projectDirectory
source = projectDir.dir("source")
destination = projectDir.dir(System.getProperty("someDestination"))
}abstract class MyCopyTask extends DefaultTask { // (1)
@InputDirectory abstract DirectoryProperty getSource() // (2)
@OutputDirectory abstract DirectoryProperty getDestination() // (2)
@Inject abstract FileSystemOperations getFs() // (3)
@TaskAction
void action() {
fs.copy { // (3)
from source
into destination
}
}
}
tasks.register('someTask', MyCopyTask) {
def projectDir = layout.projectDirectory
source = projectDir.dir('source')
destination = projectDir.dir(System.getProperty('someDestination'))
}-
We turned our ad-hoc task into a proper task class,
-
with inputs and outputs declaration,
-
and injected with the
FileSystemOperationsservice, a supported replacement forproject.copy {}.
Running the task twice now succeeds without reporting any problem and reuses the configuration cache on the second run:
❯ gradle --configuration-cache someTask -DsomeDestination=dest Calculating task graph as no cached configuration is available for tasks: someTask > Task :someTask BUILD SUCCESSFUL in 0s 1 actionable task: 1 executed Configuration cache entry stored. ❯ gradle --configuration-cache someTask -DsomeDestination=dest Reusing configuration cache. > Task :someTask BUILD SUCCESSFUL in 0s 1 actionable task: 1 executed Configuration cache entry reused.
But, what if we change the value of the system property?
❯ gradle --configuration-cache someTask -DsomeDestination=another Calculating task graph as configuration cache cannot be reused because system property 'someDestination' has changed. > Task :someTask BUILD SUCCESSFUL in 0s 1 actionable task: 1 executed Configuration cache entry stored.
The previous configuration cache entry could not be reused, and the task graph had to be calculated and stored again. This is because we read the system property at configuration time, hence requiring Gradle to run the configuration phase again when the value of that property changes. Fixing that is as simple as obtaining the provider of the system property and wiring it to the task input, without reading it at configuration time.
tasks.register<MyCopyTask>("someTask") {
val projectDir = layout.projectDirectory
source = projectDir.dir("source")
destination = projectDir.dir(providers.systemProperty("someDestination")) // (1)
}tasks.register('someTask', MyCopyTask) {
def projectDir = layout.projectDirectory
source = projectDir.dir('source')
destination = projectDir.dir(providers.systemProperty('someDestination')) // (1)
}-
We wired the system property provider directly, without reading it at configuration time.
With this simple change in place we can run the task any number of times, change the system property value, and reuse the configuration cache:
❯ gradle --configuration-cache someTask -DsomeDestination=dest Calculating task graph as no cached configuration is available for tasks: someTask > Task :someTask BUILD SUCCESSFUL in 0s 1 actionable task: 1 executed Configuration cache entry stored. ❯ gradle --configuration-cache someTask -DsomeDestination=another Reusing configuration cache. > Task :someTask BUILD SUCCESSFUL in 0s 1 actionable task: 1 executed Configuration cache entry reused.
We’re now done with fixing the problems with this simple task.
Keep reading to learn how to adopt the configuration cache for your build or your plugins.
Declare a task incompatible with the configuration cache
It is possible to declare that a particular task is not compatible with the configuration cache via the Task.notCompatibleWithConfigurationCache() method.
Configuration cache problems found in tasks marked incompatible will no longer cause the build to fail.
And, when an incompatible task is scheduled to run, Gradle discards the configuration state at the end of the build. You can use this to help with migration, by temporarily opting out certain tasks that are difficult to change to work with the configuration cache.
Check the method documentation for more details.
Adoption steps
An important prerequisite is to keep your Gradle and plugins versions up to date. The following explores the recommended steps for a successful adoption. It applies both to builds and plugins. While going through these steps, keep in mind the HTML report and the solutions explained in the requirements chapter below.
- Start with
:help -
Always start by trying your build or plugin with the simplest task
:help. This will exercise the minimal configuration phase of your build or plugin. - Progressively target useful tasks
-
Don’t go with running
buildright away. You can also use--dry-runto discover more configuration time problems first.When working on a build, progressively target your development feedback loop. For example, running tests after making some changes to the source code.
When working on a plugin, progressively target the contributed or configured tasks.
- Explore by turning problems into warnings
-
Don’t stop at the first build failure and turn problems into warnings to discover how your build and plugins behave. If a build fails, use the HTML report to reason about the reported problems related to the failure. Continue running more useful tasks.
This will give you a good overview of the nature of the problems your build and plugins are facing. Remember that when turning problems into warnings you might need to manually invalidate the cache in case of troubles.
- Step back and fix problems iteratively
-
When you feel you know enough about what needs to be fixed, take a step back and start iteratively fixing the most important problems. Use the HTML report and this documentation to help you in this journey.
Start with problems reported when storing the configuration cache. Once fixed, you can rely on a valid cached configuration phase and move on to fixing problems reported when loading the configuration cache if any.
- Report encountered issues
-
If you face a problem with a Gradle feature or with a Gradle core plugin that is not covered by this documentation, please report an issue on
gradle/gradle.If you face a problem with a community Gradle plugin, see if it is already listed at gradle/gradle#13490 and consider reporting the issue to the plugin’s issue tracker.
A good way to report such issues is by providing information such as:
-
a link to this very documentation,
-
the plugin version you tried,
-
the custom configuration of the plugin if any, or ideally a reproducer build,
-
a description of what fails, for example problems with a given task
-
a copy of the build failure,
-
the self-contained
configuration-cache-report.htmlfile.
-
- Test, test, test
-
Consider adding tests for your build logic. See the below section on testing your build logic for the configuration cache. This will help you while iterating on the required changes and prevent future regressions.
- Roll it out to your team
-
Once you have your developer workflow working, for example running tests from the IDE, you can consider enabling it for your team. A faster turnaround when changing code and running tests could be worth it. You’ll probably want to do this as an opt-in first.
If needed, turn problems into warnings and set the maximum number of allowed problems in your build
gradle.propertiesfile. Keep the configuration cache disabled by default. Let your team know they can opt-in by, for example, enabling the configuration cache on their IDE run configurations for the supported workflow.Later on, when more workflows are working, you can flip this around. Enable the configuration cache by default, configure CI to disable it, and if required communicate the unsupported workflow(s) for which the configuration cache needs to be disabled.
Reacting to the configuration cache in the build
Build logic or plugin implementations can detect if the configuration cache is enabled for a given build, and react to it accordingly.
The active status of the configuration cache is provided in the corresponding build feature.
You can access it by injecting the BuildFeatures service into your code.
You can use this information to configure features of your plugin differently or to disable an optional feature that is not yet compatible. Another example involves providing additional guidance for your users, should they need to adjust their setup or be informed of temporary limitations.
Adopting changes in the configuration cache behavior
Gradle releases bring enhancements to the configuration cache, making it detect more cases of configuration logic interacting with the environment. Those changes improve the correctness of the cache by eliminating potential false cache hits. On the other hand, they impose stricter rules that plugins and build logic need to follow to be cached as often as possible.
Some of those configuration inputs may be considered "benign" if their results do not affect the configured tasks. Having new configuration misses because of them may be undesirable for the build users, and the suggested strategy for eliminating them is:
-
Identify the configuration inputs causing the invalidation of the configuration cache with the help of the configuration cache report.
-
Fix undeclared configuration inputs accessed by the build logic of the project.
-
Report issues caused by third-party plugins to the plugin maintainers, and update the plugins once they get fixed.
-
-
For some kinds of configuration inputs, it is possible to use the opt-out options that make Gradle fall back to the earlier behavior, omitting the inputs from detection. This temporary workaround is aimed to mitigate performance issues coming from out-of-date plugins.
It is possible to temporarily opt out of configuration input detection in the following cases:
-
Since Gradle 8.1, using many APIs related to the file system is correctly tracked as configuration inputs, including the file system checks, such as
File.exists()orFile.isFile().For the input tracking to ignore these file system checks on the specific paths, the Gradle property
org.gradle.configuration-cache.inputs.unsafe.ignore.file-system-checks, with the list of the paths, relative to the root project directory and separated by;, can be used. To ignore multiple paths, use*to match arbitrary strings within one segment, or**across segments. Paths starting with~/are based on the user home directory. For example:gradle.propertiesorg.gradle.configuration-cache.inputs.unsafe.ignore.file-system-checks=\ ~/.third-party-plugin/*.lock;\ ../../externalOutputDirectory/**;\ build/analytics.json -
Before Gradle 8.4, some undeclared configuration inputs that were never used in the configuration logic could still be read when the task graph was serialized by the configuration cache. However, their changes would not invalidate the configuration cache afterward. Starting with Gradle 8.4, such undeclared configuration inputs are correctly tracked.
To temporarily revert to the earlier behavior, set the Gradle property
org.gradle.configuration-cache.inputs.unsafe.ignore.in-serializationtotrue.
Ignore configuration inputs sparingly, and only if they do not affect the tasks produced by the configuration logic. The support for these options will be removed in future releases.
Testing your build logic
The Gradle TestKit (a.k.a. just TestKit) is a library that aids in testing Gradle plugins and build logic generally. For general guidance on how to use TestKit, see the dedicated chapter.
To enable configuration caching in your tests, you can pass the --configuration-cache argument to GradleRunner or use one of the other methods described in Enabling the configuration cache.
You need to run your tasks twice. Once to prime the configuration cache. Once to reuse the configuration cache.
@Test
fun `my task can be loaded from the configuration cache`() {
buildFile.writeText("""
plugins {
id 'org.example.my-plugin'
}
""")
runner()
.withArguments("--configuration-cache", "myTask") // (1)
.build()
val result = runner()
.withArguments("--configuration-cache", "myTask") // (2)
.build()
require(result.output.contains("Reusing configuration cache.")) // (3)
// ... more assertions on your task behavior
}def "my task can be loaded from the configuration cache"() {
given:
buildFile << """
plugins {
id 'org.example.my-plugin'
}
"""
when:
runner()
.withArguments('--configuration-cache', 'myTask') // (1)
.build()
and:
def result = runner()
.withArguments('--configuration-cache', 'myTask') // (2)
.build()
then:
result.output.contains('Reusing configuration cache.') // (3)
// ... more assertions on your task behavior
}-
First run primes the configuration cache.
-
Second run reuses the configuration cache.
-
Assert that the configuration cache gets reused.
If problems with the configuration cache are found then Gradle will fail the build reporting the problems, and the test will fail.
|
Tip
|
A good testing strategy for a Gradle plugin is to run its whole test suite with the configuration cache enabled. This requires testing the plugin with a supported Gradle version. If the plugin already supports a range of Gradle versions it might already have tests for multiple Gradle versions. In that case we recommend enabling the configuration cache starting with the Gradle version that supports it. If this can’t be done right away, using tests that run all tasks contributed by the plugin several times, for e.g. asserting the |
Requirements
In order to capture the state of the task graph to the configuration cache and reload it again in a later build, Gradle applies certain requirements to tasks and other build logic. Each of these requirements is treated as a configuration cache "problem" and fails the build if violations are present.
For the most part these requirements are actually surfacing some undeclared inputs. In other words, using the configuration cache is an opt-in to more strictness, correctness and reliability for all builds.
The following sections describe each of the requirements and how to change your build to fix the problems.
Certain types must not be referenced by tasks
There are a number of types that task instances must not reference from their fields.
The same applies to task actions as closures such as doFirst {} or doLast {}.
These types fall into some categories as follows:
-
Live JVM state types
-
Gradle model types
-
Dependency management types
In all cases the reason these types are disallowed is that their state cannot easily be stored or recreated by the configuration cache.
Live JVM state types (e.g. ClassLoader, Thread, OutputStream, Socket etc…) are simply disallowed.
These types almost never represent a task input or output.
The only exceptions are the standard streams: System.in, System.out, and System.err.
These streams can be used, for example, as parameters to Exec and JavaExec tasks.
Gradle model types (e.g. Gradle, Settings, Project, SourceSet, Configuration etc…) are usually used to carry some task input that should be explicitly and precisely declared instead.
For example, if you reference a Project in order to get the project.version at execution time, you should instead directly declare the project version as an input to your task using a Property<String>.
Another example would be to reference a SourceSet to later get the source files, the compilation classpath or the outputs of the source set.
You should instead declare these as a FileCollection input and reference just that.
The same requirement applies to dependency management types with some nuances.
Some types, such as Configuration or SourceDirectorySet, don’t make good task input parameters, as they hold a lot of irrelevant state, and it is better to model these inputs as something more precise.
We don’t intend to make these types serializable at all.
For example, if you reference a Configuration to later get the resolved files, you should instead declare a FileCollection as an input to your task.
In the same vein, if you reference a SourceDirectorySet you should instead declare a FileTree as an input to your task.
Referencing dependency resolution results is also disallowed (e.g. ArtifactResolutionQuery, ResolvedArtifact, ArtifactResult etc…).
For example, if you reference some ResolvedComponentResult instances, you should instead declare a Provider<ResolvedComponentResult> as an input to your task.
Such a provider can be obtained by invoking ResolutionResult.getRootComponent().
In the same vein, if you reference some ResolvedArtifactResult instances, you should instead use ArtifactCollection.getResolvedArtifacts() that returns a Provider<Set<ResolvedArtifactResult>> that can be mapped as an input to your task.
The rule of thumb is that tasks must not reference resolved results, but lazy specifications instead, in order to do the dependency resolution at execution time.
Some types, such as Publication or Dependency are not serializable, but could be.
We may, if necessary, allow these to be used as task inputs directly.
Here’s an example of a problematic task type referencing a SourceSet:
abstract class SomeTask : DefaultTask() {
@get:Input lateinit var sourceSet: SourceSet // (1)
@TaskAction
fun action() {
val classpathFiles = sourceSet.compileClasspath.files
// ...
}
}abstract class SomeTask extends DefaultTask {
@Input SourceSet sourceSet // (1)
@TaskAction
void action() {
def classpathFiles = sourceSet.compileClasspath.files
// ...
}
}-
this will be reported as a problem because referencing
SourceSetis not allowed
The following is how it should be done instead:
abstract class SomeTask : DefaultTask() {
@get:InputFiles @get:Classpath
abstract val classpath: ConfigurableFileCollection // (1)
@TaskAction
fun action() {
val classpathFiles = classpath.files
// ...
}
}abstract class SomeTask extends DefaultTask {
@InputFiles @Classpath
abstract ConfigurableFileCollection getClasspath() // (1)
@TaskAction
void action() {
def classpathFiles = classpath.files
// ...
}
}-
no more problems reported, we now reference the supported type
FileCollection
In the same vein, if you encounter the same problem with an ad-hoc task declared in a script as follows:
tasks.register("someTask") {
doLast {
val classpathFiles = sourceSets.main.get().compileClasspath.files // (1)
}
}tasks.register('someTask') {
doLast {
def classpathFiles = sourceSets.main.compileClasspath.files // (1)
}
}-
this will be reported as a problem because the
doLast {}closure is capturing a reference to theSourceSet
You still need to fulfil the same requirement, that is not referencing a disallowed type. Here’s how the task declaration above can be fixed:
tasks.register("someTask") {
val classpath = sourceSets.main.get().compileClasspath // (1)
doLast {
val classpathFiles = classpath.files
}
}tasks.register('someTask') {
def classpath = sourceSets.main.compileClasspath // (1)
doLast {
def classpathFiles = classpath.files
}
}-
no more problems reported, the
doLast {}closure now only capturesclasspathwhich is of the supportedFileCollectiontype
Note that sometimes the disallowed type is indirectly referenced. For example, you could have a task reference some type from a plugin that is allowed. That type could reference another allowed type that in turn references a disallowed type. The hierarchical view of the object graph provided in the HTML reports for problems should help you pinpoint the offender.
Using the Project object
A task must not use any Project objects at execution time.
This includes calling Task.getProject() while the task is running.
Some cases can be fixed in the same way as for disallowed types.
Often, similar things are available on both Project and Task.
For example if you need a Logger in your task actions you should use Task.logger instead of Project.logger.
Otherwise, you can use injected services instead of the methods of Project.
Here’s an example of a problematic task type using the Project object at execution time:
abstract class SomeTask : DefaultTask() {
@TaskAction
fun action() {
project.copy { // (1)
from("source")
into("destination")
}
}
}abstract class SomeTask extends DefaultTask {
@TaskAction
void action() {
project.copy { // (1)
from 'source'
into 'destination'
}
}
}-
this will be reported as a problem because the task action is using the
Projectobject at execution time
The following is how it should be done instead:
abstract class SomeTask : DefaultTask() {
@get:Inject abstract val fs: FileSystemOperations // (1)
@TaskAction
fun action() {
fs.copy {
from("source")
into("destination")
}
}
}abstract class SomeTask extends DefaultTask {
@Inject abstract FileSystemOperations getFs() // (1)
@TaskAction
void action() {
fs.copy {
from 'source'
into 'destination'
}
}
}-
no more problem reported, the injected
FileSystemOperationsservice is supported as a replacement forproject.copy {}
In the same vein, if you encounter the same problem with an ad-hoc task declared in a script as follows:
tasks.register("someTask") {
doLast {
project.copy { // (1)
from("source")
into("destination")
}
}
}tasks.register('someTask') {
doLast {
project.copy { // (1)
from 'source'
into 'destination'
}
}
}-
this will be reported as a problem because the task action is using the
Projectobject at execution time
Here’s how the task declaration above can be fixed:
interface Injected {
@get:Inject val fs: FileSystemOperations // (1)
}
tasks.register("someTask") {
val injected = project.objects.newInstance<Injected>() // (2)
doLast {
injected.fs.copy { // (3)
from("source")
into("destination")
}
}
}interface Injected {
@Inject FileSystemOperations getFs() // (1)
}
tasks.register('someTask') {
def injected = project.objects.newInstance(Injected) // (2)
doLast {
injected.fs.copy { // (3)
from 'source'
into 'destination'
}
}
}-
services can’t be injected directly in scripts, we need an extra type to convey the injection point
-
create an instance of the extra type using
project.objectoutside the task action -
no more problem reported, the task action references
injectedthat provides theFileSystemOperationsservice, supported as a replacement forproject.copy {}
As you can see above, fixing ad-hoc tasks declared in scripts requires quite a bit of ceremony. It is a good time to think about extracting your task declaration as a proper task class as shown previously.
The following table shows what APIs or injected service should be used as a replacement for each of the Project methods.
| Instead of: | Use: |
|---|---|
|
A task input or output property or a script variable to capture the result of using |
|
A task input or output property or a script variable to capture the result of using |
|
A task input or output property or a script variable to capture the result of using |
|
A task input or output property or a script variable to capture the result of using |
|
A task input or output property or a script variable to capture the result of using |
|
A task input or output property or a script variable to capture the result of using |
|
A task input or output property or a script variable to capture the result of using |
|
|
|
|
|
|
|
A task input or output property or a script variable to capture the result of using |
|
A task input or output property or a script variable to capture the result of using |
|
|
|
|
|
|
|
|
|
|
|
A task input or output property or a script variable to capture the result of using |
|
|
|
|
|
|
|
|
|
The Kotlin, Groovy or Java API available to your build logic. |
|
|
|
|
|
|
|
Accessing a task instance from another instance
Tasks should not directly access the state of another task instance. Instead, tasks should be connected using inputs and outputs relationships.
Note that this requirement makes it unsupported to write tasks that configure other tasks at execution time.
Sharing mutable objects
When storing a task to the configuration cache, all objects directly or indirectly referenced through the task’s fields are serialized.
In most cases, deserialization preserves reference equality: if two fields a and b reference the same instance at configuration time, then upon deserialization they will reference the same instance again, so a == b (or a === b in Groovy and Kotlin syntax) still holds.
However, for performance reasons, some classes, in particular java.lang.String, java.io.File, and many implementations of java.util.Collection interface, are serialized without preserving the reference equality.
Upon deserialization, fields that referred to the object of such a class can refer to different but equal objects.
Let’s look at a task that stores a user-defined object and an ArrayList in task fields.
class StateObject {
// ...
}
abstract class StatefulTask : DefaultTask() {
@get:Internal
var stateObject: StateObject? = null
@get:Internal
var strings: List<String>? = null
}
tasks.register<StatefulTask>("checkEquality") {
val objectValue = StateObject()
val stringsValue = arrayListOf("a", "b")
stateObject = objectValue
strings = stringsValue
doLast { // (1)
println("POJO reference equality: ${stateObject === objectValue}") // (2)
println("Collection reference equality: ${strings === stringsValue}") // (3)
println("Collection equality: ${strings == stringsValue}") // (4)
}
}class StateObject {
// ...
}
abstract class StatefulTask extends DefaultTask {
@Internal
StateObject stateObject
@Internal
List<String> strings
}
tasks.register("checkEquality", StatefulTask) {
def objectValue = new StateObject()
def stringsValue = ["a", "b"] as ArrayList<String>
stateObject = objectValue
strings = stringsValue
doLast { // (1)
println("POJO reference equality: ${stateObject === objectValue}") // (2)
println("Collection reference equality: ${strings === stringsValue}") // (3)
println("Collection equality: ${strings == stringsValue}") // (4)
}
}-
doLastaction captures the references from the enclosing scope. These captured references are also serialized to the configuration cache. -
Compare the reference to an object of user-defined class stored in the task field and the reference captured in the
doLastaction. -
Compare the reference to
ArrayListinstance stored in the task field and the reference captured in thedoLastaction. -
Check the equality of stored and captured lists.
Running the build without the configuration cache shows that reference equality is preserved in both cases.
❯ gradle --no-configuration-cache checkEquality > Task :checkEquality POJO reference equality: true Collection reference equality: true Collection equality: true
However, with the configuration cache enabled, only the user-defined object references are the same. List references are different, though the referenced lists are equal.
❯ gradle --configuration-cache checkEquality > Task :checkEquality POJO reference equality: true Collection reference equality: false Collection equality: true
In general, it isn’t recommended to share mutable objects between configuration and execution phases. If you need to do this, you should always wrap the state in a class you define. There is no guarantee that the reference equality is preserved for standard Java, Groovy, and Kotlin types, or for Gradle-defined types.
Note that no reference equality is preserved between tasks: each task is its own "realm", so it is not possible to share objects between tasks. Instead, you can use a build service to wrap the shared state.
Accessing task extensions or conventions
Tasks should not access conventions and extensions, including extra properties, at execution time. Instead, any value that’s relevant for the execution of the task should be modeled as a task property.
Using build listeners
Plugins and build scripts must not register any build listeners.
That is listeners registered at configuration time that get notified at execution time.
For example a BuildListener or a TaskExecutionListener.
These should be replaced by build services, registered to receive information about task execution if needed.
Use dataflow actions to handle the build result instead of buildFinished listeners.
Running external processes
Plugin and build scripts should avoid running external processes at configuration time.
In general, it is preferred to run external processes in tasks with properly declared inputs and outputs to avoid unnecessary work when the task is up-to-date.
If necessary, only configuration-cache-compatible APIs should be used instead of Java and Groovy standard APIs or existing ExecOperations,
Project.exec, Project.javaexec, and their likes in settings and init scripts.
For simpler cases, when grabbing the output of the process is enough,
providers.exec() and
providers.javaexec() can be used:
val gitVersion = providers.exec {
commandLine("git", "--version")
}.standardOutput.asText.get()def gitVersion = providers.exec {
commandLine("git", "--version")
}.standardOutput.asText.get()For more complex cases a custom ValueSource implementation with injected ExecOperations can be used.
This ExecOperations instance can be used at configuration time without restrictions.
abstract class GitVersionValueSource : ValueSource<String, ValueSourceParameters.None> {
@get:Inject
abstract val execOperations: ExecOperations
override fun obtain(): String {
val output = ByteArrayOutputStream()
execOperations.exec {
commandLine("git", "--version")
standardOutput = output
}
return String(output.toByteArray(), Charset.defaultCharset())
}
}abstract class GitVersionValueSource implements ValueSource<String, ValueSourceParameters.None> {
@Inject
abstract ExecOperations getExecOperations()
String obtain() {
ByteArrayOutputStream output = new ByteArrayOutputStream()
execOperations.exec {
it.commandLine "git", "--version"
it.standardOutput = output
}
return new String(output.toByteArray(), Charset.defaultCharset())
}
}The ValueSource implementation can then be used to create a provider with providers.of:
val gitVersionProvider = providers.of(GitVersionValueSource::class) {}
val gitVersion = gitVersionProvider.get()def gitVersionProvider = providers.of(GitVersionValueSource.class) {}
def gitVersion = gitVersionProvider.get()In both approaches, if the value of the provider is used at configuration time then it will become a build configuration input. The external process will be executed for every build to determine if the configuration cache is up-to-date, so it is recommended to only call fast-running processes at configuration time. If the value changes then the cache is invalidated and the process will be run again during this build as part of the configuration phase.
Reading system properties and environment variables
Plugins and build scripts may read system properties and environment variables directly at configuration time with standard Java, Groovy, or Kotlin APIs or with the value supplier APIs. Doing so makes such variable or property a build configuration input, so changing the value invalidates the configuration cache. The configuration cache report includes a list of these build configuration inputs to help track them.
In general, you should avoid reading the value of system properties and environment variables at configuration time, to avoid cache misses when value changes.
Instead, you can connect the Provider returned by providers.systemProperty() or
providers.environmentVariable() to task properties.
Some access patterns that potentially enumerate all environment variables or system properties (for example, calling System.getenv().forEach() or using the iterator of its keySet()) are
discouraged.
In this case, Gradle cannot find out what properties are actual build configuration inputs, so every available property becomes one.
Even adding a new property will invalidate the cache if this pattern is used.
Using a custom predicate to filter environment variables is an example of this discouraged pattern:
val jdkLocations = System.getenv().filterKeys {
it.startsWith("JDK_")
}def jdkLocations = System.getenv().findAll {
key, _ -> key.startsWith("JDK_")
}The logic in the predicate is opaque to the configuration cache, so all environment variables are considered inputs.
One way to reduce the number of inputs is to always use methods that query a concrete variable name, such as getenv(String), or getenv().get():
val jdkVariables = listOf("JDK_8", "JDK_11", "JDK_17")
val jdkLocations = jdkVariables.filter { v ->
System.getenv(v) != null
}.associate { v ->
v to System.getenv(v)
}def jdkVariables = ["JDK_8", "JDK_11", "JDK_17"]
def jdkLocations = jdkVariables.findAll { v ->
System.getenv(v) != null
}.collectEntries { v ->
[v, System.getenv(v)]
}The fixed code above, however, is not exactly equivalent to the original as only an explicit list of variables is supported. Prefix-based filtering is a common scenario, so there are provider-based APIs to access system properties and environment variables:
val jdkLocationsProvider = providers.environmentVariablesPrefixedBy("JDK_")def jdkLocationsProvider = providers.environmentVariablesPrefixedBy("JDK_")Note that the configuration cache would be invalidated not only when the value of the variable changes or the variable is removed but also when another variable with the matching prefix is added to the environment.
For more complex use cases a custom ValueSource implementation can be used.
System properties and environment variables referenced in the code of the ValueSource do not become build configuration inputs, so any processing can be applied.
Instead, the value of the ValueSource is recomputed each time the build runs and only if the value changes the configuration cache is invalidated.
For example, a ValueSource can be used to get all environment variables with names containing the substring JDK:
abstract class EnvVarsWithSubstringValueSource : ValueSource<Map<String, String>, EnvVarsWithSubstringValueSource.Parameters> {
interface Parameters : ValueSourceParameters {
val substring: Property<String>
}
override fun obtain(): Map<String, String> {
return System.getenv().filterKeys { key ->
key.contains(parameters.substring.get())
}
}
}
val jdkLocationsProvider = providers.of(EnvVarsWithSubstringValueSource::class) {
parameters {
substring = "JDK"
}
}abstract class EnvVarsWithSubstringValueSource implements ValueSource<Map<String, String>, Parameters> {
interface Parameters extends ValueSourceParameters {
Property<String> getSubstring()
}
Map<String, String> obtain() {
return System.getenv().findAll { key, _ ->
key.contains(parameters.substring.get())
}
}
}
def jdkLocationsProvider = providers.of(EnvVarsWithSubstringValueSource.class) {
parameters {
substring = "JDK"
}
}Undeclared reading of files
Plugins and build scripts should not read files directly using the Java, Groovy or Kotlin APIs at configuration time. Instead, declare files as potential build configuration inputs using the value supplier APIs.
This problem is caused by build logic similar to this:
val config = file("some.conf").readText()def config = file('some.conf').textTo fix this problem, read files using providers.fileContents() instead:
val config = providers.fileContents(layout.projectDirectory.file("some.conf"))
.asTextdef config = providers.fileContents(layout.projectDirectory.file('some.conf'))
.asTextIn general, you should avoid reading files at configuration time, to avoid invalidating configuration cache entries when the file content changes.
Instead, you can connect the Provider returned by providers.fileContents() to task properties.
Bytecode modifications and Java agent
To detect the configuration inputs, Gradle modifies the bytecode of classes on the build script classpath, like plugins and their dependencies. Gradle uses a Java agent to modify the bytecode. Integrity self-checks of some libraries may fail because of the changed bytecode or the agent’s presence.
To work around this, you can use the Worker API with classloader or process isolation to encapsulate the library code. The bytecode of the worker’s classpath is not modified, so the self-checks should pass. When process isolation is used, the worker action is executed in a separate worker process that doesn’t have the Gradle Java agent installed.
In simple cases, when the libraries also provide command-line entry points (public static void main() method), you can also use the JavaExec task to isolate the library.
Handling of credentials and secrets
The configuration cache has currently no option to prevent storing secrets that are used as inputs, and so they might end up in the serialized configuration cache entry which, by default, is stored under .gradle/configuration-cache in your project directory.
To mitigate the risk of accidental exposure, Gradle encrypts the configuration cache.
Gradle transparently generates a machine-specific secret key as required, caches it under the
GRADLE_USER_HOME directory and uses it to encrypt the data in the project specific caches.
To enhance security further, make sure to:
-
secure access to configuration cache entries;
-
leverage
GRADLE_USER_HOME/gradle.propertiesfor storing secrets. The content of that file is not part of the configuration cache, only its fingerprint. If you store secrets in that file, care must be taken to protect access to the file content.
See gradle/gradle#22618.
Providing an encryption key via GRADLE_ENCRYPTION_KEY environment variable
By default, Gradle automatically generates and manages the encryption key as a Java keystore stored under the GRADLE_USER_HOME directory.
For environments where this is undesirable (for instance, when the GRADLE_USER_HOME directory is shared across machines),
you may provide Gradle with the exact encryption key to use when
reading or writing the cached configuration data via the GRADLE_ENCRYPTION_KEY environment variable.
|
Important
|
You must ensure that the same encryption key is consistently provided across multiple Gradle runs, or else Gradle will not be able to reuse existing cached configurations. |
Generating an encryption key that is compatible with GRADLE_ENCRYPTION_KEY
For Gradle to encrypt the configuration cache using a user-specified encryption key, you must run Gradle while having the GRADLE_ENCRYPTION_KEY environment variable set with a valid AES key, encoded as a Base64 string.
One way of generating a Base64-encoded AES-compatible key is by using a command like this:
❯ openssl rand -base64 16This command should work on Linux, Mac OS, or on Windows, if using a tool like Cygwin.
You can then use the Base64-encoded key produced by that command and set it as the value of the
GRADLE_ENCRYPTION_KEY environment variable.
Not yet implemented
Support for using configuration caching with certain Gradle features is not yet implemented. Support for these features will be added in later Gradle releases.
Sharing the configuration cache
The configuration cache is currently stored locally only. It can be reused by hot or cold local Gradle daemons. But it can’t be shared between developers or CI machines.
See gradle/gradle#13510.
Source dependencies
Support for source dependencies is not yet implemented. With the configuration cache enabled, no problem will be reported and the build will fail.
See gradle/gradle#13506.
Using a Java agent with builds run using TestKit
When running builds using TestKit, the configuration cache can interfere with Java agents, such as the Jacoco agent, that are applied to these builds.
See gradle/gradle#25979.
Fine-grained tracking of Gradle properties as build configuration inputs
Currently, all external sources of Gradle properties (gradle.properties in project directories and in the GRADLE_USER_HOME, environment variables and system properties that set properties, and properties specified with
command-line flags) are considered build configuration inputs regardless of what properties are actually used at configuration time. These sources, however, are not included in the configuration cache report.
See gradle/gradle#20969.
Java Object Serialization
Gradle allows objects that support the Java Object Serialization protocol to be stored in the configuration cache.
The implementation is currently limited to serializable classes that implement the java.io.Serializable interface and define one of the following combination of methods:
-
a
writeObjectmethod combined with areadObjectmethod to control exactly which information to store; -
a
writeObjectmethod with no correspondingreadObject;writeObjectmust eventually callObjectOutputStream.defaultWriteObject; -
a
readObjectmethod with no correspondingwriteObject;readObjectmust eventually callObjectInputStream.defaultReadObject; -
a
writeReplacemethod to allow the class to nominate a replacement to be written; -
a
readResolvemethod to allow the class to nominate a replacement for the object just read;
The following Java Object Serialization features are not supported:
-
serializable classes implementing the
java.io.Externalizableinterface; objects of such classes are discarded by the configuration cache during serialization and reported as problems; -
the
serialPersistentFieldsmember to explicitly declare which fields are serializable; the member, if present, is ignored; the configuration cache considers all buttransientfields serializable; -
the following methods of
ObjectOutputStreamare not supported and will throwUnsupportedOperationException:-
reset(),writeFields(),putFields(),writeChars(String),writeBytes(String)andwriteUnshared(Any?).
-
-
the following methods of
ObjectInputStreamare not supported and will throwUnsupportedOperationException:-
readLine(),readFully(ByteArray),readFully(ByteArray, Int, Int),readUnshared(),readFields(),transferTo(OutputStream)andreadAllBytes().
-
-
validations registered via
ObjectInputStream.registerValidationare simply ignored; -
the
readObjectNoDatamethod, if present, is never invoked;
See gradle/gradle#13588.
Accessing top-level methods and variables of a build script at execution time
A common approach to reuse logic and data in a build script is to extract repeating bits into top-level methods and variables. However, calling such methods at execution time is not currently supported if the configuration cache is enabled.
For builds scripts written in Groovy, the task fails because the method cannot be found.
The following snippet uses a top-level method in the listFiles task:
def dir = file('data')
def listFiles(File dir) {
dir.listFiles({ file -> file.isFile() } as FileFilter).name.sort()
}
tasks.register('listFiles') {
doLast {
println listFiles(dir)
}
}Running the task with the configuration cache enabled produces the following error:
Execution failed for task ':listFiles'. > Could not find method listFiles() for arguments [/home/user/gradle/samples/data] on task ':listFiles' of type org.gradle.api.DefaultTask.
To prevent the task from failing, convert the referenced top-level method to a static method within a class:
def dir = file('data')
class Files {
static def listFiles(File dir) {
dir.listFiles({ file -> file.isFile() } as FileFilter).name.sort()
}
}
tasks.register('listFilesFixed') {
doLast {
println Files.listFiles(dir)
}
}Build scripts written in Kotlin cannot store tasks that reference top-level methods or variables at execution time in the configuration cache at all.
This limitation exists because the captured script object references cannot be serialized.
The first run of the Kotlin version of the listFiles task fails with the configuration cache problem.
val dir = file("data")
fun listFiles(dir: File): List<String> =
dir.listFiles { file: File -> file.isFile }.map { it.name }.sorted()
tasks.register("listFiles") {
doLast {
println(listFiles(dir))
}
}To make the Kotlin version of this task compatible with the configuration cache, make the following changes:
object Files { // (1)
fun listFiles(dir: File): List<String> =
dir.listFiles { file: File -> file.isFile }.map { it.name }.sorted()
}
tasks.register("listFilesFixed") {
val dir = file("data") // (2)
doLast {
println(Files.listFiles(dir))
}
}-
Define the method inside an object.
-
Define the variable in a smaller scope.
See gradle/gradle#22879.
Using build services to invalidate the configuration cache
Currently, it is impossible to use a BuildServiceProvider or provider derived from it with map or flatMap as a parameter for the ValueSource, if the value of the ValueSource is accessed at configuration time.
The same applies when such a ValueSource is obtained in a task that executes as part of the configuration phase, for example tasks of the buildSrc build or included builds contributing plugins.
Note that using a @ServiceReference or storing BuildServiceProvider in an @Internal-annotated property of a task is safe.
Generally speaking, this limitation makes it impossible to use a BuildService to invalidate the configuration cache.
See gradle/gradle#24085.
Inspecting Gradle Builds
Gradle provides multiple ways to inspect your build:
-
Profile with build scans
-
Local profile reports
-
Low level profiling
What is a build scan?
Build scans are a persistent, shareable record of what happened when running a build. Build scans provide insights into your build that you can use to identify and fix performance bottlenecks.
In Gradle 4.3 and above, you can create a build scan using the --scan command line option:
$ gradle build --scan
For older Gradle versions, the Build Scan Plugin User Manual explains how to enable build scans.
At the end of your build, Gradle displays a URL where you can find your build scan:
BUILD SUCCESSFUL in 2s 4 actionable tasks: 4 executed Publishing build scan... https://gradle.com/s/e6ircx2wjbf7e
This section explains how to profile your build with build scans.
Profile with build scans
The performance page can help use build scans to profile a build. To get there, click "Performance" in the left hand navigation menu or follow the "Explore performance" link on the build scan home page:
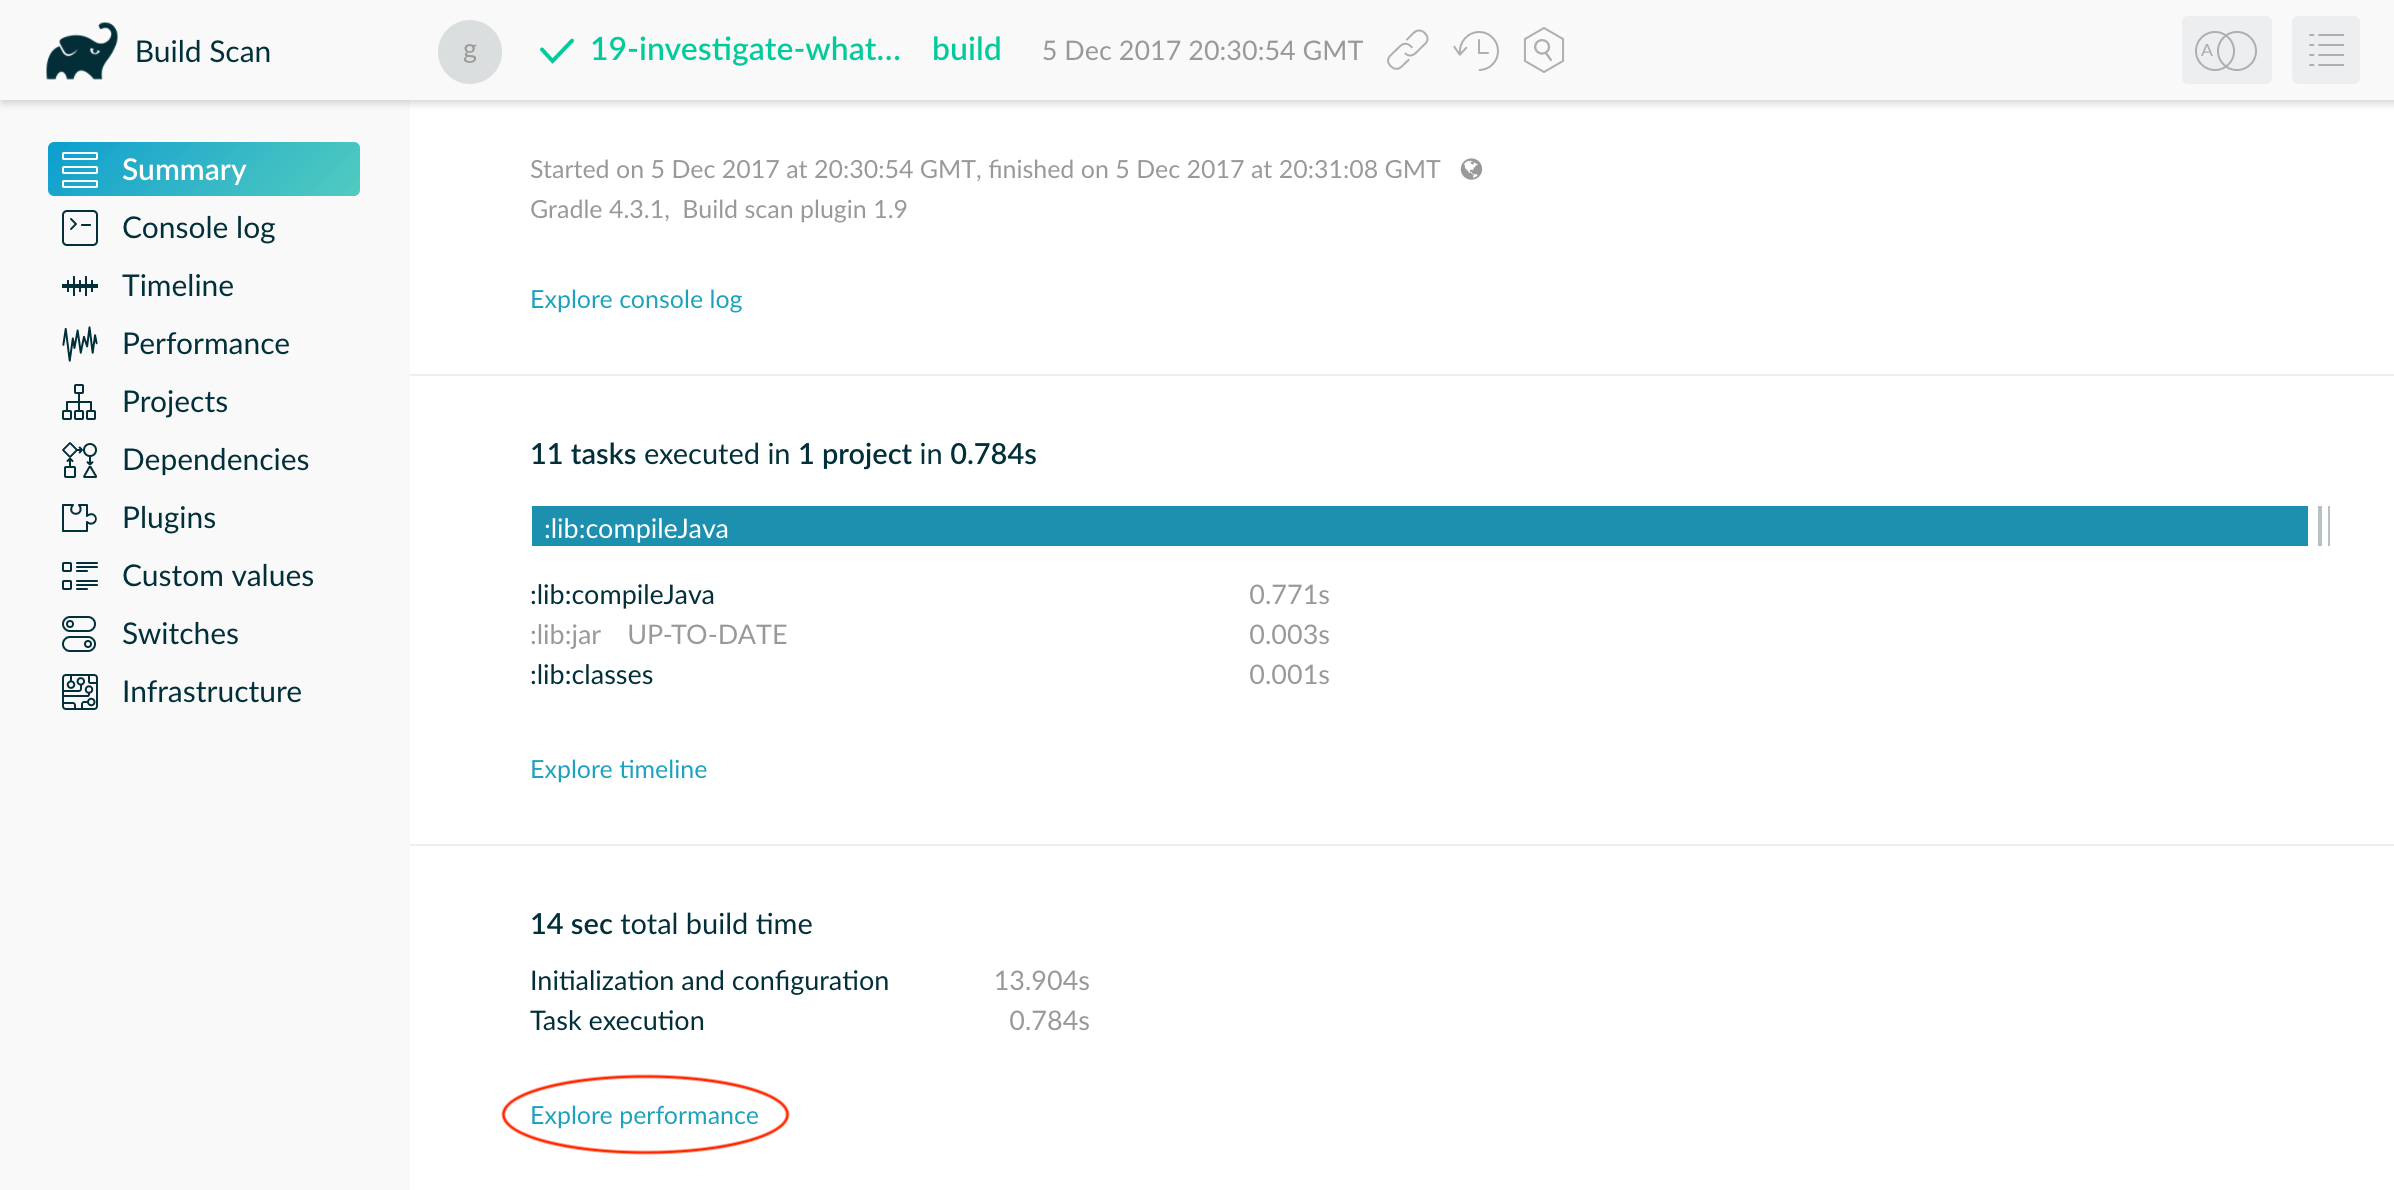
The performance page shows how long it took to complete different stages of a build. This page shows how long it took to:
-
start up
-
configure the build’s projects
-
resolve dependencies
-
execute tasks
You also get details about environmental properties, such as whether a daemon was used or not.
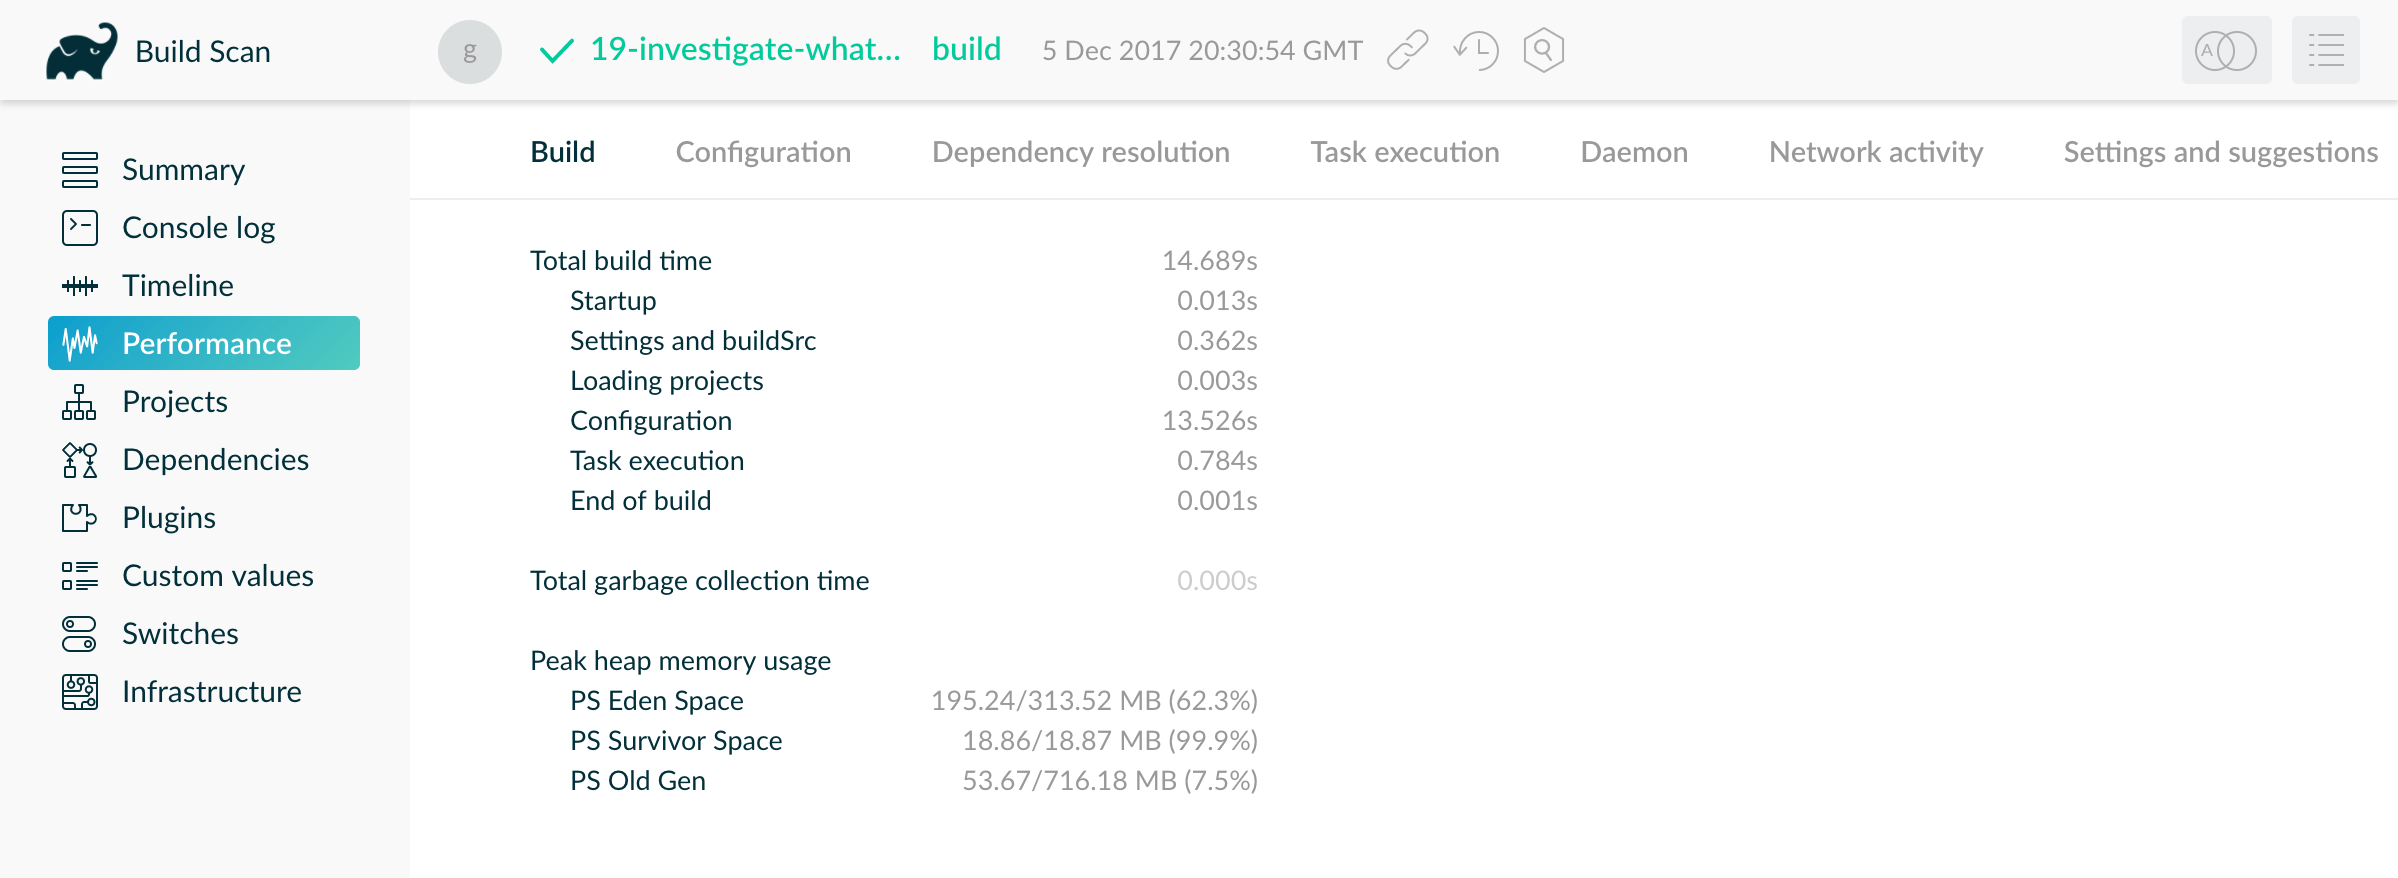
In the above build scan, configuration takes over 13 seconds. Click on the "Configuration" tab to break this stage into component parts, exposing the cause of the slowness.
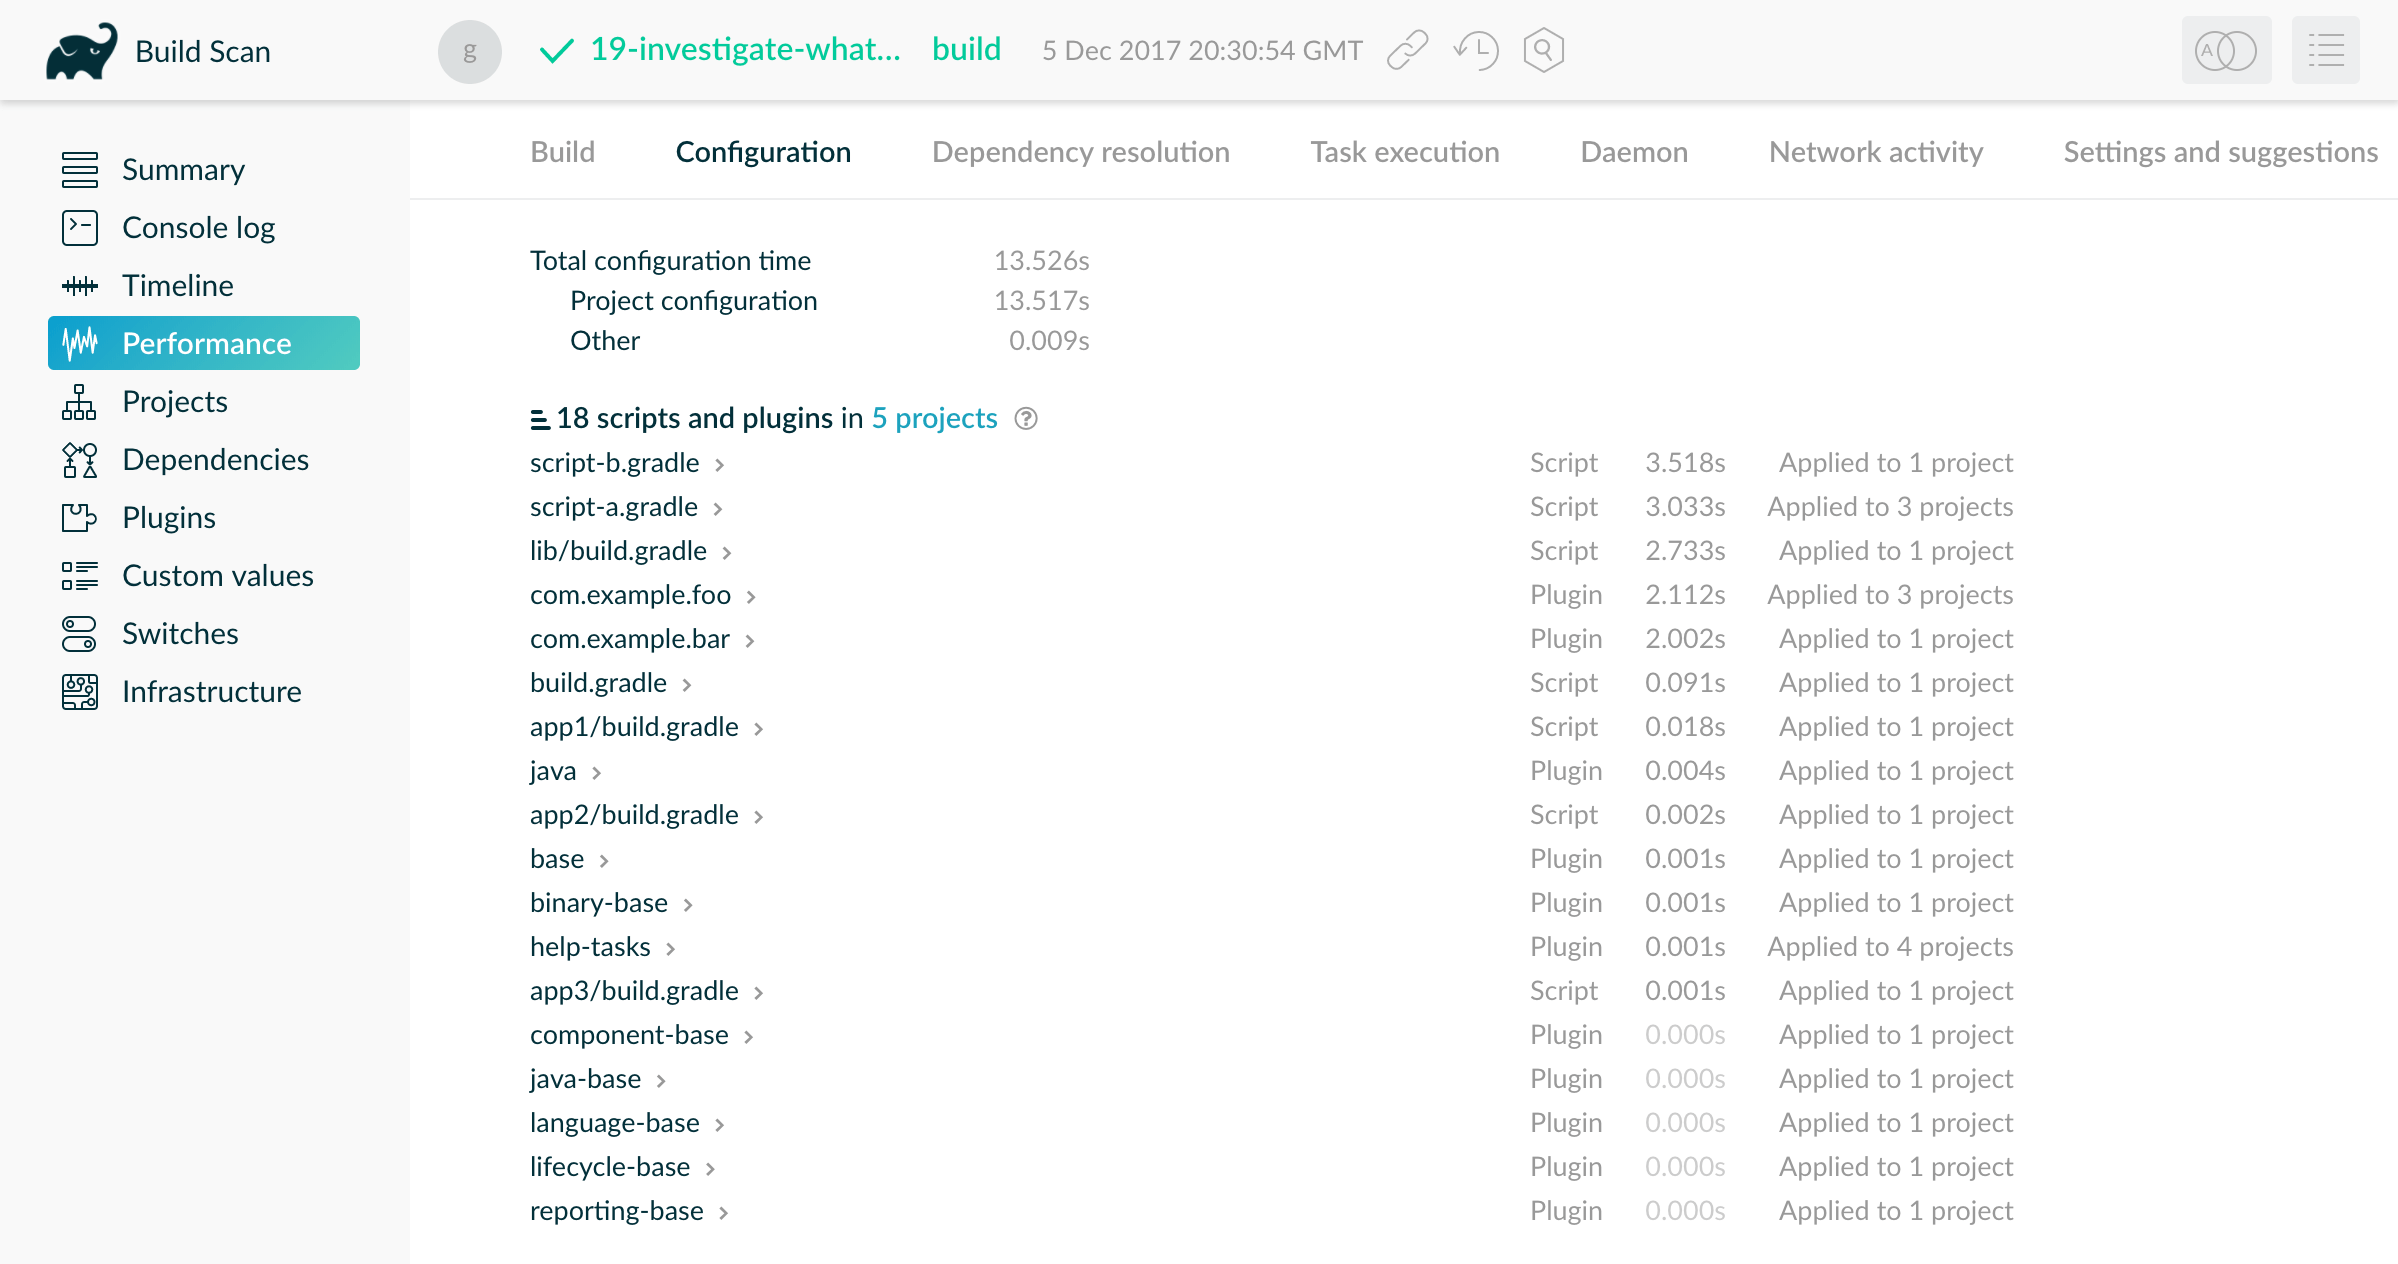
Here you can see the scripts and plugins applied to the project in descending order of how long they took to apply.
The slowest plugin and script applications are good candidates for optimization.
For example, the script script-b.gradle was applied once but took 3 seconds.
Expand that row to see where the build applied this script.
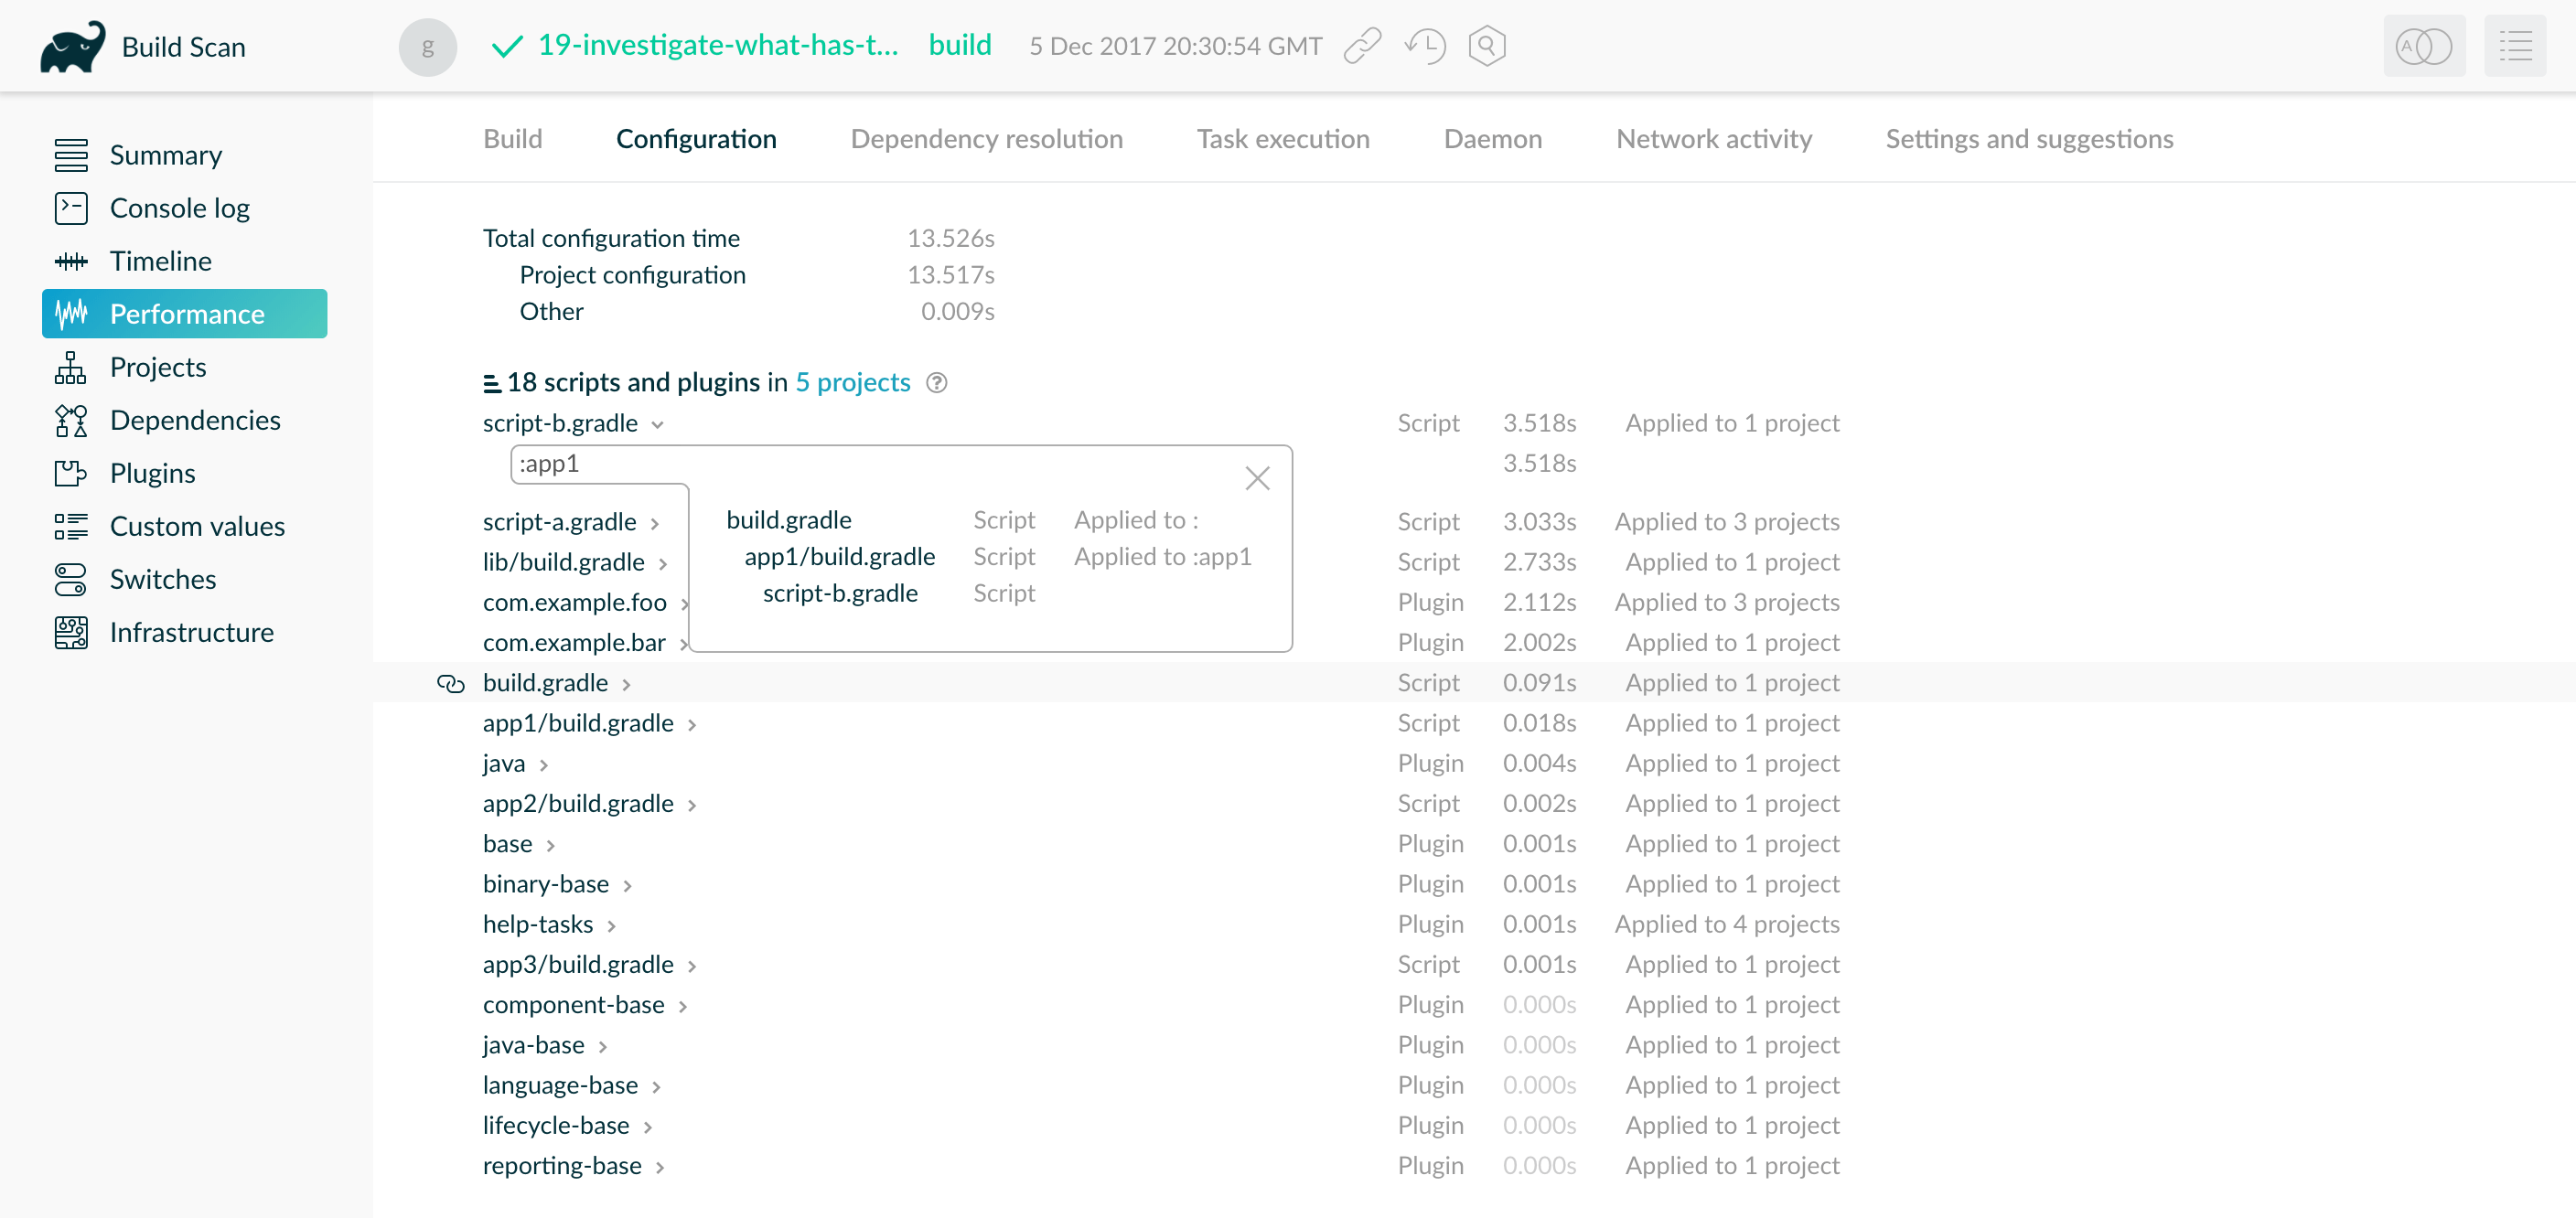
You can see that subproject :app1 applied the script once, from inside of that subproject’s build.gradle file.
Profile report
If you prefer not to use build scans, you can generate an HTML report in the
build/reports/profile directory of your root project. To generate this report,
use the --profile command-line option:
$ gradle --profile <tasks>
Each profile report has a timestamp in its name to avoid overwriting existing ones.
The report displays a breakdown of the time taken to run the build. However, this breakdown is not as detailed as a build scan. The following profile report shows the different categories available:
Low level profiling
Sometimes your build can be slow even though your build scripts do everything right. This often comes down to inefficiencies in plugins and custom tasks or constrained resources. Use the Gradle Profiler to find these kinds of bottlenecks. With the Gradle Profiler, you can define scenarios like "Running 'assemble' after making an ABI-breaking change" and run your build several times to collect profiling data. Use the Profiler to produce build scans. Or combine it with method profilers like JProfiler and YourKit. These profilers can help you find inefficient algorithms in custom plugins. If you find that something in Gradle itself slows down your build, don’t hesitate to send a profiler snapshot to performance@gradle.com.
Performance categories
Both build scans and local profile reports break down build execution into the same categories. The following sections explain those categories.
Startup
This reflects Gradle’s initialization time, which consists mostly of:
-
JVM initialization and class loading
-
Downloading the Gradle distribution if you’re using the wrapper
-
Starting the daemon if a suitable one isn’t already running
-
Executing Gradle initialization scripts
Even when a build execution has a long startup time, subsequent runs usually see a dramatic drop off in startup time. Persistently slow build startup times are usually the result of problems in your init scripts. Double check that the work you’re doing there is necessary and performant.
Settings and buildSrc
After startup, Gradle initializes your project. Usually, Gradle only processes your settings file.
If you have custom build logic in a buildSrc directory, Gradle also processes that logic.
After building buildSrc once, Gradle considers it up to date. The up-to-date checks take significantly less time than logic processing.
If your buildSrc phase takes too much time, consider breaking it out into a separate project.
You can then add that project’s JAR artifact as a dependency.
The settings file rarely contains code with significant I/O or computation. If you find that Gradle takes a long time to process it, use more traditional profiling methods, like the the Gradle Profiler, to determine the cause.
Loading projects
It normally doesn’t take a significant amount of time to load projects, nor do you have any control over it. The time spent here is basically a function of the number of projects you have in your build.
Configuring JVM memory
The org.gradle.jvmargs Gradle property controls the VM running the build.
It defaults to -Xmx512m "-XX:MaxMetaspaceSize=384m"
You can adjust JVM options for Gradle in the following ways.
Option 1: Changing JVM settings for the build VM:
org.gradle.jvmargs=-Xmx2g -XX:MaxMetaspaceSize=512m -XX:+HeapDumpOnOutOfMemoryError -Dfile.encoding=UTF-8
The JAVA_OPTS environment variable controls the command line client, which is only used to display console output. It defaults to -Xmx64m
Option 2: Changing JVM settings for the client VM:
JAVA_OPTS="-Xmx64m -XX:+HeapDumpOnOutOfMemoryError -Dfile.encoding=UTF-8"
|
Note
|
There is one case where the client VM can also serve as the build VM: If you deactivate the Gradle Daemon and the client VM has the same settings as required for the build VM, the client VM will run the build directly. Otherwise, the client VM will fork a new VM to run the actual build in order to honor the different settings. |
Certain tasks, like the test task, also fork additional JVM processes.
You can configure these through the tasks themselves.
They use -Xmx512m by default.
Example 1: Set compile options for Java compilation tasks:
plugins {
java
}
tasks.withType<JavaCompile>().configureEach {
options.compilerArgs = listOf("-Xdoclint:none", "-Xlint:none", "-nowarn")
}plugins {
id 'java'
}
tasks.withType(JavaCompile).configureEach {
options.compilerArgs += ['-Xdoclint:none', '-Xlint:none', '-nowarn']
}See other examples in the Test API documentation and test execution in the Java plugin reference.
Build scans will tell you information about the JVM that executed the build when you use the --scan option:
Configuring a task using project properties
It is possible to change the behavior of a task based on project properties specified at invocation time.
Suppose you would like to ensure release builds are only triggered by CI.
A simple way to do this is using the isCI project property.
Example 1: Prevent releasing outside of CI:
tasks.register("performRelease") {
val isCI = providers.gradleProperty("isCI")
doLast {
if (isCI.isPresent) {
println("Performing release actions")
} else {
throw InvalidUserDataException("Cannot perform release outside of CI")
}
}
}tasks.register('performRelease') {
def isCI = providers.gradleProperty("isCI")
doLast {
if (isCI.present) {
println("Performing release actions")
} else {
throw new InvalidUserDataException("Cannot perform release outside of CI")
}
}
}$ gradle performRelease -PisCI=true --quiet Performing release actions
Project properties
Project properties are available on the Project object.
They can be set from the command line using the -P / --project-prop environment option.
The following examples demonstrate how to set project properties in different ways.
Example 1: Setting a project property via the command line:
$ gradle -PgradlePropertiesProp=commandLineValue
Gradle can also set project properties when it sees specially-named system properties or environment variables.
If the environment variable name looks like ORG_GRADLE_PROJECT_prop=somevalue, then Gradle will set a prop property on your project object, with the value of somevalue.
Gradle also supports this for system properties, but with a different naming pattern, which looks like org.gradle.project.prop.
Both of the following will set the foo' property on your Project object to `"bar".
Example 2: Setting a project property via a system property:
org.gradle.project.foo=bar
Example 3: Setting a project property via an environment variable:
ORG_GRADLE_PROJECT_foo=bar
This feature is useful when you don’t have admin rights to a continuous integration server and you need to set property values that should not be easily visible.
Since you cannot use the -P option in that scenario nor change the system-level configuration files, the correct strategy is to change the configuration of your continuous integration build job, adding an environment variable setting that matches an expected pattern.
This won’t be visible to normal users on the system.
The following examples demonstrate how to use project properties.
Example 1: Reading project properties at configuration time:
// Querying the presence of a project property
if (hasProperty("myProjectProp")) {
// Accessing the value, throws if not present
println(property("myProjectProp"))
}
// Accessing the value of a project property, null if absent
println(findProperty("myProjectProp"))
// Accessing the Map<String, Any?> of project properties
println(properties["myProjectProp"])
// Using Kotlin delegated properties on `project`
val myProjectProp: String by project
println(myProjectProp)// Querying the presence of a project property
if (hasProperty('myProjectProp')) {
// Accessing the value, throws if not present
println property('myProjectProp')
}
// Accessing the value of a project property, null if absent
println findProperty('myProjectProp')
// Accessing the Map<String, ?> of project properties
println properties['myProjectProp']
// Using Groovy dynamic names, throws if not present
println myProjectPropThe Kotlin delegated properties are part of the Gradle Kotlin DSL.
You need to explicitly specify the type as String.
If you need to branch depending on the presence of the property, you can also use String? and check for null.
Note that if a Project property has a dot in its name, using the dynamic Groovy names is not possible. You have to use the API or the dynamic array notation instead.
Example 2: Reading project properties for consumption at execution time:
tasks.register<PrintValue>("printValue") {
// Eagerly accessing the value of a project property, set as a task input
inputValue = project.property("myProjectProp").toString()
}tasks.register('printValue', PrintValue) {
// Eagerly accessing the value of a project property, set as a task input
inputValue = project.property('myProjectProp')
}|
Note
|
If a project property is referenced but does not exist, an exception will be thrown, and the build will fail. You should check for the existence of optional project properties before you access them using the Project.hasProperty(java.lang.String) method. |
Accessing the web through a proxy
Configuring a proxy (for downloading dependencies, for example) is done via standard JVM system properties.
These properties can be set directly in the build script.
For example, setting the HTTP proxy host would be done with System.setProperty('http.proxyHost', 'www.somehost.org').
Alternatively, the properties can be specified in gradle.properties.
Example 1: Configuring an HTTP proxy using gradle.properties:
systemProp.http.proxyHost=www.somehost.org systemProp.http.proxyPort=8080 systemProp.http.proxyUser=userid systemProp.http.proxyPassword=password systemProp.http.nonProxyHosts=*.nonproxyrepos.com|localhost
There are separate settings for HTTPS.
Example 2: Configuring an HTTPS proxy using gradle.properties:
systemProp.https.proxyHost=www.somehost.org systemProp.https.proxyPort=8080 systemProp.https.proxyUser=userid systemProp.https.proxyPassword=password # NOTE: this is not a typo. systemProp.http.nonProxyHosts=*.nonproxyrepos.com|localhost
There are separate settings for SOCKS.
Example 3: Configuring a SOCKS proxy using gradle.properties:
systemProp.socksProxyHost=www.somehost.org systemProp.socksProxyPort=1080 systemProp.java.net.socks.username=userid systemProp.java.net.socks.password=password
You may need to set other properties to access other networks.
Helpful references:
NTLM Authentication
If your proxy requires NTLM authentication, you may need to provide the authentication domain as well as the username and password.
There are 2 ways that you can provide the domain for authenticating to a NTLM proxy:
-
Set the
http.proxyUsersystem property to a value likedomain/username. -
Provide the authentication domain via the
http.auth.ntlm.domainsystem property.
USING THE BUILD CACHE
Build Cache
|
Tip
|
Want to learn the tips and tricks top engineering teams use to keep builds fast and performant? Register here for our Build Cache Training. |
Overview
The Gradle build cache is a cache mechanism that aims to save time by reusing outputs produced by other builds. The build cache works by storing (locally or remotely) build outputs and allowing builds to fetch these outputs from the cache when it is determined that inputs have not changed, avoiding the expensive work of regenerating them.
A first feature using the build cache is task output caching. Essentially, task output caching leverages the same intelligence as up-to-date checks that Gradle uses to avoid work when a previous local build has already produced a set of task outputs. But instead of being limited to the previous build in the same workspace, task output caching allows Gradle to reuse task outputs from any earlier build in any location on the local machine. When using a shared build cache for task output caching this even works across developer machines and build agents.
Apart from tasks, artifact transforms can also leverage the build cache and re-use their outputs similarly to task output caching.
|
Tip
|
For a hands-on approach to learning how to use the build cache, start with reading through the use cases for the build cache and the follow up sections. It covers the different scenarios that caching can improve and has detailed discussions of the different caveats you need to be aware of when enabling caching for a build. |
Enable the Build Cache
By default, the build cache is not enabled. You can enable the build cache in a couple of ways:
- Run with
--build-cacheon the command-line -
Gradle will use the build cache for this build only.
- Put
org.gradle.caching=truein yourgradle.properties -
Gradle will try to reuse outputs from previous builds for all builds, unless explicitly disabled with
--no-build-cache.
When the build cache is enabled, it will store build outputs in the Gradle User Home. For configuring this directory or different kinds of build caches see Configure the Build Cache.
Task Output Caching
Beyond incremental builds described in up-to-date checks, Gradle can save time by reusing outputs from previous executions of a task by matching inputs to the task. Task outputs can be reused between builds on one computer or even between builds running on different computers via a build cache.
We have focused on the use case where users have an organization-wide remote build cache that is populated regularly by continuous integration builds.
Developers and other continuous integration agents should load cache entries from the remote build cache.
We expect that developers will not be allowed to populate the remote build cache, and all continuous integration builds populate the build cache after running the clean task.
For your build to play well with task output caching it must work well with the incremental build feature.
For example, when running your build twice in a row all tasks with outputs should be UP-TO-DATE.
You cannot expect faster builds or correct builds when enabling task output caching when this prerequisite is not met.
Task output caching is automatically enabled when you enable the build cache, see Enable the Build Cache.
What does it look like
Let us start with a project using the Java plugin which has a few Java source files. We run the build the first time.
> gradle --build-cache compileJava :compileJava :processResources :classes :jar :assemble BUILD SUCCESSFUL
We see the directory used by the local build cache in the output. Apart from that the build was the same as without the build cache. Let’s clean and run the build again.
> gradle clean :clean BUILD SUCCESSFUL
> gradle --build-cache assemble :compileJava FROM-CACHE :processResources :classes :jar :assemble BUILD SUCCESSFUL
Now we see that, instead of executing the :compileJava task, the outputs of the task have been loaded from the build cache.
The other tasks have not been loaded from the build cache since they are not cacheable. This is due to
:classes and :assemble being lifecycle tasks and :processResources
and :jar being Copy-like tasks which are not cacheable since it is generally faster to execute them.
Cacheable tasks
Since a task describes all of its inputs and outputs, Gradle can compute a build cache key that uniquely defines the task’s outputs based on its inputs. That build cache key is used to request previous outputs from a build cache or store new outputs in the build cache. If the previous build outputs have been already stored in the cache by someone else, e.g. your continuous integration server or other developers, you can avoid executing most tasks locally.
The following inputs contribute to the build cache key for a task in the same way that they do for up-to-date checks:
-
The task type and its classpath
-
The names of the output properties
-
The names and values of properties annotated as described in the section called "Custom task types"
-
The names and values of properties added by the DSL via TaskInputs
-
The classpath of the Gradle distribution, buildSrc and plugins
-
The content of the build script when it affects execution of the task
Task types need to opt-in to task output caching using the @CacheableTask annotation. Note that @CacheableTask is not inherited by subclasses. Custom task types are not cacheable by default.
Built-in cacheable tasks
Currently, the following built-in Gradle tasks are cacheable:
-
Java toolchain: JavaCompile, Javadoc
-
Groovy toolchain: GroovyCompile, Groovydoc
-
Scala toolchain: ScalaCompile,
org.gradle.language.scala.tasks.PlatformScalaCompile(removed), ScalaDoc -
Native toolchain: CppCompile, CCompile, SwiftCompile
-
Testing: Test
-
Code quality tasks: Checkstyle, CodeNarc, Pmd
-
JaCoCo: JacocoReport
-
Other tasks: AntlrTask, ValidatePlugins, WriteProperties
All other built-in tasks are currently not cacheable.
Third party plugins
There are third party plugins that work well with the build cache. The most prominent examples are the Android plugin 3.1+ and the Kotlin plugin 1.2.21+. For other third party plugins, check their documentation to find out whether they support the build cache.
Declaring task inputs and outputs
It is very important that a cacheable task has a complete picture of its inputs and outputs, so that the results from one build can be safely re-used somewhere else.
Missing task inputs can cause incorrect cache hits, where different results are treated as identical because the same cache key is used by both executions. Missing task outputs can cause build failures if Gradle does not completely capture all outputs for a given task. Wrongly declared task inputs can lead to cache misses especially when containing volatile data or absolute paths. (See the section called "Task inputs and outputs" on what should be declared as inputs and outputs.)
|
Note
|
The task path is not an input to the build cache key. This means that tasks with different task paths can re-use each other’s outputs as long as Gradle determines that executing them yields the same result. |
In order to ensure that the inputs and outputs are properly declared use integration tests (for example using TestKit) to check that a task produces the same outputs for identical inputs and captures all output files for the task. We suggest adding tests to ensure that the task inputs are relocatable, i.e. that the task can be loaded from the cache into a different build directory (see @PathSensitive).
In order to handle volatile inputs for your tasks consider configuring input normalization.
Marking tasks as non-cacheable by default
There are certain tasks that don’t benefit from using the build cache.
One example is a task that only moves data around the file system, like a Copy task.
You can signify that a task is not to be cached by adding the @DisableCachingByDefault annotation to it.
You can also give a human-readable reason for not caching the task by default.
The annotation can be used on its own, or together with @CacheableTask.
|
Note
|
This annotation is only for documenting the reason behind not caching the task by default. Build logic can override this decision via the runtime API (see below). |
Enable caching of non-cacheable tasks
As we have seen, built-in tasks, or tasks provided by plugins, are cacheable if their class is annotated with the Cacheable annotation.
But what if you want to make cacheable a task whose class is not cacheable?
Let’s take a concrete example: your build script uses a generic NpmTask task to create a JavaScript bundle by delegating to NPM (and running npm run bundle).
This process is similar to a complex compilation task, but NpmTask is too generic to be cacheable by default: it just takes arguments and runs npm with those arguments.
The inputs and outputs of this task are simple to figure out. The inputs are the directory containing the JavaScript files, and the NPM configuration files. The output is the bundle file generated by this task.
Using annotations
We create a subclass of the NpmTask and use annotations to declare the inputs and outputs.
When possible, it is better to use delegation instead of creating a subclass.
That is the case for the built in JavaExec, Exec, Copy and Sync tasks, which have a method on Project to do the actual work.
If you’re a modern JavaScript developer, you know that bundling can be quite long, and is worth caching. To achieve that, we need to tell Gradle that it’s allowed to cache the output of that task, using the @CacheableTask annotation.
This is sufficient to make the task cacheable on your own machine. However, input files are identified by default by their absolute path. So if the cache needs to be shared between several developers or machines using different paths, that won’t work as expected. So we also need to set the path sensitivity. In this case, the relative path of the input files can be used to identify them.
Note that it is possible to override property annotations from the base class by overriding the getter of the base class and annotating that method.
@CacheableTask // (1)
abstract class BundleTask : NpmTask() {
@get:Internal // (2)
override val args
get() = super.args
@get:InputDirectory
@get:SkipWhenEmpty
@get:PathSensitive(PathSensitivity.RELATIVE) // (3)
abstract val scripts: DirectoryProperty
@get:InputFiles
@get:PathSensitive(PathSensitivity.RELATIVE) // (4)
abstract val configFiles: ConfigurableFileCollection
@get:OutputFile
abstract val bundle: RegularFileProperty
init {
args.addAll("run", "bundle")
bundle = projectLayout.buildDirectory.file("bundle.js")
scripts = projectLayout.projectDirectory.dir("scripts")
configFiles.from(projectLayout.projectDirectory.file("package.json"))
configFiles.from(projectLayout.projectDirectory.file("package-lock.json"))
}
}
tasks.register<BundleTask>("bundle")@CacheableTask // (1)
abstract class BundleTask extends NpmTask {
@Override @Internal // (2)
ListProperty<String> getArgs() {
super.getArgs()
}
@InputDirectory
@SkipWhenEmpty
@PathSensitive(PathSensitivity.RELATIVE) // (3)
abstract DirectoryProperty getScripts()
@InputFiles
@PathSensitive(PathSensitivity.RELATIVE) // (4)
abstract ConfigurableFileCollection getConfigFiles()
@OutputFile
abstract RegularFileProperty getBundle()
BundleTask() {
args.addAll("run", "bundle")
bundle = projectLayout.buildDirectory.file("bundle.js")
scripts = projectLayout.projectDirectory.dir("scripts")
configFiles.from(projectLayout.projectDirectory.file("package.json"))
configFiles.from(projectLayout.projectDirectory.file("package-lock.json"))
}
}
tasks.register('bundle', BundleTask)-
(1) Add
@CacheableTaskto enable caching for the task. -
(2) Override the getter of a property of the base class to change the input annotation to
@Internal. -
(3) (4) Declare the path sensitivity.
Using the runtime API
If for some reason you cannot create a new custom task class, it is also possible to make a task cacheable using the runtime API to declare the inputs and outputs.
For enabling caching for the task you need to use the TaskOutputs.cacheIf() method.
The declarations via the runtime API have the same effect as the annotations described above. Note that you cannot override file inputs and outputs via the runtime API. Input properties can be overridden by specifying the same property name.
tasks.register<NpmTask>("bundle") {
args = listOf("run", "bundle")
outputs.cacheIf { true }
inputs.dir(file("scripts"))
.withPropertyName("scripts")
.withPathSensitivity(PathSensitivity.RELATIVE)
inputs.files("package.json", "package-lock.json")
.withPropertyName("configFiles")
.withPathSensitivity(PathSensitivity.RELATIVE)
outputs.file(layout.buildDirectory.file("bundle.js"))
.withPropertyName("bundle")
}tasks.register('bundle', NpmTask) {
args = ['run', 'bundle']
outputs.cacheIf { true }
inputs.dir(file("scripts"))
.withPropertyName("scripts")
.withPathSensitivity(PathSensitivity.RELATIVE)
inputs.files("package.json", "package-lock.json")
.withPropertyName("configFiles")
.withPathSensitivity(PathSensitivity.RELATIVE)
outputs.file(layout.buildDirectory.file("bundle.js"))
.withPropertyName("bundle")
}Configure the Build Cache
You can configure the build cache by using the Settings.buildCache(org.gradle.api.Action) block in settings.gradle.
Gradle supports a local and a remote build cache that can be configured separately.
When both build caches are enabled, Gradle tries to load build outputs from the local build cache first, and then tries the remote build cache if no build outputs are found.
If outputs are found in the remote cache, they are also stored in the local cache, so next time they will be found locally.
Gradle stores ("pushes") build outputs in any build cache that is enabled and has BuildCache.isPush() set to true.
By default, the local build cache has push enabled, and the remote build cache has push disabled.
The local build cache is pre-configured to be a DirectoryBuildCache and enabled by default. The remote build cache can be configured by specifying the type of build cache to connect to (BuildCacheConfiguration.remote(java.lang.Class)).
Built-in local build cache
The built-in local build cache, DirectoryBuildCache, uses a directory to store build cache artifacts. By default, this directory resides in the Gradle User Home, but its location is configurable.
Gradle will periodically clean-up the local cache directory by removing entries that have not been used recently to conserve disk space. How often Gradle will perform this clean-up is configurable as shown in the example below. Note that cache entries are cleaned-up regardless of the project they were produced by. If different projects configure this clean-up to run at different periods, the shortest period will clean-up cache entries for all projects. Therefore it is recommended to configure this setting globally in the init script. The Configuration use-cases section has an example of putting cache configuration in the init script.
For more details on the configuration options refer to the DSL documentation of DirectoryBuildCache. Here is an example of the configuration.
buildCache {
local {
directory = File(rootDir, "build-cache")
removeUnusedEntriesAfterDays = 30
}
}buildCache {
local {
directory = new File(rootDir, 'build-cache')
removeUnusedEntriesAfterDays = 30
}
}Remote HTTP build cache
HttpBuildCache provides the ability read to and write from a remote cache via HTTP.
With the following configuration, the local build cache will be used for storing build outputs while the local and the remote build cache will be used for retrieving build outputs.
buildCache {
remote<HttpBuildCache> {
url = uri("https://example.com:8123/cache/")
}
}buildCache {
remote(HttpBuildCache) {
url = 'https://example.com:8123/cache/'
}
}When attempting to load an entry, a GET request is made to https://example.com:8123/cache/«cache-key».
The response must have a 2xx status and the cache entry as the body, or a 404 Not Found status if the entry does not exist.
When attempting to store an entry, a PUT request is made to https://example.com:8123/cache/«cache-key».
Any 2xx response status is interpreted as success.
A 413 Payload Too Large response may be returned to indicate that the payload is larger than the server will accept, which will not be treated as an error.
Specifying access credentials
HTTP Basic Authentication is supported, with credentials being sent preemptively.
buildCache {
remote<HttpBuildCache> {
url = uri("https://example.com:8123/cache/")
credentials {
username = "build-cache-user"
password = "some-complicated-password"
}
}
}buildCache {
remote(HttpBuildCache) {
url = 'https://example.com:8123/cache/'
credentials {
username = 'build-cache-user'
password = 'some-complicated-password'
}
}
}Redirects
3xx redirecting responses will be followed automatically.
Servers must take care when redirecting PUT requests as only 307 and 308 redirect responses will be followed with a PUT request.
All other redirect responses will be followed with a GET request, as per RFC 7231,
without the entry payload as the body.
Network error handling
Requests that fail during request transmission, after having established a TCP connection, will be retried automatically.
This prevents temporary problems, such as connection drops, read or write timeouts, and low level network failures such as a connection resets, causing cache operations to fail and disabling the remote cache for the remainder of the build.
Requests will be retried up to 3 times. If the problem persists, the cache operation will fail and the remote cache will be disabled for the remainder of the build.
Using SSL
By default, use of HTTPS requires the server to present a certificate that is trusted by the build’s Java runtime. If your server’s certificate is not trusted, you can:
-
Update the trust store of your Java runtime to allow it to be trusted
-
Change the build environment to use an alternative trust store for the build runtime
-
Disable the requirement for a trusted certificate
The trust requirement can be disabled by setting HttpBuildCache.isAllowUntrustedServer() to true.
Enabling this option is a security risk, as it allows any cache server to impersonate the intended server.
It should only be used as a temporary measure or in very tightly controlled network environments.
buildCache {
remote<HttpBuildCache> {
url = uri("https://example.com:8123/cache/")
isAllowUntrustedServer = true
}
}buildCache {
remote(HttpBuildCache) {
url = 'https://example.com:8123/cache/'
allowUntrustedServer = true
}
}HTTP expect-continue
Use of HTTP Expect-Continue can be enabled. This causes upload requests to happen in two parts: first a check whether a body would be accepted, then transmission of the body if the server indicates it will accept it.
This is useful when uploading to cache servers that routinely redirect or reject upload requests, as it avoids uploading the cache entry just to have it rejected (e.g. the cache entry is larger than the cache will allow) or redirected. This additional check incurs extra latency when the server accepts the request, but reduces latency when the request is rejected or redirected.
Not all HTTP servers and proxies reliably implement Expect-Continue. Be sure to check that your cache server does support it before enabling.
To enable, set HttpBuildCache.isUseExpectContinue() to true.
buildCache {
remote<HttpBuildCache> {
url = uri("https://example.com:8123/cache/")
isUseExpectContinue = true
}
}buildCache {
remote(HttpBuildCache) {
url = 'https://example.com:8123/cache/'
useExpectContinue = true
}
}Configuration use cases
The recommended use case for the remote build cache is that your continuous integration server populates it from clean builds while developers only load from it. The configuration would then look as follows.
val isCiServer = System.getenv().containsKey("CI")
buildCache {
remote<HttpBuildCache> {
url = uri("https://example.com:8123/cache/")
isPush = isCiServer
}
}boolean isCiServer = System.getenv().containsKey("CI")
buildCache {
remote(HttpBuildCache) {
url = 'https://example.com:8123/cache/'
push = isCiServer
}
}It is also possible to configure the build cache from an init script, which can be used from the command line, added to your Gradle User Home or be a part of your custom Gradle distribution.
gradle.settingsEvaluated {
buildCache {
// vvv Your custom configuration goes here
remote<HttpBuildCache> {
url = uri("https://example.com:8123/cache/")
}
// ^^^ Your custom configuration goes here
}
}gradle.settingsEvaluated { settings ->
settings.buildCache {
// vvv Your custom configuration goes here
remote(HttpBuildCache) {
url = 'https://example.com:8123/cache/'
}
// ^^^ Your custom configuration goes here
}
}Build cache, composite builds and buildSrc
Gradle’s composite build feature allows including other complete Gradle builds into another. Such included builds will inherit the build cache configuration from the top level build, regardless of whether the included builds define build cache configuration themselves or not.
The build cache configuration present for any included build is effectively ignored, in favour of the top level build’s configuration.
This also applies to any buildSrc projects of any included builds.
The buildSrc directory is treated as an included build, and as such it inherits the build cache configuration from the top-level build.
|
Note
|
This configuration precedence does not apply to plugin builds included through pluginManagement as these are loaded before the cache configuration itself.
|
How to set up an HTTP build cache backend
Gradle provides a Docker image for a build cache node, which can connect with Develocity for centralized management. The cache node can also be used without a Develocity installation with restricted functionality.
Implement your own Build Cache
Using a different build cache backend to store build outputs (which is not covered by the built-in support for connecting to an HTTP backend) requires implementing your own logic for connecting to your custom build cache backend. To this end, custom build cache types can be registered via BuildCacheConfiguration.registerBuildCacheService(java.lang.Class, java.lang.Class).
Develocity includes a high-performance, easy to install and operate, shared build cache backend.
Use cases for the build cache
This section covers the different use cases for Gradle’s build cache, from local-only development to caching task outputs across large teams.
Speed up developer builds with the local cache
Even when used by a single developer only, the build cache can be very useful.
Gradle’s incremental build feature helps to avoid work that is already done, but once you re-execute a task, any previous results are forgotten.
When you are switching branches back and forth, the local results get rebuilt over and over again, even if you are building something that has already been built before.
The build cache remembers the earlier build results, and greatly reduces the need to rebuild things when they have already been built locally.
This can also extend to rebuilding different commits, like when running git bisect.
The local cache can also be useful when working with a project that has multiple variants, as in the case of Android projects. Each variant has a number of tasks associated with it, and some of those task variant dimensions, despite having different names, can end up producing the same output. With the local cache enabled, reuse between task variants will happen automatically when applicable.
Share results between CI builds
The build cache can do more than go back-and-forth in time: it can also bridge physical distance between computers, allowing results generated on one machine to be re-used by another. A typical first step when introducing the build cache within a team is to enable it for builds running as part of continuous integration only. Using a shared HTTP build cache backend (such as the one provided by Develocity) can significantly reduce the work CI agents need to do. This translates into faster feedback for developers, and less money spent on the CI resources. Faster builds also mean fewer commits being part of each build, which makes debugging issues more efficient.
Beginning with the build cache on CI is a good first step as the environment on CI agents is usually more stable and predictable than developer machines. This helps to identify any possible issues with the build that may affect cacheability.
If you are subject to audit requirements regarding the artifacts you ship to your customers you may need to disable the build cache for certain builds. Develocity may help you with fulfilling these requirements while still using the build cache for all your builds. It allows you to easily find out which build produced an artifact coming from the build cache via build scans.
Accelerate developer builds by reusing CI results
When multiple developers work on the same project, they don’t just need to build their own changes: whenever they pull from version control, they end up having to build each other’s changes as well. Whenever a developer is working on something independent of the pulled changes, they can safely reuse outputs already generated on CI. Say, you’re working on module "A", and you pull in some changes to module "B" (which does not depend on your module). If those changes were already built in CI, you can download the task outputs for module "B" from the cache instead of generating them locally. A typical use case for this is when developers start their day, pull all changes from version control and then run their first build.
The changes don’t need to be completely independent, either; we’ll take a look at the strategies to reuse results when dependencies are involved in the section about the different forms of normalization.
Combine remote results with local caching
You can utilize both a local and a remote cache for a compound effect.
While loading results from a CI-filled remote cache helps to avoid work needed because of changes by other developers, the local cache can speed up switching branches and doing git bisect.
On CI machines the local cache can act as a mirror of the remote cache, significantly reducing network usage.
Share results between developers
Allowing developers to upload their results to a shared cache is possible, but not recommended. Developers can make changes to task inputs or outputs while the task is executing. They can do this unintentionally and without noticing, for example by making changes in their IDEs while a build is running. Currently, Gradle has no good way to defend against these changes, and will simply cache whatever is in the output directory once the task is finished. This again can lead to corrupted results being uploaded to the shared cache. This recommendation might change when Gradle has added the necessary safeguards against unintentional modification of task inputs and outputs.
|
Warning
|
If you want to share task output from incremental builds, i.e. non-clean builds, you have to make sure that all cacheable tasks are properly configured and implemented to deal with stale output. There are for example annotation processors that do not clean up stale files in the corresponding classes/resources directories. The cache is a great forcing function to fix these problems, which will also make your incremental builds much more reliable. At the same time, until you have confidence that the incremental build behavior is flawless, only use clean builds to upload content to the cache. |
Build cache performance
The sole reason to use any build cache is to make builds faster. But how much faster can you go when using the cache? Measuring the impact is both important and complicated, as cache performance is determined by many factors. Performing measurements of the cache’s impact can validate the extra effort (work, infrastructure) that is required to start using the cache. These measurements can later serve as baselines for future improvements, and to watch for signs of regressions.
|
Note
|
Proper configuration and maintenance of a build can improve caching performance in a big way. |
Fully cached builds
The most straightforward way to get a feel for what the cache can do for you is to measure the difference between a non-cached build and a fully cached build. This will give you the theoretical limit of how fast builds with the cache can get, if everything you’re trying to build has already been built. The easiest way to measure this is using the local cache:
-
Clean the cache directory to avoid any hits from previous builds (
rm -rf $GRADLE_USER_HOME/caches/build-cache-*) -
Run the build (e.g.
./gradlew --build-cache clean assemble), so that all the results from cacheable tasks get stored in the cache. -
Run the build again (e.g.
./gradlew --build-cache clean assemble); depending on your build, you should see many of the tasks being retrieved from the cache. -
Compare the execution time for the two builds
|
Note
|
You may encounter a few cached tasks even in the first of the two builds, where no previously cached results should be available. This can happen if you have tasks in your build that are configured to produce the same results from the same inputs; in such a case once one of these tasks has finished, Gradle will simply reuse its output for the rest of the tasks. |
Normally, your fully cached build should be significantly faster than the clean build: this is the theoretical limit of how much time using the build cache can save on your particular build.
You usually don’t get the achievable performance gains on the first try, see finding problems with task output caching.
As your build logic is evolving and changing it is also important to make sure that the cache effectiveness is not regressing.
Build scans provide a detailed performance breakdown which show you how effectively your build is using the build cache:

Fully cached builds occur in situations when developers check out the latest from version control and then build, for example to generate the latest sources they need in their IDE. The purpose of running most builds though is to process some new changes. The structure of the software being built (how many modules are there, how independent are its parts etc.), and the nature of the changes themselves ("big refactor in the core of the system" vs. "small change to a unit test" etc.) strongly influence the performance gains delivered by the build cache. As developers tend to submit different kinds of changes over time, caching performance is expected to vary with each change. As with any cache, the impact should therefore be measured over time.
In a setup where a team uses a shared cache backend, there are two locations worth measuring cache impact at: on CI and on developer machines.
Cache impact on CI builds
The best way to learn about the impact of caching on CI is to set up the same builds with the cache enabled and disabled, and compare the results over time. If you have a single Gradle build step that you want to enable caching for, it’s easy to compare the results using your CI system’s built-in statistical tools.
Measuring complex pipelines may require more work or external tools to collect and process measurements. It’s important to distinguish those parts of the pipeline that caching has no effect on, for example, the time builds spend waiting in the CI system’s queue, or time taken by checking out source code from version control.
When using Develocity, you can use the Export API to access the necessary data and run your analytics. Develocity provides much richer data compared to what can be obtained from CI servers. For example, you can get insights into the execution of single tasks, how many tasks were retrieved from the cache, how long it took to download from the cache, the properties that were used to calculate the cache key and more. When using your CI servers built in functions, you can use statistic charts if you use Teamcity for your CI builds. Most of time you will end up extracting data from your CI server via the corresponding REST API (see Jenkins remote access API and Teamcity REST API).
Typically, CI builds above a certain size include parallel sections to utilize multiple agents. With parallel pipelines you can measure the wall-clock time it takes for a set of changes to go from having been pushed to version control to being built, verified and deployed. The build cache’s effect in this case can be measured in the reduction of the time developers have to wait for feedback from CI.
You can also measure the cumulative time your build agents spent building a changeset, which will give you a sense of the amount of work the CI infrastructure has to exert. The cache’s effect here is less money spent on CI resources, as you don’t need as many CI agents to maintain the same number of changes built.
If you want to look at the measurement for the Gradle build itself you can have a look at the blog post "Introducing the build cache".
Measuring developer builds
Gradle’s build cache can be very useful in reducing CI infrastructure cost and feedback time, but it usually has the biggest impact when developers can reuse cached results in their local builds. This is also the hardest to quantify for a number of reasons:
-
developers run different builds
-
developers can have different hardware, or have different settings
-
developers run all kinds of other things on their machines that can slow them down
When using Develocity you can use the Export API to extract data about developer builds, too. You can then create statistics on how many tasks were cached per developer or build. You can even compare the times it took to execute the task vs loading it from the cache and then estimate the time saved per developer.
When using the Develocity build cache backend you should pay close attention to the hit rate in the admin UI. A rise in the hit rate there probably indicates better usage by developers:
Analyzing performance in build scans
Build scans provide a summary of all cache operations for a build via the "Build cache" section of the "Performance" page.
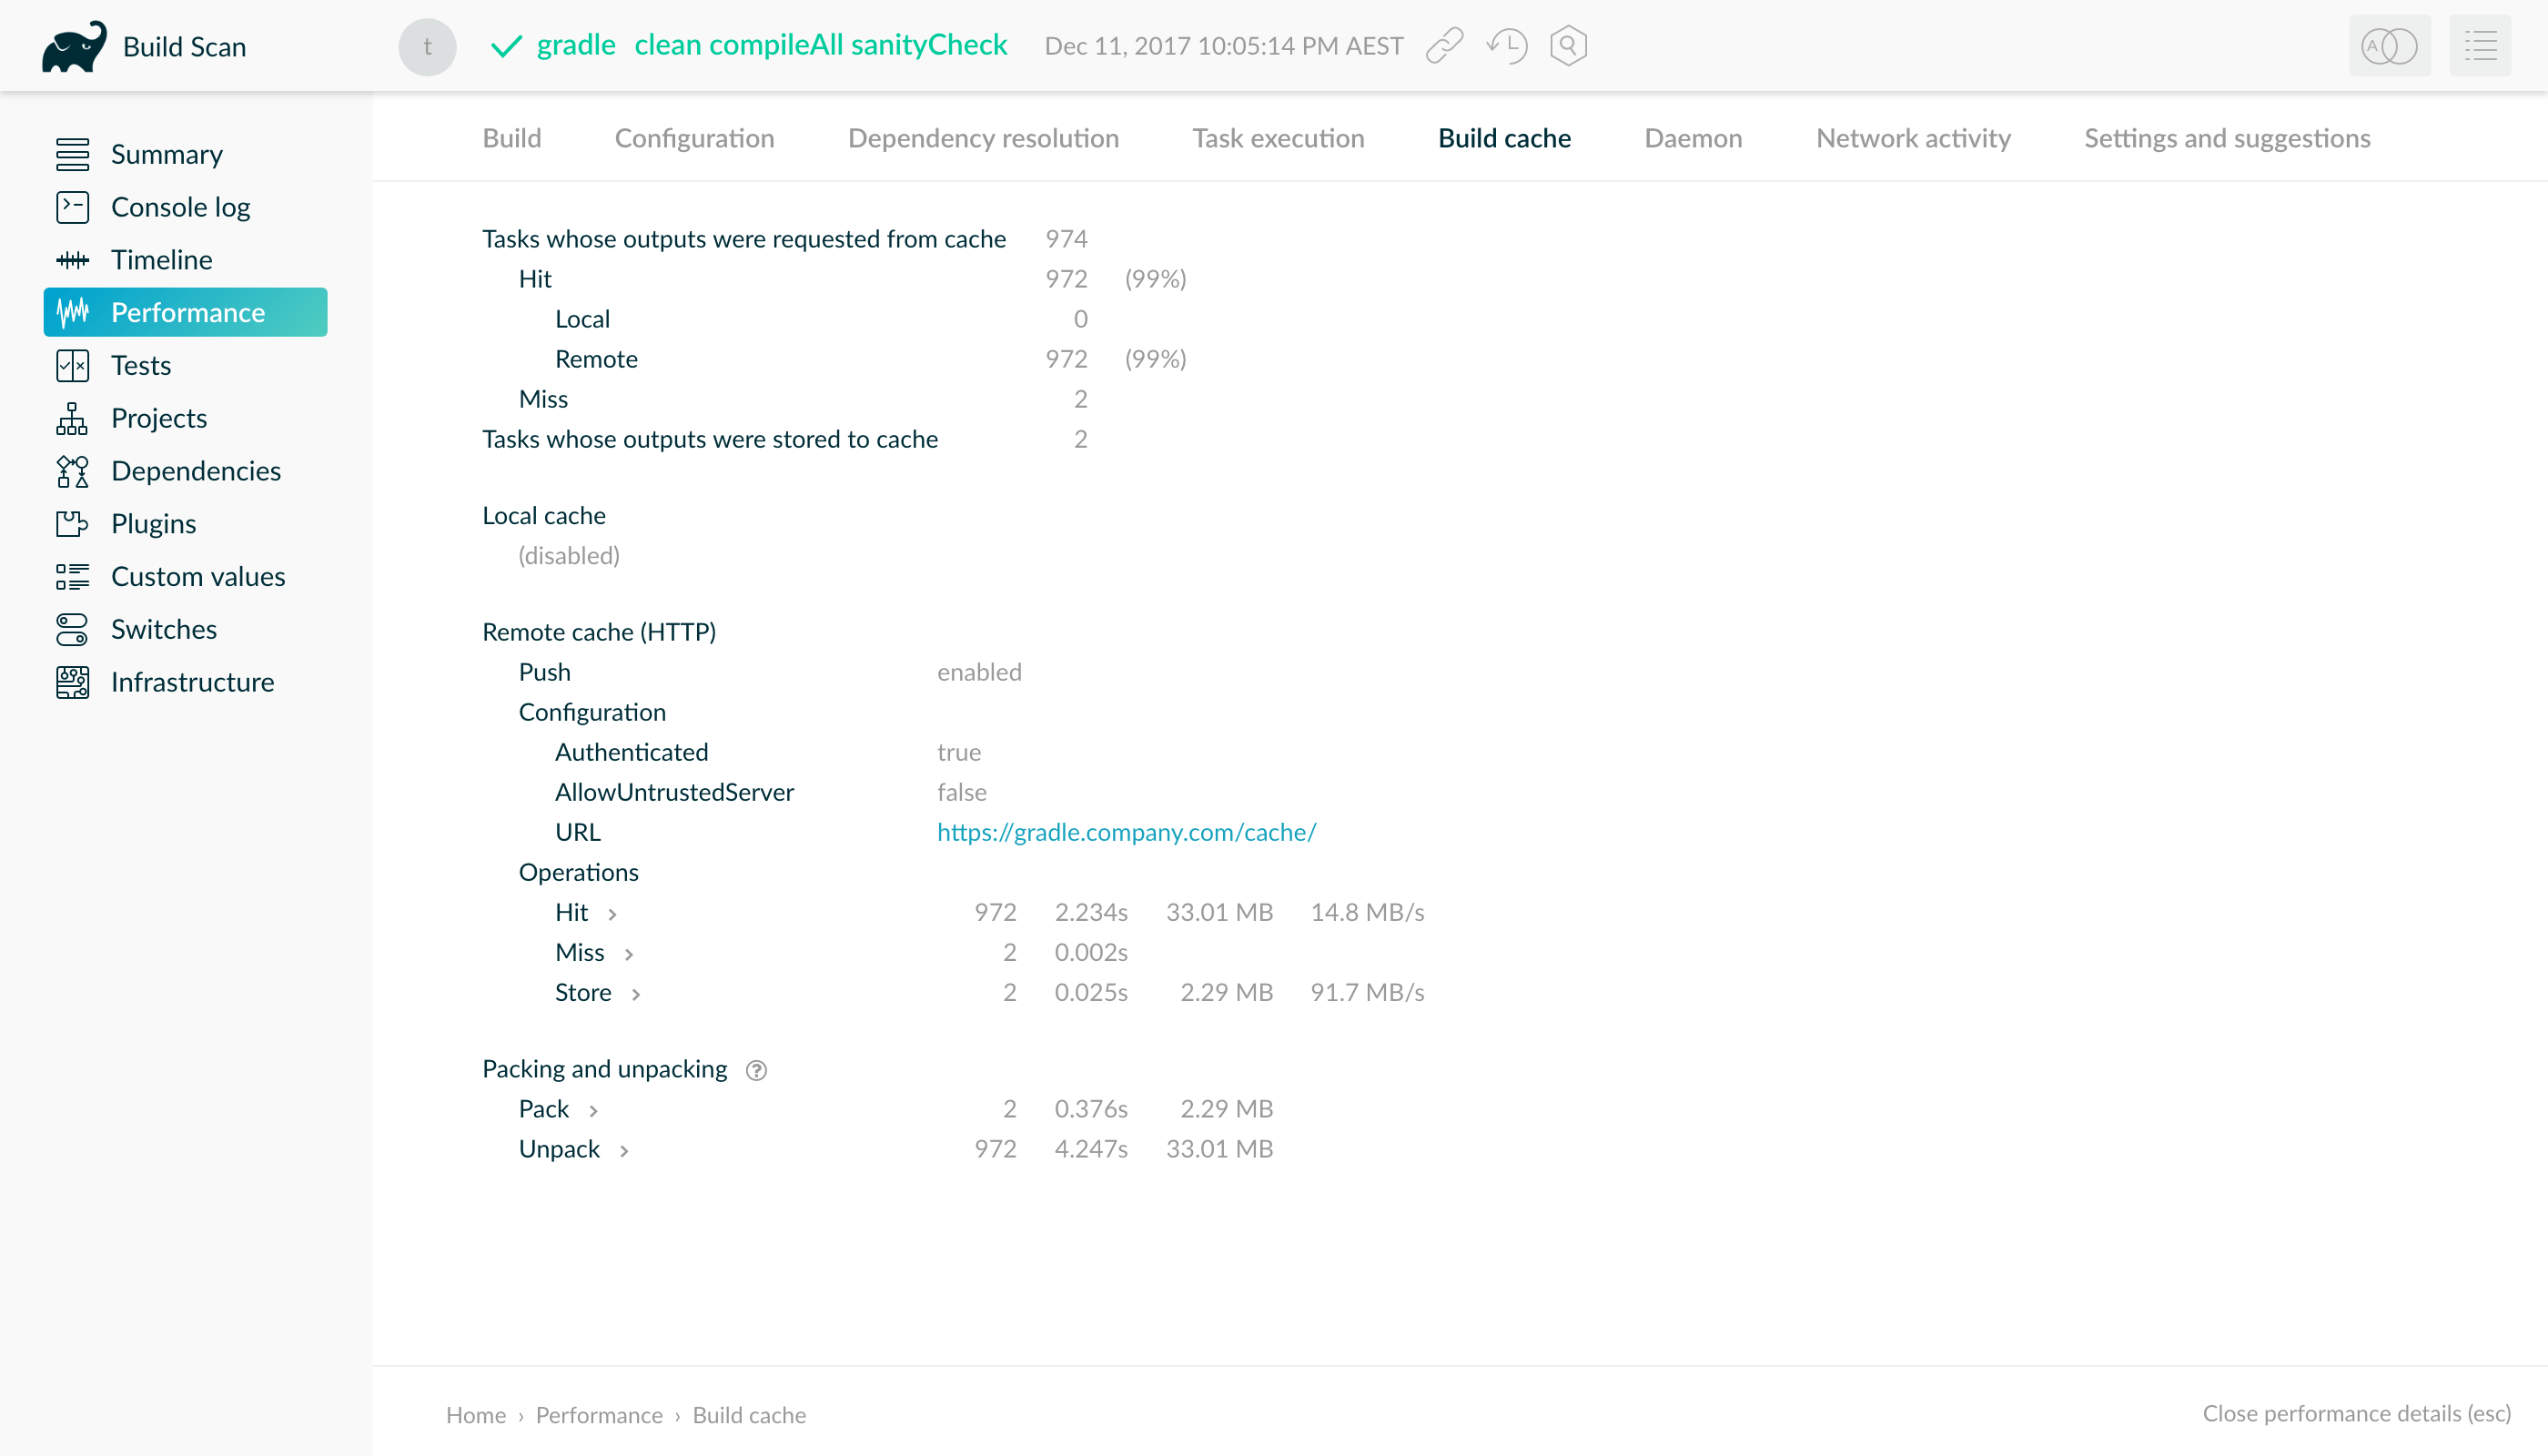
This page details which tasks were able to be avoided by cache hits, and which missed. It also indicates the hits and misses for the local and remote caches individually. For remote cache operations, the time taken to transfer artifacts to and from the cache is given, along with the transfer rate. This is particularly important for assessing the impact of network link quality on performance, as transfer times contribute to build time.
Remote cache performance
Improving the network link between the build and the remote cache can significantly improve build cache performance. How to do this depends on the remote cache in use and your network environment.
The multi-node remote build cache provided by Develocity is a fast and efficient, purpose built, remote build cache. In particular, if your development team is geographically distributed, its replication features can significantly improve performance by allowing developers to use a cache that they have a good network link to. See the “Build Cache Replication” section of the Develocity Admin Manual for more information.
Important concepts
How much of your build gets loaded from the cache depends on many factors. In this section you will see some of the tools that are essential for well-cached builds. Build scans are part of that toolchain and will be used throughout this guide.
Build cache key
Artifacts in the build cache are uniquely identified by a build cache key. A build cache key is assigned to each cacheable task when running with the build cache enabled and is used for both loading and storing task outputs to the build cache. The following inputs contribute to the build cache key for a task:
-
The task implementation
-
The task action implementations
-
The names of the output properties
-
The names and values of task inputs
Two tasks can reuse their outputs by using the build cache if their associated build cache keys are the same.
Repeatable task outputs
Assume that you have a code generator task as part of your build. When you have a fully up to date build and you clean and re-run the code generator task on the same code base it should generate exactly the same output, so anything that depends on that output will stay up-to-date.
It might also be that your code generator adds some extra information to its output that doesn’t depend on its declared inputs, like a timestamp. In such a case re-executing the task will result in different code being generated (because the timestamp will be updated). Tasks that depend on the code generator’s output will need to be re-executed.
When a task is cacheable, then the very nature of task output caching makes sure that the task will have the same outputs for a given set of inputs. Therefore, cacheable tasks should have repeatable task outputs. If they don’t, then the result of executing the task and loading the task from the cache may be different, which can lead to hard-to-diagnose cache misses.
In some cases even well-trusted tools can produce non-repeatable outputs, and lead to cascading effects.
One example is Oracle’s Java compiler, which, due to a bug, was producing different bytecode depending on the order source files to be compiled were presented to it.
If you were using Oracle JDK 8u31 or earlier to compile code in the buildSrc subproject, this could lead to all of your custom tasks producing occasional cache misses, because of the difference in their classpaths (which include buildSrc).
The key here is that cacheable tasks should not use non-repeatable task outputs as an input.
Stable task inputs
Having a task repeatably produce the same output is not enough if its inputs keep changing all the time. Such unstable inputs can be supplied directly to the task. Consider a version number that includes a timestamp being added to the jar file’s manifest:
version = "3.2-${System.currentTimeMillis()}"
tasks.jar {
manifest {
attributes(mapOf("Implementation-Version" to project.version))
}
}version = "3.2-${System.currentTimeMillis()}"
tasks.named('jar') {
manifest {
attributes('Implementation-Version': project.version)
}
}In the above example the inputs for the jar task will be different for each build execution since this timestamp will continually change.
Another example for unstable inputs is the commit ID from version control.
Maybe your version number is generated via git describe (and you include it in the jar manifest as shown above).
Or maybe you include the commit hash directly in version.properties or a jar manifest attribute.
Either way, the outputs produced by any tasks depending on such data will only be re-usable by builds running against the exact same commit.
Another common, but less obvious source of unstable inputs is when a task consumes the output of another task which produces non-repeatable results, such as the example before of a code generator that embeds timestamps in its output.
A task can only be loaded from the cache if it has stable task inputs. Unstable task inputs result in the task having a unique set of inputs for every build, which will always result in a cache miss.
Better reuse via input normalization
Having stable inputs is crucial for cacheable tasks. However, achieving byte for byte identical inputs for each task can be challenging. In some cases sanitizing the output of a task to remove unnecessary information can be a good approach, but this also means that a task’s output can only be normalized for a single purpose.
This is where input normalization comes into play. Input normalization is used by Gradle to determine if two task inputs are essentially the same. Gradle uses normalized inputs when doing up-to-date checks and when determining if a cached result can be re-used instead of executing the task. As input normalization is declared by the task consuming the data as input, different tasks can define different ways to normalize the same data.
When it comes to file inputs, Gradle can normalize the path of the files as well as their contents.
Path sensitivity and relocatability
When sharing cached results between computers, it’s rare that everyone runs the build from the exact same location on their computers. To allow cached results to be shared even when builds are executed from different root directories, Gradle needs to understand which inputs can be relocated and which cannot.
Tasks having files as inputs can declare the parts of a file’s path what are essential to them: this is called the path sensitivity of the input.
Task properties declared with ABSOLUTE path sensitivity are considered non-relocatable.
This is the default for properties not declaring path sensitivity, too.
For example, the class files produced by the Java compiler are dependent on the file names of the Java source files: renaming the source files with public classes in them would fail the build.
Though moving the files around wouldn’t have an effect on the result of the compilation, for incremental compilation the JavaCompile task relies on the relative path to find other classes in the same package.
Therefore, the path sensitivity for the sources of the JavaCompile task is RELATIVE.
Because of this only the normalized (relative) paths of the Java source files are considered as inputs to the JavaCompile task.
|
Note
|
The Java compiler only respects the package declaration in the Java source files, not the relative path of the sources.
As a consequence, path sensitivity for Java sources is NAME_ONLY and not RELATIVE.
|
Content normalization
Compile avoidance for Java
When it comes to the dependencies of a JavaCompile task (i.e. its compile classpath), only changes to the Application Binary Interface (ABI) of these dependencies require compilation to be executed.
Gradle has a deep understanding of what a compile classpath is and uses a sophisticated normalization strategy for it.
Task outputs can be re-used as long as the ABI of the classes on the compile classpath stays the same.
This enables Gradle to avoid Java compilation by using incremental builds, or load results from the cache that were produced by different (but ABI-compatible) versions of dependencies.
For more information on compile avoidance see the corresponding section.
Runtime classpath normalization
Similar to compile avoidance, Gradle also understands the concept of a runtime classpath, and uses tailored input normalization to avoid running e.g. tests. For runtime classpaths Gradle inspects the contents of jar files and ignores the timestamps and order of the entries in the jar file. This means that a rebuilt jar file would be considered the same runtime classpath input. For details on what level of understanding Gradle has for detecting changes to classpaths and what is considered as a classpath see this section.
For a runtime classpath it is possible to provide better insights to Gradle which files are essential to the input by configuring input normalization.
Given that you want to add a file build-info.properties to all your produced jar files which contains volatile information about the build, e.g. the timestamp when the build started or some ID to identify the CI job that published the artifact.
This file is only used for auditing purposes, and has no effect on the outcome of running tests.
Nonetheless, this file is part of the runtime classpath for the test task. Since the file changes on every build invocation, tests cannot be cached effectively.
To fix this you can ignore build-info.properties on any runtime classpath by adding the following configuration to the build script in the consuming project:
normalization {
runtimeClasspath {
ignore("build-info.properties")
}
}normalization {
runtimeClasspath {
ignore 'build-info.properties'
}
}If adding such a file to your jar files is something you do for all of the projects in your build, and you want to filter this file for all consumers, you may wrap the configurations described above in an allprojects {} or subprojects {} block in the root build script.
The effect of this configuration would be that changes to build-info.properties would be ignored for both up-to-date checks and task output caching.
All runtime classpath inputs for all tasks in the project where this configuration has been made will be affected.
This will not change the runtime behavior of the test task — i.e. any test is still able to load build-info.properties, and the runtime classpath stays the same as before.
The case against overlapping outputs
When two tasks write to the same output directory or output file, it is difficult for Gradle to determine which output belongs to which task. There are many edge cases, and executing the tasks in parallel cannot be done safely. For the same reason, Gradle cannot remove stale output files for these tasks. Tasks that have discrete, non-overlapping outputs can always be handled in a safe fashion by Gradle. For the aforementioned reasons, task output caching is automatically disabled for tasks whose output directories overlap with another task.
Build scans show tasks where caching was disabled due to overlapping outputs in the timeline:
Reuse of outputs between different tasks
Some builds exhibit a surprising characteristic: even when executed against an empty cache, they produce tasks loaded from cache. How is this possible? Rest assured that this is completely normal.
When considering task outputs, Gradle only cares about the inputs to the task: the task type itself, input files and parameters etc., but it doesn’t care about the task’s name or which project it can be found in.
Running javac will produce the same output regardless of the name of the JavaCompile task that invoked it.
If your build includes two tasks that share every input, the one executing later will be able to reuse the output produced by the first.
Having two tasks in the same build that do the same might sound like a problem to fix, but it is not necessarily something bad. For example, the Android plugin creates several tasks for each variant of the project; some of those tasks will potentially do the same thing. These tasks can safely reuse each other’s outputs.
As discussed previously, you can use Develocity to diagnose the source build of these unexpected cache-hits.
Non-cacheable tasks
You’ve seen quite a bit about cacheable tasks, which implies there are non-cacheable ones, too. If caching task outputs is as awesome as it sounds, why not cache every task?
There are tasks that are definitely worth caching: tasks that do complex, repeatable processing and produce moderate amounts of output. Compilation tasks are usually ideal candidates for caching.
At the other end of the spectrum lie I/O-heavy tasks, like Copy and Sync. Moving files around locally typically cannot be sped up by copying them from a cache.
Caching those tasks would even waste good resources by storing all those redundant results in the cache.
Most tasks are either obviously worth caching, or obviously not. For those in-between a good rule of thumb is to see if downloading results would be significantly faster than producing them locally.
Caching Java projects
As of Gradle 4.0, the build tool fully supports caching plain Java projects. Built-in tasks for compiling, testing, documenting and checking the quality of Java code support the build cache out of the box.
Java compilation
Caching Java compilation makes use of Gradle’s deep understanding of compile classpaths. The mechanism avoids recompilation when dependencies change in a way that doesn’t affect their application binary interfaces (ABI). Since the cache key is only influenced by the ABI of dependencies (and not by their implementation details like private types and method bodies), task output caching can also reuse compiled classes if they were produced by the same sources and ABI-equivalent dependencies.
For example, take a project with two modules: an application depending on a library. Suppose the latest version is already built by CI and uploaded to the shared cache. If a developer now modifies a method’s body in the library, the library will need to be rebuilt on their computer. But they will be able to load the compiled classes for the application from the shared cache. Gradle can do this because the library used to compile the application on CI, and the modified library available locally share the same ABI.
Annotation processors
Compile avoidance works out of the box. There is one caveat though: when using annotation processors, Gradle uses the annotation processor classpath as an input. Unlike most compile dependencies, in which only the ABI influences compilation, the implementation of annotation processors must be considered as an input to the compiler. For this reason Gradle will treat annotation processors as a runtime classpath, meaning less input normalization is taking place there. If Gradle detects an annotation processor on the compile classpath, the annotation processor classpath defaults to the compile classpath when not explicitly set, which in turn means the entire compile classpath is treated as a runtime classpath input.
For the example above this would mean the ABI extracted from the compile classpath would be unchanged, but the annotation processor classpath (because it’s not treated with compile avoidance) would be different. Ultimately, the developer would end up having to recompile the application.
The easiest way to avoid this performance penalty is to not use annotation processors. However, if you need to use them, make sure you set the annotation processor classpath explicitly to include only the libraries needed for annotation processing. The section on Java compile avoidance describes how to do this.
|
Note
|
Some common Java dependencies (such as Log4j 2.x) come bundled with annotation processors. If you use these dependencies, but do not leverage the features of the bundled annotation processors, it’s best to disable annotation processing entirely. This can be done by setting the annotation processor classpath to an empty set. |
Unit test execution
The Test task used for test execution for JVM languages employs runtime classpath normalization for its classpath.
This means that changes to order and timestamps in jars on the test classpath will not cause the task to be out-of-date or change the build cache key.
For achieving stable task inputs you can also wield the power of filtering the runtime classpath.
Integration test execution
Unit tests are easy to cache as they normally have no external dependencies. For integration tests the situation can be quite different, as they can depend on a variety of inputs outside of the test and production code. These external factors can be for example:
-
operating system type and version,
-
external tools being installed for the tests,
-
environment variables and Java system properties,
-
other services being up and running,
-
a distribution of the software under test.
You need to be careful to declare these additional inputs for your integration test in order to avoid incorrect cache hits.
For example, declaring the operating system in use by Gradle as an input to a Test task called integTest would work as follows:
tasks.integTest {
inputs.property("operatingSystem") {
System.getProperty("os.name")
}
}tasks.named('integTest') {
inputs.property("operatingSystem") {
System.getProperty("os.name")
}
}Archives as inputs
It is common for the integration tests to depend on your packaged application. If this happens to be a zip or tar archive, then adding it as an input to the integration test task may lead to cache misses. This is because, as described in repeatable task outputs, rebuilding an archive often changes the metadata in the archive. You can depend on the exploded contents of the archive instead. See also the section on dealing with non-repeatable outputs.
Dealing with file paths
You will probably pass some information from the build environment to your integration test tasks by using system properties. Passing absolute paths will break relocatability of the integration test task.
// Don't do this! Breaks relocatability!
tasks.integTest {
systemProperty("distribution.location", layout.buildDirectory.dir("dist").get().asFile.absolutePath)
}// Don't do this! Breaks relocatability!
tasks.named('integTest') {
systemProperty "distribution.location", layout.buildDirectory.dir('dist').get().asFile.absolutePath
}Instead of adding the absolute path directly as a system property, it is possible to add an
annotated CommandLineArgumentProvider to the integTest task:
abstract class DistributionLocationProvider : CommandLineArgumentProvider { // (1)
@get:InputDirectory
@get:PathSensitive(PathSensitivity.RELATIVE) // (2)
abstract val distribution: DirectoryProperty
override fun asArguments(): Iterable<String> =
listOf("-Ddistribution.location=${distribution.get().asFile.absolutePath}") // (3)
}
tasks.integTest {
jvmArgumentProviders.add(
objects.newInstance<DistributionLocationProvider>().apply { // (4)
distribution = layout.buildDirectory.dir("dist")
}
)
}abstract class DistributionLocationProvider implements CommandLineArgumentProvider { // (1)
@InputDirectory
@PathSensitive(PathSensitivity.RELATIVE) // (2)
abstract DirectoryProperty getDistribution()
@Override
Iterable<String> asArguments() {
["-Ddistribution.location=${distribution.get().asFile.absolutePath}"] // (3)
}
}
tasks.named('integTest') {
jvmArgumentProviders.add(
objects.newInstance(DistributionLocationProvider).tap { // (4)
distribution = layout.buildDirectory.dir('dist')
}
)
}-
Create a class implementing
CommandLineArgumentProvider. -
Declare the inputs and outputs with the corresponding path sensitivity.
-
asArgumentsneeds to return the JVM arguments passing the desired system properties to the test JVM. -
Add an instance of the newly created class as JVM argument provider to the integration test task.[11]
Ignoring system properties
It may be necessary to ignore some system properties as inputs as they do not influence the outcome of the integration tests.
In order to do so, add a CommandLineArgumentProvider to the integTest task:
abstract class CiEnvironmentProvider : CommandLineArgumentProvider {
@get:Internal // (1)
abstract val agentNumber: Property<String>
override fun asArguments(): Iterable<String> =
listOf("-DagentNumber=${agentNumber.get()}") // (2)
}
tasks.integTest {
jvmArgumentProviders.add(
objects.newInstance<CiEnvironmentProvider>().apply { // (3)
agentNumber = providers.environmentVariable("AGENT_NUMBER").orElse("1")
}
)
}abstract class CiEnvironmentProvider implements CommandLineArgumentProvider {
@Internal // (1)
abstract Property<String> getAgentNumber()
@Override
Iterable<String> asArguments() {
["-DagentNumber=${agentNumber.get()}"] // (2)
}
}
tasks.named('integTest') {
jvmArgumentProviders.add(
objects.newInstance(CiEnvironmentProvider).tap { // (3)
agentNumber = providers.environmentVariable("AGENT_NUMBER").orElse("1")
}
)
}-
@Internalmeans that this property does not influence the output of the integration tests. -
The system properties for the actual test execution.
-
Add an instance of the newly created class as JVM argument provider to the integration test task.[11]
Caching Android projects
While it is true that Android uses the Java toolchain as its foundation, there are nevertheless some significant differences from pure Java projects; these differences impact task cacheability.
This is even more true for Android projects that include Kotlin source code (and therefore use the kotlin-android plugin).
Disambiguation
This guide is about Gradle’s build cache, but you may have also heard about the Android build cache. These are different things. The Android cache is internal to certain tasks in the Android plugin, and will eventually be removed in favor of native Gradle support.
Why use the build cache?
The build cache can significantly improve build performance for Android projects, in many cases by 30-40%. Many of the compilation and assembly tasks provided by the Android Gradle Plugin are cacheable, and more are made so with each new iteration.
Faster CI builds
CI builds benefit particularly from the build cache.
A typical CI build starts with a clean, which means that pre-existing build outputs are deleted and none of the tasks that make up the build will be UP-TO-DATE.
However, it is likely that many of those tasks will have been run with exactly the same inputs in a prior CI build, populating the build cache; the outputs from those prior runs can safely be reused, resulting in dramatic build performance improvements.
Reusing CI builds for local development
When you sign into work at the start of your day, it’s not unusual for your first task to be pulling the main branch and then running a build (Android Studio will probably do the latter, whether you ask it to or not). Assuming all merges to main are built on CI (a best practice!), you can expect this first local build of the day to enjoy a larger-than-typical benefit with Gradle’s remote cache. CI already built this commit — why should you re-do that work?
Switching branches
During local development, it is not uncommon to switch branches several times per day.
This defeats incremental build (i.e., UP-TO-DATE checks), but this issue is mitigated via use of the local build cache.
You might run a build on Branch A, which will populate the local cache.
You then switch to Branch B to conduct a code review, help a colleague, or address feedback on an open PR.
You then switch back to Branch A to continue your original work.
When you next build, all of the outputs previously built while working on Branch A can be reused from the cache, saving potentially a lot of time.
The Android Gradle Plugin and the Gradle Build Tool
The first thing you should always do when working to optimize your build is ensure you’re on the latest stable, supported versions of the Android Gradle Plugin and the Gradle Build Tool. At the time of writing, they are 3.3.0 and 5.0, respectively. Each new version of these tools includes many performance improvements, not least of which is to the build cache.
Java and Kotlin compilation
The discussion above in “Caching Java projects” is equally relevant here, with the caveat that, for projects that include Kotlin source code, the Kotlin compiler does not currently support compile avoidance in the way that the Java compiler does.
Annotation processors and Kotlin
The advice above for pure Java projects also applies to Android projects. However, if you are using annotation processors (such as Dagger2 or Butterknife) in conjunction with Kotlin and the kotlin-kapt plugin, you should know that before Kotlin 1.3.30 kapt was not cached by default.
You can opt into it (which is recommended) by adding the following to build scripts:
pluginManager.withPlugin("kotlin-kapt") {
configure<KaptExtension> { useBuildCache = true }
}plugins.withId("kotlin-kapt") {
kapt.useBuildCache = true
}Unit test execution
Unlike with unit tests in a pure Java project, the equivalent test task in an Android project (AndroidUnitTest) is not cacheable.
The Google Team is working to make these tests cacheable.
Please see this issue.
Instrumented test execution (i.e., Espresso tests)
Android instrumented tests (DeviceProviderInstrumentTestTask), often referred to as “Espresso” tests, are also not cacheable.
The Google Android team is also working to make such tests cacheable.
Please see this issue.
Lint
Users of Android’s Lint task are well aware of the heavy performance penalty they pay for using it, but also know that it is indispensable for finding common issues in Android projects.
Currently, this task is not cacheable.
This task is planned to be cacheable with the release of Android Gradle Plugin 3.5.
This is another reason to always use the latest version of the Android plugin!
The Fabric Plugin and Crashlytics
The Fabric plugin, which is used to integrate the Crashlytics crash-reporting tool (among others), is very popular, yet imposes some hefty performance penalties during the build process. This is due to the need for each version of your app to have a unique identifier so that it can be identified in the Crashlytics dashboard. In practice, the default behavior of Crashlytics is to treat “each version” as synonymous with “each build”. This defeats incremental build, because each build will be unique. It also breaks the cacheability of certain tasks in the build, and for the same reason. This can be fixed by simply disabling Crashlytics in “debug” builds. You may find instructions for that in the Crashlytics documentation.
|
Note
|
The fix described in the referenced documentation does not work directly if you are using the Kotlin DSL; see below for the workaround. |
Kotlin DSL
The fix described in the referenced documentation does not work directly if you are using the Kotlin DSL; this is due to incompatibilities between that Kotlin DSL and the Fabric plugin. There is a simple workaround for this, based on this advice from the Kotlin DSL primer.
Create a file, fabric.gradle, in the module where you apply the io.fabric plugin. This file (known as a script plugin), should have the following contents:
plugins.withId("com.android.application") { // or "com.android.library"
android.buildTypes.debug.ext.enableCrashlytics = false
}
And then, in the module’s build.gradle.kts file, apply this script plugin:
apply(from = "fabric.gradle")
Debugging and diagnosing cache misses
To make the most of task output caching, it is important that any necessary inputs to your tasks are specified correctly, while at the same time avoiding unneeded inputs. Failing to specify an input that affects the task’s outputs can result in incorrect builds, while needlessly specifying inputs that do not affect the task’s output can cause cache misses.
This chapter is about finding out why a cache miss happened. If you have a cache hit which you didn’t expect we suggest to declare whatever change you expected to trigger the cache miss as an input to the task.
Finding problems with task output caching
Below we describe a step-by-step process that should help shake out any problems with caching in your build.
Ensure incremental build works
First, make sure your build does the right thing without the cache. Run a build twice without enabling the Gradle build cache. The expected outcome is that all actionable tasks that produce file outputs are up-to-date. You should see something like this on the command-line:
$ ./gradlew clean --quiet (1) $ ./gradlew assemble (2) BUILD SUCCESSFUL 4 actionable tasks: 4 executed $ ./gradlew assemble (3) BUILD SUCCESSFUL 4 actionable tasks: 4 up-to-date
-
Make sure we start without any leftover results by running
cleanfirst. -
We are assuming your build is represented by running the
assembletask in these examples, but you can substitute whatever tasks make sense for your build. -
Run the build again without running
clean.
|
Note
|
Tasks that have no outputs or no inputs will always be executed, but that shouldn’t be a problem. |
Use the methods as described below to diagnose and fix tasks that should be up-to-date but aren’t. If you find a task which is out of date, but no cacheable tasks depends on its outcome, then you don’t have to do anything about it. The goal is to achieve stable task inputs for cacheable tasks.
In-place caching with the local cache
When you are happy with the up-to-date performance then you can repeat the experiment above, but this time with a clean build, and the build cache turned on. The goal with clean builds and the build cache turned on is to retrieve all cacheable tasks from the cache.
|
Warning
|
When running this test make sure that you have no remote cache configured, and storing in the local cache is enabled.
These are the default settings.
|
This would look something like this on the command-line:
$ rm -rf ~/.gradle/caches/build-cache-1 (1) $ ./gradlew clean --quiet (2) $ ./gradlew assemble --build-cache (3) BUILD SUCCESSFUL 4 actionable tasks: 4 executed $ ./gradlew clean --quiet (4) $ ./gradlew assemble --build-cache (5) BUILD SUCCESSFUL 4 actionable tasks: 1 executed, 3 from cache
-
We want to start with an empty local cache.
-
Clean the project to remove any unwanted leftovers from previous builds.
-
Build it once to let it populate the cache.
-
Clean the project again.
-
Build it again: this time everything cacheable should load from the just populated cache.
You should see all cacheable tasks loaded from cache, while non-cacheable tasks should be executed.
Testing cache relocatability
Once everything loads properly while building the same checkout with the local cache enabled, it’s time to see if there are any relocation problems. A task is considered relocatable if its output can be reused when the task is executed in a different location. (More on this in path sensitivity and relocatability.)
|
Note
|
Tasks that should be relocatable but aren’t are usually a result of absolute paths being present among the task’s inputs. |
To discover these problems, first check out the same commit of your project in two different directories on your machine.
For the following example let’s assume we have a checkout in \~/checkout-1 and \~/checkout-2.
|
Warning
|
Like with the previous test, you should have no remote cache configured, and storing in the local cache should be enabled.
|
$ rm -rf ~/.gradle/caches/build-cache-1 (1) $ cd ~/checkout-1 (2) $ ./gradlew clean --quiet (3) $ ./gradlew assemble --build-cache (4) BUILD SUCCESSFUL 4 actionable tasks: 4 executed $ cd ~/checkout-2 (5) $ ./gradlew clean --quiet (6) $ ./gradlew clean assemble --build-cache (7) BUILD SUCCESSFUL 4 actionable tasks: 1 executed, 3 from cache
-
Remove all entries in the local cache first.
-
Go to the first checkout directory.
-
Clean the project to remove any unwanted leftovers from previous builds.
-
Run a build to populate the cache.
-
Go to the other checkout directory.
-
Clean the project again.
-
Run a build again.
You should see the exact same results as you saw with the previous in place caching test step.
Cross-platform tests
If your build passes the relocation test, it is in good shape already. If your build requires support for multiple platforms, it is best to see if the required tasks get reused between platforms, too. A typical example of cross-platform builds is when CI runs on Linux VMs, while developers use macOS or Windows, or a different variety or version of Linux.
To test cross-platform cache reuse, set up a remote cache (see share results between CI builds) and populate it from one platform and consume it from the other.
Incremental cache usage
After these experiments with fully cached builds, you can go on and try to make typical changes to your project and see if enough tasks are still cached. If the results are not satisfactory, you can think about restructuring your project to reduce dependencies between different tasks.
Evaluating cache performance over time
Consider recording execution times of your builds, generating graphs, and analyzing the results. Keep an eye out for certain patterns, like a build recompiling everything even though you expected compilation to be cached.
You can also make changes to your code base manually or automatically and check that the expected set of tasks is cached.
If you have tasks that are re-executing instead of loading their outputs from the cache, then it may point to a problem in your build. Techniques for debugging a cache miss are explained in the following section.
Helpful data for diagnosing a cache miss
A cache miss happens when Gradle calculates a build cache key for a task which is different from any existing build cache key in the cache. Only comparing the build cache key on its own does not give much information, so we need to look at some finer grained data to be able to diagnose the cache miss. A list of all inputs to the computed build cache key can be found in the section on cacheable tasks.
From most coarse grained to most fine grained, the items we will use to compare two tasks are:
-
Build cache keys
-
Task and Task action implementations
-
classloader hash
-
class name
-
-
Task output property names
-
Individual task property input hashes
-
Hashes of files which are part of task input properties
If you want information about the build cache key and individual input property hashes, use -Dorg.gradle.caching.debug=true:
$ ./gradlew :compileJava --build-cache -Dorg.gradle.caching.debug=true
.
.
.
Appending implementation to build cache key: org.gradle.api.tasks.compile.JavaCompile_Decorated@470c67ec713775576db4e818e7a4c75d
Appending additional implementation to build cache key: org.gradle.api.tasks.compile.JavaCompile_Decorated@470c67ec713775576db4e818e7a4c75d
Appending input value fingerprint for 'options' to build cache key: e4eaee32137a6a587e57eea660d7f85d
Appending input value fingerprint for 'options.compilerArgs' to build cache key: 8222d82255460164427051d7537fa305
Appending input value fingerprint for 'options.debug' to build cache key: f6d7ed39fe24031e22d54f3fe65b901c
Appending input value fingerprint for 'options.debugOptions' to build cache key: a91a8430ae47b11a17f6318b53f5ce9c
Appending input value fingerprint for 'options.debugOptions.debugLevel' to build cache key: f6bd6b3389b872033d462029172c8612
Appending input value fingerprint for 'options.encoding' to build cache key: f6bd6b3389b872033d462029172c8612
.
.
.
Appending input file fingerprints for 'options.sourcepath' to build cache key: 5fd1e7396e8de4cb5c23dc6aadd7787a - RELATIVE_PATH{EMPTY}
Appending input file fingerprints for 'stableSources' to build cache key: f305ada95aeae858c233f46fc1ec4d01 - RELATIVE_PATH{.../src/main/java=IGNORED / DIR, .../src/main/java/Hello.java='Hello.java' / 9c306ba203d618dfbe1be83354ec211d}
Appending output property name to build cache key: destinationDir
Appending output property name to build cache key: options.annotationProcessorGeneratedSourcesDirectory
Build cache key for task ':compileJava' is 8ebf682168823f662b9be34d27afdf77
The log shows e.g. which source files constitute the stableSources for the compileJava task.
To find the actual differences between two builds you need to resort to matching up and comparing those hashes yourself.
|
Tip
|
Develocity already takes care of this for you; it lets you quickly diagnose a cache miss with the Build Scan™ Comparison tool. |
Diagnosing the reasons for a cache miss
Having the data from the last section at hand, you should be able to diagnose why the outputs of a certain task were not found in the build cache. Since you were expecting more tasks to be cached, you should be able to pinpoint a build which would have produced the artifact under question.
Before diving into how to find out why one task has not been loaded from the cache we should first look into which task caused the cache misses. There is a cascade effect which causes dependent tasks to be executed if one of the tasks earlier in the build is not loaded from the cache and has different outputs. Therefore, you should locate the first cacheable task which was executed and continue investigating from there. This can be done from the timeline view in a Build Scan™:
At first, you should check if the implementation of the task changed. This would mean checking the class names and classloader hashes
for the task class itself and for each of its actions. If there is a change, this means that the build script, buildSrc or the Gradle version has changed.
|
Note
|
A change in the output of |
If the implementation is the same, then you need to start comparing inputs between the two builds. There should be at least one different input hash. If it is a simple value property, then the configuration of the task changed. This can happen for example by
-
changing the build script,
-
conditionally configuring the task differently for CI or the developer builds,
-
depending on a system property or an environment variable for the task configuration,
-
or having an absolute path which is part of the input.
If the changed property is a file property, then the reasons can be the same as for the change of a value property. Most probably though a file on the filesystem changed in a way that Gradle detects a difference for this input. The most common case will be that the source code was changed by a check in. It is also possible that a file generated by a task changed, e.g. since it includes a timestamp. As described in Java version tracking, the Java version can also influence the output of the Java compiler. If you did not expect the file to be an input to the task, then it is possible that you should alter the configuration of the task to not include it. For example, having your integration test configuration including all the unit test classes as a dependency has the effect that all integration tests are re-executed when a unit test changes. Another option is that the task tracks absolute paths instead of relative paths and the location of the project directory changed on disk.
Example
We will walk you through the process of diagnosing a cache miss.
Let’s say we have build A and build B and we expected all the test tasks for a sub-project sub1 to be cached in build B since only a unit test for another sub-project sub2 changed.
Instead, all the tests for the sub-project have been executed.
Since we have the cascading effect when we have cache misses, we need to find the task which caused the caching chain to fail.
This can easily be done by filtering for all cacheable tasks which have been executed and then select the first one.
In our case, it turns out that the tests for the sub-project internal-testing were executed even though there was no code change to this project.
This means that the property classpath changed and some file on the runtime classpath actually did change.
Looking deeper into this, we actually see that the inputs for the task processResources changed in that project, too.
Finally, we find this in our build file:
val currentVersionInfo = tasks.register<CurrentVersionInfo>("currentVersionInfo") {
version = project.version as String
versionInfoFile = layout.buildDirectory.file("generated-resources/currentVersion.properties")
}
sourceSets.main.get().output.dir(currentVersionInfo.map { it.versionInfoFile.get().asFile.parentFile })
abstract class CurrentVersionInfo : DefaultTask() {
@get:Input
abstract val version: Property<String>
@get:OutputFile
abstract val versionInfoFile: RegularFileProperty
@TaskAction
fun writeVersionInfo() {
val properties = Properties()
properties.setProperty("latestMilestone", version.get())
versionInfoFile.get().asFile.outputStream().use { out ->
properties.store(out, null)
}
}
}def currentVersionInfo = tasks.register('currentVersionInfo', CurrentVersionInfo) {
version = project.version
versionInfoFile = layout.buildDirectory.file('generated-resources/currentVersion.properties')
}
sourceSets.main.output.dir(currentVersionInfo.map { it.versionInfoFile.get().asFile.parentFile })
abstract class CurrentVersionInfo extends DefaultTask {
@Input
abstract Property<String> getVersion()
@OutputFile
abstract RegularFileProperty getVersionInfoFile()
@TaskAction
void writeVersionInfo() {
def properties = new Properties()
properties.setProperty('latestMilestone', version.get())
versionInfoFile.get().asFile.withOutputStream { out ->
properties.store(out, null)
}
}
}Since properties files stored by Java’s Properties.store method contain a timestamp, this will cause a change to the runtime classpath every time the build runs.
In order to solve this problem see non-repeatable task outputs or use input normalization.
|
Note
|
The compile classpath is not affected since compile avoidance ignores non-class files on the classpath. |
Solving common problems
Small problems in a build, like forgetting to declare a configuration file as an input to your task, can be easily overlooked.
The configuration file might change infrequently, or only change when some other (correctly tracked) input changes as well.
The worst that could happen is that your task doesn’t execute when it should.
Developers can always re-run the build with clean, and "fix" their builds for the price of a slow rebuild.
In the end nobody gets blocked in their work, and the incident is chalked up to "Gradle acting up again."
With cacheable tasks incorrect results are stored permanently, and can come back to haunt you later; re-running with clean won’t help in this situation either. When using a shared cache, these problems even cross machine boundaries. In the example above, Gradle might end up loading a result for your task that was produced with a different configuration. Resolving these problems with the build therefore becomes even more important when task output caching is enabled.
Other issues with the build won’t cause it to produce incorrect results, but will lead to unnecessary cache misses.
In this chapter you will learn about some typical problems and ways to avoid them.
Fixing these issues will have the added benefit that your build will stop "acting up," and developers can forget about running builds with clean altogether.
System file encoding
Most Java tools use the system file encoding when no specific encoding is specified. This means that running the same build on machines with different file encoding can yield different outputs. Currently Gradle only tracks on a per-task basis that no file encoding has been specified, but it does not track the system encoding of the JVM in use. This can cause incorrect builds. You should always set the file system encoding to avoid these kind of problems.
|
Note
|
Build scripts are compiled with the file encoding of the Gradle daemon. By default, the daemon uses the system file encoding, too. |
Setting the file encoding for the Gradle daemon mitigates both above problems by making sure that the encoding is the same across builds.
You can do so in your gradle.properties:
org.gradle.jvmargs=-Dfile.encoding=UTF-8Environment variable tracking
Gradle does not track changes in environment variables for tasks.
For example for Test tasks it is completely possible that the outcome depends on a few environment variables.
To ensure that only the right artifacts are re-used between builds, you need to add environment variables as inputs to tasks depending on them.
Absolute paths are often passed as environment variables, too. You need to pay attention what you add as an input to the task in this case. You would need to ensure that the absolute path is the same between machines. Most times it makes sense to track the file or the contents of the directory the absolute path points to. If the absolute path represents a tool being used it probably makes sense to track the tool version as an input instead.
For example, if you are using tools in your Test task called integTest which depend on the contents of the LANG variable you should do this:
tasks.integTest {
inputs.property("langEnvironment") {
System.getenv("LANG")
}
}tasks.named('integTest') {
inputs.property("langEnvironment") {
System.getenv("LANG")
}
}If you add conditional logic to distinguish CI builds from local development builds, you have to ensure that this does not break the loading of task outputs from CI onto developer machines.
For example, the following setup would break caching of Test tasks, since Gradle always detects the differences in custom task actions.
if ("CI" in System.getenv()) {
tasks.withType<Test>().configureEach {
doFirst {
println("Running test on CI")
}
}
}if (System.getenv().containsKey("CI")) {
tasks.withType(Test).configureEach {
doFirst {
println "Running test on CI"
}
}
}You should always add the action unconditionally:
tasks.withType<Test>().configureEach {
doFirst {
if ("CI" in System.getenv()) {
println("Running test on CI")
}
}
}tasks.withType(Test).configureEach {
doFirst {
if (System.getenv().containsKey("CI")) {
println "Running test on CI"
}
}
}This way, the task has the same custom action on CI and on developer builds and its outputs can be re-used if the remaining inputs are the same.
Line endings
If you are building on different operating systems be aware that some version control systems convert line endings on check-out.
For example, Git on Windows uses autocrlf=true by default which converts all line endings to \r\n.
As a consequence, compilation outputs can’t be re-used on Windows since the input sources are different.
If sharing the build cache across multiple operating systems is important in your environment, then setting autocrlf=false across your build machines is crucial for optimal build cache usage.
Symbolic links
When using symbolic links, Gradle does not store the link in the build cache but the actual file contents of the destination of the link. As a consequence you might have a hard time when trying to reuse outputs which heavily use symbolic links. There currently is no workaround for this behavior.
For operating systems supporting symbolic links, the content of the destination of the symbolic link will be added as an input.
If the operating system does not support symbolic links, the actual symbolic link file is added as an input.
Therefore, tasks which have symbolic links as input files, e.g. Test tasks having symbolic link as part of its runtime classpath, will not be cached between Windows and Linux.
If caching between operating systems is desired, symbolic links should not be checked into version control.
Java version tracking
Gradle tracks only the major version of Java as an input for compilation and test execution. Currently, it does not track the vendor nor the minor version. Still, the vendor and the minor version may influence the bytecode produced by compilation.
|
Note
|
If you’re using Java Toolchains, the Java major version, the vendor (if specified) and implementation (if specified) will be tracked automatically as an input for compilation and test execution. |
If you use different JVM vendors for compiling or running Java we strongly suggest that you add the vendor as an input to the corresponding tasks. This can be achieved by using the runtime API as shown in the following snippet.
tasks.withType<AbstractCompile>().configureEach {
inputs.property("java.vendor") {
System.getProperty("java.vendor")
}
}
tasks.withType<Test>().configureEach {
inputs.property("java.vendor") {
System.getProperty("java.vendor")
}
}tasks.withType(AbstractCompile).configureEach {
inputs.property("java.vendor") {
System.getProperty("java.vendor")
}
}
tasks.withType(Test).configureEach {
inputs.property("java.vendor") {
System.getProperty("java.vendor")
}
}With respect to tracking the Java minor version there are different competing aspects: developers having cache hits and "perfect" results on CI. There are basically two situations when you may want to track the minor version of Java: for compilation and for runtime. In the case of compilation, there can sometimes be differences in the produced bytecode for different minor versions. However, the bytecode should still result in the same runtime behavior.
|
Note
|
Java compile avoidance will treat this bytecode the same since it extracts the ABI. |
Treating the minor number as an input can decrease the likelihood of a cache hit for developer builds. Depending on how standard development environments are across your team, it’s common for many different Java minor version to be in use.
Even without tracking the Java minor version you may have cache misses for developers due to some locally compiled class files which constitute an input to test execution. If these outputs made it into the local build cache on this developers machine even a clean will not solve the situation. Therefore, the choice for tracking the Java minor version is between sometimes or never re-using outputs between different Java minor versions for test execution.
|
Note
|
The compiler infrastructure provided by the JVM used to run Gradle is also used by the Groovy compiler. Therefore, you can expect differences in the bytecode of compiled Groovy classes for the same reasons as above and the same suggestions apply. |
Avoid changing inputs external to your build
If your build is dependent on external dependencies like binary artifacts or dynamic data from a web page you need to make sure that these inputs are consistent throughout your infrastructure. Any variations across machines will result in cache misses.
Never re-release a non-changing binary dependency with the same version number but different contents: if this happens with a plugin dependency, you will never be able to explain why you don’t see cache reuse between machines (it’s because they have different versions of that artifact).
Using SNAPSHOTs or other changing dependencies in your build by design violates the stable task inputs principle.
To use the build cache effectively, you should depend on fixed dependencies.
You may want to look into dependency locking or switch to using composite builds instead.
The same is true for depending on volatile external resources, for example a list of released versions. One way of locking the changes would be to check the volatile resource into source control whenever it changes so that the builds only depend on the state in source control and not on the volatile resource itself.
Suggestions for authoring your build
Review usages of doFirst and doLast
Using doFirst and doLast from a build script on a cacheable task ties you to build script changes since the implementation of the closure comes from the build script.
If possible, you should use separate tasks instead.
Modifying input or output properties via the runtime API in doFirst is discouraged since these changes will not be detected for up-to-date checks and the build cache.
Even worse, when the task does not execute, then the configuration of the task is actually different from when it executes.
Instead of using doFirst for modifying the inputs consider using a separate task to configure the task under question - a so called configure task.
E.g., instead of doing
tasks.jar {
val runtimeClasspath: FileCollection = configurations.runtimeClasspath.get()
doFirst {
manifest {
val classPath = runtimeClasspath.map { it.name }.joinToString(" ")
attributes("Class-Path" to classPath)
}
}
}tasks.named('jar') {
FileCollection runtimeClasspath = configurations.runtimeClasspath
doFirst {
manifest {
def classPath = runtimeClasspath.collect { it.name }.join(" ")
attributes('Class-Path': classPath)
}
}
}do
val configureJar = tasks.register("configureJar") {
doLast {
tasks.jar.get().manifest {
val classPath = configurations.runtimeClasspath.get().map { it.name }.joinToString(" ")
attributes("Class-Path" to classPath)
}
}
}
tasks.jar { dependsOn(configureJar) }def configureJar = tasks.register('configureJar') {
doLast {
tasks.jar.manifest {
def classPath = configurations.runtimeClasspath.collect { it.name }.join(" ")
attributes('Class-Path': classPath)
}
}
}
tasks.named('jar') { dependsOn(configureJar) }|
Warning
|
Note that configuring a task from other task is not supported when using the configuration cache. |
Build logic based on the outcome of a task
Do not base build logic on whether a task has been executed.
In particular you should not assume that the output of a task can only change if it actually executed.
Actually, loading the outputs from the build cache would also change them.
Instead of relying on custom logic to deal with changes to input or output files you should leverage Gradle’s built-in support by declaring the correct inputs and outputs for your tasks and leave it to Gradle to decide if the task actions should be executed.
For the very same reason using outputs.upToDateWhen is discouraged and should be replaced by properly declaring the task’s inputs.
Overlapping outputs
You already saw that overlapping outputs are a problem for task output caching.
When you add new tasks to your build or re-configure built-in tasks make sure you do not create overlapping outputs for cacheable tasks.
If you must you can add a Sync task which then would sync the merged outputs into the target directory while the original tasks remain cacheable.
Develocity will show tasks where caching was disabled for overlapping outputs in the timeline and in the task input comparison:
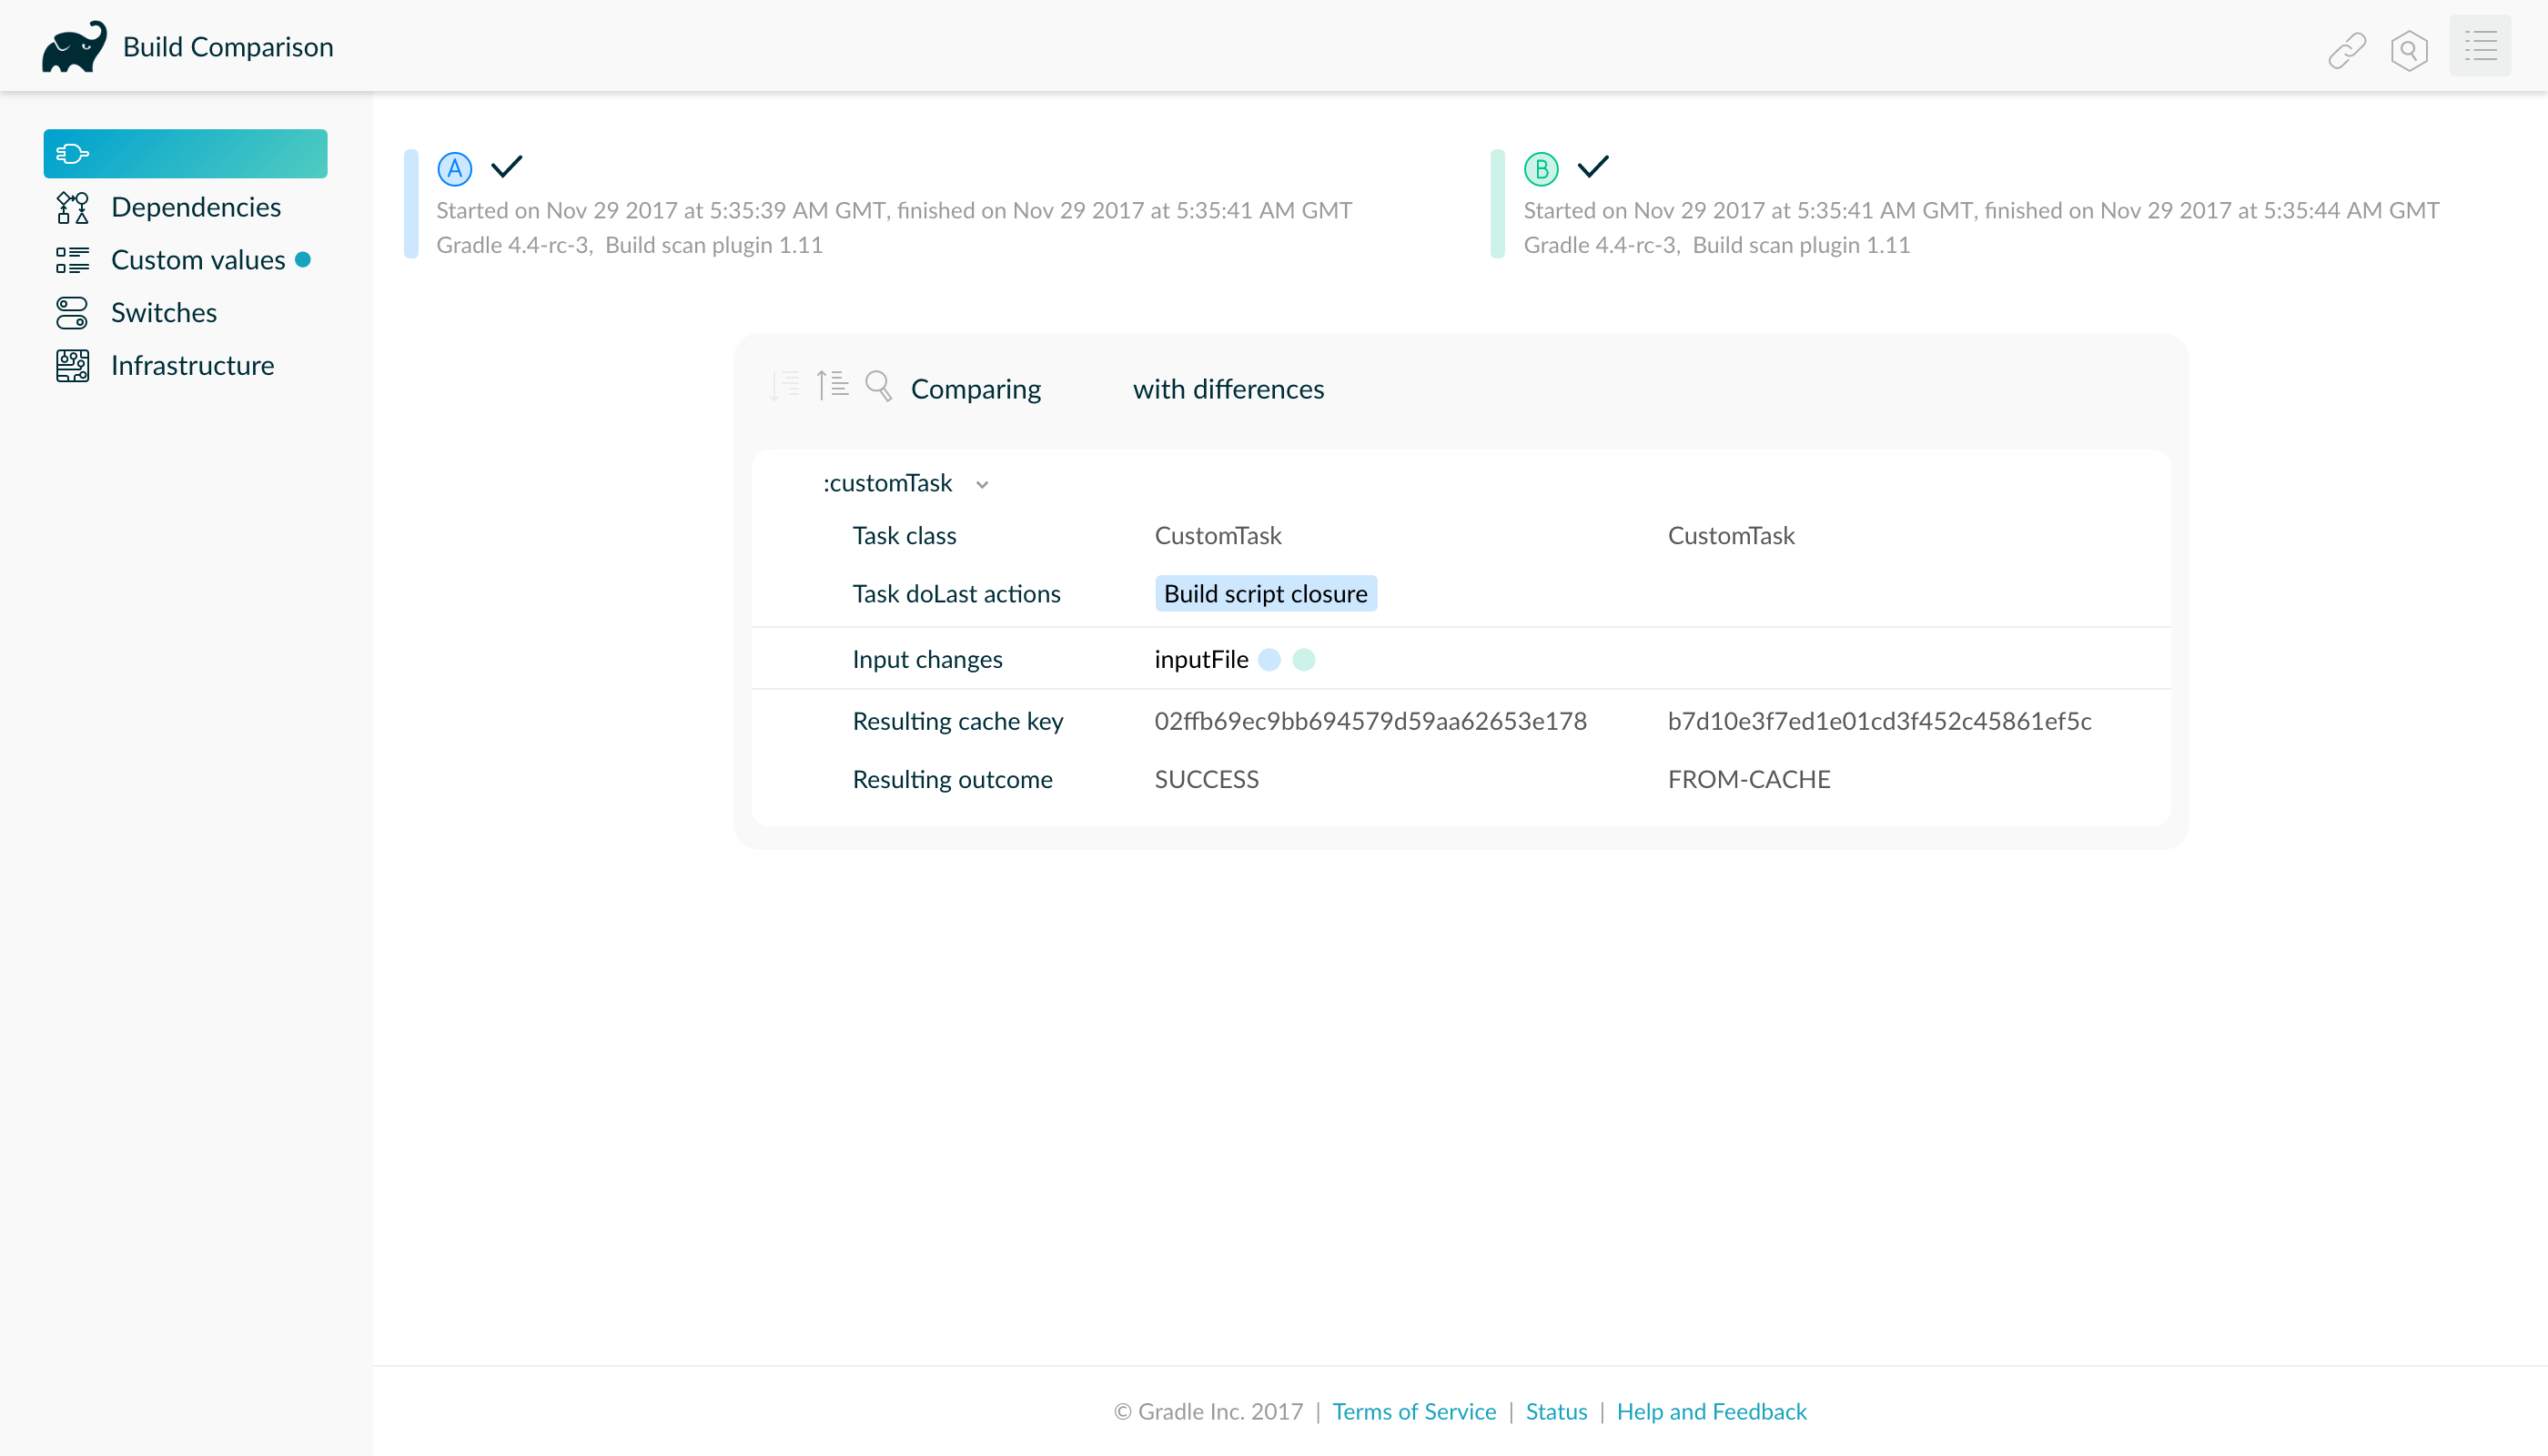
Achieving stable task inputs
It is crucial to have stable task inputs for every cacheable task. In the following section you will learn about different situations which violate stable task inputs and look at possible solutions.
Volatile task inputs
If you use a volatile input like a timestamp as an input property for a task, then there is nothing Gradle can do to make the task cacheable. You should really think hard if the volatile data is really essential to the output or if it is only there for e.g. auditing purposes.
If the volatile input is essential to the output then you can try to make the task using the volatile input cheaper to execute. You can do this by splitting the task into two tasks - the first task doing the expensive work which is cacheable and the second task adding the volatile data to the output. In this way the output stays the same and the build cache can be used to avoid doing the expensive work. For example, for building a jar file the expensive part - Java compilation - is already a different task while the jar task itself, which is not cacheable, is cheap.
If it is not an essential part of the output, then you should not declare it as an input. As long as the volatile input does not influence the output then there is nothing else to do. Most times though, the input will be part of the output.
Non-repeatable task outputs
Having tasks which generate different outputs for the same inputs can pose a challenge for the effective use of task output caching as seen in repeatable task outputs. If the non-repeatable task output is not used by any other task then the effect is very limited. It basically means that loading the task from the cache might produce a different result than executing the same task locally. If the only difference between the outputs is a timestamp, then you can either accept the effect of the build cache or decide that the task is not cacheable after all.
Non-repeatable task outputs lead to non-stable task inputs as soon as another task depends on the non-repeatable output. For example, re-creating a jar file from the files with the same contents but different modification times yields a different jar file. Any other task depending on this jar file as an input file cannot be loaded from the cache when the jar file is rebuilt locally. This can lead to hard-to-diagnose cache misses when the consuming build is not a clean build or when a cacheable task depends on the output of a non-cacheable task. For example, when doing incremental builds it is possible that the artifact on disk which is considered up-to-date and the artifact in the build cache are different even though they are essentially the same. A task depending on this task output would then not be able to load outputs from the build cache since the inputs are not exactly the same.
As described in the stable task inputs section, you can either make the task outputs repeatable or use input normalization. You already learned about the possibilities with configurable input normalization.
Gradle includes some support for creating repeatable output for archive tasks.
For tar and zip files Gradle can be configured to create reproducible archives.
This is done by configuring e.g. the Zip task via the following snippet.
tasks.register<Zip>("createZip") {
isPreserveFileTimestamps = false
isReproducibleFileOrder = true
// ...
}tasks.register('createZip', Zip) {
preserveFileTimestamps = false
reproducibleFileOrder = true
// ...
}Another way to make the outputs repeatable is to activate caching for a task with non-repeatable outputs. If you can make sure that the same build cache is used for all builds then the task will always have the same outputs for the same inputs by design of the build cache. Going down this road can lead to different problems with cache misses for incremental builds as described above. Moreover, race conditions between different builds trying to store the same outputs in the build cache in parallel can lead to hard-to-diagnose cache misses. If possible, you should avoid going down that route.
Limit the effect of volatile data
If none of the described solutions for dealing with volatile data work for you, you should still be able to limit the effect of volatile data on effective use of the build cache.
This can be done by adding the volatile data later to the outputs as described in the volatile task inputs section.
Another option would be to move the volatile data so it affects fewer tasks.
For example moving the dependency from the compile to the runtime configuration may already have quite an impact.
Sometimes it is also possible to build two artifacts, one containing the volatile data and another one containing a constant representation of the volatile data. The non-volatile output would be used e.g. for testing while the volatile one would be published to an external repository. While this conflicts with the Continuous Delivery "build artifacts once" principle it can sometimes be the only option.
Custom and third party tasks
If your build contains custom or third party tasks, you should take special care that these don’t influence the effectiveness of the build cache.
Special care should also be taken for code generation tasks which may not have repeatable task outputs.
This can happen if the code generator includes e.g. a timestamp in the generated files or depends on the order of the input files.
Other pitfalls can be the use of HashMaps or other data structures without order guarantees in the task’s code.
|
Warning
|
Some third party plugins can even influence cacheability of Gradle’s built-in tasks.
This can happen if they add inputs like absolute paths or volatile data to tasks via the runtime API.
In the worst case this can lead to incorrect builds when the plugins try to depend on the outcome of a task and do not take |
GRADLE ON CI
Executing Gradle builds on Jenkins
|
Tip
|
Top engineering teams using Jenkins have been able to reduce CI build time by up to 90% by using the Gradle Build Cache. Register here for our Build Cache training session to learn how your team can achieve similar results. |
Building Gradle projects doesn’t stop with the developer’s machine. Continuous Integration (CI) has been a long-established practice for running a build for every single change committed to version control to tighten the feedback loop.
In this guide, we’ll discuss how to configure Jenkins for a typical Gradle project.
What you’ll need
-
A text editor
-
A command prompt
-
The Java Development Kit (JDK), version 1.7 or higher
-
A Jenkins installation (setup steps explained in this post)
Setup a typical project
As example, this guide is going to focus on a Java-based project. More specifically, a Gradle plugin written in Java and tested with Spek. First, we’ll get the project set up on your local machine before covering the same steps on CI.
Just follow these steps:
Clone the Gradle Site Plugin repository
$ git clone https://github.com/gradle/gradle-site-plugin.git Cloning into 'gradle-site-plugin'... $ cd gradle-site-plugin
Build the project
As a developer of a Java project, you’ll typical want to compile the source code, run the tests and assemble the JAR artifact. That’s no different for Gradle plugins. The following command achieves exactly that:
$ ./gradlew build BUILD SUCCESSFUL 14 actionable tasks: 14 executed
The project provides the Gradle Wrapper as part of the repository. It is a recommended practice for any Gradle project as it enables your project to built on CI without having to install the Gradle runtime.
Build scan integration
The sample project is equipped with support for generating build scans.
Running the build with the command line option --scan renders a link in the console.
$ ./gradlew build --scan Publishing build scan... https://gradle.com/s/7mtynxxmesdio
The following section will describe how to build the project with the help of Jenkins.
Setup Jenkins
Jenkins is one of the most prominent players in the field. In the course of this section, you’ll learn how to set up Jenkins, configure a job to pull the source code from GitHub and run the Gradle build.
Install and start Jenkins
On the Jenkins website you can pick from a variety of distributions. This post uses the runnable WAR file. A simple Java command brings up the Jenkins server.
$ wget https://mirrors.jenkins.io/war-stable/latest/jenkins.war $ java -jar jenkins.war
In the browser, navigate to localhost with port 8080 to render the Jenkins dashboard.
You will be asked to set up an new administration user and which plugins to install.
Installation of plugins
Confirm to install the recommended plugins when starting Jenkins for the first time. Under "Manage Jenkins > Manage Plugins" ensure that you have the following two plugins installed.
Next, we can set up the job for building the project.
Create a Jenkins job
Setting up a new Gradle job can be achieved with just a couple of clicks. From the left navigation bar select "New Item > Freestyle project". Enter a new name for the project. We’ll pick "gradle-site-plugin" for the project.
Select the radio button "Git" in the section "Source Code Management".
Enter the URL of the GitHub repository: https://github.com/gradle/gradle-site-plugin.git.
Furthermore, create a "Build step" in the section "Build" by selecting "Invoke Gradle script".
As mentioned before, we’ll want to use the Wrapper to execute the build. In the "Tasks" input box enter the build and use the "Switches" --scan -s to generate a build scan and render a stack trace in case of a build failure.
Execute the job
Save the configuration of job and execute an initial build by triggering the "Build Now" button. The build should finish successfully and render a "Gradle Build Scan" icon that brings you directly to the build scan for the given build.
There are various options to trigger Jenkins builds continuously: from polling the repository periodically, to building on a set schedule, or via callback URL.
Further reading
You can learn more about advanced Jenkins usage through these resources:
Summary
Executing Gradle builds on CI can be set up and configured with just a handful of steps. The benefit of receiving fast feedback clearly speaks for itself. If you are not using Jenkins, no problem, many CI products tightly integrate with Gradle as a first-class citizen.
Executing Gradle builds on TeamCity
|
Tip
|
Top engineering teams using TeamCity have been able to reduce CI build time by up to 90% by using the Gradle Build Cache. Register here for our Build Cache training session to learn how your team can achieve similar results. |
Building Gradle projects doesn’t stop with the developer’s machine. Continuous Integration (CI) has been a long-established practice for running a build for every single change committed to version control to tighten the feedback loop.
In this guide, we’ll discuss how to configure TeamCity for a typical Gradle project.
What you’ll need
-
A command prompt
-
The Java Development Kit (JDK), version 1.8 or higher
-
A TeamCity installation (setup steps explained in this guide)
Setup a typical project
For demonstration purposes, this guide is going to focus on building a Java-based project; however, this setup will work with any Gradle-compatible project. More specifically, a Gradle plugin written in Java and tested with Spek. First, we’ll get the project set up on your local machine before covering the same steps on CI.
Just follow these steps:
Clone the Gradle Site Plugin repository
$ git clone https://github.com/gradle/gradle-site-plugin.git Cloning into 'gradle-site-plugin'... $ cd gradle-site-plugin
Build the project
As a developer of a Java project, you’ll typical want to compile the source code, run the tests and assemble the JAR artifact. That’s no different for Gradle plugins. The following command achieves exactly that:
$ ./gradlew build BUILD SUCCESSFUL 14 actionable tasks: 14 executed
The project provides the Gradle Wrapper as part of the repository. It is a recommended practice for any Gradle project as it enables your project to built on CI without having to install the Gradle runtime.
Build scan integration
The sample project is equipped with support for generating build scans.
Running the build with the command line option --scan renders a link in the console.
$ ./gradlew build --scan Publishing build scan... https://gradle.com/s/7mtynxxmesdio
Setup TeamCity
JetBrains TeamCity is a powerful and user-friendly Continuous Integration and Deployment server that works out of the box. JetBrains offers several licensing options that allow you to scale TeamCity to your needs. In this setup, we’ll use TeamCity Professional, a free fully functional edition suitable for average projects. In the course of this section, you’ll learn how to set up TeamCity, create a build configuration to pull the source code from GitHub and run the Gradle build.
Install and start TeamCity
On the TeamCity website you can pick from a variety of distributions. This post uses TeamCity bundled with Tomcat servlet container and covers the evaluation setup of a TeamCity server and a default build agent running on the same machine.
-
Make sure you have JRE or JDK installed and the JAVA_HOME environment variable is pointing to the Java installation directory. Oracle Java 1.8 JDK is required.
-
Download TeamCity .tar.gz distribution. Unpack the
TeamCity<version number>.tar.gzarchive, for example, using the WinZip, WinRar or a similar utility under Windows, or the following command under Linux or macOS:
tar xfz TeamCity<version number>.tar.gz
-
Start the TeamCity server and one default agent at the same time, using the runAll script provided in the <TeamCity home>/bin directory, e.g.
runAll.sh start
-
To access the TeamCity Web UI, navigate to
http://localhost:8111/. Follow the defaults of the TeamCity setup. You will be asked to set up a new administration user.
Next, we can set up the project and run a build in TeamCity.
Create a TeamCity build
Setting up a new Gradle build in TeamCity requires just a few clicks: TeamCity comes bundled with a Gradle plugin, so you do not need to install plugins additionally. However, it is recommended that you install the TeamCity Build Scan plugin.
On the Administration | Projects page click Create project,
use the option From the repository URL and enter the URL of the GitHub repository: https://github.com/gradle/gradle-site-plugin.git.
Follow the Create Project wizard, it will prompt for the project and build configuration name and automatically detect build steps. Select the automatically Gradle build step and click Use selected:
The build step is added to the build configuration:
Click Edit, on the page that opens click Advanced options.
Using the Wrapper to execute the build is considered good practice with Gradle,
and on automatic detection this option is selected by default.
We’ll want to generate a build scan,
so we’ll enter the --scan option in Additional Gradle command line parameters field.
Save the settings and we’re ready to run the build.
Run the build in TeamCity
Click the Run button in the right top corner:
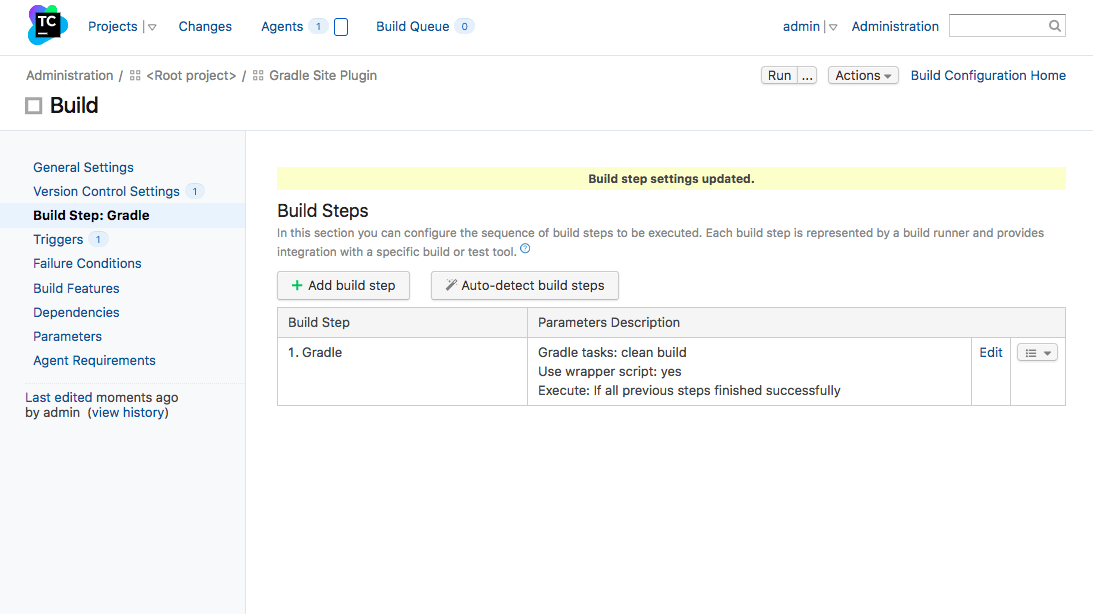
TeamCity will start the build and you’ll be able to view the build progress by clicking Build Configuration Home. When the build is finished, you can review the build results by clicking the build number link:
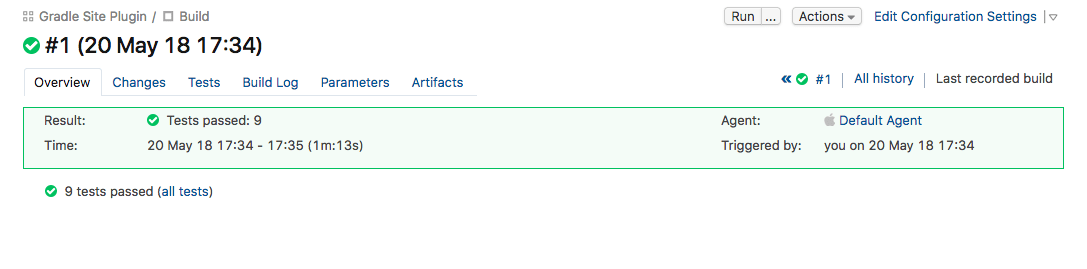
You can view the tests right here in TeamCity:
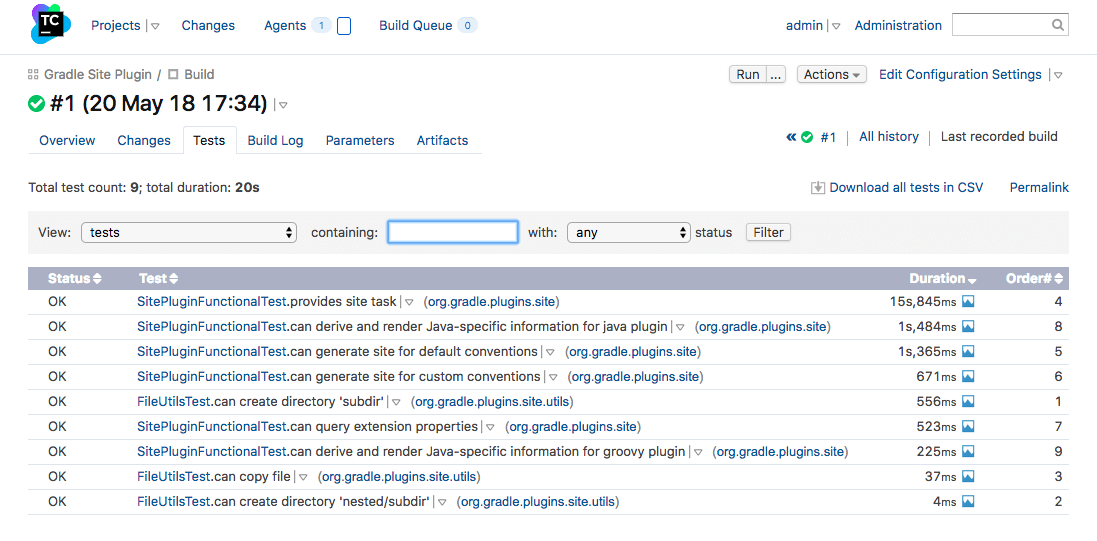
The information on parameters and environment of the build is available on the Parameters tab of the build results.
If you installed the TeamCity Build Scan plugin, you will see a link to the build scan in the Build Results view:
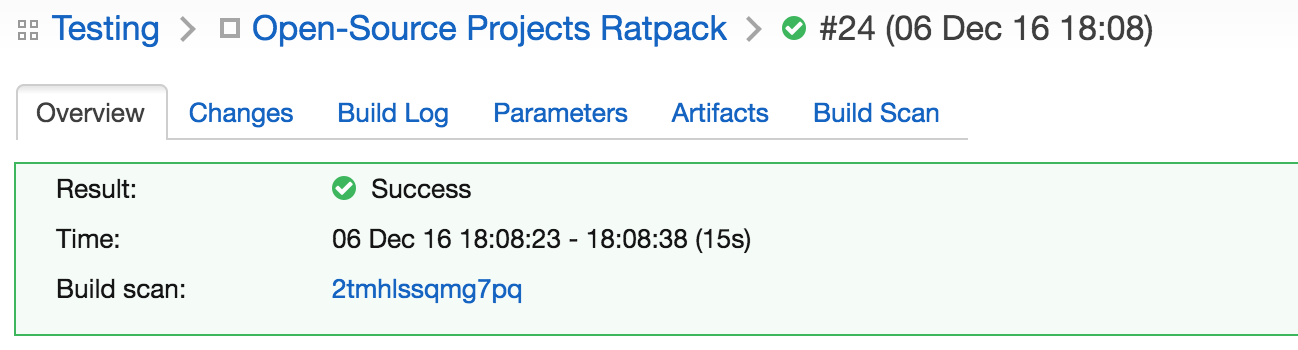
Otherwise, the link to the build scan for the given build is available in the build log:
There are various options to trigger TeamCity builds continuously: from polling the repository periodically, to building on a set schedule, or via post-commit hook.
Further reading
You can learn more about advanced TeamCity usage through these resources:
More information is available in TeamCity documentation. Follow the TeamCity blog for the latest news.
Summary
Executing Gradle builds on CI can be set up and configured with just a handful of steps. The benefit of receiving fast feedback clearly speaks for itself. If you are not using TeamCity, no problem, many CI products tightly integrate with Gradle as a first-class citizen.
Executing Gradle builds on GitHub Actions
|
Tip
|
Top engineering teams using GitHub Actions have been able to reduce CI build time by up to 90% by using the Gradle Build Cache. Register here for our Build Cache training session to learn how your team can achieve similar results. |
Building Gradle projects doesn’t stop with the developer’s machine. Continuous Integration (CI) has been a long-established practice for running a build for every single change committed to version control to tighten the feedback loop.
In this guide, we’ll discuss how to configure GitHub Actions for a Gradle project hosted on GitHub.
Introduction
GitHub Actions is a cloud-based CI solution provider built directly into GitHub, making it an excellent choice for projects hosted on GitHub.
Using the Gradle Build Action makes it simple to integrate any Gradle project into a GitHub Actions workflow.
What you’ll need
-
A text editor
-
A command prompt
-
The Java Development Kit (JDK), version 1.8 or higher
-
A local Gradle installation, to initialize a new Gradle project
-
A GitHub account
Setup a Gradle project on GitHub
If you have an existing Gradle project hosted on GitHub, then you can skip this step and move directly to Configure GitHub Actions.
If not, follow these step to initialize a new Gradle project on GitHub.
Create a new GitHub repository for your project
Via the GitHub user interface, create a new repository named github-actions-gradle-sample.
Clone the repository locally
$ git clone git@github.com:<YOUR-GITHUB-USER>/github-actions-gradle-sample.git Cloning into 'github-actions-gradle-sample'... $ cd github-actions-gradle-sample
Initialize the Gradle project and commit to the repository
Use gradle init to create a fresh Gradle project. You can choose any of the available options during init, but we recommend choosing "library" as the project type.
Once the project is generated, commit the changes and push to the repository.
$ gradle init $ git add . $ git commit -m "Initial commit" $ git push
Enable Build Scan™ publishing
Gradle Build Scans are a great way to view your build results, and provide valuable insights into your build. In order to publish Build Scans from GitHub Actions, you’ll need to pre-approve the Terms & Conditions.
To do so, add the following content to the top of your settings.gradle[.kts] file. The "CI" environment variable is set by GitHub Actions:
plugins {
id("com.gradle.enterprise") version("3.16.2")
}
gradleEnterprise {
if (System.getenv("CI") != null) {
buildScan {
publishAlways()
termsOfServiceUrl = "https://gradle.com/terms-of-service"
termsOfServiceAgree = "yes"
}
}
}Test building the project
The project uses the Gradle Wrapper for building the project. It is a recommended practice for any Gradle project as it enables your project to built on CI without having to install the Gradle runtime.
Before asking GitHub Actions to build your project, it’s useful to ensure that it builds locally. Adding the "CI" environment variable will emulate running the build on GitHub Actions.
The following command achieves that:
$ CI=true ./gradlew build BUILD SUCCESSFUL Publishing build scan... https://gradle.com/s/7mtynxxmesdio
If the build works as expected, commit the changes and push to the repository.
$ git commit -a -m "Publish Build Scans from GitHub Actions" $ git push
Configure GitHub Actions
You can create a GitHub Actions workflow by adding a .github/workflows/<workflow-name>.yml file to your repository.
This workflow definition file contains all relevant instructions for building the project on GitHub Actions.
The following workflow file instructs GitHub Actions to build your Gradle project using the Gradle Wrapper, executed by the default Java distribution for GitHub Actions.
Create a new file named .github/workflows/build-gradle-project.yml with the following content, and push it to the GitHub repository.
name: Build Gradle project
on:
push:
jobs:
build-gradle-project:
runs-on: ubuntu-latest
steps:
- name: Checkout project sources
uses: actions/checkout@v4
- name: Setup Gradle
uses: gradle/gradle-build-action@v2
- name: Run build with Gradle Wrapper
run: ./gradlew build
Commit the changes and push to the repository:
$ git add . $ git commit -m "Add GitHub Actions workflow" $ git push
View the GitHub Actions results
Once this workflow file is pushed, you should immediately see the workflow execution in the GitHub Actions page for your repository (eg https://github.com/gradle/gradle/actions). Any subsequent push to the repository will trigger the workflow to run.
List all runs of the GitHub Actions workflow
The main actions page can be filtered to list all runs for a GitHub Actions workflow.
See the results for GitHub Actions workflow run
Clicking on the link for a workflow run will show the details of the workflow run, including a link to the build scan produced for the build.
|
Note
|
Configuring build scans is especially helpful on cloud CI systems like GitHub Actions because it has additional environment and test results information that are difficult to obtain otherwise. |
View the details for Jobs and Steps in the workflow
Finally, you can view the details for the individual workflow Jobs and each Step defined for a Job:
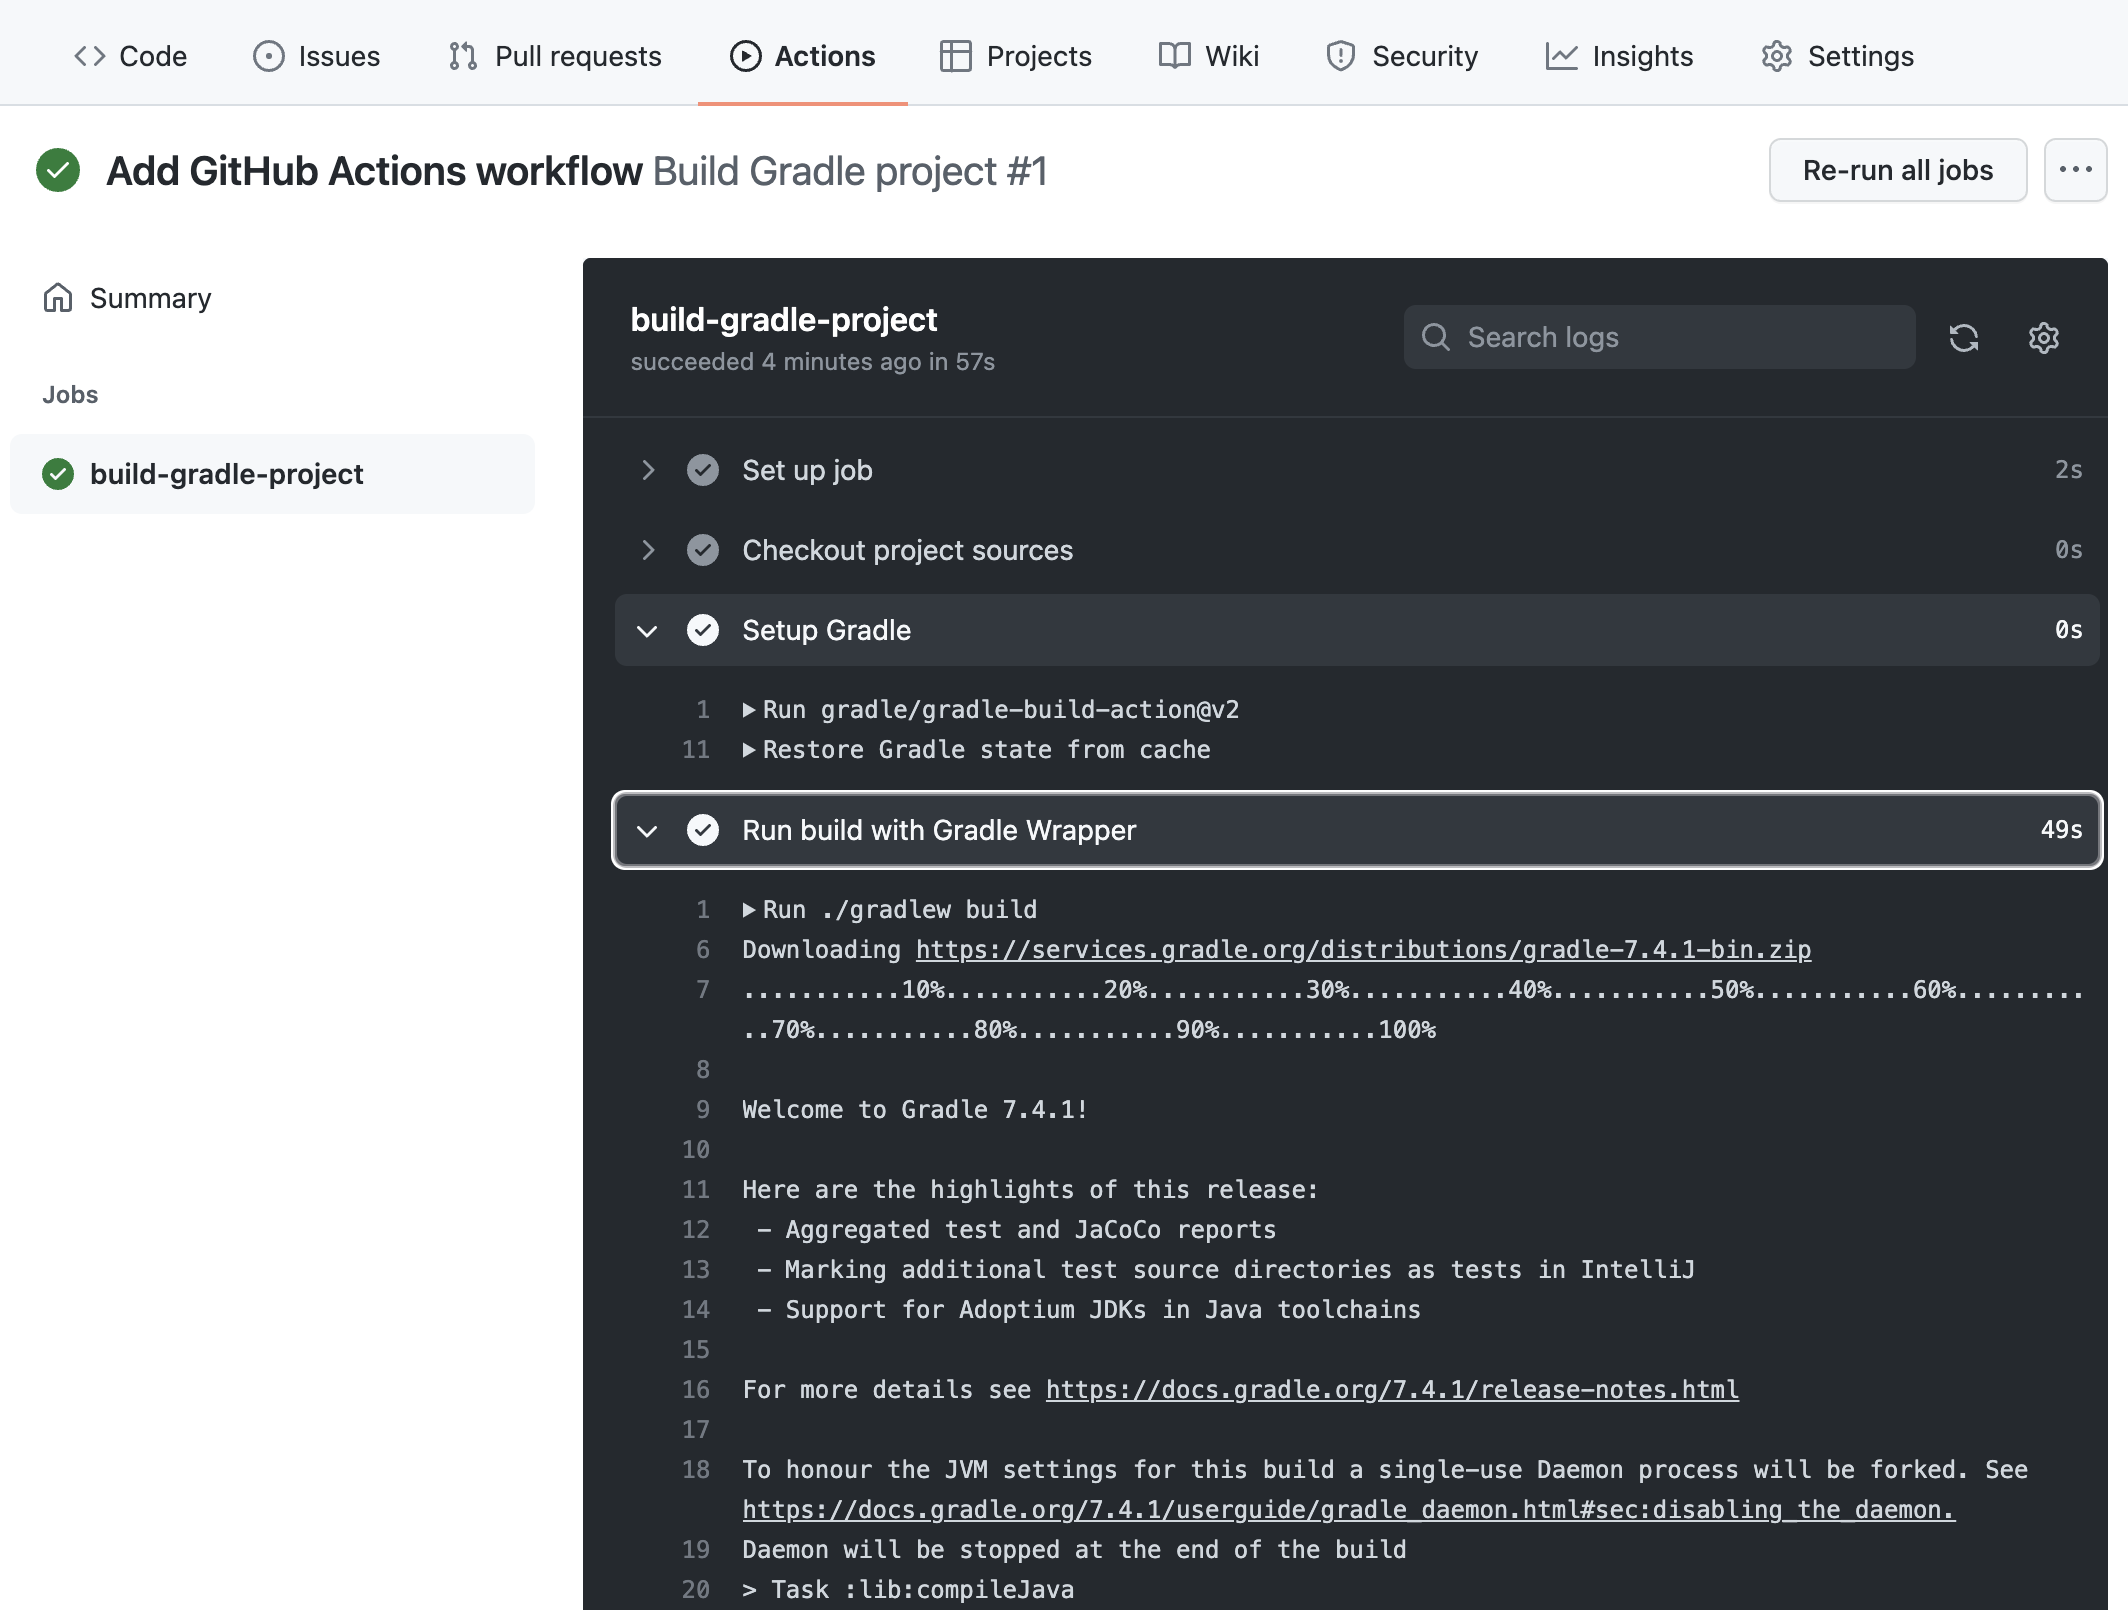
Enable caching of downloaded artifacts
The gradle-build-action used by this workflow will enable saving and restoring of the Gradle User Home directory in the built-in GitHub Actions cache. This will speed up your GitHub Actions build by avoiding the need to re-download Gradle versions and project dependencies, as well as re-using state from the previous workflow execution.
Details about what entries are saved/restored from the cache can be viewed in the Post Setup Gradle step:
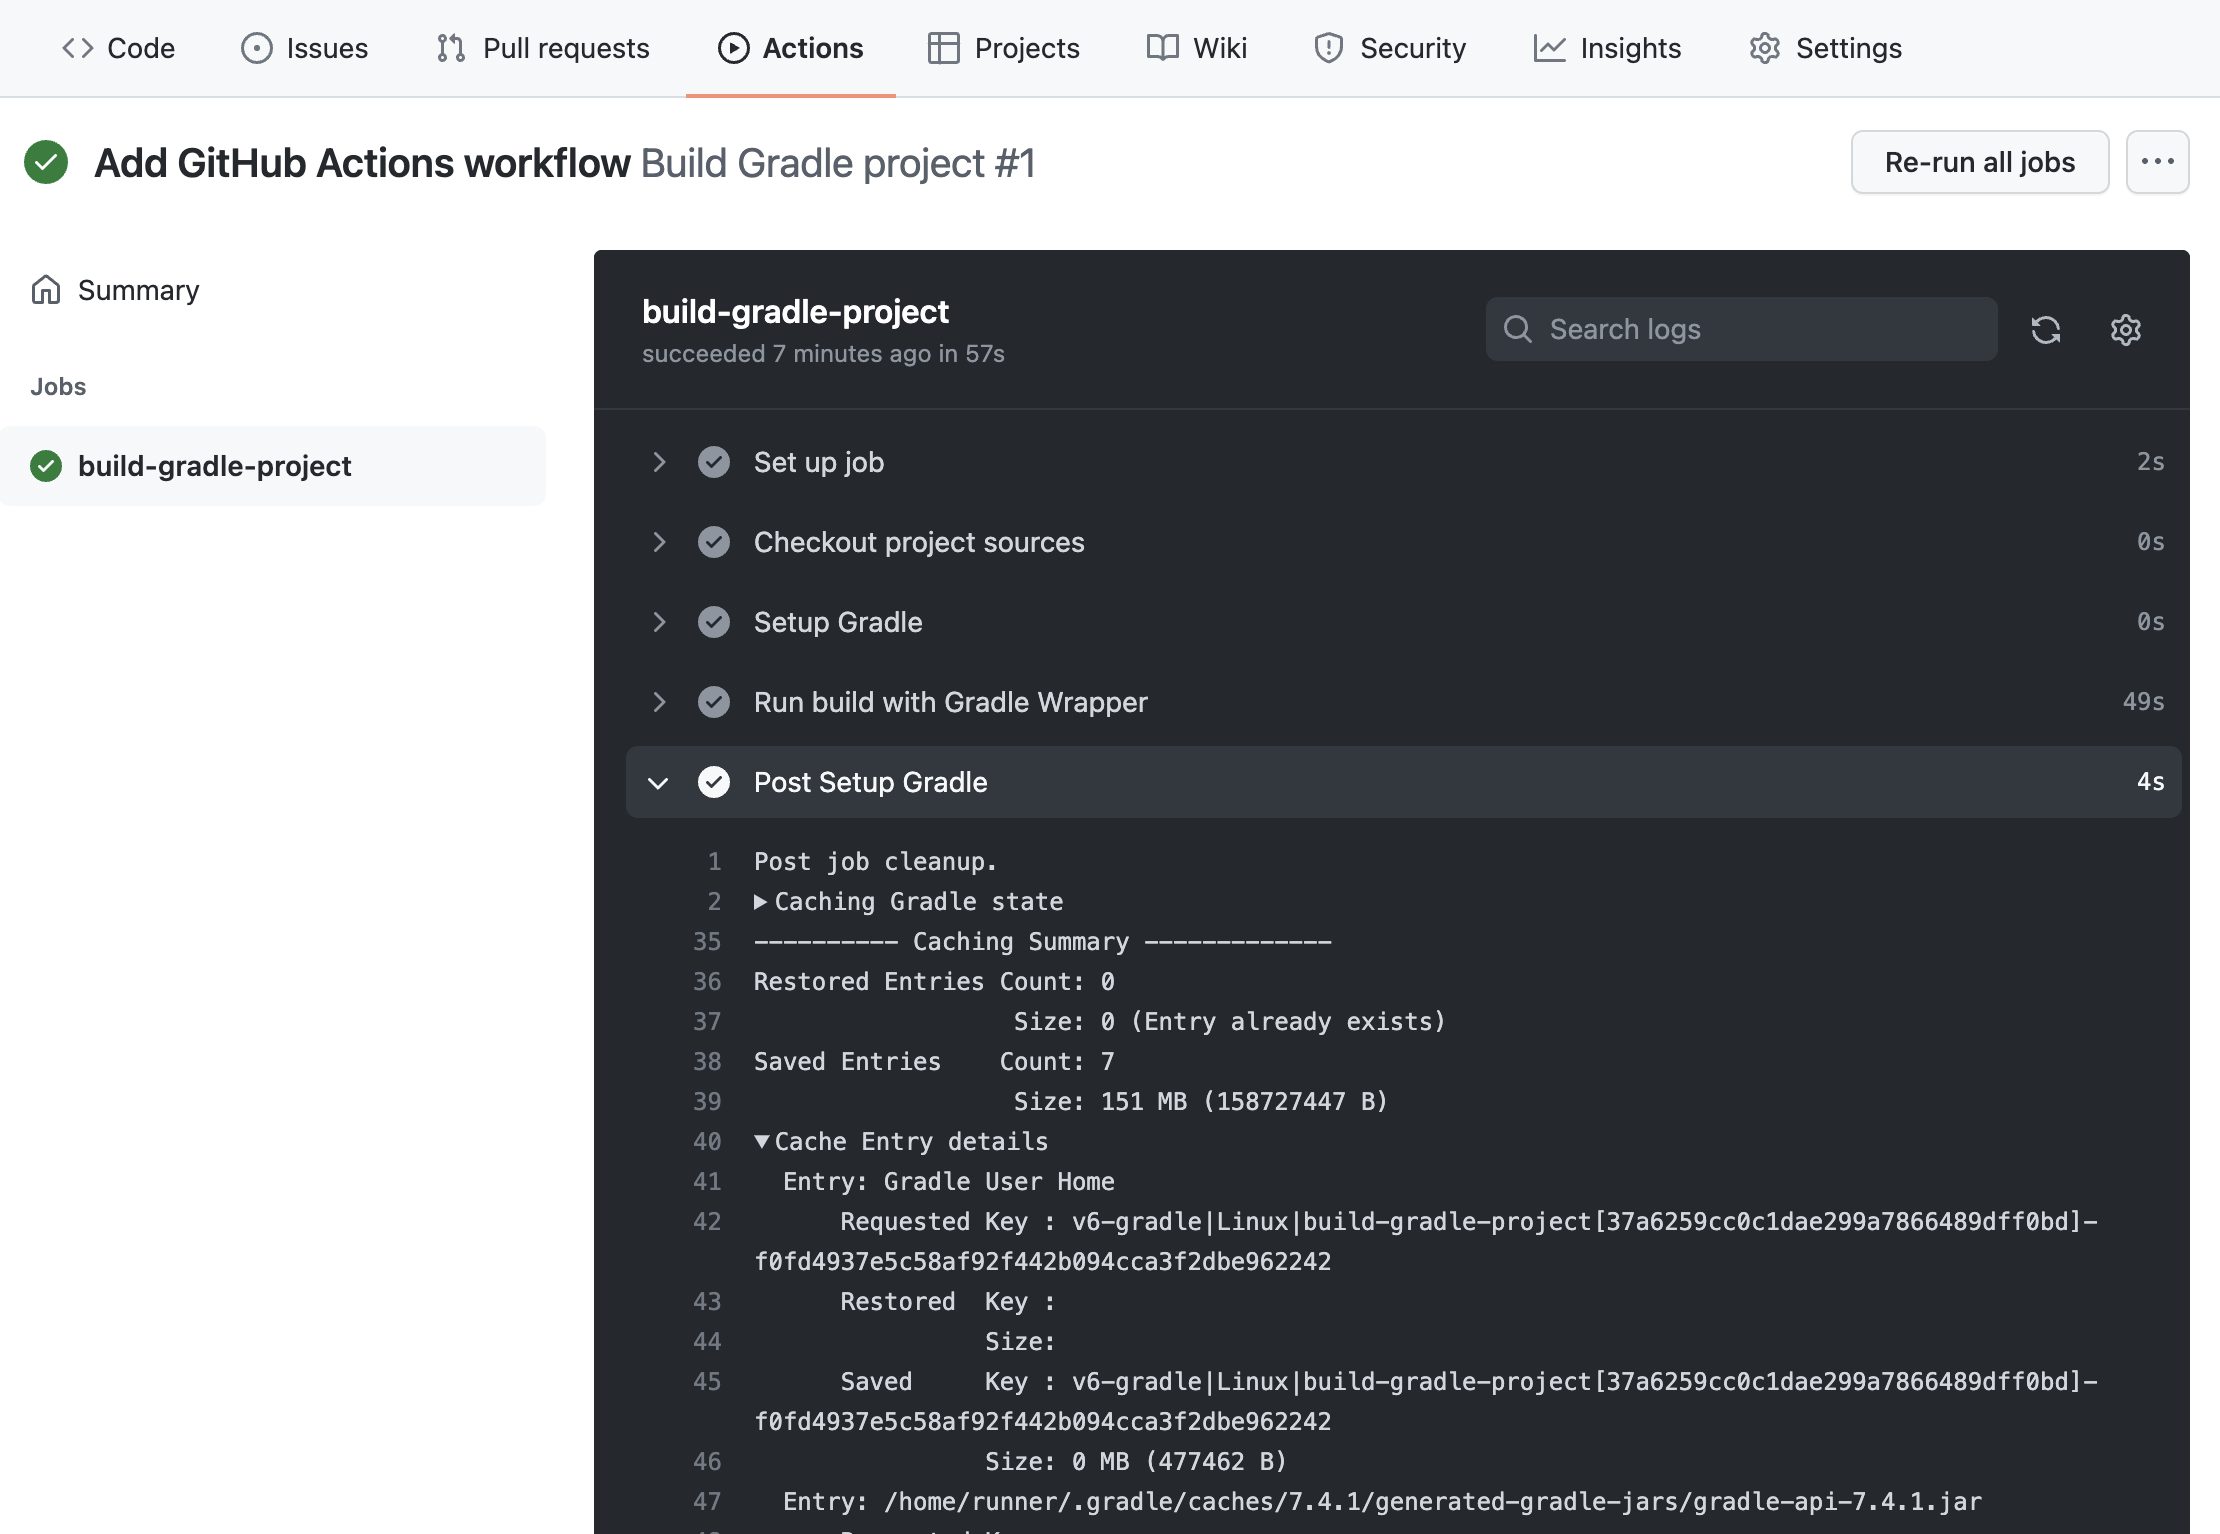
Further reading
Learn more about building Gradle projects with GitHub Actions:
Summary
Executing Gradle builds on CI can be set up and configured with just a handful of steps. The benefit of receiving fast feedback clearly speaks for itself. GitHub Actions provides a simple, convenient mechanism to setup CI for any Gradle project hosted on GitHub.
Executing Gradle builds on Travis CI
|
Tip
|
Top engineering teams using Travis CI have been able to reduce CI build time by up to 90% by using the Gradle Build Cache. Register here for our Build Cache training session to learn how your team can achieve similar results. |
Building Gradle projects doesn’t stop with the developer’s machine. Continuous Integration (CI) has been a long-established practice for running a build for every single change committed to version control to tighten the feedback loop.
In this guide, we’ll discuss how to configure Travis CI for a typical Gradle project.
What you’ll need
-
A text editor
-
A command prompt
-
The Java Development Kit (JDK), version 1.8 or higher
Setup a typical project
As example, this guide is going to focus on a Java-based project. More specifically, a Gradle plugin written in Java and tested with Spek. First, we’ll get the project set up on your local machine before covering the same steps on CI.
Just follow these steps:
Clone the Gradle Site Plugin repository
$ git clone https://github.com/gradle/gradle-site-plugin.git Cloning into 'gradle-site-plugin'... $ cd gradle-site-plugin
Build the project
As a developer of a Java project, you’ll typical want to compile the source code, run the tests and assemble the JAR artifact. That’s no different for Gradle plugins. The following command achieves exactly that:
$ ./gradlew build BUILD SUCCESSFUL 14 actionable tasks: 14 executed
The project provides the Gradle Wrapper as part of the repository. It is a recommended practice for any Gradle project as it enables your project to built on CI without having to install the Gradle runtime.
Build scan integration
The sample project is equipped with support for generating build scans.
Running the build with the command line option --scan renders a link in the console.
$ ./gradlew build --scan Publishing build scan... https://gradle.com/s/7mtynxxmesdio
The following section will describe how to build the project with the help of Travis CI.
Configure Travis CI
Travis CI is a free, cloud-based CI solution provider making it an excellent choice for open source projects. You can build any project as long as it is hosted on GitHub as a public repository. Travis CI doesn’t not provide built-in options to post-process produced artifacts of the build e.g. host the JAR file or the HTML test reports. You will have to use external services (like S3) to transfer the files.
Create the configuration file
Travis CI requires you to check in a configuration file with your source code named .travis.yml.
This file contains all relevant instructions for building the project.
The following configuration file tells Travis CI to build a Java project with JDK 8, skip the usual default execution step, and run the Gradle build with the Wrapper.
language: java install: skip os: linux dist: trusty jdk: oraclejdk8 script: - ./gradlew build --scan -s
Select the project from the Travis CI profile. After activating the repository from the dashboard, the project is ready to be built with every single commit.

|
Note
|
Configuring build scans is especially helpful on cloud CI systems like Travis CI because it has additional environment and test results information that are difficult to obtain otherwise. |
Enable caching of downloaded artifacts
Gradle’s dependency management mechanism resolves declared modules and their corresponding artifacts from a binary repository. Once downloaded, the files will be re-used from the cache. You need to tell Travis CI explicitly that you want to store and use the Gradle cache and Wrapper for successive invocations of the build.
before_cache:
- rm -f $HOME/.gradle/caches/modules-2/modules-2.lock
- rm -fr $HOME/.gradle/caches/*/plugin-resolution/
cache:
directories:
- $HOME/.gradle/caches/
- $HOME/.gradle/wrapper/
Further reading
You can learn more about advanced Travis CI usage through these resources:
Summary
Executing Gradle builds on CI can be set up and configured with just a handful of steps. The benefit of receiving fast feedback clearly speaks for itself. If you are not using Travis CI, no problem, many CI products tightly integrate with Gradle as a first-class citizen.
REFERENCE
Command-Line Interface Reference
The command-line interface is the primary method of interacting with Gradle.
The following is a reference for executing and customizing the Gradle command-line. It also serves as a reference when writing scripts or configuring continuous integration.
Use of the Gradle Wrapper is highly encouraged.
Substitute ./gradlew (in macOS / Linux) or gradlew.bat (in Windows) for gradle in the following examples.
Executing Gradle on the command-line conforms to the following structure:
gradle [taskName...] [--option-name...]
Options are allowed before and after task names.
gradle [--option-name...] [taskName...]
If multiple tasks are specified, you should separate them with a space.
gradle [taskName1 taskName2...] [--option-name...]
Options that accept values can be specified with or without = between the option and argument. The use of = is recommended.
gradle [...] --console=plain
Options that enable behavior have long-form options with inverses specified with --no-. The following are opposites.
gradle [...] --build-cache gradle [...] --no-build-cache
Many long-form options have short-option equivalents. The following are equivalent:
gradle --help gradle -h
|
Note
|
Many command-line flags can be specified in gradle.properties to avoid needing to be typed.
See the Configuring build environment guide for details.
|
Command-line usage
The following sections describe the use of the Gradle command-line interface.
Some plugins also add their own command line options.
For example, --tests, which is added by Java test filtering.
For more information on exposing command line options for your own tasks, see Declaring command-line options.
Executing tasks
You can learn about what projects and tasks are available in the project reporting section.
Most builds support a common set of tasks known as lifecycle tasks. These include the build, assemble, and check tasks.
To execute a task called myTask on the root project, type:
$ gradle :myTask
This will run the single myTask and all of its dependencies.
Specify options for tasks
To pass an option to a task, prefix the option name with -- after the task name:
$ gradle exampleTask --exampleOption=exampleValue
Disambiguate task options from built-in options
Gradle does not prevent tasks from registering options that conflict with Gradle’s built-in options, like --profile or --help.
You can fix conflicting task options from Gradle’s built-in options with a -- delimiter before the task name in the command:
$ gradle [--built-in-option-name...] -- [taskName...] [--task-option-name...]
Consider a task named mytask that accepts an option named profile:
-
In
gradle mytask --profile, Gradle accepts--profileas the built-in Gradle option. -
In
gradle -- mytask --profile=value, Gradle passes--profileas a task option.
Executing tasks in multi-project builds
In a multi-project build, subproject tasks can be executed with : separating the subproject name and task name.
The following are equivalent when run from the root project:
$ gradle :subproject:taskName
$ gradle subproject:taskName
You can also run a task for all subprojects using a task selector that consists of only the task name.
The following command runs the test task for all subprojects when invoked from the root project directory:
$ gradle test
|
Note
|
Some tasks selectors, like help or dependencies, will only run the task on the project they are invoked on and not on all the subprojects.
|
When invoking Gradle from within a subproject, the project name should be omitted:
$ cd subproject
$ gradle taskName
|
Tip
|
When executing the Gradle Wrapper from a subproject directory, reference gradlew relatively. For example: ../gradlew taskName.
|
Executing multiple tasks
You can also specify multiple tasks. The tasks' dependencies determine the precise order of execution, and a task having no dependencies may execute earlier than it is listed on the command-line.
For example, the following will execute the test and deploy tasks in the order that they are listed on the command-line and will also execute the dependencies for each task.
$ gradle test deploy
Command line order safety
Although Gradle will always attempt to execute the build quickly, command line ordering safety will also be honored.
For example, the following will
execute clean and build along with their dependencies:
$ gradle clean build
However, the intention implied in the command line order is that clean should run first and then build. It would be incorrect to execute clean after build, even if doing so would cause the build to execute faster since clean would remove what build created.
Conversely, if the command line order was build followed by clean, it would not be correct to execute clean before build. Although Gradle will execute the build as quickly as possible, it will also respect the safety of the order of tasks specified on the command line and ensure that clean runs before build when specified in that order.
Note that command line order safety relies on tasks properly declaring what they create, consume, or remove.
Excluding tasks from execution
You can exclude a task from being executed using the -x or --exclude-task command-line option and providing the name of the task to exclude:
$ gradle dist --exclude-task test
> Task :compile compiling source > Task :dist building the distribution BUILD SUCCESSFUL in 0s 2 actionable tasks: 2 executed

You can see that the test task is not executed, even though the dist task depends on it.
The test task’s dependencies, such as compileTest, are not executed either.
The dependencies of test that other tasks depend on, such as compile, are still executed.
Forcing tasks to execute
You can force Gradle to execute all tasks ignoring up-to-date checks using the --rerun-tasks option:
$ gradle test --rerun-tasks
This will force test and all task dependencies of test to execute. It is similar to running gradle clean test, but without the build’s generated output being deleted.
Alternatively, you can tell Gradle to rerun a specific task using the --rerun built-in task option.
Continue the build after a task failure
By default, Gradle aborts execution and fails the build when any task fails. This allows the build to complete sooner and prevents cascading failures from obfuscating the root cause of an error.
You can use the --continue option to force Gradle to execute every task when a failure occurs:
$ gradle test --continue
When executed with --continue, Gradle executes every task in the build if all the dependencies for that task are completed without failure.
For example, tests do not run if there is a compilation error in the code under test because the test task depends on the compilation task.
Gradle outputs each of the encountered failures at the end of the build.
|
Note
|
If any tests fail, many test suites fail the entire test task.
Code coverage and reporting tools frequently run after the test task, so "fail fast" behavior may halt execution before those tools run.
|
Name abbreviation
When you specify tasks on the command-line, you don’t have to provide the full name of the task.
You can provide enough of the task name to identify the task uniquely.
For example, it is likely gradle che is enough for Gradle to identify the check task.
The same applies to project names. You can execute the check task in the library subproject with the gradle lib:che command.
You can use camel case patterns for more complex abbreviations. These patterns are expanded to match camel case and kebab case names.
For example, the pattern foBa (or fB) matches fooBar and foo-bar.
More concretely, you can run the compileTest task in the my-awesome-library subproject with the command gradle mAL:cT.
$ gradle mAL:cT
> Task :my-awesome-library:compileTest compiling unit tests BUILD SUCCESSFUL in 0s 1 actionable task: 1 executed
Abbreviations can also be used with the -x command-line option.
Tracing name expansion
For complex projects, it might be ambiguous if the intended tasks were executed. When using abbreviated names, a single typo can lead to the execution of unexpected tasks.
When INFO, or more verbose logging is enabled, the output will contain extra information about the project and task name expansion.
For example, when executing the mAL:cT command on the previous example, the following log messages will be visible:
No exact project with name ':mAL' has been found. Checking for abbreviated names. Found exactly one project that matches the abbreviated name ':mAL': ':my-awesome-library'. No exact task with name ':cT' has been found. Checking for abbreviated names. Found exactly one task name, that matches the abbreviated name ':cT': ':compileTest'.
Common tasks
The following are task conventions applied by built-in and most major Gradle plugins.
Computing all outputs
It is common in Gradle builds for the build task to designate assembling all outputs and running all checks:
$ gradle build
Running applications
It is common for applications to run with the run task, which assembles the application and executes some script or binary:
$ gradle run
Running all checks
It is common for all verification tasks, including tests and linting, to be executed using the check task:
$ gradle check
Cleaning outputs
You can delete the contents of the build directory using the clean task. Doing so will cause pre-computed outputs to be lost, causing significant additional build time for the subsequent task execution:
$ gradle clean
Project reporting
Gradle provides several built-in tasks which show particular details of your build. This can be useful for understanding your build’s structure and dependencies, as well as debugging problems.
Listing projects
Running the projects task gives you a list of the subprojects of the selected project, displayed in a hierarchy:
$ gradle projects
You also get a project report within Build Scans.
Listing tasks
Running gradle tasks gives you a list of the main tasks of the selected project. This report shows the default tasks for the project, if any, and a description for each task:
$ gradle tasks
By default, this report shows only those tasks assigned to a task group.
Groups (such as verification, publishing, help, build…) are available as the header of each section when listing tasks:
> Task :tasks Build tasks ----------- assemble - Assembles the outputs of this project. Build Setup tasks ----------------- init - Initializes a new Gradle build. Distribution tasks ------------------ assembleDist - Assembles the main distributions Documentation tasks ------------------- javadoc - Generates Javadoc API documentation for the main source code.
You can obtain more information in the task listing using the --all option:
$ gradle tasks --all
The option --no-all can limit the report to tasks assigned to a task group.
If you need to be more precise, you can display only the tasks from a specific group using the --group option:
$ gradle tasks --group="build setup"
Show task usage details
Running gradle help --task someTask gives you detailed information about a specific task:
$ gradle -q help --task libs
Detailed task information for libs
Paths
:api:libs
:webapp:libs
Type
Task (org.gradle.api.Task)
Options
--rerun Causes the task to be re-run even if up-to-date.
Description
Builds the JAR
Group
build
This information includes the full task path, the task type, possible task-specific command line options, and the description of the given task.
You can get detailed information about the task class types using the --types option or using --no-types to hide this information.
Reporting dependencies
Build Scans give a full, visual report of what dependencies exist on which configurations, transitive dependencies, and dependency version selection.
They can be invoked using the --scan options:
$ gradle myTask --scan
This will give you a link to a web-based report, where you can find dependency information like this:
Listing project dependencies
Running the dependencies task gives you a list of the dependencies of the selected project, broken down by configuration. For each configuration, the direct and transitive dependencies of that configuration are shown in a tree.
Below is an example of this report:
$ gradle dependencies
> Task :app:dependencies
------------------------------------------------------------
Project ':app'
------------------------------------------------------------
compileClasspath - Compile classpath for source set 'main'.
+--- project :model
| \--- org.json:json:20220924
+--- com.google.inject:guice:5.1.0
| +--- javax.inject:javax.inject:1
| +--- aopalliance:aopalliance:1.0
| \--- com.google.guava:guava:30.1-jre -> 28.2-jre
| +--- com.google.guava:failureaccess:1.0.1
| +--- com.google.guava:listenablefuture:9999.0-empty-to-avoid-conflict-with-guava
| +--- com.google.code.findbugs:jsr305:3.0.2
| +--- org.checkerframework:checker-qual:2.10.0 -> 3.28.0
| +--- com.google.errorprone:error_prone_annotations:2.3.4
| \--- com.google.j2objc:j2objc-annotations:1.3
+--- com.google.inject:guice:{strictly 5.1.0} -> 5.1.0 (c)
+--- org.json:json:{strictly 20220924} -> 20220924 (c)
+--- javax.inject:javax.inject:{strictly 1} -> 1 (c)
+--- aopalliance:aopalliance:{strictly 1.0} -> 1.0 (c)
+--- com.google.guava:guava:{strictly [28.0-jre, 28.5-jre]} -> 28.2-jre (c)
+--- com.google.guava:guava:{strictly 28.2-jre} -> 28.2-jre (c)
+--- com.google.guava:failureaccess:{strictly 1.0.1} -> 1.0.1 (c)
+--- com.google.guava:listenablefuture:{strictly 9999.0-empty-to-avoid-conflict-with-guava} -> 9999.0-empty-to-avoid-conflict-with-guava (c)
+--- com.google.code.findbugs:jsr305:{strictly 3.0.2} -> 3.0.2 (c)
+--- org.checkerframework:checker-qual:{strictly 3.28.0} -> 3.28.0 (c)
+--- com.google.errorprone:error_prone_annotations:{strictly 2.3.4} -> 2.3.4 (c)
\--- com.google.j2objc:j2objc-annotations:{strictly 1.3} -> 1.3 (c)
Concrete examples of build scripts and output available in Viewing and debugging dependencies.
Running the buildEnvironment task visualises the buildscript dependencies of the selected project, similarly to how gradle dependencies visualizes the dependencies of the software being built:
$ gradle buildEnvironment
Running the dependencyInsight task gives you an insight into a particular dependency (or dependencies) that match specified input:
$ gradle dependencyInsight --dependency [...] --configuration [...]
The --configuration parameter restricts the report to a particular configuration such as compileClasspath.
Listing project properties
Running the properties task gives you a list of the properties of the selected project:
$ gradle -q api:properties
------------------------------------------------------------ Project ':api' - The shared API for the application ------------------------------------------------------------ allprojects: [project ':api'] ant: org.gradle.api.internal.project.DefaultAntBuilder@12345 antBuilderFactory: org.gradle.api.internal.project.DefaultAntBuilderFactory@12345 artifacts: org.gradle.api.internal.artifacts.dsl.DefaultArtifactHandler_Decorated@12345 asDynamicObject: DynamicObject for project ':api' baseClassLoaderScope: org.gradle.api.internal.initialization.DefaultClassLoaderScope@12345
You can also query a single property with the optional --property argument:
$ gradle -q api:properties --property allprojects
------------------------------------------------------------ Project ':api' - The shared API for the application ------------------------------------------------------------ allprojects: [project ':api']
Command-line completion
Gradle provides bash and zsh tab completion support for tasks, options, and Gradle properties through gradle-completion (installed separately):

Debugging options
-?,-h,--help-
Shows a help message with the built-in CLI options. To show project-contextual options, including help on a specific task, see the
helptask. -v,--version-
Prints Gradle, Groovy, Ant, JVM, and operating system version information and exit without executing any tasks.
-V,--show-version-
Prints Gradle, Groovy, Ant, JVM, and operating system version information and continue execution of specified tasks.
-S,--full-stacktrace-
Print out the full (very verbose) stacktrace for any exceptions. See also logging options.
-s,--stacktrace-
Print out the stacktrace also for user exceptions (e.g. compile error). See also logging options.
--scan-
Create a Build Scan with fine-grained information about all aspects of your Gradle build.
-Dorg.gradle.debug=true-
Debug Gradle Daemon process. Gradle will wait for you to attach a debugger at
localhost:5005by default. -Dorg.gradle.debug.host=(host address)-
Specifies the host address to listen on or connect to when debug is enabled. In the server mode on Java 9 and above, passing
*for the host will make the server listen on all network interfaces. By default, no host address is passed to JDWP, so on Java 9 and above, the loopback address is used, while earlier versions listen on all interfaces. -Dorg.gradle.debug.port=(port number)-
Specifies the port number to listen on when debug is enabled. Default is
5005. -Dorg.gradle.debug.server=(true,false)-
If set to
trueand debugging is enabled, Gradle will run the build with the socket-attach mode of the debugger. Otherwise, the socket-listen mode is used. Default istrue. -Dorg.gradle.debug.suspend=(true,false)-
When set to
trueand debugging is enabled, the JVM running Gradle will suspend until a debugger is attached. Default istrue. -Dorg.gradle.daemon.debug=true-
Debug Gradle Daemon process. (duplicate of
-Dorg.gradle.debug)
Performance options
Try these options when optimizing and improving build performance.
Many of these options can be specified in the gradle.properties file, so command-line flags are unnecessary.
--build-cache,--no-build-cache-
Toggles the Gradle Build Cache. Gradle will try to reuse outputs from previous builds. Default is off.
--configuration-cache,--no-configuration-cache-
Toggles the Configuration Cache. Gradle will try to reuse the build configuration from previous builds. Default is off.
--configuration-cache-problems=(fail,warn)-
Configures how the configuration cache handles problems. Default is
fail.Set to
warnto report problems without failing the build.Set to
failto report problems and fail the build if there are any problems. --configure-on-demand,--no-configure-on-demand-
Toggles configure-on-demand. Only relevant projects are configured in this build run. Default is off.
--max-workers-
Sets the maximum number of workers that Gradle may use. Default is number of processors.
--parallel,--no-parallel-
Build projects in parallel. For limitations of this option, see Parallel Project Execution. Default is off.
--priority-
Specifies the scheduling priority for the Gradle daemon and all processes launched by it. Values are
normalorlow. Default is normal. --profile-
Generates a high-level performance report in the
layout.buildDirectory.dir("reports/profile")directory.--scanis preferred. --scan-
Generate a build scan with detailed performance diagnostics.
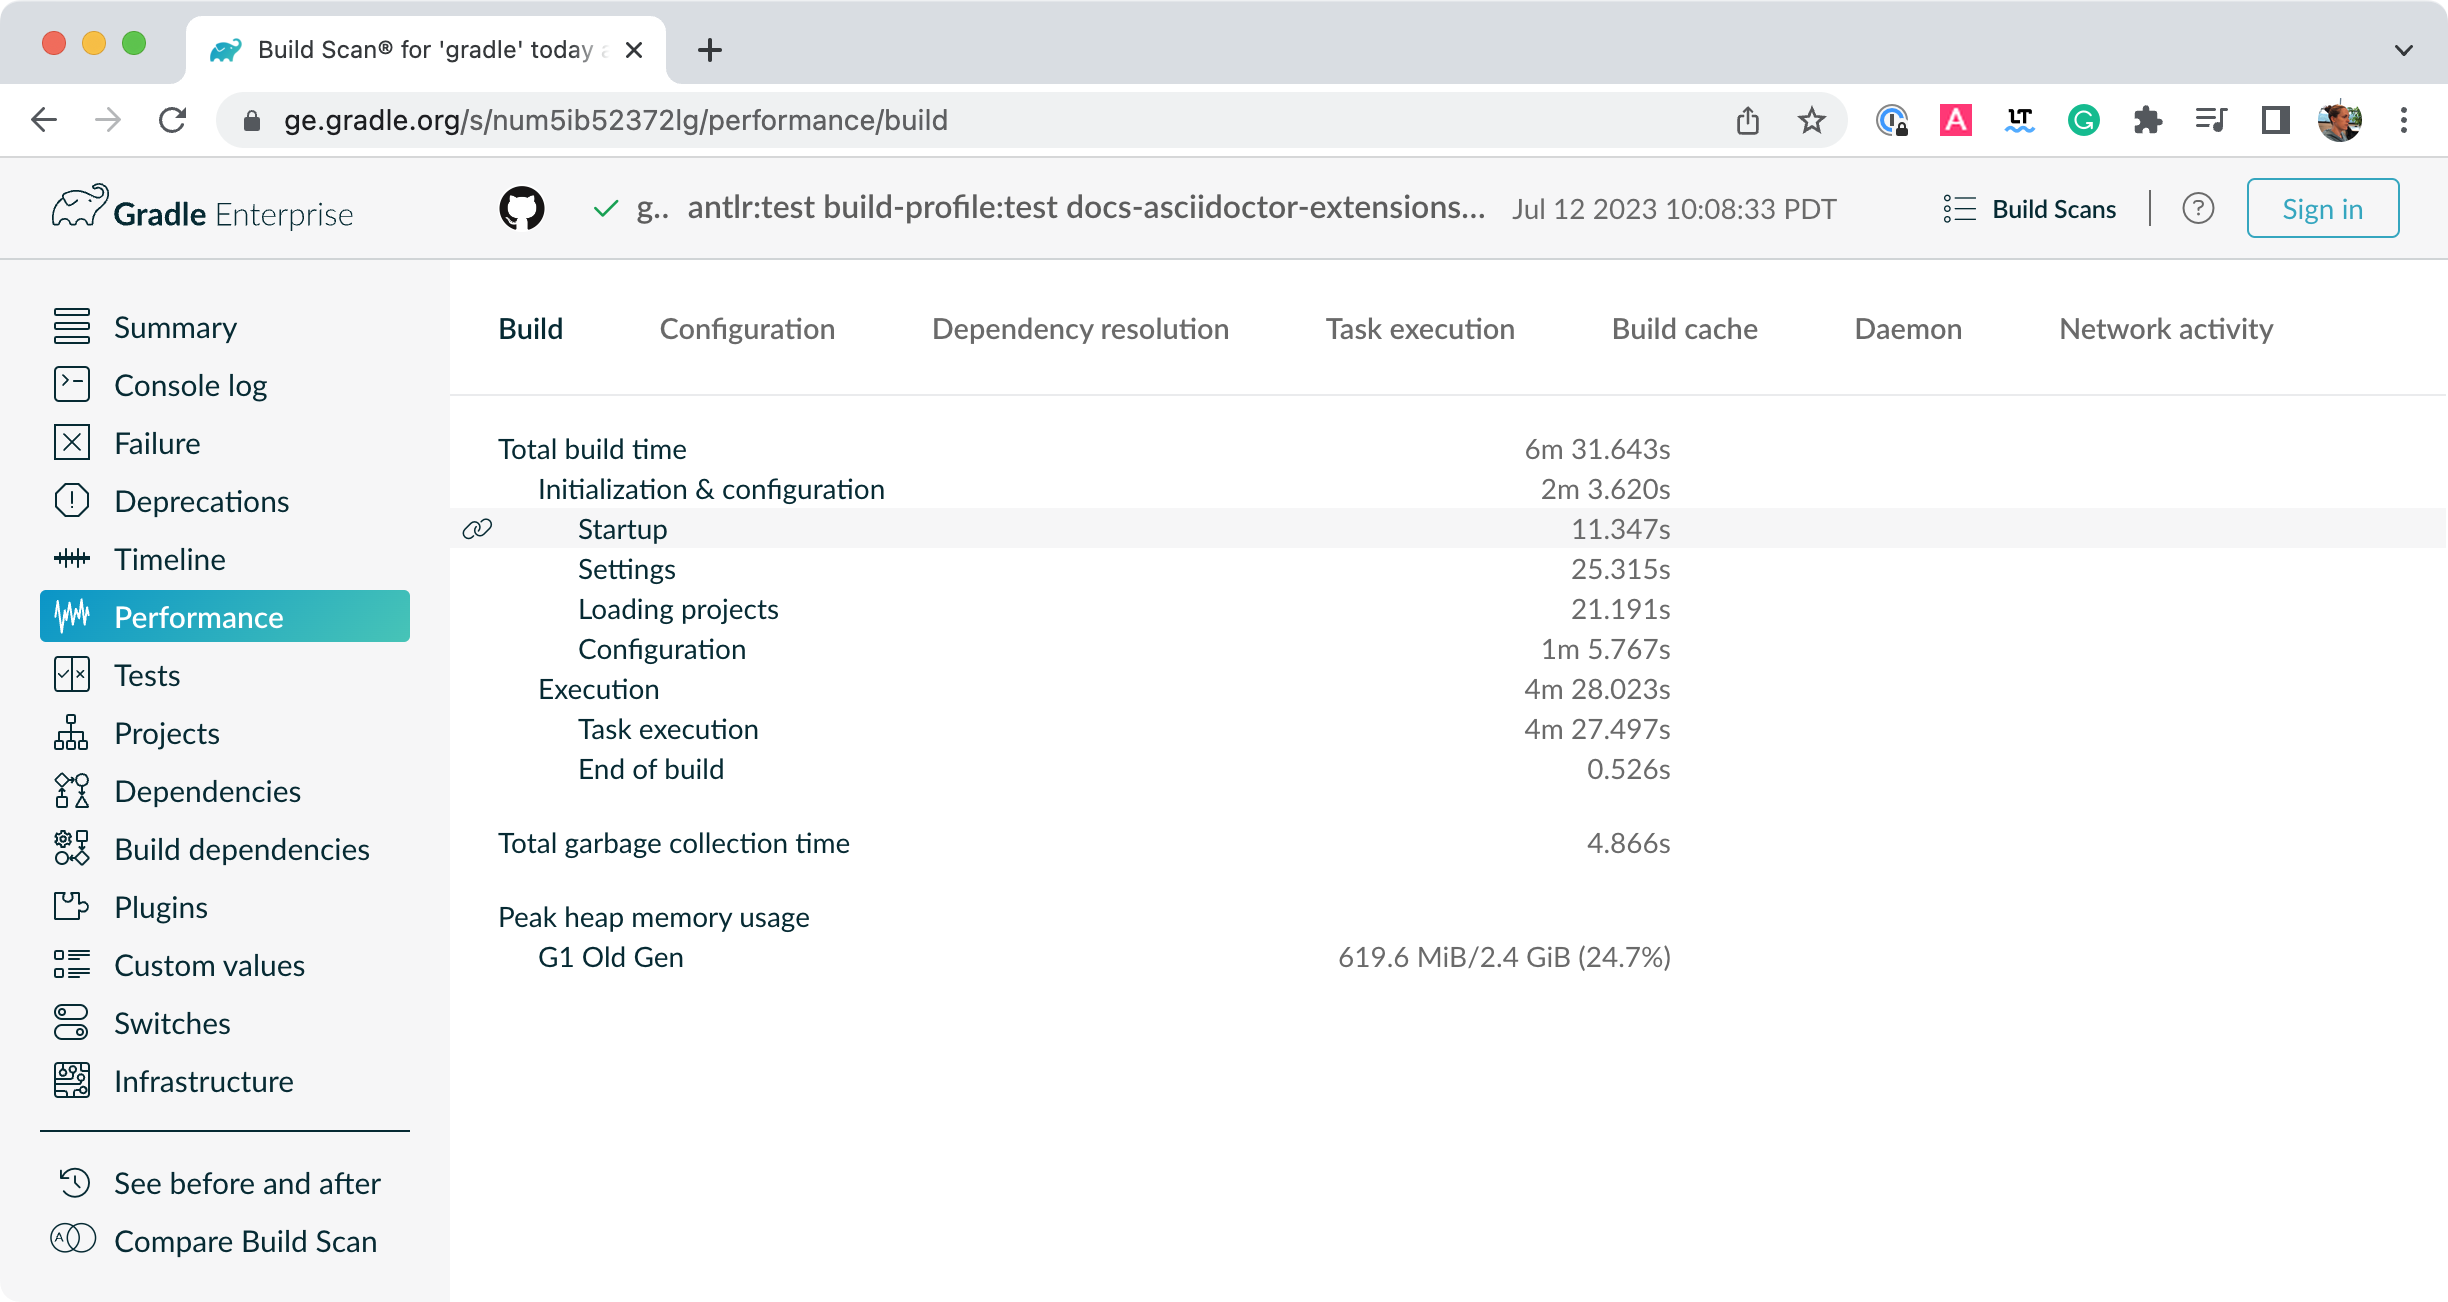
--watch-fs,--no-watch-fs-
Toggles watching the file system. When enabled, Gradle reuses information it collects about the file system between builds. Enabled by default on operating systems where Gradle supports this feature.
Gradle daemon options
You can manage the Gradle Daemon through the following command line options.
--daemon,--no-daemon-
Use the Gradle Daemon to run the build. Starts the daemon if not running or the existing daemon is busy. Default is on.
--foreground-
Starts the Gradle Daemon in a foreground process.
--status(Standalone command)-
Run
gradle --statusto list running and recently stopped Gradle daemons. It only displays daemons of the same Gradle version. --stop(Standalone command)-
Run
gradle --stopto stop all Gradle Daemons of the same version. -Dorg.gradle.daemon.idletimeout=(number of milliseconds)-
Gradle Daemon will stop itself after this number of milliseconds of idle time. Default is 10800000 (3 hours).
Logging options
Setting log level
You can customize the verbosity of Gradle logging with the following options, ordered from least verbose to most verbose.
-Dorg.gradle.logging.level=(quiet,warn,lifecycle,info,debug)-
Set logging level via Gradle properties.
-q,--quiet-
Log errors only.
-w,--warn-
Set log level to warn.
-i,--info-
Set log level to info.
-d,--debug-
Log in debug mode (includes normal stacktrace).
Lifecycle is the default log level.
Customizing log format
You can control the use of rich output (colors and font variants) by specifying the console mode in the following ways:
-Dorg.gradle.console=(auto,plain,rich,verbose)-
Specify console mode via Gradle properties. Different modes are described immediately below.
--console=(auto,plain,rich,verbose)-
Specifies which type of console output to generate.
Set to
plainto generate plain text only. This option disables all color and other rich output in the console output. This is the default when Gradle is not attached to a terminal.Set to
auto(the default) to enable color and other rich output in the console output when the build process is attached to a console or to generate plain text only when not attached to a console. This is the default when Gradle is attached to a terminal.Set to
richto enable color and other rich output in the console output, regardless of whether the build process is not attached to a console. When not attached to a console, the build output will use ANSI control characters to generate the rich output.Set to
verboseto enable color and other rich output likerichwith output task names and outcomes at the lifecycle log level, (as is done by default in Gradle 3.5 and earlier).
Showing or hiding warnings
By default, Gradle won’t display all warnings (e.g. deprecation warnings). Instead, Gradle will collect them and render a summary at the end of the build like:
Deprecated Gradle features were used in this build, making it incompatible with Gradle 5.0.
You can control the verbosity of warnings on the console with the following options:
-Dorg.gradle.warning.mode=(all,fail,none,summary)-
Specify warning mode via Gradle properties. Different modes are described immediately below.
--warning-mode=(all,fail,none,summary)-
Specifies how to log warnings. Default is
summary.Set to
allto log all warnings.Set to
failto log all warnings and fail the build if there are any warnings.Set to
summaryto suppress all warnings and log a summary at the end of the build.Set to
noneto suppress all warnings, including the summary at the end of the build.
Rich console
Gradle’s rich console displays extra information while builds are running.
Features:
-
Progress bar and timer visually describe the overall status
-
Parallel work-in-progress lines below describe what is happening now
-
Colors and fonts are used to highlight significant output and errors
Execution options
The following options affect how builds are executed by changing what is built or how dependencies are resolved.
--include-build-
Run the build as a composite, including the specified build.
--offline-
Specifies that the build should operate without accessing network resources.
-U,--refresh-dependencies-
Refresh the state of dependencies.
--continue-
Continue task execution after a task failure.
-m,--dry-run-
Run Gradle with all task actions disabled. Use this to show which task would have executed.
-t,--continuous-
Enables continuous build. Gradle does not exit and will re-execute tasks when task file inputs change.
--write-locks-
Indicates that all resolved configurations that are lockable should have their lock state persisted.
--update-locks <group:name>[,<group:name>]*-
Indicates that versions for the specified modules have to be updated in the lock file.
This flag also implies
--write-locks. -a,--no-rebuild-
Do not rebuild project dependencies. Useful for debugging and fine-tuning
buildSrc, but can lead to wrong results. Use with caution!
Dependency verification options
Learn more about this in dependency verification.
-F=(strict,lenient,off),--dependency-verification=(strict,lenient,off)-
Configures the dependency verification mode.
The default mode is
strict. -M,--write-verification-metadata-
Generates checksums for dependencies used in the project (comma-separated list) for dependency verification.
--refresh-keys-
Refresh the public keys used for dependency verification.
--export-keys-
Exports the public keys used for dependency verification.
Environment options
You can customize many aspects about where build scripts, settings, caches, and so on through the options below.
-b,--build-file(deprecated)-
Specifies the build file. For example:
gradle --build-file=foo.gradle. The default isbuild.gradle, thenbuild.gradle.kts. -c,--settings-file(deprecated)-
Specifies the settings file. For example:
gradle --settings-file=somewhere/else/settings.gradle -g,--gradle-user-home-
Specifies the Gradle User Home directory. The default is the
.gradledirectory in the user’s home directory. -p,--project-dir-
Specifies the start directory for Gradle. Defaults to current directory.
--project-cache-dir-
Specifies the project-specific cache directory. Default value is
.gradlein the root project directory. -D,--system-prop-
Sets a system property of the JVM, for example
-Dmyprop=myvalue. -I,--init-script-
Specifies an initialization script.
-P,--project-prop-
Sets a project property of the root project, for example
-Pmyprop=myvalue. -Dorg.gradle.jvmargs-
Set JVM arguments.
-Dorg.gradle.java.home-
Set JDK home dir.
Task options
Tasks may define task-specific options which are different from most of the global options described in the sections above (which are interpreted by Gradle itself, can appear anywhere in the command line, and can be listed using the --help option).
Task options:
-
Are consumed and interpreted by the tasks themselves;
-
Must be specified immediately after the task in the command-line;
-
May be listed using
gradle help --task someTask(see Show task usage details).
To learn how to declare command-line options for your own tasks, see Declaring and Using Command Line Options.
Built-in task options
Built-in task options are options available as task options for all tasks. At this time, the following built-in task options exist:
--rerun-
Causes the task to be rerun even if up-to-date. Similar to
--rerun-tasks, but for a specific task.
Bootstrapping new projects
Creating new Gradle builds
Use the built-in gradle init task to create a new Gradle build, with new or existing projects.
$ gradle init
Most of the time, a project type is specified.
Available types include basic (default), java-library, java-application, and more.
See init plugin documentation for details.
$ gradle init --type java-library
Standardize and provision Gradle
The built-in gradle wrapper task generates a script, gradlew, that invokes a declared version of Gradle, downloading it beforehand if necessary.
$ gradle wrapper --gradle-version=8.1
You can also specify --distribution-type=(bin|all), --gradle-distribution-url, --gradle-distribution-sha256-sum in addition to --gradle-version.
Full details on using these options are documented in the Gradle wrapper section.
Continuous build
Continuous Build allows you to automatically re-execute the requested tasks when file inputs change.
You can execute the build in this mode using the -t or --continuous command-line option.
For example, you can continuously run the test task and all dependent tasks by running:
$ gradle test --continuous
Gradle will behave as if you ran gradle test after a change to sources or tests that contribute to the requested tasks.
This means unrelated changes (such as changes to build scripts) will not trigger a rebuild.
To incorporate build logic changes, the continuous build must be restarted manually.
Continuous build uses file system watching to detect changes to the inputs.
If file system watching does not work on your system, then continuous build won’t work either.
In particular, continuous build does not work when using --no-daemon.
When Gradle detects a change to the inputs, it will not trigger the build immediately.
Instead, it will wait until no additional changes are detected for a certain period of time - the quiet period.
You can configure the quiet period in milliseconds by the Gradle property org.gradle.continuous.quietperiod.
Terminating Continuous Build
If Gradle is attached to an interactive input source, such as a terminal, the continuous build can be exited by pressing CTRL-D (On Microsoft Windows, it is required to also press ENTER or RETURN after CTRL-D).
If Gradle is not attached to an interactive input source (e.g. is running as part of a script), the build process must be terminated (e.g. using the kill command or similar).
If the build is being executed via the Tooling API, the build can be cancelled using the Tooling API’s cancellation mechanism.
Learn more in Continuous Builds Continuous Builds.
Changes to symbolic links
In general, Gradle will not detect changes to symbolic links or to files referenced via symbolic links.
Changes to build logic are not considered
The current implementation does not recalculate the build model on subsequent builds. This means that changes to task configuration, or any other change to the build model, are effectively ignored.
Gradle Wrapper Reference
The recommended way to execute any Gradle build is with the help of the Gradle Wrapper (referred to as "Wrapper").
The Wrapper is a script that invokes a declared version of Gradle, downloading it beforehand if necessary. As a result, developers can get up and running with a Gradle project quickly.
In a nutshell, you gain the following benefits:
-
Standardizes a project on a given Gradle version for more reliable and robust builds.
-
Provisioning the Gradle version for different users is done with a simple Wrapper definition change.
-
Provisioning the Gradle version for different execution environments (e.g., IDEs or Continuous Integration servers) is done with a simple Wrapper definition change.
There are three ways to use the Wrapper:
-
You set up a new Gradle project and add the Wrapper to it.
-
You run a project with the Wrapper that already provides it.
-
You upgrade the Wrapper to a new version of Gradle.
The following sections explain each of these use cases in more detail.
Adding the Gradle Wrapper
Generating the Wrapper files requires an installed version of the Gradle runtime on your machine as described in Installation. Thankfully, generating the initial Wrapper files is a one-time process.
Every vanilla Gradle build comes with a built-in task called wrapper.
The task is listed under the group "Build Setup tasks" when listing the tasks.
Executing the wrapper task generates the necessary Wrapper files in the project directory:
$ gradle wrapper
> Task :wrapper BUILD SUCCESSFUL in 0s 1 actionable task: 1 executed
|
Tip
|
To make the Wrapper files available to other developers and execution environments, you need to check them into version control. Wrapper files, including the JAR file, are small. Adding the JAR file to version control is expected. Some organizations do not allow projects to submit binary files to version control, and there is no workaround available. |
The generated Wrapper properties file, gradle/wrapper/gradle-wrapper.properties, stores the information about the Gradle distribution:
-
The server hosting the Gradle distribution.
-
The type of Gradle distribution. By default, the
-bindistribution contains only the runtime but no sample code and documentation. -
The Gradle version used for executing the build. By default, the
wrappertask picks the same Gradle version used to generate the Wrapper files. -
Optionally, a timeout in ms used when downloading the Gradle distribution.
-
Optionally, a boolean to set the validation of the distribution URL.
The following is an example of the generated distribution URL in gradle/wrapper/gradle-wrapper.properties:
distributionUrl=https\://services.gradle.org/distributions/gradle-8.7-bin.zipAll of those aspects are configurable at the time of generating the Wrapper files with the help of the following command line options:
--gradle-version-
The Gradle version used for downloading and executing the Wrapper. The resulting distribution URL is validated before it is written to the properties file.
The following labels are allowed:
--distribution-type-
The Gradle distribution type used for the Wrapper. Available options are
binandall. The default value isbin. --gradle-distribution-url-
The full URL pointing to the Gradle distribution ZIP file. This option makes
--gradle-versionand--distribution-typeobsolete, as the URL already contains this information. This option is valuable if you want to host the Gradle distribution inside your company’s network. The URL is validated before it is written to the properties file. --gradle-distribution-sha256-sum-
The SHA256 hash sum used for verifying the downloaded Gradle distribution.
--network-timeout-
The network timeout to use when downloading the Gradle distribution, in ms. The default value is
10000. --no-validate-url-
Disables the validation of the configured distribution URL.
--validate-url-
Enables the validation of the configured distribution URL. Enabled by default.
If the distribution URL is configured with --gradle-version or --gradle-distribution-url, the URL is validated by sending a HEAD request in the case of the https scheme or by checking the existence of the file in the case of the file scheme.
Let’s assume the following use-case to illustrate the use of the command line options.
You would like to generate the Wrapper with version 8.7 and use the -all distribution to enable your IDE to enable code-completion and being able to navigate to the Gradle source code.
The following command-line execution captures those requirements:
$ gradle wrapper --gradle-version 8.7 --distribution-type all > Task :wrapper BUILD SUCCESSFUL in 0s 1 actionable task: 1 executed
As a result, you can find the desired information (the generated distribution URL) in the Wrapper properties file:
distributionUrl=https\://services.gradle.org/distributions/gradle-8.7-all.zipLet’s have a look at the following project layout to illustrate the expected Wrapper files:
.
├── a-subproject
│ └── build.gradle.kts
├── settings.gradle.kts
├── gradle
│ └── wrapper
│ ├── gradle-wrapper.jar
│ └── gradle-wrapper.properties
├── gradlew
└── gradlew.bat.
├── a-subproject
│ └── build.gradle
├── settings.gradle
├── gradle
│ └── wrapper
│ ├── gradle-wrapper.jar
│ └── gradle-wrapper.properties
├── gradlew
└── gradlew.batA Gradle project typically provides a settings.gradle(.kts) file and one build.gradle(.kts) file for each subproject.
The Wrapper files live alongside in the gradle directory and the root directory of the project.
The following list explains their purpose:
gradle-wrapper.jar-
The Wrapper JAR file containing code for downloading the Gradle distribution.
gradle-wrapper.properties-
A properties file responsible for configuring the Wrapper runtime behavior e.g. the Gradle version compatible with this version. Note that more generic settings, like configuring the Wrapper to use a proxy, need to go into a different file.
gradlew,gradlew.bat-
A shell script and a Windows batch script for executing the build with the Wrapper.
You can go ahead and execute the build with the Wrapper without installing the Gradle runtime. If the project you are working on does not contain those Wrapper files, you will need to generate them.
Using the Gradle Wrapper
It is always recommended to execute a build with the Wrapper to ensure a reliable, controlled, and standardized execution of the build.
Using the Wrapper looks like running the build with a Gradle installation.
Depending on the operating system you either run gradlew or gradlew.bat instead of the gradle command.
The following console output demonstrates the use of the Wrapper on a Windows machine for a Java-based project:
$ gradlew.bat build Downloading https://services.gradle.org/distributions/gradle-5.0-all.zip ..................................................................................... Unzipping C:\Documents and Settings\Claudia\.gradle\wrapper\dists\gradle-5.0-all\ac27o8rbd0ic8ih41or9l32mv\gradle-5.0-all.zip to C:\Documents and Settings\Claudia\.gradle\wrapper\dists\gradle-5.0-al\ac27o8rbd0ic8ih41or9l32mv Set executable permissions for: C:\Documents and Settings\Claudia\.gradle\wrapper\dists\gradle-5.0-all\ac27o8rbd0ic8ih41or9l32mv\gradle-5.0\bin\gradle BUILD SUCCESSFUL in 12s 1 actionable task: 1 executed
If the Gradle distribution is unavailable on the machine, the Wrapper will download it and store it in the local file system. Any subsequent build invocation will reuse the existing local distribution as long as the distribution URL in the Gradle properties doesn’t change.
|
Note
|
The Wrapper shell script and batch file reside in the root directory of a single or multi-project Gradle build. You will need to reference the correct path to those files in case you want to execute the build from a subproject directory e.g. ../../gradlew tasks.
|
Upgrading the Gradle Wrapper
Projects typically want to keep up with the times and upgrade their Gradle version to benefit from new features and improvements.
One way to upgrade the Gradle version is by manually changing the distributionUrl property in the Wrapper’s gradle-wrapper.properties file.
The better and recommended option is to run the wrapper task and provide the target Gradle version as described in Adding the Gradle Wrapper.
Using the wrapper task ensures that any optimizations made to the Wrapper shell script or batch file with that specific Gradle version are applied to the project.
As usual, you should commit the changes to the Wrapper files to version control.
Note that running the wrapper task once will update gradle-wrapper.properties only, but leave the wrapper itself in gradle-wrapper.jar untouched.
This is usually fine as new versions of Gradle can be run even with older wrapper files.
|
Note
|
If you want all the wrapper files to be completely up-to-date, you will need to run the wrapper task a second time.
|
The following command upgrades the Wrapper to the latest version:
$ ./gradlew wrapper --gradle-version latest BUILD SUCCESSFUL in 4s 1 actionable task: 1 executed
The following command upgrades the Wrapper to a specific version:
$ ./gradlew wrapper --gradle-version 8.7 BUILD SUCCESSFUL in 4s 1 actionable task: 1 executed
Once you have upgraded the wrapper, you can check that it’s the version you expected by executing ./gradlew --version.
Don’t forget to run the wrapper task again to download the Gradle distribution binaries (if needed) and update the gradlew and gradlew.bat files.
Customizing the Gradle Wrapper
Most users of Gradle are happy with the default runtime behavior of the Wrapper. However, organizational policies, security constraints or personal preferences might require you to dive deeper into customizing the Wrapper.
Thankfully, the built-in wrapper task exposes numerous options to bend the runtime behavior to your needs.
Most configuration options are exposed by the underlying task type Wrapper.
Let’s assume you grew tired of defining the -all distribution type on the command line every time you upgrade the Wrapper.
You can save yourself some keyboard strokes by re-configuring the wrapper task.
tasks.wrapper {
distributionType = Wrapper.DistributionType.ALL
}tasks.named('wrapper') {
distributionType = Wrapper.DistributionType.ALL
}With the configuration in place, running ./gradlew wrapper --gradle-version 8.7 is enough to produce a distributionUrl value in the Wrapper properties file that will request the -all distribution:
distributionUrl=https\://services.gradle.org/distributions/gradle-8.7-all.zip
Check out the API documentation for a more detailed description of the available configuration options. You can also find various samples for configuring the Wrapper in the Gradle distribution.
Authenticated Gradle distribution download
The Gradle Wrapper can download Gradle distributions from servers using HTTP Basic Authentication.
This enables you to host the Gradle distribution on a private protected server.
You can specify a username and password in two different ways depending on your use case: as system properties or directly embedded in the distributionUrl.
Credentials in system properties take precedence over the ones embedded in distributionUrl.
|
Tip
|
HTTP Basic Authentication should only be used with |
System properties can be specified in the .gradle/gradle.properties file in the user’s home directory or by other means.
To specify the HTTP Basic Authentication credentials, add the following lines to the system properties file:
systemProp.gradle.wrapperUser=username
systemProp.gradle.wrapperPassword=passwordEmbedding credentials in the distributionUrl in the gradle/wrapper/gradle-wrapper.properties file also works.
Please note that this file is to be committed into your source control system.
|
Tip
|
Shared credentials embedded in distributionUrl should only be used in a controlled environment.
|
To specify the HTTP Basic Authentication credentials in distributionUrl, add the following line:
distributionUrl=https://username:password@somehost/path/to/gradle-distribution.zip
This can be used in conjunction with a proxy, authenticated or not.
See Accessing the web via a proxy for more information on how to configure the Wrapper to use a proxy.
Verification of downloaded Gradle distributions
The Gradle Wrapper allows for verification of the downloaded Gradle distribution via SHA-256 hash sum comparison. This increases security against targeted attacks by preventing a man-in-the-middle attacker from tampering with the downloaded Gradle distribution.
To enable this feature, download the .sha256 file associated with the Gradle distribution you want to verify.
Downloading the SHA-256 file
You can download the .sha256 file from the stable releases or release candidate and nightly releases.
The format of the file is a single line of text that is the SHA-256 hash of the corresponding zip file.
You can also reference the list of Gradle distribution checksums.
Configuring checksum verification
Add the downloaded (SHA-256 checksum) hash sum to gradle-wrapper.properties using the distributionSha256Sum property or use --gradle-distribution-sha256-sum on the command-line:
distributionSha256Sum=371cb9fbebbe9880d147f59bab36d61eee122854ef8c9ee1ecf12b82368bcf10Gradle will report a build failure if the configured checksum does not match the checksum found on the server hosting the distribution. Checksum verification is only performed if the configured Wrapper distribution hasn’t been downloaded yet.
|
Note
|
The Wrapper task fails if gradle-wrapper.properties contains distributionSha256Sum, but the task configuration does not define a sum.
Executing the Wrapper task preserves the distributionSha256Sum configuration when the Gradle version does not change.
|
Verifying the integrity of the Gradle Wrapper JAR
The Wrapper JAR is a binary file that will be executed on the computers of developers and build servers. As with all such files, you should ensure it’s trustworthy before executing it.
Since the Wrapper JAR is usually checked into a project’s version control system, there is the potential for a malicious actor to replace the original JAR with a modified one by submitting a pull request that only upgrades the Gradle version.
To verify the integrity of the Wrapper JAR, Gradle has created a GitHub Action that automatically checks Wrapper JARs in pull requests against a list of known good checksums.
Gradle also publishes the checksums of all releases (except for version 3.3 to 4.0.2, which did not generate reproducible JARs), so you can manually verify the integrity of the Wrapper JAR.
Automatically verifying the Gradle Wrapper JAR on GitHub
The GitHub Action is released separately from Gradle, so please check its documentation for how to apply it to your project.
Manually verifying the Gradle Wrapper JAR
You can manually verify the checksum of the Wrapper JAR to ensure that it has not been tampered with by running the following commands on one of the major operating systems.
Manually verifying the checksum of the Wrapper JAR on Linux:
$ cd gradle/wrapper$ curl --location --output gradle-wrapper.jar.sha256 \
https://services.gradle.org/distributions/gradle-{gradleVersion}-wrapper.jar.sha256
$ echo " gradle-wrapper.jar" >> gradle-wrapper.jar.sha256
$ sha256sum --check gradle-wrapper.jar.sha256
gradle-wrapper.jar: OK
Manually verifying the checksum of the Wrapper JAR on macOS:
$ cd gradle/wrapper$ curl --location --output gradle-wrapper.jar.sha256 \
https://services.gradle.org/distributions/gradle-{gradleVersion}-wrapper.jar.sha256
$ echo " gradle-wrapper.jar" >> gradle-wrapper.jar.sha256
$ shasum --check gradle-wrapper.jar.sha256
gradle-wrapper.jar: OK
Manually verifying the checksum of the Wrapper JAR on Windows (using PowerShell):
> $expected = Invoke-RestMethod -Uri https://services.gradle.org/distributions/gradle-8.7-wrapper.jar.sha256> $actual = (Get-FileHash gradle\wrapper\gradle-wrapper.jar -Algorithm SHA256).Hash.ToLower()
> @{$true = 'OK: Checksum match'; $false = "ERROR: Checksum mismatch!`nExpected: $expected`nActual: $actual"}[$actual -eq $expected]
OK: Checksum match
Troubleshooting a checksum mismatch
If the checksum does not match the one you expected, chances are the wrapper task wasn’t executed with the upgraded Gradle distribution.
You should first check whether the actual checksum matches a different Gradle version.
Here are the commands you can run on the major operating systems to generate the actual checksum of the Wrapper JAR.
Generating the checksum of the Wrapper JAR on Linux:
$ sha256sum gradle/wrapper/gradle-wrapper.jar
d81e0f23ade952b35e55333dd5f1821585e887c6d24305aeea2fbc8dad564b95 gradle/wrapper/gradle-wrapper.jarGenerating the actual checksum of the Wrapper JAR on macOS:
$ shasum --algorithm=256 gradle/wrapper/gradle-wrapper.jar
d81e0f23ade952b35e55333dd5f1821585e887c6d24305aeea2fbc8dad564b95 gradle/wrapper/gradle-wrapper.jarGenerating the actual checksum of the Wrapper JAR on Windows (using PowerShell):
> (Get-FileHash gradle\wrapper\gradle-wrapper.jar -Algorithm SHA256).Hash.ToLower()
d81e0f23ade952b35e55333dd5f1821585e887c6d24305aeea2fbc8dad564b95Once you know the actual checksum, check whether it’s listed on https://gradle.org/release-checksums/.
If it is listed, you have verified the integrity of the Wrapper JAR.
If the version of Gradle that generated the Wrapper JAR doesn’t match the version in gradle/wrapper/gradle-wrapper.properties, it’s safe to run the wrapper task again to update the Wrapper JAR.
If the checksum is not listed on the page, the Wrapper JAR might be from a milestone, release candidate, or nightly build or may have been generated by Gradle 3.3 to 4.0.2. Try to find out how it was generated but treat it as untrustworthy until proven otherwise. If you think the Wrapper JAR was compromised, please let the Gradle team know by sending an email to security@gradle.com.
Gradle Plugin Reference
This page contains links and short descriptions for all the core plugins provided by Gradle itself.
JVM languages and frameworks
- Java
-
Provides support for building any type of Java project.
- Java Library
-
Provides support for building a Java library.
- Java Platform
-
Provides support for building a Java platform.
- Groovy
-
Provides support for building any type of Groovy project.
- Scala
-
Provides support for building any type of Scala project.
- ANTLR
-
Provides support for generating parsers using ANTLR.
- JVM Test Suite
-
Provides support for modeling and configuring multiple test suite invocations.
- Test Report Aggregation
-
Aggregates the results of multiple Test task invocations (potentially spanning multiple Gradle projects) into a single HTML report.
Native languages
- C++ Application
-
Provides support for building C++ applications on Windows, Linux, and macOS.
- C++ Library
-
Provides support for building C++ libraries on Windows, Linux, and macOS.
- C++ Unit Test
-
Provides support for building and running C++ executable-based tests on Windows, Linux, and macOS.
- Swift Application
-
Provides support for building Swift applications on Linux and macOS.
- Swift Library
-
Provides support for building Swift libraries on Linux and macOS.
- XCTest
-
Provides support for building and running XCTest-based tests on Linux and macOS.
Packaging and distribution
- Application
-
Provides support for building JVM-based, runnable applications.
- WAR
-
Provides support for building and packaging WAR-based Java web applications.
- EAR
-
Provides support for building and packaging Java EE applications.
- Maven Publish
-
Provides support for publishing artifacts to Maven-compatible repositories.
- Ivy Publish
-
Provides support for publishing artifacts to Ivy-compatible repositories.
- Distribution
-
Makes it easy to create ZIP and tarball distributions of your project.
- Java Library Distribution
-
Provides support for creating a ZIP distribution of a Java library project that includes its runtime dependencies.
Code analysis
- Checkstyle
-
Performs quality checks on your project’s Java source files using Checkstyle and generates associated reports.
- PMD
-
Performs quality checks on your project’s Java source files using PMD and generates associated reports.
- JaCoCo
-
Provides code coverage metrics for your Java project using JaCoCo.
- JaCoCo Report Aggregation
-
Aggregates the results of multiple JaCoCo code coverage reports (potentially spanning multiple Gradle projects) into a single HTML report.
- CodeNarc
-
Performs quality checks on your Groovy source files using CodeNarc and generates associated reports.
IDE integration
- Eclipse
-
Generates Eclipse project files for the build that can be opened by the IDE. This set of plugins can also be used to fine tune Buildship’s import process for Gradle builds.
- IntelliJ IDEA
-
Generates IDEA project files for the build that can be opened by the IDE. It can also be used to fine tune IDEA’s import process for Gradle builds.
- Visual Studio
-
Generates Visual Studio solution and project files for build that can be opened by the IDE.
- Xcode
-
Generates Xcode workspace and project files for the build that can be opened by the IDE.
Utility
- Base
-
Provides common lifecycle tasks, such as
clean, and other features common to most builds. - Build Init
-
Generates a new Gradle build of a specified type, such as a Java library. It can also generate a build script from a Maven POM — see Migrating from Maven to Gradle for more details.
- Signing
-
Provides support for digitally signing generated files and artifacts.
- Plugin Development
-
Makes it easier to develop and publish a Gradle plugin.
- Project Report Plugin
-
Helps to generate reports containing useful information about your build.
Gradle & Third-party Tools
Gradle can be integrated with many different third-party tools such as IDEs and continuous integration platforms. Here we look at some of the more common ones as well as how to integrate your own tool with Gradle.
IDEs
- Android Studio
-
As a variant of IntelliJ IDEA, Android Studio has built-in support for importing and building Gradle projects. You can also use the IDEA Plugin for Gradle to fine-tune the import process if that’s necessary.
This IDE also has an extensive user guide to help you get the most out of the IDE and Gradle.
- Eclipse
-
If you want to work on a project within Eclipse that has a Gradle build, you should use the Eclipse Buildship plugin. This will allow you to import and run Gradle builds. If you need to fine tune the import process so that the project loads correctly, you can use the Eclipse Plugins for Gradle. See the associated release announcement for details on what fine tuning you can do.
- IntelliJ IDEA
-
IDEA has built-in support for importing Gradle projects. If you need to fine tune the import process so that the project loads correctly, you can use the IDEA Plugin for Gradle.
- NetBeans
-
Built-in support for Gradle in Apache NetBeans
- Visual Studio
-
For developing C++ projects, Gradle comes with a Visual Studio plugin.
- Xcode
-
For developing C++ projects, Gradle comes with a Xcode plugin.
- CLion
-
JetBrains supports building C++ projects with Gradle.
Continuous integration
We have dedicated guides showing you how to integrate a Gradle project with the following CI platforms:
Even if you don’t use one of the above, you can almost certainly configure your CI platform to use the Gradle Wrapper scripts.
How to integrate with Gradle
There are two main ways to integrate a tool with Gradle:
-
The Gradle build uses the tool
-
The tool executes the Gradle build
The former case is typically implemented as a Gradle plugin. The latter can be accomplished by embedding Gradle through the Tooling API as described below.
Embedding Gradle using the Tooling API
Introduction to the Tooling API
Gradle provides a programmatic API called the Tooling API, which you can use for embedding Gradle into your own software. This API allows you to execute and monitor builds and to query Gradle about the details of a build. The main audience for this API is IDE, CI server, other UI authors; however, the API is open for anyone who needs to embed Gradle in their application.
-
Gradle TestKit uses the Tooling API for functional testing of your Gradle plugins.
-
Eclipse Buildship uses the Tooling API for importing your Gradle project and running tasks.
-
IntelliJ IDEA uses the Tooling API for importing your Gradle project and running tasks.
Tooling API Features
A fundamental characteristic of the Tooling API is that it operates in a version independent way. This means that you can use the same API to work with builds that use different versions of Gradle, including versions that are newer or older than the version of the Tooling API that you are using. The Tooling API is Gradle wrapper aware and, by default, uses the same Gradle version as that used by the wrapper-powered build.
Some features that the Tooling API provides:
-
Query the details of a build, including the project hierarchy and the project dependencies, external dependencies (including source and Javadoc jars), source directories and tasks of each project.
-
Execute a build and listen to stdout and stderr logging and progress messages (e.g. the messages shown in the 'status bar' when you run on the command line).
-
Execute a specific test class or test method.
-
Receive interesting events as a build executes, such as project configuration, task execution or test execution.
-
Cancel a build that is running.
-
Combine multiple separate Gradle builds into a single composite build.
-
The Tooling API can download and install the appropriate Gradle version, similar to the wrapper.
-
The implementation is lightweight, with only a small number of dependencies. It is also a well-behaved library, and makes no assumptions about your classloader structure or logging configuration. This makes the API easy to embed in your application.
Tooling API and the Gradle Build Daemon
The Tooling API always uses the Gradle daemon. This means that subsequent calls to the Tooling API, be it model building requests or task executing requests will be executed in the same long-living process. Gradle Daemon contains more details about the daemon, specifically information on situations when new daemons are forked.
Quickstart
As the Tooling API is an interface for developers, the Javadoc is the main documentation for it.
To use the Tooling API, add the following repository and dependency declarations to your build script:
repositories {
maven { url = uri("https://repo.gradle.org/gradle/libs-releases") }
}
dependencies {
implementation("org.gradle:gradle-tooling-api:$toolingApiVersion")
// The tooling API need an SLF4J implementation available at runtime, replace this with any other implementation
runtimeOnly("org.slf4j:slf4j-simple:1.7.10")
}repositories {
maven { url 'https://repo.gradle.org/gradle/libs-releases' }
}
dependencies {
implementation "org.gradle:gradle-tooling-api:$toolingApiVersion"
// The tooling API need an SLF4J implementation available at runtime, replace this with any other implementation
runtimeOnly 'org.slf4j:slf4j-simple:1.7.10'
}The main entry point to the Tooling API is the GradleConnector.
You can navigate from there to find code samples and explore the available Tooling API models.
You can use GradleConnector.connect() to create a ProjectConnection.
A ProjectConnection connects to a single Gradle project.
Using the connection you can execute tasks, tests and retrieve models relative to this project.
Compatibility of Java and Gradle versions
The following components should be considered when implementing Gradle integration: the Tooling API version, The JVM running the Tooling API client (i.e. the IDE process), the JVM running the Gradle daemon, and the Gradle version.
The Tooling API itself is a Java library published as part of the Gradle release. Each Gradle release has a corresponding Tooling API version with the same version number.
The Tooling API classes are loaded into the client’s JVM, so they should have a matching version. The current version of the Tooling API library is compiled with Java 8 compatibility.
The JVM running the Tooling API client and the one running the daemon can be different. At the same time, classes that are sent to the build via custom build actions need to be targeted to the lowest supported Java version. The JVM versions supported by Gradle is version-specific. The upper bound is defined in the compatibility matrix. The rule for the lower bound is the following:
-
Gradle 3.x and 4.x require a minimum version of Java 7.
-
Gradle 5 and above require a minimum version of Java 8.
The Tooling API version is guaranteed to support running builds with all Gradle versions for the last five major releases. For example, the Tooling API 8.0 release is compatible with Gradle versions >= 3.0. Besides, the Tooling API is guaranteed to be compatible with future Gradle releases for the current and the next major. This means, for example, that the 8.1 version of the Tooling API will be able to run Gradle 9.x builds and might break with Gradle 10.0.
GRADLE DSLs and API
A Groovy Build Script Primer
Ideally, a Groovy build script looks mostly like configuration: setting some properties of the project, configuring dependencies, declaring tasks, and so on. That configuration is based on Groovy language constructs. This primer aims to explain what those constructs are and — most importantly — how they relate to Gradle’s API documentation.
The Project object
As Groovy is an object-oriented language based on Java, its properties and methods apply to objects. In some cases, the object is implicit — particularly at the top level of a build script, i.e. not nested inside a {} block.
Consider this fragment of build script, which contains an unqualified property and block:
version = '1.0.0.GA'
configurations {
...
}Both version and configurations {} are part of org.gradle.api.Project.
This example reflects how every Groovy build script is backed by an implicit instance of Project. If you see an unqualified element and you don’t know where it’s defined, always check the Project API documentation to see if that’s where it’s coming from.
|
Caution
|
Avoid using Groovy MetaClass programming techniques in your build scripts. Gradle provides its own API for adding dynamic runtime properties. Use of Groovy-specific metaprogramming can cause builds to retain large amounts of memory between builds that will eventually cause the Gradle daemon to run out-of-memory. |
Properties
<obj>.<name> // Get a property value
<obj>.<name> = <value> // Set a property to a new value
"$<name>" // Embed a property value in a string
"${<obj>.<name>}" // Same as previous (embedded value)version = '1.0.1'
myCopyTask.description = 'Copies some files'
file("$projectDir/src")
println "Destination: ${myCopyTask.destinationDir}"A property represents some state of an object. The presence of an = sign is a clear indicator that you’re looking at a property. Otherwise, a qualified name — it begins with <obj>. — without any other decoration is also a property.
If the name is unqualified, then it may be one of the following:
-
A task instance with that name.
-
A property on Project.
-
An extra property defined elsewhere in the project.
-
A property of an implicit object within a block.
-
A local variable defined earlier in the build script.
Note that plugins can add their own properties to the Project object. The API documentation lists all the properties added by core plugins. If you’re struggling to find where a property comes from, check the documentation for the plugins that the build uses.
|
Tip
|
When referencing a project property in your build script that is added by a non-core plugin, consider prefixing it with project. — it’s clear then that the property belongs to the project object.
|
Properties in the API documentation
The Groovy DSL reference shows properties as they are used in your build scripts, but the Javadocs only display methods. That’s because properties are implemented as methods behind the scenes:
-
A property can be read if there is a method named
get<PropertyName>with zero arguments that returns the same type as the property. -
A property can be modified if there is a method named
set<PropertyName>with one argument that has the same type as the property and a return type ofvoid.
Note that property names usually start with a lower-case letter, but that letter is upper case in the method names. So the getter method getProjectVersion() corresponds to the property projectVersion. This convention does not apply when the name begins with at least two upper-case letters, in which case there is not change in case. For example, getRAM() corresponds to the property RAM.
project.getVersion()
project.version
project.setVersion('1.0.1')
project.version = '1.0.1'Methods
<obj>.<name>() // Method call with no arguments
<obj>.<name>(<arg>, <arg>) // Method call with multiple arguments
<obj>.<name> <arg>, <arg> // Method call with multiple args (no parentheses)myCopyTask.include '**/*.xml', '**/*.properties'
ext.resourceSpec = copySpec() // `copySpec()` comes from `Project`
file('src/main/java')
println 'Hello, World!'A method represents some behavior of an object, although Gradle often uses methods to configure the state of objects as well. Methods are identifiable by their arguments or empty parentheses. Note that parentheses are sometimes required, such as when a method has zero arguments, so you may find it simplest to always use parentheses.
|
Note
|
Gradle has a convention whereby if a method has the same name as a collection-based property, then the method appends its values to that collection. |
Blocks
Blocks are also methods, just with specific types for the last argument.
<obj>.<name> {
...
}
<obj>.<name>(<arg>, <arg>) {
...
}plugins {
id 'java-library'
}
configurations {
assets
}
sourceSets {
main {
java {
srcDirs = ['src']
}
}
}
dependencies {
implementation project(':util')
}Blocks are a mechanism for configuring multiple aspects of a build element in one go. They also provide a way to nest configuration, leading to a form of structured data.
There are two important aspects of blocks that you should understand:
-
They are implemented as methods with specific signatures.
-
They can change the target ("delegate") of unqualified methods and properties.
Both are based on Groovy language features and we explain them in the following sections.
Block method signatures
You can easily identify a method as the implementation behind a block by its signature, or more specifically, its argument types. If a method corresponds to a block:
-
It must have at least one argument.
-
The last argument must be of type
groovy.lang.Closureor org.gradle.api.Action.
For example, Project.copy(Action) matches these requirements, so you can use the syntax:
copy {
into layout.buildDirectory.dir("tmp")
from 'custom-resources'
}That leads to the question of how into() and from() work. They’re clearly methods, but where would you find them in the API documentation? The answer comes from understanding object delegation.
Delegation
The section on properties lists where unqualified properties might be found. One common place is on the Project object. But there is an alternative source for those unqualified properties and methods inside a block: the block’s delegate object.
To help explain this concept, consider the last example from the previous section:
copy {
into layout.buildDirectory.dir("tmp")
from 'custom-resources'
}All the methods and properties in this example are unqualified. You can easily find copy() and layout in the Project API documentation, but what about into() and from()? These are resolved against the delegate of the copy {} block. What is the type of that delegate? You’ll need to check the API documentation for that.
There are two ways to determine the delegate type, depending on the signature of the block method:
-
For
Actionarguments, look at the type’s parameter.In the example above, the method signature is
copy(Action<? super CopySpec>)and it’s the bit inside the angle brackets that tells you the delegate type — CopySpec in this case. -
For
Closurearguments, the documentation will explicitly say in the description what type is being configured or what type the delegate it (different terminology for the same thing).
Hence you can find both into() and from() on CopySpec. You might even notice that both of those methods have variants that take an Action as their last argument, which means you can use block syntax with them.
All new Gradle APIs declare an Action argument type rather than Closure, which makes it very easy to pick out the delegate type. Even older APIs have an Action variant in addition to the old Closure one.
Local variables
def <name> = <value> // Untyped variable
<type> <name> = <value> // Typed variabledef i = 1
String errorMsg = 'Failed, because reasons'Local variables are a Groovy construct — unlike extra properties — that can be used to share values within a build script.
|
Caution
|
Avoid using local variables in the root of the project, i.e. as pseudo project properties. They cannot be read outside of the build script and Gradle has no knowledge of them. Within a narrower context — such as configuring a task — local variables can occasionally be helpful. |
Gradle Kotlin DSL Primer
Gradle’s Kotlin DSL provides an alternative syntax to the traditional Groovy DSL with an enhanced editing experience in supported IDEs, with superior content assist, refactoring, documentation, and more. This chapter provides details of the main Kotlin DSL constructs and how to use it to interact with the Gradle API.
|
Tip
|
If you are interested in migrating an existing Gradle build to the Kotlin DSL, please also check out the dedicated migration section. |
Prerequisites
-
The embedded Kotlin compiler is known to work on Linux, macOS, Windows, Cygwin, FreeBSD and Solaris on x86-64 architectures.
-
Knowledge of Kotlin syntax and basic language features is very helpful. The Kotlin reference documentation and Kotlin Koans will help you to learn the basics.
-
Use of the plugins {} block to declare Gradle plugins significantly improves the editing experience and is highly recommended.
IDE support
The Kotlin DSL is fully supported by IntelliJ IDEA and Android Studio. Other IDEs do not yet provide helpful tools for editing Kotlin DSL files, but you can still import Kotlin-DSL-based builds and work with them as usual.
| Build import | Syntax highlighting 1 | Semantic editor 2 | |
|---|---|---|---|
IntelliJ IDEA |
✓ |
✓ |
✓ |
Android Studio |
✓ |
✓ |
✓ |
Eclipse IDE |
✓ |
✓ |
✖ |
CLion |
✓ |
✓ |
✖ |
Apache NetBeans |
✓ |
✓ |
✖ |
Visual Studio Code (LSP) |
✓ |
✓ |
✖ |
Visual Studio |
✓ |
✖ |
✖ |
1 Kotlin syntax highlighting in Gradle Kotlin DSL scripts
2 code completion, navigation to sources, documentation, refactorings etc… in Gradle Kotlin DSL scripts
As mentioned in the limitations, you must import your project from the Gradle model to get content-assist and refactoring tools for Kotlin DSL scripts in IntelliJ IDEA.
Builds with slow configuration time might affect the IDE responsiveness, so please check out the performance section to help resolve such issues.
Automatic build import vs. automatic reloading of script dependencies
Both IntelliJ IDEA and Android Studio — which is derived from IntelliJ IDEA — will detect when you make changes to your build logic and offer two suggestions:
-
Import the whole build again


-
Reload script dependencies when editing a build script

We recommend that you disable automatic build import, but enable automatic reloading of script dependencies. That way you get early feedback while editing Gradle scripts and control over when the whole build setup gets synchronized with your IDE.
Troubleshooting
The IDE support is provided by two components:
-
The Kotlin Plugin used by IntelliJ IDEA/Android Studio
-
Gradle
The level of support varies based on the versions of each.
If you run into trouble, the first thing you should try is running ./gradlew tasks from the command line to see whether your issue is limited to the IDE. If you encounter the same problem from the command line, then the issue is with the build rather than the IDE integration.
If you can run the build successfully from the command line but your script editor is complaining, then you should try restarting your IDE and invalidating its caches.
If the above doesn’t work and you suspect an issue with the Kotlin DSL script editor, you can:
-
Run
./gradle tasksto get more details -
Check the logs in one of these locations:
-
$HOME/Library/Logs/gradle-kotlin-dslon Mac OS X -
$HOME/.gradle-kotlin-dsl/logon Linux -
$HOME/AppData/Local/gradle-kotlin-dsl/logon Windows
-
-
Open an issue on the Gradle issue tracker, including as much detail as you can.
From version 5.1 onwards, the log directory is cleaned up automatically. It is checked periodically (at most every 24 hours) and log files are deleted if they haven’t been used for 7 days.
If the above isn’t enough to pinpoint the problem, you can enable the org.gradle.kotlin.dsl.logging.tapi system property in your IDE. This will cause the Gradle Daemon to log extra information in its log file located in $HOME/.gradle/daemon. In IntelliJ IDEA this can be done by opening Help > Edit Custom VM Options… and adding -Dorg.gradle.kotlin.dsl.logging.tapi=true.
For IDE problems outside of the Kotlin DSL script editor, please open issues in the corresponding IDE’s issue tracker:
Lastly, if you face problems with Gradle itself or with the Kotlin DSL, please open issues on the Gradle issue tracker.
Kotlin DSL scripts
Just like the Groovy-based equivalent, the Kotlin DSL is implemented on top of Gradle’s Java API. Everything you can read in a Kotlin DSL script is Kotlin code compiled and executed by Gradle. Many of the objects, functions and properties you use in your build scripts come from the Gradle API and the APIs of the applied plugins.
|
Tip
|
You can use the Kotlin DSL reference search functionality to drill through the available members. |
Script file names
-
Groovy DSL script files use the
.gradlefile name extension. -
Kotlin DSL script files use the
.gradle.ktsfile name extension.
To activate the Kotlin DSL, simply use the .gradle.kts extension for your build scripts in place of .gradle. That also applies to the settings file — for example settings.gradle.kts — and initialization scripts.
Note that you can mix Groovy DSL build scripts with Kotlin DSL ones, i.e. a Kotlin DSL build script can apply a Groovy DSL one and each project in a multi-project build can use either one.
We recommend that you apply the following conventions to get better IDE support:
-
Name settings scripts (or any script that is backed by a Gradle
Settingsobject) according to the pattern*.settings.gradle.kts— this includes script plugins that are applied from settings scripts -
Name initialization scripts according to the pattern
*.init.gradle.ktsor simplyinit.gradle.kts.
Implicit imports
All Kotlin DSL build scripts have implicit imports consisting of:
-
The Kotlin DSL API, which is all types within the following packages:
-
org.gradle.kotlin.dsl -
org.gradle.kotlin.dsl.plugins.dsl -
org.gradle.kotlin.dsl.precompile
-
Use of internal Kotlin DSL APIs in plugins and build scripts has the potential to break builds when either Gradle or plugins change. The Kotlin DSL API extends the Gradle public API with the types listed in the corresponding API docs that are in the packages listed above (but not subpackages of those).
Compilation warnings
Gradle Kotlin DSL scripts are compiled by Gradle during the configuration phase of your build. Deprecation warnings found by the Kotlin compiler are reported on the console when compiling the scripts.
> Configure project :
w: build.gradle.kts:4:5: 'getter for uploadTaskName: String!' is deprecated. Deprecated in JavaIt is possible to configure your build to fail on any warning emitted during script compilation by setting the org.gradle.kotlin.dsl.allWarningsAsErrors Gradle property to true:
# gradle.properties
org.gradle.kotlin.dsl.allWarningsAsErrors=trueType-safe model accessors
The Groovy DSL allows you to reference many elements of the build model by name, even when they are defined at runtime. Think named configurations, named source sets, and so on. For example, you can get hold of the implementation configuration via configurations.implementation.
The Kotlin DSL replaces such dynamic resolution with type-safe model accessors that work with model elements contributed by plugins.
Understanding when type-safe model accessors are available
The Kotlin DSL currently supports type-safe model accessors for any of the following that are contributed by plugins:
-
Dependency and artifact configurations (such as
implementationandruntimeOnlycontributed by the Java Plugin) -
Project extensions and conventions (such as
sourceSets) -
Extensions on the
dependenciesandrepositoriescontainers -
Elements in the
tasksandconfigurationscontainers -
Elements in project-extension containers (for example the source sets contributed by the Java Plugin that are added to the
sourceSetscontainer) -
Extensions on each of the above
|
Important
|
Only the main project build scripts and precompiled project script plugins have type-safe model accessors. Initialization scripts, settings scripts, script plugins do not. These limitations will be removed in a future Gradle release. |
The set of type-safe model accessors available is calculated right before evaluating the script body, immediately after the plugins {} block.
Any model elements contributed after that point do not work with type-safe model accessors.
For example, this includes any configurations you might define in your own build script.
However, this approach does mean that you can use type-safe accessors for any model elements that are contributed by plugins that are applied by parent projects.
The following project build script demonstrates how you can access various configurations, extensions and other elements using type-safe accessors:
plugins {
`java-library`
}
dependencies { // (1)
api("junit:junit:4.13")
implementation("junit:junit:4.13")
testImplementation("junit:junit:4.13")
}
configurations { // (1)
implementation {
resolutionStrategy.failOnVersionConflict()
}
}
sourceSets { // (2)
main { // (3)
java.srcDir("src/core/java")
}
}
java { // (4)
sourceCompatibility = JavaVersion.VERSION_11
targetCompatibility = JavaVersion.VERSION_11
}
tasks {
test { // (5)
testLogging.showExceptions = true
useJUnit()
}
}-
Uses type-safe accessors for the
api,implementationandtestImplementationdependency configurations contributed by the Java Library Plugin -
Uses an accessor to configure the
sourceSetsproject extension -
Uses an accessor to configure the
mainsource set -
Uses an accessor to configure the
javasource for themainsource set -
Uses an accessor to configure the
testtask
|
Tip
|
Your IDE knows about the type-safe accessors, so it will include them in its suggestions. This will happen both at the top level of your build scripts — most plugin extensions are added to the |
Note that accessors for elements of containers such as configurations, tasks and sourceSets leverage Gradle’s configuration avoidance APIs.
For example, on tasks they are of type TaskProvider<T> and provide a lazy reference and lazy configuration of the underlying task.
Here are some examples that illustrate the situations in which configuration avoidance applies:
tasks.test {
// lazy configuration
}
// Lazy reference
val testProvider: TaskProvider<Test> = tasks.test
testProvider {
// lazy configuration
}
// Eagerly realized Test task, defeat configuration avoidance if done out of a lazy context
val test: Test = tasks.test.get()For all other containers than tasks, accessors for elements are of type NamedDomainObjectProvider<T> and provide the same behavior.
Understanding what to do when type-safe model accessors are not available
Consider the sample build script shown above that demonstrates the use of type-safe accessors.
The following sample is exactly the same except that is uses the apply() method to apply the plugin.
The build script can not use type-safe accessors in this case because the apply() call happens in the body of the build script.
You have to use other techniques instead, as demonstrated here:
apply(plugin = "java-library")
dependencies {
"api"("junit:junit:4.13")
"implementation"("junit:junit:4.13")
"testImplementation"("junit:junit:4.13")
}
configurations {
"implementation" {
resolutionStrategy.failOnVersionConflict()
}
}
configure<SourceSetContainer> {
named("main") {
java.srcDir("src/core/java")
}
}
configure<JavaPluginExtension> {
sourceCompatibility = JavaVersion.VERSION_11
targetCompatibility = JavaVersion.VERSION_11
}
tasks {
named<Test>("test") {
testLogging.showExceptions = true
}
}Type-safe accessors are unavailable for model elements contributed by the following:
-
Plugins applied via the
apply(plugin = "id")method -
The project build script
-
Script plugins, via
apply(from = "script-plugin.gradle.kts") -
Plugins applied via cross-project configuration
You also can not use type-safe accessors in Binary Gradle plugins implemented in Kotlin.
If you can’t find a type-safe accessor, fall back to using the normal API for the corresponding types. To do that, you need to know the names and/or types of the configured model elements. We’ll now show you how those can be discovered by looking at the above script in detail.
Artifact configurations
The following sample demonstrates how to reference and configure artifact configurations without type accessors:
apply(plugin = "java-library")
dependencies {
"api"("junit:junit:4.13")
"implementation"("junit:junit:4.13")
"testImplementation"("junit:junit:4.13")
}
configurations {
"implementation" {
resolutionStrategy.failOnVersionConflict()
}
}The code looks similar to that for the type-safe accessors, except that the configuration names are string literals in this case.
You can use string literals for configuration names in dependency declarations and within the configurations {} block.
The IDE won’t be able to help you discover the available configurations in this situation, but you can look them up either in the corresponding plugin’s documentation or by running gradle dependencies.
Project extensions and conventions
Project extensions and conventions have both a name and a unique type, but the Kotlin DSL only needs to know the type in order to configure them.
As the following sample shows for the sourceSets {} and java {} blocks from the original example build script, you can use the configure<T>() function with the corresponding type to do that:
apply(plugin = "java-library")
configure<SourceSetContainer> {
named("main") {
java.srcDir("src/core/java")
}
}
configure<JavaPluginExtension> {
sourceCompatibility = JavaVersion.VERSION_11
targetCompatibility = JavaVersion.VERSION_11
}Note that sourceSets is a Gradle extension on Project of type SourceSetContainer and java is an extension on Project of type JavaPluginExtension.
You can discover what extensions and conventions are available either by looking at the documentation for the applied plugins or by running gradle kotlinDslAccessorsReport, which prints the Kotlin code necessary to access the model elements contributed by all the applied plugins.
The report provides both names and types.
As a last resort, you can also check a plugin’s source code, but that shouldn’t be necessary in the majority of cases.
Note that you can also use the the<T>() function if you only need a reference to the extension or convention without configuring it, or if you want to perform a one-line configuration, like so:
the<SourceSetContainer>()["main"].srcDir("src/core/java")The snippet above also demonstrates one way of configuring the elements of a project extension that is a container.
Elements in project-extension containers
Container-based project extensions, such as SourceSetContainer, also allow you to configure the elements held by them.
In our sample build script, we want to configure a source set named main within the source set container, which we can do by using the named() method in place of an accessor, like so:
apply(plugin = "java-library")
configure<SourceSetContainer> {
named("main") {
java.srcDir("src/core/java")
}
}All elements within a container-based project extension have a name, so you can use this technique in all such cases.
As for project extensions and conventions themselves, you can discover what elements are present in any container by either looking at the documentation of the applied plugins or by running gradle kotlinDslAccessorsReport.
And as a last resort, you may be able to view the plugin’s source code to find out what it does, but that shouldn’t be necessary in the majority of cases.
Tasks
Tasks are not managed through a container-based project extension, but they are part of a container that behaves in a similar way. This means that you can configure tasks in the same way as you do for source sets, as you can see in this example:
apply(plugin = "java-library")
tasks {
named<Test>("test") {
testLogging.showExceptions = true
}
}We are using the Gradle API to refer to the tasks by name and type, rather than using accessors.
Note that it’s necessary to specify the type of the task explicitly, otherwise the script won’t compile because the inferred type will be Task, not Test, and the testLogging property is specific to the Test task type.
You can, however, omit the type if you only need to configure properties or to call methods that are common to all tasks, i.e. they are declared on the Task interface.
One can discover what tasks are available by running gradle tasks. You can then find out the type of a given task by running gradle help --task <taskName>, as demonstrated here:
❯ ./gradlew help --task test
...
Type
Test (org.gradle.api.tasks.testing.Test)Note that the IDE can assist you with the required imports, so you only need the simple names of the types, i.e. without the package name part.
In this case, there’s no need to import the Test task type as it is part of the Gradle API and is therefore imported implicitly.
About conventions
Some of the Gradle core plugins expose configurability with the help of a so-called convention object. These serve a similar purpose to — and have now been superseded by — extensions. Conventions are deprecated. Please avoid using convention objects when writing new plugins.
As seen above, the Kotlin DSL provides accessors only for convention objects on Project.
There are situations that require you to interact with a Gradle plugin that uses convention objects on other types.
The Kotlin DSL provides the withConvention(T::class) {} extension function to do this:
sourceSets {
main {
withConvention(CustomSourceSetConvention::class) {
someOption = "some value"
}
}
}This technique is primarily necessary for source sets added by language plugins that have yet to be migrated to extensions.
Multi-project builds
As with single-project builds, you should try to use the plugins {} block in your multi-project builds so that you can use the type-safe accessors. Another consideration with multi-project builds is that you won’t be able to use type-safe accessors when configuring subprojects within the root build script or with other forms of cross configuration between projects. We discuss both topics in more detail in the following sections.
Applying plugins
You can declare your plugins within the subprojects to which they apply, but we recommend that you also declare them within the root project build script. This makes it easier to keep plugin versions consistent across projects within a build. The approach also improves the performance of the build.
The Using Gradle plugins chapter explains how you can declare plugins in the root project build script with a version and then apply them to the appropriate subprojects' build scripts. What follows is an example of this approach using three subprojects and three plugins. Note how the root build script only declares the community plugins as the Java Library Plugin is tied to the version of Gradle you are using:
rootProject.name = "multi-project-build"
include("domain", "infra", "http")plugins {
id("com.github.johnrengelman.shadow") version "7.1.2" apply false
id("io.ratpack.ratpack-java") version "1.8.2" apply false
}plugins {
`java-library`
}
dependencies {
api("javax.measure:unit-api:1.0")
implementation("tec.units:unit-ri:1.0.3")
}plugins {
`java-library`
id("com.github.johnrengelman.shadow")
}
shadow {
applicationDistribution.from("src/dist")
}
tasks.shadowJar {
minimize()
}plugins {
java
id("io.ratpack.ratpack-java")
}
dependencies {
implementation(project(":domain"))
implementation(project(":infra"))
implementation(ratpack.dependency("dropwizard-metrics"))
}
application {
mainClass = "example.App"
}
ratpack.baseDir = file("src/ratpack/baseDir")If your build requires additional plugin repositories on top of the Gradle Plugin Portal, you should declare them in the pluginManagement {} block in your settings.gradle.kts file, like so:
pluginManagement {
repositories {
mavenCentral()
gradlePluginPortal()
}
}Plugins fetched from a source other than the Gradle Plugin Portal can only be declared via the plugins {} block if they are published with their plugin marker artifacts.
|
Note
|
At the time of writing, all versions of the Android Plugin for Gradle up to 3.2.0 present in the google() repository lack plugin marker artifacts.
|
If those artifacts are missing, then you can’t use the plugins {} block. You must instead fall back to declaring your plugin dependencies using the buildscript {} block in the root project build script. Here’s an example of doing that for the Android Plugin:
include("lib", "app")buildscript {
repositories {
google()
gradlePluginPortal()
}
dependencies {
classpath("com.android.tools.build:gradle:7.3.0")
}
}plugins {
id("com.android.library")
}
android {
// ...
}plugins {
id("com.android.application")
}
android {
// ...
}This technique is not that different from what Android Studio produces when creating a new build.
The main difference is that the subprojects' build scripts in the above sample declare their plugins using the plugins {} block. This means that you can use type-safe accessors for the model elements that they contribute.
Note that you can’t use this technique if you want to apply such a plugin either to the root project build script of a multi-project build (rather than solely to its subprojects) or to a single-project build. You’ll need to use a different approach in those cases that we detail in another section.
Cross-configuring projects
Cross project configuration is a mechanism by which you can configure a project from another project’s build script. A common example is when you configure subprojects in the root project build script.
Taking this approach means that you won’t be able to use type-safe accessors for model elements contributed by the plugins. You will instead have to rely on string literals and the standard Gradle APIs.
As an example, let’s modify the Java/Ratpack sample build to fully configure its subprojects from the root project build script:
rootProject.name = "multi-project-build"
include("domain", "infra", "http")import com.github.jengelman.gradle.plugins.shadow.ShadowExtension
import com.github.jengelman.gradle.plugins.shadow.tasks.ShadowJar
import ratpack.gradle.RatpackExtension
plugins {
id("com.github.johnrengelman.shadow") version "7.1.2" apply false
id("io.ratpack.ratpack-java") version "1.8.2" apply false
}
project(":domain") {
apply(plugin = "java-library")
repositories { mavenCentral() }
dependencies {
"api"("javax.measure:unit-api:1.0")
"implementation"("tec.units:unit-ri:1.0.3")
}
}
project(":infra") {
apply(plugin = "java-library")
apply(plugin = "com.github.johnrengelman.shadow")
configure<ShadowExtension> {
applicationDistribution.from("src/dist")
}
tasks.named<ShadowJar>("shadowJar") {
minimize()
}
}
project(":http") {
apply(plugin = "java")
apply(plugin = "io.ratpack.ratpack-java")
repositories { mavenCentral() }
val ratpack = the<RatpackExtension>()
dependencies {
"implementation"(project(":domain"))
"implementation"(project(":infra"))
"implementation"(ratpack.dependency("dropwizard-metrics"))
"runtimeOnly"("org.slf4j:slf4j-simple:1.7.25")
}
configure<JavaApplication> {
mainClass = "example.App"
}
ratpack.baseDir = file("src/ratpack/baseDir")
}Note how we’re using the apply() method to apply the plugins since the plugins {} block doesn’t work in this context.
We are also using standard APIs instead of type-safe accessors to configure tasks, extensions and conventions — an approach that we discussed in more detail elsewhere.
When you can’t use the plugins {} block
Plugins fetched from a source other than the Gradle Plugin Portal may or may not be usable with the plugins {} block.
It depends on how they have been published and, specifically, whether they have been published with the necessary plugin marker artifacts.
For example, the Android Plugin for Gradle is not published to the Gradle Plugin Portal and — at least up to version 3.2.0 of the plugin — the metadata required to resolve the artifacts for a given plugin identifier is not published to the Google repository.
If your build is a multi-project build and you don’t need to apply such a plugin to your root project, then you can get round this issue using the technique described above. For any other situation, keep reading.
|
Tip
|
When publishing plugins, please use Gradle’s built-in Gradle Plugin Development Plugin. It automates the publication of the metadata necessary to make your plugins usable with the |
We will show you in this section how to apply the Android Plugin to a single-project build or the root project of a multi-project build.
The goal is to instruct your build on how to map the com.android.application plugin identifier to a resolvable artifact.
This is done in two steps:
-
Add a plugin repository to the build’s settings script
-
Map the plugin ID to the corresponding artifact coordinates
You accomplish both steps by configuring a pluginManagement {} block in the build’s settings script.
To demonstrate, the following sample adds the google() repository — where the Android plugin is published — to the repository search list, and uses a resolutionStrategy {} block to map the com.android.application plugin ID to the com.android.tools.build:gradle:<version> artifact available in the google() repository:
pluginManagement {
repositories {
google()
gradlePluginPortal()
}
resolutionStrategy {
eachPlugin {
if(requested.id.namespace == "com.android") {
useModule("com.android.tools.build:gradle:${requested.version}")
}
}
}
}plugins {
id("com.android.application") version "7.3.0"
}
android {
// ...
}In fact, the above sample will work for all com.android.* plugins that are provided by the specified module. That’s because the packaged module contains the details of which plugin ID maps to which plugin implementation class, using the properties-file mechanism described in the Writing Custom Plugins chapter.
See the Plugin Management section of the Gradle user manual for more information on the pluginManagement {} block and what it can be used for.
Working with container objects
The Gradle build model makes heavy use of container objects (or just "containers").
For example, both configurations and tasks are container objects that contain Configuration and Task objects respectively.
Community plugins also contribute containers, like the android.buildTypes container contributed by the Android Plugin.
The Kotlin DSL provides several ways for build authors to interact with containers.
We look at each of those ways next, using the tasks container as an example.
|
Tip
|
Note that you can leverage the type-safe accessors described in another section if you are configuring existing elements on supported containers. That section also describes which containers support type-safe accessors. |
Using the container API
All containers in Gradle implement NamedDomainObjectContainer<DomainObjectType>. Some of them can contain objects of different types and implement PolymorphicDomainObjectContainer<BaseType>. The simplest way to interact with containers is through these interfaces.
The following sample demonstrates how you can use the named() method to configure existing tasks and the register() method to create new ones.
tasks.named("check") // (1)
tasks.register("myTask1") // (2)
tasks.named<JavaCompile>("compileJava") // (3)
tasks.register<Copy>("myCopy1") // (4)
tasks.named("assemble") { // (5)
dependsOn(":myTask1")
}
tasks.register("myTask2") { // (6)
description = "Some meaningful words"
}
tasks.named<Test>("test") { // (7)
testLogging.showStackTraces = true
}
tasks.register<Copy>("myCopy2") { // (8)
from("source")
into("destination")
}-
Gets a reference of type
Taskto the existing task namedcheck -
Registers a new untyped task named
myTask1 -
Gets a reference to the existing task named
compileJavaof typeJavaCompile -
Registers a new task named
myCopy1of typeCopy -
Gets a reference to the existing (untyped) task named
assembleand configures it — you can only configure properties and methods that are available onTaskwith this syntax -
Registers a new untyped task named
myTask2and configures it — you can only configure properties and methods that are available onTaskin this case -
Gets a reference to the existing task named
testof typeTestand configures it — in this case you have access to the properties and methods of the specified type -
Registers a new task named
myCopy2of typeCopyand configures it
|
Note
|
The above sample relies on the configuration avoidance APIs. If you need or want to eagerly configure or register container elements, simply replace named() with getByName() and register() with create().
|
Using Kotlin delegated properties
Another way to interact with containers is via Kotlin delegated properties. These are particularly useful if you need a reference to a container element that you can use elsewhere in the build. In addition, Kotlin delegated properties can easily be renamed via IDE refactoring.
The following sample does the exact same things as the one in the previous section, but it uses delegated properties and reuses those references in place of string-literal task paths:
val check by tasks.existing
val myTask1 by tasks.registering
val compileJava by tasks.existing(JavaCompile::class)
val myCopy1 by tasks.registering(Copy::class)
val assemble by tasks.existing {
dependsOn(myTask1) // (1)
}
val myTask2 by tasks.registering {
description = "Some meaningful words"
}
val test by tasks.existing(Test::class) {
testLogging.showStackTraces = true
}
val myCopy2 by tasks.registering(Copy::class) {
from("source")
into("destination")
}-
Uses the reference to the
myTask1task rather than a task path
|
Note
|
The above rely on configuration avoidance APIs.
If you need to eagerly configure or register container elements simply replace |
Configuring multiple container elements together
When configuring several elements of a container one can group interactions in a block in order to avoid repeating the container’s name on each interaction. The following example uses a combination of type-safe accessors, the container API and Kotlin delegated properties:
tasks {
test {
testLogging.showStackTraces = true
}
val myCheck by registering {
doLast { /* assert on something meaningful */ }
}
check {
dependsOn(myCheck)
}
register("myHelp") {
doLast { /* do something helpful */ }
}
}Working with runtime properties
Gradle has two main sources of properties that are defined at runtime: project properties and extra properties. The Kotlin DSL provides specific syntax for working with these types of properties, which we look at in the following sections.
Project properties
The Kotlin DSL allows you to access project properties by binding them via Kotlin delegated properties. Here’s a sample snippet that demonstrates the technique for a couple of project properties, one of which must be defined:
val myProperty: String by project // (1)
val myNullableProperty: String? by project // (2)-
Makes the
myPropertyproject property available via amyPropertydelegated property — the project property must exist in this case, otherwise the build will fail when the build script attempts to use themyPropertyvalue -
Does the same for the
myNullablePropertyproject property, but the build won’t fail on using themyNullablePropertyvalue as long as you check for null (standard Kotlin rules for null safety apply)
The same approach works in both settings and initialization scripts, except you use by settings and by gradle respectively in place of by project.
Extra properties
Extra properties are available on any object that implements the ExtensionAware interface.
Kotlin DSL allows you to access extra properties and create new ones via delegated properties, using any of the by extra forms demonstrated in the following sample:
val myNewProperty by extra("initial value") // (1)
val myOtherNewProperty by extra { "calculated initial value" } // (2)
val myProperty: String by extra // (3)
val myNullableProperty: String? by extra // (4)-
Creates a new extra property called
myNewPropertyin the current context (the project in this case) and initializes it with the value"initial value", which also determines the property’s type -
Create a new extra property whose initial value is calculated by the provided lambda
-
Binds an existing extra property from the current context (the project in this case) to a
myPropertyreference -
Does the same as the previous line but allows the property to have a null value
This approach works for all Gradle scripts: project build scripts, script plugins, settings scripts and initialization scripts.
You can also access extra properties on a root project from a subproject using the following syntax:
val myNewProperty: String by rootProject.extra // (1)-
Binds the root project’s
myNewPropertyextra property to a reference of the same name
Extra properties aren’t just limited to projects.
For example, Task extends ExtensionAware, so you can attach extra properties to tasks as well.
Here’s an example that defines a new myNewTaskProperty on the test task and then uses that property to initialize another task:
tasks {
test {
val reportType by extra("dev") // (1)
doLast {
// Use 'suffix' for post processing of reports
}
}
register<Zip>("archiveTestReports") {
val reportType: String by test.get().extra // (2)
archiveAppendix = reportType
from(test.get().reports.html.destination)
}
}-
Creates a new
reportTypeextra property on thetesttask -
Makes the
testtask’sreportTypeextra property available to configure thearchiveTestReportstask
If you’re happy to use eager configuration rather than the configuration avoidance APIs, you could use a single, "global" property for the report type, like this:
tasks.test.doLast { ... }
val testReportType by tasks.test.get().extra("dev") // (1)
tasks.create<Zip>("archiveTestReports") {
archiveAppendix = testReportType // (2)
from(test.get().reports.html.destination)
}-
Creates and initializes an extra property on the
testtask, binding it to a "global" property -
Uses the "global" property to initialize the
archiveTestReportstask
There is one last syntax for extra properties that we should cover, one that treats extra as a map.
We recommend against using this in general as you lose the benefits of Kotlin’s type checking and it prevents IDEs from providing as much support as they could.
However, it is more succinct than the delegated properties syntax and can reasonably be used if you only need to set the value of an extra property without referencing it later.
Here’s a simple example demonstrating how to set and read extra properties using the map syntax:
extra["myNewProperty"] = "initial value" // (1)
tasks.create("myTask") {
doLast {
println("Property: ${project.extra["myNewProperty"]}") // (2)
}
}-
Creates a new project extra property called
myNewPropertyand sets its value -
Reads the value from the project extra property we created — note the
project.qualifier onextra[…], otherwise Gradle will assume we want to read an extra property from the task
Kotlin lazy property assignment
Gradle’s Kotlin DSL supports lazy property assignment using the = operator .
Lazy property assignment reduces the verbosity for Kotlin DSL when lazy properties are used.
It works for properties that are publicly seen as final (without a setter) and have type Property or ConfigurableFileCollection.
Since properties have to be final, our general recommendation is not to implement custom setters for properties with lazy types and, if possible, implement such properties via an abstract getter.
Using the = operator is the preferred way to call set() in the Kotlin DSL.
java {
toolchain {
languageVersion = JavaLanguageVersion.of(17)
}
}
abstract class WriteJavaVersionTask : DefaultTask() {
@get:Input
abstract val javaVersion: Property<String>
@get:OutputFile
abstract val output: RegularFileProperty
@TaskAction
fun execute() {
output.get().asFile.writeText("Java version: ${javaVersion.get()}")
}
}
tasks.register<WriteJavaVersionTask>("writeJavaVersion") {
javaVersion.set("17") // (1)
javaVersion = "17" // (2)
javaVersion = java.toolchain.languageVersion.map { it.toString() } // (3)
output = layout.buildDirectory.file("writeJavaVersion/javaVersion.txt")
}-
Set value with the
.set()method -
Set value with lazy property assignment using the
=operator -
The
=operator can be used also for assigning lazy values
IDE support
Lazy property assignment is supported from IntelliJ 2022.3 and from Android Studio Giraffe.
The Kotlin DSL Plugin
The Kotlin DSL Plugin provides a convenient way to develop Kotlin-based projects that contribute build logic. That includes buildSrc projects, included builds and Gradle plugins.
The plugin achieves this by doing the following:
-
Applies the Kotlin Plugin, which adds support for compiling Kotlin source files.
-
Adds the
kotlin-stdlib,kotlin-reflectandgradleKotlinDsl()dependencies to thecompileOnlyandtestImplementationconfigurations, which allows you to make use of those Kotlin libraries and the Gradle API in your Kotlin code. -
Configures the Kotlin compiler with the same settings that are used for Kotlin DSL scripts, ensuring consistency between your build logic and those scripts:
-
registers the SAM-with-receiver Kotlin compiler plugin.
-
Enables support for precompiled script plugins.
kotlin-dsl pluginEach Gradle release is meant to be used with a specific version of the kotlin-dsl plugin and compatibility between arbitrary Gradle releases and kotlin-dsl plugin versions is not guaranteed. Using an unexpected version of the kotlin-dsl plugin in a build will emit a warning and can cause hard to diagnose problems.
This is the basic configuration you need to use the plugin:
buildSrc projectplugins {
`kotlin-dsl`
}
repositories {
// The org.jetbrains.kotlin.jvm plugin requires a repository
// where to download the Kotlin compiler dependencies from.
mavenCentral()
}The Kotlin DSL Plugin leverages Java Toolchains. By default the code will target Java 8. You can change that by defining a Java toolchain to be used by the project:
java {
toolchain {
languageVersion = JavaLanguageVersion.of(11)
}
}java {
toolchain {
languageVersion = JavaLanguageVersion.of(11)
}
}The embedded Kotlin
Gradle embeds Kotlin in order to provide support for Kotlin-based scripts.
Kotlin versions
Gradle ships with kotlin-compiler-embeddable plus matching versions of kotlin-stdlib and kotlin-reflect libraries. For details see the Kotlin section of Gradle’s compatibility matrix. The kotlin package from those modules is visible through the Gradle classpath.
The compatibility guarantees provided by Kotlin apply for both backward and forward compatibility.
Backward compatibility
Our approach is to only do backwards-breaking Kotlin upgrades on a major Gradle release. We will always clearly document which Kotlin version we ship and announce upgrade plans before a major release.
Plugin authors who want to stay compatible with older Gradle versions need to limit their API usage to a subset that is compatible with these old versions. It’s not really different from any other new API in Gradle. E.g. if we introduce a new API for dependency resolution and a plugin wants to use that API, then they either need to drop support for older Gradle versions or they need to do some clever organization of their code to only execute the new code path on newer versions.
Forward compatibility
The biggest issue is the compatibility between the external kotlin-gradle-plugin version and the kotlin-stdlib version shipped with Gradle. More generally, between any plugin that transitively depends on kotlin-stdlib and its version shipped with Gradle. As long as the combination is compatible everything should work. This will become less of an issue as the language matures.
Kotlin compiler arguments
These are the Kotlin compiler arguments used for compiling Kotlin DSL scripts and Kotlin sources and scripts in a project that has the kotlin-dsl plugin applied:
-java-parameters-
Generate metadata for Java >= 1.8 reflection on method parameters. See Kotlin/JVM compiler options in the Kotlin documentation for more information.
-Xjvm-default=all-
Makes all non-abstract members of Kotlin interfaces default for the Java classes implementing them. This is to provide a better interoperability with Java and Groovy for plugins written in Kotlin. See Default methods in interfaces in the Kotlin documentation for more information.
-Xsam-conversions=class-
Sets up the implementation strategy for SAM (single abstract method) conversion to always generate anonymous classes, instead of using the
invokedynamicJVM instruction. This is to provide a better support for configuration cache and incremental build. See KT-44912 in the Kotlin issue tracker for more information. -Xjsr305=strict-
Sets up Kotlin’s Java interoperability to strictly follow JSR-305 annotations for increased null safety. See Calling Java code from Kotlin in the Kotlin documentation for more information.
Interoperability
When mixing languages in your build logic, you may have to cross language boundaries. An extreme example would be a build that uses tasks and plugins that are implemented in Java, Groovy and Kotlin, while also using both Kotlin DSL and Groovy DSL build scripts.
Quoting the Kotlin reference documentation:
Kotlin is designed with Java Interoperability in mind. Existing Java code can be called from Kotlin in a natural way, and Kotlin code can be used from Java rather smoothly as well.
Both calling Java from Kotlin and calling Kotlin from Java are very well covered in the Kotlin reference documentation.
The same mostly applies to interoperability with Groovy code. In addition, the Kotlin DSL provides several ways to opt into Groovy semantics, which we look at next.
Static extensions
Both the Groovy and Kotlin languages support extending existing classes via Groovy Extension modules and Kotlin extensions.
To call a Kotlin extension function from Groovy, call it as a static function, passing the receiver as the first parameter:
TheTargetTypeKt.kotlinExtensionFunction(receiver, "parameters", 42, aReference)Kotlin extension functions are package-level functions and you can learn how to locate the name of the type declaring a given Kotlin extension in the Package-Level Functions section of the Kotlin reference documentation.
To call a Groovy extension method from Kotlin, the same approach applies: call it as a static function passing the receiver as the first parameter. Here’s an example:
TheTargetTypeGroovyExtension.groovyExtensionMethod(receiver, "parameters", 42, aReference)Named parameters and default arguments
Both the Groovy and Kotlin languages support named function parameters and default arguments, although they are implemented very differently.
Kotlin has fully-fledged support for both, as described in the Kotlin language reference under named arguments and default arguments.
Groovy implements named arguments in a non-type-safe way based on a Map<String, ?> parameter, which means they cannot be combined with default arguments.
In other words, you can only use one or the other in Groovy for any given method.
Calling Kotlin from Groovy
To call a Kotlin function that has named arguments from Groovy, just use a normal method call with positional parameters. There is no way to provide values by argument name.
To call a Kotlin function that has default arguments from Groovy, always pass values for all the function parameters.
Calling Groovy from Kotlin
To call a Groovy function with named arguments from Kotlin, you need to pass a Map<String, ?>, as shown in this example:
groovyNamedArgumentTakingMethod(mapOf(
"parameterName" to "value",
"other" to 42,
"and" to aReference))To call a Groovy function with default arguments from Kotlin, always pass values for all the parameters.
Groovy closures from Kotlin
You may sometimes have to call Groovy methods that take Closure arguments from Kotlin code. For example, some third-party plugins written in Groovy expect closure arguments.
|
Note
|
Gradle plugins written in any language should prefer the type Action<T> type in place of closures. Groovy closures and Kotlin lambdas are automatically mapped to arguments of that type.
|
In order to provide a way to construct closures while preserving Kotlin’s strong typing, two helper methods exist:
-
closureOf<T> {} -
delegateClosureOf<T> {}
Both methods are useful in different circumstances and depend upon the method you are passing the Closure instance into.
Some plugins expect simple closures, as with the Bintray plugin:
closureOf<T> {}bintray {
pkg(closureOf<PackageConfig> {
// Config for the package here
})
}In other cases, like with the Gretty Plugin when configuring farms, the plugin expects a delegate closure:
delegateClosureOf<T> {}farms {
farm("OldCoreWar", delegateClosureOf<FarmExtension> {
// Config for the war here
})
}There sometimes isn’t a good way to tell, from looking at the source code, which version to use.
Usually, if you get a NullPointerException with closureOf<T> {}, using delegateClosureOf<T> {}
will resolve the problem.
These two utility functions are useful for configuration closures, but some plugins might expect Groovy closures for other purposes.
The KotlinClosure0 to KotlinClosure2 types allows adapting Kotlin functions to Groovy closures with more flexibility.
KotlinClosureX typessomePlugin {
// Adapt parameter-less function
takingParameterLessClosure(KotlinClosure0({
"result"
}))
// Adapt unary function
takingUnaryClosure(KotlinClosure1<String, String>({
"result from single parameter $this"
}))
// Adapt binary function
takingBinaryClosure(KotlinClosure2<String, String, String>({ a, b ->
"result from parameters $a and $b"
}))
}The Kotlin DSL Groovy Builder
If some plugin makes heavy use of Groovy metaprogramming, then using it from Kotlin or Java or any statically-compiled language can be very cumbersome.
The Kotlin DSL provides a withGroovyBuilder {} utility extension that attaches the Groovy metaprogramming semantics to objects of type Any.
The following example demonstrates several features of the method on the object target:
withGroovyBuilder {}target.withGroovyBuilder { // (1)
// GroovyObject methods available // (2)
if (hasProperty("foo")) { /*...*/ }
val foo = getProperty("foo")
setProperty("foo", "bar")
invokeMethod("name", arrayOf("parameters", 42, aReference))
// Kotlin DSL utilities
"name"("parameters", 42, aReference) // (3)
"blockName" { // (4)
// Same Groovy Builder semantics on `blockName`
}
"another"("name" to "example", "url" to "https://example.com/") // (5)
}-
The receiver is a GroovyObject and provides Kotlin helpers
-
The
GroovyObjectAPI is available -
Invoke the
methodNamemethod, passing some parameters -
Configure the
blockNameproperty, maps to aClosuretaking method invocation -
Invoke
anothermethod taking named arguments, maps to a Groovy named argumentsMap<String, ?>taking method invocation
Using a Groovy script
Another option when dealing with problematic plugins that assume a Groovy DSL build script is to configure them in a Groovy DSL build script that is applied from the main Kotlin DSL build script:
native { (1)
dynamic {
groovy as Usual
}
}plugins {
id("dynamic-groovy-plugin") version "1.0" (2)
}
apply(from = "dynamic-groovy-plugin-configuration.gradle") (3)-
The Groovy script uses dynamic Groovy to configure plugin
-
The Kotlin build script requests and applies the plugin
-
The Kotlin build script applies the Groovy script
Limitations
-
The Kotlin DSL is known to be slower than the Groovy DSL on first use, for example with clean checkouts or on ephemeral continuous integration agents. Changing something in the buildSrc directory also has an impact as it invalidates build-script caching. The main reason for this is the slower script compilation for Kotlin DSL.
-
In IntelliJ IDEA, you must import your project from the Gradle model in order to get content assist and refactoring support for your Kotlin DSL build scripts.
-
Kotlin DSL script compilation avoidance has known issues. If you encounter problems, it can be disabled by setting the
org.gradle.kotlin.dsl.scriptCompilationAvoidancesystem property tofalse. -
The Kotlin DSL will not support the
model {}block, which is part of the discontinued Gradle Software Model.
If you run into trouble or discover a suspected bug, please report the issue in the Gradle issue tracker.
LICENSE INFORMATION
License Information
Gradle Documentation
Copyright © 2007-2023 Gradle, Inc.
Gradle build tool source code is open-source and licensed under the Apache License 2.0.
Gradle user manual and DSL reference manual are licensed under Creative Commons Attribution-NonCommercial-ShareAlike 4.0 International License.
Gradle Build Scan Plugin
Use of the build scan plugin is subject to Gradle’s Terms of Service.
@groovy.transform.CompileStatic.
testng.xml files: http://testng.org/doc/documentation-main.html#testng-xml.