Command-Line Interface Reference
The command-line interface is the primary method of interacting with Gradle.
The following is a reference for executing and customizing the Gradle command-line. It also serves as a reference when writing scripts or configuring continuous integration.
Use of the Gradle Wrapper is highly encouraged.
Substitute ./gradlew (in macOS / Linux) or gradlew.bat (in Windows) for gradle in the following examples.
Executing Gradle on the command-line conforms to the following structure:
gradle [taskName...] [--option-name...]
Options are allowed before and after task names.
gradle [--option-name...] [taskName...]
If multiple tasks are specified, you should separate them with a space.
gradle [taskName1 taskName2...] [--option-name...]
Options that accept values can be specified with or without = between the option and argument. The use of = is recommended.
gradle [...] --console=plain
Options that enable behavior have long-form options with inverses specified with --no-. The following are opposites.
gradle [...] --build-cache
gradle [...] --no-build-cache
Many long-form options have short-option equivalents. The following are equivalent:
gradle --help
gradle -h
Many command-line flags can be specified in gradle.properties to avoid needing to be typed.
See the Configuring build environment guide for details.
|
Command-line usage
The following sections describe the use of the Gradle command-line interface.
Some plugins also add their own command line options.
For example, --tests, which is added by Java test filtering.
For more information on exposing command line options for your own tasks, see Declaring command-line options.
Executing tasks
You can learn about what projects and tasks are available in the project reporting section.
Most builds support a common set of tasks known as lifecycle tasks. These include the build, assemble, and check tasks.
To execute a task called myTask on the root project, type:
$ gradle :myTask
This will run the single myTask and all of its dependencies.
Specify options for tasks
To pass an option to a task, prefix the option name with -- after the task name:
$ gradle exampleTask --exampleOption=exampleValue
Disambiguate task options from built-in options
Gradle does not prevent tasks from registering options that conflict with Gradle’s built-in options, like --profile or --help.
You can fix conflicting task options from Gradle’s built-in options with a -- delimiter before the task name in the command:
$ gradle [--built-in-option-name...] -- [taskName...] [--task-option-name...]
Consider a task named mytask that accepts an option named profile:
-
In
gradle mytask --profile, Gradle accepts--profileas the built-in Gradle option. -
In
gradle -- mytask --profile=value, Gradle passes--profileas a task option.
Executing tasks in multi-project builds
In a multi-project build, subproject tasks can be executed with : separating the subproject name and task name.
The following are equivalent when run from the root project:
$ gradle :subproject:taskName
$ gradle subproject:taskName
You can also run a task for all subprojects using a task selector that consists of only the task name.
The following command runs the test task for all subprojects when invoked from the root project directory:
$ gradle test
Some tasks selectors, like help or dependencies, will only run the task on the project they are invoked on and not on all the subprojects.
|
When invoking Gradle from within a subproject, the project name should be omitted:
$ cd subproject
$ gradle taskName
When executing the Gradle Wrapper from a subproject directory, reference gradlew relatively. For example: ../gradlew taskName.
|
Executing multiple tasks
You can also specify multiple tasks. The tasks' dependencies determine the precise order of execution, and a task having no dependencies may execute earlier than it is listed on the command-line.
For example, the following will execute the test and deploy tasks in the order that they are listed on the command-line and will also execute the dependencies for each task.
$ gradle test deploy
Command line order safety
Although Gradle will always attempt to execute the build quickly, command line ordering safety will also be honored.
For example, the following will
execute clean and build along with their dependencies:
$ gradle clean build
However, the intention implied in the command line order is that clean should run first and then build. It would be incorrect to execute clean after build, even if doing so would cause the build to execute faster since clean would remove what build created.
Conversely, if the command line order was build followed by clean, it would not be correct to execute clean before build. Although Gradle will execute the build as quickly as possible, it will also respect the safety of the order of tasks specified on the command line and ensure that clean runs before build when specified in that order.
Note that command line order safety relies on tasks properly declaring what they create, consume, or remove.
Excluding tasks from execution
You can exclude a task from being executed using the -x or --exclude-task command-line option and providing the name of the task to exclude:
$ gradle dist --exclude-task test
> Task :compile
compiling source

> Task :dist
building the distribution

BUILD SUCCESSFUL in 0s
2 actionable tasks: 2 executed

You can see that the test task is not executed, even though the dist task depends on it.
The test task’s dependencies, such as compileTest, are not executed either.
The dependencies of test that other tasks depend on, such as compile, are still executed.
Forcing tasks to execute
You can force Gradle to execute all tasks ignoring up-to-date checks using the --rerun-tasks option:
$ gradle test --rerun-tasks
This will force test and all task dependencies of test to execute. It is similar to running gradle clean test, but without the build’s generated output being deleted.
Alternatively, you can tell Gradle to rerun a specific task using the --rerun built-in task option.
Continue the build after a task failure
By default, Gradle aborts execution and fails the build when any task fails. This allows the build to complete sooner and prevents cascading failures from obfuscating the root cause of an error.
You can use the --continue option to force Gradle to execute every task when a failure occurs:
$ gradle test --continue
When executed with --continue, Gradle executes every task in the build if all the dependencies for that task are completed without failure.
For example, tests do not run if there is a compilation error in the code under test because the test task depends on the compilation task.
Gradle outputs each of the encountered failures at the end of the build.
If any tests fail, many test suites fail the entire test task.
Code coverage and reporting tools frequently run after the test task, so "fail fast" behavior may halt execution before those tools run.
|
Name abbreviation
When you specify tasks on the command-line, you don’t have to provide the full name of the task.
You can provide enough of the task name to identify the task uniquely.
For example, it is likely gradle che is enough for Gradle to identify the check task.
The same applies to project names. You can execute the check task in the library subproject with the gradle lib:che command.
You can use camel case patterns for more complex abbreviations. These patterns are expanded to match camel case and kebab case names.
For example, the pattern foBa (or fB) matches fooBar and foo-bar.
More concretely, you can run the compileTest task in the my-awesome-library subproject with the command gradle mAL:cT.
$ gradle mAL:cT
> Task :my-awesome-library:compileTest
compiling unit tests

BUILD SUCCESSFUL in 0s
1 actionable task: 1 executed
Abbreviations can also be used with the -x command-line option.
Tracing name expansion
For complex projects, it might be ambiguous if the intended tasks were executed. When using abbreviated names, a single typo can lead to the execution of unexpected tasks.
When INFO, or more verbose logging is enabled, the output will contain extra information about the project and task name expansion.
For example, when executing the mAL:cT command on the previous example, the following log messages will be visible:
No exact project with name ':mAL' has been found. Checking for abbreviated names.
Found exactly one project that matches the abbreviated name ':mAL': ':my-awesome-library'.
No exact task with name ':cT' has been found. Checking for abbreviated names.
Found exactly one task name, that matches the abbreviated name ':cT': ':compileTest'.
Common tasks
The following are task conventions applied by built-in and most major Gradle plugins.
Computing all outputs
It is common in Gradle builds for the build task to designate assembling all outputs and running all checks:
$ gradle build
Running applications
It is common for applications to run with the run task, which assembles the application and executes some script or binary:
$ gradle run
Running all checks
It is common for all verification tasks, including tests and linting, to be executed using the check task:
$ gradle check
Cleaning outputs
You can delete the contents of the build directory using the clean task. Doing so will cause pre-computed outputs to be lost, causing significant additional build time for the subsequent task execution:
$ gradle clean
Project reporting
Gradle provides several built-in tasks which show particular details of your build. This can be useful for understanding your build’s structure and dependencies, as well as debugging problems.
Listing projects
Running the projects task gives you a list of the subprojects of the selected project, displayed in a hierarchy:
$ gradle projects
You also get a project report within Build Scans.
Listing tasks
Running gradle tasks gives you a list of the main tasks of the selected project. This report shows the default tasks for the project, if any, and a description for each task:
$ gradle tasks
By default, this report shows only those tasks assigned to a task group.
Groups (such as verification, publishing, help, build…) are available as the header of each section when listing tasks:
> Task :tasks

Build tasks
-----------
assemble - Assembles the outputs of this project.

Build Setup tasks
-----------------
init - Initializes a new Gradle build.

Distribution tasks
------------------
assembleDist - Assembles the main distributions

Documentation tasks
-------------------
javadoc - Generates Javadoc API documentation for the main source code.
You can obtain more information in the task listing using the --all option:
$ gradle tasks --all
The option --no-all can limit the report to tasks assigned to a task group.
If you need to be more precise, you can display only the tasks from a specific group using the --group option:
$ gradle tasks --group="build setup"
Show task usage details
Running gradle help --task someTask gives you detailed information about a specific task:
$ gradle -q help --task libs
Detailed task information for libs

Paths
     :api:libs
     :webapp:libs

Type
     Task (org.gradle.api.Task)

Options
     --rerun     Causes the task to be re-run even if up-to-date.

Description
     Builds the JAR

Group
     build
This information includes the full task path, the task type, possible task-specific command line options, and the description of the given task.
You can get detailed information about the task class types using the --types option or using --no-types to hide this information.
Reporting dependencies
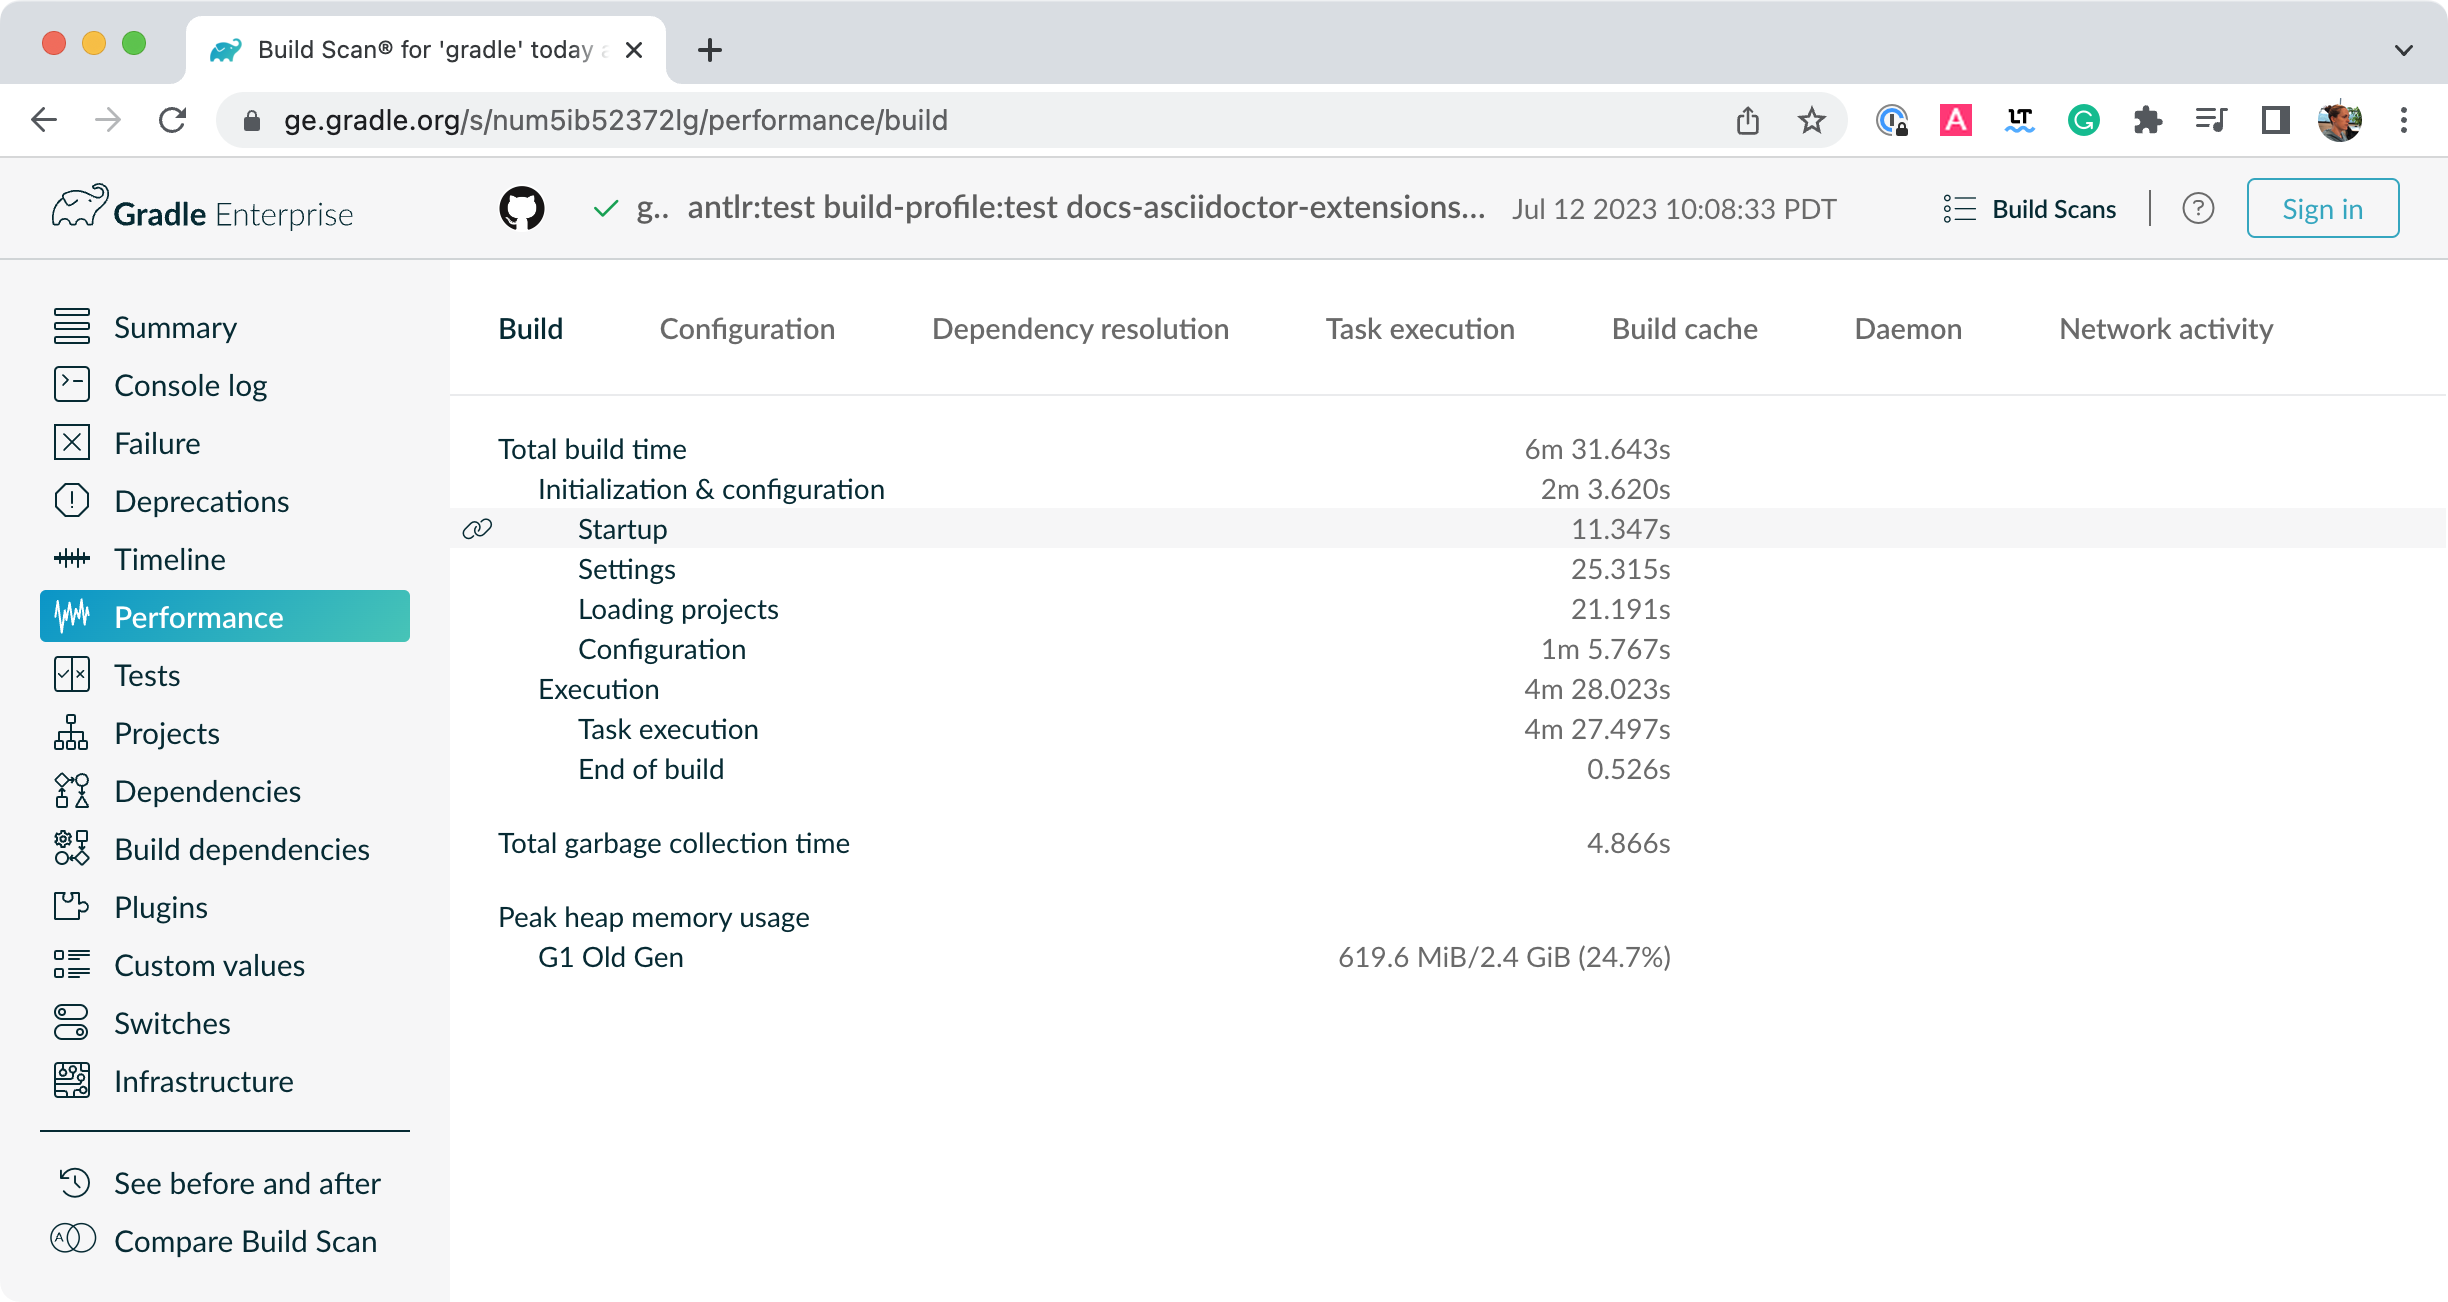
Build Scans give a full, visual report of what dependencies exist on which configurations, transitive dependencies, and dependency version selection.
They can be invoked using the --scan options:
$ gradle myTask --scan
This will give you a link to a web-based report, where you can find dependency information like this:

Listing project dependencies
Running the dependencies task gives you a list of the dependencies of the selected project, broken down by configuration. For each configuration, the direct and transitive dependencies of that configuration are shown in a tree.
Below is an example of this report:
$ gradle dependencies
> Task :app:dependencies

------------------------------------------------------------
Project ':app'
------------------------------------------------------------

compileClasspath - Compile classpath for source set 'main'.
+--- project :model
|    \--- org.json:json:20220924
+--- com.google.inject:guice:5.1.0
|    +--- javax.inject:javax.inject:1
|    +--- aopalliance:aopalliance:1.0
|    \--- com.google.guava:guava:30.1-jre -> 28.2-jre
|         +--- com.google.guava:failureaccess:1.0.1
|         +--- com.google.guava:listenablefuture:9999.0-empty-to-avoid-conflict-with-guava
|         +--- com.google.code.findbugs:jsr305:3.0.2
|         +--- org.checkerframework:checker-qual:2.10.0 -> 3.28.0
|         +--- com.google.errorprone:error_prone_annotations:2.3.4
|         \--- com.google.j2objc:j2objc-annotations:1.3
+--- com.google.inject:guice:{strictly 5.1.0} -> 5.1.0 (c)
+--- org.json:json:{strictly 20220924} -> 20220924 (c)
+--- javax.inject:javax.inject:{strictly 1} -> 1 (c)
+--- aopalliance:aopalliance:{strictly 1.0} -> 1.0 (c)
+--- com.google.guava:guava:{strictly [28.0-jre, 28.5-jre]} -> 28.2-jre (c)
+--- com.google.guava:guava:{strictly 28.2-jre} -> 28.2-jre (c)
+--- com.google.guava:failureaccess:{strictly 1.0.1} -> 1.0.1 (c)
+--- com.google.guava:listenablefuture:{strictly 9999.0-empty-to-avoid-conflict-with-guava} -> 9999.0-empty-to-avoid-conflict-with-guava (c)
+--- com.google.code.findbugs:jsr305:{strictly 3.0.2} -> 3.0.2 (c)
+--- org.checkerframework:checker-qual:{strictly 3.28.0} -> 3.28.0 (c)
+--- com.google.errorprone:error_prone_annotations:{strictly 2.3.4} -> 2.3.4 (c)
\--- com.google.j2objc:j2objc-annotations:{strictly 1.3} -> 1.3 (c)
Concrete examples of build scripts and output available in Viewing and debugging dependencies.
Running the buildEnvironment task visualises the buildscript dependencies of the selected project, similarly to how gradle dependencies visualizes the dependencies of the software being built:
$ gradle buildEnvironment
Running the dependencyInsight task gives you an insight into a particular dependency (or dependencies) that match specified input:
$ gradle dependencyInsight --dependency [...] --configuration [...]
The --configuration parameter restricts the report to a particular configuration such as compileClasspath.
Listing project properties
Running the properties task gives you a list of the properties of the selected project:
$ gradle -q api:properties
------------------------------------------------------------
Project ':api' - The shared API for the application
------------------------------------------------------------

allprojects: [project ':api']
ant: org.gradle.api.internal.project.DefaultAntBuilder@12345
antBuilderFactory: org.gradle.api.internal.project.DefaultAntBuilderFactory@12345
artifacts: org.gradle.api.internal.artifacts.dsl.DefaultArtifactHandler_Decorated@12345
asDynamicObject: DynamicObject for project ':api'
baseClassLoaderScope: org.gradle.api.internal.initialization.DefaultClassLoaderScope@12345
You can also query a single property with the optional --property argument:
$ gradle -q api:properties --property allprojects
------------------------------------------------------------
Project ':api' - The shared API for the application
------------------------------------------------------------

allprojects: [project ':api']
Command-line completion
Gradle provides bash and zsh tab completion support for tasks, options, and Gradle properties through gradle-completion (installed separately):

Debugging options
-?,-h,--help-
Shows a help message with the built-in CLI options. To show project-contextual options, including help on a specific task, see the
helptask. -v,--version-
Prints Gradle, Groovy, Ant, JVM, and operating system version information and exit without executing any tasks.
-V,--show-version-
Prints Gradle, Groovy, Ant, JVM, and operating system version information and continue execution of specified tasks.
-S,--full-stacktrace-
Print out the full (very verbose) stacktrace for any exceptions. See also logging options.
-s,--stacktrace-
Print out the stacktrace also for user exceptions (e.g. compile error). See also logging options.
--scan-
Create a Build Scan with fine-grained information about all aspects of your Gradle build.
-Dorg.gradle.debug=true-
Debug Gradle Daemon process. Gradle will wait for you to attach a debugger at
localhost:5005by default. -Dorg.gradle.debug.host=(host address)-
Specifies the host address to listen on or connect to when debug is enabled. In the server mode on Java 9 and above, passing
*for the host will make the server listen on all network interfaces. By default, no host address is passed to JDWP, so on Java 9 and above, the loopback address is used, while earlier versions listen on all interfaces. -Dorg.gradle.debug.port=(port number)-
Specifies the port number to listen on when debug is enabled. Default is
5005. -Dorg.gradle.debug.server=(true,false)-
If set to
trueand debugging is enabled, Gradle will run the build with the socket-attach mode of the debugger. Otherwise, the socket-listen mode is used. Default istrue. -Dorg.gradle.debug.suspend=(true,false)-
When set to
trueand debugging is enabled, the JVM running Gradle will suspend until a debugger is attached. Default istrue. -Dorg.gradle.daemon.debug=true-
Debug Gradle Daemon process. (duplicate of
-Dorg.gradle.debug)
Performance options
Try these options when optimizing and improving build performance.
Many of these options can be specified in the gradle.properties file, so command-line flags are unnecessary.
--build-cache,--no-build-cache-
Toggles the Gradle Build Cache. Gradle will try to reuse outputs from previous builds. Default is off.
--configuration-cache,--no-configuration-cache-
Toggles the Configuration Cache. Gradle will try to reuse the build configuration from previous builds. Default is off.
--configuration-cache-problems=(fail,warn)-
Configures how the configuration cache handles problems. Default is
fail.Set to
warnto report problems without failing the build.Set to
failto report problems and fail the build if there are any problems. --configure-on-demand,--no-configure-on-demand-
Toggles configure-on-demand. Only relevant projects are configured in this build run. Default is off.
--max-workers-
Sets the maximum number of workers that Gradle may use. Default is number of processors.
--parallel,--no-parallel-
Build projects in parallel. For limitations of this option, see Parallel Project Execution. Default is off.
--priority-
Specifies the scheduling priority for the Gradle daemon and all processes launched by it. Values are
normalorlow. Default is normal. --profile-
Generates a high-level performance report in the
layout.buildDirectory.dir("reports/profile")directory.--scanis preferred. --scan-
Generate a build scan with detailed performance diagnostics.
--watch-fs,--no-watch-fs-
Toggles watching the file system. When enabled, Gradle reuses information it collects about the file system between builds. Enabled by default on operating systems where Gradle supports this feature.
Gradle daemon options
You can manage the Gradle Daemon through the following command line options.
--daemon,--no-daemon-
Use the Gradle Daemon to run the build. Starts the daemon if not running or the existing daemon is busy. Default is on.
--foreground-
Starts the Gradle Daemon in a foreground process.
--status(Standalone command)-
Run
gradle --statusto list running and recently stopped Gradle daemons. It only displays daemons of the same Gradle version. --stop(Standalone command)-
Run
gradle --stopto stop all Gradle Daemons of the same version. -Dorg.gradle.daemon.idletimeout=(number of milliseconds)-
Gradle Daemon will stop itself after this number of milliseconds of idle time. Default is 10800000 (3 hours).
Logging options
Setting log level
You can customize the verbosity of Gradle logging with the following options, ordered from least verbose to most verbose.
-Dorg.gradle.logging.level=(quiet,warn,lifecycle,info,debug)-
Set logging level via Gradle properties.
-q,--quiet-
Log errors only.
-w,--warn-
Set log level to warn.
-i,--info-
Set log level to info.
-d,--debug-
Log in debug mode (includes normal stacktrace).
Lifecycle is the default log level.
Customizing log format
You can control the use of rich output (colors and font variants) by specifying the console mode in the following ways:
-Dorg.gradle.console=(auto,plain,rich,verbose)-
Specify console mode via Gradle properties. Different modes are described immediately below.
--console=(auto,plain,rich,verbose)-
Specifies which type of console output to generate.
Set to
plainto generate plain text only. This option disables all color and other rich output in the console output. This is the default when Gradle is not attached to a terminal.Set to
auto(the default) to enable color and other rich output in the console output when the build process is attached to a console or to generate plain text only when not attached to a console. This is the default when Gradle is attached to a terminal.Set to
richto enable color and other rich output in the console output, regardless of whether the build process is not attached to a console. When not attached to a console, the build output will use ANSI control characters to generate the rich output.Set to
verboseto enable color and other rich output likerichwith output task names and outcomes at the lifecycle log level, (as is done by default in Gradle 3.5 and earlier).
Showing or hiding warnings
By default, Gradle won’t display all warnings (e.g. deprecation warnings). Instead, Gradle will collect them and render a summary at the end of the build like:
Deprecated Gradle features were used in this build, making it incompatible with Gradle 5.0.
You can control the verbosity of warnings on the console with the following options:
-Dorg.gradle.warning.mode=(all,fail,none,summary)-
Specify warning mode via Gradle properties. Different modes are described immediately below.
--warning-mode=(all,fail,none,summary)-
Specifies how to log warnings. Default is
summary.Set to
allto log all warnings.Set to
failto log all warnings and fail the build if there are any warnings.Set to
summaryto suppress all warnings and log a summary at the end of the build.Set to
noneto suppress all warnings, including the summary at the end of the build.
Rich console
Gradle’s rich console displays extra information while builds are running.
Features:
-
Progress bar and timer visually describe the overall status
-
Parallel work-in-progress lines below describe what is happening now
-
Colors and fonts are used to highlight significant output and errors
Execution options
The following options affect how builds are executed by changing what is built or how dependencies are resolved.
--include-build-
Run the build as a composite, including the specified build.
--offline-
Specifies that the build should operate without accessing network resources.
-U,--refresh-dependencies-
Refresh the state of dependencies.
--continue-
Continue task execution after a task failure.
-m,--dry-run-
Run Gradle with all task actions disabled. Use this to show which task would have executed.
-t,--continuous-
Enables continuous build. Gradle does not exit and will re-execute tasks when task file inputs change.
--write-locks-
Indicates that all resolved configurations that are lockable should have their lock state persisted.
--update-locks <group:name>[,<group:name>]*-
Indicates that versions for the specified modules have to be updated in the lock file.
This flag also implies
--write-locks. -a,--no-rebuild-
Do not rebuild project dependencies. Useful for debugging and fine-tuning
buildSrc, but can lead to wrong results. Use with caution!
Dependency verification options
Learn more about this in dependency verification.
-F=(strict,lenient,off),--dependency-verification=(strict,lenient,off)-
Configures the dependency verification mode.
The default mode is
strict. -M,--write-verification-metadata-
Generates checksums for dependencies used in the project (comma-separated list) for dependency verification.
--refresh-keys-
Refresh the public keys used for dependency verification.
--export-keys-
Exports the public keys used for dependency verification.
Environment options
You can customize many aspects about where build scripts, settings, caches, and so on through the options below.
-b,--build-file(deprecated)-
Specifies the build file. For example:
gradle --build-file=foo.gradle. The default isbuild.gradle, thenbuild.gradle.kts. -c,--settings-file(deprecated)-
Specifies the settings file. For example:
gradle --settings-file=somewhere/else/settings.gradle -g,--gradle-user-home-
Specifies the Gradle User Home directory. The default is the
.gradledirectory in the user’s home directory. -p,--project-dir-
Specifies the start directory for Gradle. Defaults to current directory.
--project-cache-dir-
Specifies the project-specific cache directory. Default value is
.gradlein the root project directory. -D,--system-prop-
Sets a system property of the JVM, for example
-Dmyprop=myvalue. -I,--init-script-
Specifies an initialization script.
-P,--project-prop-
Sets a project property of the root project, for example
-Pmyprop=myvalue. -Dorg.gradle.jvmargs-
Set JVM arguments.
-Dorg.gradle.java.home-
Set JDK home dir.
Task options
Tasks may define task-specific options which are different from most of the global options described in the sections above (which are interpreted by Gradle itself, can appear anywhere in the command line, and can be listed using the --help option).
Task options:
-
Are consumed and interpreted by the tasks themselves;
-
Must be specified immediately after the task in the command-line;
-
May be listed using
gradle help --task someTask(see Show task usage details).
To learn how to declare command-line options for your own tasks, see Declaring and Using Command Line Options.
Built-in task options
Built-in task options are options available as task options for all tasks. At this time, the following built-in task options exist:
--rerun-
Causes the task to be rerun even if up-to-date. Similar to
--rerun-tasks, but for a specific task.
Bootstrapping new projects
Creating new Gradle builds
Use the built-in gradle init task to create a new Gradle build, with new or existing projects.
$ gradle init
Most of the time, a project type is specified.
Available types include basic (default), java-library, java-application, and more.
See init plugin documentation for details.
$ gradle init --type java-library
Standardize and provision Gradle
The built-in gradle wrapper task generates a script, gradlew, that invokes a declared version of Gradle, downloading it beforehand if necessary.
$ gradle wrapper --gradle-version=8.1
You can also specify --distribution-type=(bin|all), --gradle-distribution-url, --gradle-distribution-sha256-sum in addition to --gradle-version.
Full details on using these options are documented in the Gradle wrapper section.
Continuous build
Continuous Build allows you to automatically re-execute the requested tasks when file inputs change.
You can execute the build in this mode using the -t or --continuous command-line option.
For example, you can continuously run the test task and all dependent tasks by running:
$ gradle test --continuous
Gradle will behave as if you ran gradle test after a change to sources or tests that contribute to the requested tasks.
This means unrelated changes (such as changes to build scripts) will not trigger a rebuild.
To incorporate build logic changes, the continuous build must be restarted manually.
Continuous build uses file system watching to detect changes to the inputs.
If file system watching does not work on your system, then continuous build won’t work either.
In particular, continuous build does not work when using --no-daemon.
When Gradle detects a change to the inputs, it will not trigger the build immediately.
Instead, it will wait until no additional changes are detected for a certain period of time - the quiet period.
You can configure the quiet period in milliseconds by the Gradle property org.gradle.continuous.quietperiod.
Terminating Continuous Build
If Gradle is attached to an interactive input source, such as a terminal, the continuous build can be exited by pressing CTRL-D (On Microsoft Windows, it is required to also press ENTER or RETURN after CTRL-D).
If Gradle is not attached to an interactive input source (e.g. is running as part of a script), the build process must be terminated (e.g. using the kill command or similar).
If the build is being executed via the Tooling API, the build can be cancelled using the Tooling API’s cancellation mechanism.
Learn more in continuous_builds.html Continuous Builds.
Changes to symbolic links
In general, Gradle will not detect changes to symbolic links or to files referenced via symbolic links.
Changes to build logic are not considered
The current implementation does not recalculate the build model on subsequent builds. This means that changes to task configuration, or any other change to the build model, are effectively ignored.